2010 MERCEDES-BENZ R320 warning
[x] Cancel search: warningPage 190 of 364
G
Warning!
Only use the roof rack when the basic carrier
bars have been completely mounted. The left
and right roof rails are only stabilized by
means of the basic carrier bars being
mounted.
Follow the manufacturer’s installation
instructions. Otherwise, an improperly
attached roof rack system or its load could
become detached from the vehicle.
Do not exceed the maximum roof load of
220 lb (100 kg).
Take into consideration that when the roof
rack is loaded, the handling characteristics
are different from those when operating the
vehicle without the roof rack loaded.
Make sure
R you can raise the tilt/sliding sunroof (or
tilt/sliding panel) at the rear completely
R you can open the tilt/sliding sunroof (or
tilt/sliding panel) completely
R you can open the tailgate completely X
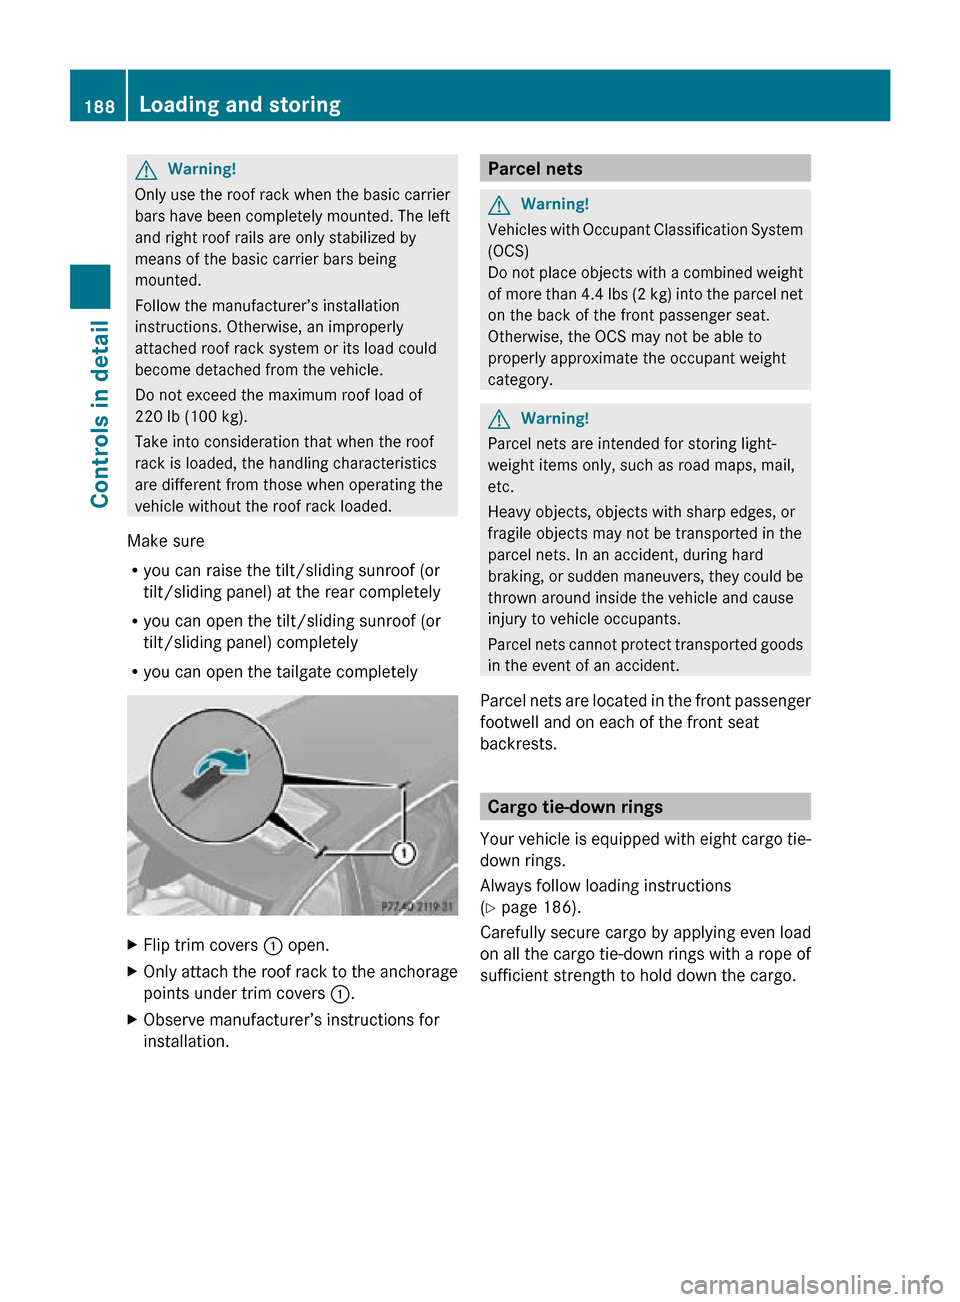
Flip trim covers : open.
X Only attach the roof rack to the anchorage
points under trim covers :.
X Observe manufacturer’s instructions for
installation. Parcel nets
G
Warning!
Vehicles with Occupant Classification System
(OCS)
Do not place objects with a combined weight
of more than 4.4 lbs (2 kg) into the parcel net
on the back of the front passenger seat.
Otherwise, the OCS may not be able to
properly approximate the occupant weight
category. G
Warning!
Parcel nets are intended for storing light-
weight items only, such as road maps, mail,
etc.
Heavy objects, objects with sharp edges, or
fragile objects may not be transported in the
parcel nets. In an accident, during hard
braking, or sudden maneuvers, they could be
thrown around inside the vehicle and cause
injury to vehicle occupants.
Parcel nets cannot protect transported goods
in the event of an accident.
Parcel nets are located in the front passenger
footwell and on each of the front seat
backrests. Cargo tie-down rings
Your vehicle is equipped with eight cargo tie-
down rings.
Always follow loading instructions
(Y page 186).
Carefully secure cargo by applying even load
on all the cargo tie-down rings with a rope of
sufficient strength to hold down the cargo. 188
Loading and storingControls in detail
251_AKB; 4; 52, en-US
d2ureepe,
Version: 2.11.8.1 2009-03-23T09:22:52+01:00 - Seite 188
Page 191 of 364
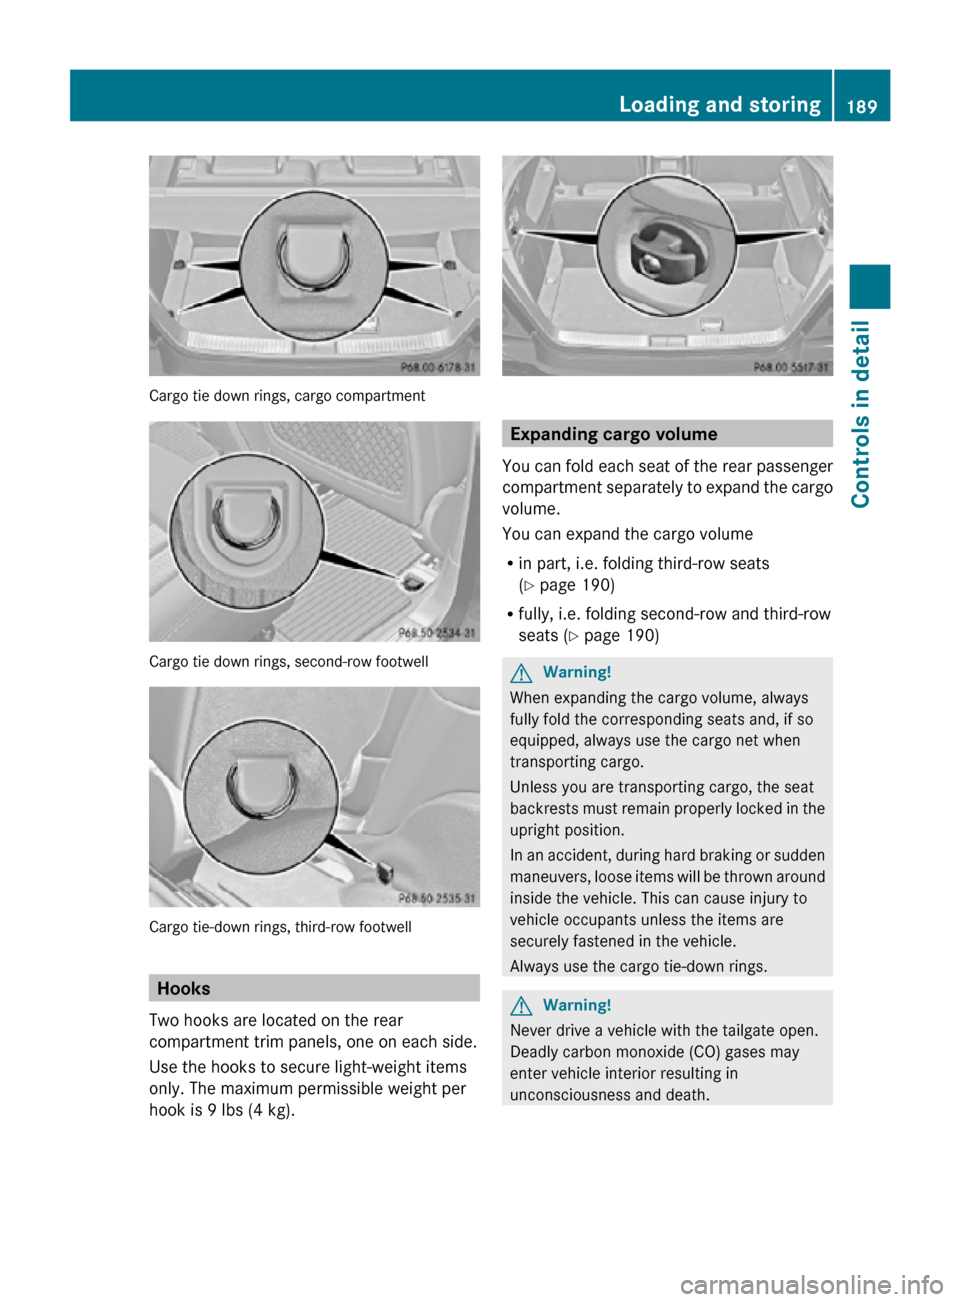
Cargo tie down rings, cargo compartment
Cargo tie down rings, second-row footwell
Cargo tie-down rings, third-row footwell
Hooks
Two hooks are located on the rear
compartment trim panels, one on each side.
Use the hooks to secure light-weight items
only. The maximum permissible weight per
hook is 9 lbs (4 kg). Expanding cargo volume
You can fold each seat of the rear passenger
compartment separately to expand the cargo
volume.
You can expand the cargo volume
R in part, i.e. folding third-row seats
(Y page 190)
R fully, i.e. folding second-row and third-row
seats (Y page 190) G
Warning!
When expanding the cargo volume, always
fully fold the corresponding seats and, if so
equipped, always use the cargo net when
transporting cargo.
Unless you are transporting cargo, the seat
backrests must remain properly locked in the
upright position.
In an accident, during hard braking or sudden
maneuvers, loose items will be thrown around
inside the vehicle. This can cause injury to
vehicle occupants unless the items are
securely fastened in the vehicle.
Always use the cargo tie-down rings. G
Warning!
Never drive a vehicle with the tailgate open.
Deadly carbon monoxide (CO) gases may
enter vehicle interior resulting in
unconsciousness and death. Loading and storing
189Controls in detail
251_AKB; 4; 52, en-US
d2ureepe, Version: 2.11.8.1 2009-03-23T09:22:52+01:00 - Seite 189 Z
Page 192 of 364
Expanding cargo volume in part
Folding third-row seats
X
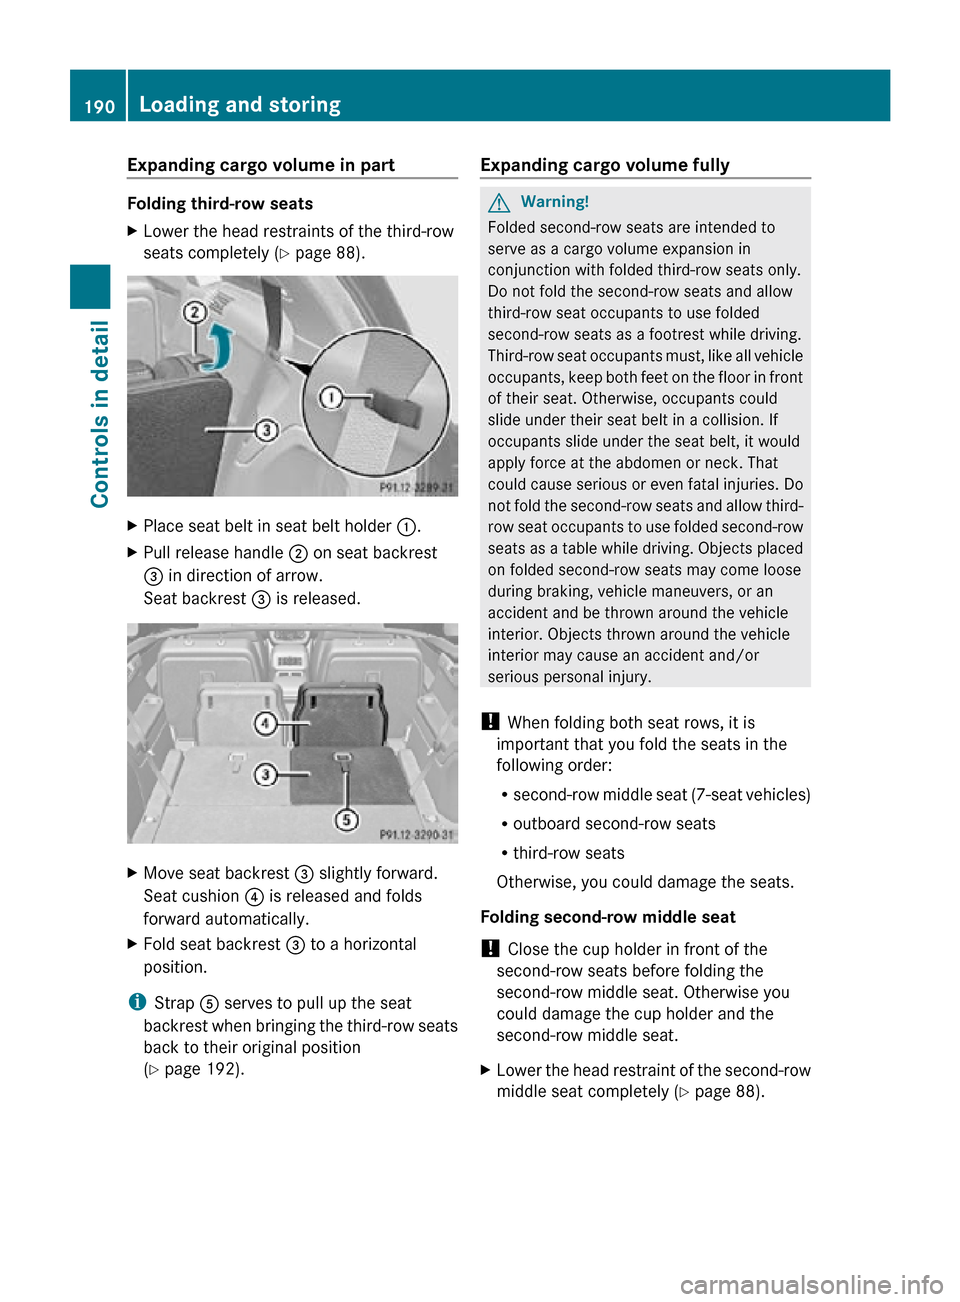
Lower the head restraints of the third-row
seats completely ( Y page 88).X
Place seat belt in seat belt holder :.
X Pull release handle ; on seat backrest
= in direction of arrow.
Seat backrest = is released. X
Move seat backrest = slightly forward.
Seat cushion ? is released and folds
forward automatically.
X Fold seat backrest = to a horizontal
position.
i Strap A serves to pull up the seat
backrest when bringing the third-row seats
back to their original position
(Y page 192). Expanding cargo volume fully G
Warning!
Folded second-row seats are intended to
serve as a cargo volume expansion in
conjunction with folded third-row seats only.
Do not fold the second-row seats and allow
third-row seat occupants to use folded
second-row seats as a footrest while driving.
Third-row seat occupants must, like all vehicle
occupants, keep both feet on the floor in front
of their seat. Otherwise, occupants could
slide under their seat belt in a collision. If
occupants slide under the seat belt, it would
apply force at the abdomen or neck. That
could cause serious or even fatal injuries. Do
not fold the second-row seats and allow third-
row seat occupants to use folded second-row
seats as a table while driving. Objects placed
on folded second-row seats may come loose
during braking, vehicle maneuvers, or an
accident and be thrown around the vehicle
interior. Objects thrown around the vehicle
interior may cause an accident and/or
serious personal injury.
! When folding both seat rows, it is
important that you fold the seats in the
following order:
R second-row middle seat (7-seat vehicles)
R outboard second-row seats
R third-row seats
Otherwise, you could damage the seats.
Folding second-row middle seat
! Close the cup holder in front of the
second-row seats before folding the
second-row middle seat. Otherwise you
could damage the cup holder and the
second-row middle seat.
X Lower the head restraint of the second-row
middle seat completely ( Y page 88).190
Loading and storingControls in detail
251_AKB; 4; 52, en-US
d2ureepe,
Version: 2.11.8.1 2009-03-23T09:22:52+01:00 - Seite 190
Page 194 of 364
point in direction of arrow as far as it will
go.
Seat and seat backrest
: are unlocked.
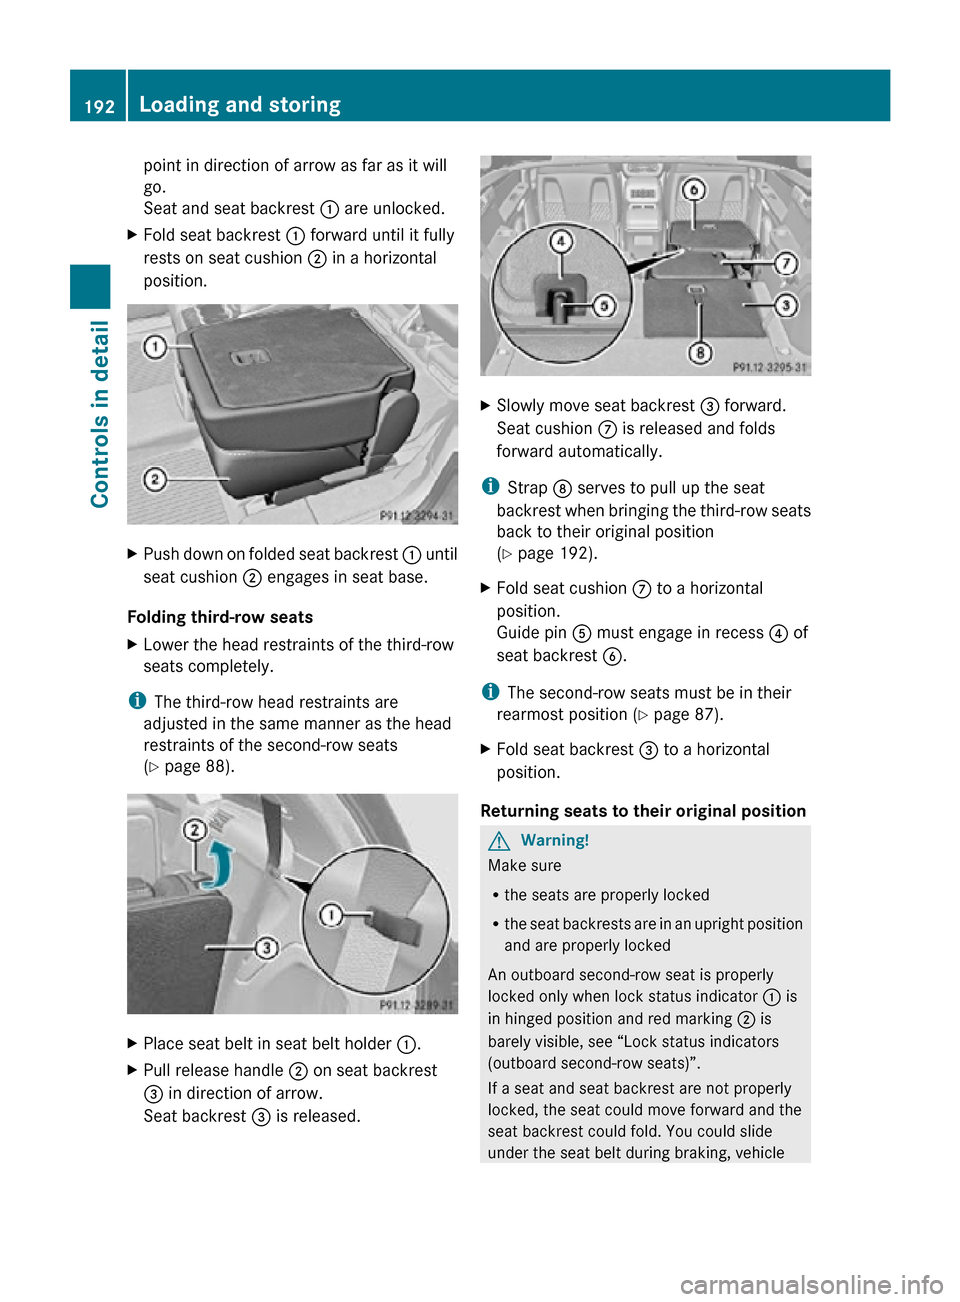
X Fold seat backrest : forward until it fully
rests on seat cushion ; in a horizontal
position. X
Push down on folded seat backrest : until
seat cushion ; engages in seat base.
Folding third-row seats
X Lower the head restraints of the third-row
seats completely.
i The third-row head restraints are
adjusted in the same manner as the head
restraints of the second-row seats
(Y page 88). X
Place seat belt in seat belt holder :.
X Pull release handle ; on seat backrest
= in direction of arrow.
Seat backrest = is released. X
Slowly move seat backrest = forward.
Seat cushion C is released and folds
forward automatically.
i Strap D serves to pull up the seat
backrest when bringing the third-row seats
back to their original position
(Y page 192).
X Fold seat cushion C to a horizontal
position.
Guide pin A must engage in recess ? of
seat backrest B.
i The second-row seats must be in their
rearmost position (Y page 87).
X Fold seat backrest = to a horizontal
position.
Returning seats to their original position G
Warning!
Make sure
R the seats are properly locked
R the seat backrests are in an upright position
and are properly locked
An outboard second-row seat is properly
locked only when lock status indicator : is
in hinged position and red marking ; is
barely visible, see “Lock status indicators
(outboard second-row seats)”.
If a seat and seat backrest are not properly
locked, the seat could move forward and the
seat backrest could fold. You could slide
under the seat belt during braking, vehicle 192
Loading and storingControls in detail
251_AKB; 4; 52, en-US
d2ureepe,
Version: 2.11.8.1 2009-03-23T09:22:52+01:00 - Seite 192
Page 198 of 364
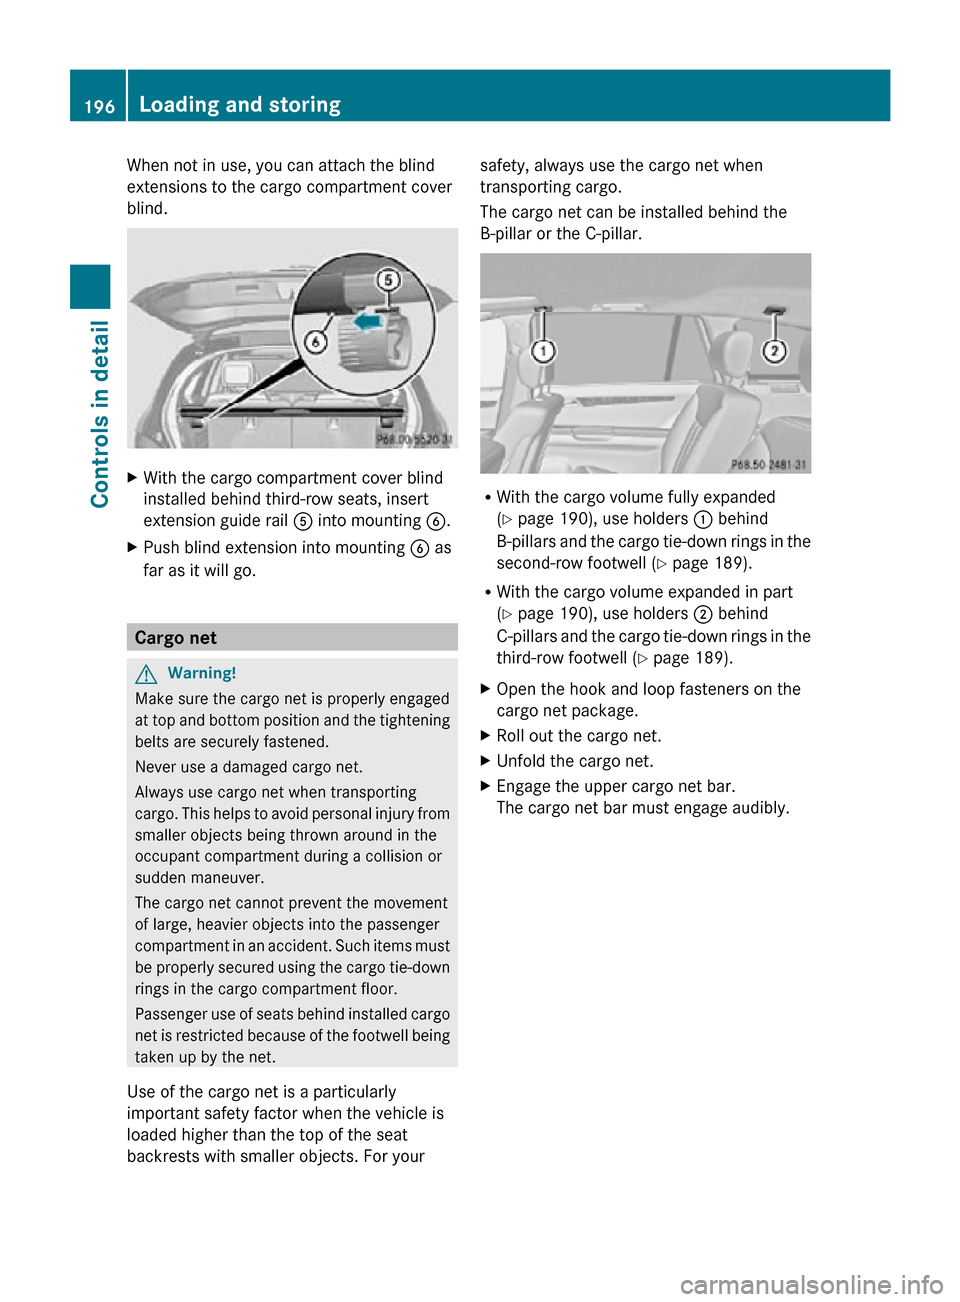
When not in use, you can attach the blind
extensions to the cargo compartment cover
blind.
X
With the cargo compartment cover blind
installed behind third-row seats, insert
extension guide rail A into mounting B.
X Push blind extension into mounting B as
far as it will go. Cargo net
G
Warning!
Make sure the cargo net is properly engaged
at top and bottom position and the tightening
belts are securely fastened.
Never use a damaged cargo net.
Always use cargo net when transporting
cargo. This helps to avoid personal injury from
smaller objects being thrown around in the
occupant compartment during a collision or
sudden maneuver.
The cargo net cannot prevent the movement
of large, heavier objects into the passenger
compartment in an accident. Such items must
be properly secured using the cargo tie-down
rings in the cargo compartment floor.
Passenger use of seats behind installed cargo
net is restricted because of the footwell being
taken up by the net.
Use of the cargo net is a particularly
important safety factor when the vehicle is
loaded higher than the top of the seat
backrests with smaller objects. For your safety, always use the cargo net when
transporting cargo.
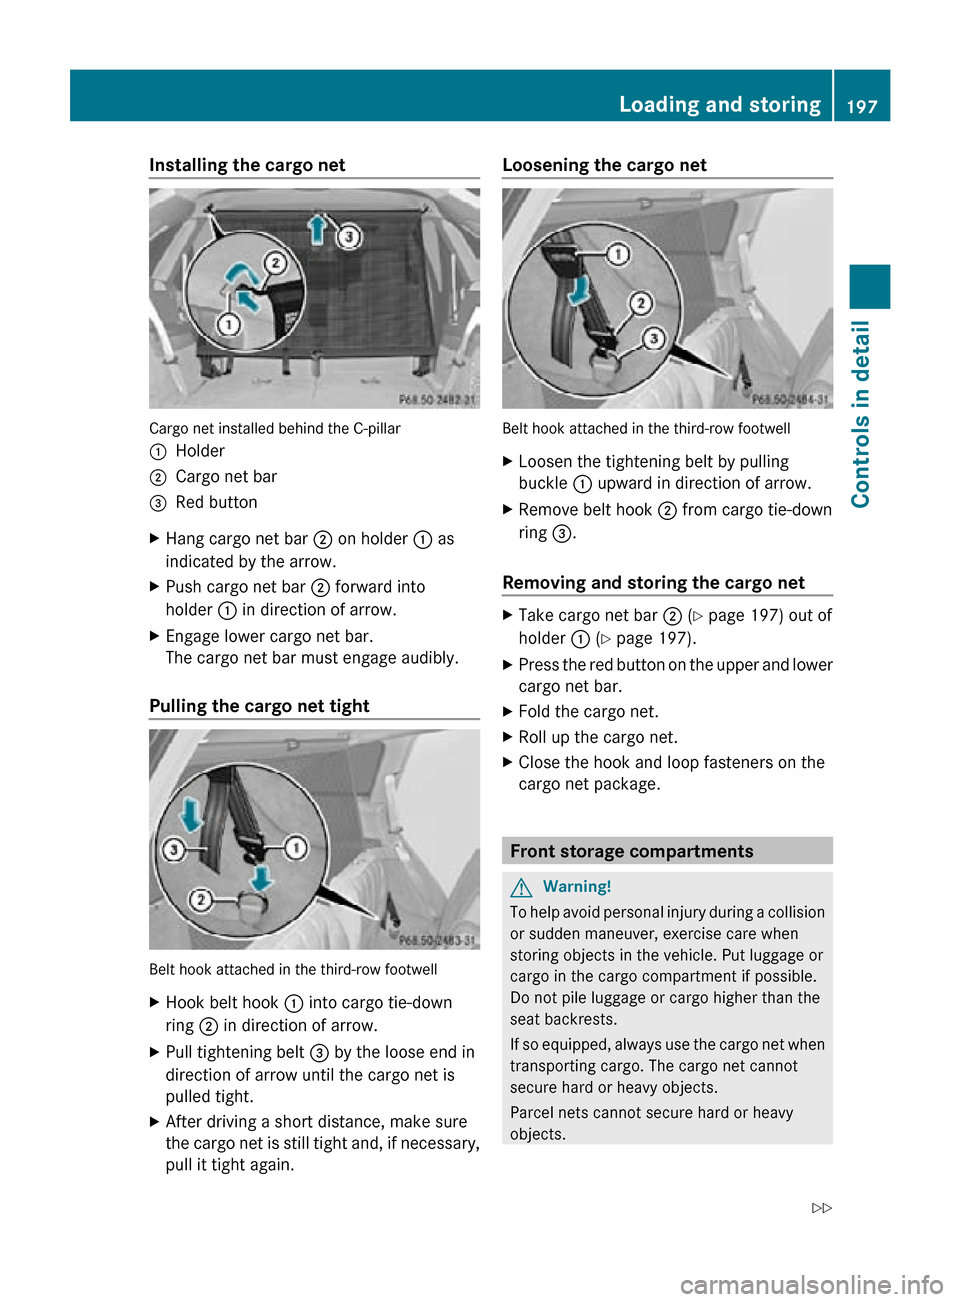
The cargo net can be installed behind the
B-pillar or the C-pillar.
R
With the cargo volume fully expanded
(Y page 190), use holders : behind
B-pillars and the cargo tie-down rings in the
second-row footwell ( Y page 189).
R With the cargo volume expanded in part
(Y page 190), use holders ; behind
C-pillars and the cargo tie-down rings in the
third-row footwell ( Y page 189).
X Open the hook and loop fasteners on the
cargo net package.
X Roll out the cargo net.
X Unfold the cargo net.
X Engage the upper cargo net bar.
The cargo net bar must engage audibly. 196
Loading and storingControls in detail
251_AKB; 4; 52, en-US
d2ureepe,
Version: 2.11.8.1 2009-03-23T09:22:52+01:00 - Seite 196
Page 199 of 364
Installing the cargo net
Cargo net installed behind the C-pillar
:
Holder
; Cargo net bar
= Red button
X Hang cargo net bar ; on holder : as
indicated by the arrow.
X Push cargo net bar ; forward into
holder : in direction of arrow.
X Engage lower cargo net bar.
The cargo net bar must engage audibly.
Pulling the cargo net tight Belt hook attached in the third-row footwell
X
Hook belt hook : into cargo tie-down
ring ; in direction of arrow.
X Pull tightening belt = by the loose end in
direction of arrow until the cargo net is
pulled tight.
X After driving a short distance, make sure
the cargo net is still tight and, if necessary,
pull it tight again. Loosening the cargo net
Belt hook attached in the third-row footwell
X
Loosen the tightening belt by pulling
buckle : upward in direction of arrow.
X Remove belt hook ; from cargo tie-down
ring =.
Removing and storing the cargo net X
Take cargo net bar ; (Y page 197) out of
holder : (Y page 197).
X Press the red button on the upper and lower
cargo net bar.
X Fold the cargo net.
X Roll up the cargo net.
X Close the hook and loop fasteners on the
cargo net package. Front storage compartments
G
Warning!
To help avoid personal injury during a collision
or sudden maneuver, exercise care when
storing objects in the vehicle. Put luggage or
cargo in the cargo compartment if possible.
Do not pile luggage or cargo higher than the
seat backrests.
If so equipped, always use the cargo net when
transporting cargo. The cargo net cannot
secure hard or heavy objects.
Parcel nets cannot secure hard or heavy
objects. Loading and storing
197Controls in detail
251_AKB; 4; 52, en-US
d2ureepe, Version: 2.11.8.1 2009-03-23T09:22:52+01:00 - Seite 197 Z
Page 202 of 364
i
If your vehicle is equipped with a 3-zone
automatic climate control, the storage
compartments are replaced by adjustable
air vents (Y page 164). Rear center console
The rear center console is located between
the second-row seats.
The rear center console contains a storage
compartment (Y page 199) and a cup holder
(Y page 203).
i When fully expanding the cargo
compartment, the rear center console has
to be removed from the vehicle in order for
the cargo compartment floor to be an even
plane ( Y page 190).
Removing G
Warning!
Remove all containers that may be stored in
the cup holder of the rear center console.
Otherwise liquids could spill on vehicle
occupants and/or vehicle equipment. Hot
liquids spilled on vehicle occupants may
cause serious personal injury. Liquids spilled
on vehicle equipment may cause damage not
covered by the Mercedes-Benz Limited
Warranty.
! To prevent damage to the rear center
console and/or its components, make sure
the storage compartment is closed before
removing the rear center console.
i Remove all items from the rear armrest
storage compartment (Y page 199) of the
rear center console to reduce its weight. X
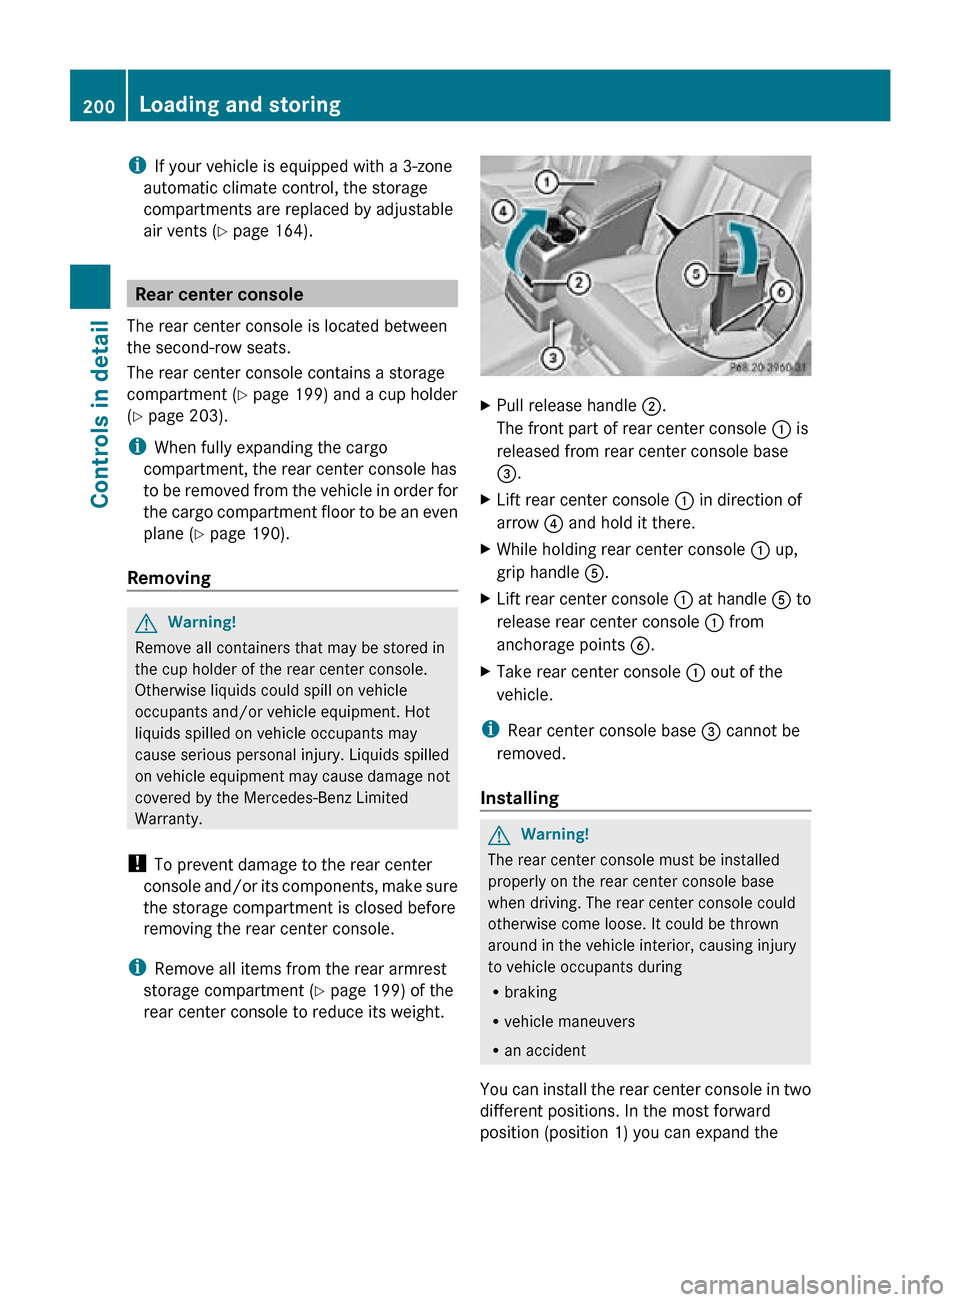
Pull release handle ;.
The front part of rear center console : is
released from rear center console base
=.
X Lift rear center console : in direction of
arrow ? and hold it there.
X While holding rear center console : up,
grip handle A.
X Lift rear center console : at handle A to
release rear center console : from
anchorage points B.
X Take rear center console : out of the
vehicle.
i Rear center console base = cannot be
removed.
Installing G
Warning!
The rear center console must be installed
properly on the rear center console base
when driving. The rear center console could
otherwise come loose. It could be thrown
around in the vehicle interior, causing injury
to vehicle occupants during
R braking
R vehicle maneuvers
R an accident
You can install the rear center console in two
different positions. In the most forward
position (position 1) you can expand the 200
Loading and storingControls in detail
251_AKB; 4; 52, en-US
d2ureepe,
Version: 2.11.8.1 2009-03-23T09:22:52+01:00 - Seite 200
Page 203 of 364
cargo compartment fully (
Y page 190)
without removing the rear center console.
i The storage compartment and the cup
holder in the rear center console are only
illuminated, when the rear center console
is installed in the most rearward position
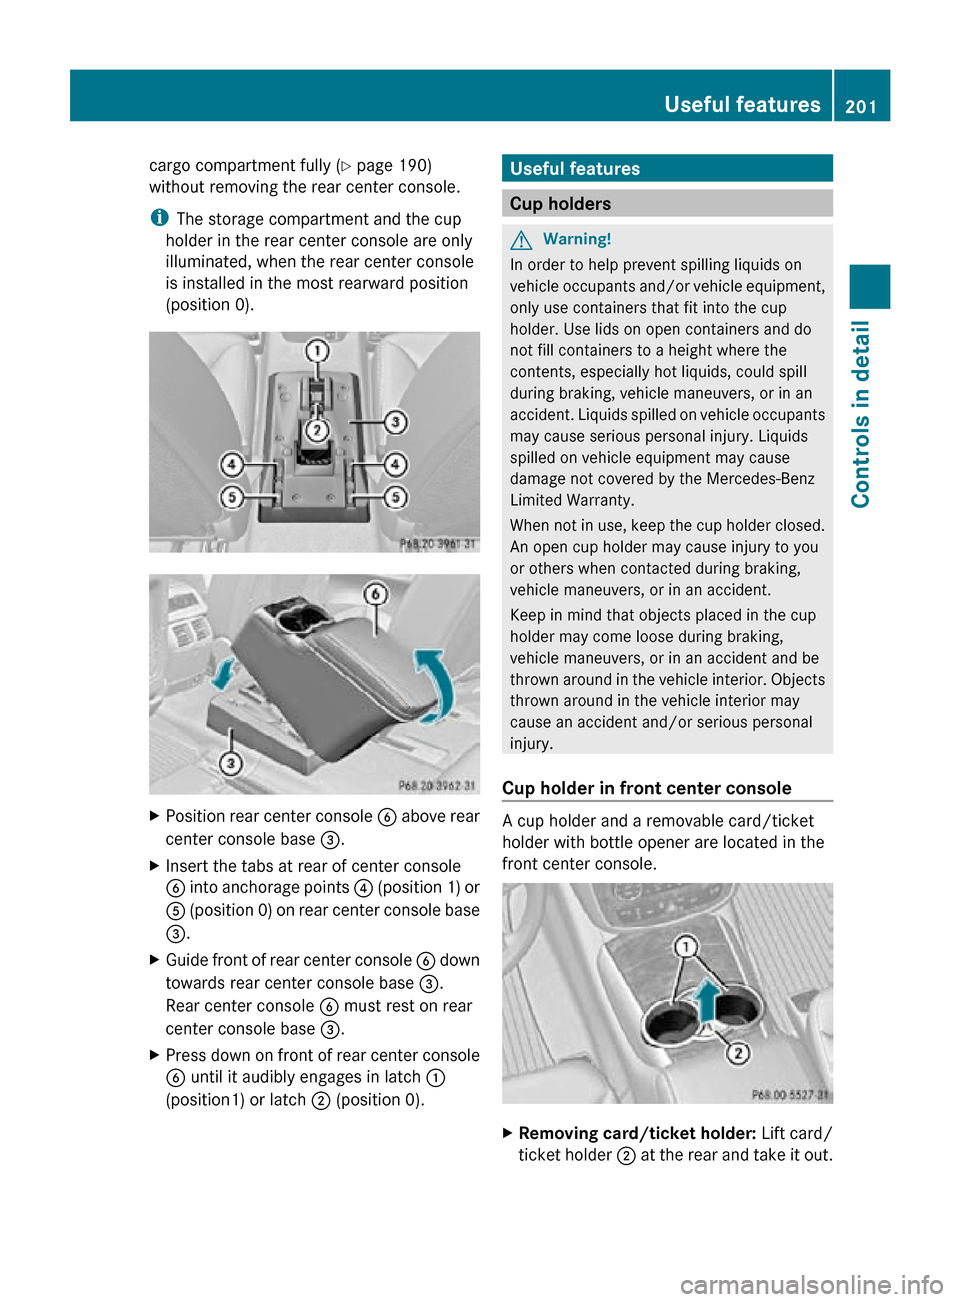
(position 0). X
Position rear center console B above rear
center console base =.
X Insert the tabs at rear of center console
B into anchorage points ? (position 1) or
A (position 0) on rear center console base
=.
X Guide front of rear center console B down
towards rear center console base =.
Rear center console B must rest on rear
center console base =.
X Press down on front of rear center console
B until it audibly engages in latch :
(position1) or latch ; (position 0). Useful features
Cup holders
G
Warning!
In order to help prevent spilling liquids on
vehicle occupants and/or vehicle equipment,
only use containers that fit into the cup
holder. Use lids on open containers and do
not fill containers to a height where the
contents, especially hot liquids, could spill
during braking, vehicle maneuvers, or in an
accident. Liquids spilled on vehicle occupants
may cause serious personal injury. Liquids
spilled on vehicle equipment may cause
damage not covered by the Mercedes-Benz
Limited Warranty.
When not in use, keep the cup holder closed.
An open cup holder may cause injury to you
or others when contacted during braking,
vehicle maneuvers, or in an accident.
Keep in mind that objects placed in the cup
holder may come loose during braking,
vehicle maneuvers, or in an accident and be
thrown around in the vehicle interior. Objects
thrown around in the vehicle interior may
cause an accident and/or serious personal
injury.
Cup holder in front center console A cup holder and a removable card/ticket
holder with bottle opener are located in the
front center console.
X
Removing card/ticket holder: Lift card/
ticket holder ; at the rear and take it out. Useful features
201Controls in detail
251_AKB; 4; 52, en-US
d2ureepe, Version: 2.11.8.1 2009-03-23T09:22:52+01:00 - Seite 201 Z