2010 MERCEDES-BENZ R-Class battery
[x] Cancel search: batteryPage 51 of 224

Update Sequence
The sequence includes the following stages:
R Loading DVD into the DVD changer
R Update process
i The update process may take between 60
and 150 minutes, depending on the size of
the map software.
If possible, perform the update when the
vehicle is stationary. The DVD read speed
is faster when the vehicle is stationary than
when the vehicle is moving and the update
therefore takes less time. If you perform
the update with the engine off and the
vehicle battery is no longer powerful
enough, COMAND may shut off
automatically during the process to protect
the battery. In this case, restart the update
with the engine running.
You can interrupt the update process and
continue it at later time. If you cancel the
update process, the navigation system is
not ready for operation.
GWarning
Never leave the engine running in an enclosed
space. The exhaust gases contain carbon
monoxide. Inhaling exhaust gases constitutes
a health hazard and could lead to loss of
consciousness or even death.
Loading DVDs into DVD Changer
The 6-disc DVD changer is integrated with
COMAND.
1Load/Eject button2Disc slotXPress the Load button 1.
A disc icon indicates which magazine
compartments are currently loaded.XTo select an empty magazine
compartment: Press ; or = .XTo start loading: Press 9.
The message Please Insert Disc
will be displayed.XInsert the DVD into the slot with the printed
side upwards.
The DVD changer pulls in the DVD. The
message Loading Disc
displayed.
i If the magazine is full, you will first need
to eject a disc ( Y page 134).
Update Process
The update process starts once the DVD has
been loaded.
COMAND checks whether the map software
on the DVD matches the vehicle's navigation
system and system software.
Map Software Is not Suitable for the
Navigation System or the System
Software
A message is displayed stating that the
navigation update DVD with the new map
data is not suitable for the system or the
system software.
COMAND ejects the DVD.
XRemove the DVD from the slot 1.XHave the system software updated by an
authorized Mercedes-Benz Center.
i It will only be possible to update the map
software once the system software has
been updated.
Map Software Matches the Navigation
System and the Current System Software
COMAND checks whether the DVD's map
data has already been installed.
Introduction49NavigationZ
Page 148 of 224

Supported Data Formats (USB devices)
The following data types are supported:
R MP3: CBR, VBR (up to 320 kbit/s)
R WMA: CBR, VBR (up to 320 kbit/s)
In order to display the metadata during
playback, ID3 tags (version 1.x, 2.3, 2.4) and
WMA tags in ASCII and UTF16 coding are
supported.
Notes on USB Devices
R In order to keep the initialisation time short,
do not store data other than music files on
the USB device.
R Up to eight directory levels with up to 1,000
tracks are supported.
R Do not use a USB extension cable or
adapter. These may impair functionality.
R Playlists are searched for in the
background on the USB device and, if
available, are offered beside folders in a
separate category. The initialisation of
large USB mass storage devices can take
several minutes.
i Files protected with DRM (Digital Rights
Management) are not supported by the
Media Interface.
Connecting External Devices
For the connection of external devices to the
Media Interface device-specific adaption
cables are needed, which are included in the
delivery of the Media Interface. You will find
the connection sockets in the glove
compartment or in the storage compartment
of the center console (SL-Class).
Never connect more than one device at a
time. Please consult a Mercedes-Benz
Service Center for further information.
i Do not leave external devices in the
vehicle, as functionality cannot be
guaranteed above certain temperatures
(such as inside a vehicle in direct sunlight).
Mercedes-Benz does not take
responsibility for any damage to external
devices.1Connection socket for 1/8 inch jack plug,
for MP3 players, for example.2iPod plug for connecting an iPod ®3USB socket for connecting a USB device4Example device: iPod®XConnect the external device using
appropriate connection 1, 2 or 3.
Never connect more than one device at a
time. You will otherwise not be able to play
back from the external device.
COMAND activates the device.
If you remove a device, the No Device
Connected message appears.
i The connected iPod or USB device should
not be operated with a remote control
(such as a Bluetooth remote control) while
it is being operated with Media Interface,
as this could cause unforeseen technical
difficulties.
i The initialisation period may be extended
if you connect an iPod or USB device which
has a fully discharged battery.
i Error messages appear while the device
is being activated if:
R you have connected two devices at the
same time
R COMAND does not support the device
connected
146Media InterfaceAudio
Page 167 of 224

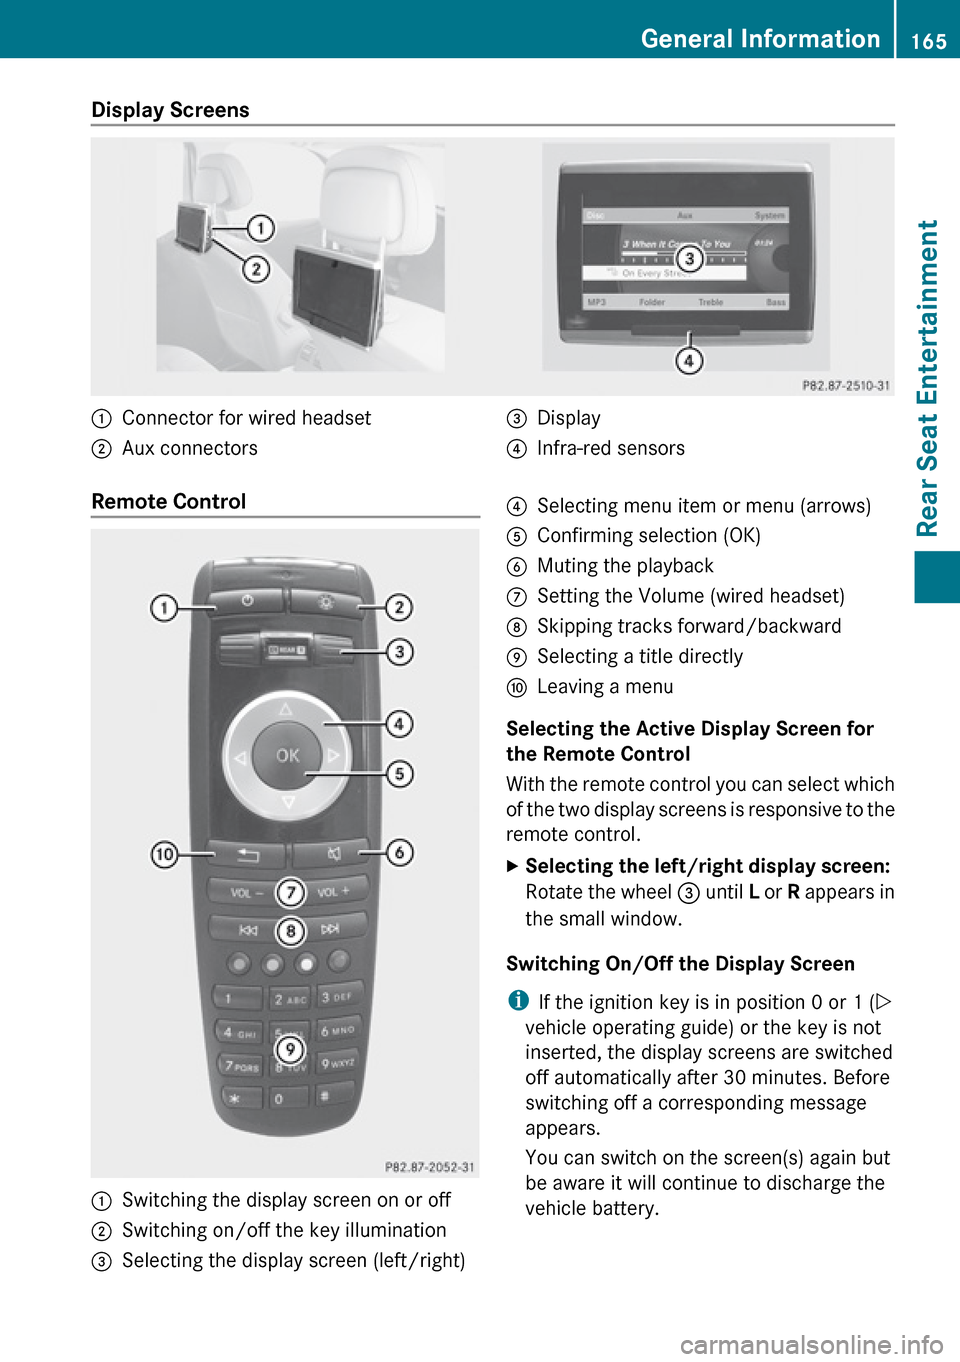
Display Screens :Connector for wired headset;Aux connectors=Display?Infra-red sensorsRemote Control :Switching the display screen on or off;Switching on/off the key illumination=Selecting the display screen (left/right)?Selecting menu item or menu (arrows)AConfirming selection (OK)BMuting the playbackCSetting the Volume (wired headset)DSkipping tracks forward/backwardESelecting a title directlyFLeaving a menu
Selecting the Active Display Screen for
the Remote Control
With the remote control you can select which
of the two display screens is responsive to the
remote control.
XSelecting the left/right display screen:
Rotate the wheel = until L or R appears in
the small window.
Switching On/Off the Display Screen
i If the ignition key is in position 0 or 1 ( Y
vehicle operating guide) or the key is not
inserted, the display screens are switched
off automatically after 30 minutes. Before
switching off a corresponding message
appears.
You can switch on the screen(s) again but
be aware it will continue to discharge the
vehicle battery.
General Information165Rear Seat EntertainmentZ
Page 168 of 224

XPoint the remote control to the active
screen and press the On/Off : button on
the remote control.
The display screen is switched on or off.
i Switching on with the remote control is
only possible if the ignition is on.
Muting the Audio Playback (Only Wired
Headset)
XPress the button B on the remote control.
Depending on the previous state the sound
is switched on or off.
Selecting a Menu Item and Confirming the
Selection
XSelecting the menu item: Press the arrow
buttons ? on the remote control.XConfirming the selection: Press the OK
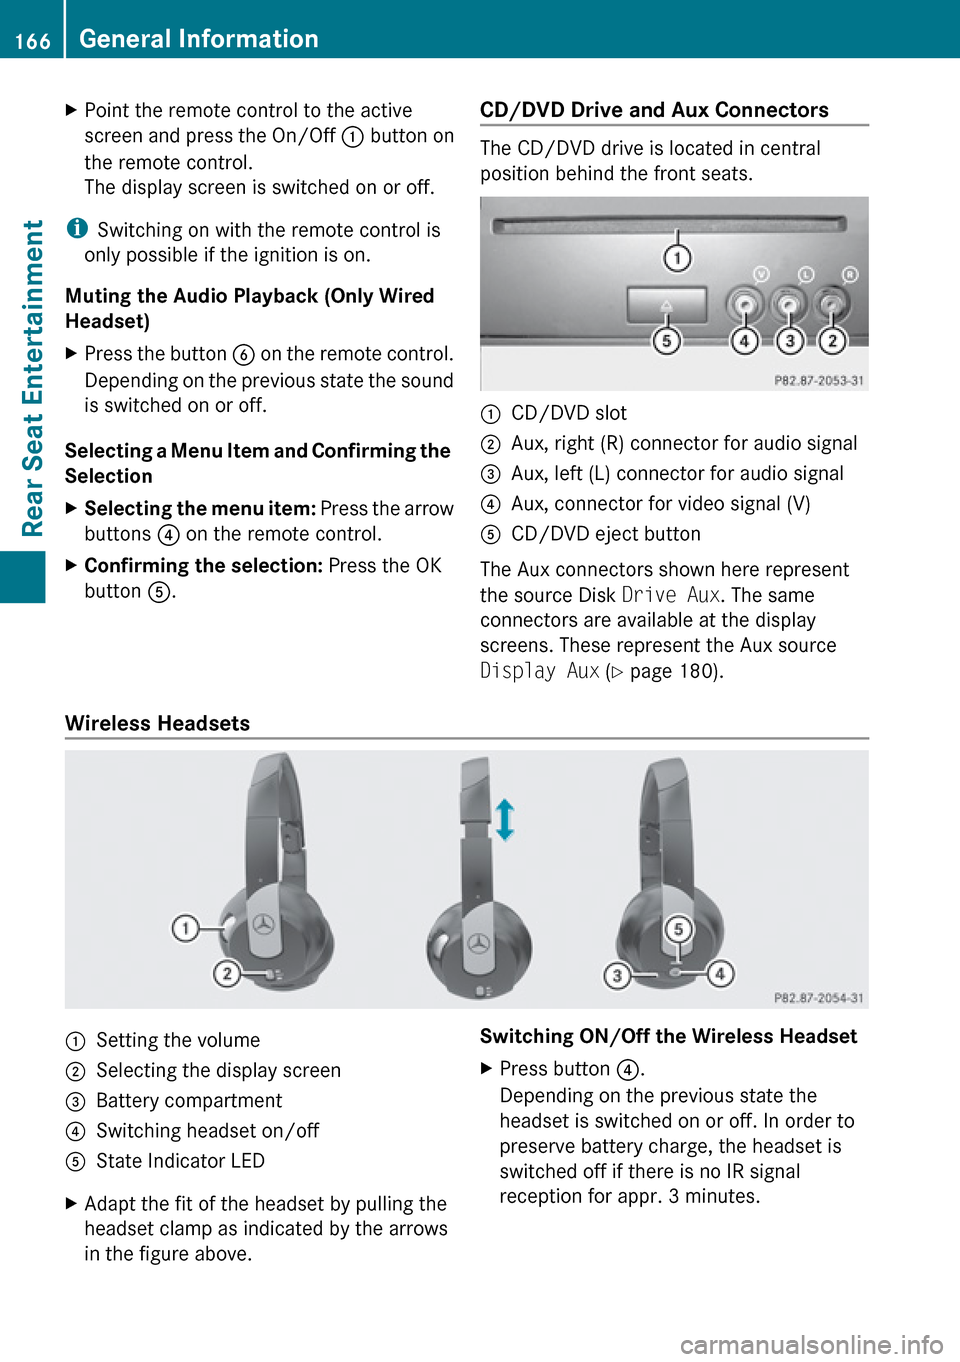
button A.CD/DVD Drive and Aux Connectors
The CD/DVD drive is located in central
position behind the front seats.
:CD/DVD slot;Aux, right (R) connector for audio signal=Aux, left (L) connector for audio signal?Aux, connector for video signal (V)ACD/DVD eject button
The Aux connectors shown here represent
the source Disk Drive Aux. The same
connectors are available at the display
screens. These represent the Aux source
Display Aux (Y page 180).
Wireless Headsets
:Setting the volume;Selecting the display screen=Battery compartment?Switching headset on/offAState Indicator LEDXAdapt the fit of the headset by pulling the
headset clamp as indicated by the arrows
in the figure above.Switching ON/Off the Wireless HeadsetXPress button ?.
Depending on the previous state the
headset is switched on or off. In order to
preserve battery charge, the headset is
switched off if there is no IR signal
reception for appr. 3 minutes.166General InformationRear Seat Entertainment
Page 169 of 224

Setting the Wireless Headset Volume XTurn the Thumb wheel : to set the desired
volume.
i If you have connected a wired headset to
a display screen, you can set the volume
with the button : of the remote control
( Y page 165).
Selecting the Display Screen for the
Headset
XRotate the wheel = until L or R appears in
the small window.
State Indicator LED
The color of the LED indicates:
R if the headset is switched on or off
R the battery condition
ColorStateGreenHeadset is switched on and the
batteries are full.DarkHeadset is switched off or the
batteries are empty or not
inserted.RedHeadset is switched on and the
batteries are almost empty.
Connecting Additional Headsets
You can connect wired headsets to both of
the display screens. The socket is suitable for
headsets with 1/8“ stereo jacks and 32 Ohm
impedance ( Y page 165).
Replacing the Batteries
You need batteries for the remote control and
the wireless headset.
GWarning
Keep batteries out of the reach of children.
Immediately seek medical help if a child
swallows a battery. Batteries are not to be
short-circuited, dismantled or thrown into
fire.
HEnvironmental Note
Batteries contain materials that can harm the
environment if disposed of improperly.
Recycling of batteries is the preferred method
of disposal. Many states require sellers of
batteries to accept old batteries for recycling.
Remote Control Batteries
The remote control contains two batteries of
size AAA, 1.5 V.
XRemove the cover of the battery
compartment 3 on the back of the remote
control by pressing down the snap-fit hook
2 .XTake out the empty batteries 5.XInsert the new batteries. Mind the polarity
marks on the batteries.
Battery on the left:
The plus terminal (+) must face upwards.General Information167Rear Seat EntertainmentZ
Page 170 of 224

Battery on the right:
The plus terminal (+) must face downwards.XPut the cover with the engagement
hooks ? first onto the battery
compartment and let the snap-fit hook 2
snap in.
Wireless Headset Batteries
The battery compartment cover is located on
the left headphone.
1Battery compartment cover
The wireless headset contains two batteries
of size AAA, 1.5 V.
XOpen battery compartment cover : by
folding it up. When doing so, hold the left
headphone as shown in the illustration to
prevent the inserted batteries from falling
out.XTake out the empty batteries.XInsert the new batteries. Mind the polarity
marks on the batteries.
Battery on the left:
The plus terminal (+) must face upwards.
Battery on the right:
The plus terminal (+) must face downwards.XClose the battery compartment.
The state indicator LED lights green when
you switch on the headset and the batteries
were inserted correctly.Basic Functions
The following operating modes are available
for the rear-seat entertainment system:
R CD/DVD audio and MP3 mode
( Y page 170)
R DVD Video operation ( Y page 174)
R AUX mode ( Y page 179)
In Aux mode you can play external video
sources that are connected either to the
display screens or to the CD/DVD drive. In
addition you can play the active audio or
video source of COMAND ( Y page 180).
With the system settings menu you can set
display design and language for each screen
separately ( Y page 170).
Headset Operation
You can use the provided wireless headset
and/or two wired headsets connected to the
display screens ( Y page 166).
XSwitch on the wireless headset
( Y page 166).XSet the volume of the headset
( Y page 167).XSelect the display screen for the headset
( Y page 167).
Main Loudspeaker Operation
i This function is available in connection
with COMAND.
The sound of a medium which is played in the
RSE disc drive can also be heard over the
vehicle loudspeakers. For this, at least on one
of the display screens the operating mode
Disc has to be active.
XSwitching to Audio menu: Select Audio
£ Audio in COMAND.XSelect Rear.
The volume control of the headsets has no
impact on the volume of the loudspeakers.
168Basic FunctionsRear Seat Entertainment