2010 MERCEDES-BENZ GLK350 4MATIC ESP
[x] Cancel search: ESPPage 173 of 344
XBriefly pull the cruise control lever in
direction of arrow ?.
If no speed is stored, the current speed is
set and stored.XRemove your foot from the accelerator
pedal.
The last stored speed is deleted from memory
when the engine is turned off.
Hill-start assist system
On uphill grades, the hill-start assist system
maintains the pressure in the brake system
for approximately 1 second after you have
released the brake pedal. Therefore, you can
start off smoothly without the vehicle moving
immediately after releasing the brake pedal.
GWarning!
The hill-start assist system is not designed to
function as a parking brake. It does not
prevent the vehicle from moving when parked
on an incline.
Always engage the parking brake in addition
to shifting the automatic transmission into
park position P.
XDepress the brake pedal.XShift the automatic transmission into drive
position D or reverse gear R.XRelease the brake pedal.XCarefully depress the accelerator pedal.
The hill-start assist system is inactive
R when starting off on a level road or downhill
grades
R with the automatic transmission in neutral
position N
R with the parking brake engaged
R if the ESP ®
has switched off due to a
malfunction
All-wheel drive (4MATIC)
In vehicles with all-wheel drive (4MATIC),
both axles are powered at all times when the
vehicle is being operated. The 4MATIC
improves traction in conjunction with the
ESP ®
( Y page 61) and the Electronic Traction
System (ETS/4-ETS) ( Y page 62).GWarning!
If a drive wheel is spinning due to insufficient
traction:
R While driving off, apply as little throttle as
possible.
R While driving, ease up on the accelerator
pedal.
R Adapt your speed and driving style to the
prevailing road conditions.
Failure to observe these guidelines could
cause the vehicle to skid.
The 4MATIC cannot prevent accidents
resulting from excessive speed.
! Do not tow with one axle raised. Doing so
could damage the transfer case, which is
not covered by the Mercedes-Benz Limited
Warranty. All wheels must be on or off the
ground. Observe instructions for towing the
vehicle with all wheels on the ground.
! Only conduct operational or performance
tests on a two-axle dynamometer. If such
tests are necessary, contact an authorized
Mercedes-Benz Center. You could
otherwise seriously damage the brake
system and/or the transfer case which is
not covered by the Mercedes-Benz Limited
Warranty.
i In winter operation, the maximum
effectiveness of the 4MATIC is only
achieved with winter tires ( Y page 241) or
snow chains as required.
Driving systems171Controls in detailX204_AKB; 3; 23, en-USd2ureepe,Version: 2.11.8.12009-07-16T19:16:58+02:00 - Seite 171Z
Page 174 of 344
Parktronic system (Parking Assist)
The Parktronic system is an electronic
parking aid with ultrasonic sensors designed
to assist the driver during parking maneuvers.
The Parktronic system indicates the relative
distance between the vehicle and an obstacle
visually and audibly.
The Parktronic system is activated
automatically when
Ryou switch on the ignition
and
Ryou release the parking brake
and
Rthe automatic transmission is in drive
position D, reverse gear R, or neutral
position N
The Parktronic system deactivates at speeds
above approximately 11 mph (18 km/h). At
lower speeds, the Parktronic system
activates again.
The Parktronic system also deactivates when
you shift the automatic transmission into
park position P or engage the parking brake.
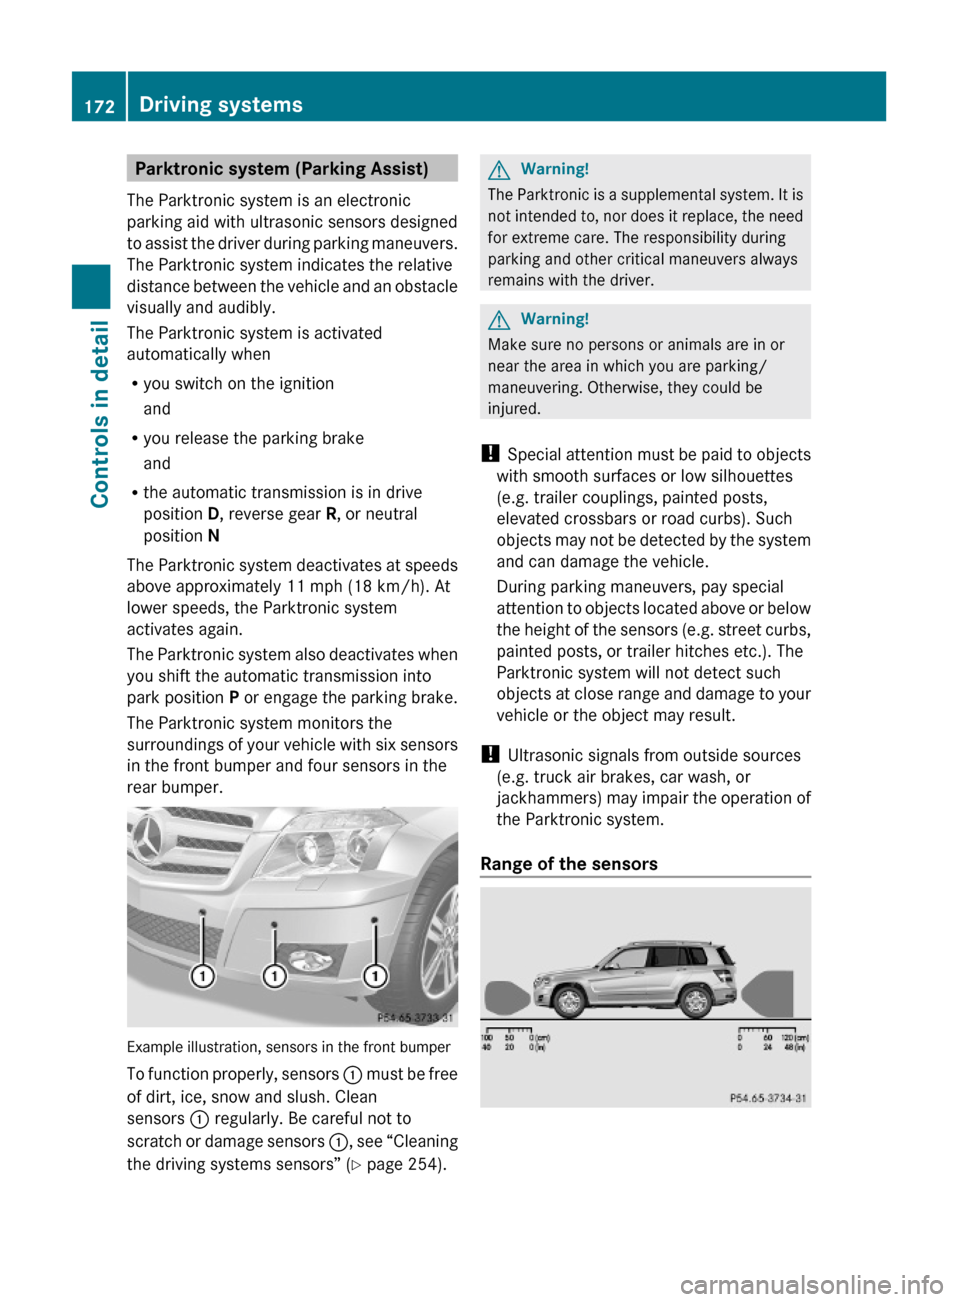
The Parktronic system monitors the
surroundings of your vehicle with six sensors
in the front bumper and four sensors in the
rear bumper.
Example illustration, sensors in the front bumper
To function properly, sensors : must be free
of dirt, ice, snow and slush. Clean
sensors : regularly. Be careful not to
scratch or damage sensors :, see “Cleaning
the driving systems sensors” (Y page 254).
GWarning!
The Parktronic is a supplemental system. It is
not intended to, nor does it replace, the need
for extreme care. The responsibility during
parking and other critical maneuvers always
remains with the driver.
GWarning!
Make sure no persons or animals are in or
near the area in which you are parking/
maneuvering. Otherwise, they could be
injured.
! Special attention must be paid to objects
with smooth surfaces or low silhouettes
(e.g. trailer couplings, painted posts,
elevated crossbars or road curbs). Such
objects may not be detected by the system
and can damage the vehicle.
During parking maneuvers, pay special
attention to objects located above or below
the height of the sensors (e.g. street curbs,
painted posts, or trailer hitches etc.). The
Parktronic system will not detect such
objects at close range and damage to your
vehicle or the object may result.
! Ultrasonic signals from outside sources
(e.g. truck air brakes, car wash, or
jackhammers) may impair the operation of
the Parktronic system.
Range of the sensors
172Driving systemsControls in detail
X204_AKB; 3; 23, en-USd2ureepe,Version: 2.11.8.12009-07-16T19:16:58+02:00 - Seite 172
Page 177 of 344
In addition, the rear view camera contains
guidelines to help you with driving in reverse.
GWarning!
Make sure no persons or animals are in or
near the area in which you are parking/
maneuvering. Otherwise, they could be
injured.
GWarning!
The rear view camera is only an aid and may
display obstacles
Rfrom a distorted perspective
Rinaccurately
Rmay not display obstacles at all
The rear view camera does not relieve you of
the responsibility to be cautious. Take care
and pay careful attention. The rear view
camera may not show objects which are
Rvery close to the rear bumper
Runder the rear bumper
Rabove the tailgate handle
You are responsible for safety at all times and
must continue to pay attention to the
immediate surroundings when parking and
maneuvering. This includes the area behind,
in front of, and beside the vehicle. Otherwise
you could endanger yourself and/or others.
GWarning!
The rear view camera either will not function
or will not function to its full capability if
Rthe tailgate is open
Rit is raining very hard, snowing or foggy
Rit is night or you are parking/maneuvering
your vehicle in an area where it is very dark
Rthe camera is exposed to a very bright white
light
Rthe immediate surroundings are
illuminated with fluorescent light (the
display may flicker)
Rthere is a sudden change in temperature,
e.g. if you drive into a heated garage from
the cold (lens condensation)
Rthe camera lens is dirty or covered
Rthe rear of your vehicle is damaged
In this case, have the position and setting
of the camera checked by a qualified
specialist workshop. Mercedes-Benz
recommends that you contact a Mercedes-
Benz Center for this purpose.
Do not use the rear view camera in these
situations. Otherwise you could injure
yourself or others and/or damage property
including your vehicle while parking/
maneuvering.
GWarning!
Use of rear view camera can be dangerous if
you are color-blind or have impaired color
vision.
Only use rear view camera if you can see and
distinguish all colored guidelines shown by
rear view camera on the COMAND system
display.
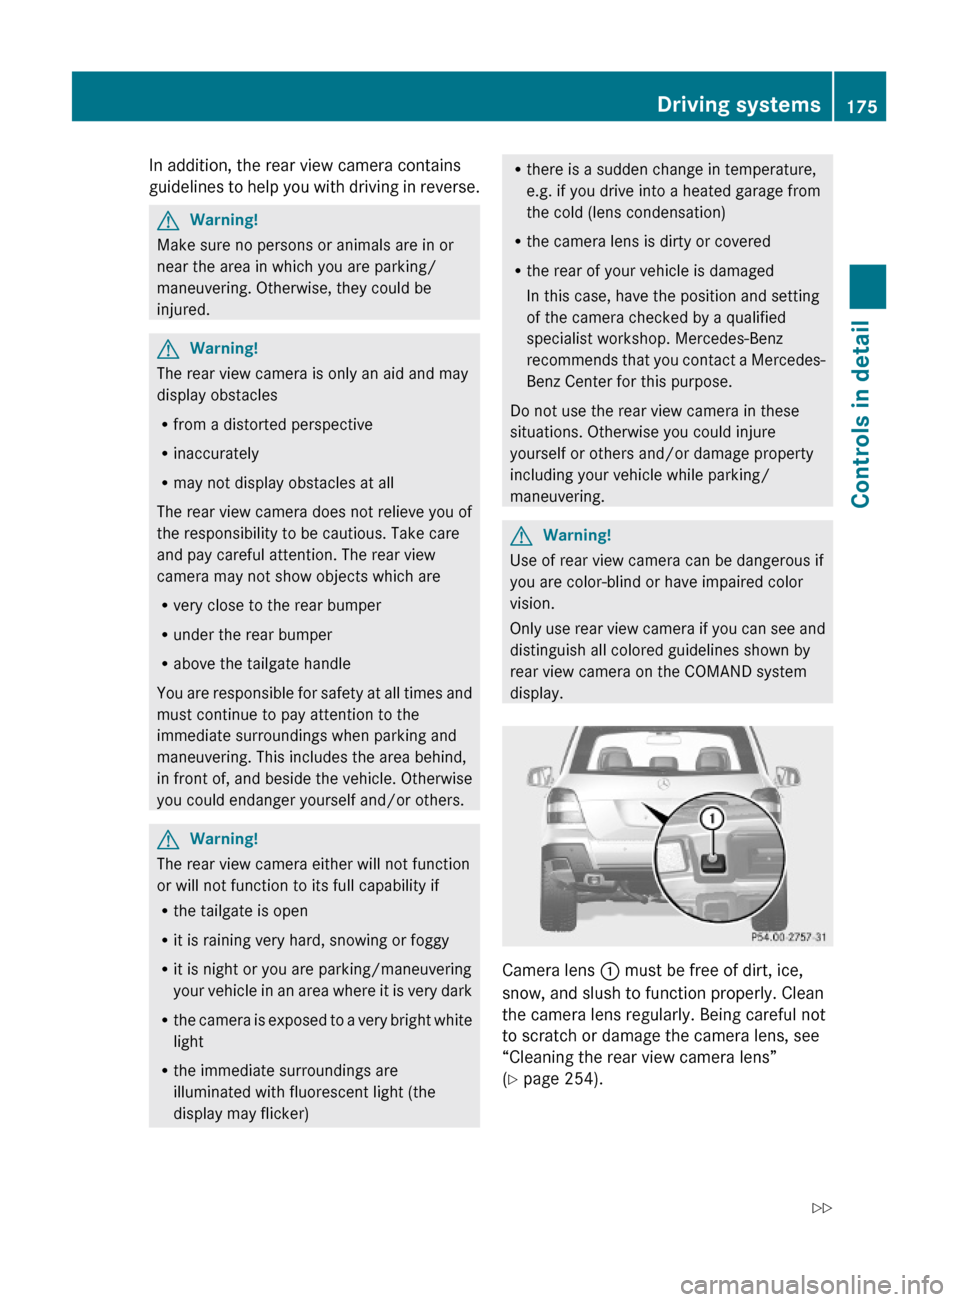
Camera lens : must be free of dirt, ice,
snow, and slush to function properly. Clean
the camera lens regularly. Being careful not
to scratch or damage the camera lens, see
“Cleaning the rear view camera lens”
(Y page 254).
Driving systems175Controls in detailX204_AKB; 3; 23, en-USd2ureepe,Version: 2.11.8.12009-07-16T19:16:58+02:00 - Seite 175Z
Page 184 of 344
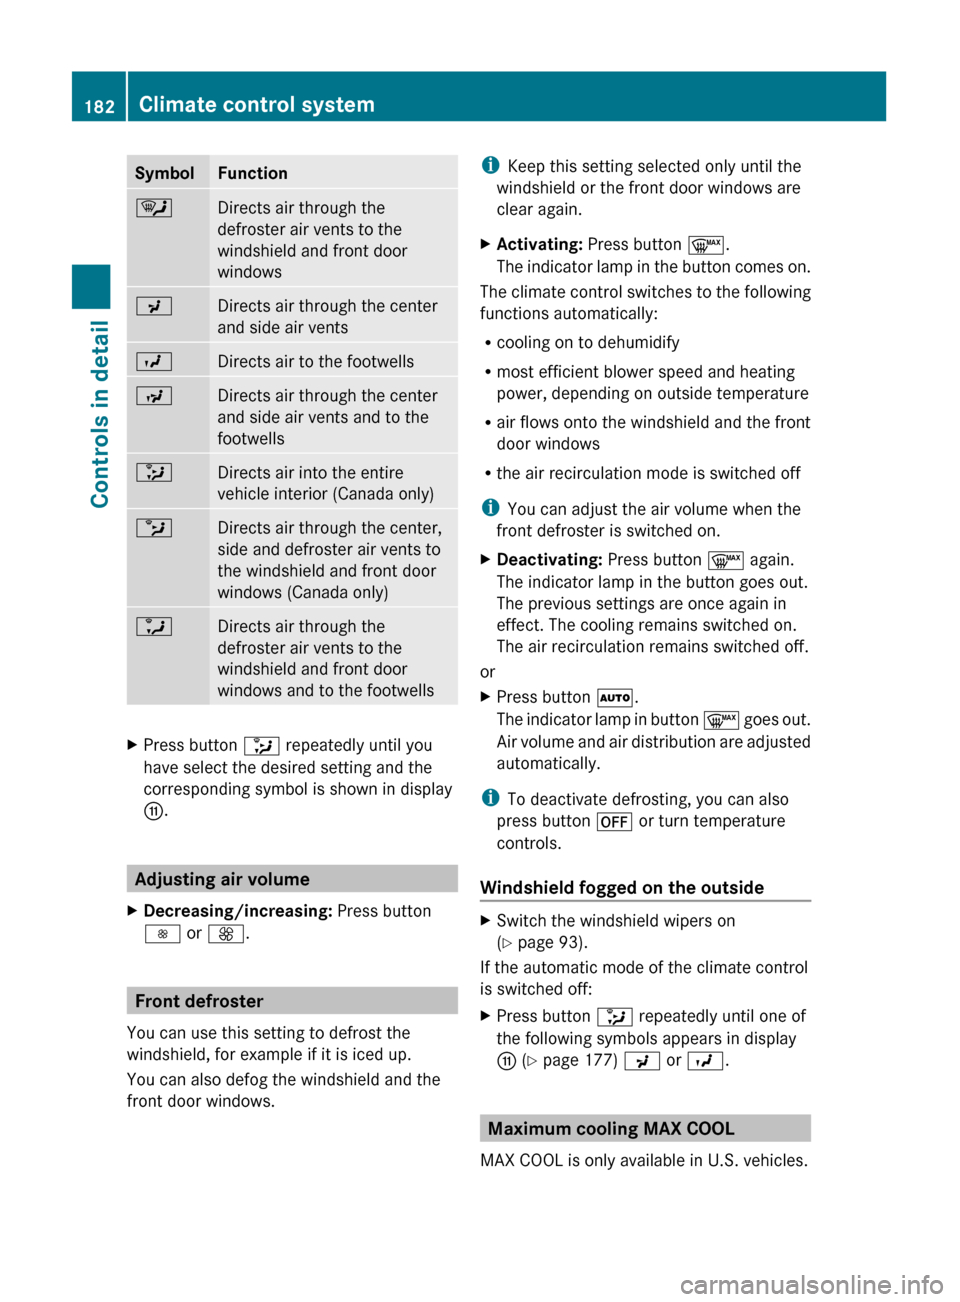
SymbolFunction¯Directs air through the
defroster air vents to the
windshield and front door
windowsPDirects air through the center
and side air ventsODirects air to the footwellsNDirects air through the center
and side air vents and to the
footwells_Directs air into the entire
vehicle interior (Canada only)bDirects air through the center,
side and defroster air vents to
the windshield and front door
windows (Canada only)aDirects air through the
defroster air vents to the
windshield and front door
windows and to the footwellsXPress button _ repeatedly until you
have select the desired setting and the
corresponding symbol is shown in display
G .
Adjusting air volume
XDecreasing/increasing: Press button
I or K .
Front defroster
You can use this setting to defrost the
windshield, for example if it is iced up.
You can also defog the windshield and the
front door windows.
i Keep this setting selected only until the
windshield or the front door windows are
clear again.XActivating: Press button ¬.
The indicator lamp in the button comes on.
The climate control switches to the following
functions automatically:
R cooling on to dehumidify
R most efficient blower speed and heating
power, depending on outside temperature
R air flows onto the windshield and the front
door windows
R the air recirculation mode is switched off
i You can adjust the air volume when the
front defroster is switched on.
XDeactivating: Press button ¬ again.
The indicator lamp in the button goes out.
The previous settings are once again in
effect. The cooling remains switched on.
The air recirculation remains switched off.
or
XPress button Ã.
The indicator lamp in button ¬ goes out.
Air volume and air distribution are adjusted
automatically.
i To deactivate defrosting, you can also
press button ^ or turn temperature
controls.
Windshield fogged on the outside
XSwitch the windshield wipers on
( Y page 93).
If the automatic mode of the climate control
is switched off:
XPress button _ repeatedly until one of
the following symbols appears in display
G (Y page 177) P or O .
Maximum cooling MAX COOL
MAX COOL is only available in U.S. vehicles.
182Climate control systemControls in detail
X204_AKB; 3; 23, en-USd2ureepe,Version: 2.11.8.12009-07-16T19:16:58+02:00 - Seite 182
Page 191 of 344
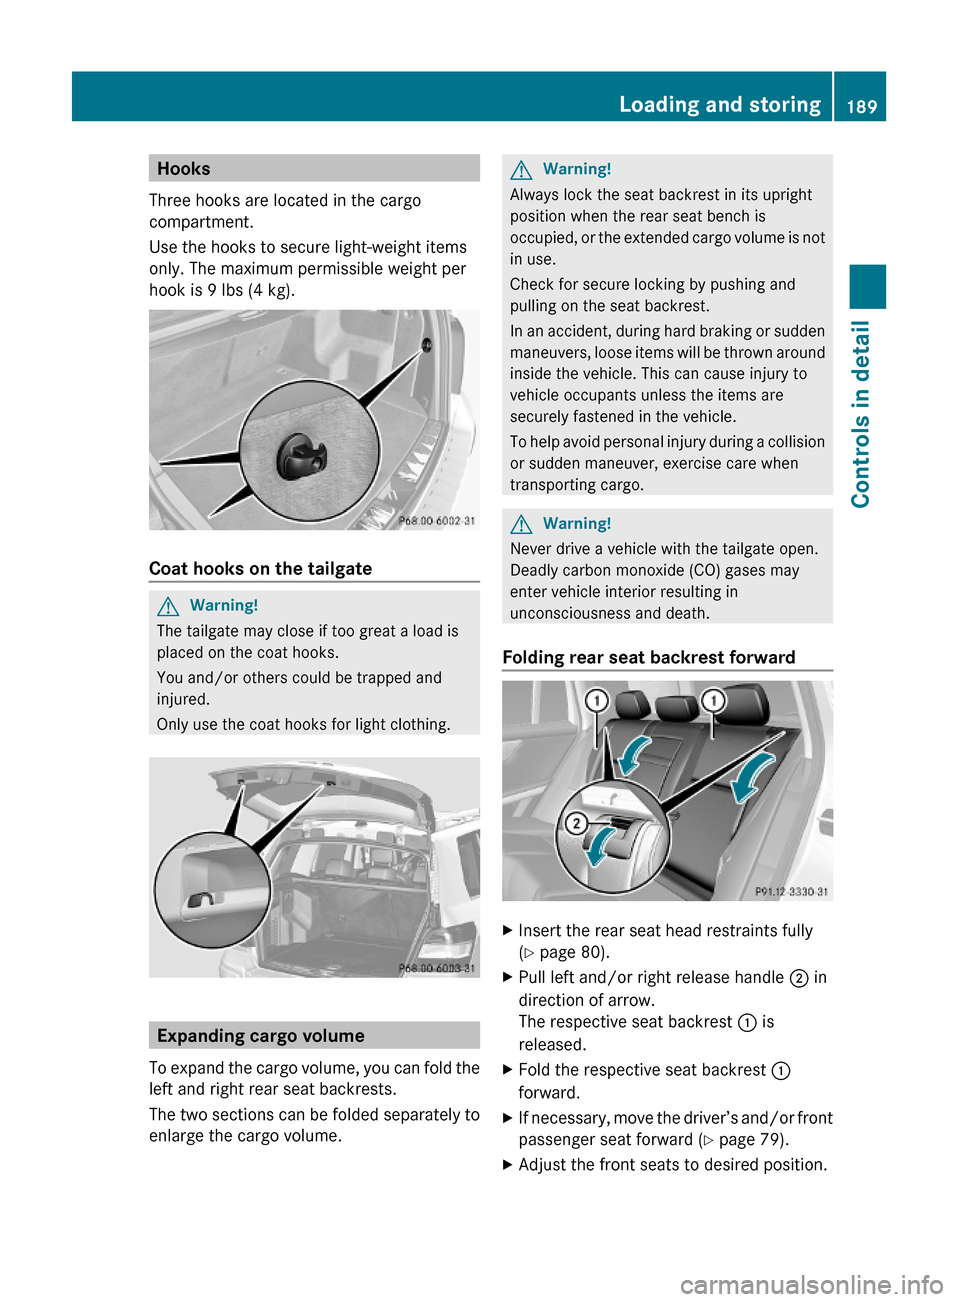
Hooks
Three hooks are located in the cargo
compartment.
Use the hooks to secure light-weight items
only. The maximum permissible weight per
hook is 9 lbs (4 kg).
Coat hooks on the tailgate
GWarning!
The tailgate may close if too great a load is
placed on the coat hooks.
You and/or others could be trapped and
injured.
Only use the coat hooks for light clothing.
Expanding cargo volume
To expand the cargo volume, you can fold the
left and right rear seat backrests.
The two sections can be folded separately to
enlarge the cargo volume.
GWarning!
Always lock the seat backrest in its upright
position when the rear seat bench is
occupied, or the extended cargo volume is not
in use.
Check for secure locking by pushing and
pulling on the seat backrest.
In an accident, during hard braking or sudden
maneuvers, loose items will be thrown around
inside the vehicle. This can cause injury to
vehicle occupants unless the items are
securely fastened in the vehicle.
To help avoid personal injury during a collision
or sudden maneuver, exercise care when
transporting cargo.
GWarning!
Never drive a vehicle with the tailgate open.
Deadly carbon monoxide (CO) gases may
enter vehicle interior resulting in
unconsciousness and death.
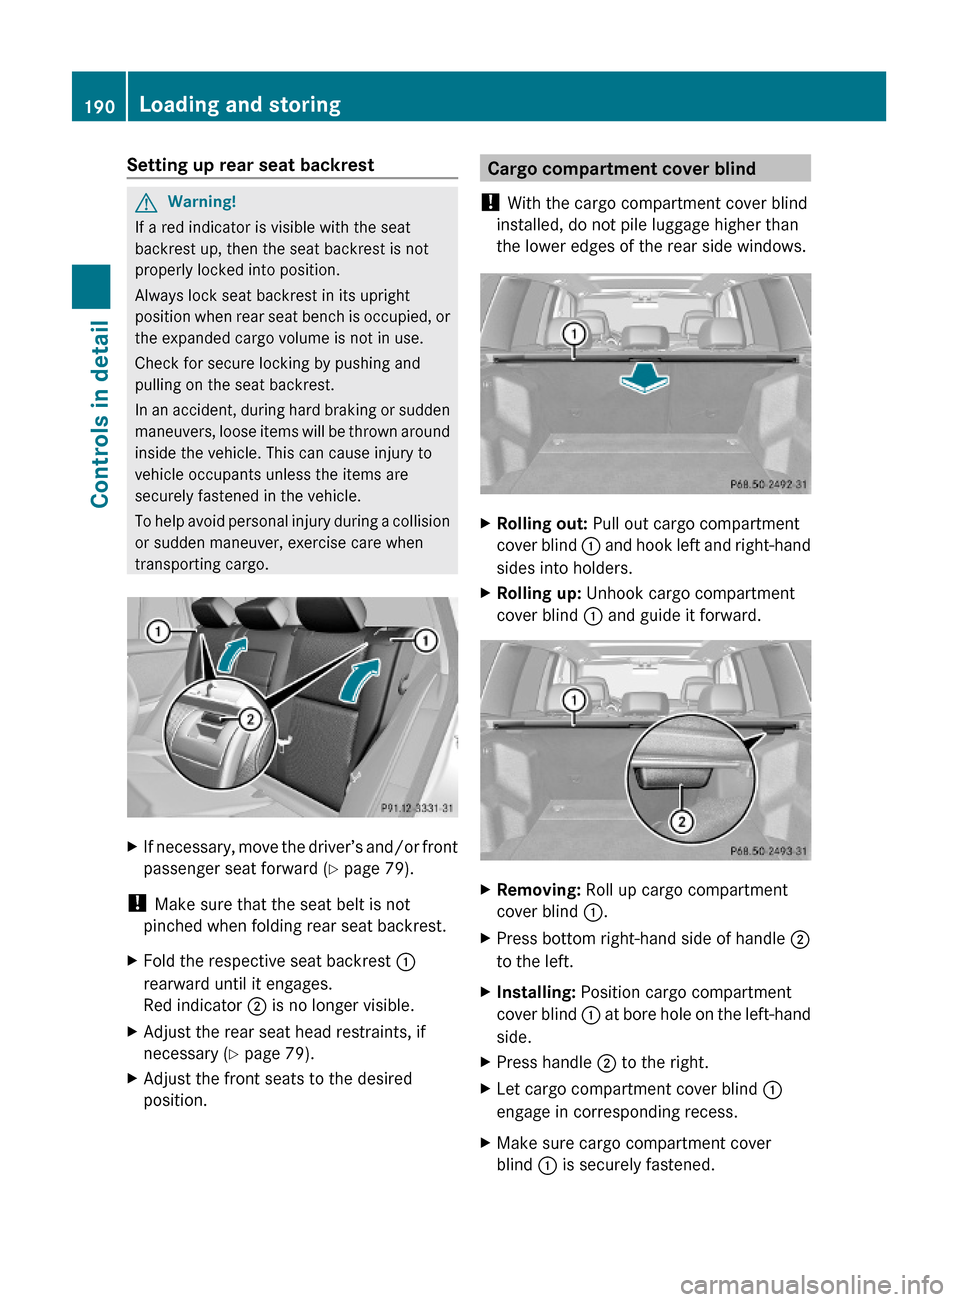
Folding rear seat backrest forward
XInsert the rear seat head restraints fully
(Y page 80).
XPull left and/or right release handle ; in
direction of arrow.
The respective seat backrest : is
released.
XFold the respective seat backrest :
forward.
XIf necessary, move the driver’s and/or front
passenger seat forward (Y page 79).
XAdjust the front seats to desired position.Loading and storing189Controls in detailX204_AKB; 3; 23, en-USd2ureepe,Version: 2.11.8.12009-07-16T19:16:58+02:00 - Seite 189Z
Page 192 of 344
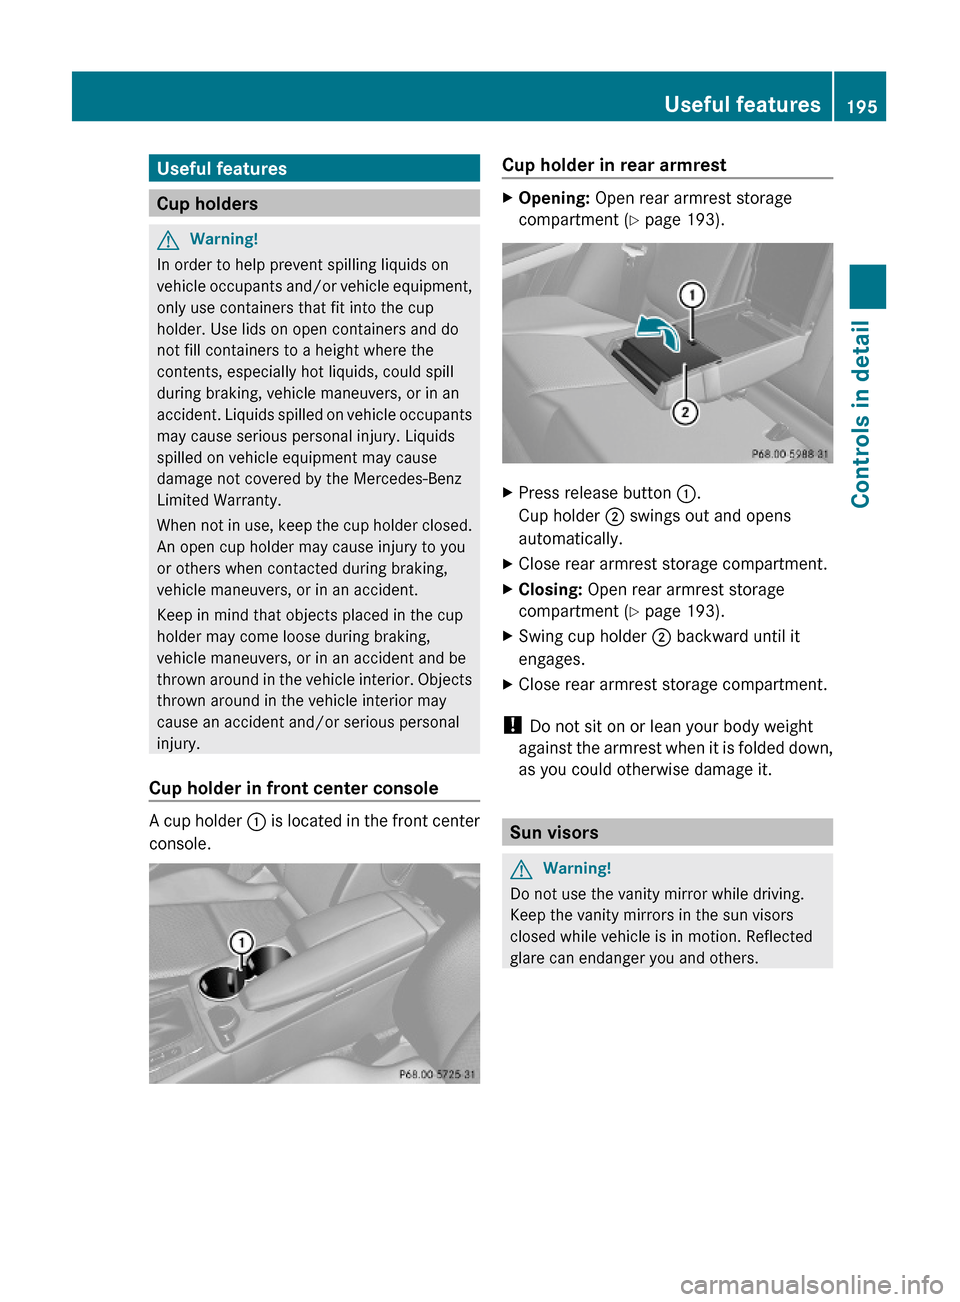
Setting up rear seat backrestGWarning!
If a red indicator is visible with the seat
backrest up, then the seat backrest is not
properly locked into position.
Always lock seat backrest in its upright
position when rear seat bench is occupied, or
the expanded cargo volume is not in use.
Check for secure locking by pushing and
pulling on the seat backrest.
In an accident, during hard braking or sudden
maneuvers, loose items will be thrown around
inside the vehicle. This can cause injury to
vehicle occupants unless the items are
securely fastened in the vehicle.
To help avoid personal injury during a collision
or sudden maneuver, exercise care when
transporting cargo.
XIf necessary, move the driver’s and/or front
passenger seat forward (Y page 79).
! Make sure that the seat belt is not
pinched when folding rear seat backrest.
XFold the respective seat backrest :
rearward until it engages.
Red indicator ; is no longer visible.
XAdjust the rear seat head restraints, if
necessary (Y page 79).
XAdjust the front seats to the desired
position.Cargo compartment cover blind
! With the cargo compartment cover blind
installed, do not pile luggage higher than
the lower edges of the rear side windows.
XRolling out: Pull out cargo compartment
cover blind : and hook left and right-hand
sides into holders.
XRolling up: Unhook cargo compartment
cover blind : and guide it forward.
XRemoving: Roll up cargo compartment
cover blind :.
XPress bottom right-hand side of handle ;
to the left.
XInstalling: Position cargo compartment
cover blind : at bore hole on the left-hand
side.
XPress handle ; to the right.XLet cargo compartment cover blind :
engage in corresponding recess.
XMake sure cargo compartment cover
blind : is securely fastened.
190Loading and storingControls in detail
X204_AKB; 3; 23, en-USd2ureepe,Version: 2.11.8.12009-07-16T19:16:58+02:00 - Seite 190
Page 197 of 344
Useful features
Cup holders
GWarning!
In order to help prevent spilling liquids on
vehicle occupants and/or vehicle equipment,
only use containers that fit into the cup
holder. Use lids on open containers and do
not fill containers to a height where the
contents, especially hot liquids, could spill
during braking, vehicle maneuvers, or in an
accident. Liquids spilled on vehicle occupants
may cause serious personal injury. Liquids
spilled on vehicle equipment may cause
damage not covered by the Mercedes-Benz
Limited Warranty.
When not in use, keep the cup holder closed.
An open cup holder may cause injury to you
or others when contacted during braking,
vehicle maneuvers, or in an accident.
Keep in mind that objects placed in the cup
holder may come loose during braking,
vehicle maneuvers, or in an accident and be
thrown around in the vehicle interior. Objects
thrown around in the vehicle interior may
cause an accident and/or serious personal
injury.
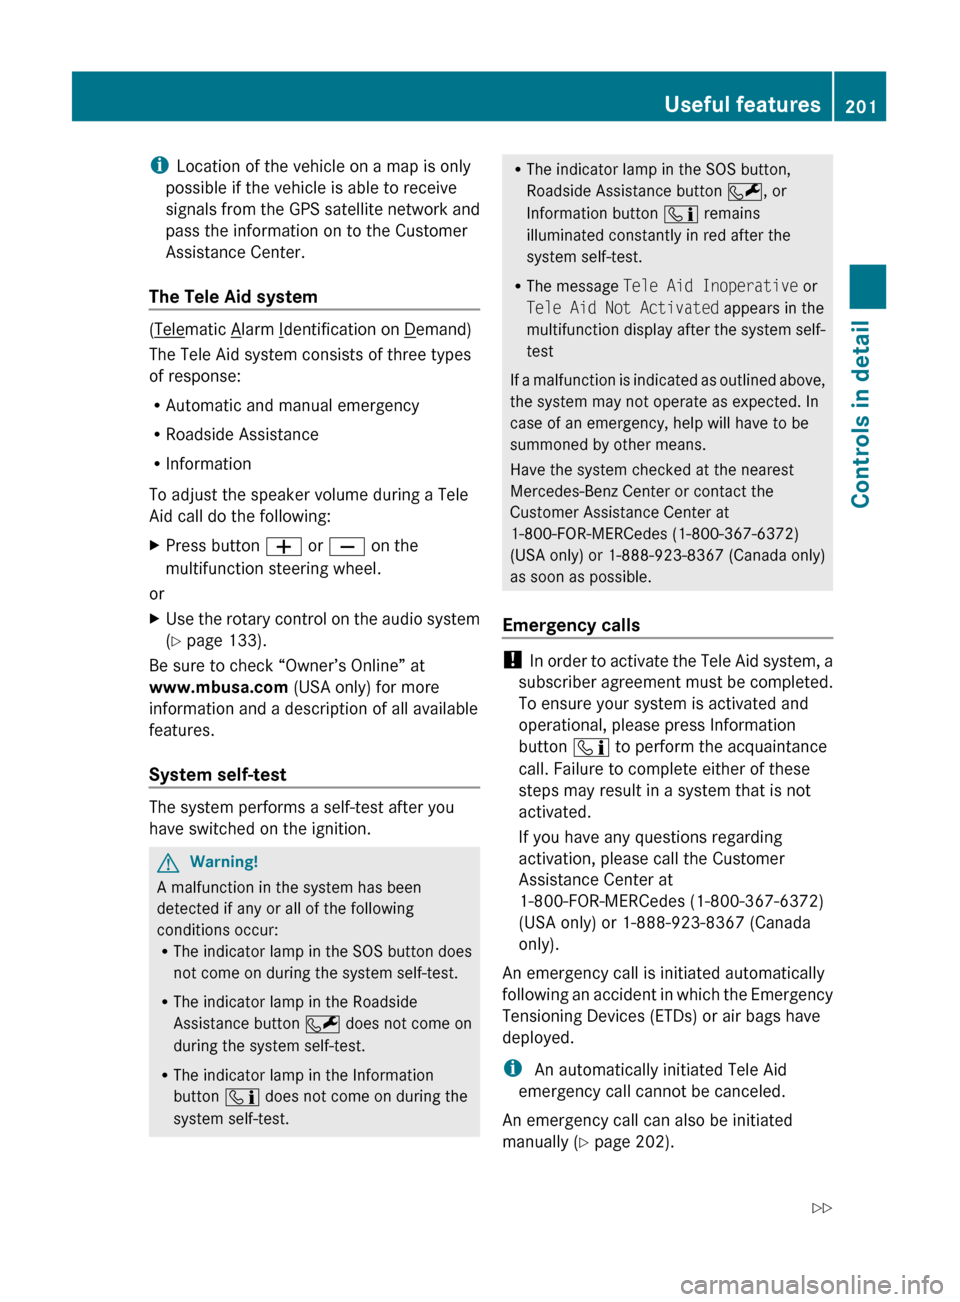
Cup holder in front center console
A cup holder : is located in the front center
console.
Cup holder in rear armrest XOpening: Open rear armrest storage
compartment (Y page 193).
XPress release button :.
Cup holder ; swings out and opens
automatically.
XClose rear armrest storage compartment.XClosing: Open rear armrest storage
compartment (Y page 193).
XSwing cup holder ; backward until it
engages.
XClose rear armrest storage compartment.
! Do not sit on or lean your body weight
against the armrest when it is folded down,
as you could otherwise damage it.
Sun visors
GWarning!
Do not use the vanity mirror while driving.
Keep the vanity mirrors in the sun visors
closed while vehicle is in motion. Reflected
glare can endanger you and others.
Useful features195Controls in detailX204_AKB; 3; 23, en-USd2ureepe,Version: 2.11.8.12009-07-16T19:16:58+02:00 - Seite 195Z
Page 203 of 344
iLocation of the vehicle on a map is only
possible if the vehicle is able to receive
signals from the GPS satellite network and
pass the information on to the Customer
Assistance Center.
The Tele Aid system
(Telematic Alarm Identification on Demand)
The Tele Aid system consists of three types
of response:
R Automatic and manual emergency
R Roadside Assistance
R Information
To adjust the speaker volume during a Tele
Aid call do the following:
XPress button W or X on the
multifunction steering wheel.
or
XUse the rotary control on the audio system
( Y page 133).
Be sure to check “Owner’s Online” at
www.mbusa.com (USA only) for more
information and a description of all available
features.
System self-test
The system performs a self-test after you
have switched on the ignition.
GWarning!
A malfunction in the system has been
detected if any or all of the following
conditions occur:
R The indicator lamp in the SOS button does
not come on during the system self-test.
R The indicator lamp in the Roadside
Assistance button F does not come on
during the system self-test.
R The indicator lamp in the Information
button ï does not come on during the
system self-test.
R The indicator lamp in the SOS button,
Roadside Assistance button F, or
Information button ï remains
illuminated constantly in red after the
system self-test.
R The message Tele Aid Inoperative or
Tele Aid Not Activated appears in the
multifunction display after the system self-
test
If a malfunction is indicated as outlined above,
the system may not operate as expected. In
case of an emergency, help will have to be
summoned by other means.
Have the system checked at the nearest
Mercedes-Benz Center or contact the
Customer Assistance Center at
1-800-FOR-MERCedes (1-800-367-6372)
(USA only) or 1-888-923-8367 (Canada only)
as soon as possible.
Emergency calls
! In order to activate the Tele Aid system, a
subscriber agreement must be completed.
To ensure your system is activated and
operational, please press Information
button ï to perform the acquaintance
call. Failure to complete either of these
steps may result in a system that is not
activated.
If you have any questions regarding
activation, please call the Customer
Assistance Center at
1-800-FOR-MERCedes (1-800-367-6372)
(USA only) or 1-888-923-8367 (Canada
only).
An emergency call is initiated automatically
following an accident in which the Emergency
Tensioning Devices (ETDs) or air bags have
deployed.
i An automatically initiated Tele Aid
emergency call cannot be canceled.
An emergency call can also be initiated
manually ( Y page 202).
Useful features201Controls in detailX204_AKB; 3; 23, en-USd2ureepe,Version: 2.11.8.12009-07-16T19:16:58+02:00 - Seite 201Z