2010 MERCEDES-BENZ GLK350 4MATIC phone
[x] Cancel search: phonePage 167 of 344
mobile phone and only use the audio
system’s hands-free device, these calls will
not be listed.
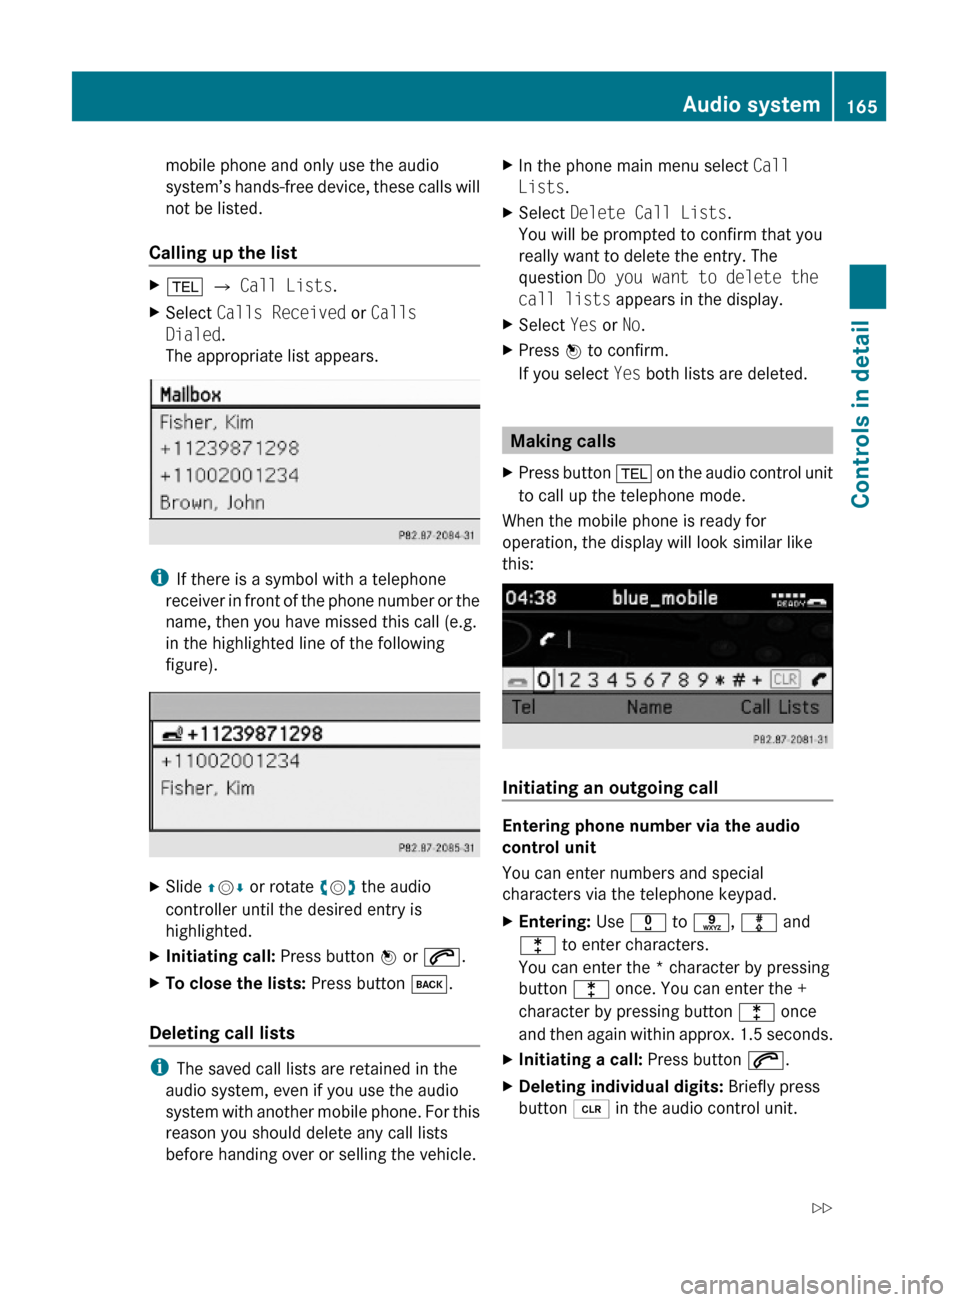
Calling up the list
X% Q Call Lists.XSelect Calls Received or Calls
Dialed.
The appropriate list appears.
iIf there is a symbol with a telephone
receiver in front of the phone number or the
name, then you have missed this call (e.g.
in the highlighted line of the following
figure).
XSlide ZVÆ or rotate cVd the audio
controller until the desired entry is
highlighted.
XInitiating call: Press button W or 6.XTo close the lists: Press button k.
Deleting call lists
iThe saved call lists are retained in the
audio system, even if you use the audio
system with another mobile phone. For this
reason you should delete any call lists
before handing over or selling the vehicle.
XIn the phone main menu select Call
Lists.
XSelect Delete Call Lists.
You will be prompted to confirm that you
really want to delete the entry. The
question Do you want to delete the
call lists appears in the display.
XSelect Yes or No.XPress W to confirm.
If you select Yes both lists are deleted.
Making calls
XPress button % on the audio control unit
to call up the telephone mode.
When the mobile phone is ready for
operation, the display will look similar like
this:
Initiating an outgoing call
Entering phone number via the audio
control unit
You can enter numbers and special
characters via the telephone keypad.
XEntering: Use x to s, m and
l to enter characters.
You can enter the * character by pressing
button l once. You can enter the +
character by pressing button l once
and then again within approx. 1.5 seconds.
XInitiating a call: Press button 6.XDeleting individual digits: Briefly press
button 2 in the audio control unit.
Audio system165Controls in detailX204_AKB; 3; 23, en-USd2ureepe,Version: 2.11.8.12009-07-16T19:16:58+02:00 - Seite 165Z
Page 168 of 344
XDeleting an entire entry: Press and hold
button 2 until the entire entry has been
deleted.
or
XPress button ~.
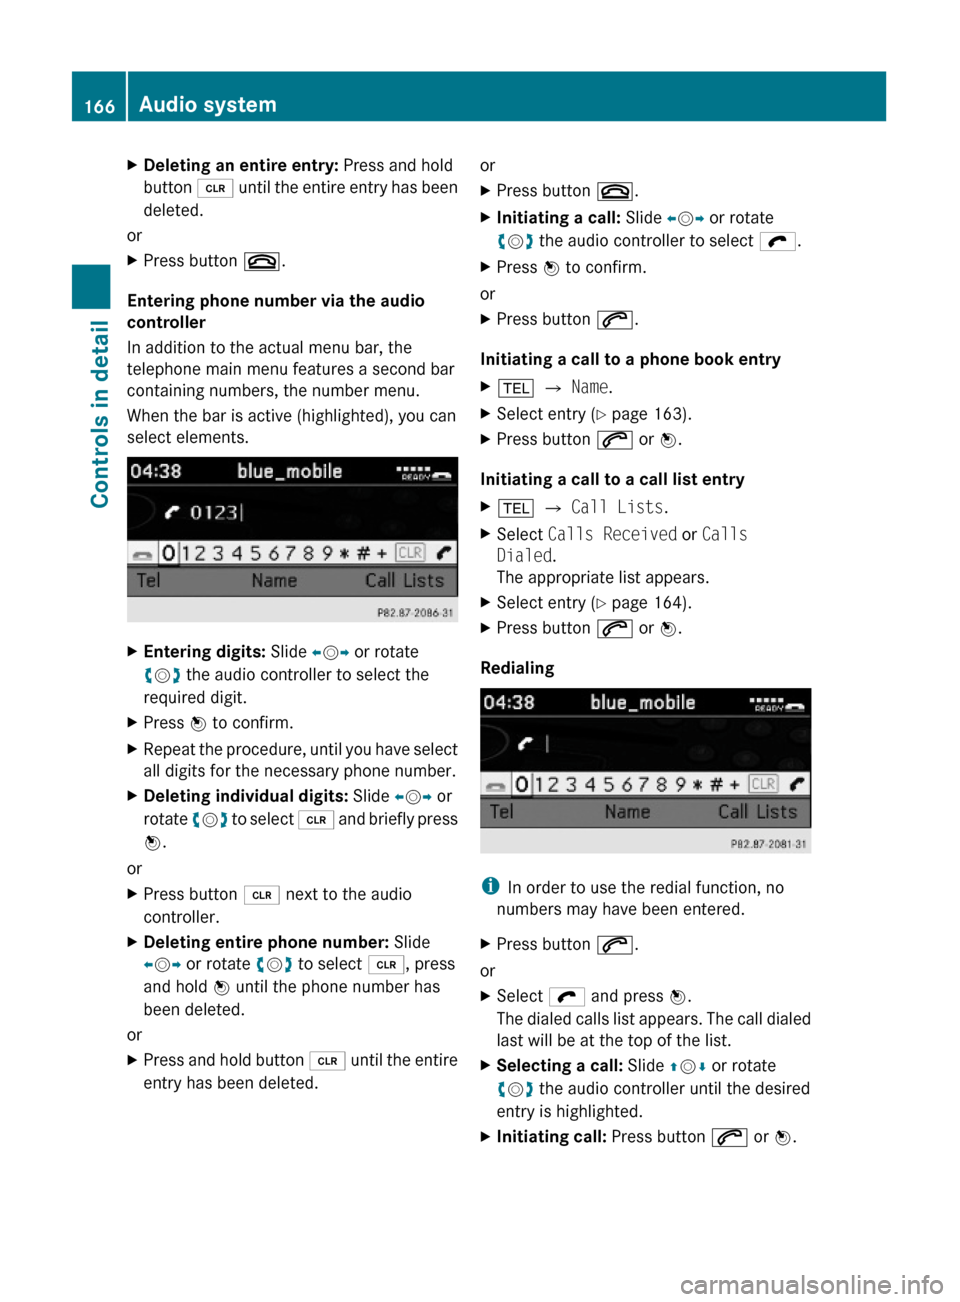
Entering phone number via the audio
controller
In addition to the actual menu bar, the
telephone main menu features a second bar
containing numbers, the number menu.
When the bar is active (highlighted), you can
select elements.
XEntering digits: Slide XVY or rotate
cVd the audio controller to select the
required digit.
XPress W to confirm.XRepeat the procedure, until you have select
all digits for the necessary phone number.
XDeleting individual digits: Slide XVY or
rotate cVd to select 2 and briefly press
W.
or
XPress button 2 next to the audio
controller.
XDeleting entire phone number: Slide
XVY or rotate cVd to select 2, press
and hold W until the phone number has
been deleted.
or
XPress and hold button 2 until the entire
entry has been deleted.
orXPress button ~.XInitiating a call: Slide XVY or rotate
cVd the audio controller to select ö.
XPress W to confirm.
or
XPress button 6.
Initiating a call to a phone book entry
X% Q Name.XSelect entry (Y page 163).XPress button 6 or W.
Initiating a call to a call list entry
X% Q Call Lists.XSelect Calls Received or Calls
Dialed.
The appropriate list appears.
XSelect entry (Y page 164).XPress button 6 or W.
Redialing
iIn order to use the redial function, no
numbers may have been entered.
XPress button 6.
or
XSelect ö and press W.
The dialed calls list appears. The call dialed
last will be at the top of the list.
XSelecting a call: Slide ZVÆ or rotate
cVd the audio controller until the desired
entry is highlighted.
XInitiating call: Press button 6 or W.166Audio systemControls in detail
X204_AKB; 3; 23, en-USd2ureepe,Version: 2.11.8.12009-07-16T19:16:58+02:00 - Seite 166
Page 169 of 344
Aborting dial or ending a callX% Q ¢ and press W.
or
XPress button ~ on the audio control unit
or on the multifunction steering wheel.
Rejecting or accepting calls
You will be notified of an incoming call by the
ringing tone and a message on the display.
iDepending on the mobile phone you are
using, the audio system’s ringing tone may
differ from the one you have set on your
mobile phone. You may hear
Rthe ringing tone set on the mobile phone
Rthe audio system’s preset ringing tone
Rthe audio system’s preset ringing tone
and the ringing tone set on the mobile
phone
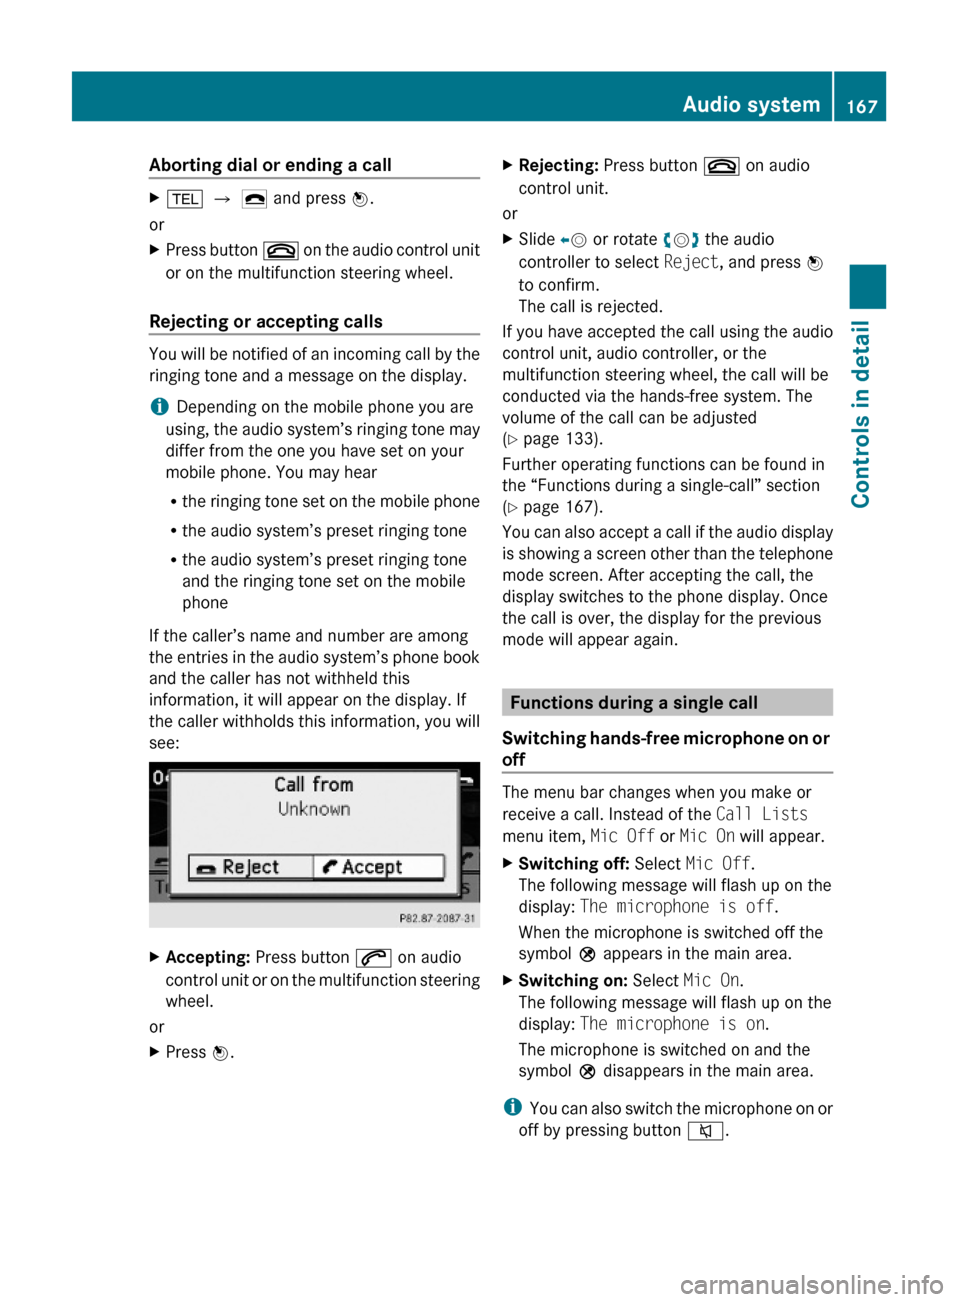
If the caller’s name and number are among
the entries in the audio system’s phone book
and the caller has not withheld this
information, it will appear on the display. If
the caller withholds this information, you will
see:
XAccepting: Press button 6 on audio
control unit or on the multifunction steering
wheel.
or
XPress W.XRejecting: Press button ~ on audio
control unit.
or
XSlide XV or rotate cVd the audio
controller to select Reject, and press W
to confirm.
The call is rejected.
If you have accepted the call using the audio
control unit, audio controller, or the
multifunction steering wheel, the call will be
conducted via the hands-free system. The
volume of the call can be adjusted
(Y page 133).
Further operating functions can be found in
the “Functions during a single-call” section
(Y page 167).
You can also accept a call if the audio display
is showing a screen other than the telephone
mode screen. After accepting the call, the
display switches to the phone display. Once
the call is over, the display for the previous
mode will appear again.
Functions during a single call
Switching hands-free microphone on or
off
The menu bar changes when you make or
receive a call. Instead of the Call Lists
menu item, Mic Off or Mic On will appear.
XSwitching off: Select Mic Off.
The following message will flash up on the
display: The microphone is off.
When the microphone is switched off the
symbol Q appears in the main area.
XSwitching on: Select Mic On.
The following message will flash up on the
display: The microphone is on.
The microphone is switched on and the
symbol Q disappears in the main area.
iYou can also switch the microphone on or
off by pressing button 8.
Audio system167Controls in detailX204_AKB; 3; 23, en-USd2ureepe,Version: 2.11.8.12009-07-16T19:16:58+02:00 - Seite 167Z
Page 170 of 344
Sending DTMF tones
iThis function is not possible with all
mobile phones.
Answering machines or other devices can be
controlled via DTMF tones, e.g. for remote
query functions.
XTransmitting individual characters:
During a call select the required
characters.
or
XPress the corresponding button on the
audio control unit.
Every selected character is transmitted
immediately.
XTransmitting a phone number of a
phone book entry as a sequence of
characters: Select Name.
XSelect the desired phone book entry.
The entry is transmitted immediately as a
sequence of characters.
XSwitching back to call display: Select
Back.
Driving systems
Introduction
This section describes the following driving
systems of your vehicle:
RCruise control
RHill-start assist system
RAll-wheel drive (4MATIC)
RParktronic system
RRear view camera
The driving safety systems ABS, Adaptive
Brake, BAS, EBP and ESP® are described in
the “Safety and security” section
(Y page 59).
Cruise control
The cruise control maintains the speed you
set for your vehicle automatically.
The use of the cruise control is recommended
for driving at a constant speed for extended
periods of time.
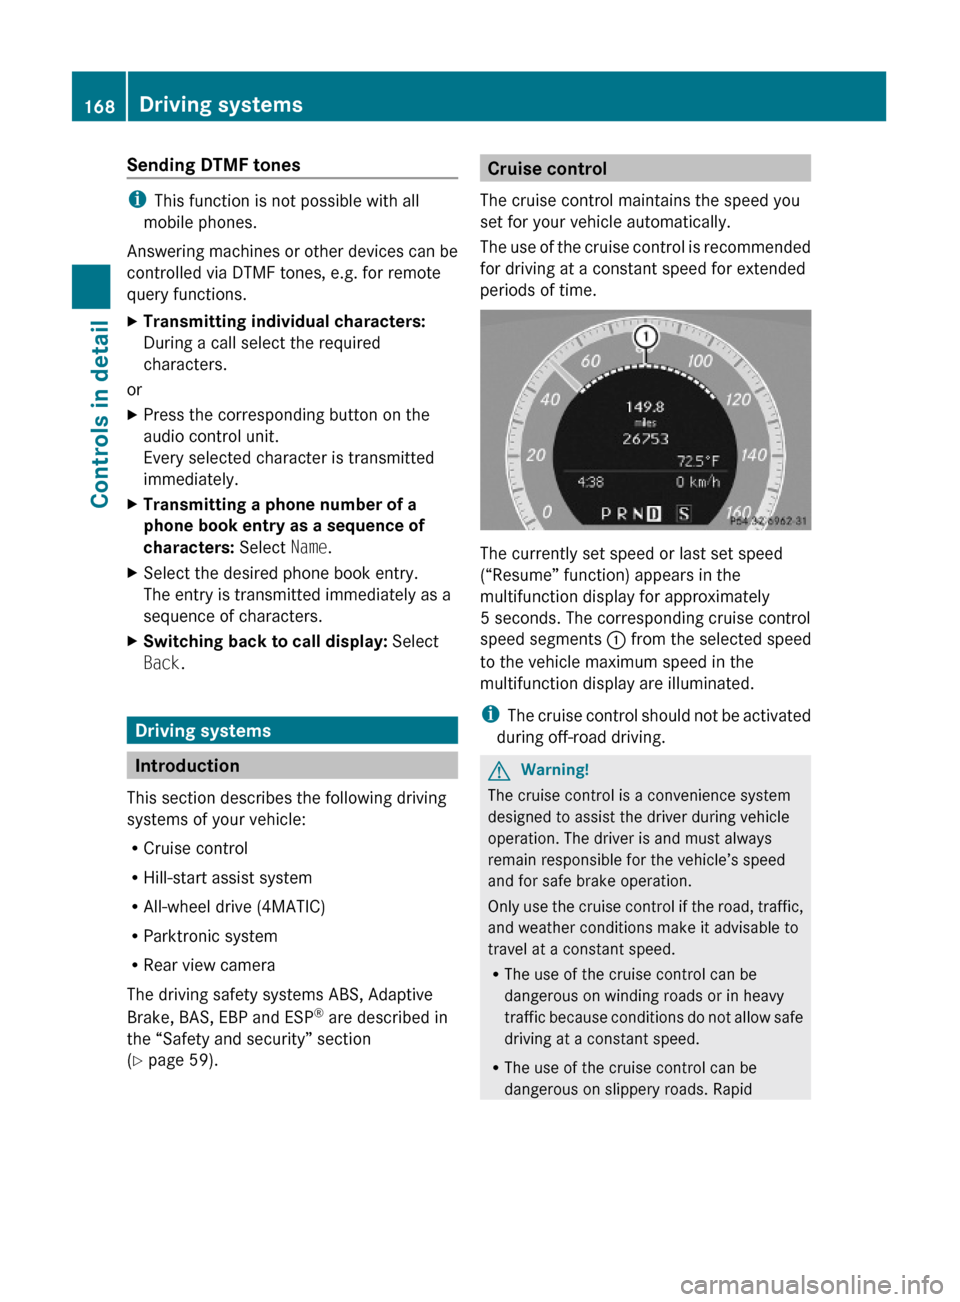
The currently set speed or last set speed
(“Resume” function) appears in the
multifunction display for approximately
5 seconds. The corresponding cruise control
speed segments : from the selected speed
to the vehicle maximum speed in the
multifunction display are illuminated.
iThe cruise control should not be activated
during off-road driving.
GWarning!
The cruise control is a convenience system
designed to assist the driver during vehicle
operation. The driver is and must always
remain responsible for the vehicle’s speed
and for safe brake operation.
Only use the cruise control if the road, traffic,
and weather conditions make it advisable to
travel at a constant speed.
RThe use of the cruise control can be
dangerous on winding roads or in heavy
traffic because conditions do not allow safe
driving at a constant speed.
RThe use of the cruise control can be
dangerous on slippery roads. Rapid
168Driving systemsControls in detail
X204_AKB; 3; 23, en-USd2ureepe,Version: 2.11.8.12009-07-16T19:16:58+02:00 - Seite 168
Page 199 of 344
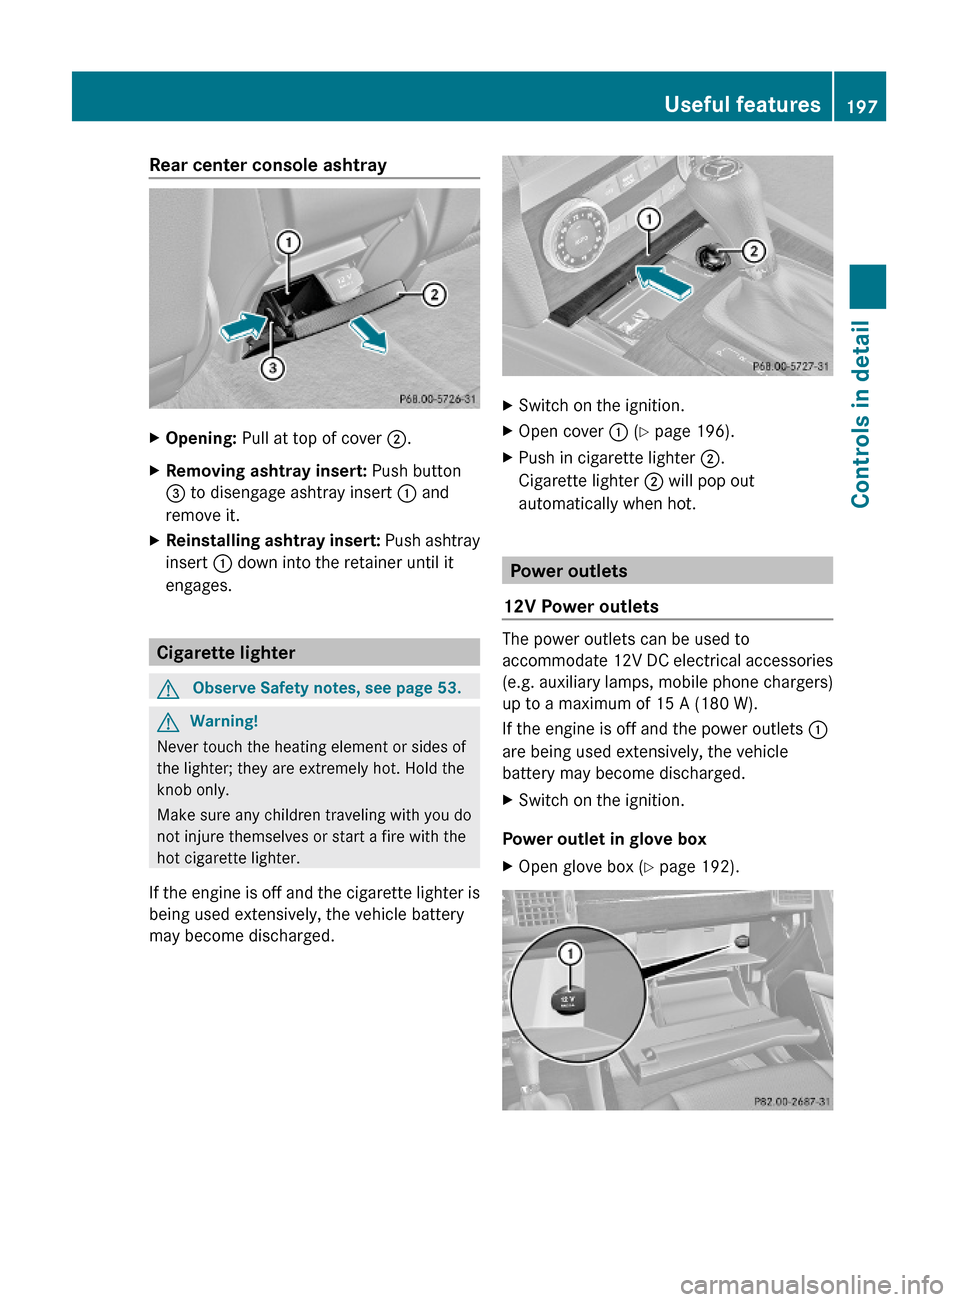
Rear center console ashtray XOpening: Pull at top of cover ;.XRemoving ashtray insert: Push button
= to disengage ashtray insert : and
remove it.
XReinstalling ashtray insert: Push ashtray
insert : down into the retainer until it
engages.
Cigarette lighter
GObserve Safety notes, see page 53.GWarning!
Never touch the heating element or sides of
the lighter; they are extremely hot. Hold the
knob only.
Make sure any children traveling with you do
not injure themselves or start a fire with the
hot cigarette lighter.
If the engine is off and the cigarette lighter is
being used extensively, the vehicle battery
may become discharged.
XSwitch on the ignition.XOpen cover : (Y page 196).XPush in cigarette lighter ;.
Cigarette lighter ; will pop out
automatically when hot.
Power outlets
12V Power outlets
The power outlets can be used to
accommodate 12V DC electrical accessories
(e.g. auxiliary lamps, mobile phone chargers)
up to a maximum of 15 A (180 W).
If the engine is off and the power outlets :
are being used extensively, the vehicle
battery may become discharged.
XSwitch on the ignition.
Power outlet in glove box
XOpen glove box (Y page 192).Useful features197Controls in detailX204_AKB; 3; 23, en-USd2ureepe,Version: 2.11.8.12009-07-16T19:16:58+02:00 - Seite 197Z
Page 200 of 344
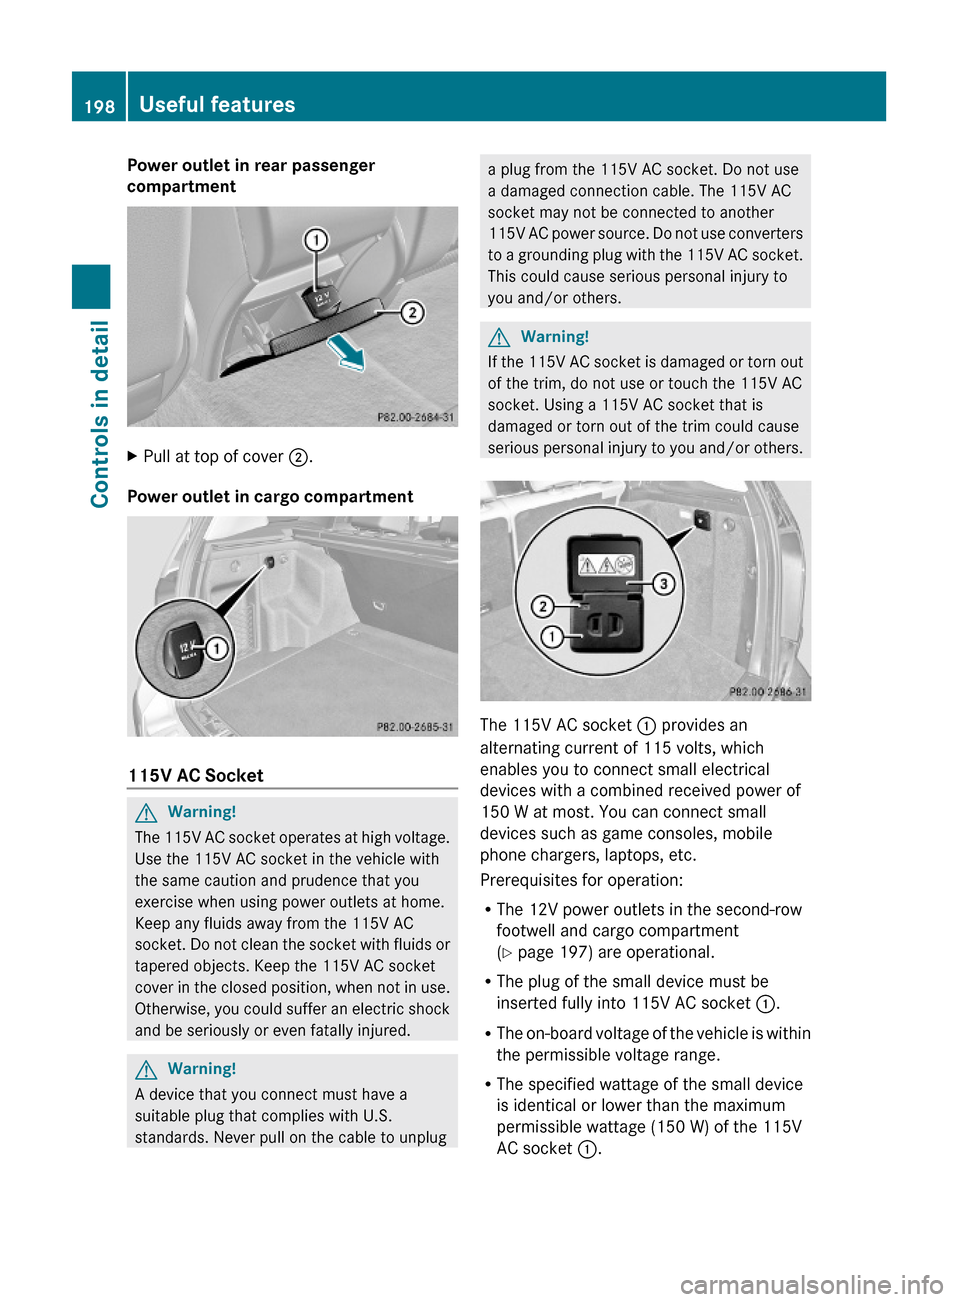
Power outlet in rear passenger
compartment
XPull at top of cover ;.
Power outlet in cargo compartment
115V AC Socket
GWarning!
The 115V AC socket operates at high voltage.
Use the 115V AC socket in the vehicle with
the same caution and prudence that you
exercise when using power outlets at home.
Keep any fluids away from the 115V AC
socket. Do not clean the socket with fluids or
tapered objects. Keep the 115V AC socket
cover in the closed position, when not in use.
Otherwise, you could suffer an electric shock
and be seriously or even fatally injured.
GWarning!
A device that you connect must have a
suitable plug that complies with U.S.
standards. Never pull on the cable to unplug
a plug from the 115V AC socket. Do not use
a damaged connection cable. The 115V AC
socket may not be connected to another
115V AC power source. Do not use converters
to a grounding plug with the 115V AC socket.
This could cause serious personal injury to
you and/or others.
GWarning!
If the 115V AC socket is damaged or torn out
of the trim, do not use or touch the 115V AC
socket. Using a 115V AC socket that is
damaged or torn out of the trim could cause
serious personal injury to you and/or others.
The 115V AC socket : provides an
alternating current of 115 volts, which
enables you to connect small electrical
devices with a combined received power of
150 W at most. You can connect small
devices such as game consoles, mobile
phone chargers, laptops, etc.
Prerequisites for operation:
RThe 12V power outlets in the second-row
footwell and cargo compartment
(Y page 197) are operational.
RThe plug of the small device must be
inserted fully into 115V AC socket :.
RThe on-board voltage of the vehicle is within
the permissible voltage range.
RThe specified wattage of the small device
is identical or lower than the maximum
permissible wattage (150 W) of the 115V
AC socket :.
198Useful featuresControls in detail
X204_AKB; 3; 23, en-USd2ureepe,Version: 2.11.8.12009-07-16T19:16:58+02:00 - Seite 198
Page 202 of 344
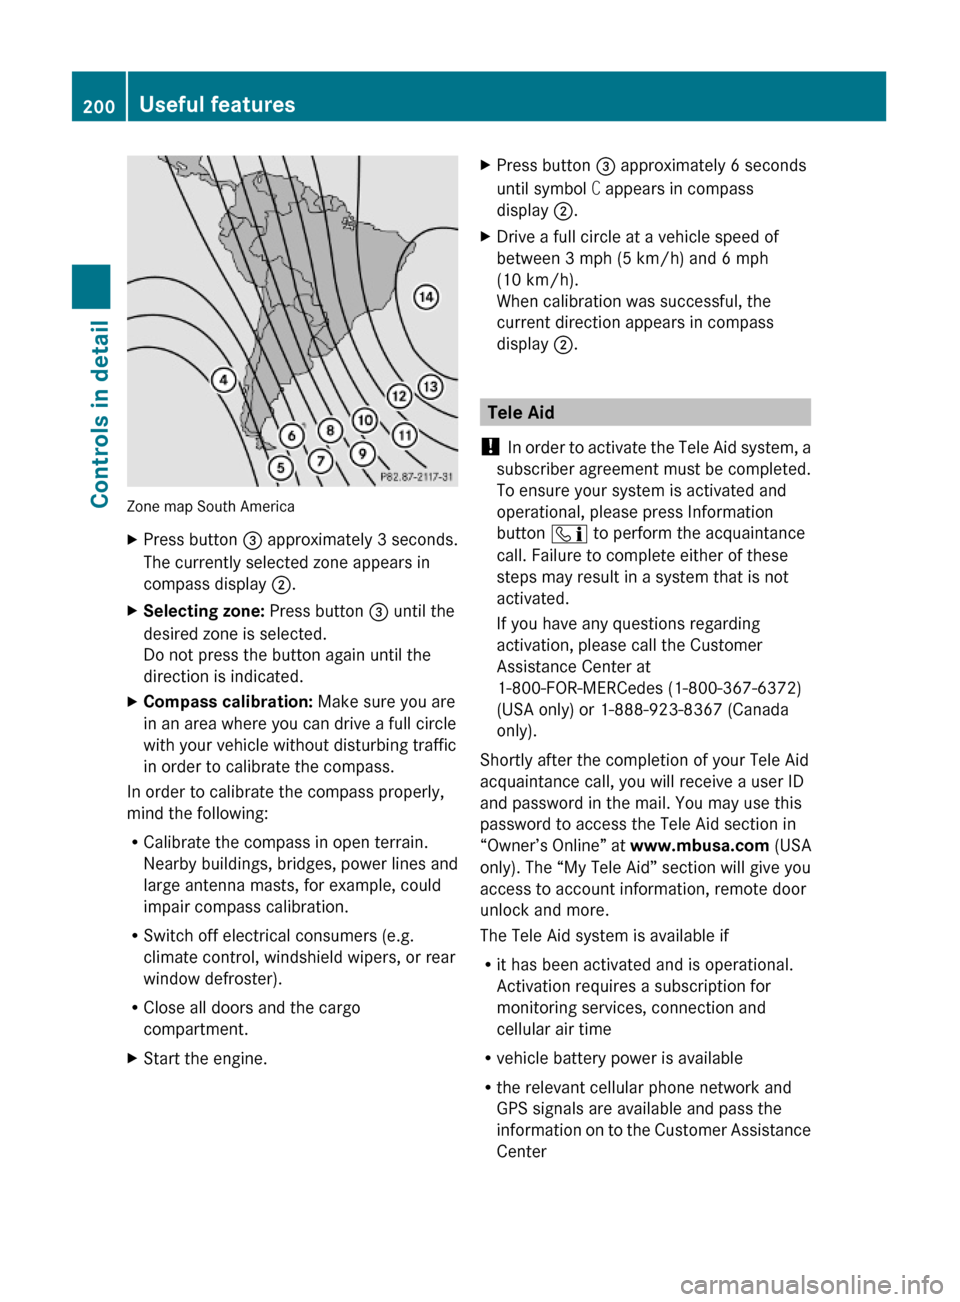
Zone map South America
XPress button = approximately 3 seconds.
The currently selected zone appears in
compass display ;.
XSelecting zone: Press button = until the
desired zone is selected.
Do not press the button again until the
direction is indicated.
XCompass calibration: Make sure you are
in an area where you can drive a full circle
with your vehicle without disturbing traffic
in order to calibrate the compass.
In order to calibrate the compass properly,
mind the following:
RCalibrate the compass in open terrain.
Nearby buildings, bridges, power lines and
large antenna masts, for example, could
impair compass calibration.
RSwitch off electrical consumers (e.g.
climate control, windshield wipers, or rear
window defroster).
RClose all doors and the cargo
compartment.
XStart the engine.XPress button = approximately 6 seconds
until symbol C appears in compass
display ;.
XDrive a full circle at a vehicle speed of
between 3 mph (5 km/h) and 6 mph
(10 km/h).
When calibration was successful, the
current direction appears in compass
display ;.
Tele Aid
! In order to activate the Tele Aid system, a
subscriber agreement must be completed.
To ensure your system is activated and
operational, please press Information
button ï to perform the acquaintance
call. Failure to complete either of these
steps may result in a system that is not
activated.
If you have any questions regarding
activation, please call the Customer
Assistance Center at
1-800-FOR-MERCedes (1-800-367-6372)
(USA only) or 1-888-923-8367 (Canada
only).
Shortly after the completion of your Tele Aid
acquaintance call, you will receive a user ID
and password in the mail. You may use this
password to access the Tele Aid section in
“Owner’s Online” at www.mbusa.com (USA
only). The “My Tele Aid” section will give you
access to account information, remote door
unlock and more.
The Tele Aid system is available if
Rit has been activated and is operational.
Activation requires a subscription for
monitoring services, connection and
cellular air time
Rvehicle battery power is available
Rthe relevant cellular phone network and
GPS signals are available and pass the
information on to the Customer Assistance
Center
200Useful featuresControls in detail
X204_AKB; 3; 23, en-USd2ureepe,Version: 2.11.8.12009-07-16T19:16:58+02:00 - Seite 200
Page 204 of 344
Once the emergency call is in progress, the
indicator lamp in the SOS button will begin to
flash. The message Connecting Call
appears in the multifunction display and the
COMAND system is muted. When the
connection is established, the message
Call Connected appears in the
multifunction display.
All information relevant to the emergency,
such as the location of the vehicle
(determined by the GPS satellite location
system), vehicle model, identification number
and color are generated.
A voice connection between the Customer
Assistance Center and the occupants of the
vehicle will be established automatically soon
after the emergency call has been initiated.
The Customer Assistance Center will attempt
to determine the nature of the emergency
more precisely, provided they can speak to
an occupant of the vehicle.
iIf no vehicle occupant responds, an
ambulance will be sent to the vehicle
immediately.
GWarning!
If the indicator lamp in the SOS button is
flashing continuously and there was no voice
connection to the Customer Assistance
Center established, then the Tele Aid system
could not initiate an emergency call (e.g. the
relevant cellular phone network is not
available).
The message Call Failed appears in the
multifunction display for approximately
10 seconds.
Should this occur, assistance must be
summoned by other means.
iThe “911” emergency call system is a
public service. Using it without due cause
is a criminal offense.
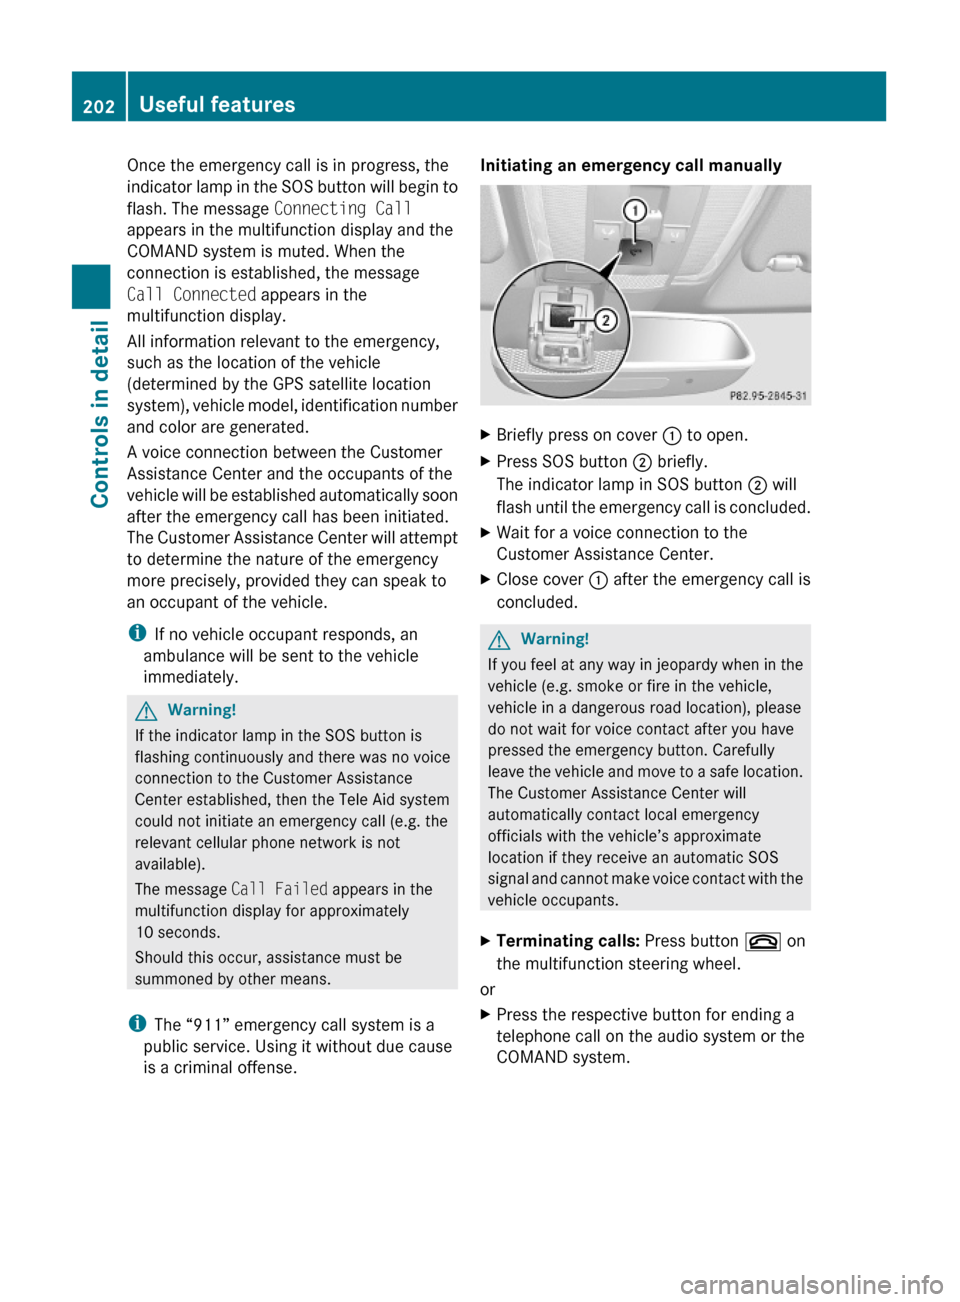
Initiating an emergency call manually XBriefly press on cover : to open.XPress SOS button ; briefly.
The indicator lamp in SOS button ; will
flash until the emergency call is concluded.
XWait for a voice connection to the
Customer Assistance Center.
XClose cover : after the emergency call is
concluded.
GWarning!
If you feel at any way in jeopardy when in the
vehicle (e.g. smoke or fire in the vehicle,
vehicle in a dangerous road location), please
do not wait for voice contact after you have
pressed the emergency button. Carefully
leave the vehicle and move to a safe location.
The Customer Assistance Center will
automatically contact local emergency
officials with the vehicle’s approximate
location if they receive an automatic SOS
signal and cannot make voice contact with the
vehicle occupants.
XTerminating calls: Press button ~ on
the multifunction steering wheel.
or
XPress the respective button for ending a
telephone call on the audio system or the
COMAND system.
202Useful featuresControls in detail
X204_AKB; 3; 23, en-USd2ureepe,Version: 2.11.8.12009-07-16T19:16:58+02:00 - Seite 202