2010 MERCEDES-BENZ GLK350 4MATIC low beam
[x] Cancel search: low beamPage 91 of 344
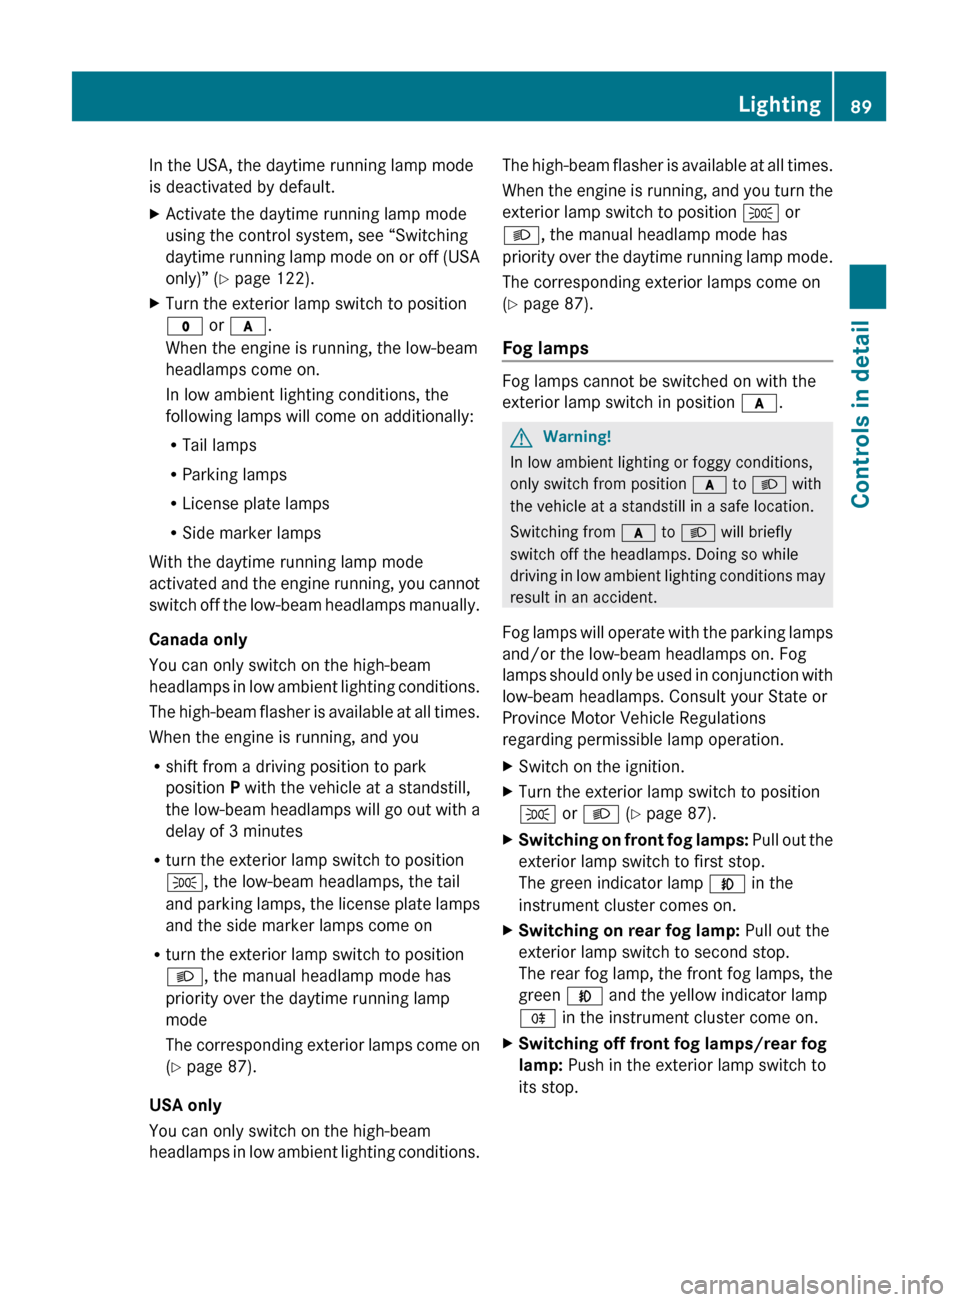
In the USA, the daytime running lamp mode
is deactivated by default.XActivate the daytime running lamp mode
using the control system, see “Switching
daytime running lamp mode on or off (USA
only)” ( Y page 122).XTurn the exterior lamp switch to position
$ or c .
When the engine is running, the low-beam
headlamps come on.
In low ambient lighting conditions, the
following lamps will come on additionally:
R Tail lamps
R Parking lamps
R License plate lamps
R Side marker lamps
With the daytime running lamp mode
activated and the engine running, you cannot
switch off the low-beam headlamps manually.
Canada only
You can only switch on the high-beam
headlamps in low ambient lighting conditions.
The high-beam flasher is available at all times.
When the engine is running, and you
R shift from a driving position to park
position P with the vehicle at a standstill,
the low-beam headlamps will go out with a
delay of 3 minutes
R turn the exterior lamp switch to position
T , the low-beam headlamps, the tail
and parking lamps, the license plate lamps
and the side marker lamps come on
R turn the exterior lamp switch to position
L , the manual headlamp mode has
priority over the daytime running lamp
mode
The corresponding exterior lamps come on
( Y page 87).
USA only
You can only switch on the high-beam
headlamps in low ambient lighting conditions.
The high-beam flasher is available at all times.
When the engine is running, and you turn the
exterior lamp switch to position T or
L , the manual headlamp mode has
priority over the daytime running lamp mode.
The corresponding exterior lamps come on
( Y page 87).
Fog lamps
Fog lamps cannot be switched on with the
exterior lamp switch in position c.
GWarning!
In low ambient lighting or foggy conditions,
only switch from position c to L with
the vehicle at a standstill in a safe location.
Switching from c to L will briefly
switch off the headlamps. Doing so while
driving in low ambient lighting conditions may
result in an accident.
Fog lamps will operate with the parking lamps
and/or the low-beam headlamps on. Fog
lamps should only be used in conjunction with
low-beam headlamps. Consult your State or
Province Motor Vehicle Regulations
regarding permissible lamp operation.
XSwitch on the ignition.XTurn the exterior lamp switch to position
T or L (Y page 87).XSwitching on front fog lamps: Pull out the
exterior lamp switch to first stop.
The green indicator lamp N in the
instrument cluster comes on.XSwitching on rear fog lamp: Pull out the
exterior lamp switch to second stop.
The rear fog lamp, the front fog lamps, the
green N and the yellow indicator lamp
R in the instrument cluster come on.XSwitching off front fog lamps/rear fog
lamp: Push in the exterior lamp switch to
its stop.Lighting89Controls in detailX204_AKB; 3; 23, en-USd2ureepe,Version: 2.11.8.12009-07-16T19:16:58+02:00 - Seite 89Z
Page 124 of 344
XPress button a.
The current date appears in the
multifunction display.
XTo set a new date press button a again.XPress button = or ; to select the
setting you wish to change: month, day or
year.
XPress button : or 9 to change the
setting which is highlighted.
XPress button a to store the entry.
Lights submenu
Access the Lights submenu via the
Settings menu. Use the Lights submenu to
change the lamp and lighting settings on your
vehicle.
The following functions are available:
RSwitching daytime running lamp mode on
or off (USA only) (Y page 122)
RSwitching locator lighting function on or off
(Y page 122)
RSwitching interior lighting delayed shut-off
on or off (Y page 123)
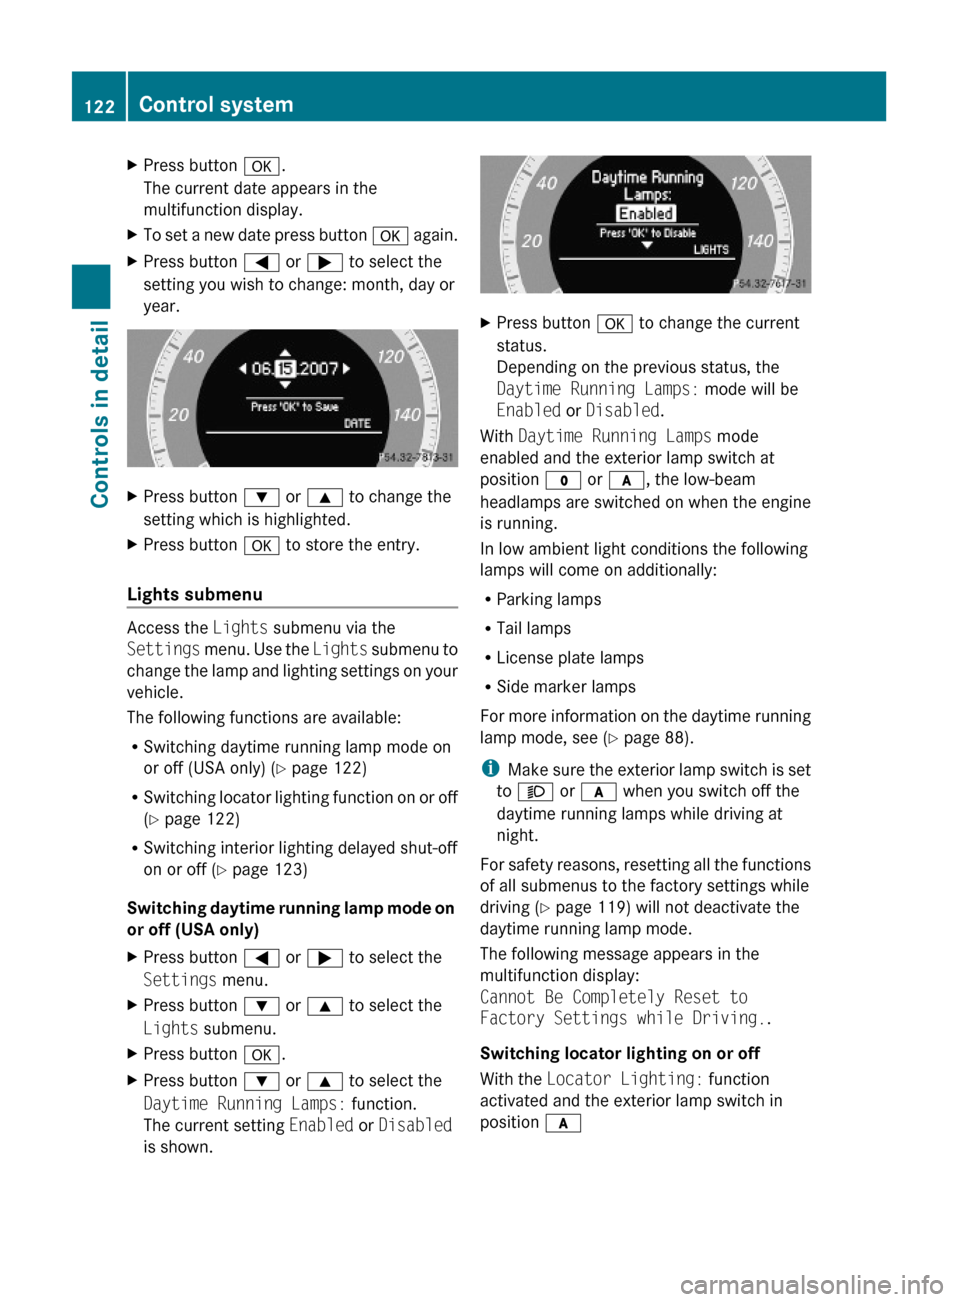
Switching daytime running lamp mode on
or off (USA only)
XPress button = or ; to select the
Settings menu.
XPress button : or 9 to select the
Lights submenu.
XPress button a.XPress button : or 9 to select the
Daytime Running Lamps: function.
The current setting Enabled or Disabled
is shown.
XPress button a to change the current
status.
Depending on the previous status, the
Daytime Running Lamps: mode will be
Enabled or Disabled.
With Daytime Running Lamps mode
enabled and the exterior lamp switch at
position $ or c, the low-beam
headlamps are switched on when the engine
is running.
In low ambient light conditions the following
lamps will come on additionally:
RParking lamps
RTail lamps
RLicense plate lamps
RSide marker lamps
For more information on the daytime running
lamp mode, see (Y page 88).
iMake sure the exterior lamp switch is set
to M or c when you switch off the
daytime running lamps while driving at
night.
For safety reasons, resetting all the functions
of all submenus to the factory settings while
driving (Y page 119) will not deactivate the
daytime running lamp mode.
The following message appears in the
multifunction display:
Cannot Be Completely Reset to
Factory Settings while Driving..
Switching locator lighting on or off
With the Locator Lighting: function
activated and the exterior lamp switch in
position c
122Control systemControls in detail
X204_AKB; 3; 23, en-USd2ureepe,Version: 2.11.8.12009-07-16T19:16:58+02:00 - Seite 122
Page 287 of 344
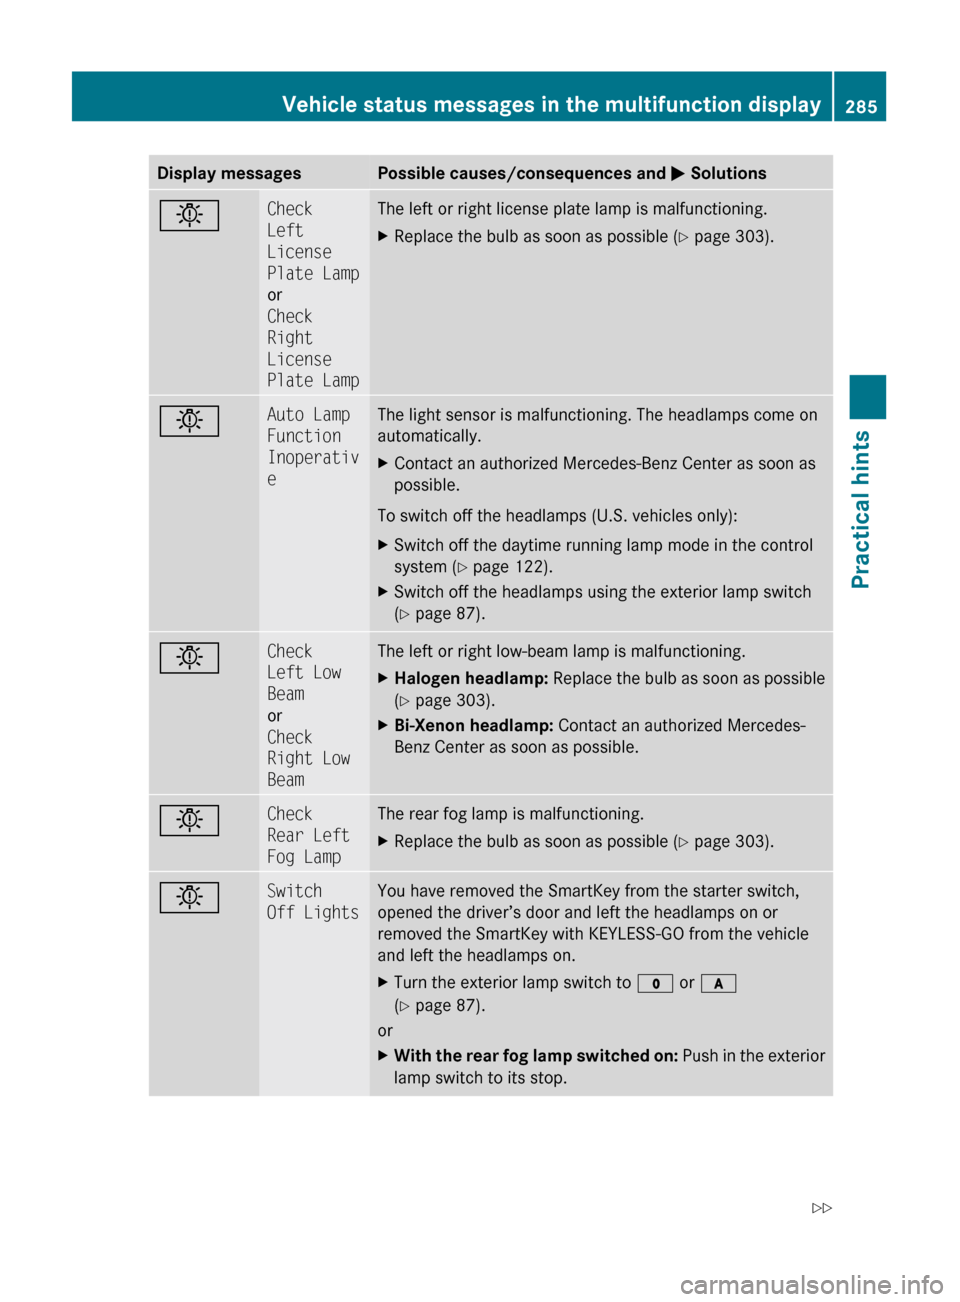
Display messagesPossible causes/consequences and M SolutionsbCheck
Left
License
Plate Lamp
or
Check
Right
License
Plate LampThe left or right license plate lamp is malfunctioning.XReplace the bulb as soon as possible ( Y page 303).bAuto Lamp
Function
Inoperativ
eThe light sensor is malfunctioning. The headlamps come on
automatically.XContact an authorized Mercedes-Benz Center as soon as
possible.
To switch off the headlamps (U.S. vehicles only):
XSwitch off the daytime running lamp mode in the control
system ( Y page 122).XSwitch off the headlamps using the exterior lamp switch
( Y page 87).bCheck
Left Low
Beam
or
Check
Right Low
BeamThe left or right low-beam lamp is malfunctioning.XHalogen headlamp: Replace the bulb as soon as possible
( Y page 303).XBi-Xenon headlamp: Contact an authorized Mercedes-
Benz Center as soon as possible.bCheck
Rear Left
Fog LampThe rear fog lamp is malfunctioning.XReplace the bulb as soon as possible ( Y page 303).bSwitch
Off LightsYou have removed the SmartKey from the starter switch,
opened the driver’s door and left the headlamps on or
removed the SmartKey with KEYLESS-GO from the vehicle
and left the headlamps on.XTurn the exterior lamp switch to $ or c
( Y page 87).
or
XWith the rear fog lamp switched on: Push in the exterior
lamp switch to its stop.Vehicle status messages in the multifunction display285Practical hintsX204_AKB; 3; 23, en-USd2ureepe,Version: 2.11.8.12009-07-16T19:16:58+02:00 - Seite 285Z
Page 290 of 344
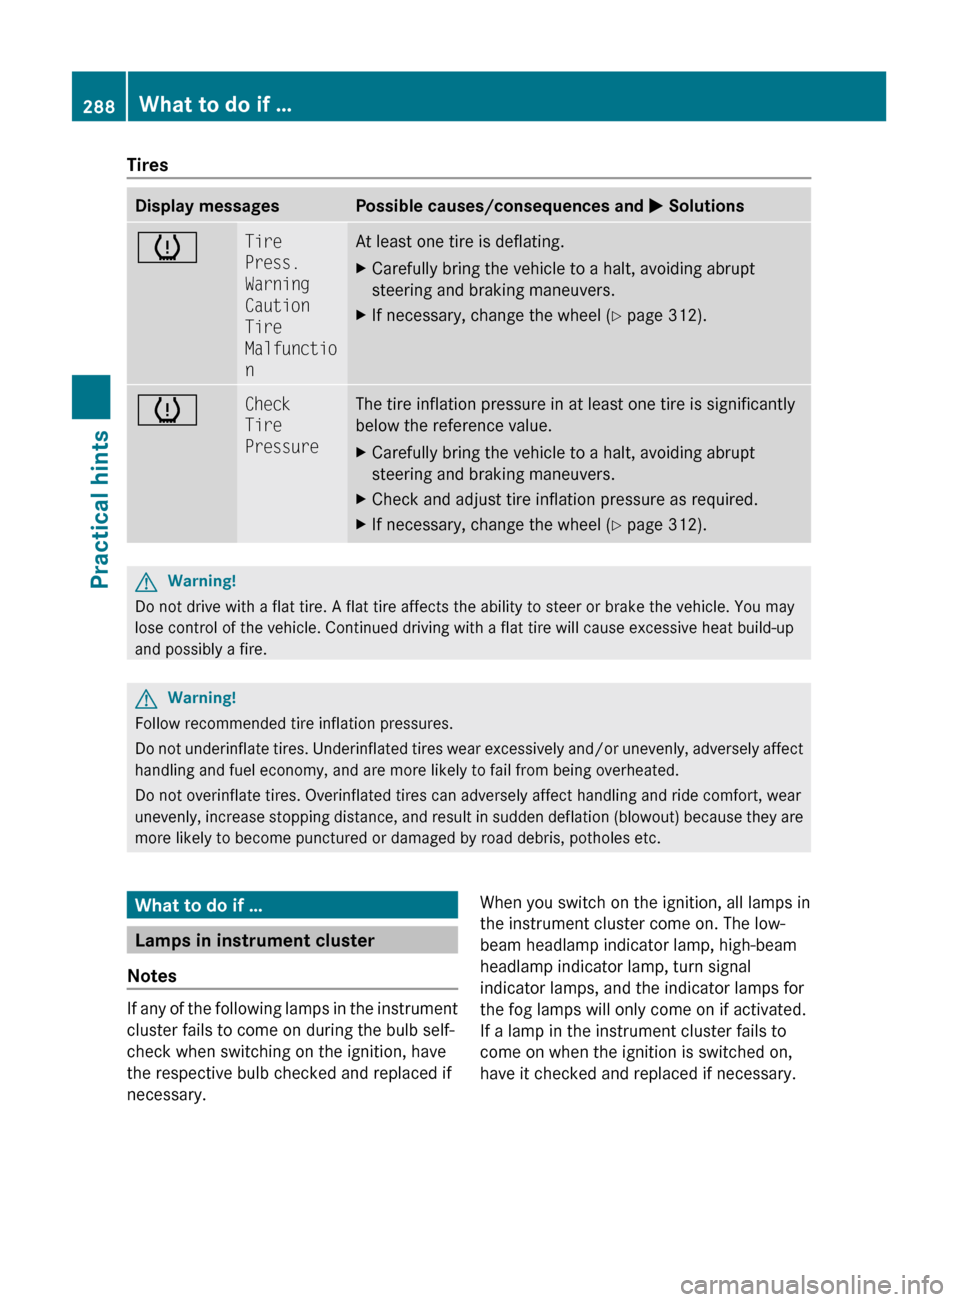
TiresDisplay messagesPossible causes/consequences and M SolutionshTire
Press.
Warning
Caution
Tire
Malfunctio
nAt least one tire is deflating.XCarefully bring the vehicle to a halt, avoiding abrupt
steering and braking maneuvers.XIf necessary, change the wheel ( Y page 312).hCheck
Tire
PressureThe tire inflation pressure in at least one tire is significantly
below the reference value.XCarefully bring the vehicle to a halt, avoiding abrupt
steering and braking maneuvers.XCheck and adjust tire inflation pressure as required.XIf necessary, change the wheel ( Y page 312).GWarning!
Do not drive with a flat tire. A flat tire affects the ability to steer or brake the vehicle. You may
lose control of the vehicle. Continued driving with a flat tire will cause excessive heat build-up
and possibly a fire.
GWarning!
Follow recommended tire inflation pressures.
Do not underinflate tires. Underinflated tires wear excessively and/or unevenly, adversely affect
handling and fuel economy, and are more likely to fail from being overheated.
Do not overinflate tires. Overinflated tires can adversely affect handling and ride comfort, wear
unevenly, increase stopping distance, and result in sudden deflation (blowout) because they are
more likely to become punctured or damaged by road debris, potholes etc.
What to do if …
Lamps in instrument cluster
Notes
If any of the following lamps in the instrument
cluster fails to come on during the bulb self-
check when switching on the ignition, have
the respective bulb checked and replaced if
necessary.
When you switch on the ignition, all lamps in
the instrument cluster come on. The low-
beam headlamp indicator lamp, high-beam
headlamp indicator lamp, turn signal
indicator lamps, and the indicator lamps for
the fog lamps will only come on if activated.
If a lamp in the instrument cluster fails to
come on when the ignition is switched on,
have it checked and replaced if necessary.288What to do if …Practical hints
X204_AKB; 3; 23, en-USd2ureepe,Version: 2.11.8.12009-07-16T19:16:58+02:00 - Seite 288
Page 306 of 344
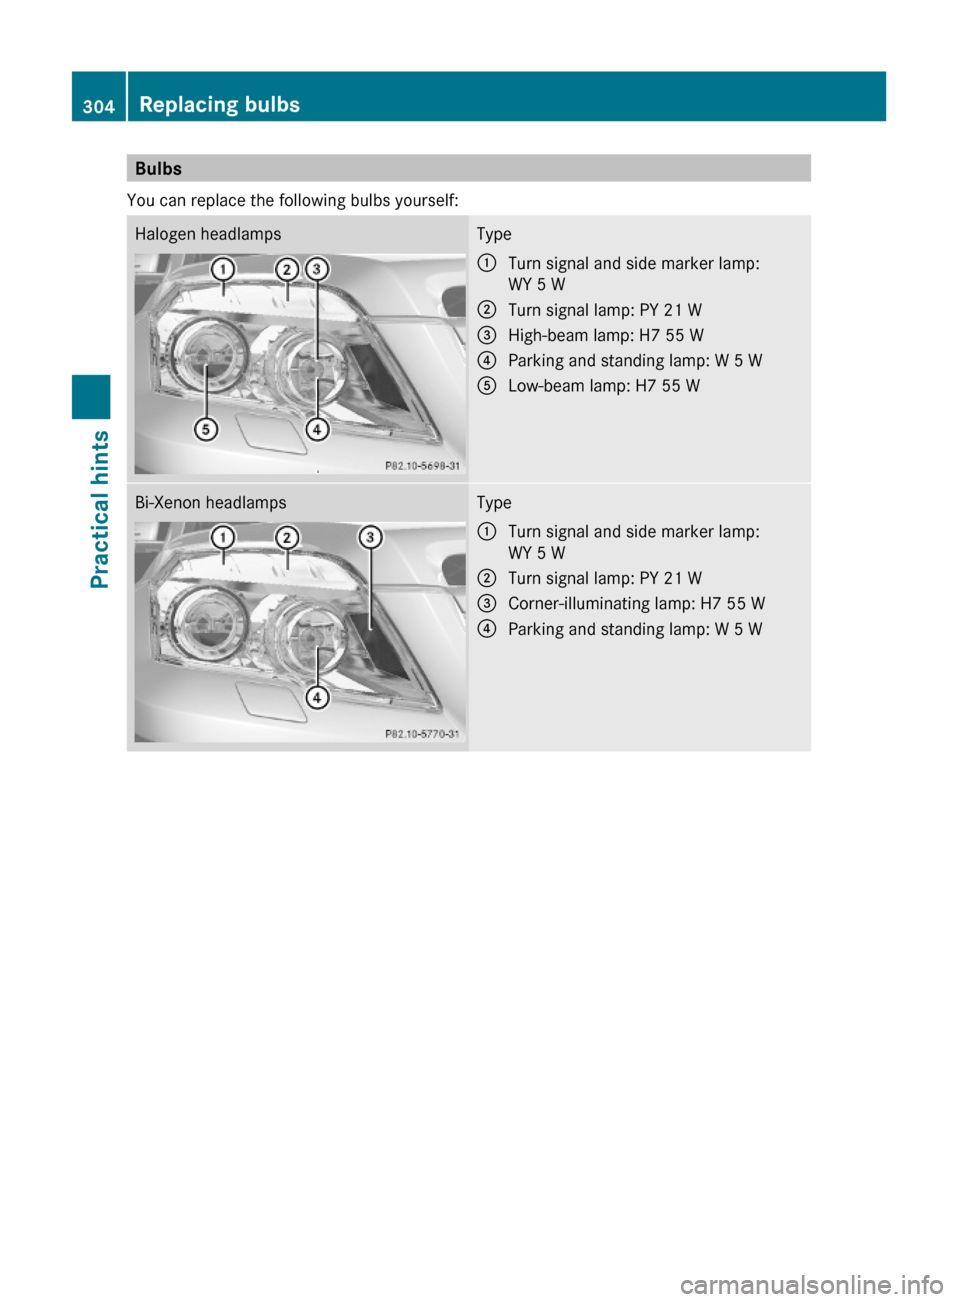
Bulbs
You can replace the following bulbs yourself:
Halogen headlampsType:Turn signal and side marker lamp:
WY 5 W
;Turn signal lamp: PY 21 W=High-beam lamp: H7 55 W?Parking and standing lamp: W 5 WALow-beam lamp: H7 55 WBi-Xenon headlampsType:Turn signal and side marker lamp:
WY 5 W
;Turn signal lamp: PY 21 W=Corner-illuminating lamp: H7 55 W?Parking and standing lamp: W 5 W304Replacing bulbsPractical hints
X204_AKB; 3; 23, en-USd2ureepe,Version: 2.11.8.12009-07-16T19:16:58+02:00 - Seite 304
Page 308 of 344
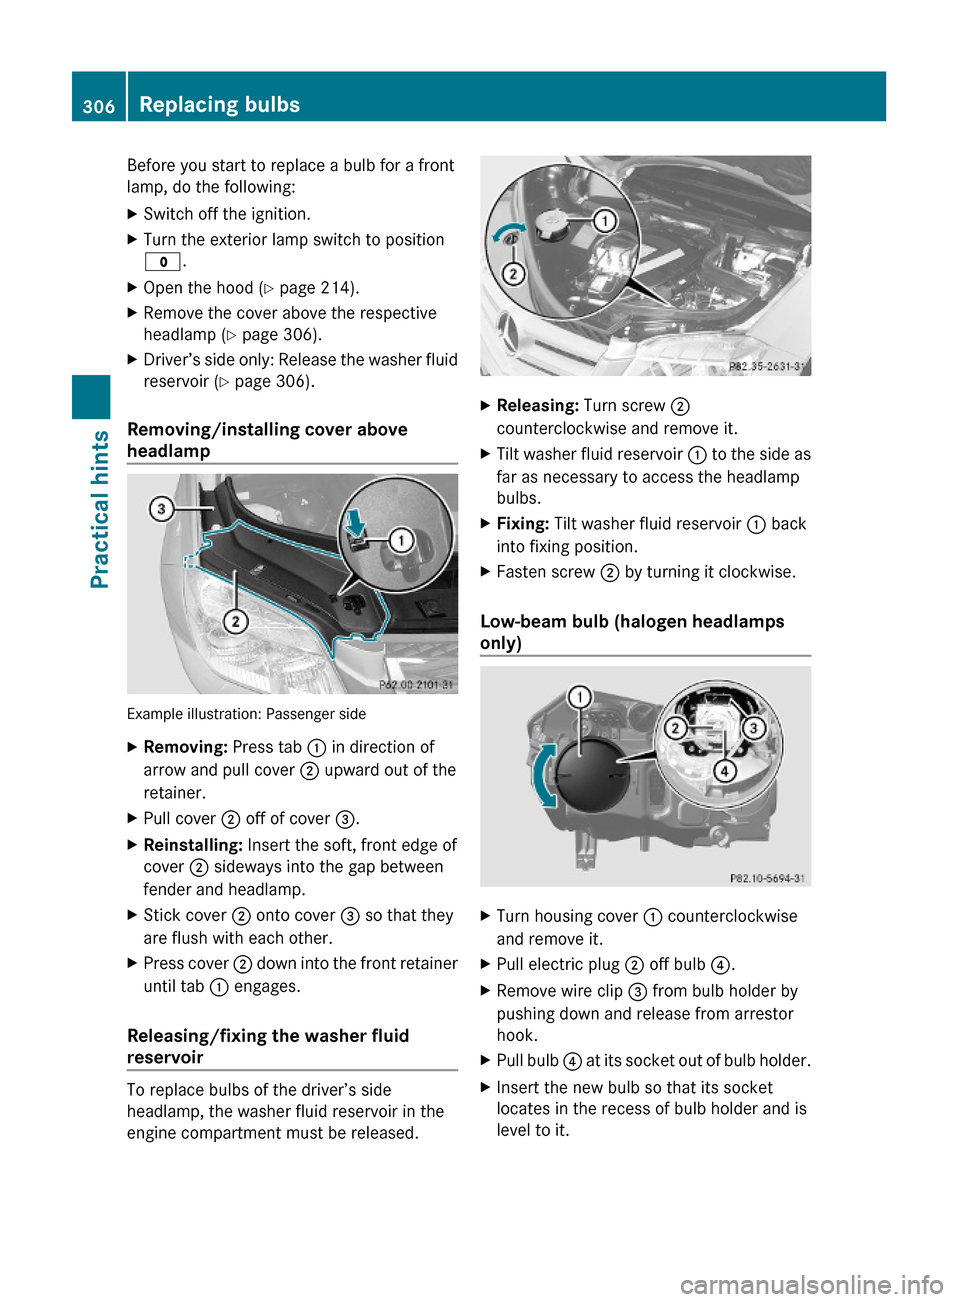
Before you start to replace a bulb for a front
lamp, do the following:
XSwitch off the ignition.XTurn the exterior lamp switch to position
$.
XOpen the hood (Y page 214).XRemove the cover above the respective
headlamp (Y page 306).
XDriver’s side only: Release the washer fluid
reservoir (Y page 306).
Removing/installing cover above
headlamp
Example illustration: Passenger side
XRemoving: Press tab : in direction of
arrow and pull cover ; upward out of the
retainer.
XPull cover ; off of cover =.XReinstalling: Insert the soft, front edge of
cover ; sideways into the gap between
fender and headlamp.
XStick cover ; onto cover = so that they
are flush with each other.
XPress cover ; down into the front retainer
until tab : engages.
Releasing/fixing the washer fluid
reservoir
To replace bulbs of the driver’s side
headlamp, the washer fluid reservoir in the
engine compartment must be released.
XReleasing: Turn screw ;
counterclockwise and remove it.
XTilt washer fluid reservoir : to the side as
far as necessary to access the headlamp
bulbs.
XFixing: Tilt washer fluid reservoir : back
into fixing position.
XFasten screw ; by turning it clockwise.
Low-beam bulb (halogen headlamps
only)
XTurn housing cover : counterclockwise
and remove it.
XPull electric plug ; off bulb ?.XRemove wire clip = from bulb holder by
pushing down and release from arrestor
hook.
XPull bulb ? at its socket out of bulb holder.XInsert the new bulb so that its socket
locates in the recess of bulb holder and is
level to it.
306Replacing bulbsPractical hints
X204_AKB; 3; 23, en-USd2ureepe,Version: 2.11.8.12009-07-16T19:16:58+02:00 - Seite 306