2010 MERCEDES-BENZ GL550 steering
[x] Cancel search: steeringPage 127 of 380

iThe instrument cluster illumination is
dimmed or brightened automatically to suit
ambient light conditions.
The instrument cluster illumination will also
be adjusted automatically when you switch
on the vehicle’s exterior lamps.
iWith the exterior lighting switched on, the
brightness of the switches in the center
console will also be adjusted when using
button : or =.
Resetting trip odometer
XMake sure you are viewing the standard
display (Y page 128) in the multifunction
display.
XPress and hold the reset button in the
instrument cluster (Y page 124) until the
trip odometer is reset.
Tachometer
The red marking on the tachometer
(Y page 29) denotes excessive engine speed.
! Avoid driving at excessive engine speeds,
as it may result in serious engine damage
that is not covered by the Mercedes-Benz
Limited Warranty.
To help protect the engine, the fuel supply is
interrupted if the engine is operated within
the red marking.
Control system
Introduction
The control system is activated as soon as the
starter switch is in position 1 (Y page 80).
The control system enables you to call up
information about your vehicle and to change
vehicle settings.
For example, you can use the control system
to find out when your vehicle is next due for
maintenance service, to set the language for
messages in the instrument cluster display,
and much more.
GWarning!
A driver’s attention to the road and traffic
conditions must always be his/her primary
focus when driving.
For your safety and the safety of others,
selecting features through the multifunction
steering wheel should only be done by the
driver when traffic and road conditions permit
it to be done safely.
Bear in mind that at a speed of just 30 mph
(approximately 50 km/h), your vehicle is
covering a distance of 44 feet (approximately
14 m) every second.
The control system relays information to the
multifunction display.
Multifunction steering wheel
The displays in the multifunction display and
the settings in the control system are
controlled by using the buttons on the
multifunction steering wheel.
Control system125Controls in detailX164_AKB; 5; 31, en-USd2ureepe,Version: 2.11.8.12009-09-11T12:30:16+02:00 - Seite 125Z
Page 128 of 380
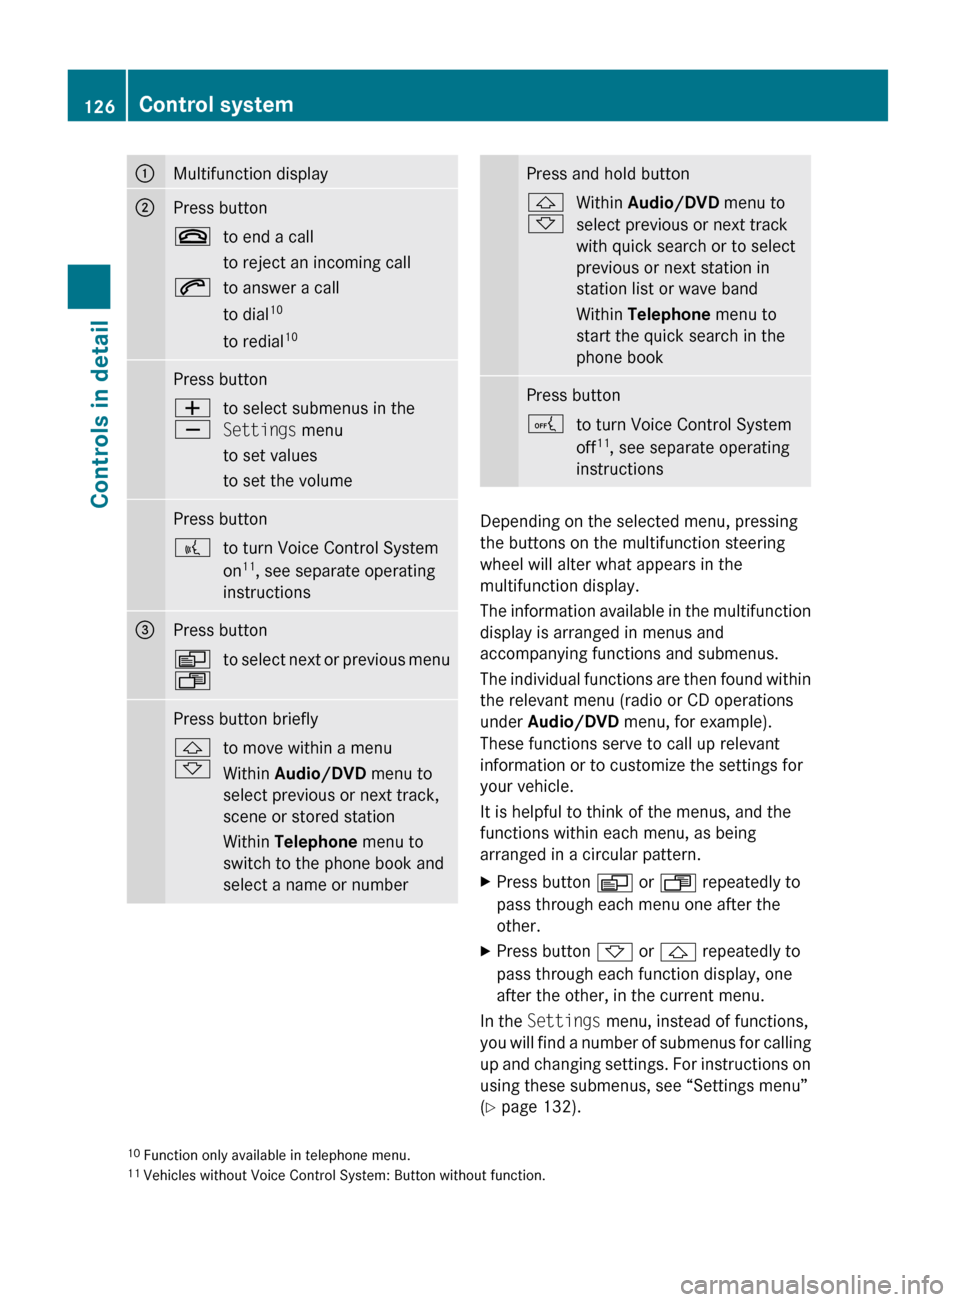
:Multifunction display;Press button~to end a call
to reject an incoming call6to answer a call
to dial 10
to redial 10Press buttonW
Xto select submenus in the
Settings menu
to set values
to set the volumePress button?to turn Voice Control System
on 11
, see separate operating
instructions=Press buttonV
Uto select next or previous menuPress button briefly&
*to move within a menu
Within Audio/DVD menu to
select previous or next track,
scene or stored station
Within Telephone menu to
switch to the phone book and
select a name or numberPress and hold button&
*Within Audio/DVD menu to
select previous or next track
with quick search or to select
previous or next station in
station list or wave band
Within Telephone menu to
start the quick search in the
phone bookPress buttonAto turn Voice Control System
off 11
, see separate operating
instructions
Depending on the selected menu, pressing
the buttons on the multifunction steering
wheel will alter what appears in the
multifunction display.
The information available in the multifunction
display is arranged in menus and
accompanying functions and submenus.
The individual functions are then found within
the relevant menu (radio or CD operations
under Audio/DVD menu, for example).
These functions serve to call up relevant
information or to customize the settings for
your vehicle.
It is helpful to think of the menus, and the
functions within each menu, as being
arranged in a circular pattern.
XPress button V or U repeatedly to
pass through each menu one after the
other.XPress button * or & repeatedly to
pass through each function display, one
after the other, in the current menu.
In the Settings menu, instead of functions,
you will find a number of submenus for calling
up and changing settings. For instructions on
using these submenus, see “Settings menu”
( Y page 132).
10
Function only available in telephone menu.
11 Vehicles without Voice Control System: Button without function.126Control systemControls in detail
X164_AKB; 5; 31, en-USd2ureepe,Version: 2.11.8.12009-09-11T12:30:16+02:00 - Seite 126
Page 141 of 380
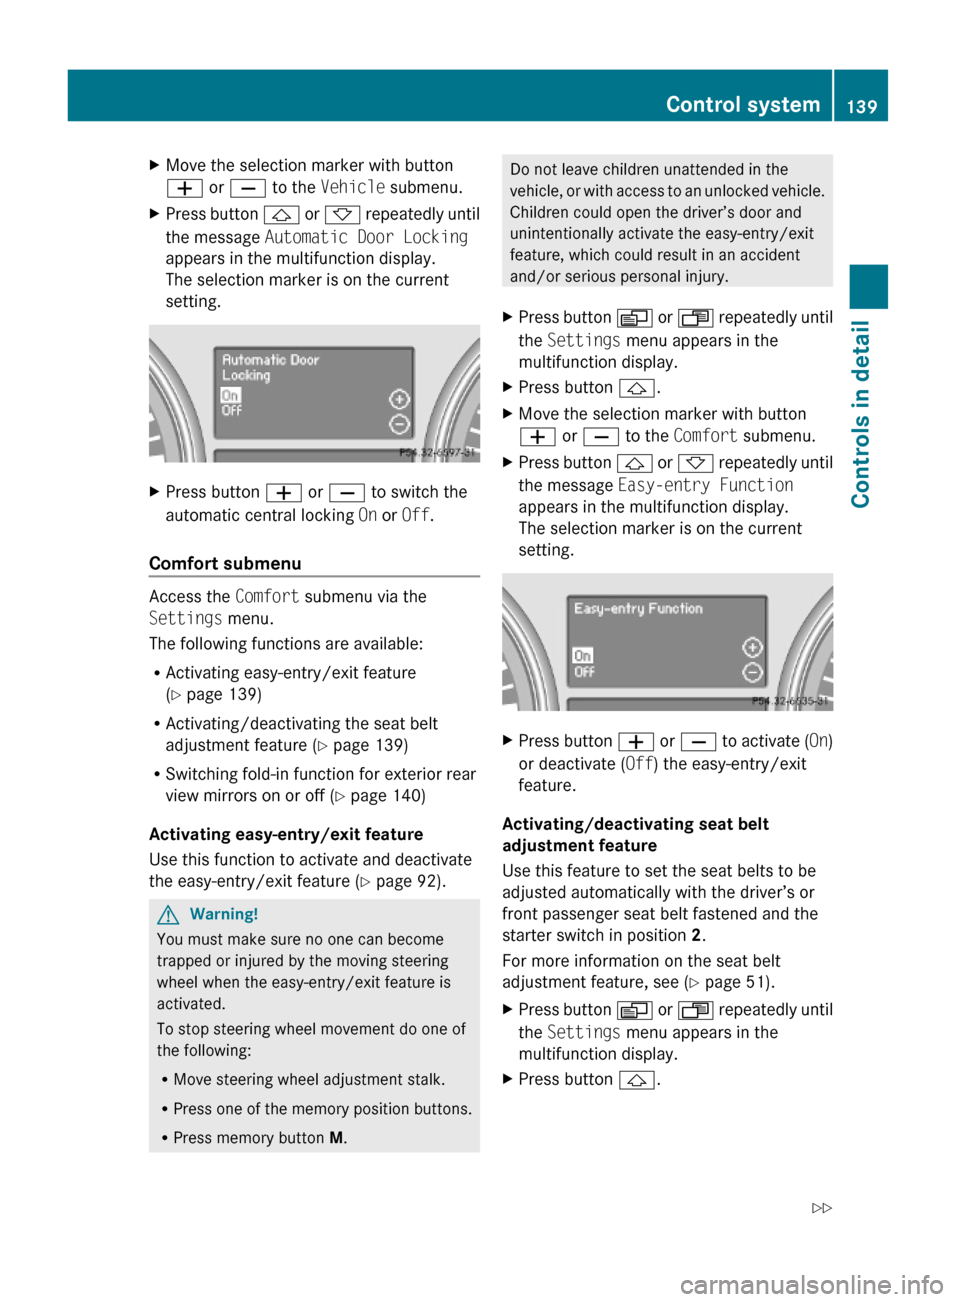
XMove the selection marker with button
W or X to the Vehicle submenu.
XPress button & or * repeatedly until
the message Automatic Door Locking
appears in the multifunction display.
The selection marker is on the current
setting.
XPress button W or X to switch the
automatic central locking On or Off.
Comfort submenu
Access the Comfort submenu via the
Settings menu.
The following functions are available:
RActivating easy-entry/exit feature
(Y page 139)
RActivating/deactivating the seat belt
adjustment feature (Y page 139)
RSwitching fold-in function for exterior rear
view mirrors on or off (Y page 140)
Activating easy-entry/exit feature
Use this function to activate and deactivate
the easy-entry/exit feature (Y page 92).
GWarning!
You must make sure no one can become
trapped or injured by the moving steering
wheel when the easy-entry/exit feature is
activated.
To stop steering wheel movement do one of
the following:
RMove steering wheel adjustment stalk.
RPress one of the memory position buttons.
RPress memory button M.
Do not leave children unattended in the
vehicle, or with access to an unlocked vehicle.
Children could open the driver’s door and
unintentionally activate the easy-entry/exit
feature, which could result in an accident
and/or serious personal injury.
XPress button V or U repeatedly until
the Settings menu appears in the
multifunction display.
XPress button &.XMove the selection marker with button
W or X to the Comfort submenu.
XPress button & or * repeatedly until
the message Easy-entry Function
appears in the multifunction display.
The selection marker is on the current
setting.
XPress button W or X to activate (On)
or deactivate (Off) the easy-entry/exit
feature.
Activating/deactivating seat belt
adjustment feature
Use this feature to set the seat belts to be
adjusted automatically with the driver’s or
front passenger seat belt fastened and the
starter switch in position 2.
For more information on the seat belt
adjustment feature, see (Y page 51).
XPress button V or U repeatedly until
the Settings menu appears in the
multifunction display.
XPress button &.Control system139Controls in detailX164_AKB; 5; 31, en-USd2ureepe,Version: 2.11.8.12009-09-11T12:30:16+02:00 - Seite 139Z
Page 150 of 380
GWarning!
The Distronic adaptive cruise control is not a
substitute for active driving involvement. It
does not react to pedestrians or on stationary
objects, nor does it recognize or predict the
lane curvature or the movement of preceding
vehicles.
The Distronic can only apply 20% of the
maximum braking power of the vehicle.
It is the driver’s responsibility at all times to
be attentive to the road, weather and traffic
conditions. Additionally, the driver must
provide the steering, braking and other driving
inputs necessary to remain in control of the
vehicle.
High-frequency sources such as toll stations,
speed measuring systems etc. can cause the
Distronic system to malfunction.
GWarning!
The Distronic cannot take road and traffic
conditions into account. Only use the
Distronic if the road, weather and traffic
conditions make it advisable to travel at a
constant speed.
GWarning!
Use of the Distronic can be dangerous on
slippery roads. Rapid changes in tire traction
can result in wheel spin and loss of control.
The Distronic does not function in adverse
sight and distance conditions. Do not use the
Distronic during conditions of fog, heavy rain,
snow or sleet.
GWarning!
The Distronic cannot take weather conditions
into account. Switch off the Distronic or do
not switch it on if:
R roads are slippery or covered with snow or
ice. The wheels could lose traction while
braking or accelerating, and the vehicle
could skid.
R the Distronic system sensor cover is dirty
or visibility is diminished due to snow, rain
or fog, for example. The distance control
system functionality could be impaired.
Always pay attention to surrounding traffic
conditions even while the Distronic is
switched on. Otherwise, you may not be able
to recognize dangerous situations until it is
too late. This could cause an accident in which
you and/or others could be injured.GWarning!
The “Resume” function should only be
operated if the driver is fully aware of the
previously set speed and wishes to resume
this particular preset speed.
GWarning!
Close attention to road and traffic conditions
is imperative at all times, regardless of
whether or not the Distronic is activated.
Use of the Distronic can be dangerous on
winding roads or in heavy traffic because
conditions do not allow safe driving at a
constant speed.
The Distronic will not react to stationary
objects in the roadway (e.g. a stopped vehicle
in a traffic jam or a disabled vehicle). The
Distronic will also not respond to oncoming
vehicles.
Switch off the Distronic:
R when changing from the left to the right
lane if vehicles are moving more slowly in
the left lane
R when entering a turn lane or highway off
ramp
R in complex driving situations, such as in
highway construction zones
In these situations, the Distronic will continue
to maintain the set speed unless deactivated.
The Distronic is designed and intended only
to maintain a set speed and keep a set
distance from moving objects in front of it.
i USA only:
148Driving systemsControls in detail
X164_AKB; 5; 31, en-USd2ureepe,Version: 2.11.8.12009-09-11T12:30:16+02:00 - Seite 148
Page 156 of 380
The Distronic regulates only the distance
between your vehicle and those directly
ahead of it, but does not register stationary
objects in the road, e.g.:
Ra stopped vehicle in a traffic jam
Ra disabled vehicle
Ran oncoming vehicle
The driver must always be alert, observe all
traffic and intercede as required by means of
steering or braking the vehicle.
GWarning!
The Distronic should not be used in snowy or
icy road conditions.
The most likely cause for a malfunctioning
system is a dirty Distronic system sensor
cover (located in the hood grille), especially
at times of snow and ice or heavy rain.
In such a case, the Distronic will switch off,
and the message DISTRONIC Currently
Unavailable – See Operator’s Manual
appears in the multifunction display.
For cleaning and care of the Distronic system
sensor cover, see (Y page 278).
iIf the message DISTRONIC Available
Again appears during driving, the dirt (e.g.
slush) has dissolved; the Distronic works
again, if you reactivate it (Y page 151).
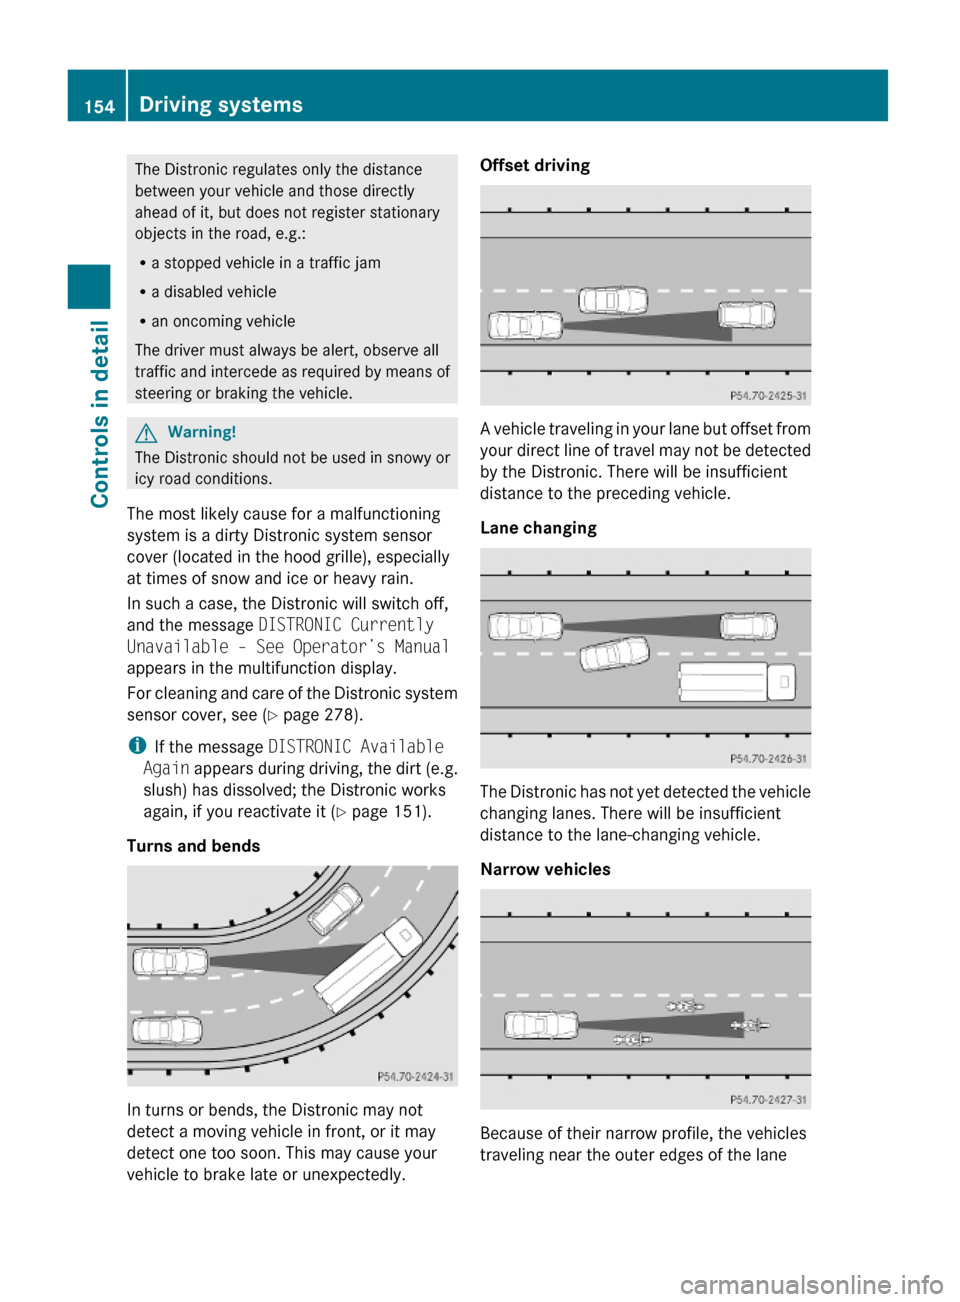
Turns and bends
In turns or bends, the Distronic may not
detect a moving vehicle in front, or it may
detect one too soon. This may cause your
vehicle to brake late or unexpectedly.
Offset driving
A vehicle traveling in your lane but offset from
your direct line of travel may not be detected
by the Distronic. There will be insufficient
distance to the preceding vehicle.
Lane changing
The Distronic has not yet detected the vehicle
changing lanes. There will be insufficient
distance to the lane-changing vehicle.
Narrow vehicles
Because of their narrow profile, the vehicles
traveling near the outer edges of the lane
154Driving systemsControls in detail
X164_AKB; 5; 31, en-USd2ureepe,Version: 2.11.8.12009-09-11T12:30:16+02:00 - Seite 154
Page 163 of 380

Basic settings
The following vehicle chassis ride heights can
be selected using vehicle level control
switch : in the center console:
LevelDriving situationRaised levelFor off-road driving or
driving in rough terrain.
Indicator lamp ; is on.
Highway
level
For driving on paved roads
in fair or better condition.
Indicator lamp ; is off.
iThe third available level is the highspeed
level that is set automatically.
The following is the approximate change in
ride height for each of the level settings:
LevelRide heightRaised level+2.3 in (60 mm)Highway
level13+/-0 in (0 mm)Highspeed
level
-0.6 in (-15 mm)
iVehicles with ADS:
Depending on the ADS setting
(Y page 159), the vehicle will be lowered to
the highspeed level when traveling at
higher speeds. At speeds below 40 mph
(64 km/h) at the latest, it will be returned
to the highway level.
iThe highspeed level is not available when
towing a trailer. For more information on
towing a trailer, see “Trailer towing”
(Y page 269).
Raised level
Only select the raised level if appropriate for
the driving situation encountered. Otherwise
the fuel consumption may increase and/or
the handling characteristics of the vehicle
may be unfavorable.
iYou can select the raised level at speeds
up to 40 mph (64 km/h). At higher speeds,
the message Á Level Selection
Not Permitted appears in the
multifunction display.
XStart the engine.
When indicator lamp ; is off:
XPress vehicle level control switch :.
Indicator lamp ; flashes. The vehicle
adjusts to the raised level.
The following message appears in the
multifunction display while the level is
being set:
iThe message can be cleared by pressing
the V, U, & or * button on
the multifunction steering wheel.
When the raised level is reached, indicator
lamp ; comes on continuously and the
following message appears in the
multifunction display for 5 seconds:
Highway level
! Keep in mind that on rough or uneven
roads, adjusting the vehicle to a lower level
may cause the vehicle underbody to come
in contact with the road and result in
13Ground clearance: 8.5 in (217 mm)Driving systems161Controls in detailX164_AKB; 5; 31, en-USd2ureepe,Version: 2.11.8.12009-09-11T12:30:16+02:00 - Seite 161Z
Page 164 of 380
damage to the vehicle underbody. Always
make sure the vehicle has sufficient ground
clearance before adjusting it to a lower
level.
XStart the engine.
When indicator lamp ; is on:
XPress vehicle level control switch :.
Indicator lamp ; flashes. The vehicle
adjusts to the highway level.
The following message appears in the
multifunction display while the level is
being set:
iThe message can be cleared by pressing
the V, U, & or * button on
the multifunction steering wheel.
When the highway level is reached, indicator
lamp ; goes out and the following message
appears in the multifunction display for
5 seconds:
iThe vehicle is lowered to the highway level
automatically if the vehicle speed is above
55 mph (88 km/h) or if the vehicle speed
stays between 40 mph (64 km/h) and
55 mph (88 km/h) for approximately 20
seconds.
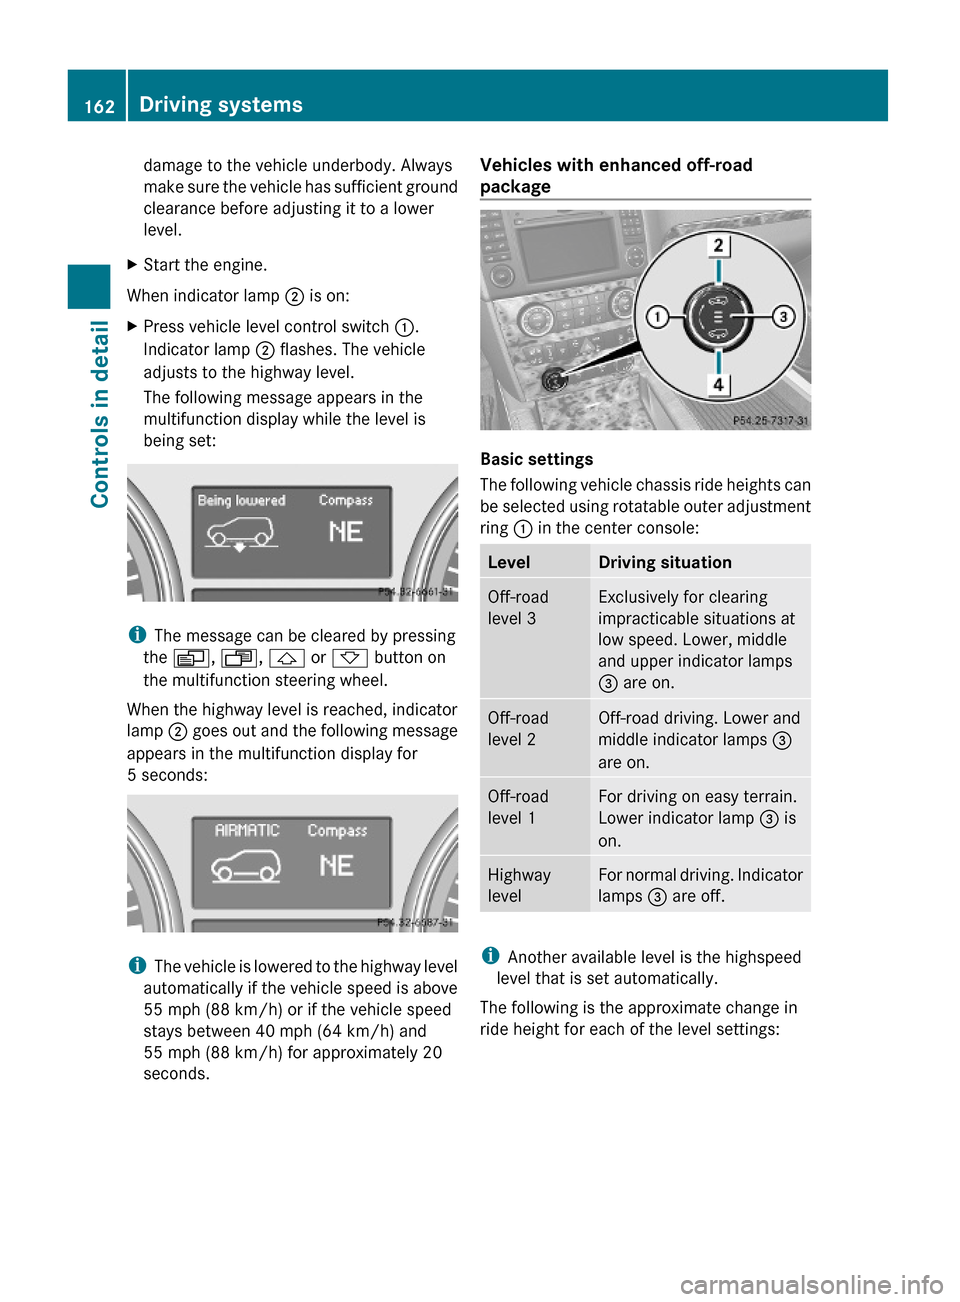
Vehicles with enhanced off-road
package
Basic settings
The following vehicle chassis ride heights can
be selected using rotatable outer adjustment
ring : in the center console:
LevelDriving situationOff-road
level 3
Exclusively for clearing
impracticable situations at
low speed. Lower, middle
and upper indicator lamps
= are on.
Off-road
level 2
Off-road driving. Lower and
middle indicator lamps =
are on.
Off-road
level 1
For driving on easy terrain.
Lower indicator lamp = is
on.
Highway
level
For normal driving. Indicator
lamps = are off.
iAnother available level is the highspeed
level that is set automatically.
The following is the approximate change in
ride height for each of the level settings:
162Driving systemsControls in detail
X164_AKB; 5; 31, en-USd2ureepe,Version: 2.11.8.12009-09-11T12:30:16+02:00 - Seite 162
Page 165 of 380
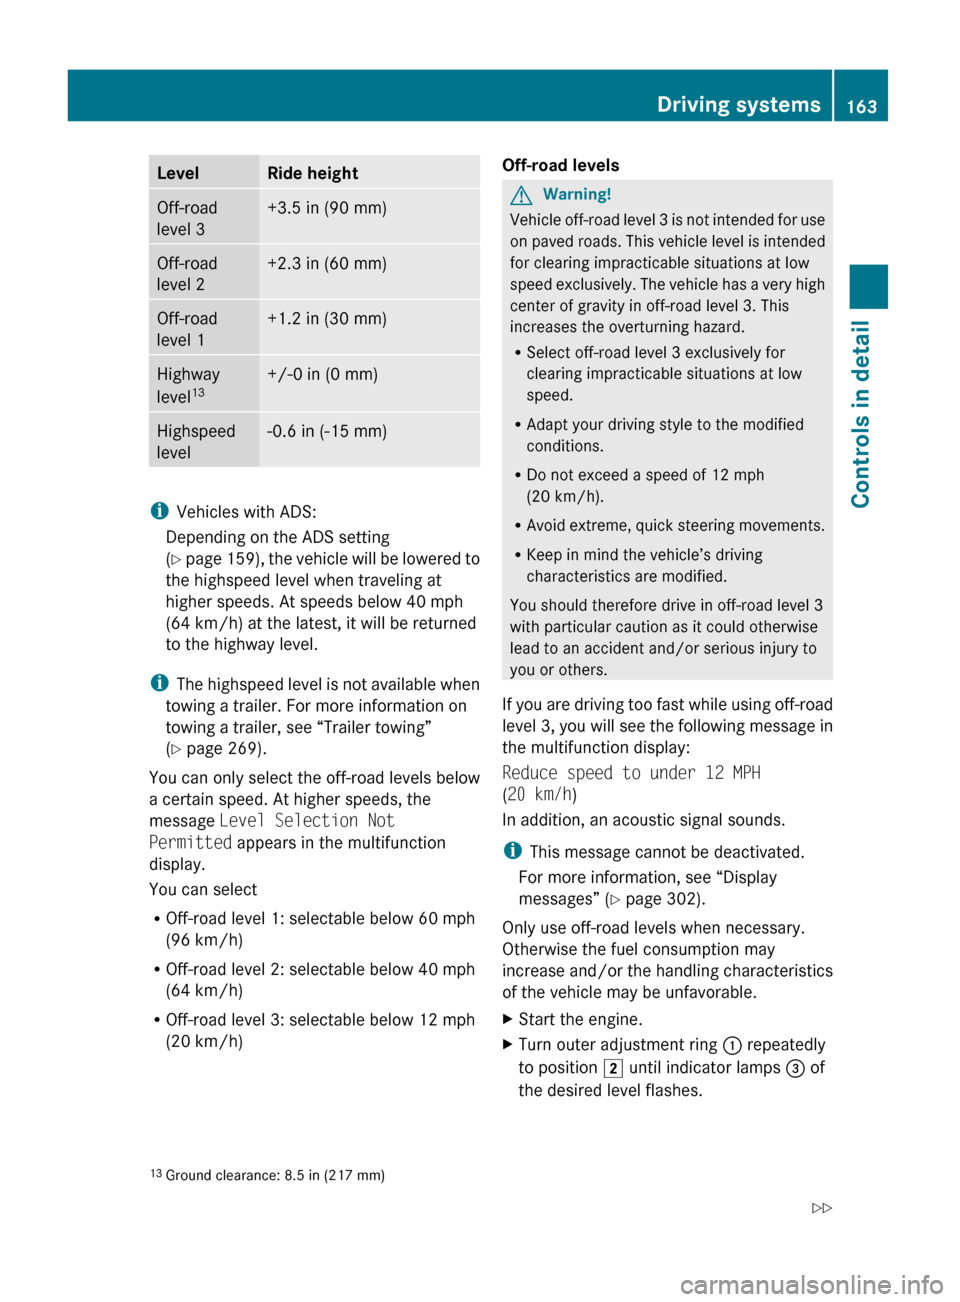
LevelRide heightOff-road
level 3+3.5 in (90 mm)Off-road
level 2+2.3 in (60 mm)Off-road
level 1+1.2 in (30 mm)Highway
level 13+/-0 in (0 mm)Highspeed
level-0.6 in (-15 mm)
i Vehicles with ADS:
Depending on the ADS setting
( Y page 159), the vehicle will be lowered to
the highspeed level when traveling at
higher speeds. At speeds below 40 mph
(64 km/h) at the latest, it will be returned
to the highway level.
i The highspeed level is not available when
towing a trailer. For more information on
towing a trailer, see “Trailer towing”
( Y page 269).
You can only select the off-road levels below
a certain speed. At higher speeds, the
message Level Selection Not
Permitted appears in the multifunction
display.
You can select
R Off-road level 1: selectable below 60 mph
(96 km/h)
R Off-road level 2: selectable below 40 mph
(64 km/h)
R Off-road level 3: selectable below 12 mph
(20 km/h)
Off-road levelsGWarning!
Vehicle off-road level 3 is not intended for use
on paved roads. This vehicle level is intended
for clearing impracticable situations at low
speed exclusively. The vehicle has a very high
center of gravity in off-road level 3. This
increases the overturning hazard.
R Select off-road level 3 exclusively for
clearing impracticable situations at low
speed.
R Adapt your driving style to the modified
conditions.
R Do not exceed a speed of 12 mph
(20 km/h).
R Avoid extreme, quick steering movements.
R Keep in mind the vehicle’s driving
characteristics are modified.
You should therefore drive in off-road level 3
with particular caution as it could otherwise
lead to an accident and/or serious injury to
you or others.
If you are driving too fast while using off-road
level 3, you will see the following message in
the multifunction display:
Reduce speed to under 12 MPH
( 20 km/h )
In addition, an acoustic signal sounds.
i This message cannot be deactivated.
For more information, see “Display
messages” ( Y page 302).
Only use off-road levels when necessary.
Otherwise the fuel consumption may
increase and/or the handling characteristics
of the vehicle may be unfavorable.
XStart the engine.XTurn outer adjustment ring : repeatedly
to position 2 until indicator lamps = of
the desired level flashes.13 Ground clearance: 8.5 in (217 mm)Driving systems163Controls in detailX164_AKB; 5; 31, en-USd2ureepe,Version: 2.11.8.12009-09-11T12:30:16+02:00 - Seite 163Z