2010 MERCEDES-BENZ GL550 run flat
[x] Cancel search: run flatPage 12 of 380
Transmission position indicator .....116
Transmission positions ..................116
Generator
see Alternator
Global locking/unlocking
see Key, SmartKey
Glove box ........................................... 207
Gross Axle Weight Rating see GAWR
Gross Trailer Weight
see GTW
Gross Vehicle Weight
see GVW
Gross Vehicle Weight Rating
see GVWR
GTW (Gross Trailer Weight) .............. 255
GVW (Gross Vehicle Weight) ............ 255
GVWR (Gross Vehicle Weight
Rating) ................................................ 255
H
Halogen headlamps see Headlamps
Hard plastic trim items, cleaning .... 279
Hazard warning flasher .................... 101
Headlamp cleaning system .............. 101
Headlamps
Active Bi-Xenon headlamps .............97
Adjusting aim ................................. 333
Automatic headlamp mode ..............98
Bi-Xenon .................................. 97, 329
Cleaning lenses ............................. 277
Cleaning system ............................ 101
Daytime running lamp mode ............99
Delayed shut-off ............................ 137
Halogen ......................................... 329
High-beam flasher .........................101
High-beam headlamps ...................100
Low-beam headlamps ......................98
Replacing bulbs ............................. 328
Switch .............................................. 97
Headliner, cleaning and care of ....... 280
Head restraints .................................... 82
Adjustment ................................ 82, 84
Comfort head restraint ....................84
NECK-PRO active front head
restraints ......................................... 53
NECK-PRO active front head
restraints, resetting .......................325
Heated steering wheel ........................ 93
Height adjustment
Seat belt outlet ................................ 51
Seats ............................................... 82
Vehicle level control ......................159
High-beam flasher ............................. 101
High-beam headlamps .............. 100, 329
Indicator lamp .................................. 29
Hill-start assist system ..................... 155
Hinged quarter windows .................. 106
Hood ................................................... 228
Messages in the multifunction
display ........................................... 304
Hooks ................................................. 201
Horn ...................................................... 27
HVAC see Climate control system
Hydroplaning ..................................... 262
I
Identification labels .......................... 360
Identification number, vehicle
(VIN) ................................................... 361
Ignition ......................................... 80, 109
Immobilizer .......................................... 66
Indicator lamps see Lamps, indicator and warning
Infant and child restraint systems
see Children in the vehicle
Inflation pressure
see Tires, Inflation pressure
Infrared reflecting windshield ......... 223
Inside door handle .............................. 74
Instrument cluster ............................ 124
Illumination .................................... 124
Lamps ............................................ 314
Multifunction display .....................127
Instrument lighting
see Instrument cluster, Illumination
Instrument panel
see Instrument cluster
Instruments and controls
see Cockpit
10IndexX164_AKB; 5; 31, en-USd2ureepe,Version: 2.11.8.12009-09-11T12:30:16+02:00 - Seite 10
Page 14 of 380
LATCH-type child seat anchorssee Children in the vehicle
License plate lamps
Messages in the multifunction
display ........................................... 311
Replacing bulbs ............................. 330
Light alloy wheels, cleaning ............. 279
Lighter see Cigarette lighter
Lighting ................................................ 97
Daytime running lamp mode ............99
Exterior ............................................ 97
Interior ........................................... 101
Limp-home mode .............................. 119
Load index (tires) ...................... 251, 255
Loading see Vehicle loading
Locator lighting ................................. 136
Lock button
Outside door handle (KEYLESS-
GO) .................................................. 73
Locking the vehicle
KEYLESS-GO .................................... 71
Manually ........................................ 324
SmartKey ......................................... 70
Loss of
Key .................................................. 73
Service and Warranty Information
booklet .......................................... 360
Low-beam headlamps ......................... 98
Exterior lamp switch ........................97
Indicator lamp .................................. 29
Switching on .................................... 98
LOW RANGE mode ............................. 120
Messages in the multifunction
display ........................................... 303
Switching ....................................... 121
Lubricants .......................................... 368
Lumbar support ................................... 87
M
Maintenance ........................................ 21
Maintenance System
Service indicator display ................274
Service indicator message .............273
Service term exceeded ..................274
Manual headlamp mode (Low-
beam headlamps) ................................ 98
Maximum engine speed see Vehicle specification
Maximum loaded vehicle weight ..... 256
Maximum load rating (tires) ............. 255
Maximum permissible tire
inflation pressure .............................. 256
Mechanical key .................................. 323
Media interface ................................. 207
Memory function ................................. 96
Menus see Control system menus
Minispare wheel
see Spare wheel
Mirrors .................................................. 93
Auto-dimming rear view mirrors ....... 94
Exterior rear view mirror parking
position ............................................ 95
Exterior rear view mirrors ................94
Interior rear view mirror ...................93
Memory function .............................. 96
Power-folding exterior rear view
mirrors ............................................. 95
Vanity mirror .................................. 210
MOExtended system ......................... 345
MOExtended tires ..................... 345, 365
MON (Motor Octane Number) .......... 371
Motor Octane Number see MON
Multicontour seat ................................ 90
Multifunction display ........................ 127
Symbol messages ..........................299
Text messages ............................... 288
Vehicle status messages ...............287
Multifunction display messages
ABS ....................................... 288, 300
Active headlamps .......................... 310
Advanced TPMS ..................... 297, 313
Air bags ......................................... 291
Air filter .......................................... 309
Air suspension program .................301
Alternator .............................. 296, 308
Automatic
transmission .................................. 296
Battery ................................... 296, 308
Brake fluid ..................................... 30012IndexX164_AKB; 5; 31, en-USd2ureepe,Version: 2.11.8.12009-09-11T12:30:16+02:00 - Seite 12
Page 17 of 380

R
Radiator ..................................... 230, 257
Radio
Selecting stations ..........................129
Radio transmitters ............................ 272
Rain sensor see Intermittent wiping
Rear axle oil ....................................... 369
Rear center console ashtray see Ashtrays
Rear doors
Child safety locks ............................ 60
Rear door window
Override switch ................................ 60
Rear fog lamp
see Fog lamps
Rear lamps
see Tail lamps
Rear seats
see Seats
Rear view camera .............................. 169
Cleaning the camera lens ..............278
Rear window defroster ..................... 191
Rear window wiper/washer ............. 104
Recommended tire inflation
pressure ..................................... 234, 256
Refilling
AdBlue ®
......................................... 347
Refrigerant, air conditioning ............ 371
Refueling ............................................ 226
Regular checks .................................. 228
Reminder, Seat belt see Seat belts, Telltale
Remote control
see Key, SmartKey
Remote door unlock (Tele Aid) ......... 219
Replacing
Key .................................................. 74
Replacing bulbs ................................. 328
Reporting safety defects .................... 24
Research Octane Number see RON
Reserve fuel
Messages in the multifunction
display ........................................... 309
Warning lamp ................................... 29
Reset button ................................ 28, 124Reset tool (NECK-PRO active front
head restraints) ................................. 325
Restraint systems see Occupant safety
Rims ........................................... 256, 365
Roadside Assistance ................... 21, 216
RON (Research Octane Number) ..... 371
Rubber parts, cleaning ...................... 279
Run-flat tires see MOExtended tires
S
Safety
Driving safety systems .....................61
Occupant safety ............................... 36
Reporting defects ............................ 24
Safety belts
see Seat belts
Seat belt force limiter ......................... 52
Seat belts ............................................. 48
Adjustment function ........................51
Children in the vehicle .....................55
Cleaning ......................................... 280
Fastening ......................................... 50
Height adjustment ...........................51
Proper use of ................................... 49
Safety guidelines ............................. 39
Safety notes ..................................... 48
Telltale ..................................... 29, 317
Seat heating ......................................... 90
Seating capacity ................................ 243
Seats ..................................................... 82
Adjustment ...................................... 82
Easy-entry/exit feature ....................92
Folding (expanding cargo volume) . 201
Heating ............................................ 90
Memory function .............................. 96
Multicontour seat ............................ 90
Rear seats ........................................ 87
Ventilation ....................................... 90
Securing cargo
Cargo tie-down rings ...................... 200
Selective setting
see Key, SmartKey
Selector lever
see Gear selector lever
Index15X164_AKB; 5; 31, en-USd2ureepe,Version: 2.11.8.12009-09-11T12:30:16+02:00 - Seite 15
Page 78 of 380
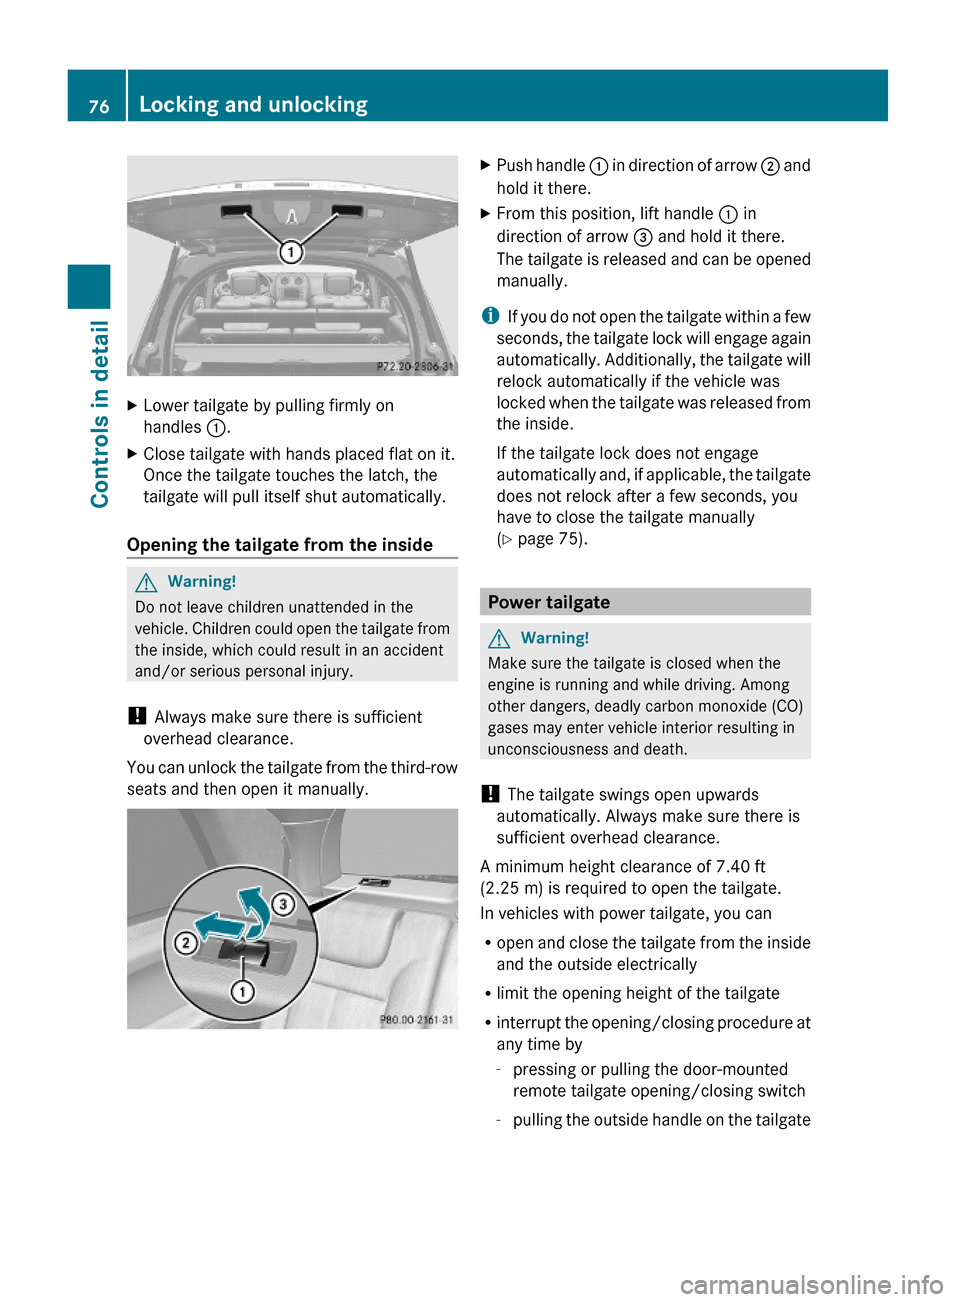
XLower tailgate by pulling firmly on
handles :.
XClose tailgate with hands placed flat on it.
Once the tailgate touches the latch, the
tailgate will pull itself shut automatically.
Opening the tailgate from the inside
GWarning!
Do not leave children unattended in the
vehicle. Children could open the tailgate from
the inside, which could result in an accident
and/or serious personal injury.
! Always make sure there is sufficient
overhead clearance.
You can unlock the tailgate from the third-row
seats and then open it manually.
XPush handle : in direction of arrow ; and
hold it there.
XFrom this position, lift handle : in
direction of arrow = and hold it there.
The tailgate is released and can be opened
manually.
iIf you do not open the tailgate within a few
seconds, the tailgate lock will engage again
automatically. Additionally, the tailgate will
relock automatically if the vehicle was
locked when the tailgate was released from
the inside.
If the tailgate lock does not engage
automatically and, if applicable, the tailgate
does not relock after a few seconds, you
have to close the tailgate manually
(Y page 75).
Power tailgate
GWarning!
Make sure the tailgate is closed when the
engine is running and while driving. Among
other dangers, deadly carbon monoxide (CO)
gases may enter vehicle interior resulting in
unconsciousness and death.
! The tailgate swings open upwards
automatically. Always make sure there is
sufficient overhead clearance.
A minimum height clearance of 7.40 ft
(2.25 m) is required to open the tailgate.
In vehicles with power tailgate, you can
Ropen and close the tailgate from the inside
and the outside electrically
Rlimit the opening height of the tailgate
Rinterrupt the opening/closing procedure at
any time by
-pressing or pulling the door-mounted
remote tailgate opening/closing switch
-pulling the outside handle on the tailgate
76Locking and unlockingControls in detail
X164_AKB; 5; 31, en-USd2ureepe,Version: 2.11.8.12009-09-11T12:30:16+02:00 - Seite 76
Page 230 of 380

iLeaving the engine running and the fuel
filler cap open can cause the yellow fuel
tank reserve warning lamp to flash and the
malfunction indicator lamp ! (USA
only) or ; (Canada only) to illuminate.
For more information, see also “Practical
hints” ( Y page 320).XRemove the SmartKey from the starter
switch.
KEYLESS-GO: Open the driver’s door. This
puts the starter switch in position 0, same
as with the SmartKey removed from the
starter switch. The driver’s door then can
be closed again.XOpening: Press fuel filler flap : at the
point indicated by the arrow.XTurn fuel filler cap ; counterclockwise.XTake off fuel filler cap ;.
!
The fuel filler cap is tethered to the fuel
filler neck. Do not drop the cap. It could
damage the vehicle paint finish.
XSet fuel filler cap ; on fuel filler flap :.XFully insert filler nozzle unit and refuel.XOnly fill your tank until the filler nozzle unit
cuts out – do not top off or overfill .XClosing: Turn fuel filler cap ; clockwise
until it audibly engages.
i Close the fuel filler flap before locking the
vehicle. Otherwise the flap locking pin will
prevent closing the fuel filler flap.
XClose fuel filler flap :.
Low outside temperatures (diesel
engine)
! Do not fill the tank with gasoline. Do not
blend diesel fuel with gasoline or kerosene.
The fuel system and engine will otherwise
be damaged, which is not covered by the
Mercedes-Benz Limited Warranty.
To prevent malfunctions, diesel fuel with
improved cold flow characteristics is offered
in the winter months. Check with your fuel
retailer.
Check regularly and before a long trip
For information on quantities and
requirements of operating agents, see “Fuels,
coolants, lubricants, etc.” ( Y page 368).
Check the following:
R Engine oil level ( Y page 230)
R Tire inflation pressure ( Y page 237)
R Coolant level ( Y page 231)
R Vehicle lighting ( Y page 328)
R Washer system and headlamp cleaning
system ( Y page 232)
R Brake fluid ( Y page 233)
Engine compartment
Hood
GWarning!
Do not pull the release lever while the vehicle
is in motion. Otherwise the hood could be
forced open by passing air flow.
This could cause the hood to come loose and
injure you and/or others.
Opening
GWarning!
Do not open the hood when the engine is
overheated. You could be seriously injured.
Observe the coolant temperature display to
determine whether the engine may be
overheated. If you see flames or smoke
coming from the engine compartment, move
away from the vehicle. Wait until the engine
has cooled. If necessary, call the fire
department.
228Engine compartmentOperation
X164_AKB; 5; 31, en-USd2ureepe,Version: 2.11.8.12009-09-11T12:30:16+02:00 - Seite 228
Page 240 of 380
Each tire, including the spare, should be
checked at least once a month when cold.
Inflate the tires to the recommended tire
inflation pressure as specified on
R the Tire and Loading Information placard on
the driver’s door B-pillar
or
R the tire inflation pressure label located on
the inside of the fuel filler flap
i The recommended tire inflation pressures
for your vehicle can be found on
R the Tire and Loading Information placard
located on the driver’s door B-pillar
( Y page 242)
R the tire inflation pressure label on the
inside of the fuel filler flap
The tire inflation pressures are not listed in
the Operator’s Manual.GWarning!
The tire pressure loss warning system does
not provide a warning for wrongly selected tire
inflation pressures. Always adjust tire
inflation pressure according to the Tire and
Loading Information placard on the driver’s
door B-pillar or on the tire inflation pressure
label located on the inside of the fuel filler flap.
The tire pressure loss warning system does
not replace regular checks of the tire inflation
pressures since a gradual pressure loss in
more than one tire cannot be detected by the
tire pressure loss warning system.
The tire pressure loss warning system is not
able to issue a warning due to a sudden
dramatic loss of tire inflation pressure (e.g.
tire blowout caused by a foreign object). In
this case bring the vehicle to a halt by carefully
applying the brakes and avoiding abrupt
steering maneuvers.
Restarting the tire pressure loss warning
system
The tire pressure loss warning system must
be restarted in the following situations:
R after you have changed the tire inflation
pressure
R after you have replaced the wheels or tires
R after you have installed new wheels or tiresXUsing the Tire and Loading Information
placard on the driver’s door B-pillar or, if
available, the tire inflation pressure label on
the inside of the fuel filler flap, make sure
the tire inflation pressure of all four tires is
correct.GWarning!
The tire pressure loss warning system can
only warn you in a reliable manner if you have
set the correct tire inflation pressures for
each tire.
If an incorrect tire inflation pressure was set,
the system will monitor the pressure
according to the incorrect value.
XSwitch on the ignition.XMake sure the standard display appears in
the multifunction display ( Y page 128).XPress button * or & on the
multifunction steering wheel repeatedly
until the following message appears in the
multifunction display:
Run Flat Indicator
Active
Menu: R-ButtonXPress the reset button ( Y page 124).
The following message will appear in the
multifunction display:
Restart
Run Flat Indicator?XIf you wish to confirm: Press button
W .
The following message will appear in the
multifunction display:
Run Flat Indicator
Restarted238Tires and wheelsOperation
X164_AKB; 5; 31, en-USd2ureepe,Version: 2.11.8.12009-09-11T12:30:16+02:00 - Seite 238
Page 249 of 380
You may only use the MOExtended system in
conjunction with the tire pressure loss
warning system ( Y page 237) or the
Advanced TPMS ( Y page 239).
i Vehicles with MOExtended system are
not factory-equipped with a TIREFIT kit.
When retrofitting with tires that do not have
run-flat characteristics, e.g. winter tires,
you should also equip your vehicle with a
TIREFIT kit. TIREFIT kits are available at any
authorized Mercedes-Benz Center.
For information on driving in case of pressure
loss in one or more tires (emergency mode),
see the “Practical hints” section
( Y page 345).
Tire care and maintenance
GWarning!
Regularly check the tires for damage.
Damaged tires can cause tire inflation
pressure loss. As a result, you could lose
control of your vehicle.
Worn, old tires can cause accidents. If the tire
tread is worn to minimum tread depth, or if
the tires have sustained damage, replace
them.
Check the tire inflation pressure at least once
a month. For more information on checking
tire inflation pressure, see “Recommended
tire inflation pressure” ( Y page 234).
Tire inspection
Every time you check the tire inflation
pressure, you should also inspect your tires
for the following:
R excessive treadwear ( Y page 247)
R cord or fabric showing through the tire’s
rubber
R bumps, bulges, cuts, cracks or splits in the
tread or side of the tire
Replace the tire if you find any of the above
conditions.
Make sure you also inspect the spare tire
periodically for condition and inflation. Spare
tires will age and become worn over time even
if never used, and thus should be inspected
and replaced when necessary.
Life of tire GWarning!
Tires and spare tire should be replaced after
6 years, regardless of the remaining tread.
The service life of a tire is dependent upon
varying factors including but not limited to:
R Driving style
R Tire inflation pressure
R Distance driven
Tread depth
GWarning!
Although the applicable federal motor vehicle
safety laws consider a tire to be worn when
the treadwear indicators (TWI) become visible
at approximately 1
/ 16 in (1.6 mm), we
recommend that you do not allow your tires
to wear down to that level. As tread depth
approaches 1
/ 8 in (3 mm), the adhesion
properties on a wet road are sharply reduced.
Depending upon the weather and/or road
surface (conditions), the tire traction varies
widely.
Do not allow your tires to wear down too far.
Adhesion properties on wet roads are sharply
reduced at tread depths of less than 1
/ 8 in
(3 mm).
Treadwear indicators (TWI) are required by
law. These indicators are located in six places
on the tread circumference and become
visible at a tread depth of approximately
1 / 16 in (1.6 mm), at which point the tire is
considered worn and should be replaced.
The recommended minimum tire tread depth
for summer tires is 1
/ 8 in (3 mm). The
Tires and wheels247OperationX164_AKB; 5; 31, en-USd2ureepe,Version: 2.11.8.12009-09-11T12:30:16+02:00 - Seite 247Z
Page 260 of 380
After installing winter tires:XCheck the tire inflation pressure and adjust
it if necessary ( Y page 237).XRestart the tire pressure loss warning
system ( Y page 237) or the Advanced Tire
Pressure Monitoring System (Y page 239).
Snow chains
! Vehicles with Adaptive Damping System
(ADS):
When driving with snow chains, do not
select SPORT mode as this may result in
damage to your vehicle.
! Some tire sizes do not leave adequate
clearance for snow chains. To help avoid
serious damage to your vehicle or tires,
make sure the use of snow chains is
permissible as specified in the “Technical
data” section of this Operator’s Manual.
Snow chains should only be driven on snow-
covered roads at speeds not to exceed
30 mph (50 km/h). Remove chains as soon
as possible when driving on roads without
snow.
Observe the following guidelines when using
snow chains:
R Use of snow chains is not permissible with
all wheel/tire combinations ( Y page 365).
R Use snow chains in pairs and on rear
wheels only. Follow the manufacturer’s
mounting instructions.
! If snow chains are mounted to the front
wheels, they may scrape against the body
or axle components. The tires or the vehicle
could be damaged as a result.
R Only use snow chains that are approved by
Mercedes-Benz. Any authorized Mercedes-
Benz Center will be glad to advise you on
this subject.
R Use of snow chains may be prohibited
depending on location. Always check local
and state laws before installing snow
chains.
R Do not use snow chains on the spare wheel.
i When driving with snow chains, you may
wish to switch off the ESP ®
(Y page 63)
before setting the vehicle in motion. This
will improve the vehicle’s traction.
Winter driving instructions
GWarning!
If the vehicle becomes stuck in snow, make
sure snow is kept clear of the exhaust pipe
and from around the vehicle with the engine
running. Otherwise, deadly carbon monoxide
(CO) gases may enter vehicle interior
resulting in unconsciousness and death.
To assure sufficient fresh air ventilation, open
a window slightly on the side of the vehicle
not facing the wind.
GWarning!
The outside temperature indicator is not
designed to serve as an ice-warning device
and is therefore unsuitable for that purpose.
Indicated temperatures just above the
freezing point do not guarantee that the road
surface is free of ice. The road may still be icy,
especially in wooded areas or on bridges.
GWarning!
On slippery road surfaces, never downshift in
order to obtain braking action. This could
result in drive wheel slip and reduced vehicle
control. Your vehicle’s ABS will not prevent
this type of control loss.
Do not engage the transfer case in position
LOW when driving on ice or packed snow. At
speeds below 18 mph (30 km/h) vehicle
steering is adversely affected by the Off-road
ABS.
The most important rule for slippery or icy
roads is to drive sensibly and to avoid abrupt
acceleration, braking and steering
258Winter drivingOperation
X164_AKB; 5; 31, en-USd2ureepe,Version: 2.11.8.12009-09-11T12:30:16+02:00 - Seite 258