2010 MERCEDES-BENZ GL550 display
[x] Cancel search: displayPage 93 of 380
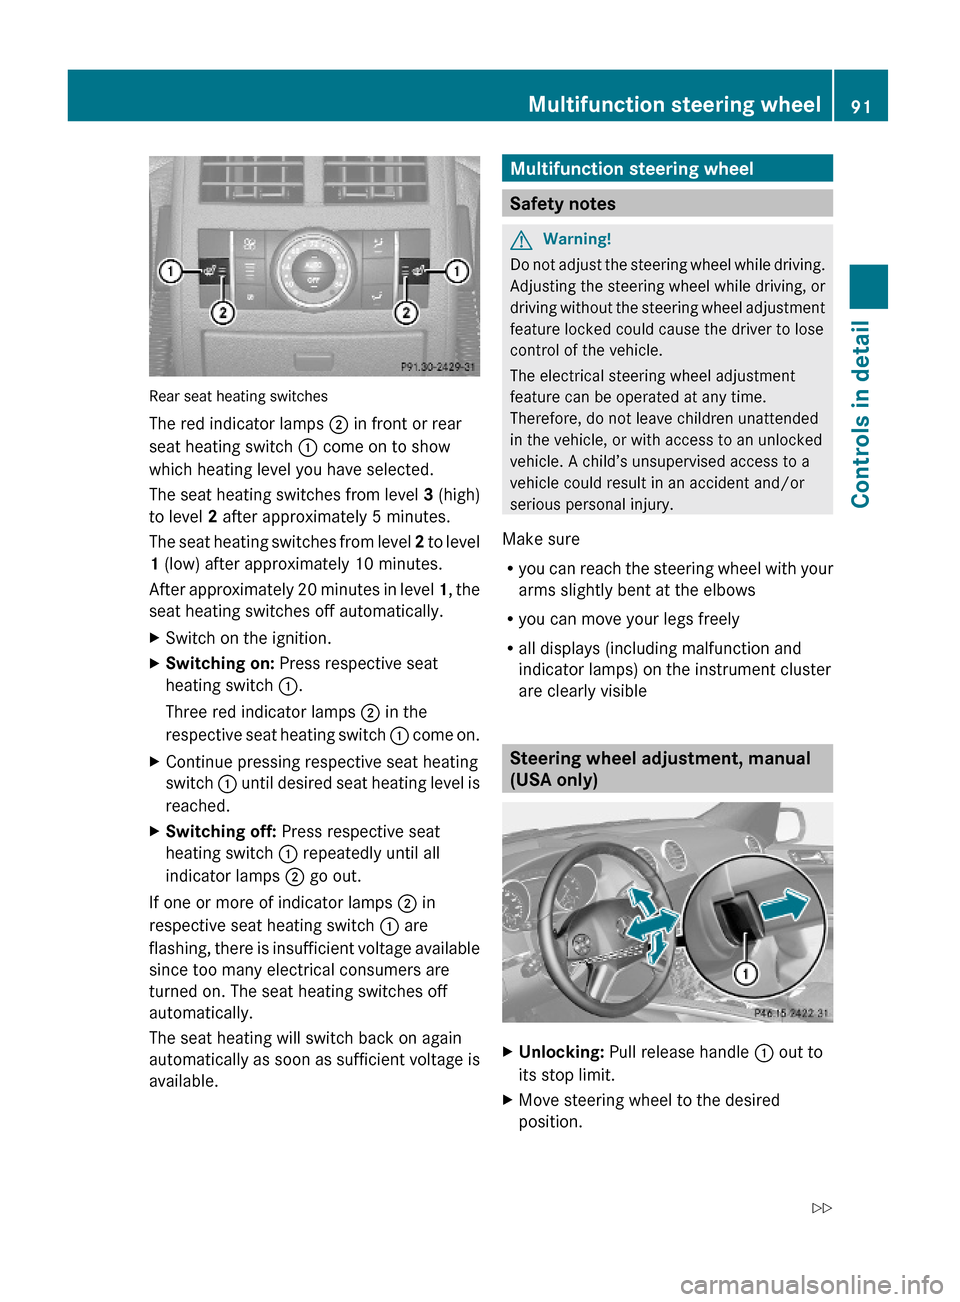
Rear seat heating switches
The red indicator lamps ; in front or rear
seat heating switch : come on to show
which heating level you have selected.
The seat heating switches from level 3 (high)
to level 2 after approximately 5 minutes.
The seat heating switches from level 2 to level
1 (low) after approximately 10 minutes.
After approximately 20 minutes in level 1, the
seat heating switches off automatically.
XSwitch on the ignition.XSwitching on: Press respective seat
heating switch :.
Three red indicator lamps ; in the
respective seat heating switch : come on.
XContinue pressing respective seat heating
switch : until desired seat heating level is
reached.
XSwitching off: Press respective seat
heating switch : repeatedly until all
indicator lamps ; go out.
If one or more of indicator lamps ; in
respective seat heating switch : are
flashing, there is insufficient voltage available
since too many electrical consumers are
turned on. The seat heating switches off
automatically.
The seat heating will switch back on again
automatically as soon as sufficient voltage is
available.
Multifunction steering wheel
Safety notes
GWarning!
Do not adjust the steering wheel while driving.
Adjusting the steering wheel while driving, or
driving without the steering wheel adjustment
feature locked could cause the driver to lose
control of the vehicle.
The electrical steering wheel adjustment
feature can be operated at any time.
Therefore, do not leave children unattended
in the vehicle, or with access to an unlocked
vehicle. A child’s unsupervised access to a
vehicle could result in an accident and/or
serious personal injury.
Make sure
Ryou can reach the steering wheel with your
arms slightly bent at the elbows
Ryou can move your legs freely
Rall displays (including malfunction and
indicator lamps) on the instrument cluster
are clearly visible
Steering wheel adjustment, manual
(USA only)
XUnlocking: Pull release handle : out to
its stop limit.
XMove steering wheel to the desired
position.
Multifunction steering wheel91Controls in detailX164_AKB; 5; 31, en-USd2ureepe,Version: 2.11.8.12009-09-11T12:30:16+02:00 - Seite 91Z
Page 100 of 380
iThe exterior lamps (except standing
lamps or parking lamps) go out
automatically when you remove the
SmartKey from the starter switch or open
the driver’s door with the ignition switched
off.
When the parking lamps or the rear fog
lamp are switched on and you remove the
SmartKey from the starter switch and open
the driver’s door, an acoustic signal
sounds.
In addition the message Switch Off
Lights appears in the multifunction
display.
Switch off the parking lamps or the rear fog
lamp manually.
! Failure to switch off the parking lamps
when leaving the vehicle may result in a
discharged battery.
i Vehicles without front fog lamps: For
better detection of the vehicle, the LED
daytime running lamps are dimmed to
parking lamp level when the low-beam
headlamps are switched on.
Low-beam headlamps
The low-beam headlamps can be switched on
and off with the exterior lamp switch.
XSwitch on the ignition.XSwitching on: Turn the exterior lamp
switch to position L.
The following lamps come on:
R Low-beam headlamps
R Parking lamps 6
R Green indicator lamp L in the
instrument clusterXSwitching off: Turn the exterior lamp
switch to position $.Automatic headlamp mode GWarning!
If the exterior lamp switch is set to Ã, the
headlamps will not automatically come on
under foggy conditions.
To minimize risk to you and to others, activate
headlamps by turning exterior lamp switch to
L when driving or when traffic and/or
ambient lighting conditions require you to do
so.
In low ambient lighting conditions, only switch
from position à to L with the vehicle
at a standstill in a safe location. Switching
from à to L will briefly switch off the
headlamps. Doing so while driving in low
ambient lighting conditions may result in an
accident.
The automatic headlamp feature is only an aid
to the driver. The driver is responsible for the
operation of the vehicle’s lights at all times.
XSwitching on: Turn the exterior lamp
switch to position Ã.
When ambient light is low: When the
SmartKey is in starter switch position 1 or
when the KEYLESS-GO start/stop button has
been pressed once, the parking lamps 6
come
on automatically.
When the engine is running, the low-beam
headlamps come on additionally.
When ambient light is bright: When the
SmartKey is in starter switch position 1 or
when the KEYLESS-GO start/stop button has
been pressed once, all lamps are off.
When the engine is running, the daytime
running lamps 7
come on automatically.
When the low-beam headlamps are switched
on, the green indicator lamp L in the
instrument cluster comes on.
Once the low-beam headlamps are on, the
high-beam headlamps are also available.
6 When the parking lamps are on, the tail lamps, the license plate lamps, the side marker lamps, and the
instrument cluster illumination are also on.
7 USA only: The daytime running lamp mode must be activated via the control system.98LightingControls in detail
X164_AKB; 5; 31, en-USd2ureepe,Version: 2.11.8.12009-09-11T12:30:16+02:00 - Seite 98
Page 106 of 380
! If you have set intermittent wiping, dirt on
the surface of the rain sensor or optical
effects may cause the windshield wipers to
wipe in an undesired fashion. This could
then damage the windshield wiper blades
or scratch the windshield. You should
therefore switch off the windshield wipers
when weather conditions are dry.
XTurn the combination switch to position
Ä or Å.
After the initial wipe, pauses between
wipes are controlled by the rain sensor
automatically.
Intermittent wiping is interrupted when the
vehicle is at a standstill and a front door is
opened. This protects persons getting into or
out of the vehicle from being sprayed.
Intermittent wiping will be continued when all
doors are closed andRthe automatic transmission is in drive
position D or reverse gear R
or
Rthe wiper setting is changed using the
combination switch
Single wipe
XPress the combination switch briefly in
direction of arrow B to the resistance
point.
The windshield wipers wipe one time
without washer fluid.
Wiping with washer fluid
XPress the combination switch in direction
of arrow B past the resistance point.
The windshield wipers operate with washer
fluid.
iTo prevent smears on the windshield or
noisy/chattering wiper blades, wipe with
washer fluid every now and then even when
it is raining.
For information on filling up the washer
reservoir, see “Washer system and headlamp
cleaning system” (Y page 232).
For information on cleaning the headlamps
with washer fluid, see “Headlamp cleaning
system” (Y page 101).
Rear window wiper/washer
XObserve notes on page (Y page 103).
The rear window wiper engages automatically
when the automatic transmission is shifted
into reverse gear R with the windshield wipers
switched on.
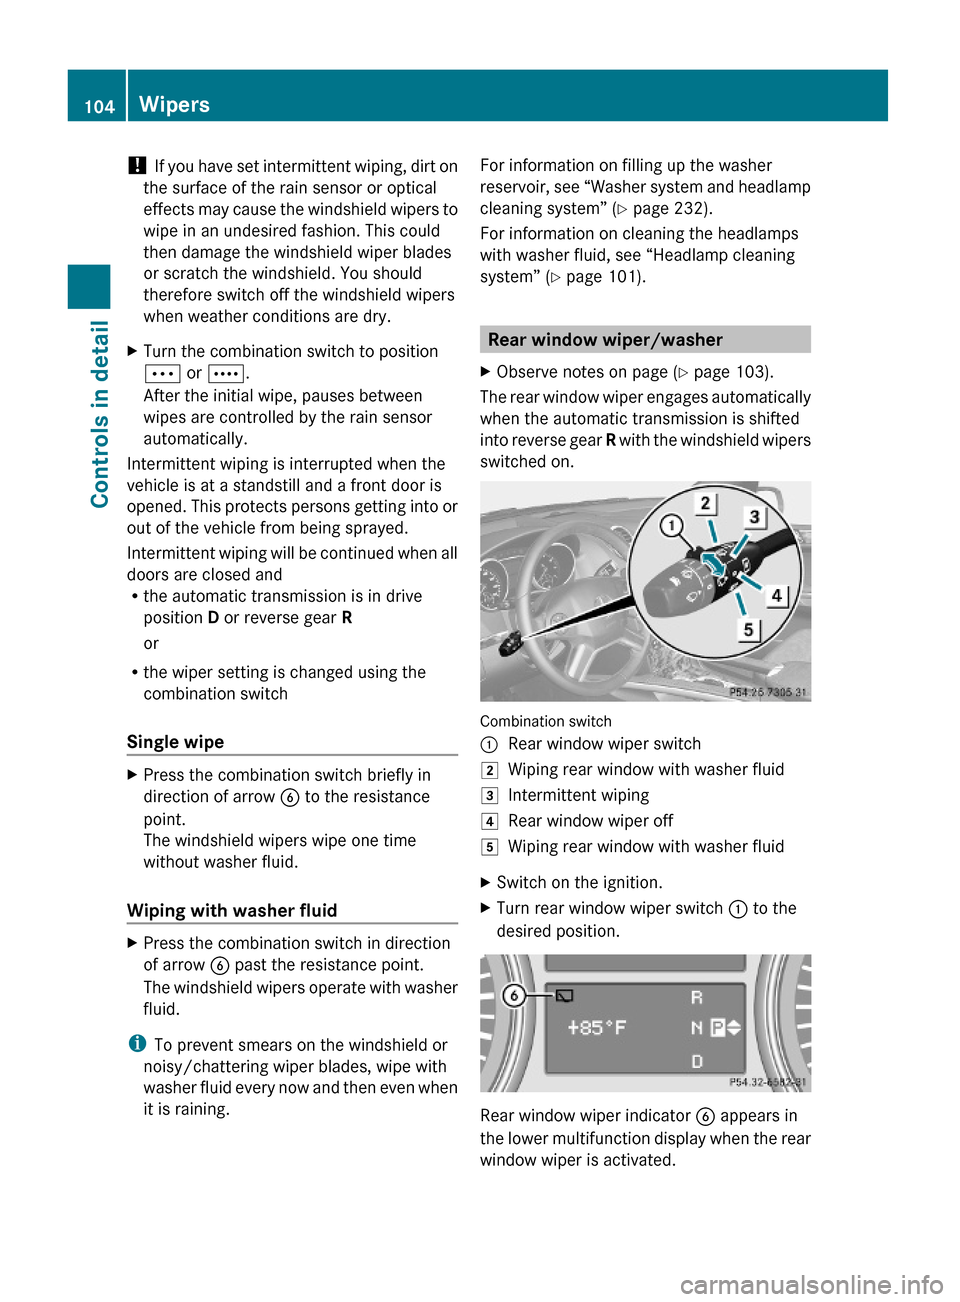
Combination switch
:Rear window wiper switch2Wiping rear window with washer fluid3Intermittent wiping4Rear window wiper off5Wiping rear window with washer fluidXSwitch on the ignition.XTurn rear window wiper switch : to the
desired position.
Rear window wiper indicator B appears in
the lower multifunction display when the rear
window wiper is activated.
104WipersControls in detail
X164_AKB; 5; 31, en-USd2ureepe,Version: 2.11.8.12009-09-11T12:30:16+02:00 - Seite 104
Page 111 of 380
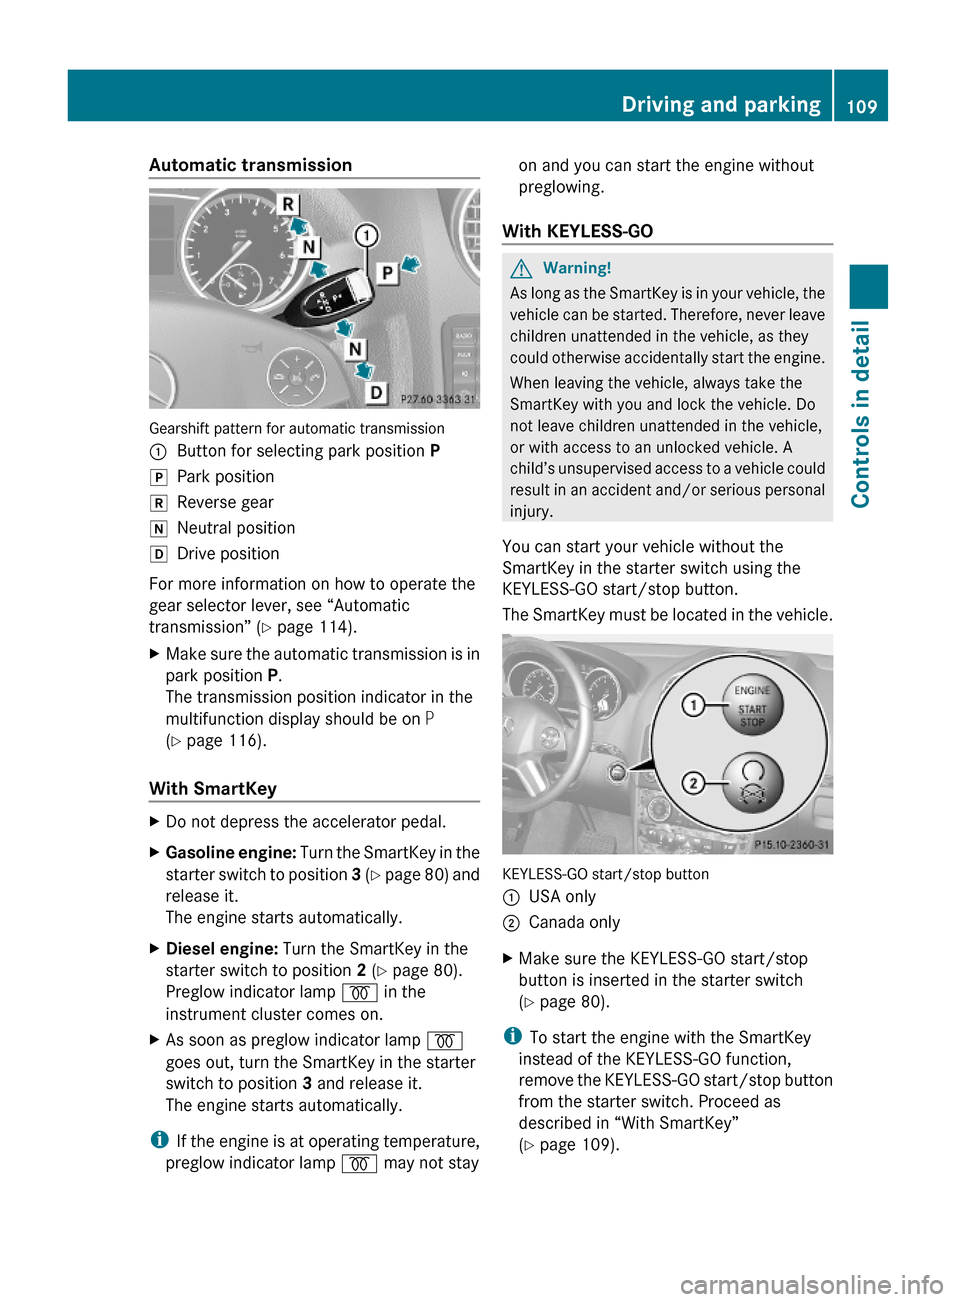
Automatic transmission
Gearshift pattern for automatic transmission
:Button for selecting park position PjPark positionkReverse geariNeutral positionhDrive position
For more information on how to operate the
gear selector lever, see “Automatic
transmission” (Y page 114).
XMake sure the automatic transmission is in
park position P.
The transmission position indicator in the
multifunction display should be on P
(Y page 116).
With SmartKey
XDo not depress the accelerator pedal.XGasoline engine: Turn the SmartKey in the
starter switch to position 3 (Y page 80) and
release it.
The engine starts automatically.
XDiesel engine: Turn the SmartKey in the
starter switch to position 2 (Y page 80).
Preglow indicator lamp % in the
instrument cluster comes on.
XAs soon as preglow indicator lamp %
goes out, turn the SmartKey in the starter
switch to position 3 and release it.
The engine starts automatically.
iIf the engine is at operating temperature,
preglow indicator lamp % may not stay
on and you can start the engine without
preglowing.
With KEYLESS-GO
GWarning!
As long as the SmartKey is in your vehicle, the
vehicle can be started. Therefore, never leave
children unattended in the vehicle, as they
could otherwise accidentally start the engine.
When leaving the vehicle, always take the
SmartKey with you and lock the vehicle. Do
not leave children unattended in the vehicle,
or with access to an unlocked vehicle. A
child’s unsupervised access to a vehicle could
result in an accident and/or serious personal
injury.
You can start your vehicle without the
SmartKey in the starter switch using the
KEYLESS-GO start/stop button.
The SmartKey must be located in the vehicle.
KEYLESS-GO start/stop button
:USA only;Canada onlyXMake sure the KEYLESS-GO start/stop
button is inserted in the starter switch
(Y page 80).
iTo start the engine with the SmartKey
instead of the KEYLESS-GO function,
remove the KEYLESS-GO start/stop button
from the starter switch. Proceed as
described in “With SmartKey”
(Y page 109).
Driving and parking109Controls in detailX164_AKB; 5; 31, en-USd2ureepe,Version: 2.11.8.12009-09-11T12:30:16+02:00 - Seite 109Z
Page 112 of 380
XDepress the brake pedal during the starting
procedure.XDo not depress the accelerator pedal.XGasoline engine: Press the KEYLESS-GO
start/stop button once.
The engine starts automatically.XDiesel engine: Press the KEYLESS-GO
start/stop button once.
The engine preglows and starts
automatically.
i If the engine is at operating temperature,
the time the engine needs to preglow is
reduced.
Starting difficulties
! Remember that extended starting
attempts can drain the battery.
The engine does not start. You can hear
the starter.
There could be a malfunction in the engine
electronics or in the fuel supply system.
Carry out the following steps:
XIf you are starting the engine with the
SmartKey: Turn the SmartKey in the starter
switch to position 0 and repeat the starting
procedure.XIf you are starting the engine with KEYLESS-
GO: Close any doors that may be open to
allow for better detection of the SmartKey.
or
XRemove the KEYLESS-GO start/stop
button from the starter switch.XStart the engine with the SmartKey as radio
signals from another source may be
interfering with the KEYLESS-GO function.XRepeat the starting procedure.
If the engine does not start after several
starting attempts:
XContact an authorized Mercedes-Benz
Center or call Roadside Assistance.The engine does not start. You cannot
hear the starter.
The battery may not be charged sufficiently.XGet a jump start ( Y page 350).
If the engine will not start despite a jump
start:
XContact an authorized Mercedes-Benz
Center or call Roadside Assistance.
The starter has been exposed to excessive
temperatures.
XLet the starter cool for about 2 minutes.XRepeat the starting procedure.
If the engine does not start after several
starting attempts:
XContact an authorized Mercedes-Benz
Center or call Roadside Assistance.
Driving off
GWarning!
On slippery road surfaces, never downshift in
order to obtain braking action. This could
result in drive wheel slip and reduced vehicle
control. Your vehicle’s ABS will not prevent
this type of loss of control.
! Do not run a cold engine at high engine
speeds. Running a cold engine at high
engine speeds may shorten the service life
of the engine. This is not covered by the
Mercedes-Benz Limited Warranty.
! If an acoustic warning sounds and the
message Release Parking Brake
appears in the multifunction display when
driving off, you have forgotten to release
the parking brake.
Release the parking brake.
! Avoid spinning of a drive wheel. This may
cause serious damage to the drivetrain
which is not covered by the Mercedes-Benz
Limited Warranty.
110Driving and parkingControls in detail
X164_AKB; 5; 31, en-USd2ureepe,Version: 2.11.8.12009-09-11T12:30:16+02:00 - Seite 110
Page 117 of 380
iShifting the automatic transmission out of
park position P is only possible with the
brake pedal depressed.
Without the brake pedal depressed, the
gear selector lever can be moved up or
down, but the parking pawl remains
engaged, not allowing shifting to occur.
i Depending on vehicle production date:
The automatic transmission will shift into
park position P automatically when
R you open the driver’s door while driving
at low speed, and
R the automatic transmission is in drive
position D or reverse gear R
After the vehicle has engaged park position
P automatically, you can engage drive
position D or reverse gear R again to
override this locking feature purposely.
i The gear selector lever always returns to
its original position.
The current transmission position P, R , N ,
or D appears in the multifunction display
( Y page 116).
Shifting into park position PXWith the vehicle at a standstill, press
button : on the gear selector lever.
SmartKey: When you turn off the engine using
the SmartKey, and remove the SmartKey
from the starter switch or open a front door,
the automatic transmission will shift into park
position P automatically.
KEYLESS-GO: When you turn off the engine
using the KEYLESS-GO start/stop button and
open a front door, the automatic transmission
will shift into park position P automatically.
GWarning!
Keep in mind that turning off the engine alone
only will shift the automatic transmission into
neutral position N automatically.
Always shift the automatic transmission into
park position P before turning off the engine.
Otherwise the vehicle could roll away which
could result in an accident and/or serious
personal injury.
i Moving the gear selector lever up or down
shifts the automatic transmission out of
park position P.
Shifting into neutral position NXWith the vehicle at a standstill, depress the
brake pedal.XMove the gear selector lever up or down to
the resistance point to select neutral
position N.
When you turn off the engine, the automatic
transmission will shift into neutral position
N automatically.
SmartKey: Removing the SmartKey from the
starter switch or opening a front door after
turning off the engine will shift the automatic
transmission into park position P
automatically.
KEYLESS-GO: Opening a front door after
turning off the engine will shift the automatic
transmission into park position P
automatically.
Remaining in neutral position N
If you want the automatic transmission to
remain in neutral position N, e.g. when taking
the vehicle through an automatic conveyor-
type car wash, observe the following
instructions.
GWarning!
When leaving the SmartKey in the starter
switch, do not leave children unattended in
the vehicle. It is possible for children to switch
on the ignition which could result in
unsupervised use of vehicle equipment.
Unsupervised use of vehicle equipment could
result in an accident and/or serious personal
injury.
Automatic transmission115Controls in detailX164_AKB; 5; 31, en-USd2ureepe,Version: 2.11.8.12009-09-11T12:30:16+02:00 - Seite 115Z
Page 118 of 380
With SmartKey:XMake sure the ignition is switched on.XWith the vehicle at a standstill, depress the
brake pedal and keep it pressed.
XShift the automatic transmission into
neutral position N.
XRelease the brake pedal.XIf engaged, release the parking brake.XSwitch off the ignition and leave the
SmartKey in the starter switch.
With KEYLESS-GO:
XMake sure the ignition is switched on.XWith the vehicle at a standstill, depress the
brake pedal and keep it pressed.
XShift the automatic transmission into park
position P.
XRelease the brake pedal.XRemove the KEYLESS-GO start/stop
button from the starter switch.
XInsert the SmartKey into the starter switch.XSwitch on the ignition.XDepress the brake pedal and keep it
pressed.
XShift the automatic transmission into
neutral position N.
XRelease the brake pedal.XIf engaged, release the parking brake.XSwitch off the ignition and leave the
SmartKey in the starter switch.
Shifting into reverse gear R
XWith the vehicle at a standstill, depress the
brake pedal.
XMove the gear selector lever up past the
resistance point.
Shifting into drive position D
XWith the vehicle at a standstill, depress the
brake pedal.
XMove the gear selector lever down past the
resistance point.Shifting procedure
The automatic transmission selects individual
gears automatically, depending onRthe selected gear range (Y page 118)
Rthe position of the accelerator pedal
Rthe vehicle speed
With drive position D selected, you can
influence transmission shifting by limiting or
extending the gear range.
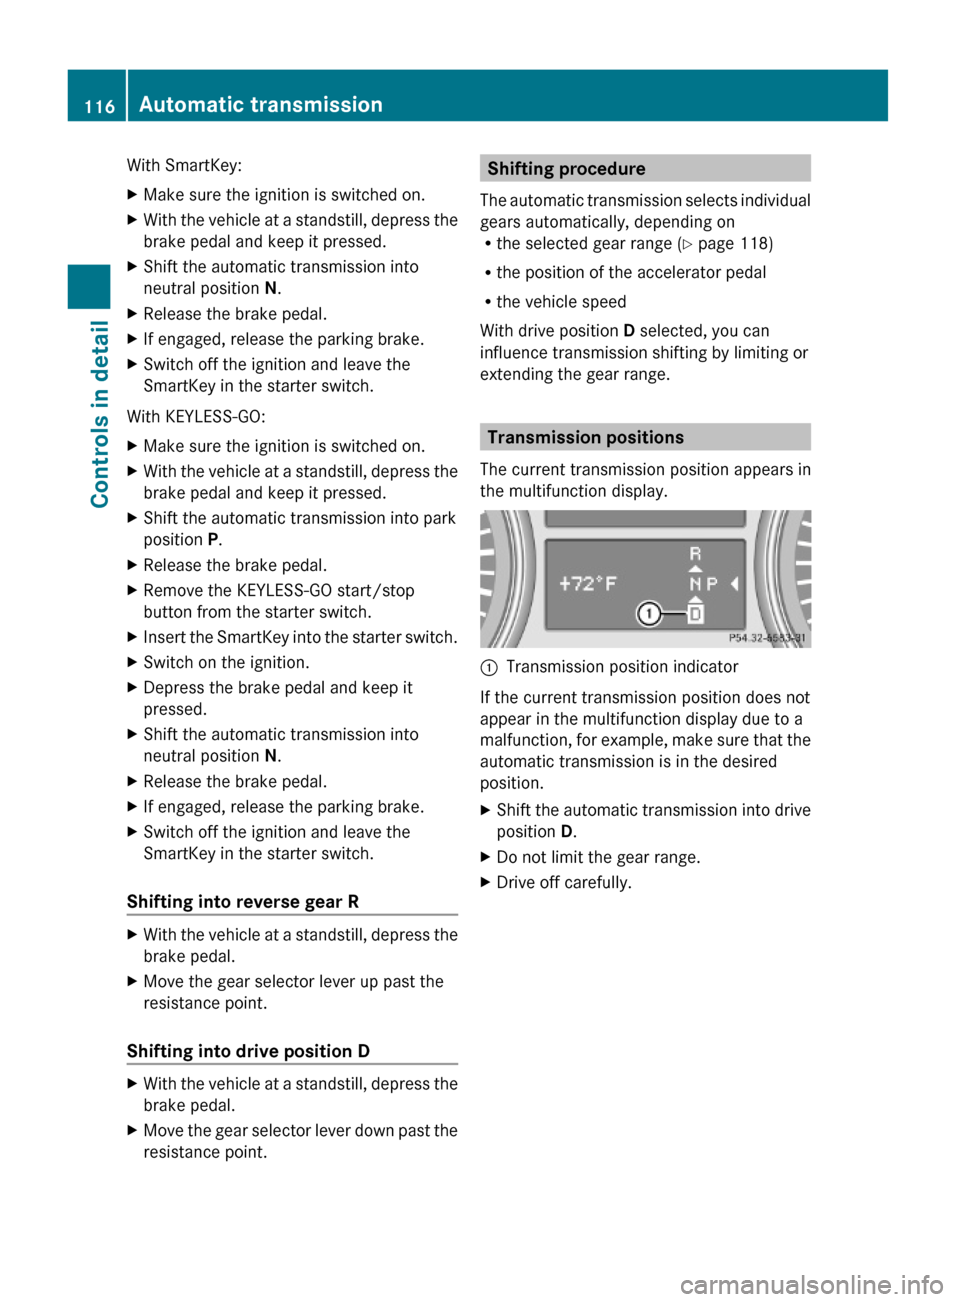
Transmission positions
The current transmission position appears in
the multifunction display.
:Transmission position indicator
If the current transmission position does not
appear in the multifunction display due to a
malfunction, for example, make sure that the
automatic transmission is in the desired
position.
XShift the automatic transmission into drive
position D.
XDo not limit the gear range.XDrive off carefully.116Automatic transmissionControls in detail
X164_AKB; 5; 31, en-USd2ureepe,Version: 2.11.8.12009-09-11T12:30:16+02:00 - Seite 116
Page 120 of 380

Rocking the vehicle
Rocking the vehicle by shifting the automatic
transmission directly between drive position
D and reverse gear R can help free a vehicle
stuck in mud or snow. The engine control
system of this vehicle electronically limits
directly shifting the automatic transmission
between drive position D and reverse gear R
to very low speeds, i.e. approximately 5 mph
(9 km/h). To shift the automatic transmission
directly between drive position D and reverse
gear R, move the gear selector lever up or
down past the resistance point.
Working on the vehicle
GWarning!
When working on the vehicle, engage the
parking brake and shift the automatic
transmission into park position P. Otherwise
the vehicle could roll away which could result
in an accident and/or serious personal injury.
Towing a trailer
XWhen you tow a trailer, shift into a lower
gear range manually if the automatic
transmission hunts between gears on
inclines.
A lower gear range and reduction of speed
reduces the potential to overload or to
overheat the engine.
For more information on trailer towing, see
“Trailer towing” (Y page 269).
Gear ranges
With the automatic transmission in drive
position D, you can limit or extend the gear
range, see “One-touch gearshifting”
(Y page 118).
The current gear range appears in the
multifunction display.:Gear range indicator Effect=With this selection you can use the
braking effect of the engine.
5Allows the use of the engine’s
braking effect when driving
Ron steep downgrades
Rin mountainous regions
Runder extreme operating
conditions
4For maximum use of the engine’s
braking effect on very steep or
lengthy downgrades.
One-touch gearshifting
With the automatic transmission in drive
position D, you can limit or extend the gear
range using the steering wheel gearshift
control.
Steering wheel gearshift control
118Automatic transmissionControls in detail
X164_AKB; 5; 31, en-USd2ureepe,Version: 2.11.8.12009-09-11T12:30:16+02:00 - Seite 118