2010 MERCEDES-BENZ GL550 display
[x] Cancel search: displayPage 31 of 380
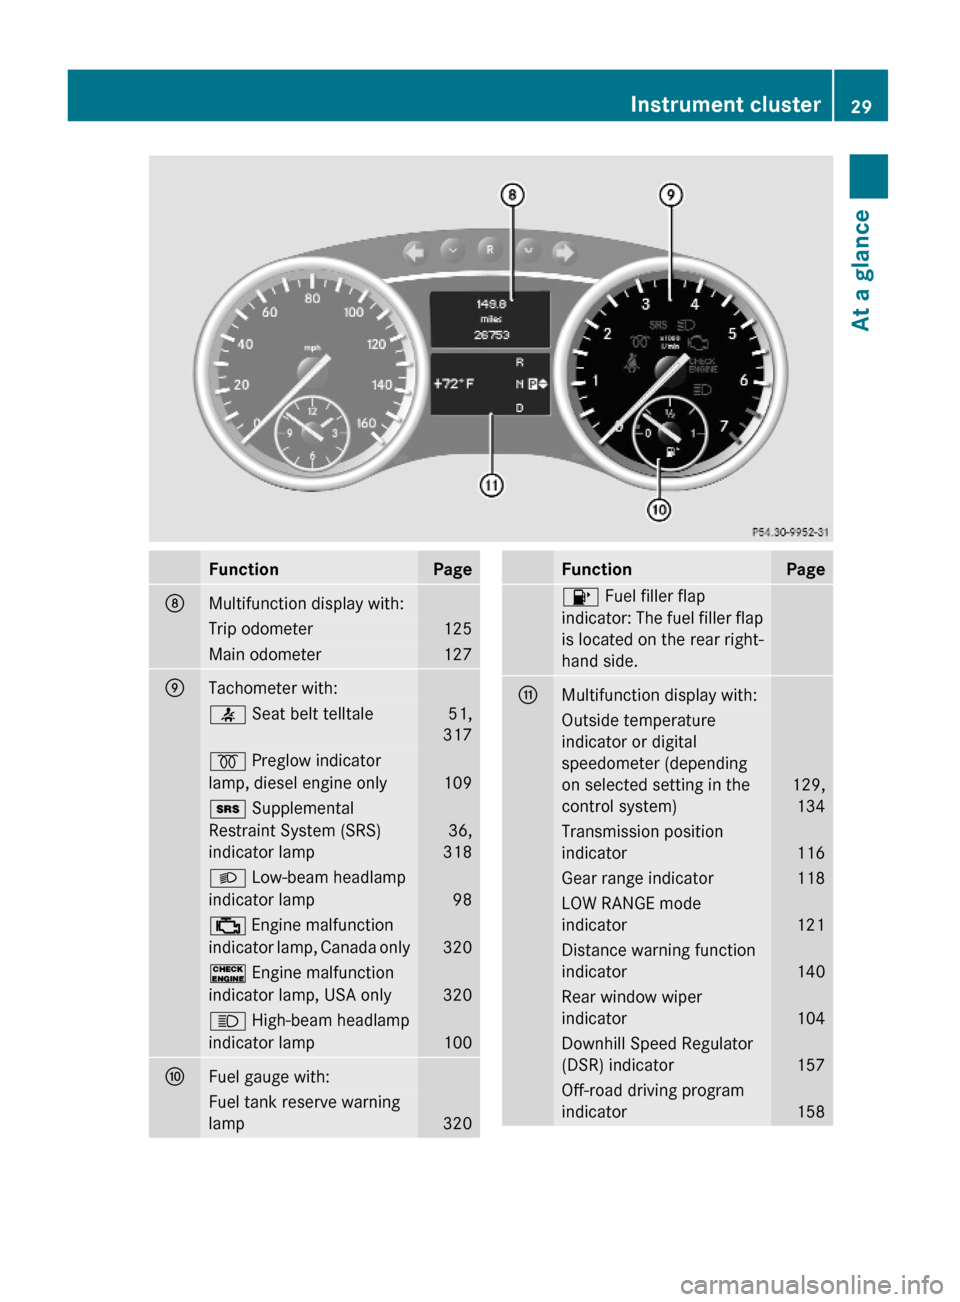
FunctionPageDMultifunction display with:Trip odometer125Main odometer127ETachometer with: 7 Seat belt telltale 51,
317
% Preglow indicator
lamp, diesel engine only 109
+ Supplemental
Restraint System (SRS)
indicator lamp
36,
318
L Low-beam headlamp
indicator lamp 98
; Engine malfunction
indicator lamp, Canada only320
! Engine malfunction
indicator lamp, USA only 320
K High-beam headlamp
indicator lamp 100
FFuel gauge with:Fuel tank reserve warning
lamp 320
FunctionPage8 Fuel filler flap
indicator: The fuel filler flap
is located on the rear right-
hand side.
GMultifunction display with:Outside temperature
indicator or digital
speedometer (depending
on selected setting in the
control system)
129,
134
Transmission position
indicator116
Gear range indicator118LOW RANGE mode
indicator121
Distance warning function
indicator140
Rear window wiper
indicator104
Downhill Speed Regulator
(DSR) indicator157
Off-road driving program
indicator158
Instrument cluster29At a glanceX164_AKB; 5; 31, en-USd2ureepe,Version: 2.11.8.12009-09-11T12:30:16+02:00 - Seite 29Z
Page 32 of 380
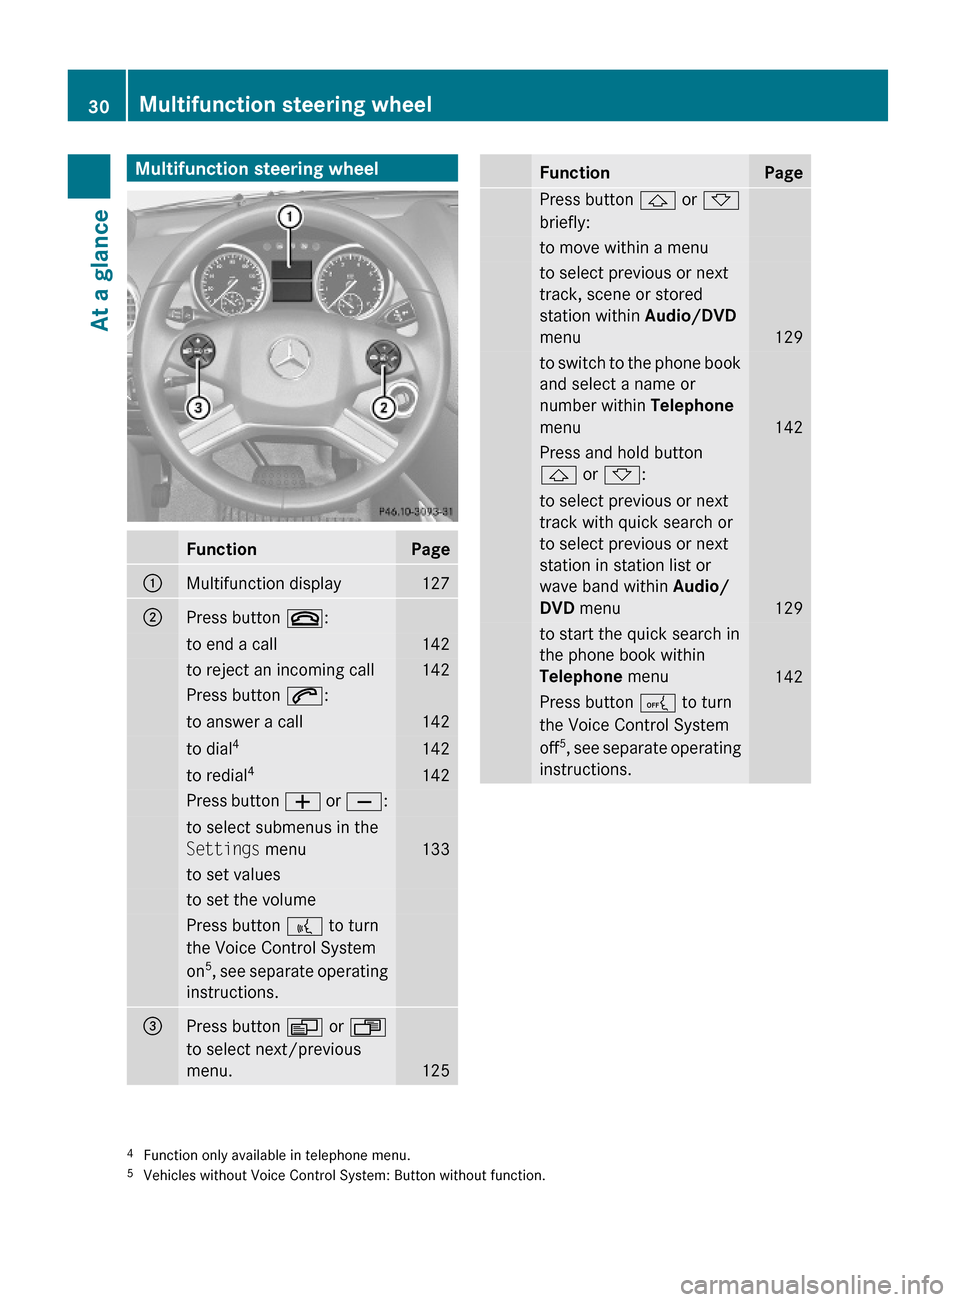
Multifunction steering wheelFunctionPage:Multifunction display127;Press button ~:to end a call142to reject an incoming call142Press button 6:to answer a call142to dial4142to redial4142Press button W or X:to select submenus in the
Settings menu133
to set valuesto set the volumePress button ? to turn
the Voice Control System
on5, see separate operating
instructions.
=Press button V or U
to select next/previous
menu.125
FunctionPagePress button & or *
briefly:
to move within a menuto select previous or next
track, scene or stored
station within Audio/DVD
menu129
to switch to the phone book
and select a name or
number within Telephone
menu142
Press and hold button
& or *:
to select previous or next
track with quick search or
to select previous or next
station in station list or
wave band within Audio/
DVD menu129
to start the quick search in
the phone book within
Telephone menu142
Press button A to turn
the Voice Control System
off5, see separate operating
instructions.
4Function only available in telephone menu.5Vehicles without Voice Control System: Button without function.
30Multifunction steering wheelAt a glance
X164_AKB; 5; 31, en-USd2ureepe,Version: 2.11.8.12009-09-11T12:30:16+02:00 - Seite 30
Page 45 of 380
GWarning!
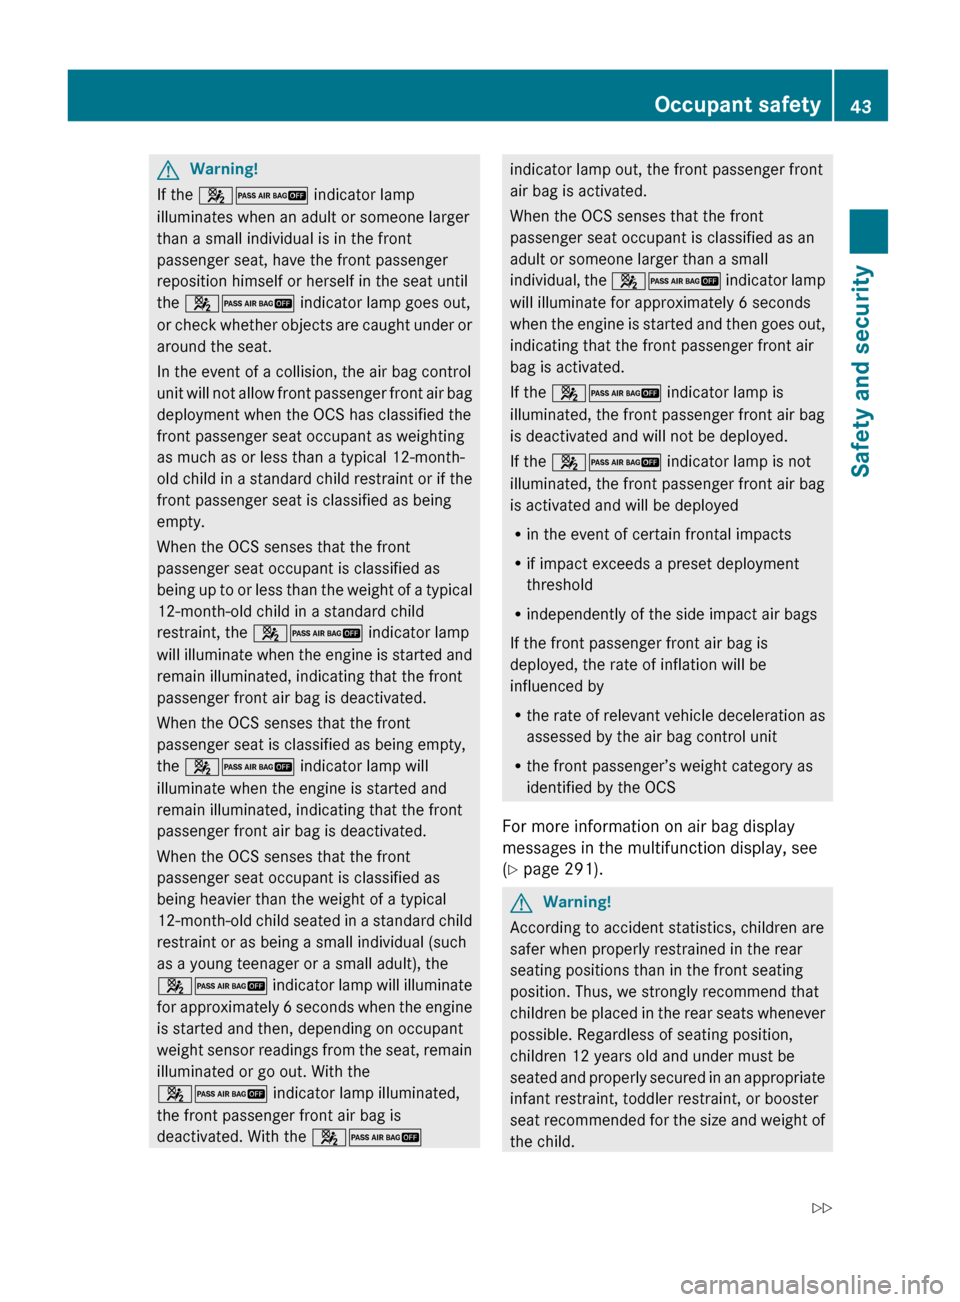
If the 42 indicator lamp
illuminates when an adult or someone larger
than a small individual is in the front
passenger seat, have the front passenger
reposition himself or herself in the seat until
the 42 indicator lamp goes out,
or check whether objects are caught under or
around the seat.
In the event of a collision, the air bag control
unit will not allow front passenger front air bag
deployment when the OCS has classified the
front passenger seat occupant as weighting
as much as or less than a typical 12-month-
old child in a standard child restraint or if the
front passenger seat is classified as being
empty.
When the OCS senses that the front
passenger seat occupant is classified as
being up to or less than the weight of a typical
12-month-old child in a standard child
restraint, the 42 indicator lamp
will illuminate when the engine is started and
remain illuminated, indicating that the front
passenger front air bag is deactivated.
When the OCS senses that the front
passenger seat is classified as being empty,
the 42 indicator lamp will
illuminate when the engine is started and
remain illuminated, indicating that the front
passenger front air bag is deactivated.
When the OCS senses that the front
passenger seat occupant is classified as
being heavier than the weight of a typical
12-month-old child seated in a standard child
restraint or as being a small individual (such
as a young teenager or a small adult), the
42 indicator lamp will illuminate
for approximately 6 seconds when the engine
is started and then, depending on occupant
weight sensor readings from the seat, remain
illuminated or go out. With the
42 indicator lamp illuminated,
the front passenger front air bag is
deactivated. With the 42
indicator lamp out, the front passenger front
air bag is activated.
When the OCS senses that the front
passenger seat occupant is classified as an
adult or someone larger than a small
individual, the 42 indicator lamp
will illuminate for approximately 6 seconds
when the engine is started and then goes out,
indicating that the front passenger front air
bag is activated.
If the 42 indicator lamp is
illuminated, the front passenger front air bag
is deactivated and will not be deployed.
If the 42 indicator lamp is not
illuminated, the front passenger front air bag
is activated and will be deployed
R in the event of certain frontal impacts
R if impact exceeds a preset deployment
threshold
R independently of the side impact air bags
If the front passenger front air bag is
deployed, the rate of inflation will be
influenced by
R the rate of relevant vehicle deceleration as
assessed by the air bag control unit
R the front passenger’s weight category as
identified by the OCS
For more information on air bag display
messages in the multifunction display, see
( Y page 291).GWarning!
According to accident statistics, children are
safer when properly restrained in the rear
seating positions than in the front seating
position. Thus, we strongly recommend that
children be placed in the rear seats whenever
possible. Regardless of seating position,
children 12 years old and under must be
seated and properly secured in an appropriate
infant restraint, toddler restraint, or booster
seat recommended for the size and weight of
the child.
Occupant safety43Safety and securityX164_AKB; 5; 31, en-USd2ureepe,Version: 2.11.8.12009-09-11T12:30:16+02:00 - Seite 43Z
Page 56 of 380
must be reset. Otherwise, the NECK-PRO
active front head restraints cannot offer any
additional protection in the event of another
rear-end collision.
For information on resetting the activated
NECK-PRO active front head restraints, see
“Resetting activated head restraints”
(Y page 325).
You cannot remove the NECK-PRO active
front head restraints.
GWarning!
For your protection, drive only with properly
positioned head restraints.
Adjust the head restraint so that it is as close
to the head as possible and the center of the
head restraint supports the back of the head
at eye level. This will reduce the potential for
injury to the head and neck in the event of an
accident or similar situation.
For information on head restraint adjustment,
see “Head restraint height” (Y page 83), or
see “Head restraint fore and aft adjustment”
(Y page 84).
Correct driver seat adjustment
GWarning!
In order to avoid possible loss of vehicle
control the following must be done before the
vehicle is put into motion:
Rseat adjustment
Rhead restraint adjustment
Rsteering wheel adjustment
Rrear view mirror adjustment
Rfastening of seat belts
Steering wheel
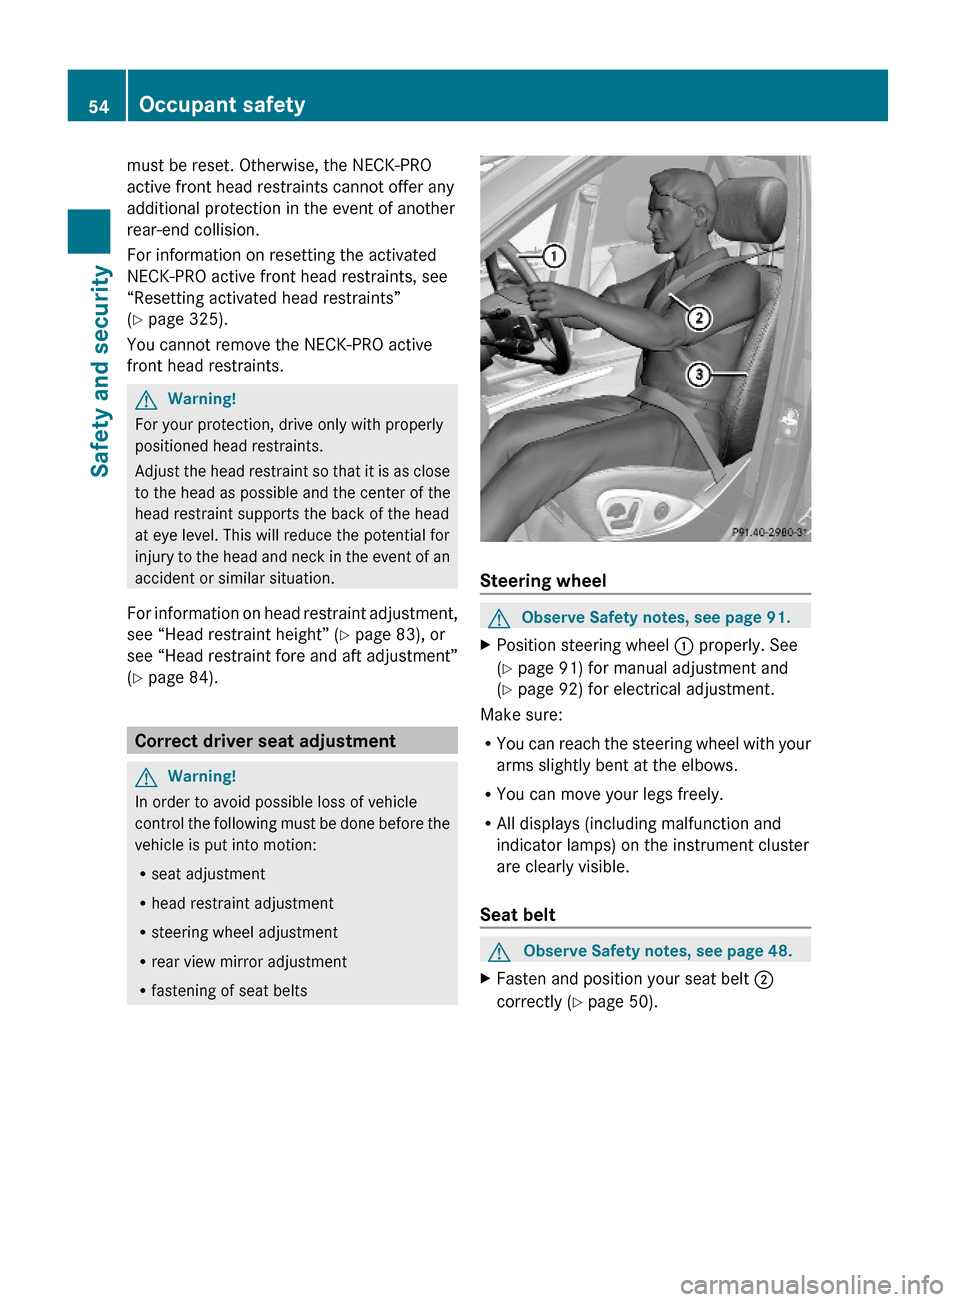
GObserve Safety notes, see page 91.XPosition steering wheel : properly. See
(Y page 91) for manual adjustment and
(Y page 92) for electrical adjustment.
Make sure:
RYou can reach the steering wheel with your
arms slightly bent at the elbows.
RYou can move your legs freely.
RAll displays (including malfunction and
indicator lamps) on the instrument cluster
are clearly visible.
Seat belt
GObserve Safety notes, see page 48.XFasten and position your seat belt ;
correctly (Y page 50).
54Occupant safetySafety and security
X164_AKB; 5; 31, en-USd2ureepe,Version: 2.11.8.12009-09-11T12:30:16+02:00 - Seite 54
Page 64 of 380

achieved with winter tires, or snow chains
as required.
Safety notesGWarning!
The following factors increase the risk of
accidents:
R Excessive speed, especially in turns
R Wet and slippery road surfaces
R Following another vehicle too closely
The driving safety systems described in this
section cannot reduce these risks or prevent
the natural laws of physics from acting on the
vehicle. They cannot increase braking or
steering efficiency beyond that afforded by
the condition of the vehicle brakes and tires
or the traction afforded.
Only a safe, attentive, and skillful driver can
prevent accidents.
The capabilities of a vehicle equipped with the
driving safety systems described in this
section must never be exploited in a reckless
or dangerous manner which could jeopardize
the user’s safety or the safety of others.
Always adjust your driving style to the
prevailing road and weather conditions and
keep a safe distance to other road users and
objects on the street.
If a driving system malfunctions, other driving
safety systems may also switch off. Observe
indicator and warning lamps that may come
on as well as messages in the multifunction
display that may appear.
ABS
GObserve Safety notes, see page 62.GWarning!
Do not pump the brake pedal. Use firm, steady
brake pedal pressure instead. Pumping the
brake pedal defeats the purpose of the ABS
and significantly reduces braking
effectiveness.
The Antilock Brake System (ABS) regulates
the brake pressure so that the wheels do not
lock during braking. This allows you to
maintain the ability to steer your vehicle.
The ABS is functional above a speed of
approximately 5 mph (8 km/h) independent
of road surface conditions.
On slippery road surfaces, the ABS will
respond even to light brake pressure.
The ABS indicator lamp ! indicator lamp
in the instrument cluster comes on when you
switch on the ignition. It goes out when the
engine is running.
Braking
At the instant one of the wheels is about to
lock up, a slight pulsation can be felt in the
brake pedal. The pulsation indicates that the
ABS is in the regulating mode.
XKeep firm and steady pressure on the brake
pedal while you feel the pulsation.
Continuous, steady brake pedal pressure
yields the advantages provided by the ABS,
namely braking power and the ability to steer
the vehicle.
The pulsating brake pedal can be an
indication of hazardous road conditions and
functions as a reminder to take extra care
while driving.
Emergency brake maneuver
XKeep continuous full pressure on the brake
pedal.GWarning!
If the ABS malfunctions, other driving safety
systems such as the BAS or the ESP ®
are also
switched off. Observe indicator and warning
lamps that may come on as well as messages
in the multifunction display that may appear.
62Driving safety systemsSafety and security
X164_AKB; 5; 31, en-USd2ureepe,Version: 2.11.8.12009-09-11T12:30:16+02:00 - Seite 62
Page 74 of 380
Important notes on using KEYLESS-GO
RYou can also use the SmartKey with
KEYLESS-GO like a normal SmartKey
( Y page 70).
R You can combine KEYLESS-GO functions
with normal SmartKey functions (e.g.
unlocking with KEYLESS-GO and locking
with button &).
R Always carry the SmartKey with you.
R Never store the SmartKey together with:
- Electronic items such as a mobile phone
or another SmartKey
- Metallic objects such as coins or metal
foil
Doing so could impair the function of the
KEYLESS-GO system.
R To lock or unlock the vehicle, the SmartKey
must be located outside the vehicle within
approximately 3 ft (1 m) of a door or the
tailgate.
R When the vehicle has been parked for more
than 72 hours, the KEYLESS-GO function is
deactivated. Pull an outside door handle
and switch on the ignition once to activate
the KEYLESS-GO function.
R If the SmartKey is positioned farther away
from the vehicle, the system may no longer
recognize the SmartKey. The vehicle
cannot be locked or the engine started via
the KEYLESS-GO system.
R If the SmartKey is removed from the vehicle
(e.g. if a passenger exits the vehicle with
the SmartKey)
- when pressing the KEYLESS-GO start/
stop button or trying to lock the vehicle
with the lock button on an outside door
handle the message Key Not
Detected appears in the multifunction
display
- with the engine running, the red message
Key Not Detected appears in the
multifunction display while driving off
Find the SmartKey or change its present
location immediately (e.g. place it on the
front passenger seat or insert it in shirt
pocket).
R If you have started the engine with the
KEYLESS-GO start/stop button, you can
turn it off again by
- pressing the KEYLESS-GO start/stop
button
- inserting the SmartKey into the starter
switch when the vehicle is at a standstill
and the automatic transmission is in park
position P
R The vehicle could be inadvertently
unlocked if the SmartKey is within 3 ft (1 m)
of the vehicle and
- an outside door handle is splashed with
water
or
- you attempt to clean an outside door
handle
R Remember that the engine can be started
by anyone with a SmartKey that is left
inside the vehicle.
Possibility 1 (One SmartKey in the vehicle,
one SmartKey outside the vehicle):
If you leave the SmartKey behind when
exiting and locking the vehicle, no message
appears in the multifunction display.
Possibility 2 (One SmartKey in the vehicle,
no SmartKey outside the vehicle):
When exiting and trying to lock the vehicle,
the message Key Detected In Vehicle
appears in the multifunction display. The
vehicle will not be locked.
Factory setting XGlobal unlocking: Grasp an outside door
handle.72Locking and unlockingControls in detail
X164_AKB; 5; 31, en-USd2ureepe,Version: 2.11.8.12009-09-11T12:30:16+02:00 - Seite 72
Page 87 of 380
Easy-entry/exit feature for third-row
seats
This feature allows for easier access to and
exit from the vehicle’s third-row seats.
GWarning!
To help avoid personal injury, the second-row
seat backrests must be properly locked either
in the upright position or, when using the
expanded cargo volume, in the fully folded
position while the vehicle is in motion.
Easy-entry feature for third-row seats
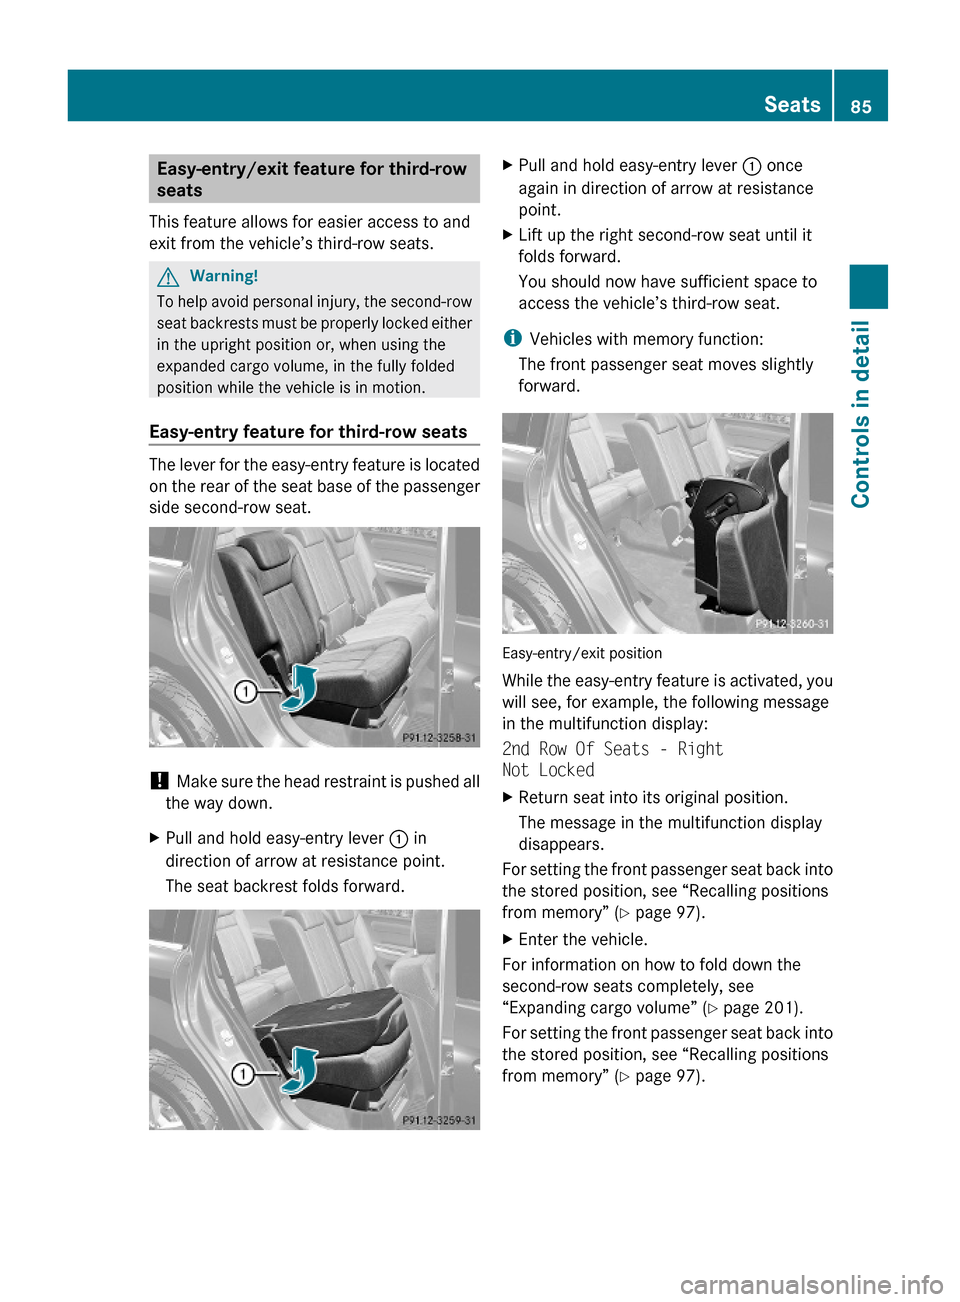
The lever for the easy-entry feature is located
on the rear of the seat base of the passenger
side second-row seat.
! Make sure the head restraint is pushed all
the way down.
XPull and hold easy-entry lever : in
direction of arrow at resistance point.
The seat backrest folds forward.
XPull and hold easy-entry lever : once
again in direction of arrow at resistance
point.
XLift up the right second-row seat until it
folds forward.
You should now have sufficient space to
access the vehicle’s third-row seat.
iVehicles with memory function:
The front passenger seat moves slightly
forward.
Easy-entry/exit position
While the easy-entry feature is activated, you
will see, for example, the following message
in the multifunction display:
2nd Row Of Seats - Right
Not Locked
XReturn seat into its original position.
The message in the multifunction display
disappears.
For setting the front passenger seat back into
the stored position, see “Recalling positions
from memory” (Y page 97).
XEnter the vehicle.
For information on how to fold down the
second-row seats completely, see
“Expanding cargo volume” (Y page 201).
For setting the front passenger seat back into
the stored position, see “Recalling positions
from memory” (Y page 97).
Seats85Controls in detailX164_AKB; 5; 31, en-USd2ureepe,Version: 2.11.8.12009-09-11T12:30:16+02:00 - Seite 85Z
Page 88 of 380
Easy-exit feature for third-row seats
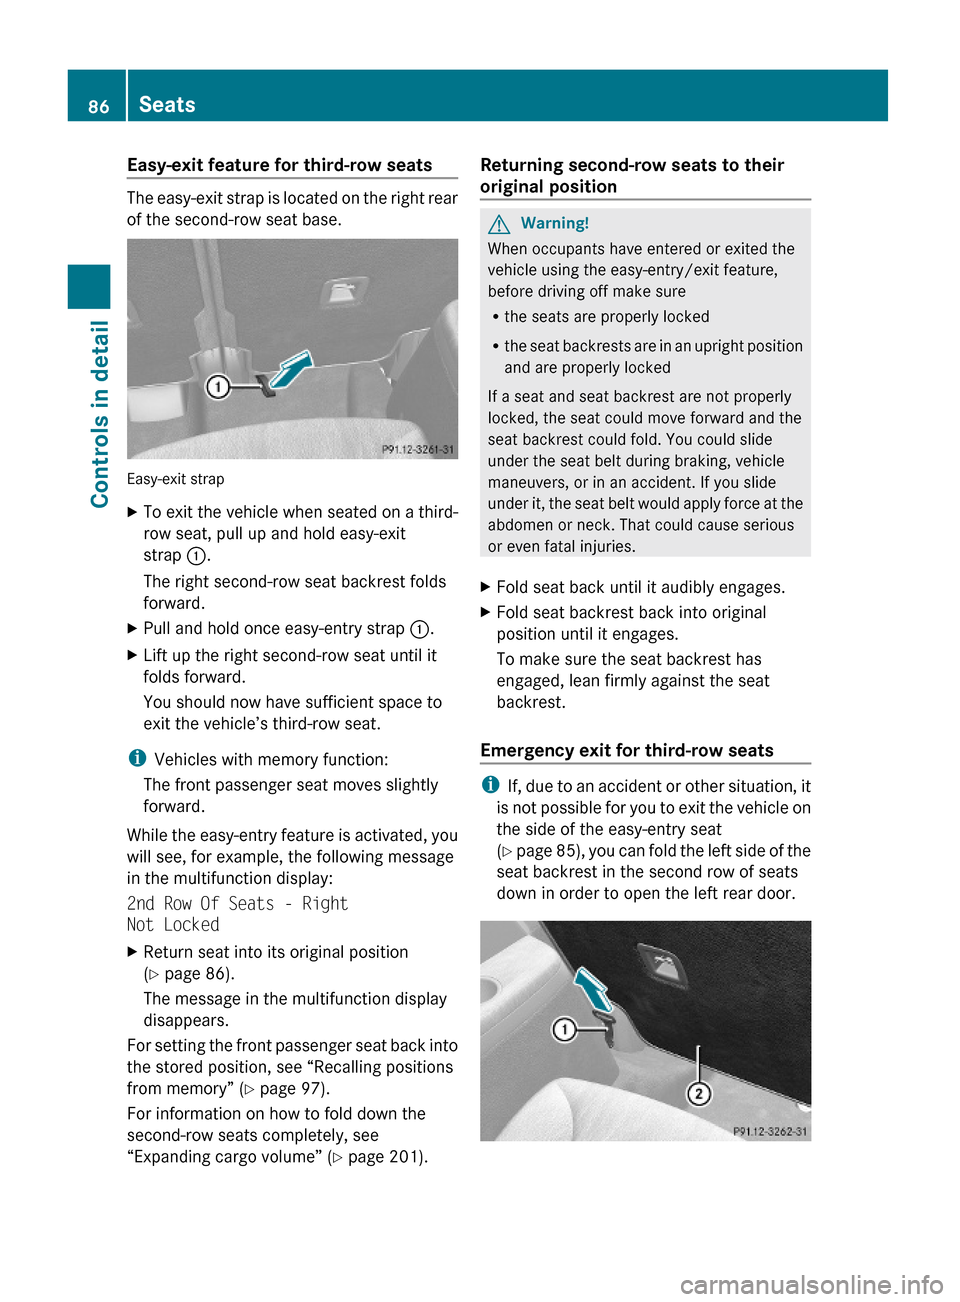
The easy-exit strap is located on the right rear
of the second-row seat base.
Easy-exit strap
XTo exit the vehicle when seated on a third-
row seat, pull up and hold easy-exit
strap :.
The right second-row seat backrest folds
forward.
XPull and hold once easy-entry strap :.XLift up the right second-row seat until it
folds forward.
You should now have sufficient space to
exit the vehicle’s third-row seat.
iVehicles with memory function:
The front passenger seat moves slightly
forward.
While the easy-entry feature is activated, you
will see, for example, the following message
in the multifunction display:
2nd Row Of Seats - Right
Not Locked
XReturn seat into its original position
(Y page 86).
The message in the multifunction display
disappears.
For setting the front passenger seat back into
the stored position, see “Recalling positions
from memory” (Y page 97).
For information on how to fold down the
second-row seats completely, see
“Expanding cargo volume” (Y page 201).
Returning second-row seats to their
original position
GWarning!
When occupants have entered or exited the
vehicle using the easy-entry/exit feature,
before driving off make sure
Rthe seats are properly locked
Rthe seat backrests are in an upright position
and are properly locked
If a seat and seat backrest are not properly
locked, the seat could move forward and the
seat backrest could fold. You could slide
under the seat belt during braking, vehicle
maneuvers, or in an accident. If you slide
under it, the seat belt would apply force at the
abdomen or neck. That could cause serious
or even fatal injuries.
XFold seat back until it audibly engages.XFold seat backrest back into original
position until it engages.
To make sure the seat backrest has
engaged, lean firmly against the seat
backrest.
Emergency exit for third-row seats
iIf, due to an accident or other situation, it
is not possible for you to exit the vehicle on
the side of the easy-entry seat
(Y page 85), you can fold the left side of the
seat backrest in the second row of seats
down in order to open the left rear door.
86SeatsControls in detail
X164_AKB; 5; 31, en-USd2ureepe,Version: 2.11.8.12009-09-11T12:30:16+02:00 - Seite 86