2010 MERCEDES-BENZ GL550 towing
[x] Cancel search: towingPage 246 of 380
XStep 3: Subtract the combined weight of
the driver and passengers from
XXX kilograms or XXX lbs.XStep 4: The resulting figure equals the
available amount of cargo and luggage load
capacity. For example, if the “XXX” amount
equals 1 400 lbs and there will be five
150 lbs passengers in your vehicle, the
amount of available cargo and luggage load
capacity is 650 lbs
(1 400 - 750 (5 x 150) = 650 lbs).XStep 5: Determine the combined weight of
luggage and cargo being loaded on the
vehicle. That weight may not safely exceed
the available cargo and luggage load
capacity calculated in step 4.XStep 6 (if applicable): If your vehicle will
be towing a trailer, load from your trailer
will be transferred to your vehicle. Consult
this manual to determine how this reduces
the available cargo and luggage load
capacity of your vehicle ( Y page 246).
The following table shows examples on how
to calculate total and cargo load capacities
with varying seating configurations and
number and size of occupants. The following
examples use a load limit of 1 500 lbs. This
is for illustration purposes only. Make sure
you are using the actual load limit for your
vehicle stated on the vehicle’s Tire and
Loading Information placard ( Y page 243).
244Tires and wheelsOperation
X164_AKB; 5; 31, en-USd2ureepe,Version: 2.11.8.12009-09-11T12:30:16+02:00 - Seite 244
Page 271 of 380
Trailer towingGWarning!
Failure to use proper equipment and driving
technique can result in a loss of vehicle
control when towing a trailer.
Improper towing or failure to follow the
instructions in this manual can result in
vehicle damage and/or serious personal
injury. Follow the guidelines below carefully
to assure safe trailer operation.
Contact an authorized Mercedes-Benz Center
should you require an explanation of
information contained in this manual.
Trailer hitch
R Only install a trailer hitch receiver approved
for your vehicle.
For information on availability and
installation, contact an authorized
Mercedes-Benz Center.
R The bumpers on your vehicle are not
designed for use with clamp-type hitches.
Do not attach rental hitches or other
bumper-type hitches to them.
R To reduce the possibility of damage,
remove the hitch ball adapter from the
receiver when not in use.
Electrical connections
The vehicle is prewired to accept the seven-
wire harness included in the Mercedes-Benz
approved trailer hitch receiver kit.
i A four-pole conversion plug is available
from your authorized Mercedes-Benz
Center as a spare part.
For further information, contact an
authorized Mercedes-Benz Center.
Vehicle and trailer weights and ratings
The Gross Trailer Weight (GTW) is the weight
of the trailer plus the weight of all cargo,
equipment, luggage, etc. loaded on the
trailer. The maximum permissible GTW to be
towed: 7 500 lb (3 402 kg).
Trailer Tongue Weight Rating (TWR) is the
maximum permissible weight on the trailer
tongue: 600 lb (272 kg) limit for Mercedes-
Benz approved hitch receiver.
Loading a trailer
R When loading a trailer, you should observe
that neither the permissible GTW, nor the
Gross Vehicle Weight Rating (GVWR) are
exceeded. The GVWR is indicated on the
certification label located on the driver’s
door B-pillar ( Y page 242).
Maximum permissible values are listed on
the safety compliance certification labels
for the vehicle and for the trailer to be
towed.
The lowest value listed must be selected
when determining how the vehicle and
trailer are loaded.
R The tongue weight at the hitch ball must be
added to the rear axle weight to prevent
exceeding the rear Gross Axle Weight
Rating (GAWR). The GAWR is indicated on
the certification label located on the
driver’s door B-pillar ( Y page 242).
i Mercedes-Benz recommends loading the
trailer in such a manner that it has a tongue
weight between 8 % and 15 % of the GTW.
i The weight of other accessories,
passengers and cargo will reduce the
maximum trailer weight and tongue weight
your vehicle can tow.
Checking weights of vehicle and trailer
R To assure that the towing vehicle and trailer
are in compliance with the maximum
permissible weight limits, have the loaded
rig (towing vehicle including driver,
passengers and cargo, trailer fully loaded)
weighed on a commercial scale.
R Check the vehicle’s front and rear gross
axle weight, the Gross Trailer Weight (GTW)
and tongue weight.Driving instructions269OperationX164_AKB; 5; 31, en-USd2ureepe,Version: 2.11.8.12009-09-11T12:30:16+02:00 - Seite 269Z
Page 272 of 380
The values as measured must not exceed
the weight limits listed under “Vehicle and
trailer weights and ratings” ( Y page 269).
Coupling a trailer GWarning!
While you are coupling or decoupling a trailer,
make sure nobody locks or unlocks the
vehicle and/or opens or closes doors or the
tailgate.
The vehicle’s level could change and you
could endanger yourself and/or others as a
result.
Make sure that you do not operate the ADS
button or the vehicle level control system
when coupling/decoupling the trailer.
Observe maximum permitted trailer
dimensions (width and length).
Most states and all Canadian provinces
require
R safety chains between the towing vehicle
and the trailer
The chains should be criss-crossed under
the trailer tongue. They must be attached
to the hitch receiver, and not to the
vehicle’s bumper or axle.
Make sure to leave enough slack in the
chains to permit turning corners.
R a separate brake system at various trailer
weights
R a break-away switch on trailers with a
separate brake system.
Check with your local state laws for specific
requirements.
The switch activates the trailer brakes in
the possible event that the trailer might
separate from the tow vehicle.
! Do not connect a trailer brake system (if
trailer is so equipped) directly to the
vehicle’s hydraulic brake system, as your
vehicle is equipped with antilock brakes. If
you do, neither the vehicle’s brakes nor the
trailer’s brakes will function properly.
i The provided vehicle electrical wiring
harness for trailer towing has a brake signal
wire for hook-up to a brake controller.XMake sure the automatic transmission is in
park position P (Y page 115).XEngage the parking brake for the vehicle
( Y page 112).XStart the engine ( Y page 108).XSelect the highway level ( Y page 159).XVehicles with Adaptive Damping System
(ADS):
Set the ADS to AUTO or COMF
( Y page 159).XTurn off the engine ( Y page 113).XClose all doors and the tailgate.XAttach the trailer.XPlug in all electrical connectors.
i
When you are towing a trailer, the vehicle
level always remains in the highway setting.
The following applies additionally when
towing a trailer:
R The vehicle is lowered to the highway
level when it reaches a speed of 5 mph
(8 km/h) if not set to highway level.
R The highspeed level is not available.
The restrictions that apply to towing also
apply when using accessories that are
connected to the trailer power socket, such
as a bicycle rack.
Towing a trailer
There are many different laws, including
speed limit restrictions, having to do with
trailer towing. Make sure your rig will be legal,
not only for where you reside, but also for
where you will be driving. A good source for
this information can be the police or local
authorities.
Note the following, when driving with a trailer:
R In order to gain skill and an understanding
of the vehicle’s behavior, you should
270Driving instructionsOperation
X164_AKB; 5; 31, en-USd2ureepe,Version: 2.11.8.12009-09-11T12:30:16+02:00 - Seite 270
Page 273 of 380
practice turning, stopping and backing up
in an area which is free of traffic.
R Before you start driving check the
- trailer hitch
- break-away switch
- safety chains
- electrical connections
- lighting
- tires
R Adjust the mirrors ( Y page 94) to permit
unobstructed view beyond rear of trailer.
R If the trailer has electric brakes, start your
vehicle and trailer moving slowly, and then
apply only the trailer brake controller by
hand to make sure the brakes are working
properly.
R Always secure items in the trailer to
prevent load shifts while driving.
R When towing a trailer, check occasionally
to make sure the load is secure, and that
trailer lighting and brakes (if so equipped)
are functioning properly.
R Take into consideration that when towing a
trailer, the handling characteristics are
different and less stable from those when
operating the vehicle without a trailer.
It is important to avoid sudden maneuvers.
R The vehicle and trailer combination is
heavier, and therefore limited in
acceleration and climbing ability, and has a
larger braking distance.
It is more prone to reacting to cross wind
gusts, and requires more sensitive steering
input.
R If possible, do not brake abruptly, but
rather engage the brake slightly at first to
permit the trailer to activate its brake. Then
increase the braking force.
! If the trailer should begin to sway, reduce
the vehicle’s speed immediately.Do not attempt to straighten out the tow
vehicle and trailer by increasing the speed.
R If the transmission shifts between gears on
inclines repeatedly, shift to a lower gear
range manually ( Y page 118). Select 4, 3 ,
2 or 1.
A lower gear and reduction of speed
reduces the chance of engine overloading
and/or overheating.
R On very steep inclines, not manageable
with automatic transmission in gear range
1 , switch on off-road driving program
( Y page 158) or LOW RANGE mode
( Y page 120).
R When going down an incline, shift into a
lower gear and use the engine’s braking
effect.
Avoid riding the brakes, thus overheating
the vehicle and trailer brakes (if so
equipped).
R If the engine coolant rises to an extremely
high temperature when the air conditioning
is on, turn off the air conditioning system.
Engine coolant heat can be additionally
vented by opening the windows, switching
the climate control fan speed to high and
setting the temperature control to the
maximum.
R During a passing maneuver extreme care
must be exercised since your vehicle with
a trailer will require additional passing
distance ahead than when driving without
a trailer.
Because your vehicle and trailer is longer
than your vehicle alone, you will also need
to go much farther ahead of the passed
vehicle before you can return to your lane.
Decoupling a trailer GWarning!
While you are coupling or decoupling a trailer,
make sure nobody locks or unlocks the
Driving instructions271OperationX164_AKB; 5; 31, en-USd2ureepe,Version: 2.11.8.12009-09-11T12:30:16+02:00 - Seite 271Z
Page 285 of 380
Vehicle equipment ............................284
Where will I find ...? ..........................284
Vehicle status messages in the
multifunction display .......................287
What to do if … ..................................314
Unlocking/locking manually ...........323
Resetting activated NECK-PRO
active front head restraints .............325
Replacing SmartKey batteries .........326
Replacing bulbs .................................328
Replacing wiper blades ....................334
Flat tire ..............................................336
Bleeding the fuel system (diesel
engine only) .......................................345
AdBlue® (diesel engine only) ...........346
Battery ...............................................348
Jump starting ....................................350
Towing the vehicle ............................352
Fuses ..................................................355
283Practical hintsX164_AKB; 5; 31, en-USd2ureepe,Version: 2.11.8.12009-09-11T12:30:16+02:00 - Seite 283
Page 286 of 380
Vehicle equipment
iThis Operator’s Manual describes all
features, standard or optional, potentially
available for your vehicle at the time of
purchase. Please be aware that your
vehicle might not be equipped with all
features described in this manual.
Where will I find ...?
First aid kit
iCheck expiration dates and contents for
completeness at least once a year and
replace missing/expired items.
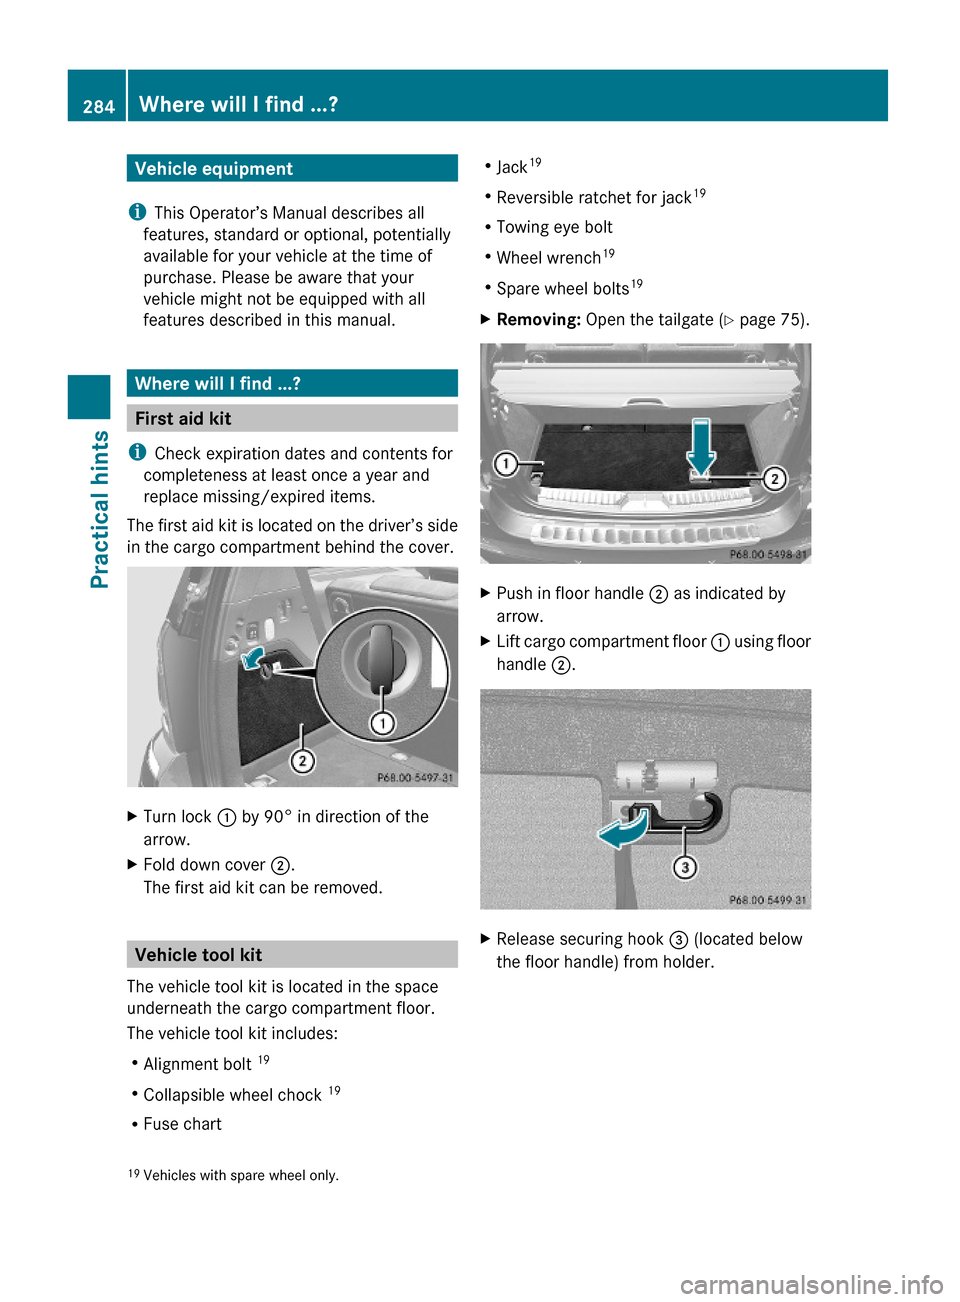
The first aid kit is located on the driver’s side
in the cargo compartment behind the cover.
XTurn lock : by 90° in direction of the
arrow.
XFold down cover ;.
The first aid kit can be removed.
Vehicle tool kit
The vehicle tool kit is located in the space
underneath the cargo compartment floor.
The vehicle tool kit includes:
RAlignment bolt 19
RCollapsible wheel chock 19
RFuse chart
RJack19
RReversible ratchet for jack19
RTowing eye bolt
RWheel wrench19
RSpare wheel bolts19
XRemoving: Open the tailgate (Y page 75).XPush in floor handle ; as indicated by
arrow.
XLift cargo compartment floor : using floor
handle ;.
XRelease securing hook = (located below
the floor handle) from holder.19Vehicles with spare wheel only.284Where will I find ...?Practical hints
X164_AKB; 5; 31, en-USd2ureepe,Version: 2.11.8.12009-09-11T12:30:16+02:00 - Seite 284
Page 287 of 380
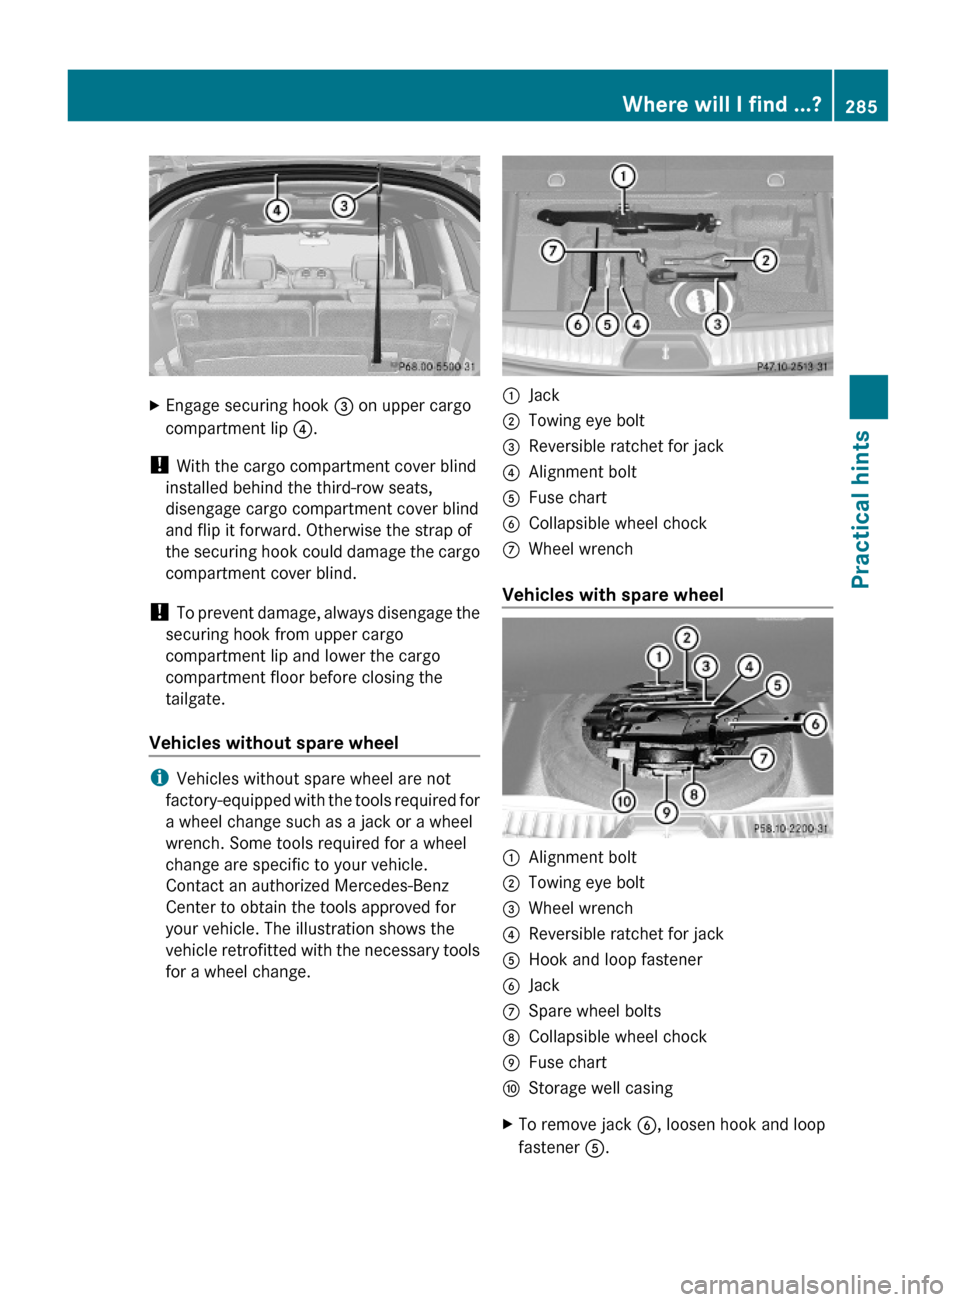
XEngage securing hook = on upper cargo
compartment lip ?.
! With the cargo compartment cover blind
installed behind the third-row seats,
disengage cargo compartment cover blind
and flip it forward. Otherwise the strap of
the securing hook could damage the cargo
compartment cover blind.
! To prevent damage, always disengage the
securing hook from upper cargo
compartment lip and lower the cargo
compartment floor before closing the
tailgate.
Vehicles without spare wheel
iVehicles without spare wheel are not
factory-equipped with the tools required for
a wheel change such as a jack or a wheel
wrench. Some tools required for a wheel
change are specific to your vehicle.
Contact an authorized Mercedes-Benz
Center to obtain the tools approved for
your vehicle. The illustration shows the
vehicle retrofitted with the necessary tools
for a wheel change.
:Jack;Towing eye bolt=Reversible ratchet for jack?Alignment boltAFuse chartBCollapsible wheel chockCWheel wrench
Vehicles with spare wheel
:Alignment bolt;Towing eye bolt=Wheel wrench?Reversible ratchet for jackAHook and loop fastenerBJackCSpare wheel boltsDCollapsible wheel chockEFuse chartFStorage well casingXTo remove jack B, loosen hook and loop
fastener A.
Where will I find ...?285Practical hintsX164_AKB; 5; 31, en-USd2ureepe,Version: 2.11.8.12009-09-11T12:30:16+02:00 - Seite 285Z
Page 303 of 380
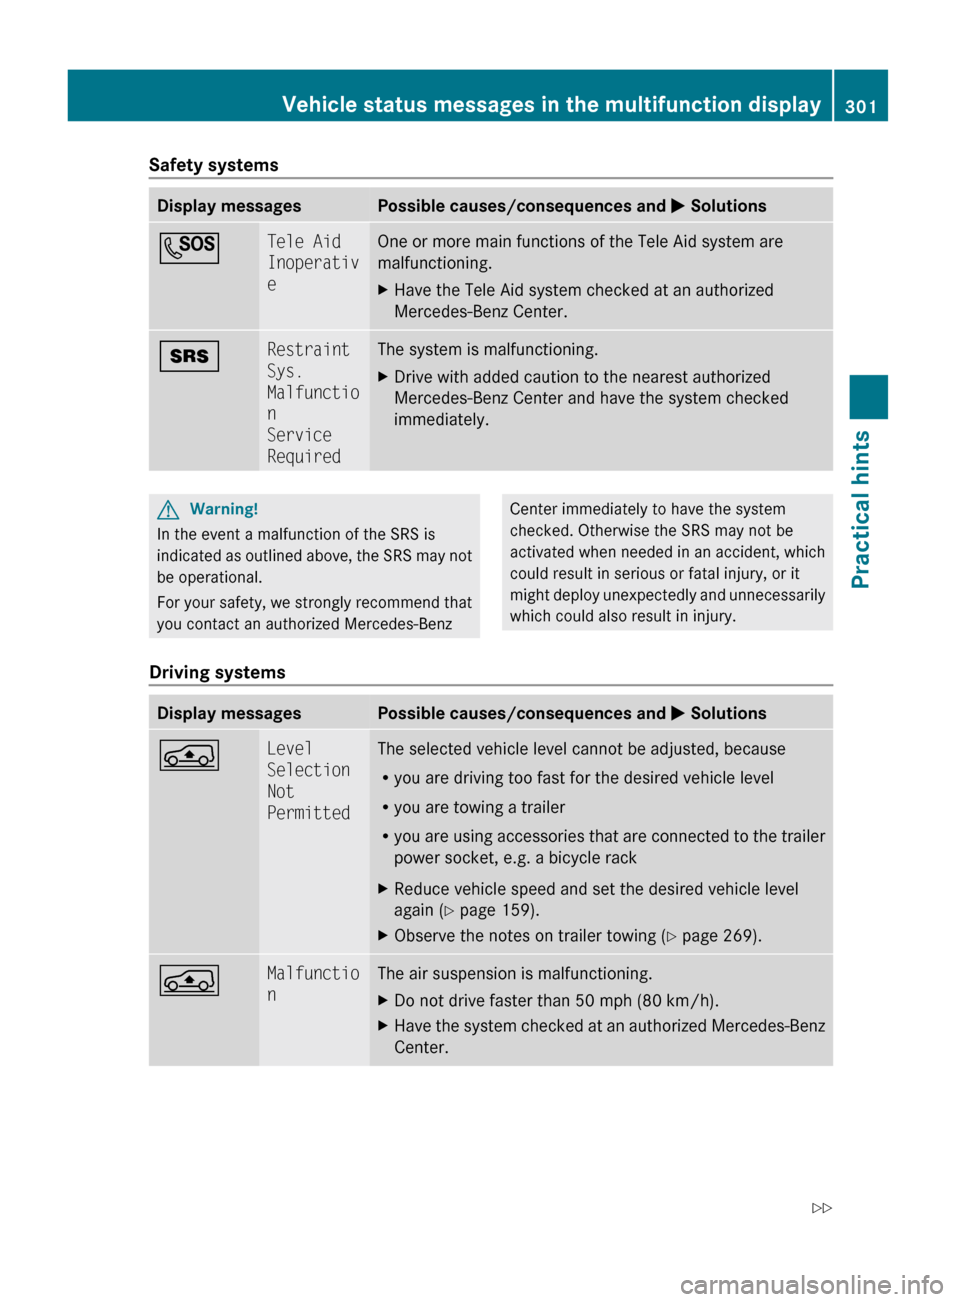
Safety systemsDisplay messagesPossible causes/consequences and M SolutionsGTele Aid
Inoperativ
eOne or more main functions of the Tele Aid system are
malfunctioning.XHave the Tele Aid system checked at an authorized
Mercedes-Benz Center.+Restraint
Sys.
Malfunctio
n
Service
RequiredThe system is malfunctioning.XDrive with added caution to the nearest authorized
Mercedes-Benz Center and have the system checked
immediately.GWarning!
In the event a malfunction of the SRS is
indicated as outlined above, the SRS may not
be operational.
For your safety, we strongly recommend that
you contact an authorized Mercedes-Benz
Center immediately to have the system
checked. Otherwise the SRS may not be
activated when needed in an accident, which
could result in serious or fatal injury, or it
might deploy unexpectedly and unnecessarily
which could also result in injury.
Driving systems
Display messagesPossible causes/consequences and M SolutionsÁLevel
Selection
Not
PermittedThe selected vehicle level cannot be adjusted, because
R you are driving too fast for the desired vehicle level
R you are towing a trailer
R you are using accessories that are connected to the trailer
power socket, e.g. a bicycle rackXReduce vehicle speed and set the desired vehicle level
again ( Y page 159).XObserve the notes on trailer towing ( Y page 269).ÁMalfunctio
nThe air suspension is malfunctioning.XDo not drive faster than 50 mph (80 km/h).XHave the system checked at an authorized Mercedes-Benz
Center.Vehicle status messages in the multifunction display301Practical hintsX164_AKB; 5; 31, en-USd2ureepe,Version: 2.11.8.12009-09-11T12:30:16+02:00 - Seite 301Z