2010 MERCEDES-BENZ GL550 height
[x] Cancel search: heightPage 77 of 380

Locking and unlocking from the insideGObserve Safety notes, see page 55.
You can lock or unlock the vehicle from the
inside using the central locking switches. This
can be useful, for example, if you want to lock
the vehicle before starting to drive.
The central locking switches do not lock or
unlock the fuel filler flap.
The switches are located in each front door.
XLocking: Press central locking switch ;.
When all doors and the tailgate are closed,
the vehicle locks.
XUnlocking: Press central unlocking
switch :.
You can open a locked front door from the
inside at any time. Open door only when
conditions are safe to do so.
If the vehicle was previously locked with the
central locking switch
Rand the SmartKey is set to factory settings,
the complete vehicle is unlocked when a
front door is opened from the inside
Rand the SmartKey is set to selective
settings, only the front door opened from
the inside is unlocked
If the vehicle has been locked centrally with
the SmartKey or with KEYLESS-GO, it will not
unlock using the central unlocking switch.
TailgateGWarning!
Make sure the tailgate is closed when the
engine is running and while driving. Among
other dangers, deadly carbon monoxide (CO)
gases may enter vehicle interior resulting in
unconsciousness and death.
A minimum height clearance of 7.40 ft
(2.25 m) is required to open the tailgate.
Opening the tailgate from the outside
XPull on handle :.
In vehicles without KEYLESS-GO: The
vehicle must be unlocked.
XPull tailgate upwards to open.
Closing the tailgate from the outside
GObserve Safety notes, see page 55.GWarning!
To prevent possible personal injury, always
keep hands and fingers away from the cargo
compartment opening when closing the
tailgate. Be especially careful when small
children are around.
Locking and unlocking75Controls in detailX164_AKB; 5; 31, en-USd2ureepe,Version: 2.11.8.12009-09-11T12:30:16+02:00 - Seite 75Z
Page 78 of 380
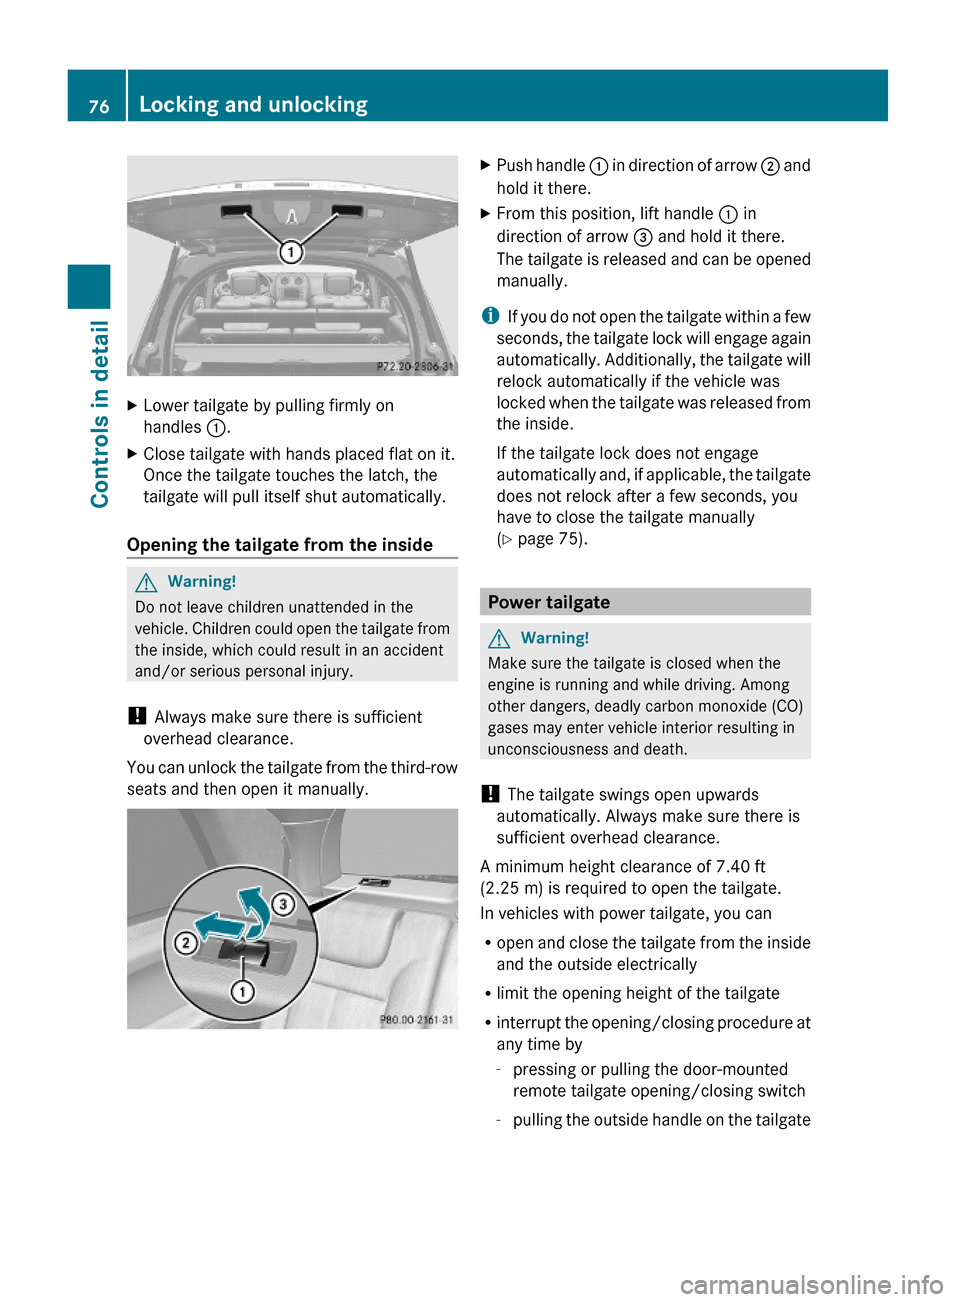
XLower tailgate by pulling firmly on
handles :.
XClose tailgate with hands placed flat on it.
Once the tailgate touches the latch, the
tailgate will pull itself shut automatically.
Opening the tailgate from the inside
GWarning!
Do not leave children unattended in the
vehicle. Children could open the tailgate from
the inside, which could result in an accident
and/or serious personal injury.
! Always make sure there is sufficient
overhead clearance.
You can unlock the tailgate from the third-row
seats and then open it manually.
XPush handle : in direction of arrow ; and
hold it there.
XFrom this position, lift handle : in
direction of arrow = and hold it there.
The tailgate is released and can be opened
manually.
iIf you do not open the tailgate within a few
seconds, the tailgate lock will engage again
automatically. Additionally, the tailgate will
relock automatically if the vehicle was
locked when the tailgate was released from
the inside.
If the tailgate lock does not engage
automatically and, if applicable, the tailgate
does not relock after a few seconds, you
have to close the tailgate manually
(Y page 75).
Power tailgate
GWarning!
Make sure the tailgate is closed when the
engine is running and while driving. Among
other dangers, deadly carbon monoxide (CO)
gases may enter vehicle interior resulting in
unconsciousness and death.
! The tailgate swings open upwards
automatically. Always make sure there is
sufficient overhead clearance.
A minimum height clearance of 7.40 ft
(2.25 m) is required to open the tailgate.
In vehicles with power tailgate, you can
Ropen and close the tailgate from the inside
and the outside electrically
Rlimit the opening height of the tailgate
Rinterrupt the opening/closing procedure at
any time by
-pressing or pulling the door-mounted
remote tailgate opening/closing switch
-pulling the outside handle on the tailgate
76Locking and unlockingControls in detail
X164_AKB; 5; 31, en-USd2ureepe,Version: 2.11.8.12009-09-11T12:30:16+02:00 - Seite 76
Page 81 of 380
Opening/closing the tailgate from the
inside
Opening
GObserve Safety notes, see page 76.GWarning!
Maintain sight of the area around the rear of
the vehicle while operating the tailgate with
the door-mounted remote tailgate switch.
Monitor the opening procedure carefully to
make sure no one is in danger of being
injured.
To interrupt the opening procedure, press or
pull the door-mounted remote tailgate switch.
When the SmartKey is not inserted in the
starter switch (vehicles with KEYLESS-GO:
Make sure the vehicle’s on-board electronics
have status 0): Press button F on the
SmartKey.
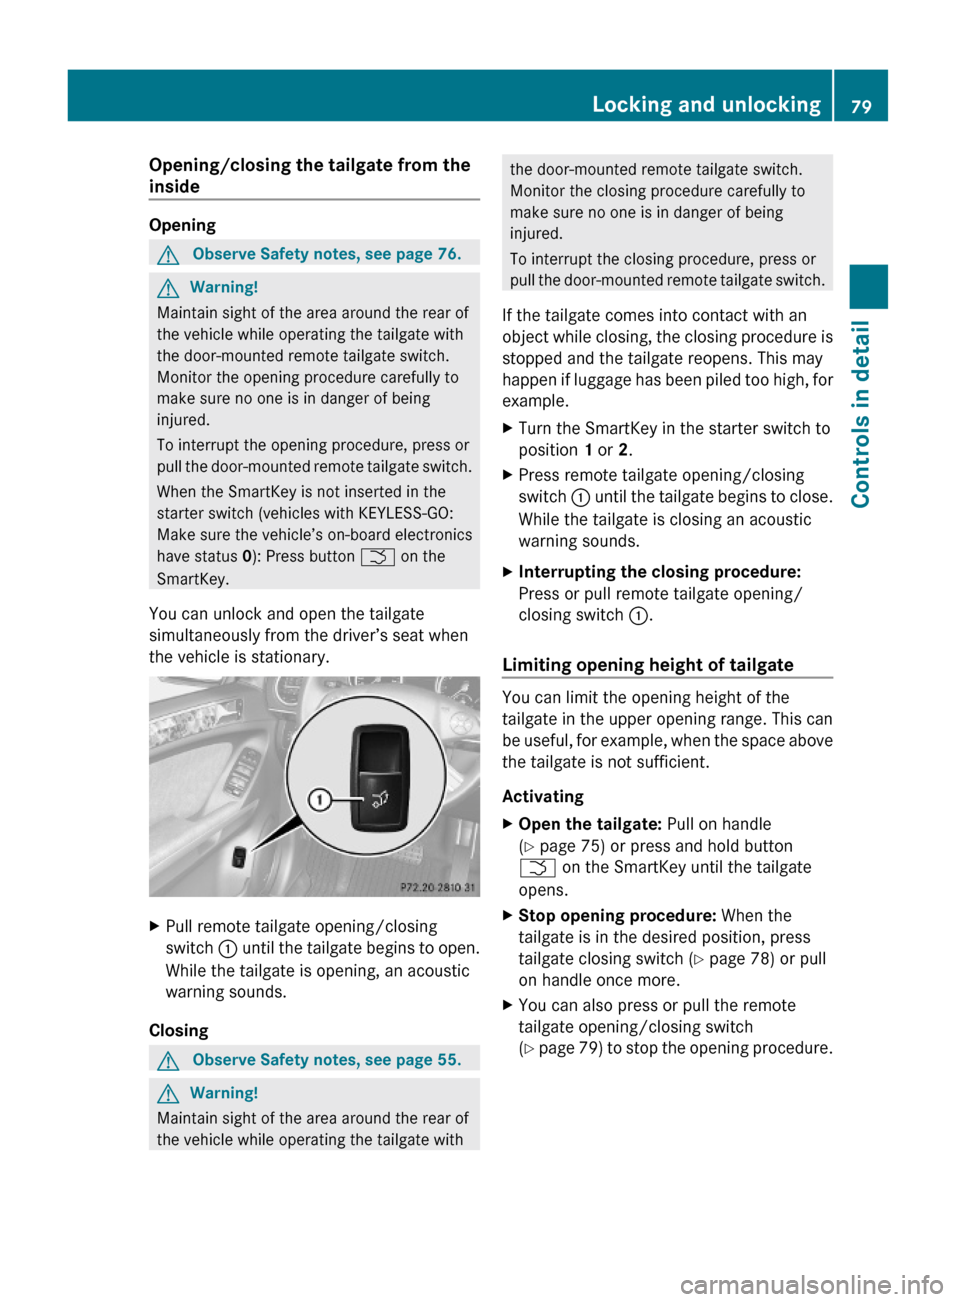
You can unlock and open the tailgate
simultaneously from the driver’s seat when
the vehicle is stationary.
XPull remote tailgate opening/closing
switch : until the tailgate begins to open.
While the tailgate is opening, an acoustic
warning sounds.
Closing
GObserve Safety notes, see page 55.GWarning!
Maintain sight of the area around the rear of
the vehicle while operating the tailgate with
the door-mounted remote tailgate switch.
Monitor the closing procedure carefully to
make sure no one is in danger of being
injured.
To interrupt the closing procedure, press or
pull the door-mounted remote tailgate switch.
If the tailgate comes into contact with an
object while closing, the closing procedure is
stopped and the tailgate reopens. This may
happen if luggage has been piled too high, for
example.
XTurn the SmartKey in the starter switch to
position 1 or 2.
XPress remote tailgate opening/closing
switch : until the tailgate begins to close.
While the tailgate is closing an acoustic
warning sounds.
XInterrupting the closing procedure:
Press or pull remote tailgate opening/
closing switch :.
Limiting opening height of tailgate
You can limit the opening height of the
tailgate in the upper opening range. This can
be useful, for example, when the space above
the tailgate is not sufficient.
Activating
XOpen the tailgate: Pull on handle
(Y page 75) or press and hold button
F on the SmartKey until the tailgate
opens.
XStop opening procedure: When the
tailgate is in the desired position, press
tailgate closing switch (Y page 78) or pull
on handle once more.
XYou can also press or pull the remote
tailgate opening/closing switch
(Y page 79) to stop the opening procedure.
Locking and unlocking79Controls in detailX164_AKB; 5; 31, en-USd2ureepe,Version: 2.11.8.12009-09-11T12:30:16+02:00 - Seite 79Z
Page 82 of 380
XPress and hold the tailgate closing switch
in the tailgate (Y page 78) until you hear a
short acoustic signal.
The opening height of the tailgate is limited.
The tailgate will now stop at the stored
position when opened.
Deactivating
XPress and hold the tailgate closing switch
in the tailgate (Y page 78) until you hear
two short, consecutive acoustic signals.
Starter switch positions
SmartKey
GObserve Safety notes, see page 55.
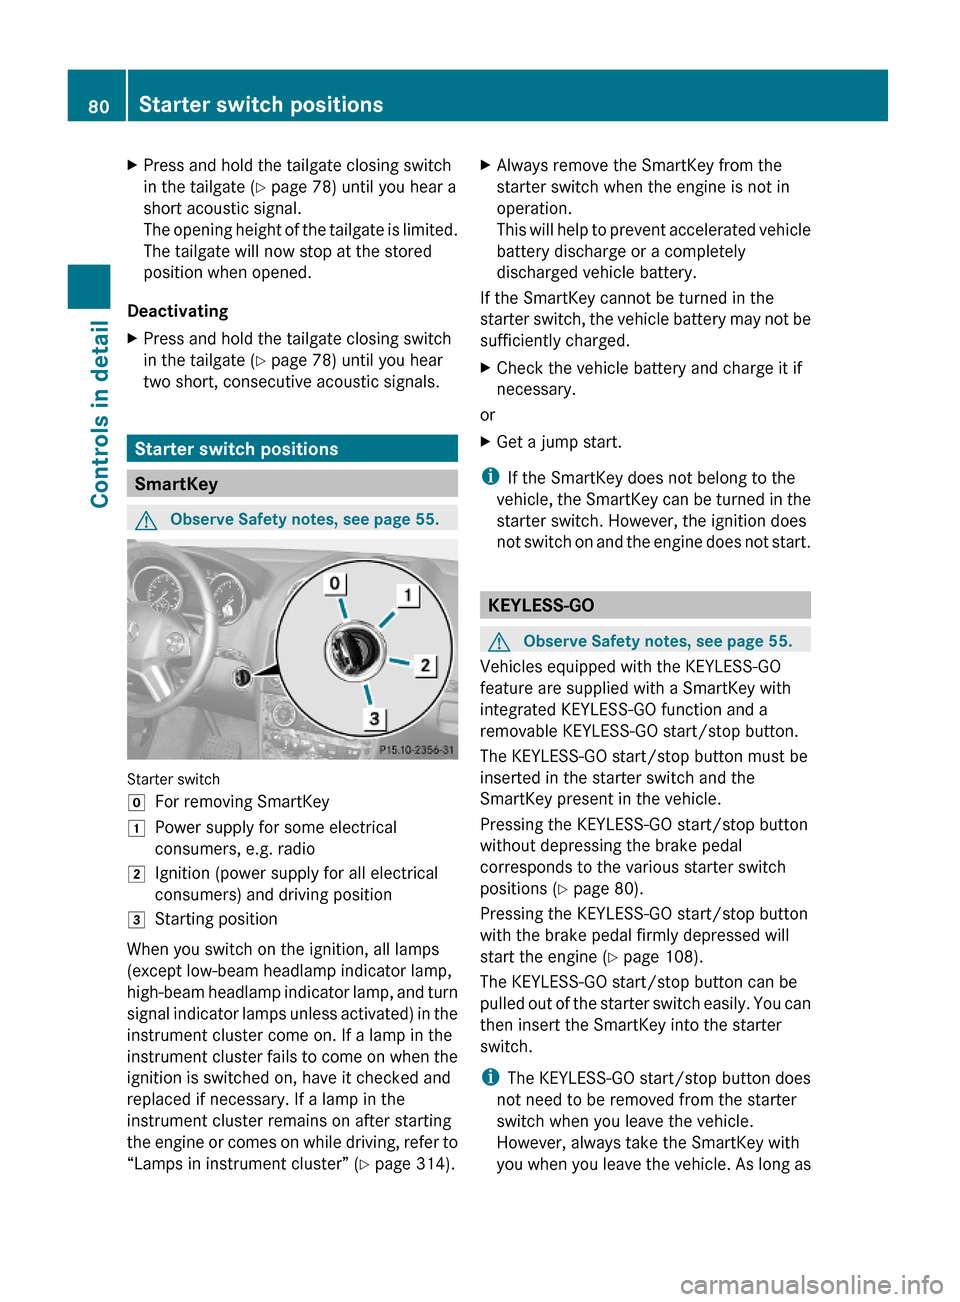
Starter switch
gFor removing SmartKey1Power supply for some electrical
consumers, e.g. radio
2Ignition (power supply for all electrical
consumers) and driving position
3Starting position
When you switch on the ignition, all lamps
(except low-beam headlamp indicator lamp,
high-beam headlamp indicator lamp, and turn
signal indicator lamps unless activated) in the
instrument cluster come on. If a lamp in the
instrument cluster fails to come on when the
ignition is switched on, have it checked and
replaced if necessary. If a lamp in the
instrument cluster remains on after starting
the engine or comes on while driving, refer to
“Lamps in instrument cluster” (Y page 314).
XAlways remove the SmartKey from the
starter switch when the engine is not in
operation.
This will help to prevent accelerated vehicle
battery discharge or a completely
discharged vehicle battery.
If the SmartKey cannot be turned in the
starter switch, the vehicle battery may not be
sufficiently charged.
XCheck the vehicle battery and charge it if
necessary.
or
XGet a jump start.
iIf the SmartKey does not belong to the
vehicle, the SmartKey can be turned in the
starter switch. However, the ignition does
not switch on and the engine does not start.
KEYLESS-GO
GObserve Safety notes, see page 55.
Vehicles equipped with the KEYLESS-GO
feature are supplied with a SmartKey with
integrated KEYLESS-GO function and a
removable KEYLESS-GO start/stop button.
The KEYLESS-GO start/stop button must be
inserted in the starter switch and the
SmartKey present in the vehicle.
Pressing the KEYLESS-GO start/stop button
without depressing the brake pedal
corresponds to the various starter switch
positions (Y page 80).
Pressing the KEYLESS-GO start/stop button
with the brake pedal firmly depressed will
start the engine (Y page 108).
The KEYLESS-GO start/stop button can be
pulled out of the starter switch easily. You can
then insert the SmartKey into the starter
switch.
iThe KEYLESS-GO start/stop button does
not need to be removed from the starter
switch when you leave the vehicle.
However, always take the SmartKey with
you when you leave the vehicle. As long as
80Starter switch positionsControls in detail
X164_AKB; 5; 31, en-USd2ureepe,Version: 2.11.8.12009-09-11T12:30:16+02:00 - Seite 80
Page 85 of 380
Do not drive the vehicle without the seat head
restraints. Head restraints are intended to
help reduce injuries during an accident.
Seat adjustment
! When moving the seats, make sure there
are no items in the footwell or behind the
seats. Otherwise, you could damage the
seats and/or the items.
Power seats
! When the second-row seats are folded
forward, e.g. for cargo volume expansion,
the front seats may not be moved to the
rearmost position. Otherwise you could
damage the front and second-row seats.
! When adjusting the seat backrest tilt and
head restraint height, make sure the sun
visor is folded up. If the head restraint is in
the uppermost position, it could hit and
damage the sun visor.
iVehicles without memory function:
The seats can be adjusted within 5 minutes
after either front door has been opened.
The counter resets each time
Ryou open or close a front door
Ryou insert the SmartKey into the starter
switch
Ryou remove the SmartKey from the
starter switch
Ryou switch the ignition on or off
Just like in vehicles with memory function,
the power seats can be operated at any
time when the ignition is switched on.
iThe memory function (Y page 96) lets
you store the settings for the seat position
together with the settings for the steering
wheel (electrical) and exterior rear view
mirrors.
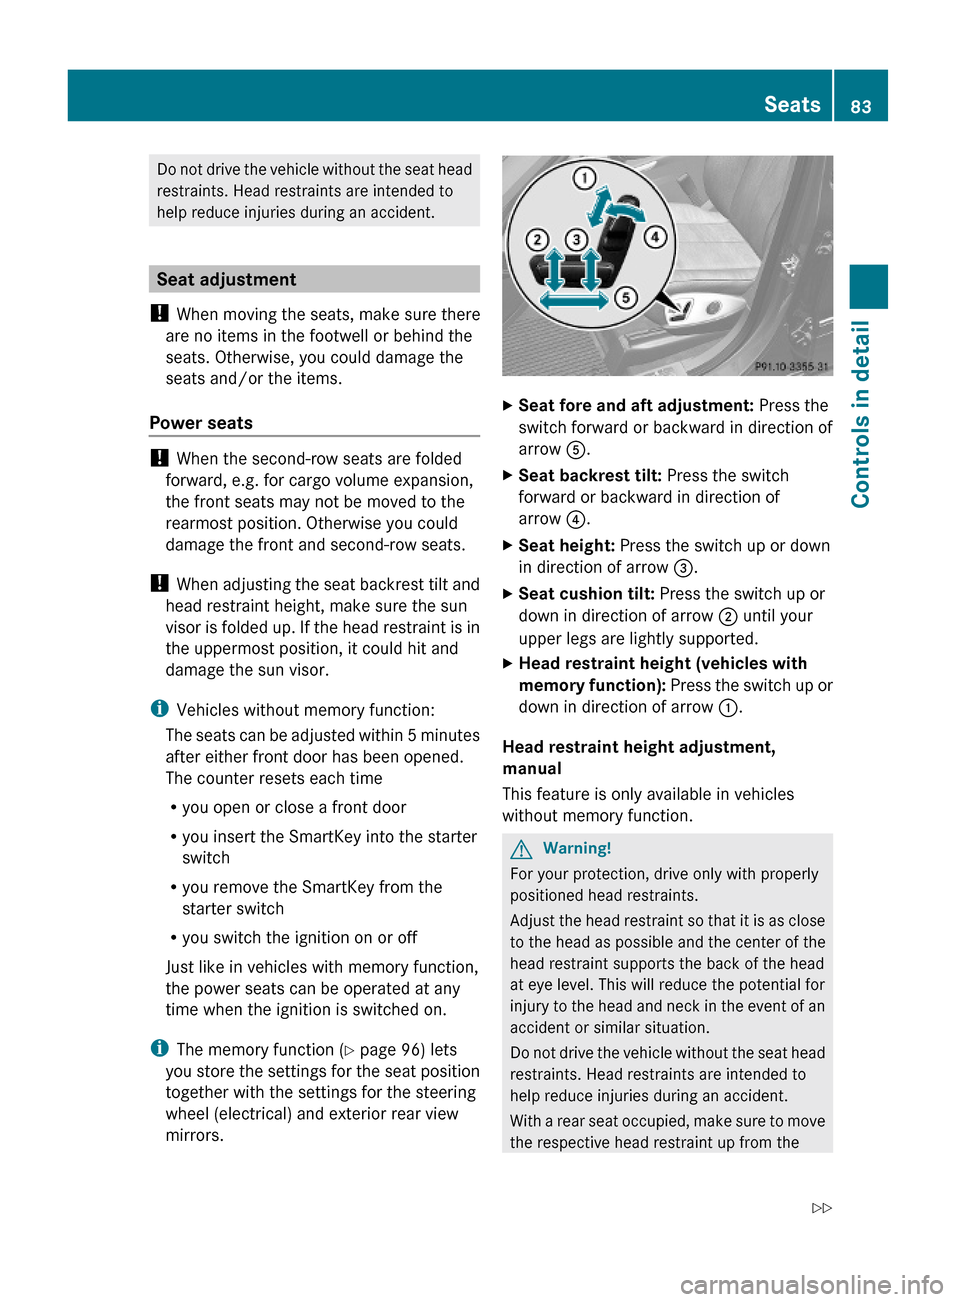
XSeat fore and aft adjustment: Press the
switch forward or backward in direction of
arrow A.
XSeat backrest tilt: Press the switch
forward or backward in direction of
arrow ?.
XSeat height: Press the switch up or down
in direction of arrow =.
XSeat cushion tilt: Press the switch up or
down in direction of arrow ; until your
upper legs are lightly supported.
XHead restraint height (vehicles with
memory function): Press the switch up or
down in direction of arrow :.
Head restraint height adjustment,
manual
This feature is only available in vehicles
without memory function.
GWarning!
For your protection, drive only with properly
positioned head restraints.
Adjust the head restraint so that it is as close
to the head as possible and the center of the
head restraint supports the back of the head
at eye level. This will reduce the potential for
injury to the head and neck in the event of an
accident or similar situation.
Do not drive the vehicle without the seat head
restraints. Head restraints are intended to
help reduce injuries during an accident.
With a rear seat occupied, make sure to move
the respective head restraint up from the
Seats83Controls in detailX164_AKB; 5; 31, en-USd2ureepe,Version: 2.11.8.12009-09-11T12:30:16+02:00 - Seite 83Z
Page 86 of 380
lowest non-use position and have the
occupant adjust the head restraint properly.
! Do not attempt to remove front seat head
restraints. They can only be removed by
qualified technicians. We recommend that
you have this work carried out by an
authorized Mercedes-Benz Center.
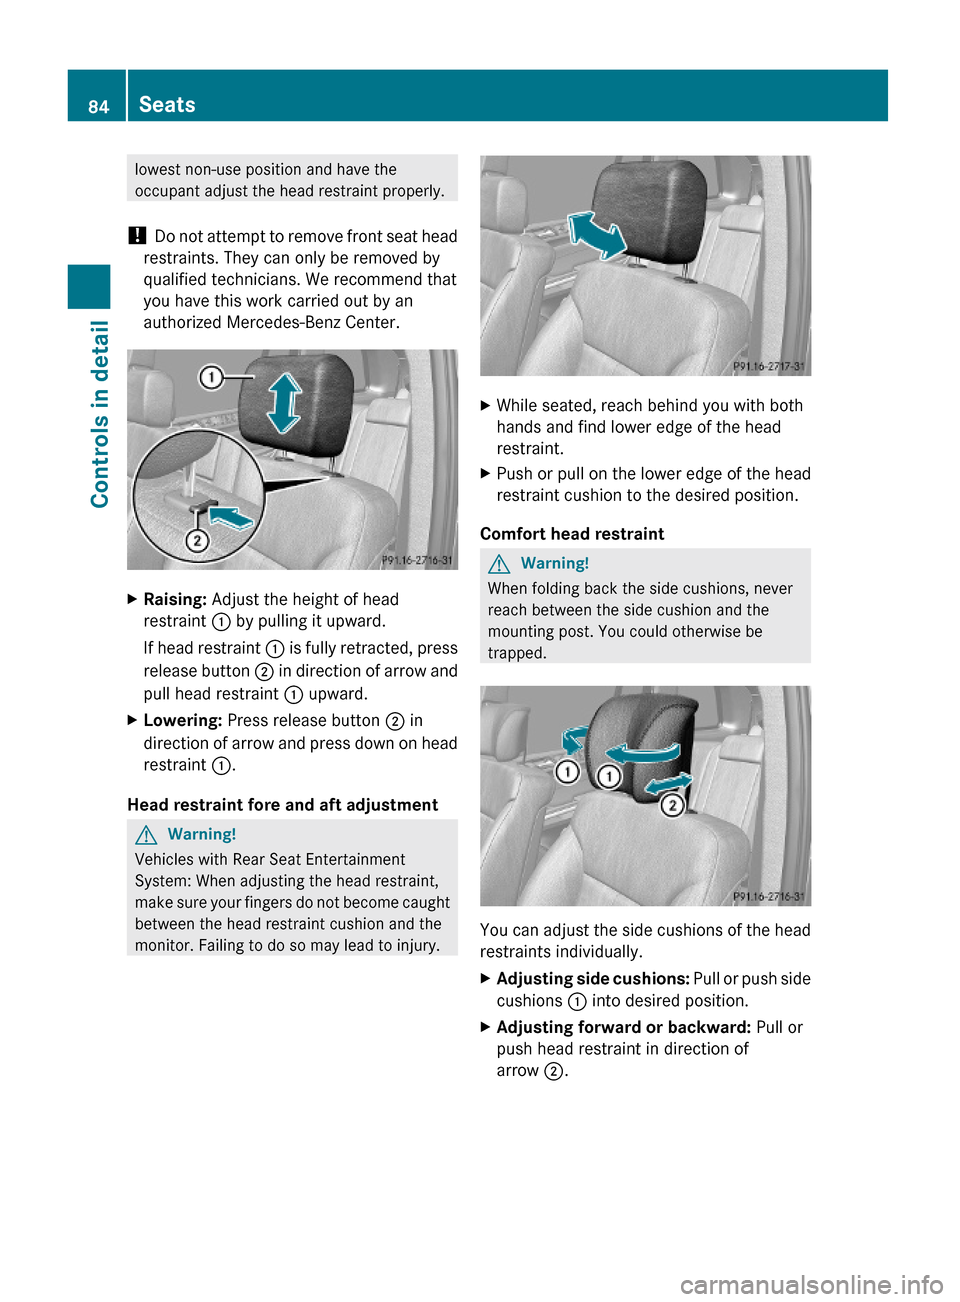
XRaising: Adjust the height of head
restraint : by pulling it upward.
If head restraint : is fully retracted, press
release button ; in direction of arrow and
pull head restraint : upward.
XLowering: Press release button ; in
direction of arrow and press down on head
restraint :.
Head restraint fore and aft adjustment
GWarning!
Vehicles with Rear Seat Entertainment
System: When adjusting the head restraint,
make sure your fingers do not become caught
between the head restraint cushion and the
monitor. Failing to do so may lead to injury.
XWhile seated, reach behind you with both
hands and find lower edge of the head
restraint.
XPush or pull on the lower edge of the head
restraint cushion to the desired position.
Comfort head restraint
GWarning!
When folding back the side cushions, never
reach between the side cushion and the
mounting post. You could otherwise be
trapped.
You can adjust the side cushions of the head
restraints individually.
XAdjusting side cushions: Pull or push side
cushions : into desired position.
XAdjusting forward or backward: Pull or
push head restraint in direction of
arrow ;.
84SeatsControls in detail
X164_AKB; 5; 31, en-USd2ureepe,Version: 2.11.8.12009-09-11T12:30:16+02:00 - Seite 84
Page 90 of 380
backrest could fold. The child seat would no
longer be properly supported or positioned to
provide its intended benefit.
Seat backrest tilt (second-row seats)
GWarning!
The seat belt only offers its intended
protection when the seat backrest is in a
nearly vertical position and the occupant is
sitting upright. Avoid sitting in positions that
prevent the seat belt from being properly
positioned against the body. You should
therefore adjust the seat backrest to a
position as upright as possible.
The seat backrest tilt can be set to five
different positions.
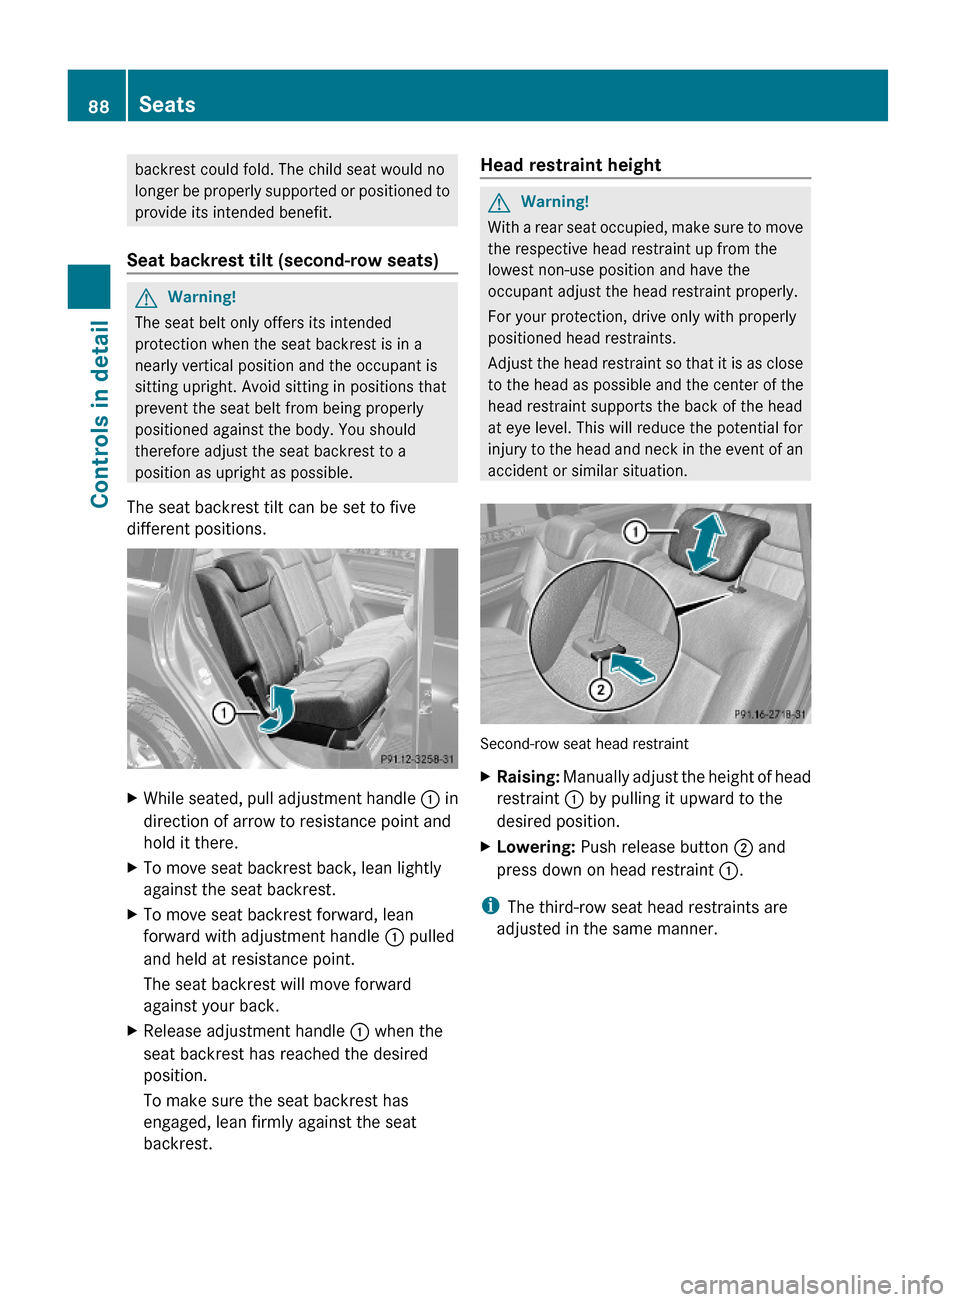
XWhile seated, pull adjustment handle : in
direction of arrow to resistance point and
hold it there.
XTo move seat backrest back, lean lightly
against the seat backrest.
XTo move seat backrest forward, lean
forward with adjustment handle : pulled
and held at resistance point.
The seat backrest will move forward
against your back.
XRelease adjustment handle : when the
seat backrest has reached the desired
position.
To make sure the seat backrest has
engaged, lean firmly against the seat
backrest.
Head restraint heightGWarning!
With a rear seat occupied, make sure to move
the respective head restraint up from the
lowest non-use position and have the
occupant adjust the head restraint properly.
For your protection, drive only with properly
positioned head restraints.
Adjust the head restraint so that it is as close
to the head as possible and the center of the
head restraint supports the back of the head
at eye level. This will reduce the potential for
injury to the head and neck in the event of an
accident or similar situation.
Second-row seat head restraint
XRaising: Manually adjust the height of head
restraint : by pulling it upward to the
desired position.
XLowering: Push release button ; and
press down on head restraint :.
iThe third-row seat head restraints are
adjusted in the same manner.
88SeatsControls in detail
X164_AKB; 5; 31, en-USd2ureepe,Version: 2.11.8.12009-09-11T12:30:16+02:00 - Seite 88
Page 161 of 380

XSwitching off: Press switch : again.
Indicator lamp ; goes out. The symbol
Ç disappears.
Air suspension program
The system lets you select the chassis and
suspension setup. The chassis and
suspension setup adjusts the damping
behavior and the ride height for your vehicle.
The system consists of two components. The
Adaptive Damping System (ADS)
(Y page 159) and the vehicle level control
(Y page 159).
Adaptive Damping System (ADS)
The Adaptive Damping System (ADS) is
controlled electronically and operates
continuously. It adjusts the damping
characteristics to the current operating and
driving conditions. The damping is adjusted
individually for each wheel. Driving safety and
tire comfort are increased.
The fine tuning of the damping is dependent
on:
Ryour driving style
Rroad surface conditions
Ryour personal settings
Vehicles without enhanced off-road package
Vehicles with enhanced off-road package
The following settings are available:
RAUTO (for normal driving situations)
Indicator lamps ; and = are off.
RSPORT (for sporty driving)
Indicator lamp ; comes on.
With the ADS SPORT setting, the vehicle is
lowered approximately 0.6 in (15 mm).
RCOMF (for comfort driving)
Indicator lamp = comes on.
XStart the engine.XPress ADS switch : repeatedly until the
desired suspension tuning is reached.
The setting remains stored when you turn off
the engine.
Vehicle level control
Your vehicle automatically adjusts its ride
height to increase vehicle safety and to
reduce fuel consumption.
Driving systems159Controls in detailX164_AKB; 5; 31, en-USd2ureepe,Version: 2.11.8.12009-09-11T12:30:16+02:00 - Seite 159Z