2010 MERCEDES-BENZ GL550 wheel
[x] Cancel search: wheelPage 256 of 380
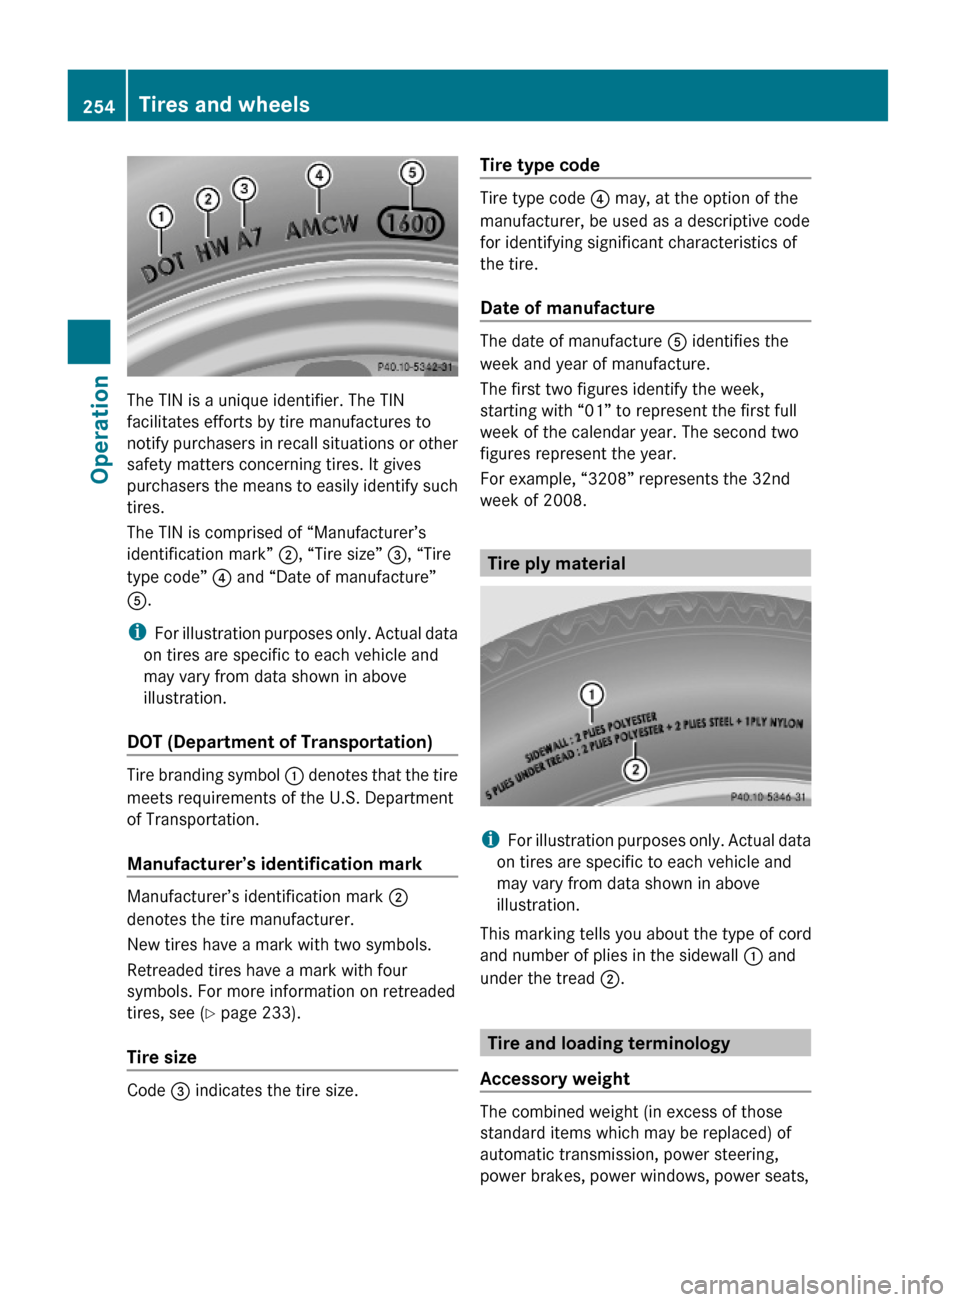
The TIN is a unique identifier. The TIN
facilitates efforts by tire manufactures to
notify purchasers in recall situations or other
safety matters concerning tires. It gives
purchasers the means to easily identify such
tires.
The TIN is comprised of “Manufacturer’s
identification mark” ;, “Tire size” =, “Tire
type code” ? and “Date of manufacture”
A.
iFor illustration purposes only. Actual data
on tires are specific to each vehicle and
may vary from data shown in above
illustration.
DOT (Department of Transportation)
Tire branding symbol : denotes that the tire
meets requirements of the U.S. Department
of Transportation.
Manufacturer’s identification mark
Manufacturer’s identification mark ;
denotes the tire manufacturer.
New tires have a mark with two symbols.
Retreaded tires have a mark with four
symbols. For more information on retreaded
tires, see (Y page 233).
Tire size
Code = indicates the tire size.
Tire type code
Tire type code ? may, at the option of the
manufacturer, be used as a descriptive code
for identifying significant characteristics of
the tire.
Date of manufacture
The date of manufacture A identifies the
week and year of manufacture.
The first two figures identify the week,
starting with “01” to represent the first full
week of the calendar year. The second two
figures represent the year.
For example, “3208” represents the 32nd
week of 2008.
Tire ply material
iFor illustration purposes only. Actual data
on tires are specific to each vehicle and
may vary from data shown in above
illustration.
This marking tells you about the type of cord
and number of plies in the sidewall : and
under the tread ;.
Tire and loading terminology
Accessory weight
The combined weight (in excess of those
standard items which may be replaced) of
automatic transmission, power steering,
power brakes, power windows, power seats,
254Tires and wheelsOperation
X164_AKB; 5; 31, en-USd2ureepe,Version: 2.11.8.12009-09-11T12:30:16+02:00 - Seite 254
Page 257 of 380
radio, and heater, to the extent that these
items are available as factory-installed
equipment (whether installed or not).
Air pressure
The amount of air inside the tire pressing
outward on each square inch of the tire. Air
pressure is expressed in pounds per square
inch (psi), kilopascal (kPa), or bar.
Aspect ratio
Dimensional relationship between tire
section height and section width expressed
in percentage.
Bar
Metric unit for air pressure. There are
14.5038 pounds per square inch (psi) to
1 bar; there are 100 kilopascals (kPa) to 1 bar.
Bead
The tire bead contains steel wires wrapped by
steel cords that hold the tire onto the rim.
Cold tire inflation pressure
Tire inflation pressure when your vehicle has
been sitting for at least 3 hours or driven no
more than 1 mile (1.6 km).
Curb weight
The weight of a motor vehicle with standard
equipment including the maximum capacity
of fuel, oil, and coolant, and, if so equipped,
air conditioning and additional optional
equipment, but without passengers and
cargo.
DOT (Department of Transportation)
A tire branding symbol which denotes the tire
meets requirements of the U.S. Department
of Transportation.
GAWR (Gross Axle Weight Rating)
The GAWR is the maximum permissible axle
weight. The gross vehicle weight on each axle
must never exceed the GAWR for the front
and rear axle indicated on the certification
label located on the driver’s door B-pillar.
GTW (Gross Trailer Weight)
The GTW is the weight of the trailer plus the
weight of all cargo, equipment, luggage etc.
loaded on the trailer.
GVW (Gross Vehicle Weight)
The GVW comprises the weight of the vehicle
including fuel, tools, spare wheel, installed
accessories, passengers and cargo and, if
applicable, trailer tongue load. The GVW must
never exceed the GVWR indicated on the
certification label located on the driver’s door
B-pillar.
GVWR (Gross Vehicle Weight Rating)
This is the maximum permissible vehicle
weight of the fully loaded vehicle (weight of
the vehicle including all options, passengers,
fuel, and cargo and, if applicable, trailer
tongue load). It is indicated on the
certification label located on the driver’s door
B-pillar.
Kilopascal (kPa)
Metric unit for air pressure. There are 6.9 kPa
to 1 psi; another metric unit for air pressure
is bar. There are 100 kilopascals (kPa) to
1 bar.
Load index
Numerical code associated with the
maximum load a tire can support.
Maximum load rating
The maximum load in kilograms and pounds
that can be carried by the tire.
Tires and wheels255OperationX164_AKB; 5; 31, en-USd2ureepe,Version: 2.11.8.12009-09-11T12:30:16+02:00 - Seite 255Z
Page 258 of 380
Maximum loaded vehicle weight
The sum of curb weight, accessory weight,
total load limit, and production options
weight.
Maximum permissible tire inflation
pressure
This number is the greatest amount of air
pressure that should ever be put in the tire.
Normal occupant weight
The number of occupants the vehicle is
designed to seat, multiplied by 68 kilograms
(150 lb).
Occupant distribution
The distribution of occupants in a vehicle at
their designated seating positions.
Production options weight
The combined weight of those installed
regular production options weighing over
5 lbs (2.3 kilograms) in excess of those
standard items which they replace, not
previously considered in curb weight or
accessory weight, including heavy duty
brakes, ride levelers, roof rack, heavy duty
battery, and special trim.
PSI (Pounds per square inch)
A standard unit of measure for air pressure.
Recommended tire inflation pressure
The recommended tire inflation pressure for
normal driving conditions is listed on the Tire
and Loading Information placard located on
the driver’s door B-pillar. It provides best
handling, tread life and riding comfort.
Supplemental information pertaining to
special driving situations can be found on the
tire inflation pressure label on the inside of
the fuel filler flap.
Rim
A metal support for a tire or a tire and tube
assembly upon which the tire beads are
seated.
Sidewall
The portion of a tire between the tread and
the bead.
TIN (Tire Identification Number)
Unique identifier which facilitates efforts by
tire manufacturers to notify purchasers in
recall situations or other safety matters
concerning tires and gives purchasers the
means to easily identify such tires. The TIN is
comprised of “Manufacturer’s identification
mark”, “Tire size”, “Tire type code” and “Date
of manufacture”.
Tire ply composition and material used
This indicates the number of plies or the
number of layers of rubber-coated fabric in
the tire tread and sidewall. Tire
manufacturers also must indicate the ply
materials in the tire and sidewall, which
include steel, nylon, polyester, and others.
Tire speed rating
Part of tire designation (speed symbol);
indicates the speed range for which a tire is
approved.
Total load limit
Rated cargo and luggage load plus
68 kilograms (150 lb) times the vehicle’s
designated seating capacity.
Traction
The adhesive friction of a tire on a surface on
which it moves. The amount of grip provided.
256Tires and wheelsOperation
X164_AKB; 5; 31, en-USd2ureepe,Version: 2.11.8.12009-09-11T12:30:16+02:00 - Seite 256
Page 259 of 380
Tread
The portion of a tire that comes into contact
with the road.
Treadwear indicators
Narrow bands, sometimes called “wear bars”
that show across the tread of a tire when only
1 / 16 in (1.6 mm) of tread remains.
TWR (Tongue Weight Rating)
Maximum permissible weight on trailer
tongue.
Uniform Tire Quality Grading Standards
A tire information system that provides
consumers with ratings for a tire’s traction,
temperature and treadwear. Ratings are
determined by tire manufacturers using U.S.
government testing procedures. The ratings
are molded into the sidewall of the tire.
Vehicle maximum load on the tire
Load on an individual tire that is determined
by distributing to each axle its share of the
maximum loaded vehicle weight and dividing
it by two.
Winter driving
General information
Have your vehicle winterized at an authorized
Mercedes-Benz Center.
i Vehicles with diesel engine:
Do not cover the radiator, for example with
a winter front. Otherwise the readings of
the on-board diagnostic system may be
inaccurate. Some of theses readings are
required by law and must be accurate at all
times.
Winter tiresGWarning!
Winter tires with a tread depth of less than
1 / 6 in (4 mm) must be replaced. They are no
longer suitable for winter operation.
GWarning!
If you use your spare wheel when winter tires
are fitted on the other wheels, be aware that
the difference in tire characteristics may very
well impair turning stability and that overall
driving stability may be reduced. Adapt your
driving style accordingly.
Have the spare wheel replaced by a regular
road wheel with a winter tire at the nearest
authorized Mercedes-Benz Center.
Always use winter tires at temperatures
below 45‡ (7†) and whenever wintry road
conditions prevail. Not all M+S rated tires
provide special winter performance. Make
sure the tires you use show the mountain/
snowflake imarking on the tire sidewall.
These tires meet specific snow traction
performance requirements of the Rubber
Manufacturers Association (RMA) and the
Rubber Association of Canada (RAC) and
have been designed specifically for use in
snow conditions. Use of winter tires is the
only way to achieve the maximum
effectiveness of your vehicle’s driving safety
systems such as the ABS and the ESP ®
in
winter operation.
For safe handling, make sure all mounted
winter tires are of the same make and have
the same tread design.
For information on winter tires for your
vehicle model, see the “Technical data”
section ( Y page 365).
Always observe the speed rating of the winter
tires installed on your vehicle.
Winter driving257OperationX164_AKB; 5; 31, en-USd2ureepe,Version: 2.11.8.12009-09-11T12:30:16+02:00 - Seite 257Z
Page 260 of 380
After installing winter tires:XCheck the tire inflation pressure and adjust
it if necessary ( Y page 237).XRestart the tire pressure loss warning
system ( Y page 237) or the Advanced Tire
Pressure Monitoring System (Y page 239).
Snow chains
! Vehicles with Adaptive Damping System
(ADS):
When driving with snow chains, do not
select SPORT mode as this may result in
damage to your vehicle.
! Some tire sizes do not leave adequate
clearance for snow chains. To help avoid
serious damage to your vehicle or tires,
make sure the use of snow chains is
permissible as specified in the “Technical
data” section of this Operator’s Manual.
Snow chains should only be driven on snow-
covered roads at speeds not to exceed
30 mph (50 km/h). Remove chains as soon
as possible when driving on roads without
snow.
Observe the following guidelines when using
snow chains:
R Use of snow chains is not permissible with
all wheel/tire combinations ( Y page 365).
R Use snow chains in pairs and on rear
wheels only. Follow the manufacturer’s
mounting instructions.
! If snow chains are mounted to the front
wheels, they may scrape against the body
or axle components. The tires or the vehicle
could be damaged as a result.
R Only use snow chains that are approved by
Mercedes-Benz. Any authorized Mercedes-
Benz Center will be glad to advise you on
this subject.
R Use of snow chains may be prohibited
depending on location. Always check local
and state laws before installing snow
chains.
R Do not use snow chains on the spare wheel.
i When driving with snow chains, you may
wish to switch off the ESP ®
(Y page 63)
before setting the vehicle in motion. This
will improve the vehicle’s traction.
Winter driving instructions
GWarning!
If the vehicle becomes stuck in snow, make
sure snow is kept clear of the exhaust pipe
and from around the vehicle with the engine
running. Otherwise, deadly carbon monoxide
(CO) gases may enter vehicle interior
resulting in unconsciousness and death.
To assure sufficient fresh air ventilation, open
a window slightly on the side of the vehicle
not facing the wind.
GWarning!
The outside temperature indicator is not
designed to serve as an ice-warning device
and is therefore unsuitable for that purpose.
Indicated temperatures just above the
freezing point do not guarantee that the road
surface is free of ice. The road may still be icy,
especially in wooded areas or on bridges.
GWarning!
On slippery road surfaces, never downshift in
order to obtain braking action. This could
result in drive wheel slip and reduced vehicle
control. Your vehicle’s ABS will not prevent
this type of control loss.
Do not engage the transfer case in position
LOW when driving on ice or packed snow. At
speeds below 18 mph (30 km/h) vehicle
steering is adversely affected by the Off-road
ABS.
The most important rule for slippery or icy
roads is to drive sensibly and to avoid abrupt
acceleration, braking and steering
258Winter drivingOperation
X164_AKB; 5; 31, en-USd2ureepe,Version: 2.11.8.12009-09-11T12:30:16+02:00 - Seite 258
Page 262 of 380
Steering and braking requires significantly
more effort and you could lose control of the
vehicle and cause an accident as a result.
Do not turn off the engine while the vehicle is
in motion.
Brakes
Downhill grades
! When driving down long and steep
grades, relieve the load on the brakes by
shifting into a lower gear to use the
engine’s braking power. This helps prevent
overheating of the brakes and reduces
wear.
When using the engine’s braking power, a
drive wheel may not spin for an extended
period of time, e.g. on slippery road
surfaces. This may cause serious damage
to the drivetrain which is not covered by the
Mercedes-Benz Limited Warranty.
Continuous or hard braking
GWarning!
Resting your foot on the brake pedal will
cause excessive and premature wear of the
brake pads.
It can also result in the brakes overheating,
thereby significantly reducing their
effectiveness. It may not be possible to stop
the vehicle in sufficient time to avoid an
accident.
After hard braking, it is advisable to drive on
for some time, rather than immediately park,
so that the air stream will cool down the
brakes faster.
Wet roads
GWarning!
After driving in heavy rain for some time
without applying the brakes or through water
deep enough to wet brake components, the
first braking action may be somewhat
reduced and increased pedal pressure may be
necessary to obtain expected brake effect.
Maintain a safe distance from vehicles in
front.
To help prevent brake disk corrosion after
driving on wet or salt-covered roads, it is
advisable to brake the vehicle with
considerable force prior to parking. The heat
generated serves to dry the brakes.
Salt-covered roadsGWarning!
A layer of salt on the brake discs and the brake
linings may cause a delay in the braking
effect, resulting in a significantly increased
braking distance, which could lead to an
accident.
To avoid this danger, you should:
R occasionally brake carefully when you are
driving on salt-covered roads, so that any
layer of salt that may have built up on the
brake discs and the brake linings is
removed without putting other road users
at risk
R maintain a greater distance to the vehicle
ahead and drive with particular care
R carefully apply the brakes at the end of a
trip and immediately after commencing a
new trip, so that salt residues are removed
from the brake disc
Brake service
! The brake fluid level in the reservoir may
be too low if the brake warning lamp in the
instrument cluster comes on and an
acoustic warning sounds although the
parking brake is released. Observe
additional messages in the multifunction
display that may appear.
Brake pad wear or a leak in the system may
be the reason for low brake fluid in the
reservoir.
260Driving instructionsOperation
X164_AKB; 5; 31, en-USd2ureepe,Version: 2.11.8.12009-09-11T12:30:16+02:00 - Seite 260
Page 263 of 380
Have the brake system inspected
immediately. Contact an authorized
Mercedes-Benz Center.
All checks and service work on the brake
system should be carried out by qualified
technicians only. Contact an authorized
Mercedes-Benz Center.
Only install brake pads and use brake fluid
recommended by Mercedes-Benz.GWarning!
If other than recommended brake pads are
installed, or other than recommended brake
fluid is used, the braking properties of the
vehicle can be degraded to an extent that safe
braking is substantially impaired. This could
result in an accident.
! Only conduct operational or performance
tests on a two-axle dynamometer. If such
tests are necessary, contact an authorized
Mercedes-Benz Center. You could
otherwise seriously damage the brake
system or the transfer case which is not
covered by the Mercedes-Benz Limited
Warranty.
! Because the ESP ®
operates
automatically, the engine and ignition must
be shut off (SmartKey in starter switch
position 0 or 1 or KEYLESS-GO start/stop
button in position 0 or 1) when the parking
brake is being tested on a brake test
dynamometer. Such testing should be no
longer than 10 seconds.
Active braking action through the ESP ®
may otherwise seriously damage the brake
system which is not covered by the
Mercedes-Benz Limited Warranty.
If your brake system is only subjected to
moderate loads, you should occasionally test
the effectiveness of the brakes by applying
above-normal braking pressure at higher
speeds. This will also enhance the grip of the
brake pads.
GWarning!
Make sure not to endanger any other road
users when carrying out these braking
maneuvers.
Refer to the description of the Brake Assist
System (BAS) ( Y page 63).
Parking brake
When driving on wet roads or dirt covered
surfaces, road salt and/or dirt can get into
the parking brake.
To prevent corrosion and a reduction in the
braking power of the parking brake, observe
the following:
XFrom time to time, lightly engage the
parking brake before driving off.XDrive a distance of approximately 110 yds
(100 m) at a maximum speed of 12 mph
(20 km/h).GWarning!
While performing this procedure please
assure that the vehicle is stopped before
applying the parking brake. Otherwise the
rear wheels could lock up. You could lose
control of the vehicle and cause an accident.
In addition, the vehicle’s brake lights do not
light up when the parking brake is engaged.
Make sure not to endanger any other road
users when you engage the parking brake.
Driving off
Warm up the engine smoothly. Do not place
full load on the engine until the operating
temperature has been reached.
! When driving off on a slippery surface, do
not allow a drive wheel to spin for an
extended period with the ESP ®
switched
off. Doing so may cause serious damage to
the drivetrain which is not covered by the
Mercedes-Benz Limited Warranty.
Driving instructions261OperationX164_AKB; 5; 31, en-USd2ureepe,Version: 2.11.8.12009-09-11T12:30:16+02:00 - Seite 261Z
Page 267 of 380
100% grade which is equivalent to a slope
angle of 45°. Keep in mind that the
climbing ability of the vehicle depends on
terrain conditions.
R Shift automatic transmission into gear
range 1 (Y page 118).
R Drive slowly.
R Avoid excessive engine speeds – drive with
moderate engine speeds (max. 3 000 rpm).
R Utilize the engine’s braking power when
descending a slope, observe the engine
speed (do not overrev the engine). Apply
the service brake as needed.
i For maximum engine speed, see
“Tachometer” (Y page 125) and see vehicle
specification for your vehicle
( Y page 362).
R Check the brakes after a lengthy
downgrade drive.GWarning!
Never turn the vehicle around on steep
inclines. The vehicle might roll over. If the
vehicle cannot complete the attempted climb,
back it down in reverse gear.
i The hill-start assist system supports you
when driving uphill.
For more information, see “Hill-start assist
system” ( Y page 155).
Traction in steep terrain
The maximum vehicle climbing ability is a
100% grade which is equivalent to a slope
angle of 45°. Keep in mind that the climbing
ability of the vehicle depends on terrain
conditions.
Be easy on the accelerator and watch for
continuous wheel traction when driving in
steep terrain.
i The 4-ETS helps greatly when starting out
on a steep incline when the front wheels
have then the tendency to slip due to the
weight shifting towards the rear axle.
The 4-ETS recognizes the situation and
limits the torque for the front wheels by
braking them.
Simultaneously the torque for the rear
wheels is increased.
i Vehicles with enhanced off-road package
are equipped with automatic locks for the
center and rear axle differential to improve
vehicle traction.
Driving across a hilltop
Decelerate just ahead of a hilltop (do not shift
automatic transmission into neutral position
N ), to prevent the vehicle from speeding up
too much after climbing a hill.
Use the momentum of the vehicle to drive
across the hilltop.
After climbing a hill, driving in this manner
prevents the vehicle from:
R losing ground contact when cresting hills
R losing its forward momentum
R speeding up too much after climbing the hill
Driving downhill
R Drive slowly.
R Do not drive at an angle to the incline. Steer
into the line of gravity and drive with the
front wheels pointing straight downhill.
Otherwise, the vehicle may slide sideways
off the path and roll over.
R Shift automatic transmission into gear
range 1 (Y page 118).
R On steep inclines, use the Downhill Speed
Regulation ( Y page 155).
R Utilize the engine’s braking power to
reduce vehicle speed.
If this is insufficient, apply the brakes
gently. Make sure the vehicle is moving in
the line of gravity.
R Check the brakes after a lengthy
downgrade drive.
Driving instructions265OperationX164_AKB; 5; 31, en-USd2ureepe,Version: 2.11.8.12009-09-11T12:30:16+02:00 - Seite 265Z