2010 MERCEDES-BENZ GL450 off button
[x] Cancel search: off buttonPage 190 of 380
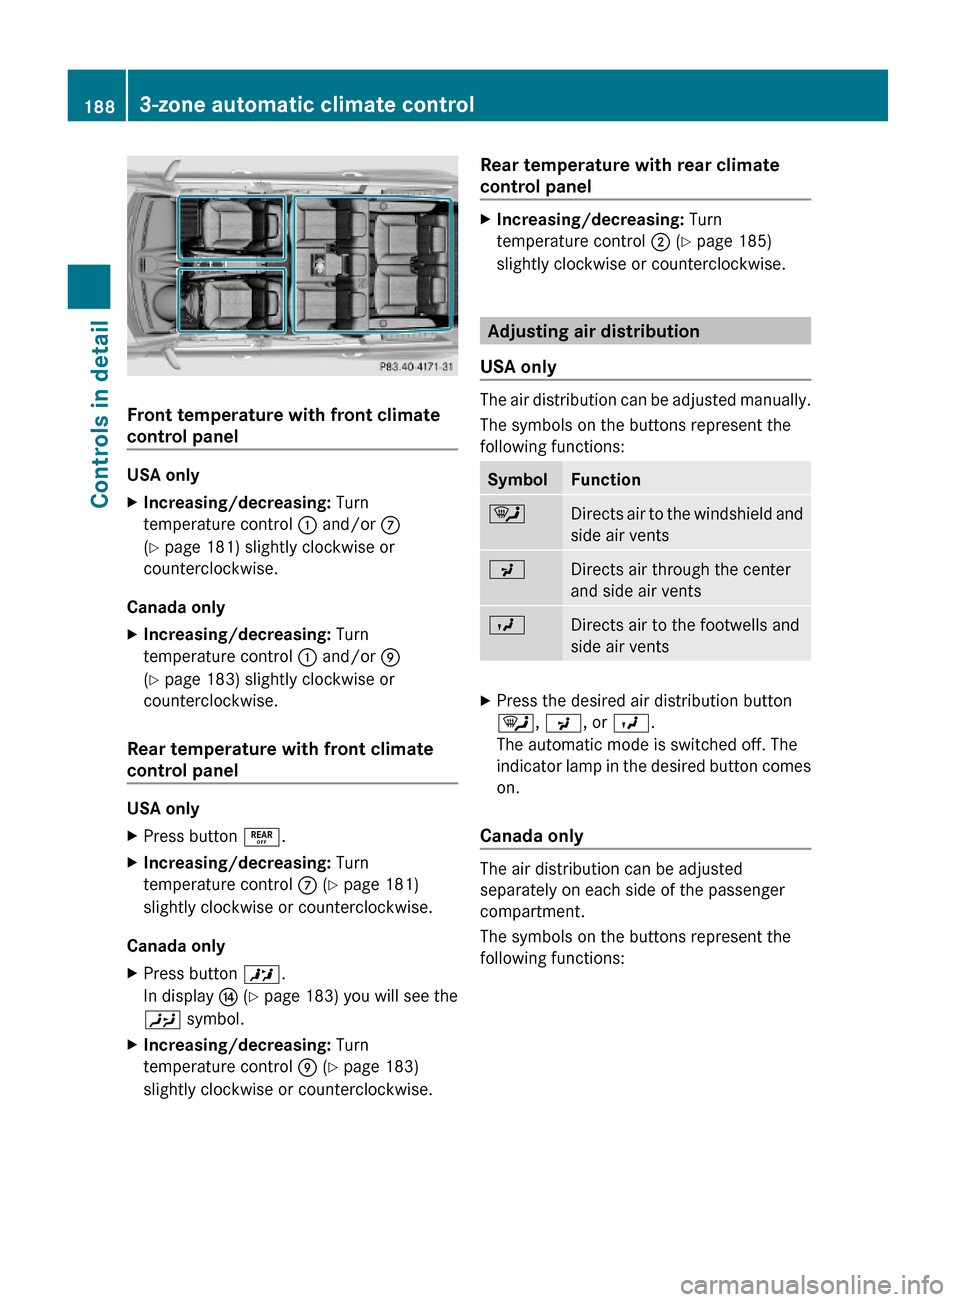
Front temperature with front climate
control panel
USA only
XIncreasing/decreasing: Turn
temperature control : and/or C
(Y page 181) slightly clockwise or
counterclockwise.
Canada only
XIncreasing/decreasing: Turn
temperature control : and/or E
(Y page 183) slightly clockwise or
counterclockwise.
Rear temperature with front climate
control panel
USA only
XPress button ±.XIncreasing/decreasing: Turn
temperature control C (Y page 181)
slightly clockwise or counterclockwise.
Canada only
XPress button X.
In display J (Y page 183) you will see the
Y symbol.
XIncreasing/decreasing: Turn
temperature control E (Y page 183)
slightly clockwise or counterclockwise.
Rear temperature with rear climate
control panel
XIncreasing/decreasing: Turn
temperature control ; (Y page 185)
slightly clockwise or counterclockwise.
Adjusting air distribution
USA only
The air distribution can be adjusted manually.
The symbols on the buttons represent the
following functions:
SymbolFunction¯Directs air to the windshield and
side air vents
PDirects air through the center
and side air vents
ODirects air to the footwells and
side air vents
XPress the desired air distribution button
¯, P, or O.
The automatic mode is switched off. The
indicator lamp in the desired button comes
on.
Canada only
The air distribution can be adjusted
separately on each side of the passenger
compartment.
The symbols on the buttons represent the
following functions:
1883-zone automatic climate controlControls in detail
X164_AKB; 5; 31, en-USd2ureepe,Version: 2.11.8.12009-09-11T12:30:16+02:00 - Seite 188
Page 191 of 380
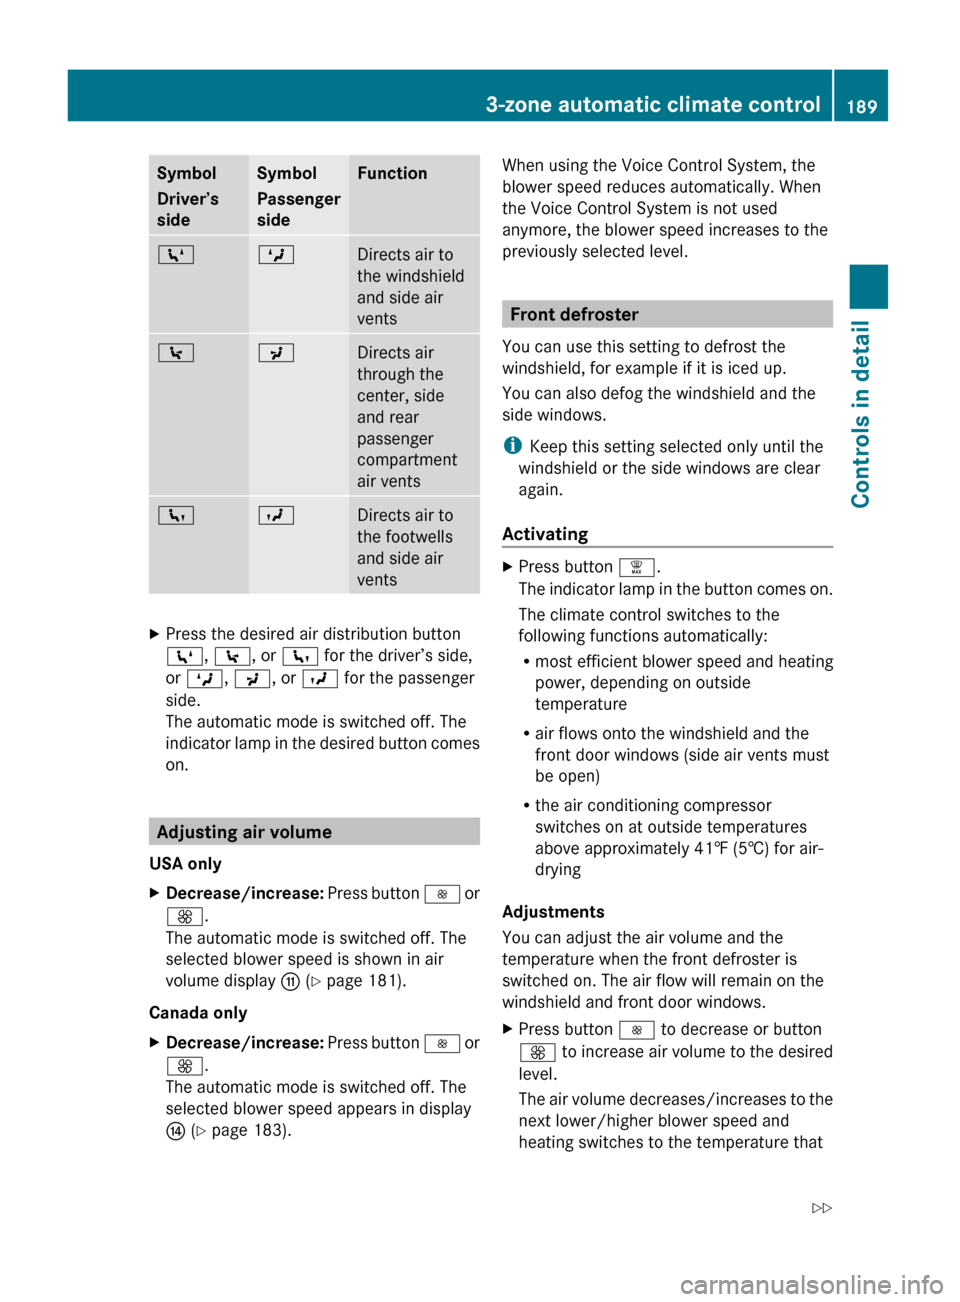
Symbol
Driver’s
sideSymbol
Passenger
sideFunctionZMDirects air to
the windshield
and side air
vents\PDirects air
through the
center, side
and rear
passenger
compartment
air ventscODirects air to
the footwells
and side air
ventsXPress the desired air distribution button
Z , \ , or c for the driver’s side,
or M , P , or O for the passenger
side.
The automatic mode is switched off. The
indicator lamp in the desired button comes
on.
Adjusting air volume
USA only
XDecrease/increase: Press button I or
K .
The automatic mode is switched off. The
selected blower speed is shown in air
volume display G (Y page 181).
Canada only
XDecrease/increase: Press button I or
K .
The automatic mode is switched off. The
selected blower speed appears in display
J (Y page 183).When using the Voice Control System, the
blower speed reduces automatically. When
the Voice Control System is not used
anymore, the blower speed increases to the
previously selected level.
Front defroster
You can use this setting to defrost the
windshield, for example if it is iced up.
You can also defog the windshield and the
side windows.
i Keep this setting selected only until the
windshield or the side windows are clear
again.
Activating
XPress button ¦.
The indicator lamp in the button comes on.
The climate control switches to the
following functions automatically:
R most efficient blower speed and heating
power, depending on outside
temperature
R air flows onto the windshield and the
front door windows (side air vents must
be open)
R the air conditioning compressor
switches on at outside temperatures
above approximately 41‡ (5†) for air-
drying
Adjustments
You can adjust the air volume and the
temperature when the front defroster is
switched on. The air flow will remain on the
windshield and front door windows.
XPress button I to decrease or button
K to increase air volume to the desired
level.
The air volume decreases/increases to the
next lower/higher blower speed and
heating switches to the temperature that3-zone automatic climate control189Controls in detailX164_AKB; 5; 31, en-USd2ureepe,Version: 2.11.8.12009-09-11T12:30:16+02:00 - Seite 189Z
Page 192 of 380

was set before the front defroster was
switched on.
The indicator lamp in button ¦ goes out.
The indicator lamp in button Á comes
on.
or
XTurn temperature control : and/or C
(USA only) ( Y page 181) or : and/or E
(Canada only) ( Y page 183) slightly in any
direction.
Heating switches to the temperature that
was set before the front defroster was
switched on.
The indicator lamp in button ¦ goes out.
The indicator lamp in button Á comes
on.
i The air conditioning compressor remains
on even if the indicator lamp in button
¦ goes out. This helps to prevent the
windshield from fogging.
Deactivating
XPress button ¦ once more.
The indicator lamp in the button goes out.
Defrosting is turned off.
The previous settings are once again in
effect. The air conditioning compressor
remains switched on.
i To deactivate, you can also press button
^ or à .
Windshield fogged on the outside
XSwitch the windshield wipers on
( Y page 103).XPress button Ã.
The indicator lamp in the button goes out.
Air volume and air distribution are
controlled separately for each zone.
If the automatic air volume and air
distribution are switched off:
XPress buttons O/c 16
and P /
\ 16
.
Air recirculation mode
Switch to air recirculation mode to prevent
unpleasant odors from entering the vehicle
from the outside (e. g. before driving through
a tunnel). This setting cuts off the intake of
outside air and recirculates the air in the
passenger compartment.
GWarning!
Fogged windows impair visibility,
endangering you and others. If the windows
begin to fog on the inside, switching off the
air recirculation mode immediately should
clear interior window fogging. If interior
window fogging persists, make sure the air
conditioning is activated, or press button
¦ .
XActivating: Press button d.
The indicator lamp in the button comes on.
i The air recirculation mode is activated
automatically at high outside
temperatures.
The indicator lamp in button d is not lit
when the air recirculation mode is switched
on automatically.
A quantity of outside air is added after
approximately 30 minutes.
If you have turned off the air conditioning
or the outside temperature is below 41‡
(5†), the air recirculation mode will not
switch on automatically.
XDeactivating: Press button d.
The indicator lamp in the button goes out.16 Canada only1903-zone automatic climate controlControls in detail
X164_AKB; 5; 31, en-USd2ureepe,Version: 2.11.8.12009-09-11T12:30:16+02:00 - Seite 190
Page 193 of 380
iThe manually selected air recirculation
mode is deactivated automatically:
R after 5 minutes if the outside
temperature is below approximately
41‡ (5†)
R after 5 minutes if the air conditioning and
air-drying are turned off
R after 30 minutes if the outside
temperature is above approximately
41‡ (5†)
At outside temperatures above 79‡ (26†)
the system will not automatically switch back
to outside air. A quantity of outside air is
added after approximately 30 minutes.
Residual heat and ventilation
With the engine switched off, it is possible to
continue to heat or ventilate the interior for
up to 30 minutes. This feature makes use of
the residual heat produced by the engine.
i How long the system will provide heating
depends on the coolant temperature and
the battery voltage.
Regardless of the temperature and air
volume set on the climate control panel, an
interior temperature is aimed at by 72‡
(22† ) and the blower runs on low speed to
protect the vehicle battery.
XActivating: Switch off the ignition.XPress button Á.
The indicator lamp in the button comes on.XDeactivating: Press button Á again.
The indicator lamp in the button goes out.
The residual heat is deactivated
automatically:
R when the ignition is switched on
R after approximately 30 minutes
R if the battery voltage drops
R if the coolant temperature is too low
Using driver-side settings for all
temperature zones
This feature is only available in Canada
vehicles.
You can use the settings of the driver’s side,
such as temperature, air volume and air
distribution, for all temperature zones. These
settings only need to be made once and the
climate control system will automatically
regulate the settings for all temperature
zones quickly and comfortably.XActivating: Adjust the air temperature, air
volume and air distribution.XPress button ¸.
The indicator lamp in the button comes on.
The driver-side settings are used for all
temperature zones.XDeactivating: Press button ¸ again.
The indicator lamp in the button goes out.
i If you manually set the temperature, air
volume or air distribution for the passenger
side or the rear passenger compartment
when the MONO setting is active, the
MONO setting will be switched off.
Rear window defroster
GWarning!
Any accumulation of snow and ice should be
removed from the rear window before driving.
Visibility could otherwise be impaired,
endangering you and others.
The rear window defroster uses a large
amount of power. To keep the battery drain
to a minimum, switch off the defroster as
soon as the rear window is clear. The
defroster is switched off automatically after
some time of operation depending on the
outside temperature.
Rear window defroster191Controls in detailX164_AKB; 5; 31, en-USd2ureepe,Version: 2.11.8.12009-09-11T12:30:16+02:00 - Seite 191Z
Page 194 of 380
XSwitch on the ignition.XSwitching on: Press button ª on the
respective climate control panel.
The indicator lamp in the button comes on.XSwitching off: Press button ª again.
The rear window defroster switches off when
the battery voltage is too low. The indicator
lamp in button ª flashes. Too many
electrical consumers may be operating
simultaneously.
XSwitch off consumers that are currently not
needed if required.
Power tilt/sliding sunroof
Opening and closing
GObserve Safety notes, see page 55.GWarning!
When opening or closing the tilt/sliding
sunroof, make sure there is no danger of
anyone being harmed by the opening/closing
procedure.
The tilt/sliding sunroof is equipped with the
express operation and automatic reversal
function. If the movement of the tilt/sliding
sunroof is blocked during the closing
procedure, the tilt/sliding sunroof will stop
and open slightly.
The tilt/sliding sunroof operates differently
when the sunroof switch is pressed and held.
See the “Closing when the tilt/sliding sunroof
is blocked” section for details.
The opening/closing procedure of the tilt/
sliding sunroof can be immediately halted by
releasing the sunroof switch or, if the sunroof
switch was moved past the resistance point
and released, by moving the sunroof switch in
any direction.
GWarning!
The tilt/sliding sunroof is made out of glass.
In the event of an accident, the glass may
shatter. This may result in an opening in the
roof.
In a vehicle rollover, occupants not wearing
their seat belts or not wearing them properly
may be thrown out of the opening. Such an
opening also presents a potential for injury for
occupants wearing their seat belts properly as
entire body parts or portions of them may
protrude from the passenger compartment.
! To avoid damaging the seals, do not
transport any objects with sharp edges
which can stick out of the tilt/sliding
sunroof.
Do not open the tilt/sliding sunroof if there
is snow or ice on the roof, as this could
result in malfunctions.
If you cannot open or close the tilt/sliding
sunroof due to a malfunction contact
Roadside Assistance or an authorized
Mercedes-Benz Center.
! Please keep in mind that weather
conditions can sometimes change rapidly.
Make sure to close the tilt/sliding sunroof
when leaving the vehicle. If water enters
the vehicle interior, vehicle electronics
could be damaged which is not covered by
the Mercedes-Benz Limited Warranty.
i You can also open or close the tilt/sliding
sunroof using the SmartKey or the
KEYLESS-GO function, see “Summer
opening feature” ( Y page 107) and
“Convenience closing feature”
( Y page 107).
i After switching off the ignition or
removing the SmartKey from the starter
switch, you can operate the tilt/sliding
sunroof until you open the driver’s or front
passenger door. If no door was opened you
can operate the tilt/sliding sunroof for up
to 5 minutes.192Power tilt/sliding sunroofControls in detail
X164_AKB; 5; 31, en-USd2ureepe,Version: 2.11.8.12009-09-11T12:30:16+02:00 - Seite 192
Page 206 of 380
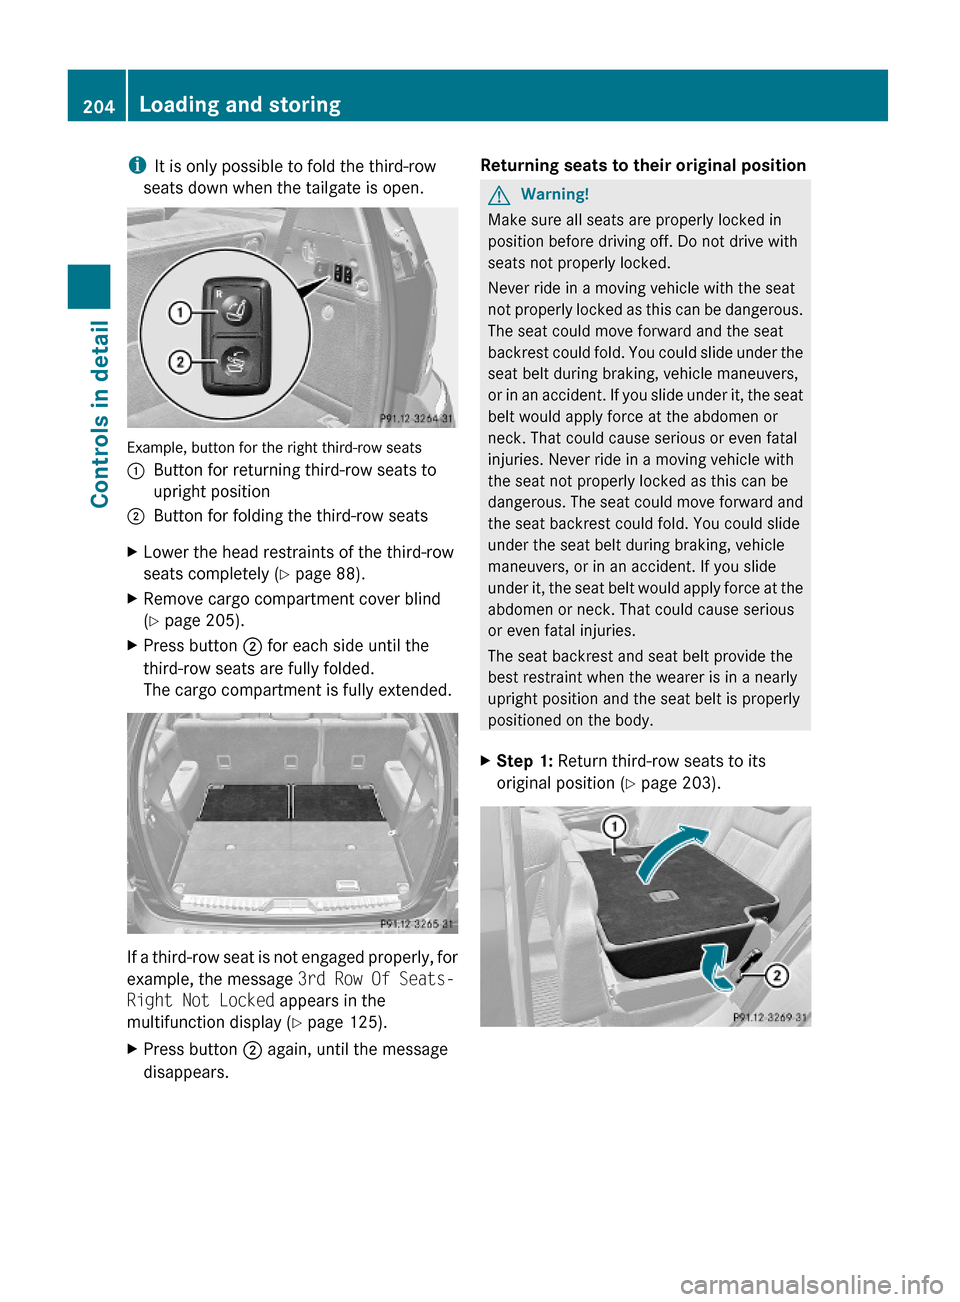
iIt is only possible to fold the third-row
seats down when the tailgate is open.
Example, button for the right third-row seats
:Button for returning third-row seats to
upright position
;Button for folding the third-row seatsXLower the head restraints of the third-row
seats completely (Y page 88).
XRemove cargo compartment cover blind
(Y page 205).
XPress button ; for each side until the
third-row seats are fully folded.
The cargo compartment is fully extended.
If a third-row seat is not engaged properly, for
example, the message 3rd Row Of Seats-
Right Not Locked appears in the
multifunction display (Y page 125).
XPress button ; again, until the message
disappears.
Returning seats to their original positionGWarning!
Make sure all seats are properly locked in
position before driving off. Do not drive with
seats not properly locked.
Never ride in a moving vehicle with the seat
not properly locked as this can be dangerous.
The seat could move forward and the seat
backrest could fold. You could slide under the
seat belt during braking, vehicle maneuvers,
or in an accident. If you slide under it, the seat
belt would apply force at the abdomen or
neck. That could cause serious or even fatal
injuries. Never ride in a moving vehicle with
the seat not properly locked as this can be
dangerous. The seat could move forward and
the seat backrest could fold. You could slide
under the seat belt during braking, vehicle
maneuvers, or in an accident. If you slide
under it, the seat belt would apply force at the
abdomen or neck. That could cause serious
or even fatal injuries.
The seat backrest and seat belt provide the
best restraint when the wearer is in a nearly
upright position and the seat belt is properly
positioned on the body.
XStep 1: Return third-row seats to its
original position (Y page 203).
204Loading and storingControls in detail
X164_AKB; 5; 31, en-USd2ureepe,Version: 2.11.8.12009-09-11T12:30:16+02:00 - Seite 204
Page 210 of 380
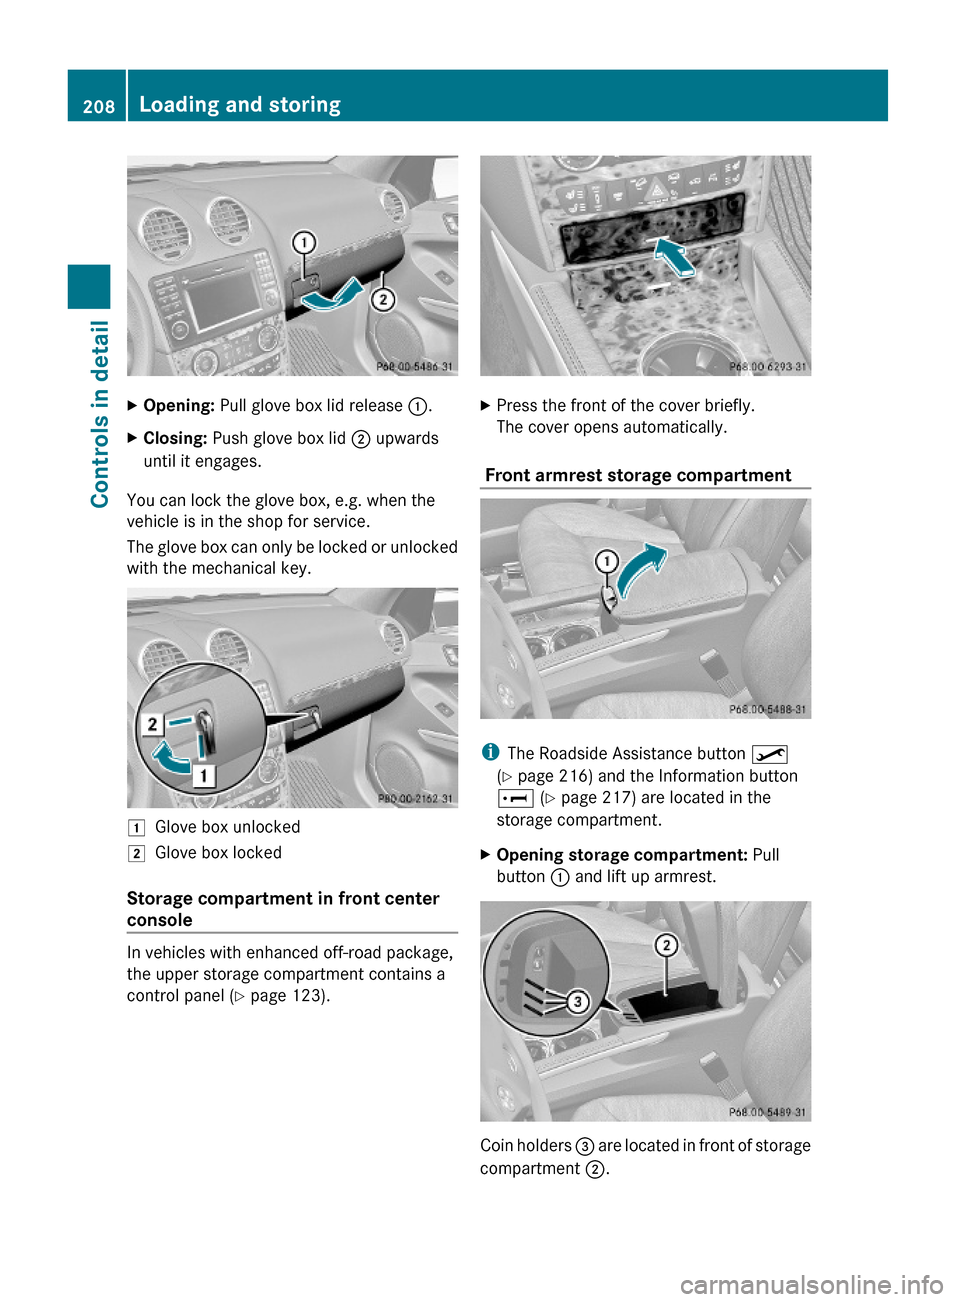
XOpening: Pull glove box lid release :.XClosing: Push glove box lid ; upwards
until it engages.
You can lock the glove box, e.g. when the
vehicle is in the shop for service.
The glove box can only be locked or unlocked
with the mechanical key.
1Glove box unlocked2Glove box locked
Storage compartment in front center
console
In vehicles with enhanced off-road package,
the upper storage compartment contains a
control panel (Y page 123).
XPress the front of the cover briefly.
The cover opens automatically.
Front armrest storage compartment
iThe Roadside Assistance button º
(Y page 216) and the Information button
E (Y page 217) are located in the
storage compartment.
XOpening storage compartment: Pull
button : and lift up armrest.
Coin holders = are located in front of storage
compartment ;.
208Loading and storingControls in detail
X164_AKB; 5; 31, en-USd2ureepe,Version: 2.11.8.12009-09-11T12:30:16+02:00 - Seite 208
Page 216 of 380
Prerequisites for operation:
R The 12V power outlets in the second-row
footwell and cargo compartment
( Y page 212) are operational.
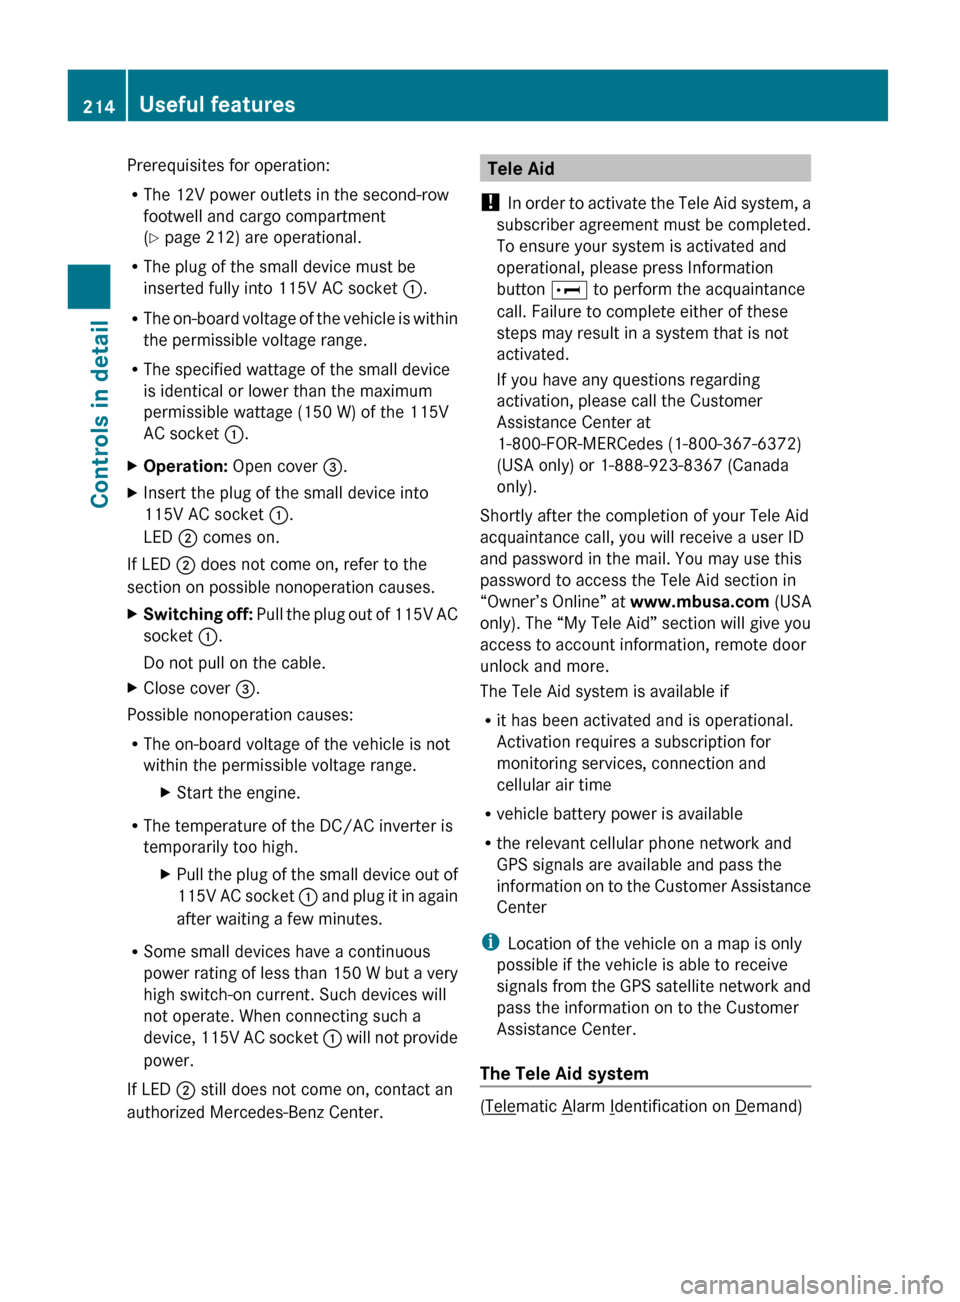
R The plug of the small device must be
inserted fully into 115V AC socket :.
R The on-board voltage of the vehicle is within
the permissible voltage range.
R The specified wattage of the small device
is identical or lower than the maximum
permissible wattage (150 W) of the 115V
AC socket :.XOperation: Open cover =.XInsert the plug of the small device into
115V AC socket :.
LED ; comes on.
If LED
; does not come on, refer to the
section on possible nonoperation causes.
XSwitching off: Pull the plug out of 115V AC
socket :.
Do not pull on the cable.XClose cover =.
Possible nonoperation causes:
R The on-board voltage of the vehicle is not
within the permissible voltage range.
XStart the engine.
R The temperature of the DC/AC inverter is
temporarily too high.
XPull the plug of the small device out of
115V AC socket : and plug it in again
after waiting a few minutes.
R Some small devices have a continuous
power rating of less than 150 W but a very
high switch-on current. Such devices will
not operate. When connecting such a
device, 115V AC socket : will not provide
power.
If LED ; still does not come on, contact an
authorized Mercedes-Benz Center.
Tele Aid
! In order to activate the Tele Aid system, a
subscriber agreement must be completed.
To ensure your system is activated and
operational, please press Information
button E to perform the acquaintance
call. Failure to complete either of these
steps may result in a system that is not
activated.
If you have any questions regarding
activation, please call the Customer
Assistance Center at
1-800-FOR-MERCedes (1-800-367-6372)
(USA only) or 1-888-923-8367 (Canada
only).
Shortly after the completion of your Tele Aid
acquaintance call, you will receive a user ID
and password in the mail. You may use this
password to access the Tele Aid section in
“Owner’s Online” at www.mbusa.com (USA
only). The “My Tele Aid” section will give you
access to account information, remote door
unlock and more.
The Tele Aid system is available if
R it has been activated and is operational.
Activation requires a subscription for
monitoring services, connection and
cellular air time
R vehicle battery power is available
R the relevant cellular phone network and
GPS signals are available and pass the
information on to the Customer Assistance
Center
i Location of the vehicle on a map is only
possible if the vehicle is able to receive
signals from the GPS satellite network and
pass the information on to the Customer
Assistance Center.
The Tele Aid system
(Telematic Alarm Identification on Demand)
214Useful featuresControls in detail
X164_AKB; 5; 31, en-USd2ureepe,Version: 2.11.8.12009-09-11T12:30:16+02:00 - Seite 214