2010 MERCEDES-BENZ GL450 weight
[x] Cancel search: weightPage 271 of 380
Trailer towingGWarning!
Failure to use proper equipment and driving
technique can result in a loss of vehicle
control when towing a trailer.
Improper towing or failure to follow the
instructions in this manual can result in
vehicle damage and/or serious personal
injury. Follow the guidelines below carefully
to assure safe trailer operation.
Contact an authorized Mercedes-Benz Center
should you require an explanation of
information contained in this manual.
Trailer hitch
R Only install a trailer hitch receiver approved
for your vehicle.
For information on availability and
installation, contact an authorized
Mercedes-Benz Center.
R The bumpers on your vehicle are not
designed for use with clamp-type hitches.
Do not attach rental hitches or other
bumper-type hitches to them.
R To reduce the possibility of damage,
remove the hitch ball adapter from the
receiver when not in use.
Electrical connections
The vehicle is prewired to accept the seven-
wire harness included in the Mercedes-Benz
approved trailer hitch receiver kit.
i A four-pole conversion plug is available
from your authorized Mercedes-Benz
Center as a spare part.
For further information, contact an
authorized Mercedes-Benz Center.
Vehicle and trailer weights and ratings
The Gross Trailer Weight (GTW) is the weight
of the trailer plus the weight of all cargo,
equipment, luggage, etc. loaded on the
trailer. The maximum permissible GTW to be
towed: 7 500 lb (3 402 kg).
Trailer Tongue Weight Rating (TWR) is the
maximum permissible weight on the trailer
tongue: 600 lb (272 kg) limit for Mercedes-
Benz approved hitch receiver.
Loading a trailer
R When loading a trailer, you should observe
that neither the permissible GTW, nor the
Gross Vehicle Weight Rating (GVWR) are
exceeded. The GVWR is indicated on the
certification label located on the driver’s
door B-pillar ( Y page 242).
Maximum permissible values are listed on
the safety compliance certification labels
for the vehicle and for the trailer to be
towed.
The lowest value listed must be selected
when determining how the vehicle and
trailer are loaded.
R The tongue weight at the hitch ball must be
added to the rear axle weight to prevent
exceeding the rear Gross Axle Weight
Rating (GAWR). The GAWR is indicated on
the certification label located on the
driver’s door B-pillar ( Y page 242).
i Mercedes-Benz recommends loading the
trailer in such a manner that it has a tongue
weight between 8 % and 15 % of the GTW.
i The weight of other accessories,
passengers and cargo will reduce the
maximum trailer weight and tongue weight
your vehicle can tow.
Checking weights of vehicle and trailer
R To assure that the towing vehicle and trailer
are in compliance with the maximum
permissible weight limits, have the loaded
rig (towing vehicle including driver,
passengers and cargo, trailer fully loaded)
weighed on a commercial scale.
R Check the vehicle’s front and rear gross
axle weight, the Gross Trailer Weight (GTW)
and tongue weight.Driving instructions269OperationX164_AKB; 5; 31, en-USd2ureepe,Version: 2.11.8.12009-09-11T12:30:16+02:00 - Seite 269Z
Page 272 of 380
The values as measured must not exceed
the weight limits listed under “Vehicle and
trailer weights and ratings” ( Y page 269).
Coupling a trailer GWarning!
While you are coupling or decoupling a trailer,
make sure nobody locks or unlocks the
vehicle and/or opens or closes doors or the
tailgate.
The vehicle’s level could change and you
could endanger yourself and/or others as a
result.
Make sure that you do not operate the ADS
button or the vehicle level control system
when coupling/decoupling the trailer.
Observe maximum permitted trailer
dimensions (width and length).
Most states and all Canadian provinces
require
R safety chains between the towing vehicle
and the trailer
The chains should be criss-crossed under
the trailer tongue. They must be attached
to the hitch receiver, and not to the
vehicle’s bumper or axle.
Make sure to leave enough slack in the
chains to permit turning corners.
R a separate brake system at various trailer
weights
R a break-away switch on trailers with a
separate brake system.
Check with your local state laws for specific
requirements.
The switch activates the trailer brakes in
the possible event that the trailer might
separate from the tow vehicle.
! Do not connect a trailer brake system (if
trailer is so equipped) directly to the
vehicle’s hydraulic brake system, as your
vehicle is equipped with antilock brakes. If
you do, neither the vehicle’s brakes nor the
trailer’s brakes will function properly.
i The provided vehicle electrical wiring
harness for trailer towing has a brake signal
wire for hook-up to a brake controller.XMake sure the automatic transmission is in
park position P (Y page 115).XEngage the parking brake for the vehicle
( Y page 112).XStart the engine ( Y page 108).XSelect the highway level ( Y page 159).XVehicles with Adaptive Damping System
(ADS):
Set the ADS to AUTO or COMF
( Y page 159).XTurn off the engine ( Y page 113).XClose all doors and the tailgate.XAttach the trailer.XPlug in all electrical connectors.
i
When you are towing a trailer, the vehicle
level always remains in the highway setting.
The following applies additionally when
towing a trailer:
R The vehicle is lowered to the highway
level when it reaches a speed of 5 mph
(8 km/h) if not set to highway level.
R The highspeed level is not available.
The restrictions that apply to towing also
apply when using accessories that are
connected to the trailer power socket, such
as a bicycle rack.
Towing a trailer
There are many different laws, including
speed limit restrictions, having to do with
trailer towing. Make sure your rig will be legal,
not only for where you reside, but also for
where you will be driving. A good source for
this information can be the police or local
authorities.
Note the following, when driving with a trailer:
R In order to gain skill and an understanding
of the vehicle’s behavior, you should
270Driving instructionsOperation
X164_AKB; 5; 31, en-USd2ureepe,Version: 2.11.8.12009-09-11T12:30:16+02:00 - Seite 270
Page 293 of 380
Display messagesPossible causes/consequences and M SolutionsFront
Passenger
Airbag
Enabled
See
Operator’s
ManualUSA only:
The front passenger front air bag is activated while driving
even though a child, small individual, or object below the
system’s weight threshold is on the front passenger seat, or
the front passenger seat is empty. Objects on the seat or
forces acting on the seat may make the system sense
supplemental weight.XStop the vehicle in a safe location as soon as possible.XEngage the parking brake.XSwitch off the ignition.XOpen the front passenger door.XRemove child and child restraint from front passenger seat
and properly secure the child in rear seat employing the
child restraint if necessary.XRemove any other items from on and around the front
passenger seat and make sure the parcel net on the back
of the front passenger seat is empty.XMake sure no objects which apply forces to the seat are
present (e.g. objects such as books, briefcases etc. lodged
behind or around the seat, head restraints pushing against
roof etc.). The system may recognize such forces as
supplemental weight and sense that an occupant on the
front passenger seat is of a greater weight than actually
present.XKeep the seat unoccupied, close the front passenger door
and switch on the ignition.
Monitor the 42 indicator lamp in the center
console ( Y page 45) and the multifunction display in the
instrument cluster for the following:
With the seat unoccupied and the ignition switched on,
R the 42 indicator lamp in the center console
should illuminate and remain illuminated, indicating that
the OCS ( Y page 42) has deactivated the front passenger
front air bag.
R the message Front Passenger Airbag Enabled See
Operator’s Manual or the message Front Passenger
Airbag Disabled See Operator’s Manual should not
appear in the multifunction display at any time the seat is
unoccupied. Wait at least 60 seconds for the system to
complete the necessary check cycles and to make sure
neither message appears in the multifunction display.
Vehicle status messages in the multifunction display291Practical hintsX164_AKB; 5; 31, en-USd2ureepe,Version: 2.11.8.12009-09-11T12:30:16+02:00 - Seite 291Z
Page 295 of 380
Display messagesPossible causes/consequences and M SolutionsFront
Passenger
Airbag
Disabled
See
Operator’s
ManualUSA only:
The front passenger front air bag is deactivated while driving
even though an adult or someone larger than a small
individual is occupying the front passenger seat. Forces
acting on the seat may make the system sense a decrease in
weight.XStop the vehicle in a safe location as soon as possible.XEngage the parking brake.XSwitch off the ignition.XHave the front passenger vacate the seat and exit the
vehicle.XAdjust the seat height to a higher position ( Y page 83).XMake sure no objects which apply forces to the seat are
present (e.g. objects such as books, briefcases etc. lodged
underneath, behind or around the seat). Such forces may
cause the system to sense that an occupant of a lesser
weight than actually present is on the front passenger seat.XKeep the seat unoccupied, close the front passenger door
and switch on the ignition.
Monitor the 42 indicator lamp in the center
console ( Y page 45) and the multifunction display in the
instrument cluster for the following:
With the seat unoccupied and the ignition switched on,
R the 42 indicator lamp in the center console
should illuminate and remain illuminated, indicating that
the OCS ( Y page 42) has deactivated the front passenger
front air bag.
R the message Front Passenger Airbag Enabled See
Operator’s Manual or the message Front Passenger
Airbag Disabled See Operator’s Manual should not
appear in the multifunction display at any time the seat is
unoccupied. Wait at least 60 seconds for the system to
complete the necessary check cycles and to make sure
neither message appears in the multifunction display.
If above conditions are met, you can occupy the front
passenger seat again. Depending on the front passenger
classification sensed by the OCS, the 42
indicator lamp will remain illuminated or go out.
If above conditions are not met, the system is not working
properly. Have the system checked at an authorized
Mercedes-Benz Center as soon as possible.
Vehicle status messages in the multifunction display293Practical hintsX164_AKB; 5; 31, en-USd2ureepe,Version: 2.11.8.12009-09-11T12:30:16+02:00 - Seite 293Z
Page 324 of 380
sequence will continue upon subsequent
vehicle start-ups as long as the malfunction
exists. When the malfunction indicator is
illuminated, the system may not be able to
detect or signal low tire pressure as intended.
TPMS malfunctions may occur for a variety of
reasons, including the installation of
incompatible replacement or alternate tiresor wheels on the vehicle that prevent the
TPMS from functioning properly. Always
check the TPMS malfunction telltale after
replacing one or more tires or wheels on your
vehicle to ensure that the replacement or
alternate tires and wheels allow the TPMS to
continue to function properly.
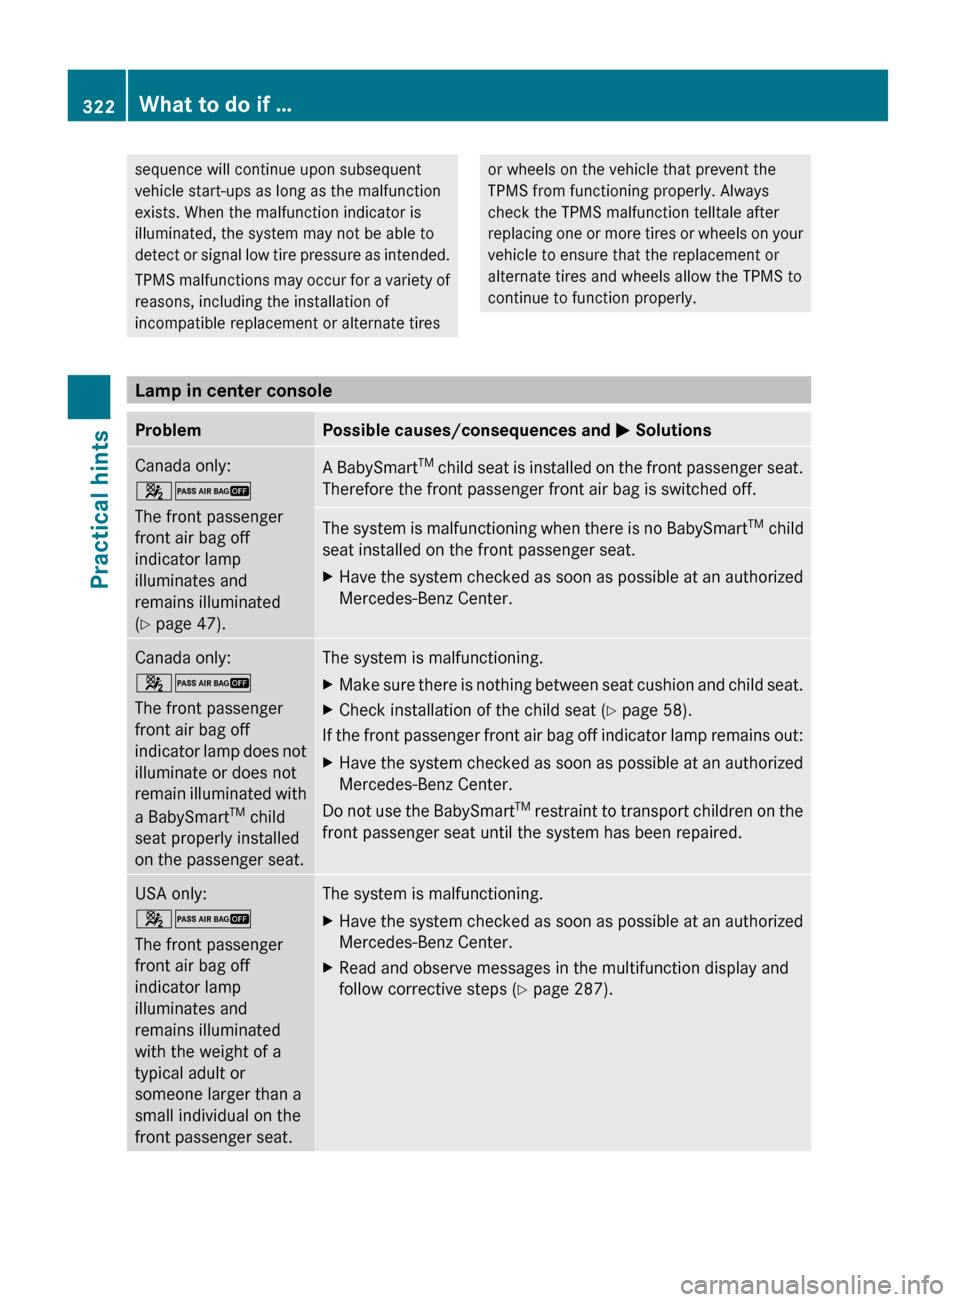
Lamp in center console
ProblemPossible causes/consequences and M SolutionsCanada only:
42
The front passenger
front air bag off
indicator lamp
illuminates and
remains illuminated
( Y page 47).A BabySmart TM
child seat is installed on the front passenger seat.
Therefore the front passenger front air bag is switched off.The system is malfunctioning when there is no BabySmart TM
child
seat installed on the front passenger seat.XHave the system checked as soon as possible at an authorized
Mercedes-Benz Center.Canada only:
42
The front passenger
front air bag off
indicator lamp does not
illuminate or does not
remain illuminated with
a BabySmart TM
child
seat properly installed
on the passenger seat.The system is malfunctioning.XMake sure there is nothing between seat cushion and child seat.XCheck installation of the child seat ( Y page 58).
If the front passenger front air bag off indicator lamp remains out:
XHave the system checked as soon as possible at an authorized
Mercedes-Benz Center.
Do not use the BabySmart TM
restraint to transport children on the
front passenger seat until the system has been repaired.
USA only:
42
The front passenger
front air bag off
indicator lamp
illuminates and
remains illuminated
with the weight of a
typical adult or
someone larger than a
small individual on the
front passenger seat.The system is malfunctioning.XHave the system checked as soon as possible at an authorized
Mercedes-Benz Center.XRead and observe messages in the multifunction display and
follow corrective steps ( Y page 287).322What to do if …Practical hints
X164_AKB; 5; 31, en-USd2ureepe,Version: 2.11.8.12009-09-11T12:30:16+02:00 - Seite 322
Page 325 of 380
GWarning!
If the 42 indicator lamp
illuminates and remains illuminated with the
weight of a typical adult or someone larger
than a small individual on the front passenger
seat, do not have any passenger use the front
passenger seat until the system has been
repaired.
ProblemPossible causes/consequences and M SolutionsUSA only:
42
The front passenger
front air bag off
indicator lamp does not
illuminate and/or does
not remain illuminated
with the weight of a
typical 12-month-old
child in a standard child
restraint or less on the
front passenger seat.
The system is malfunctioning.XMake sure there is nothing between seat cushion and child seat
and check installation of the child seat.
XMake sure no objects applying supplemental weight onto the
seat are present.
XMake sure no objects which apply forces to the seat are present
(e.g. objects such as books, briefcases etc. lodged behind or
around the seat, head restraints pushing against roof etc.). The
system may recognize such forces as supplemental weight.
XIf the front passenger front air bag off indicator lamp remains
out, have the system checked as soon as possible at an
authorized Mercedes-Benz Center. Do not transport a child on
the front passenger seat until the system has been repaired.
XRead and observe messages in the multifunction display and
follow corrective steps (Y page 287).
GWarning!
If the 42 indicator lamp does not
illuminate or remains out with the weight of a
typical 12-month-old child in a standard child
restraint or less on the front passenger seat,
do not transport a child on the front
passenger seat until the system has been
repaired.
Unlocking/locking manually
Unlocking the vehicle
If you cannot unlock the vehicle with the
SmartKey or with KEYLESS-GO, unlock the
driver’s door using the mechanical key.
The anti-theft alarm system will trigger when
you
Runlocking the driver’s door with the
mechanical key
and
Ropen the driver’s door
To cancel the alarm, insert the SmartKey into
the starter switch.
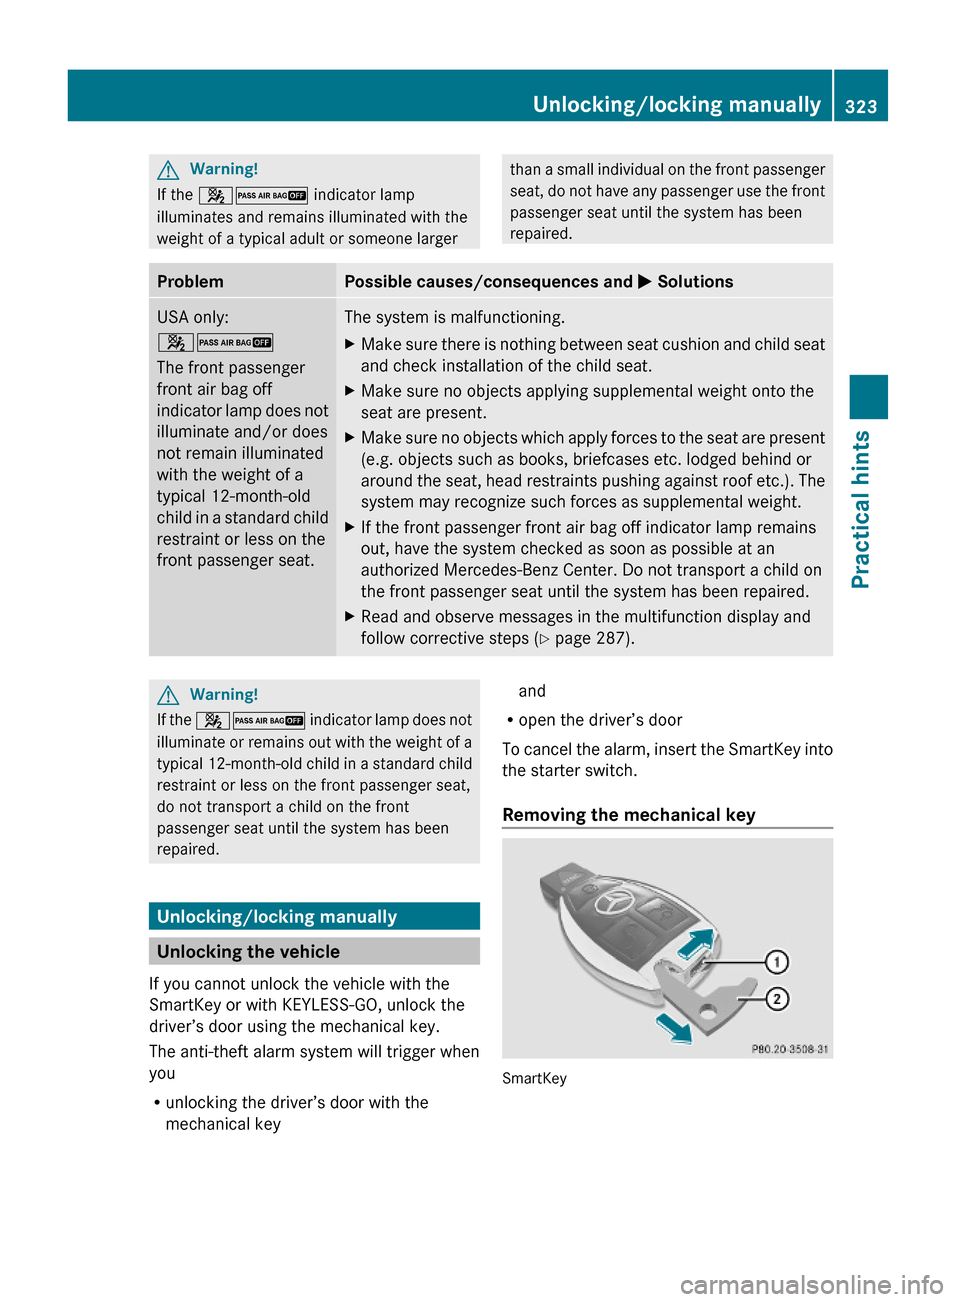
Removing the mechanical key
SmartKey
Unlocking/locking manually323Practical hintsX164_AKB; 5; 31, en-USd2ureepe,Version: 2.11.8.12009-09-11T12:30:16+02:00 - Seite 323Z
Page 346 of 380
Do not tighten the wheel bolts when the
vehicle is raised. Otherwise the vehicle could
fall off the jack.
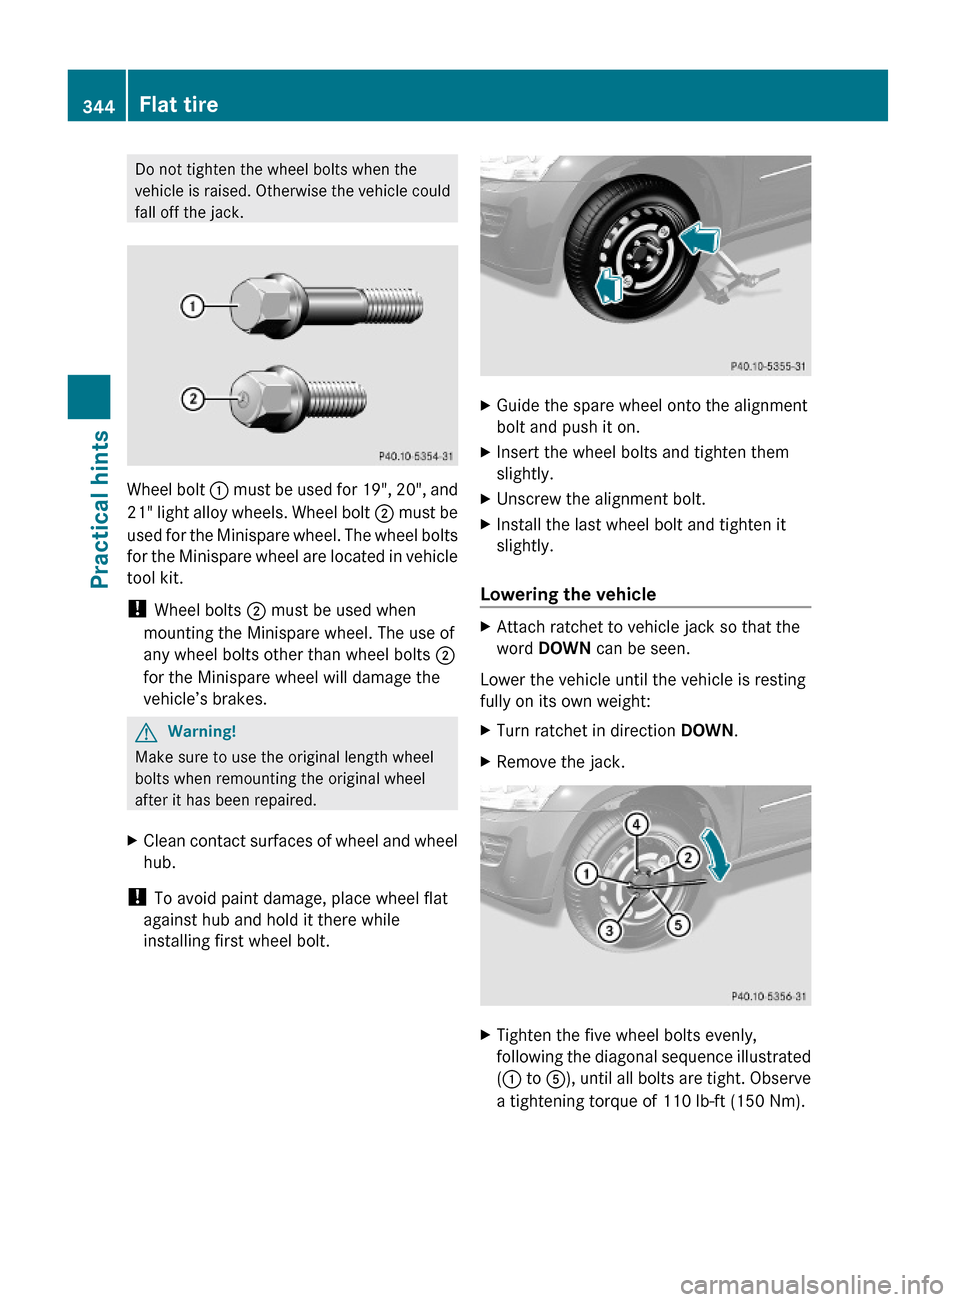
Wheel bolt : must be used for 19", 20", and
21" light alloy wheels. Wheel bolt ; must be
used for the Minispare wheel. The wheel bolts
for the Minispare wheel are located in vehicle
tool kit.
! Wheel bolts ; must be used when
mounting the Minispare wheel. The use of
any wheel bolts other than wheel bolts ;
for the Minispare wheel will damage the
vehicle’s brakes.
GWarning!
Make sure to use the original length wheel
bolts when remounting the original wheel
after it has been repaired.
XClean contact surfaces of wheel and wheel
hub.
! To avoid paint damage, place wheel flat
against hub and hold it there while
installing first wheel bolt.
XGuide the spare wheel onto the alignment
bolt and push it on.
XInsert the wheel bolts and tighten them
slightly.
XUnscrew the alignment bolt.XInstall the last wheel bolt and tighten it
slightly.
Lowering the vehicle
XAttach ratchet to vehicle jack so that the
word DOWN can be seen.
Lower the vehicle until the vehicle is resting
fully on its own weight:
XTurn ratchet in direction DOWN.XRemove the jack.XTighten the five wheel bolts evenly,
following the diagonal sequence illustrated
(: to A), until all bolts are tight. Observe
a tightening torque of 110 lb-ft (150 Nm).
344Flat tirePractical hints
X164_AKB; 5; 31, en-USd2ureepe,Version: 2.11.8.12009-09-11T12:30:16+02:00 - Seite 344
Page 364 of 380
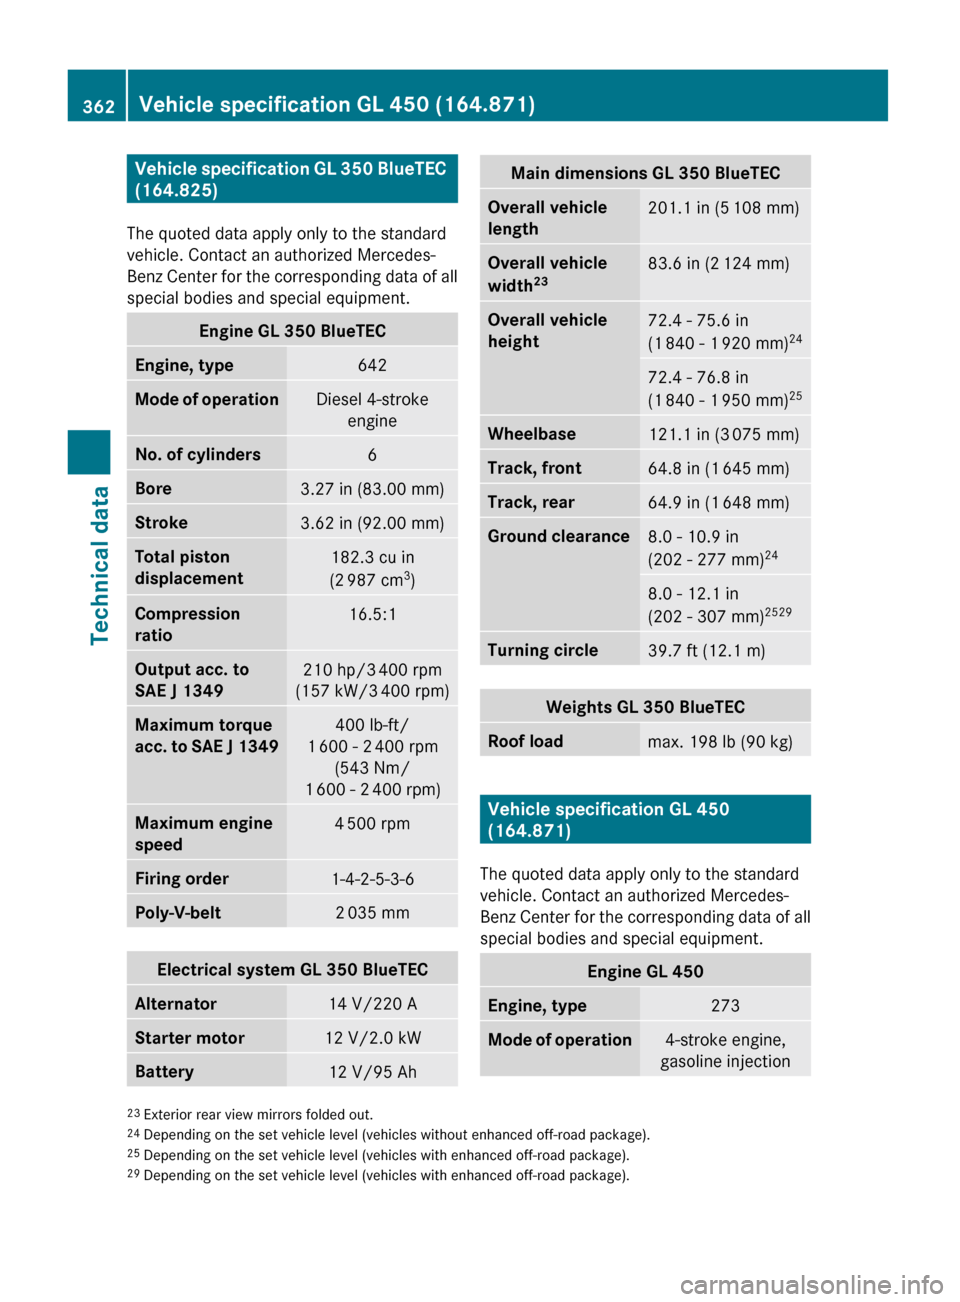
Vehicle specification GL 350 BlueTEC
(164.825)
The quoted data apply only to the standard
vehicle. Contact an authorized Mercedes-
Benz Center for the corresponding data of all
special bodies and special equipment.Engine GL 350 BlueTECEngine, type642Mode of operationDiesel 4-stroke engineNo. of cylinders6Bore3.27 in (83.00 mm)Stroke3.62 in (92.00 mm)Total piston
displacement182.3 cu in
(2 987 cm 3
)Compression
ratio16.5:1Output acc. to
SAE J 1349210 hp/3 400 rpm
(157 kW/3 400 rpm)Maximum torque
acc. to SAE J 1349400 lb-ft/
1 600 - 2 400 rpm
(543 Nm/
1 600 - 2 400 rpm)Maximum engine
speed4 500 rpmFiring order1-4-2-5-3-6Poly-V-belt2 035 mmElectrical system GL 350 BlueTECAlternator14 V/220 AStarter motor12 V/2.0 kWBattery12 V/95 AhMain dimensions GL 350 BlueTECOverall vehicle
length201.1 in (5 108 mm)Overall vehicle
width 2383.6 in (2
124 mm)Overall vehicle
height72.4 - 75.6 in
(1 840 - 1 920 mm) 2472.4 - 76.8 in
(1 840 - 1 950 mm) 25Wheelbase121.1 in (3
075 mm)Track, front64.8 in (1 645 mm)Track, rear64.9 in (1 648 mm)Ground clearance8.0 - 10.9 in
(202 - 277 mm) 248.0 - 12.1 in
(202 - 307 mm) 2529Turning circle39.7 ft (12.1 m)Weights GL 350 BlueTECRoof loadmax. 198 lb (90 kg)
Vehicle specification GL 450
(164.871)
The quoted data apply only to the standard
vehicle. Contact an authorized Mercedes-
Benz Center for the corresponding data of all
special bodies and special equipment.
Engine GL 450Engine, type273Mode of operation4-stroke engine,
gasoline injection23 Exterior rear view mirrors folded out.
24 Depending on the set vehicle level (vehicles without enhanced off-road package).
25 Depending on the set vehicle level (vehicles with enhanced off-road package).
29 Depending on the set vehicle level (vehicles with enhanced off-road package).362Vehicle specification GL 450 (164.871)Technical data
X164_AKB; 5; 31, en-USd2ureepe,Version: 2.11.8.12009-09-11T12:30:16+02:00 - Seite 362