2010 MERCEDES-BENZ GL450 passenger
[x] Cancel search: passengerPage 60 of 380
accident, they could be crushed between the
occupant and seat belt.
A child’s risk of serious or fatal injuries is
significantly increased if the child restraints
are not properly secured in the vehicle and/
or the child is not properly secured in the child
restraint.
Children too big for a toddler restraint must
ride in seats using regular seat belts. Position
shoulder belt across chest and shoulder, not
face or neck. A booster seat may be
necessary to achieve proper seat belt
positioning for children over 41 lb (18 kg) until
they reach a height where a lap/shoulder belt
fits properly without a booster.
When the child restraint is not in use, remove
it from the vehicle or secure it with the seat
belt to prevent the child restraint from
becoming a projectile in the event of an
accident.
Installation of infant and child restraint
systems
GObserve Safety notes, see page 55.GWarning!
Always lock the seat backrests in their upright
position when the rear seats are occupied by
passengers. Lock the seat backrests in their
upright position after installing top tether
straps or when the extended cargo
compartment is not in use. Make sure that
seat backrests are secured properly by
pushing and pulling on the seat backrests. If
a seat backrest is not locked properly, the
seat backrest could fold. The child seat would
no longer be supported properly or positioned
to provide its intended benefit. That could
cause serious or even fatal injuries.
This vehicle is equipped with tether
anchorages for a top tether strap at the
second-row seat backrest. For installing an
infant and child restraint system at the
third-row seats, use the cargo tie-down rings
in the cargo compartment (Y page 200).
Top tether straps enable an additional
connection to be made between child
restraint systems secured with LATCH-type
anchors and rear seats. This can further
reduce the risk of injury.
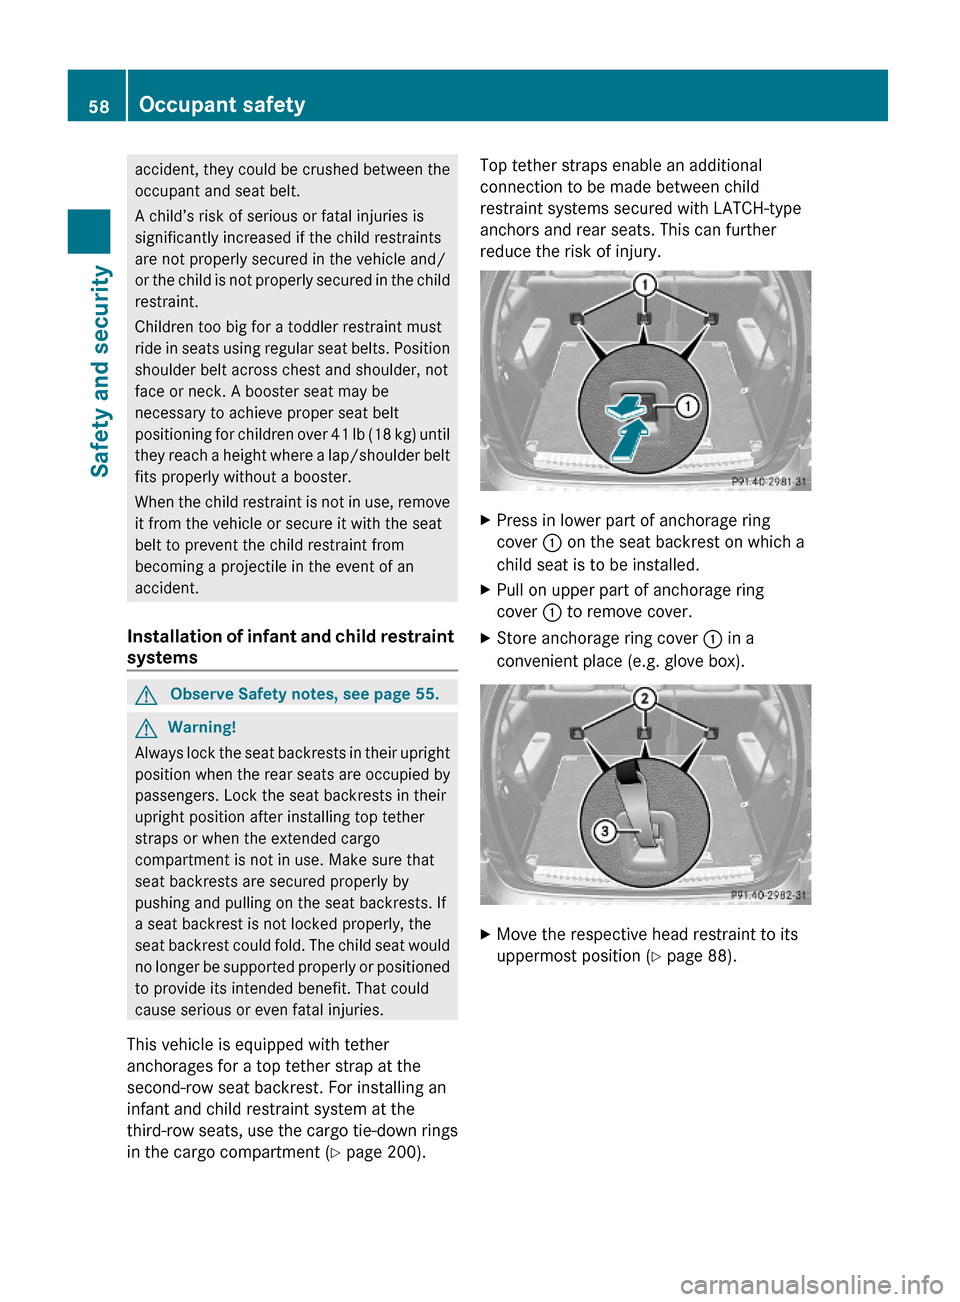
XPress in lower part of anchorage ring
cover : on the seat backrest on which a
child seat is to be installed.
XPull on upper part of anchorage ring
cover : to remove cover.
XStore anchorage ring cover : in a
convenient place (e.g. glove box).
XMove the respective head restraint to its
uppermost position (Y page 88).
58Occupant safetySafety and security
X164_AKB; 5; 31, en-USd2ureepe,Version: 2.11.8.12009-09-11T12:30:16+02:00 - Seite 58
Page 62 of 380
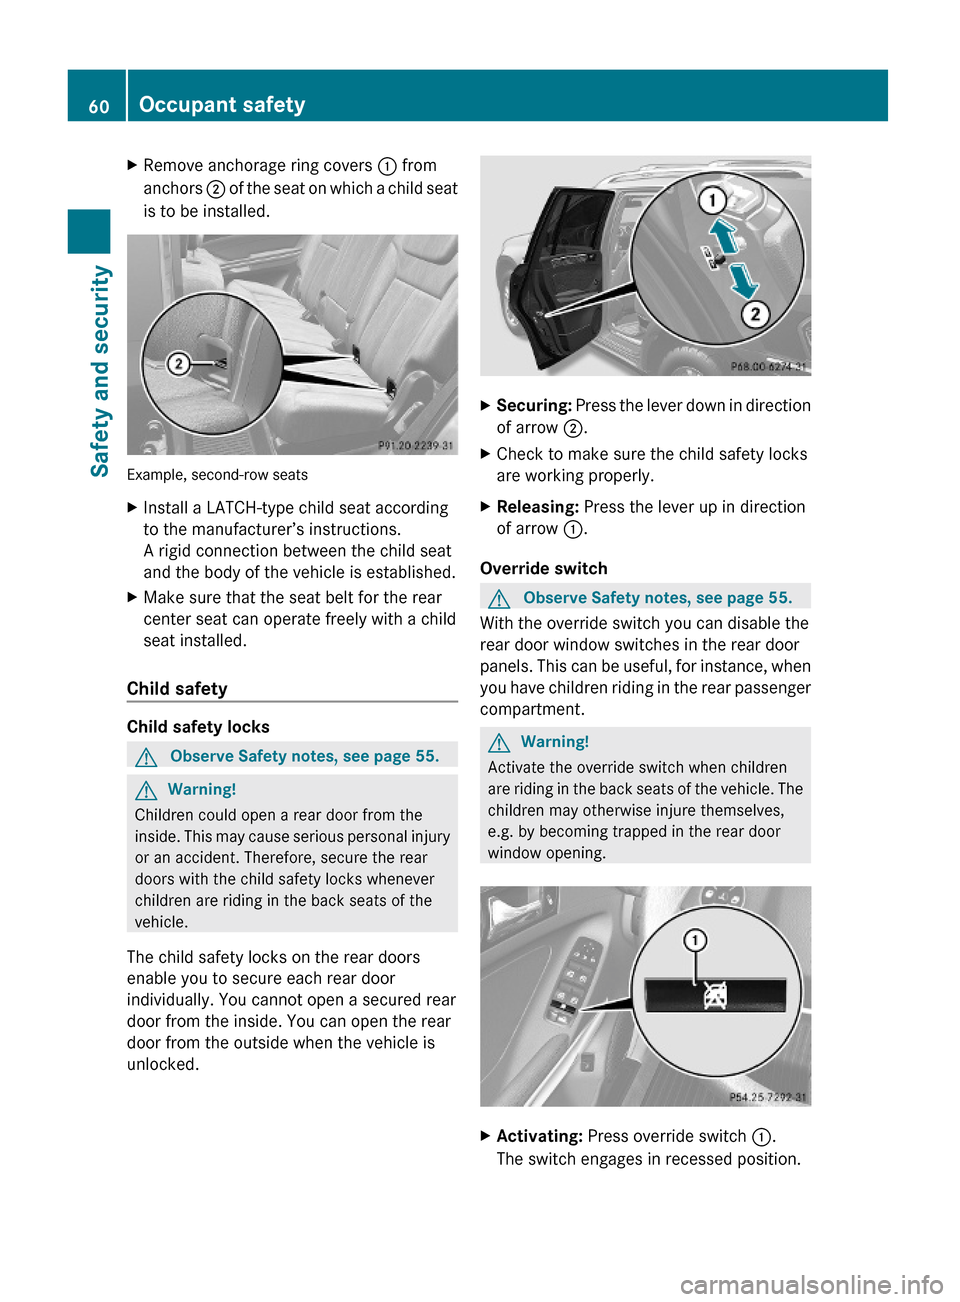
XRemove anchorage ring covers : from
anchors ; of the seat on which a child seat
is to be installed.
Example, second-row seats
XInstall a LATCH-type child seat according
to the manufacturer’s instructions.
A rigid connection between the child seat
and the body of the vehicle is established.
XMake sure that the seat belt for the rear
center seat can operate freely with a child
seat installed.
Child safety
Child safety locks
GObserve Safety notes, see page 55.GWarning!
Children could open a rear door from the
inside. This may cause serious personal injury
or an accident. Therefore, secure the rear
doors with the child safety locks whenever
children are riding in the back seats of the
vehicle.
The child safety locks on the rear doors
enable you to secure each rear door
individually. You cannot open a secured rear
door from the inside. You can open the rear
door from the outside when the vehicle is
unlocked.
XSecuring: Press the lever down in direction
of arrow ;.
XCheck to make sure the child safety locks
are working properly.
XReleasing: Press the lever up in direction
of arrow :.
Override switch
GObserve Safety notes, see page 55.
With the override switch you can disable the
rear door window switches in the rear door
panels. This can be useful, for instance, when
you have children riding in the rear passenger
compartment.
GWarning!
Activate the override switch when children
are riding in the back seats of the vehicle. The
children may otherwise injure themselves,
e.g. by becoming trapped in the rear door
window opening.
XActivating: Press override switch :.
The switch engages in recessed position.
60Occupant safetySafety and security
X164_AKB; 5; 31, en-USd2ureepe,Version: 2.11.8.12009-09-11T12:30:16+02:00 - Seite 60
Page 74 of 380
Important notes on using KEYLESS-GO
RYou can also use the SmartKey with
KEYLESS-GO like a normal SmartKey
( Y page 70).
R You can combine KEYLESS-GO functions
with normal SmartKey functions (e.g.
unlocking with KEYLESS-GO and locking
with button &).
R Always carry the SmartKey with you.
R Never store the SmartKey together with:
- Electronic items such as a mobile phone
or another SmartKey
- Metallic objects such as coins or metal
foil
Doing so could impair the function of the
KEYLESS-GO system.
R To lock or unlock the vehicle, the SmartKey
must be located outside the vehicle within
approximately 3 ft (1 m) of a door or the
tailgate.
R When the vehicle has been parked for more
than 72 hours, the KEYLESS-GO function is
deactivated. Pull an outside door handle
and switch on the ignition once to activate
the KEYLESS-GO function.
R If the SmartKey is positioned farther away
from the vehicle, the system may no longer
recognize the SmartKey. The vehicle
cannot be locked or the engine started via
the KEYLESS-GO system.
R If the SmartKey is removed from the vehicle
(e.g. if a passenger exits the vehicle with
the SmartKey)
- when pressing the KEYLESS-GO start/
stop button or trying to lock the vehicle
with the lock button on an outside door
handle the message Key Not
Detected appears in the multifunction
display
- with the engine running, the red message
Key Not Detected appears in the
multifunction display while driving off
Find the SmartKey or change its present
location immediately (e.g. place it on the
front passenger seat or insert it in shirt
pocket).
R If you have started the engine with the
KEYLESS-GO start/stop button, you can
turn it off again by
- pressing the KEYLESS-GO start/stop
button
- inserting the SmartKey into the starter
switch when the vehicle is at a standstill
and the automatic transmission is in park
position P
R The vehicle could be inadvertently
unlocked if the SmartKey is within 3 ft (1 m)
of the vehicle and
- an outside door handle is splashed with
water
or
- you attempt to clean an outside door
handle
R Remember that the engine can be started
by anyone with a SmartKey that is left
inside the vehicle.
Possibility 1 (One SmartKey in the vehicle,
one SmartKey outside the vehicle):
If you leave the SmartKey behind when
exiting and locking the vehicle, no message
appears in the multifunction display.
Possibility 2 (One SmartKey in the vehicle,
no SmartKey outside the vehicle):
When exiting and trying to lock the vehicle,
the message Key Detected In Vehicle
appears in the multifunction display. The
vehicle will not be locked.
Factory setting XGlobal unlocking: Grasp an outside door
handle.72Locking and unlockingControls in detail
X164_AKB; 5; 31, en-USd2ureepe,Version: 2.11.8.12009-09-11T12:30:16+02:00 - Seite 72
Page 87 of 380
Easy-entry/exit feature for third-row
seats
This feature allows for easier access to and
exit from the vehicle’s third-row seats.
GWarning!
To help avoid personal injury, the second-row
seat backrests must be properly locked either
in the upright position or, when using the
expanded cargo volume, in the fully folded
position while the vehicle is in motion.
Easy-entry feature for third-row seats
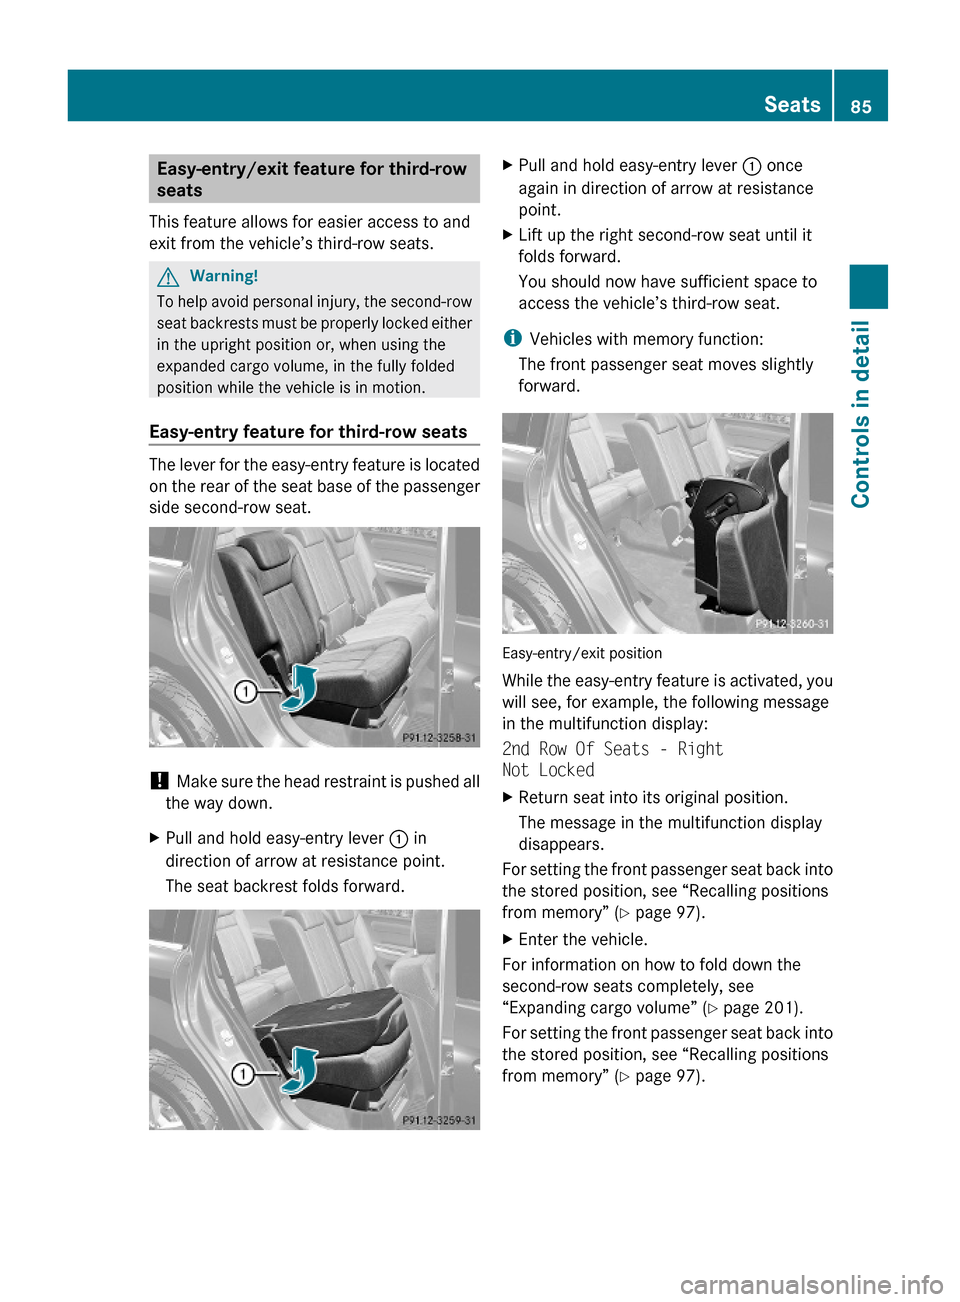
The lever for the easy-entry feature is located
on the rear of the seat base of the passenger
side second-row seat.
! Make sure the head restraint is pushed all
the way down.
XPull and hold easy-entry lever : in
direction of arrow at resistance point.
The seat backrest folds forward.
XPull and hold easy-entry lever : once
again in direction of arrow at resistance
point.
XLift up the right second-row seat until it
folds forward.
You should now have sufficient space to
access the vehicle’s third-row seat.
iVehicles with memory function:
The front passenger seat moves slightly
forward.
Easy-entry/exit position
While the easy-entry feature is activated, you
will see, for example, the following message
in the multifunction display:
2nd Row Of Seats - Right
Not Locked
XReturn seat into its original position.
The message in the multifunction display
disappears.
For setting the front passenger seat back into
the stored position, see “Recalling positions
from memory” (Y page 97).
XEnter the vehicle.
For information on how to fold down the
second-row seats completely, see
“Expanding cargo volume” (Y page 201).
For setting the front passenger seat back into
the stored position, see “Recalling positions
from memory” (Y page 97).
Seats85Controls in detailX164_AKB; 5; 31, en-USd2ureepe,Version: 2.11.8.12009-09-11T12:30:16+02:00 - Seite 85Z
Page 88 of 380
Easy-exit feature for third-row seats
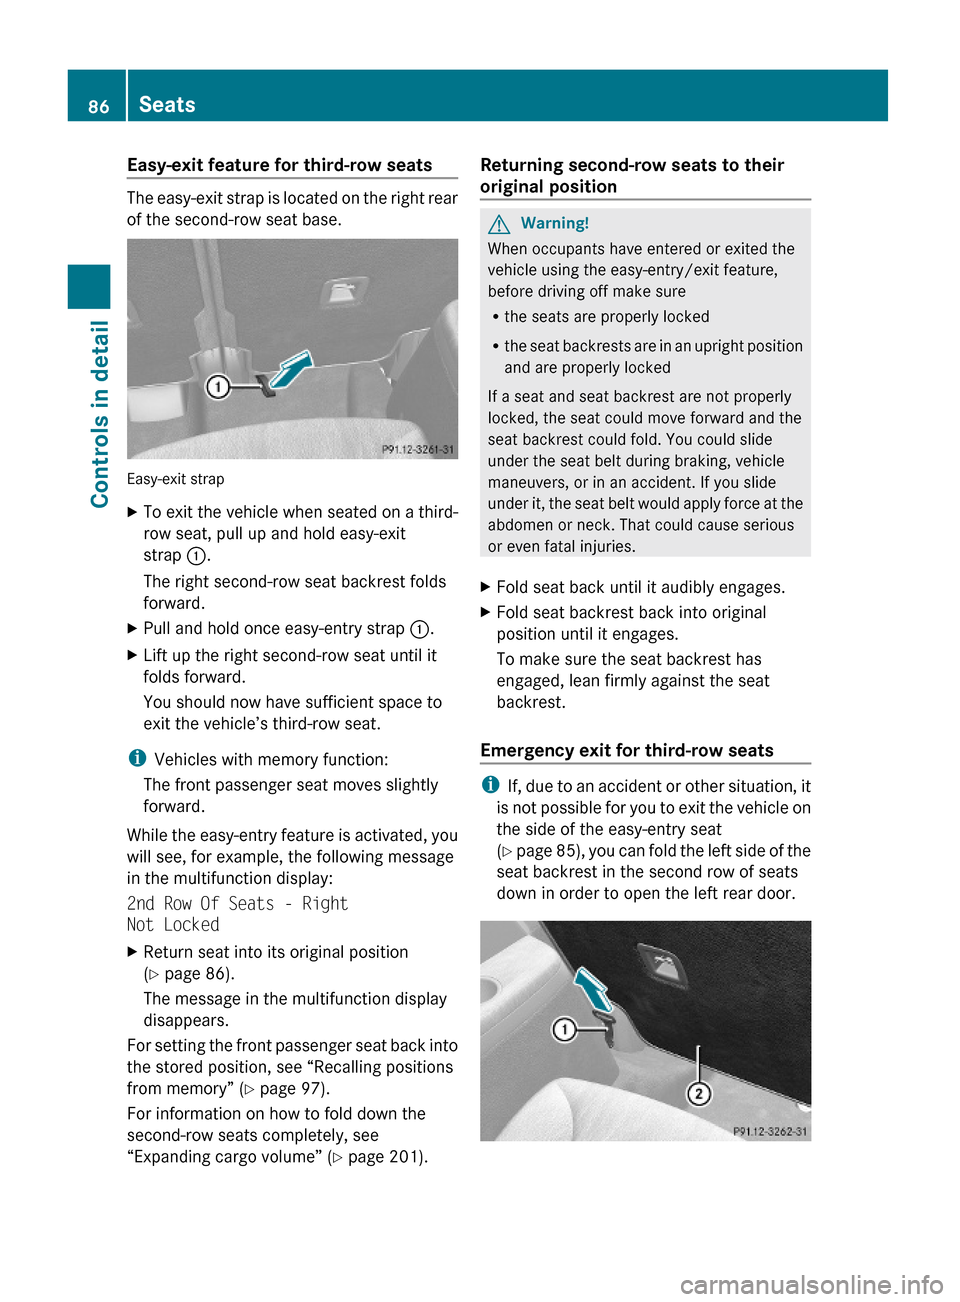
The easy-exit strap is located on the right rear
of the second-row seat base.
Easy-exit strap
XTo exit the vehicle when seated on a third-
row seat, pull up and hold easy-exit
strap :.
The right second-row seat backrest folds
forward.
XPull and hold once easy-entry strap :.XLift up the right second-row seat until it
folds forward.
You should now have sufficient space to
exit the vehicle’s third-row seat.
iVehicles with memory function:
The front passenger seat moves slightly
forward.
While the easy-entry feature is activated, you
will see, for example, the following message
in the multifunction display:
2nd Row Of Seats - Right
Not Locked
XReturn seat into its original position
(Y page 86).
The message in the multifunction display
disappears.
For setting the front passenger seat back into
the stored position, see “Recalling positions
from memory” (Y page 97).
For information on how to fold down the
second-row seats completely, see
“Expanding cargo volume” (Y page 201).
Returning second-row seats to their
original position
GWarning!
When occupants have entered or exited the
vehicle using the easy-entry/exit feature,
before driving off make sure
Rthe seats are properly locked
Rthe seat backrests are in an upright position
and are properly locked
If a seat and seat backrest are not properly
locked, the seat could move forward and the
seat backrest could fold. You could slide
under the seat belt during braking, vehicle
maneuvers, or in an accident. If you slide
under it, the seat belt would apply force at the
abdomen or neck. That could cause serious
or even fatal injuries.
XFold seat back until it audibly engages.XFold seat backrest back into original
position until it engages.
To make sure the seat backrest has
engaged, lean firmly against the seat
backrest.
Emergency exit for third-row seats
iIf, due to an accident or other situation, it
is not possible for you to exit the vehicle on
the side of the easy-entry seat
(Y page 85), you can fold the left side of the
seat backrest in the second row of seats
down in order to open the left rear door.
86SeatsControls in detail
X164_AKB; 5; 31, en-USd2ureepe,Version: 2.11.8.12009-09-11T12:30:16+02:00 - Seite 86
Page 96 of 380

Interior rear view mirror, antiglare
position
XTilt the mirror to the antiglare position by
moving lever : towards the windshield.
The interior rear view mirror is dimmed.
Exterior rear view mirrors
GWarning!
Exercise care when using the passenger-side
exterior rear view mirror. The mirror surface
is convex (outwardly curved surface for a
wider field of view). Objects in mirror are
closer than they appear. Check your interior
rear view mirror and glance over your
shoulder before changing lanes.
XSwitch on the ignition.XPress button : for the driver’s side
exterior rear view mirror or button = for
the passenger-side exterior rear view
mirror.
The indicator lamp in the respective button
comes on for approximately 15 seconds.
If you do not make adjustments to the
selected exterior rear view mirror within
15 seconds, the indicator lamp goes out.
You will then have to select the desired
exterior rear view mirror again before
adjustments can be made. Adjustments
can only be made with the indicator lamp
for the respective exterior rear view mirror
button illuminated.
XPress adjustment button ; up, down, left
or right according to the desired setting.
! If an exterior rear view mirror was forcibly
hit from the front, manually snap it back
into place.
! Vehicle with power-folding exterior rear
view mirrors:
If an exterior rear view mirror housing is
forcibly pushed forward (hit from the rear)
or forcibly pushed rearward (hit from front),
press fold button to fold mirrors in, then
press fold button again to fold mirrors out.
Do not force mirrors by hand as this may
damage the adjustment mechanism.
The mirror housing is then properly
positioned and you can adjust the mirror in
the usual manner.
iAt low ambient temperatures, the exterior
rear view mirrors will be heated
automatically.
Auto-dimming rear view mirrors
The exterior rear view mirror on the driver’s
side and the interior rear view mirror will
respond automatically to glare when the
ignition is switched on and incoming light
from headlamps falls on the sensor in the
interior rear view mirror.
94MirrorsControls in detail
X164_AKB; 5; 31, en-USd2ureepe,Version: 2.11.8.12009-09-11T12:30:16+02:00 - Seite 94
Page 97 of 380
The rear view mirrors will not react if the
automatic transmission is set to reverse gear
R or the interior lighting is switched on.
GWarning!
The auto-dimming function does not react if
incoming light is not aimed directly at sensors
in the interior rear view mirror.
The interior rear view mirror and the exterior
rear view mirror on the driver’s side do not
react, for example, when transporting cargo
which covers the rear window.
Light hitting the mirror(s) at certain angles
(incident light) could blind you. As a result,
you may not be able to observe traffic
conditions and could cause an accident.
Exterior rear view mirror parking
position
For more convenient parking, you can set the
passenger-side exterior rear view mirror so
that you can see the rear wheel and the road
curb.
Setting and storing the parking position
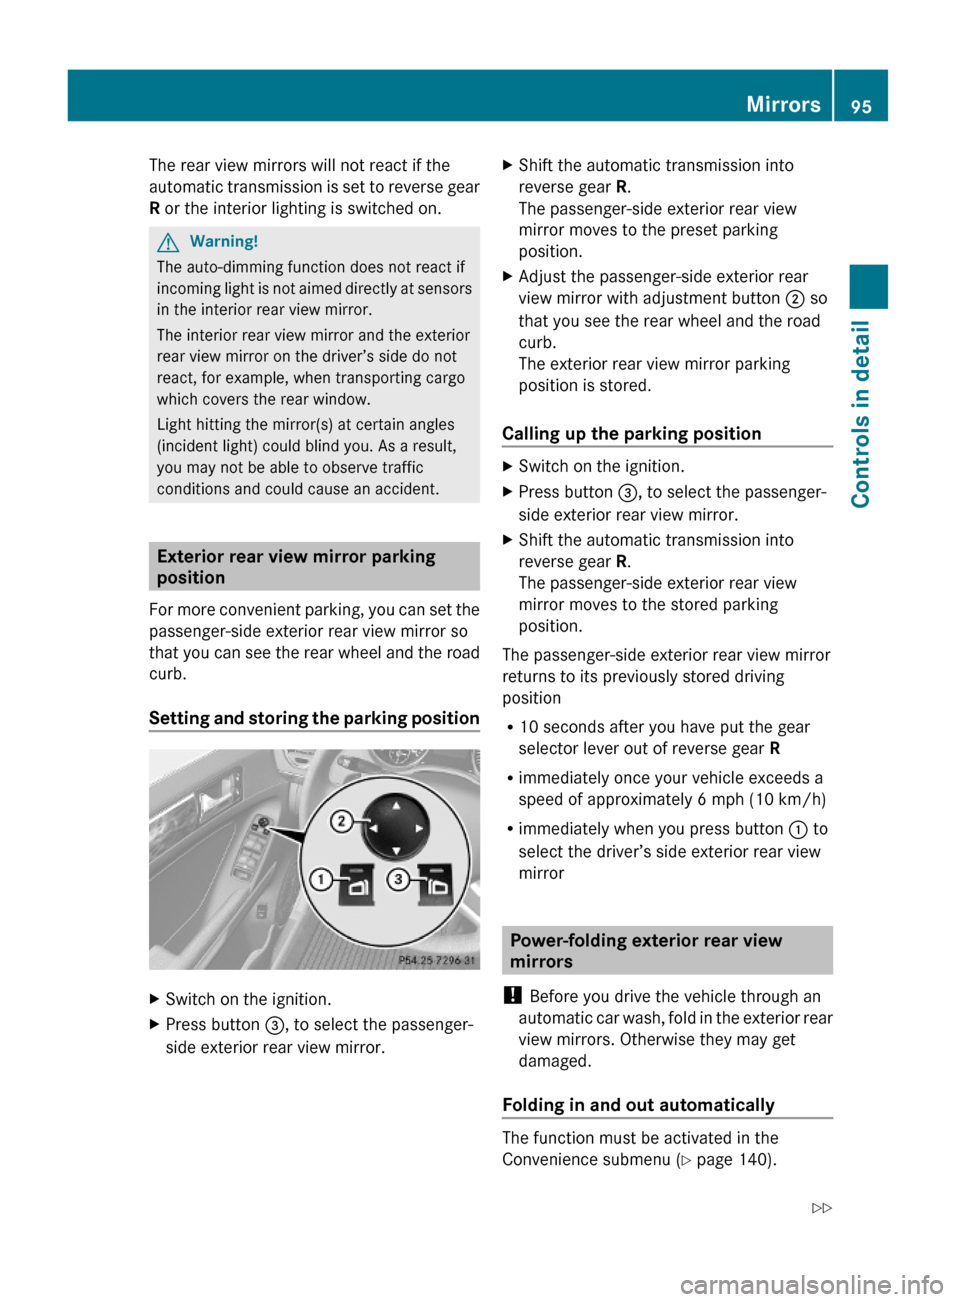
XSwitch on the ignition.XPress button =, to select the passenger-
side exterior rear view mirror.
XShift the automatic transmission into
reverse gear R.
The passenger-side exterior rear view
mirror moves to the preset parking
position.
XAdjust the passenger-side exterior rear
view mirror with adjustment button ; so
that you see the rear wheel and the road
curb.
The exterior rear view mirror parking
position is stored.
Calling up the parking position
XSwitch on the ignition.XPress button =, to select the passenger-
side exterior rear view mirror.
XShift the automatic transmission into
reverse gear R.
The passenger-side exterior rear view
mirror moves to the stored parking
position.
The passenger-side exterior rear view mirror
returns to its previously stored driving
position
R10 seconds after you have put the gear
selector lever out of reverse gear R
Rimmediately once your vehicle exceeds a
speed of approximately 6 mph (10 km/h)
Rimmediately when you press button : to
select the driver’s side exterior rear view
mirror
Power-folding exterior rear view
mirrors
! Before you drive the vehicle through an
automatic car wash, fold in the exterior rear
view mirrors. Otherwise they may get
damaged.
Folding in and out automatically
The function must be activated in the
Convenience submenu (Y page 140).
Mirrors95Controls in detailX164_AKB; 5; 31, en-USd2ureepe,Version: 2.11.8.12009-09-11T12:30:16+02:00 - Seite 95Z
Page 98 of 380
The exterior rear view mirrors fold in
automatically as soon as the vehicle is locked
from the outside.
The exterior rear view mirrors fold out
automatically as soon as the vehicle is
unlocked and the driver’s or front passenger
door is subsequently opened.
Synchronizing
The power-folding rear view mirrors may have
to be synchronized after the vehicle battery
has been disconnected or discharged. If the
exterior rear view mirrors do not fold properly
upon locking or unlocking the vehicle, do the
following:
XMake sure the power-folding function in the
control system is activated (Y page 140).
XWhen the power-folding function is
activated and the exterior rear view
mirrors still do not fold properly: Fold
each exterior rear view mirror in completely
(Y page 96).
XFold each exterior rear view mirror out
completely (Y page 96).
When the exterior rear view mirrors fold
properly upon locking the vehicle, the exterior
mirrors are synchronized. Otherwise repeat
the above steps.
Folding in and out manually
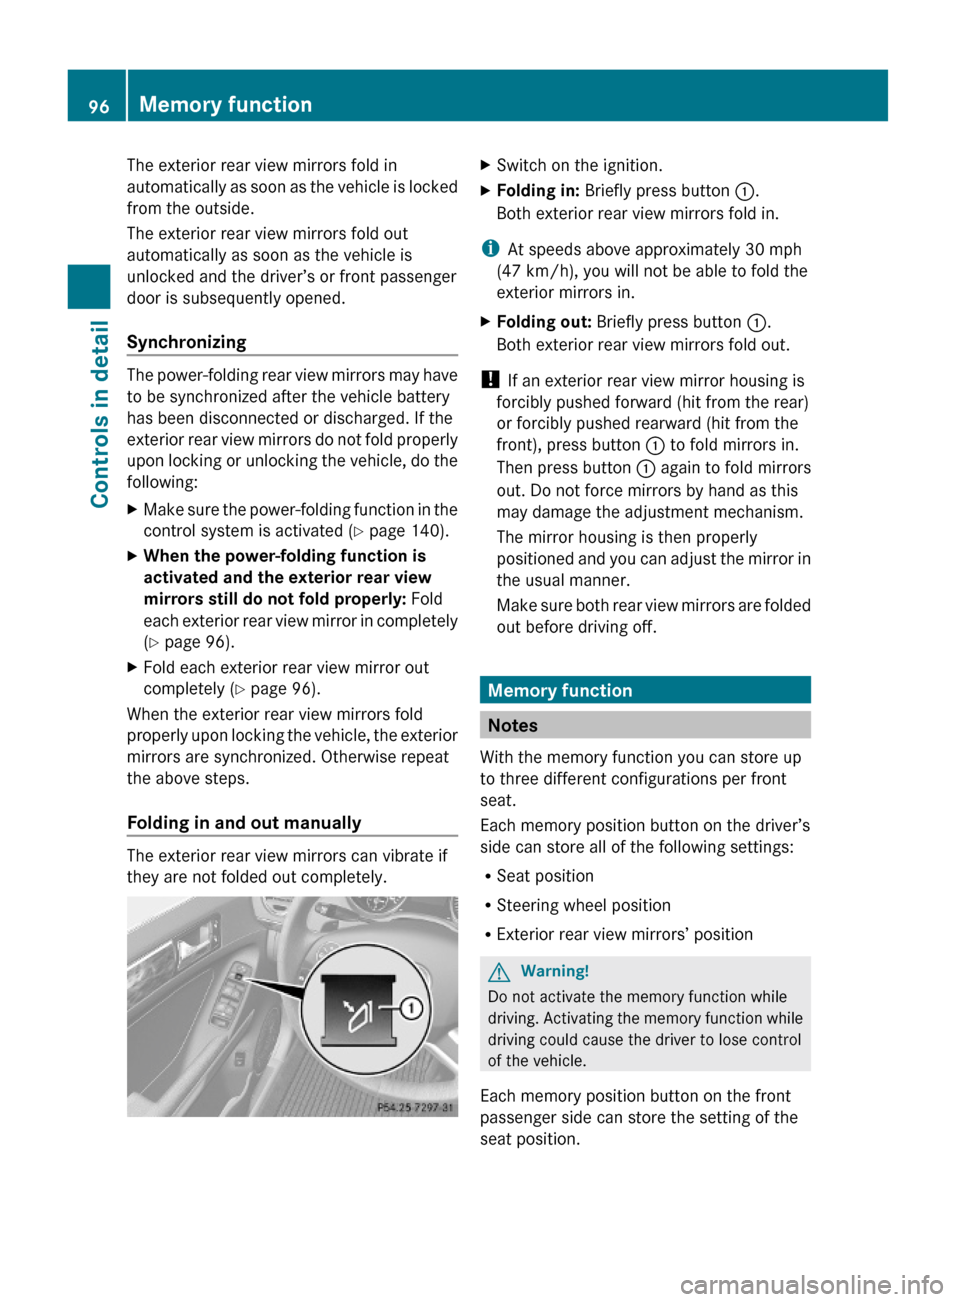
The exterior rear view mirrors can vibrate if
they are not folded out completely.
XSwitch on the ignition.XFolding in: Briefly press button :.
Both exterior rear view mirrors fold in.
iAt speeds above approximately 30 mph
(47 km/h), you will not be able to fold the
exterior mirrors in.
XFolding out: Briefly press button :.
Both exterior rear view mirrors fold out.
! If an exterior rear view mirror housing is
forcibly pushed forward (hit from the rear)
or forcibly pushed rearward (hit from the
front), press button : to fold mirrors in.
Then press button : again to fold mirrors
out. Do not force mirrors by hand as this
may damage the adjustment mechanism.
The mirror housing is then properly
positioned and you can adjust the mirror in
the usual manner.
Make sure both rear view mirrors are folded
out before driving off.
Memory function
Notes
With the memory function you can store up
to three different configurations per front
seat.
Each memory position button on the driver’s
side can store all of the following settings:
RSeat position
RSteering wheel position
RExterior rear view mirrors’ position
GWarning!
Do not activate the memory function while
driving. Activating the memory function while
driving could cause the driver to lose control
of the vehicle.
Each memory position button on the front
passenger side can store the setting of the
seat position.
96Memory functionControls in detail
X164_AKB; 5; 31, en-USd2ureepe,Version: 2.11.8.12009-09-11T12:30:16+02:00 - Seite 96