2010 MERCEDES-BENZ GL450 remove seats
[x] Cancel search: remove seatsPage 204 of 380
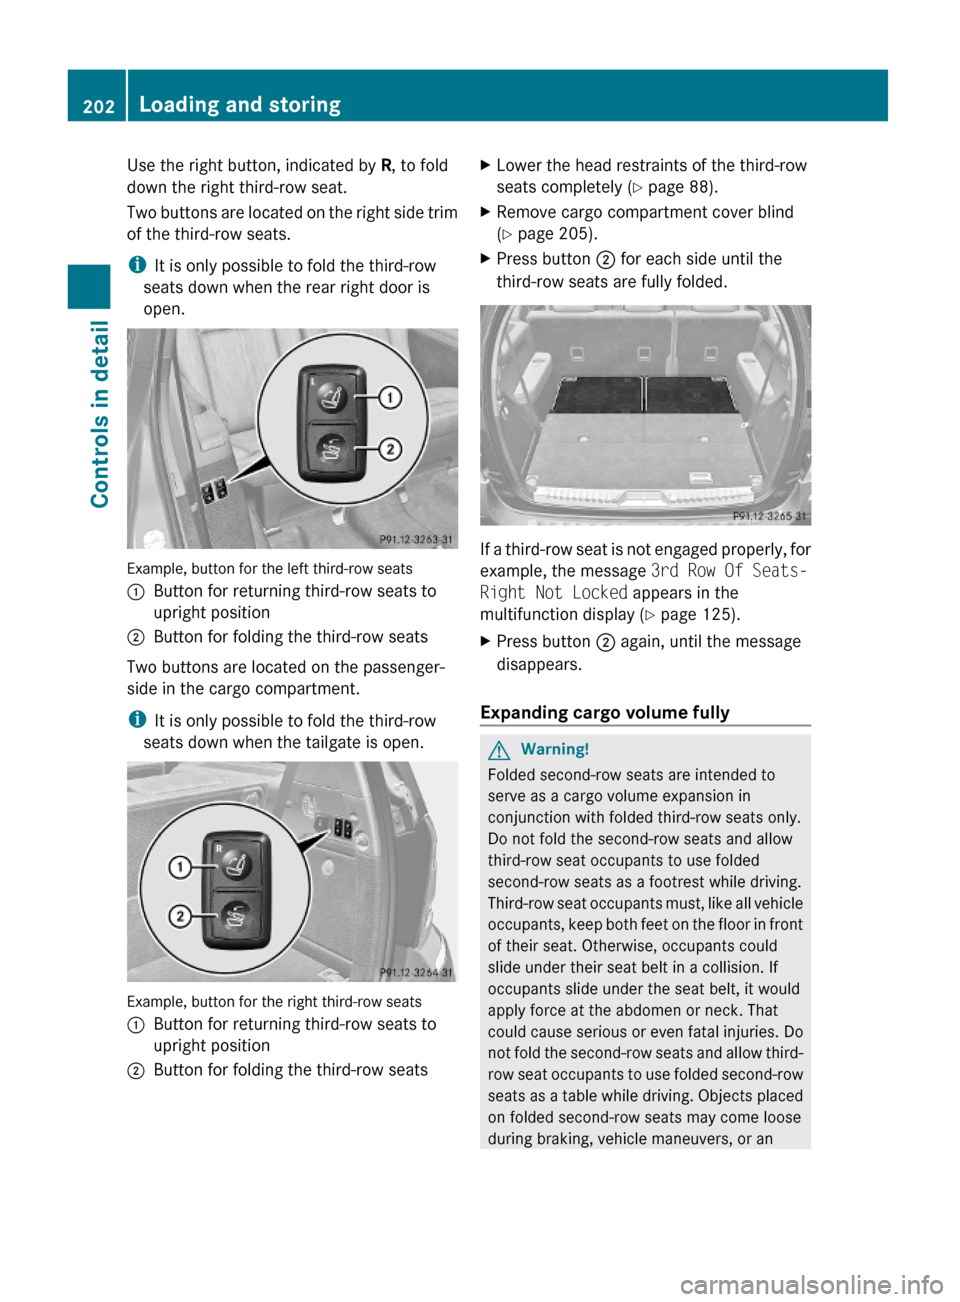
Use the right button, indicated by R, to fold
down the right third-row seat.
Two buttons are located on the right side trim
of the third-row seats.
iIt is only possible to fold the third-row
seats down when the rear right door is
open.
Example, button for the left third-row seats
:Button for returning third-row seats to
upright position
;Button for folding the third-row seats
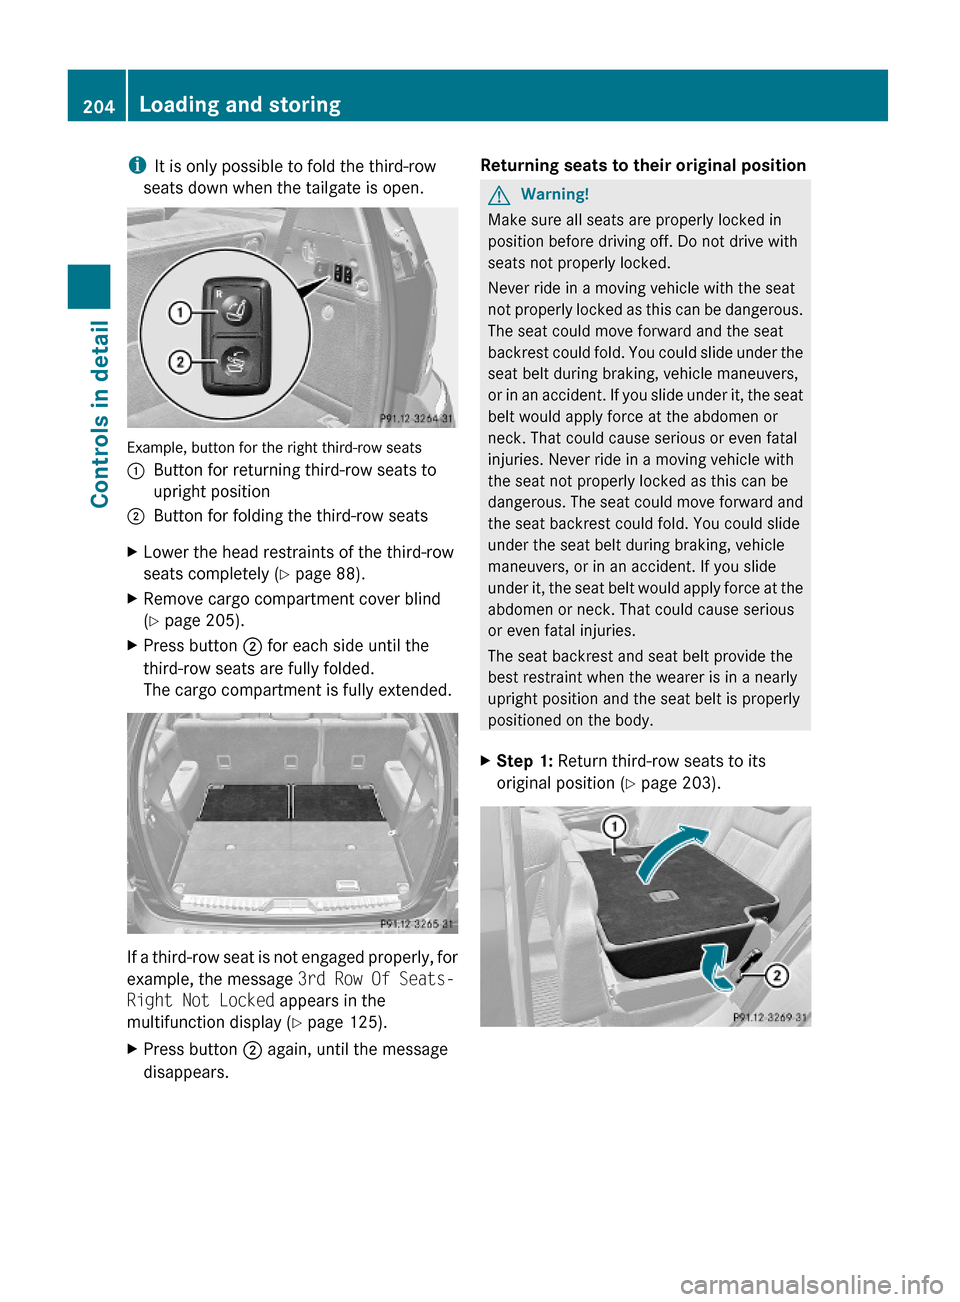
Two buttons are located on the passenger-
side in the cargo compartment.
iIt is only possible to fold the third-row
seats down when the tailgate is open.
Example, button for the right third-row seats
:Button for returning third-row seats to
upright position
;Button for folding the third-row seatsXLower the head restraints of the third-row
seats completely (Y page 88).
XRemove cargo compartment cover blind
(Y page 205).
XPress button ; for each side until the
third-row seats are fully folded.
If a third-row seat is not engaged properly, for
example, the message 3rd Row Of Seats-
Right Not Locked appears in the
multifunction display (Y page 125).
XPress button ; again, until the message
disappears.
Expanding cargo volume fully
GWarning!
Folded second-row seats are intended to
serve as a cargo volume expansion in
conjunction with folded third-row seats only.
Do not fold the second-row seats and allow
third-row seat occupants to use folded
second-row seats as a footrest while driving.
Third-row seat occupants must, like all vehicle
occupants, keep both feet on the floor in front
of their seat. Otherwise, occupants could
slide under their seat belt in a collision. If
occupants slide under the seat belt, it would
apply force at the abdomen or neck. That
could cause serious or even fatal injuries. Do
not fold the second-row seats and allow third-
row seat occupants to use folded second-row
seats as a table while driving. Objects placed
on folded second-row seats may come loose
during braking, vehicle maneuvers, or an
202Loading and storingControls in detail
X164_AKB; 5; 31, en-USd2ureepe,Version: 2.11.8.12009-09-11T12:30:16+02:00 - Seite 202
Page 206 of 380
iIt is only possible to fold the third-row
seats down when the tailgate is open.
Example, button for the right third-row seats
:Button for returning third-row seats to
upright position
;Button for folding the third-row seatsXLower the head restraints of the third-row
seats completely (Y page 88).
XRemove cargo compartment cover blind
(Y page 205).
XPress button ; for each side until the
third-row seats are fully folded.
The cargo compartment is fully extended.
If a third-row seat is not engaged properly, for
example, the message 3rd Row Of Seats-
Right Not Locked appears in the
multifunction display (Y page 125).
XPress button ; again, until the message
disappears.
Returning seats to their original positionGWarning!
Make sure all seats are properly locked in
position before driving off. Do not drive with
seats not properly locked.
Never ride in a moving vehicle with the seat
not properly locked as this can be dangerous.
The seat could move forward and the seat
backrest could fold. You could slide under the
seat belt during braking, vehicle maneuvers,
or in an accident. If you slide under it, the seat
belt would apply force at the abdomen or
neck. That could cause serious or even fatal
injuries. Never ride in a moving vehicle with
the seat not properly locked as this can be
dangerous. The seat could move forward and
the seat backrest could fold. You could slide
under the seat belt during braking, vehicle
maneuvers, or in an accident. If you slide
under it, the seat belt would apply force at the
abdomen or neck. That could cause serious
or even fatal injuries.
The seat backrest and seat belt provide the
best restraint when the wearer is in a nearly
upright position and the seat belt is properly
positioned on the body.
XStep 1: Return third-row seats to its
original position (Y page 203).
204Loading and storingControls in detail
X164_AKB; 5; 31, en-USd2ureepe,Version: 2.11.8.12009-09-11T12:30:16+02:00 - Seite 204
Page 207 of 380
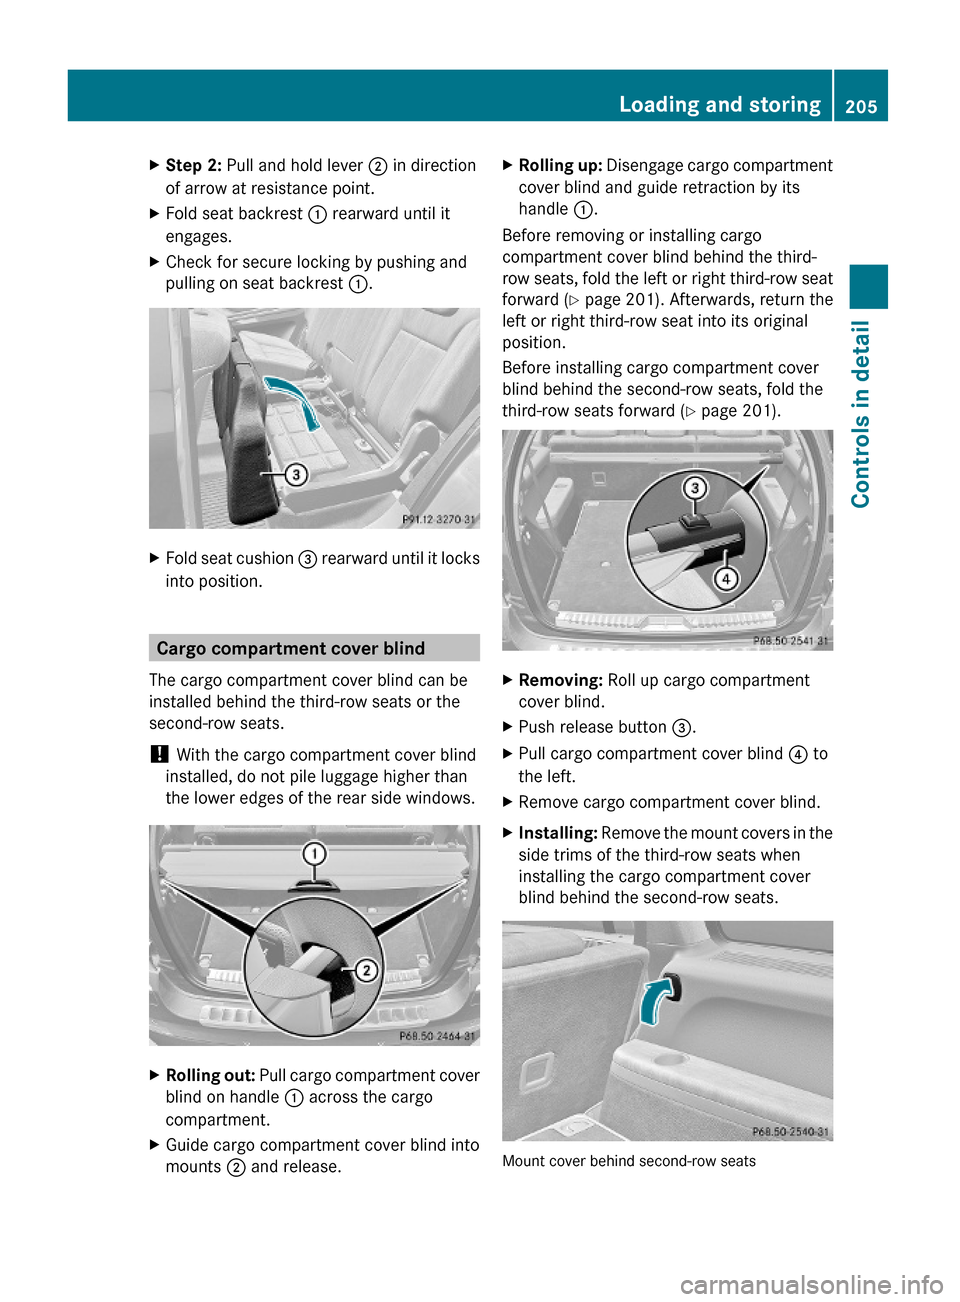
XStep 2: Pull and hold lever ; in direction
of arrow at resistance point.
XFold seat backrest : rearward until it
engages.
XCheck for secure locking by pushing and
pulling on seat backrest :.
XFold seat cushion = rearward until it locks
into position.
Cargo compartment cover blind
The cargo compartment cover blind can be
installed behind the third-row seats or the
second-row seats.
! With the cargo compartment cover blind
installed, do not pile luggage higher than
the lower edges of the rear side windows.
XRolling out: Pull cargo compartment cover
blind on handle : across the cargo
compartment.
XGuide cargo compartment cover blind into
mounts ; and release.
XRolling up: Disengage cargo compartment
cover blind and guide retraction by its
handle :.
Before removing or installing cargo
compartment cover blind behind the third-
row seats, fold the left or right third-row seat
forward (Y page 201). Afterwards, return the
left or right third-row seat into its original
position.
Before installing cargo compartment cover
blind behind the second-row seats, fold the
third-row seats forward (Y page 201).
XRemoving: Roll up cargo compartment
cover blind.
XPush release button =.XPull cargo compartment cover blind ? to
the left.
XRemove cargo compartment cover blind.XInstalling: Remove the mount covers in the
side trims of the third-row seats when
installing the cargo compartment cover
blind behind the second-row seats.
Mount cover behind second-row seats
Loading and storing205Controls in detailX164_AKB; 5; 31, en-USd2ureepe,Version: 2.11.8.12009-09-11T12:30:16+02:00 - Seite 205Z
Page 208 of 380
XPress on mount cover at its upper edge as
indicated by arrow.
The mount cover’s lower edge flips up.
XRemove mount cover by pulling its lower
edge out of the side trim.
iTo avoid loss of the mount covers, insert
the mount covers into the mounts currently
not in use.
XMake sure release button = faces up and
the handle : is to the rear before inserting
the cargo compartment cover blind.
XPlace left side of cargo compartment cover
blind in left mount.
XPosition right side of cargo compartment
cover blind over right mount.
XPress release button = and guide cargo
compartment cover blind into mount.
XMake sure cargo compartment cover blind
is securely fastened.
Cargo net
GWarning!
Make sure the cargo net is properly engaged
at top and bottom position and the tightening
belts are securely fastened.
Never use a damaged cargo net.
Always use cargo net when transporting
cargo. This helps to avoid personal injury from
smaller objects being thrown around in the
occupant compartment during a collision or
sudden maneuver.
The cargo net cannot prevent the movement
of large, heavier objects into the passenger
compartment in an accident. Such items must
be properly secured using the cargo tie-down
rings in the cargo compartment floor.
Passenger use of seats behind installed cargo
net is restricted because of the footwell being
taken up by the net.
Use of the cargo net is a particularly
important safety factor when the vehicle is
loaded higher than the top of the seat
backrests with smaller objects. For your
safety, always use the cargo net when
transporting cargo.
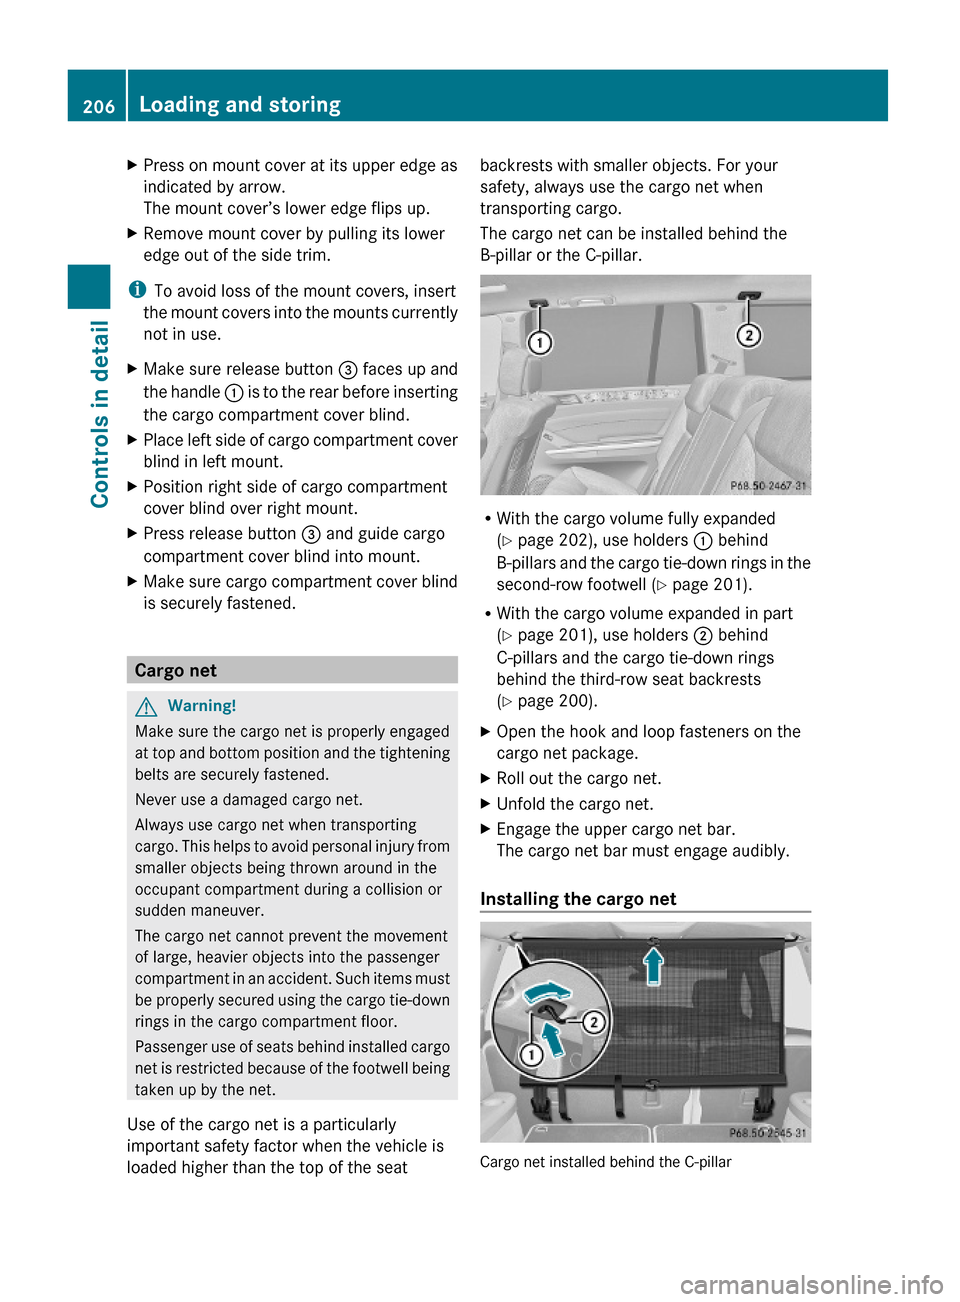
The cargo net can be installed behind the
B-pillar or the C-pillar.
RWith the cargo volume fully expanded
(Y page 202), use holders : behind
B-pillars and the cargo tie-down rings in the
second-row footwell (Y page 201).
RWith the cargo volume expanded in part
(Y page 201), use holders ; behind
C-pillars and the cargo tie-down rings
behind the third-row seat backrests
(Y page 200).
XOpen the hook and loop fasteners on the
cargo net package.
XRoll out the cargo net.XUnfold the cargo net.XEngage the upper cargo net bar.
The cargo net bar must engage audibly.
Installing the cargo net
Cargo net installed behind the C-pillar
206Loading and storingControls in detail
X164_AKB; 5; 31, en-USd2ureepe,Version: 2.11.8.12009-09-11T12:30:16+02:00 - Seite 206
Page 211 of 380
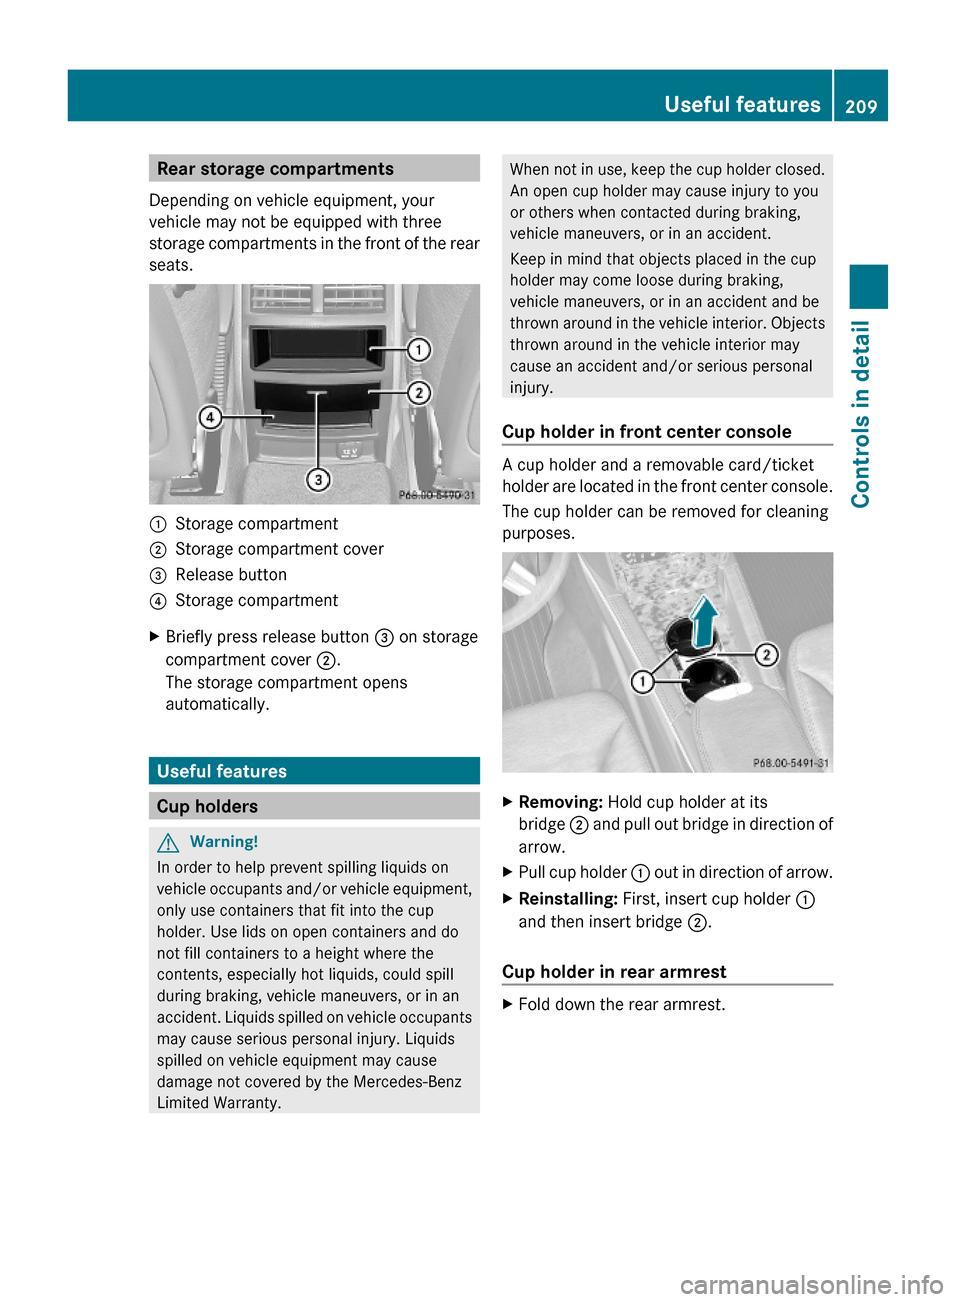
Rear storage compartments
Depending on vehicle equipment, your
vehicle may not be equipped with three
storage compartments in the front of the rear
seats.
:Storage compartment;Storage compartment cover=Release button?Storage compartmentXBriefly press release button = on storage
compartment cover ;.
The storage compartment opens
automatically.
Useful features
Cup holders
GWarning!
In order to help prevent spilling liquids on
vehicle occupants and/or vehicle equipment,
only use containers that fit into the cup
holder. Use lids on open containers and do
not fill containers to a height where the
contents, especially hot liquids, could spill
during braking, vehicle maneuvers, or in an
accident. Liquids spilled on vehicle occupants
may cause serious personal injury. Liquids
spilled on vehicle equipment may cause
damage not covered by the Mercedes-Benz
Limited Warranty.
When not in use, keep the cup holder closed.
An open cup holder may cause injury to you
or others when contacted during braking,
vehicle maneuvers, or in an accident.
Keep in mind that objects placed in the cup
holder may come loose during braking,
vehicle maneuvers, or in an accident and be
thrown around in the vehicle interior. Objects
thrown around in the vehicle interior may
cause an accident and/or serious personal
injury.
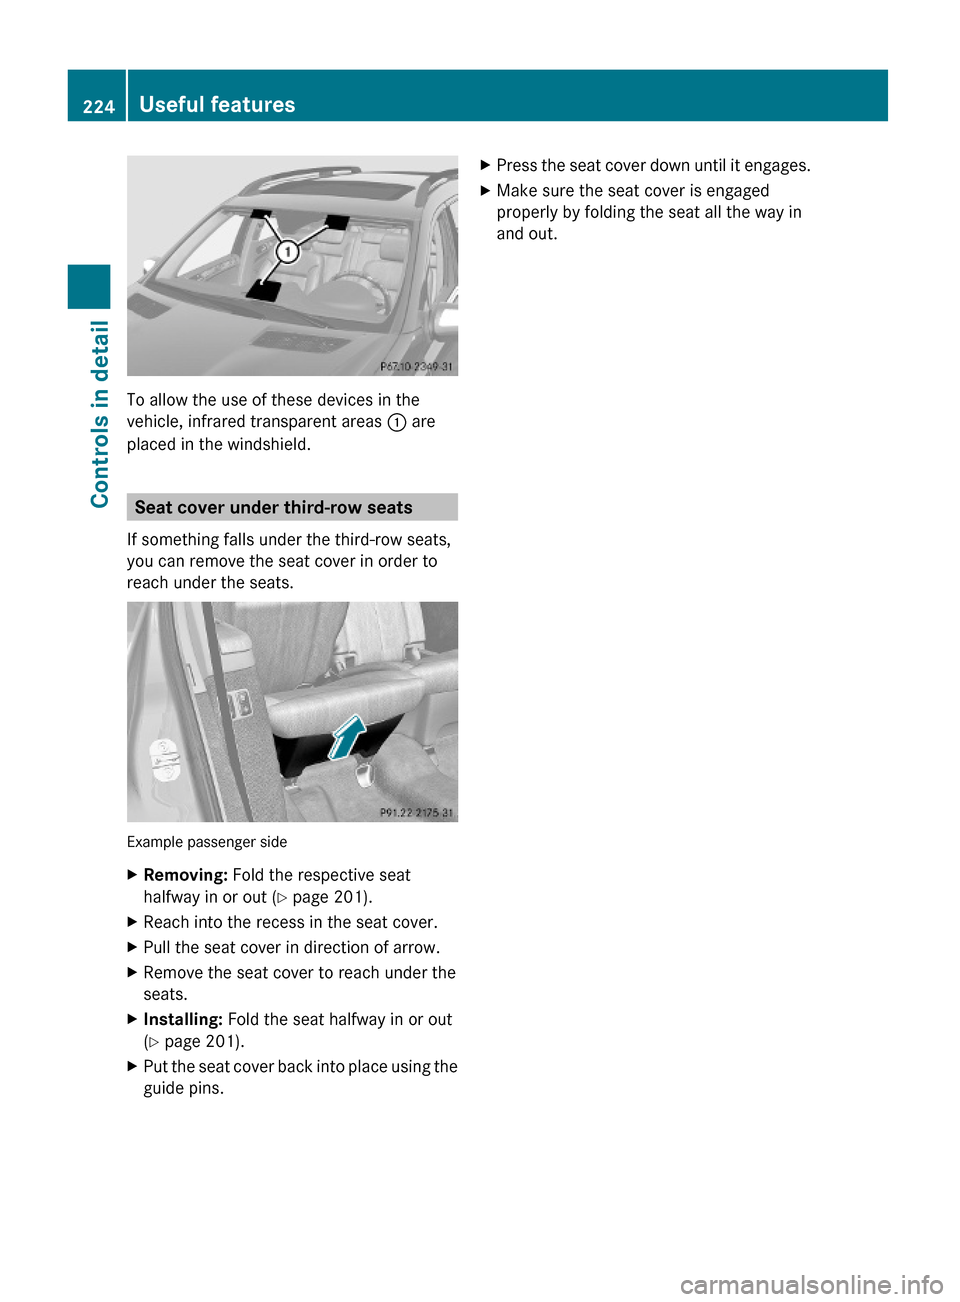
Cup holder in front center console
A cup holder and a removable card/ticket
holder are located in the front center console.
The cup holder can be removed for cleaning
purposes.
XRemoving: Hold cup holder at its
bridge ; and pull out bridge in direction of
arrow.
XPull cup holder : out in direction of arrow.XReinstalling: First, insert cup holder :
and then insert bridge ;.
Cup holder in rear armrest
XFold down the rear armrest.Useful features209Controls in detailX164_AKB; 5; 31, en-USd2ureepe,Version: 2.11.8.12009-09-11T12:30:16+02:00 - Seite 209Z
Page 226 of 380
To allow the use of these devices in the
vehicle, infrared transparent areas : are
placed in the windshield.
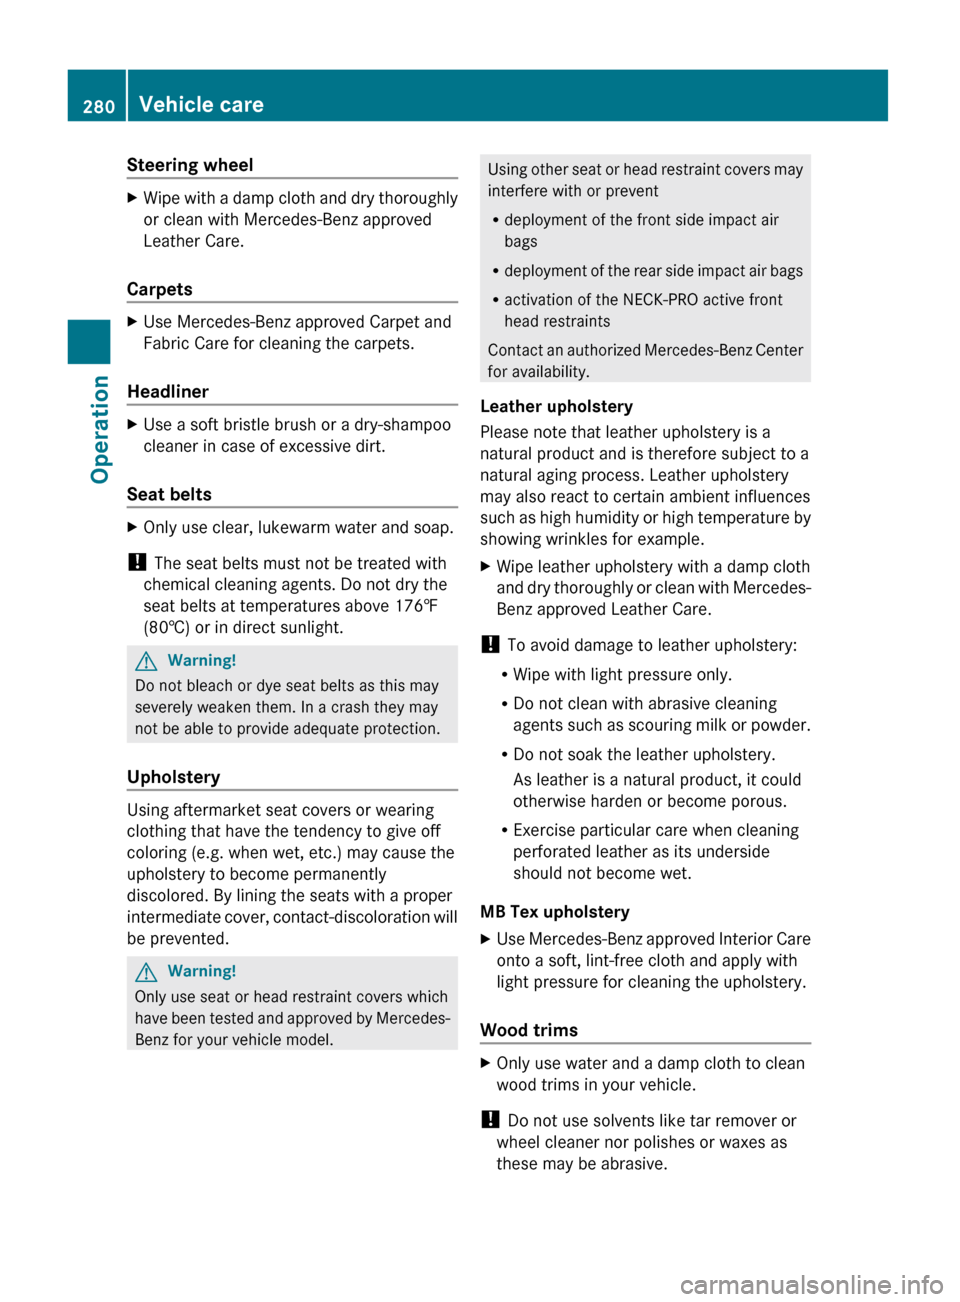
Seat cover under third-row seats
If something falls under the third-row seats,
you can remove the seat cover in order to
reach under the seats.
Example passenger side
XRemoving: Fold the respective seat
halfway in or out (Y page 201).
XReach into the recess in the seat cover.XPull the seat cover in direction of arrow.XRemove the seat cover to reach under the
seats.
XInstalling: Fold the seat halfway in or out
(Y page 201).
XPut the seat cover back into place using the
guide pins.
XPress the seat cover down until it engages.XMake sure the seat cover is engaged
properly by folding the seat all the way in
and out.
224Useful featuresControls in detail
X164_AKB; 5; 31, en-USd2ureepe,Version: 2.11.8.12009-09-11T12:30:16+02:00 - Seite 224
Page 282 of 380
Steering wheelXWipe with a damp cloth and dry thoroughly
or clean with Mercedes-Benz approved
Leather Care.
Carpets
XUse Mercedes-Benz approved Carpet and
Fabric Care for cleaning the carpets.
Headliner
XUse a soft bristle brush or a dry-shampoo
cleaner in case of excessive dirt.
Seat belts
XOnly use clear, lukewarm water and soap.
! The seat belts must not be treated with
chemical cleaning agents. Do not dry the
seat belts at temperatures above 176‡
(80†) or in direct sunlight.
GWarning!
Do not bleach or dye seat belts as this may
severely weaken them. In a crash they may
not be able to provide adequate protection.
Upholstery
Using aftermarket seat covers or wearing
clothing that have the tendency to give off
coloring (e.g. when wet, etc.) may cause the
upholstery to become permanently
discolored. By lining the seats with a proper
intermediate cover, contact-discoloration will
be prevented.
GWarning!
Only use seat or head restraint covers which
have been tested and approved by Mercedes-
Benz for your vehicle model.
Using other seat or head restraint covers may
interfere with or prevent
R deployment of the front side impact air
bags
R deployment of the rear side impact air bags
R activation of the NECK-PRO active front
head restraints
Contact an authorized Mercedes-Benz Center
for availability.
Leather upholstery
Please note that leather upholstery is a
natural product and is therefore subject to a
natural aging process. Leather upholstery
may also react to certain ambient influences
such as high humidity or high temperature by
showing wrinkles for example.XWipe leather upholstery with a damp cloth
and dry thoroughly or clean with Mercedes-
Benz approved Leather Care.
! To avoid damage to leather upholstery:
R Wipe with light pressure only.
R Do not clean with abrasive cleaning
agents such as scouring milk or powder.
R Do not soak the leather upholstery.
As leather is a natural product, it could
otherwise harden or become porous.
R Exercise particular care when cleaning
perforated leather as its underside
should not become wet.
MB Tex upholstery
XUse Mercedes-Benz approved Interior Care
onto a soft, lint-free cloth and apply with
light pressure for cleaning the upholstery.
Wood trims
XOnly use water and a damp cloth to clean
wood trims in your vehicle.
! Do not use solvents like tar remover or
wheel cleaner nor polishes or waxes as
these may be abrasive.
280Vehicle careOperation
X164_AKB; 5; 31, en-USd2ureepe,Version: 2.11.8.12009-09-11T12:30:16+02:00 - Seite 280
Page 287 of 380
XEngage securing hook = on upper cargo
compartment lip ?.
! With the cargo compartment cover blind
installed behind the third-row seats,
disengage cargo compartment cover blind
and flip it forward. Otherwise the strap of
the securing hook could damage the cargo
compartment cover blind.
! To prevent damage, always disengage the
securing hook from upper cargo
compartment lip and lower the cargo
compartment floor before closing the
tailgate.
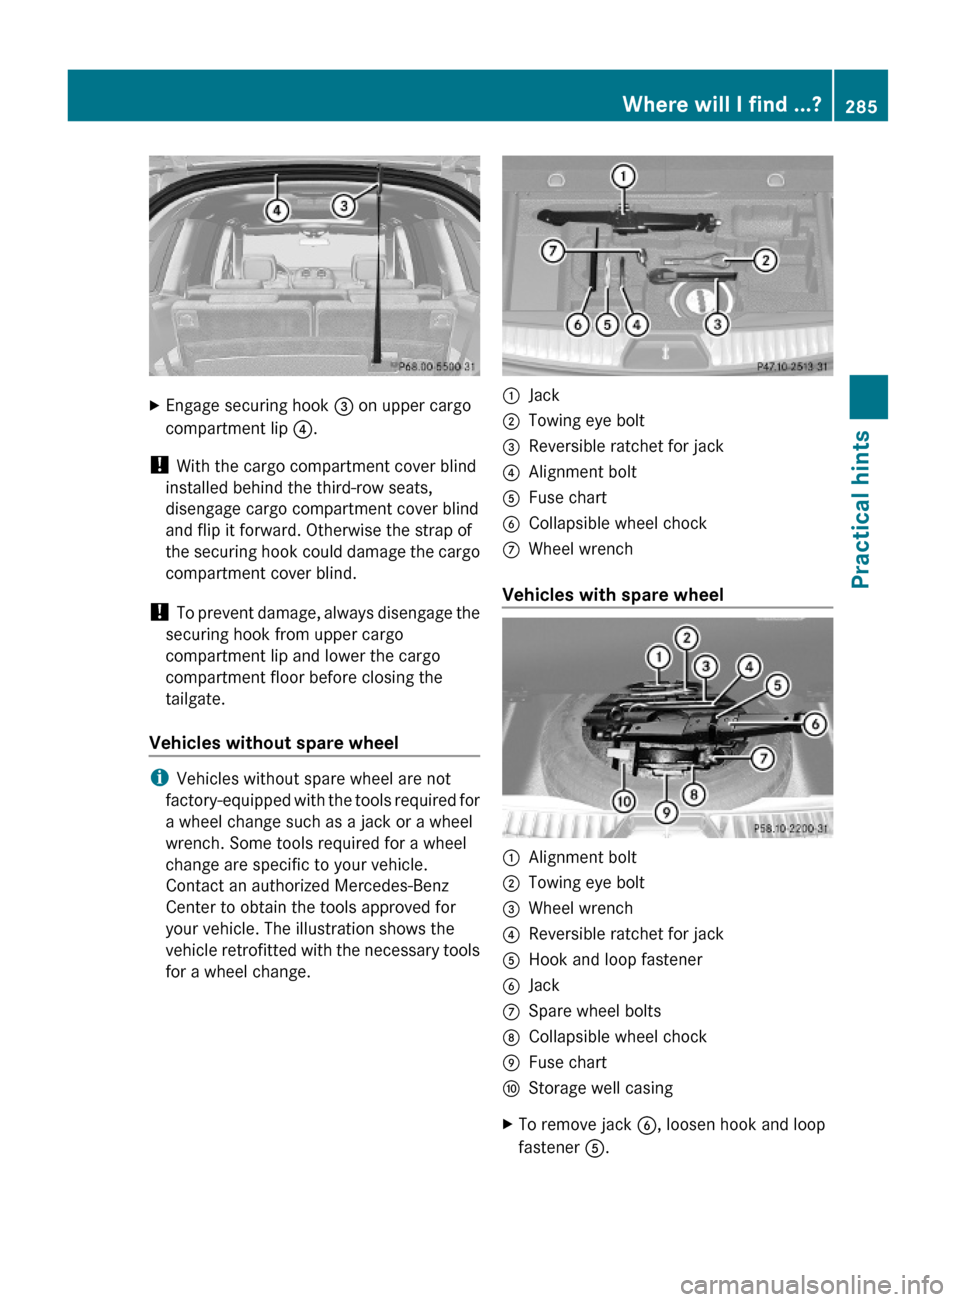
Vehicles without spare wheel
iVehicles without spare wheel are not
factory-equipped with the tools required for
a wheel change such as a jack or a wheel
wrench. Some tools required for a wheel
change are specific to your vehicle.
Contact an authorized Mercedes-Benz
Center to obtain the tools approved for
your vehicle. The illustration shows the
vehicle retrofitted with the necessary tools
for a wheel change.
:Jack;Towing eye bolt=Reversible ratchet for jack?Alignment boltAFuse chartBCollapsible wheel chockCWheel wrench
Vehicles with spare wheel
:Alignment bolt;Towing eye bolt=Wheel wrench?Reversible ratchet for jackAHook and loop fastenerBJackCSpare wheel boltsDCollapsible wheel chockEFuse chartFStorage well casingXTo remove jack B, loosen hook and loop
fastener A.
Where will I find ...?285Practical hintsX164_AKB; 5; 31, en-USd2ureepe,Version: 2.11.8.12009-09-11T12:30:16+02:00 - Seite 285Z