2010 MERCEDES-BENZ GL450 remove seats
[x] Cancel search: remove seatsPage 47 of 380
sufficient severity to deploy the driver front
air bag
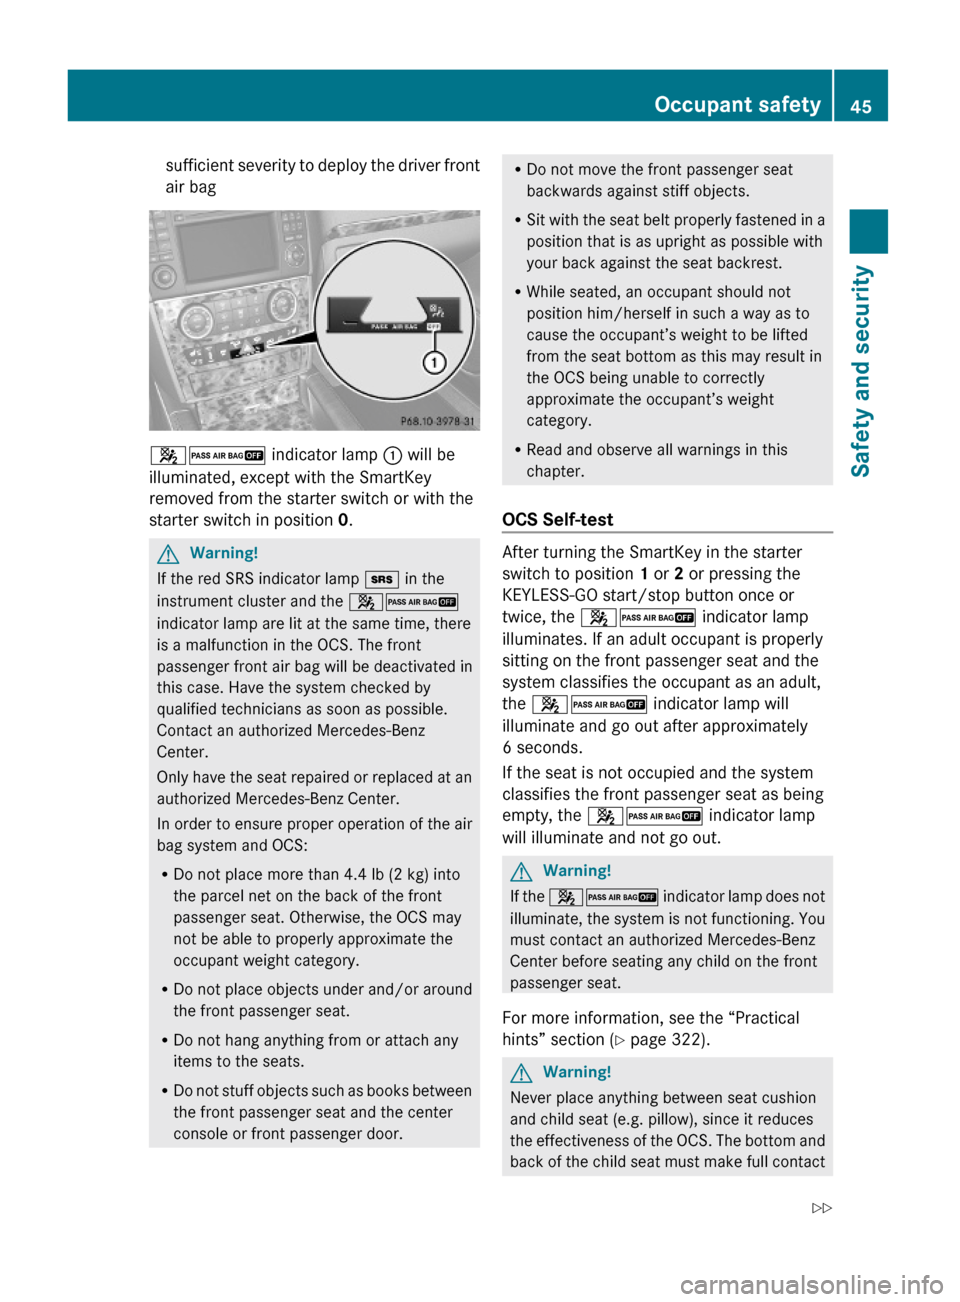
42 indicator lamp : will be
illuminated, except with the SmartKey
removed from the starter switch or with the
starter switch in position 0.
GWarning!
If the red SRS indicator lamp + in the
instrument cluster and the 42
indicator lamp are lit at the same time, there
is a malfunction in the OCS. The front
passenger front air bag will be deactivated in
this case. Have the system checked by
qualified technicians as soon as possible.
Contact an authorized Mercedes-Benz
Center.
Only have the seat repaired or replaced at an
authorized Mercedes-Benz Center.
In order to ensure proper operation of the air
bag system and OCS:
RDo not place more than 4.4 lb (2 kg) into
the parcel net on the back of the front
passenger seat. Otherwise, the OCS may
not be able to properly approximate the
occupant weight category.
RDo not place objects under and/or around
the front passenger seat.
RDo not hang anything from or attach any
items to the seats.
RDo not stuff objects such as books between
the front passenger seat and the center
console or front passenger door.
RDo not move the front passenger seat
backwards against stiff objects.
RSit with the seat belt properly fastened in a
position that is as upright as possible with
your back against the seat backrest.
RWhile seated, an occupant should not
position him/herself in such a way as to
cause the occupant’s weight to be lifted
from the seat bottom as this may result in
the OCS being unable to correctly
approximate the occupant’s weight
category.
RRead and observe all warnings in this
chapter.
OCS Self-test
After turning the SmartKey in the starter
switch to position 1 or 2 or pressing the
KEYLESS-GO start/stop button once or
twice, the 42 indicator lamp
illuminates. If an adult occupant is properly
sitting on the front passenger seat and the
system classifies the occupant as an adult,
the 42 indicator lamp will
illuminate and go out after approximately
6 seconds.
If the seat is not occupied and the system
classifies the front passenger seat as being
empty, the 42 indicator lamp
will illuminate and not go out.
GWarning!
If the 42 indicator lamp does not
illuminate, the system is not functioning. You
must contact an authorized Mercedes-Benz
Center before seating any child on the front
passenger seat.
For more information, see the “Practical
hints” section (Y page 322).
GWarning!
Never place anything between seat cushion
and child seat (e.g. pillow), since it reduces
the effectiveness of the OCS. The bottom and
back of the child seat must make full contact
Occupant safety45Safety and securityX164_AKB; 5; 31, en-USd2ureepe,Version: 2.11.8.12009-09-11T12:30:16+02:00 - Seite 45Z
Page 49 of 380
A child in a rear-facing child restraint on the
front passenger seat will be seriously
injured or even killed if the front passenger
front air bag inflates.
RIf you have to place a child in a forward-
facing child restraint on the front passenger
seat, move the seat as far back as possible,
use the proper child restraint
recommended for the age, size and weight
of the child, and secure child restraint with
the vehicle’s seat belt according to the child
seat manufacturer’s instructions.
GWarning!
When using a BabySmart™ compatible child
seat on the front passenger seat, the front
passenger front air bag will not deploy only if
the 42 indicator lamp remains
illuminated.
Please be sure to check the 42
indicator lamp every time you use a
BabySmart™ compatible child seat on the
front passenger seat. Should the
42 indicator lamp go out while
the restraint is installed, please check
installation. If the 42 indicator
lamp remains out, do not use the
BabySmart™ restraint to transport a child on
the front passenger seat until the system has
been repaired.
Special BabySmart™ compatible child seats,
designed for use with the Mercedes-Benz
system, are required for use with the
BabySmart™ air bag deactivation system.
Please contact an authorized Mercedes-Benz
Center for information on availability. With
the special child seat installed properly, the
front passenger front air bag will not deploy.
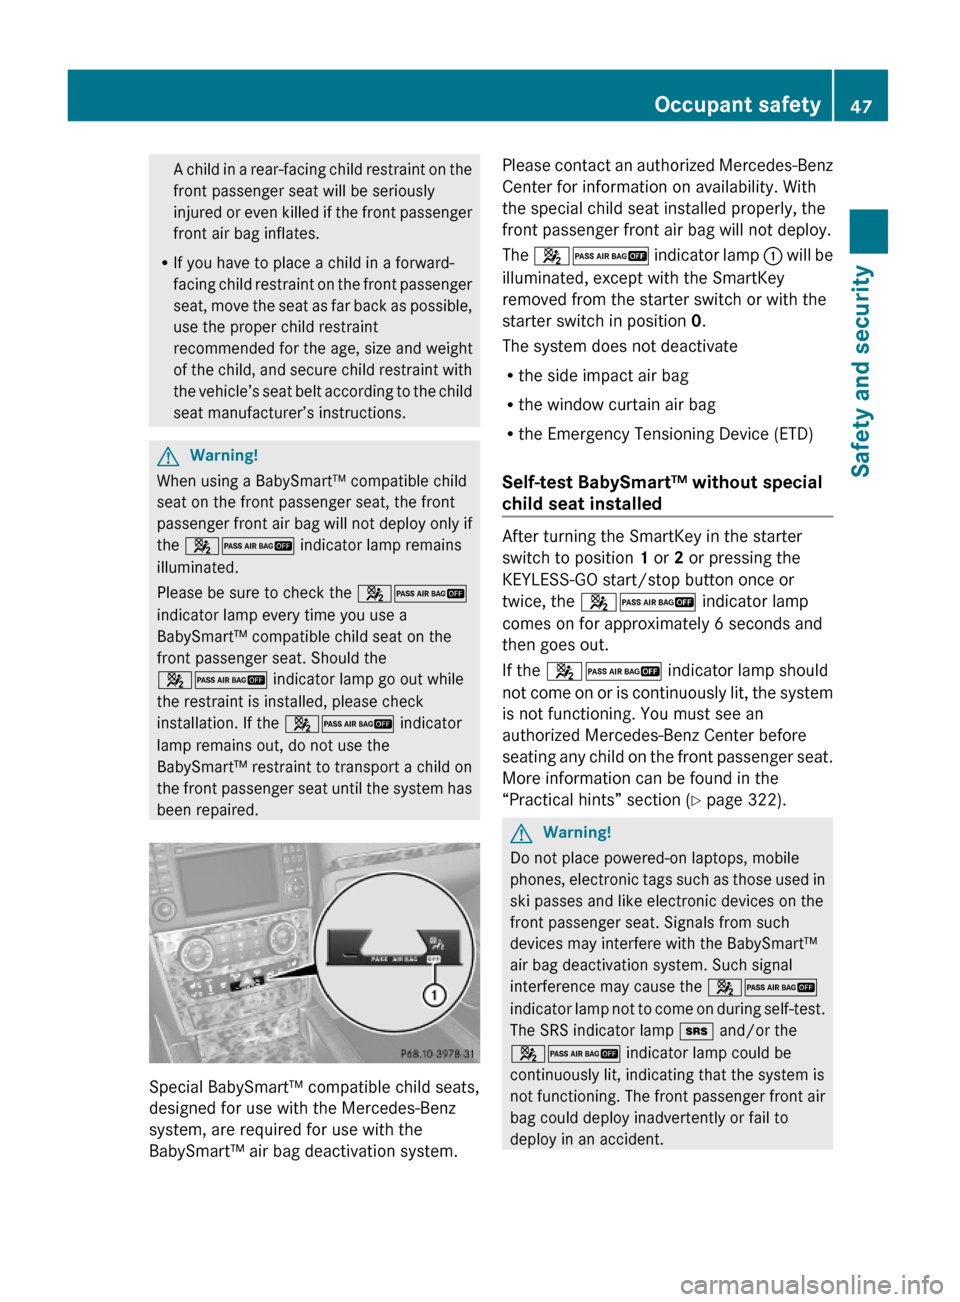
The 42 indicator lamp : will be
illuminated, except with the SmartKey
removed from the starter switch or with the
starter switch in position 0.
The system does not deactivate
Rthe side impact air bag
Rthe window curtain air bag
Rthe Emergency Tensioning Device (ETD)
Self-test BabySmart™ without special
child seat installed
After turning the SmartKey in the starter
switch to position 1 or 2 or pressing the
KEYLESS-GO start/stop button once or
twice, the 42 indicator lamp
comes on for approximately 6 seconds and
then goes out.
If the 42 indicator lamp should
not come on or is continuously lit, the system
is not functioning. You must see an
authorized Mercedes-Benz Center before
seating any child on the front passenger seat.
More information can be found in the
“Practical hints” section (Y page 322).
GWarning!
Do not place powered-on laptops, mobile
phones, electronic tags such as those used in
ski passes and like electronic devices on the
front passenger seat. Signals from such
devices may interfere with the BabySmart™
air bag deactivation system. Such signal
interference may cause the 42
indicator lamp not to come on during self-test.
The SRS indicator lamp + and/or the
42 indicator lamp could be
continuously lit, indicating that the system is
not functioning. The front passenger front air
bag could deploy inadvertently or fail to
deploy in an accident.
Occupant safety47Safety and securityX164_AKB; 5; 31, en-USd2ureepe,Version: 2.11.8.12009-09-11T12:30:16+02:00 - Seite 47Z
Page 54 of 380
If you and/or your passenger release the
seat belt during driving, the seat belt
telltale 7 starts flashing and the
warning chime sounds as described before.
If the driver’s or the front passenger’s seat
belt remains unfastened after 60 seconds,
the warning chime stops sounding, the seat
belt telltale 7 stops flashing but
continues to be illuminated.
After a vehicle standstill, the warning chime
is reactivated and the seat belt telltale
7 is flashing again if the vehicle speed
once exceeds 15 mph (25 km/h).
The seat belt telltale 7 will only go out if
both the driver’s and the front passenger’s
seat belt (with the front passenger seat
occupied) are fastened, or the vehicle is
standing still and a front door is opened.
For more information, see “Practical hints”
( Y page 317).
Emergency Tensioning Device (ETD),
seat belt force limiter
The seat belts for the front seats and second
row outer seats are equipped with ETDs and
seat belt force limiters. The seat belts for the
third-row seats are equipped with ETDs.
The ETDs are designed to activate in the
following cases:
R in frontal or rear-end impacts exceeding
the system’s preset deployment threshold
R in side impacts exceeding the system’s
preset deployment threshold on the far
side of the impact
R in certain vehicle rollovers
R if the restraint systems are operational and
functioning correctly, see “SRS indicator
lamp” ( Y page 36)
The ETDs for the front seats will only activate
if the front seat belts are fastened (latch plate
properly inserted into buckle).
The ETDs for the rear outer seats (second-row
seats) or rear seats (third-row seats) will
activate with or without the respective seat
belts fastened.
In an impact, the ETDs remove slack from the
seat belts in such a way that the seat belts fit
more snugly against the body. Seat belt force
limiters, when activated, are employed to
help reduce the peak force exerted by the
seat belts on occupants during a crash.
i The ETDs do not correct an incorrect seat
position or incorrectly worn seat belts.
The ETDs do not pull occupants back
toward the seat backrest.GWarning!
Pyrotechnic ETDs that were activated must be
replaced.
For your safety, when disposing of the
pyrotechnic ETDs always follow our safety
instructions. These are available at any
authorized Mercedes-Benz Center.
The PRE-SAFE ®
system has electrically
operated reversible pre-tensioners that do
not require replacement after activation.
Preventive occupant safety (PRE-
SAFE ®
)
GWarning!
The PRE-SAFE ®
system is intended to reduce
the effects of an accident on vehicle
occupants who are wearing their seat belt
properly. Despite your vehicle being equipped
with the PRE-SAFE ®
system, the possibility of
personal injuries occurring as a result of an
accident cannot be eliminated. Therefore,
always drive carefully and adjust your driving
to the prevailing road, weather, and traffic
conditions.
52Occupant safetySafety and security
X164_AKB; 5; 31, en-USd2ureepe,Version: 2.11.8.12009-09-11T12:30:16+02:00 - Seite 52
Page 60 of 380
accident, they could be crushed between the
occupant and seat belt.
A child’s risk of serious or fatal injuries is
significantly increased if the child restraints
are not properly secured in the vehicle and/
or the child is not properly secured in the child
restraint.
Children too big for a toddler restraint must
ride in seats using regular seat belts. Position
shoulder belt across chest and shoulder, not
face or neck. A booster seat may be
necessary to achieve proper seat belt
positioning for children over 41 lb (18 kg) until
they reach a height where a lap/shoulder belt
fits properly without a booster.
When the child restraint is not in use, remove
it from the vehicle or secure it with the seat
belt to prevent the child restraint from
becoming a projectile in the event of an
accident.
Installation of infant and child restraint
systems
GObserve Safety notes, see page 55.GWarning!
Always lock the seat backrests in their upright
position when the rear seats are occupied by
passengers. Lock the seat backrests in their
upright position after installing top tether
straps or when the extended cargo
compartment is not in use. Make sure that
seat backrests are secured properly by
pushing and pulling on the seat backrests. If
a seat backrest is not locked properly, the
seat backrest could fold. The child seat would
no longer be supported properly or positioned
to provide its intended benefit. That could
cause serious or even fatal injuries.
This vehicle is equipped with tether
anchorages for a top tether strap at the
second-row seat backrest. For installing an
infant and child restraint system at the
third-row seats, use the cargo tie-down rings
in the cargo compartment (Y page 200).
Top tether straps enable an additional
connection to be made between child
restraint systems secured with LATCH-type
anchors and rear seats. This can further
reduce the risk of injury.
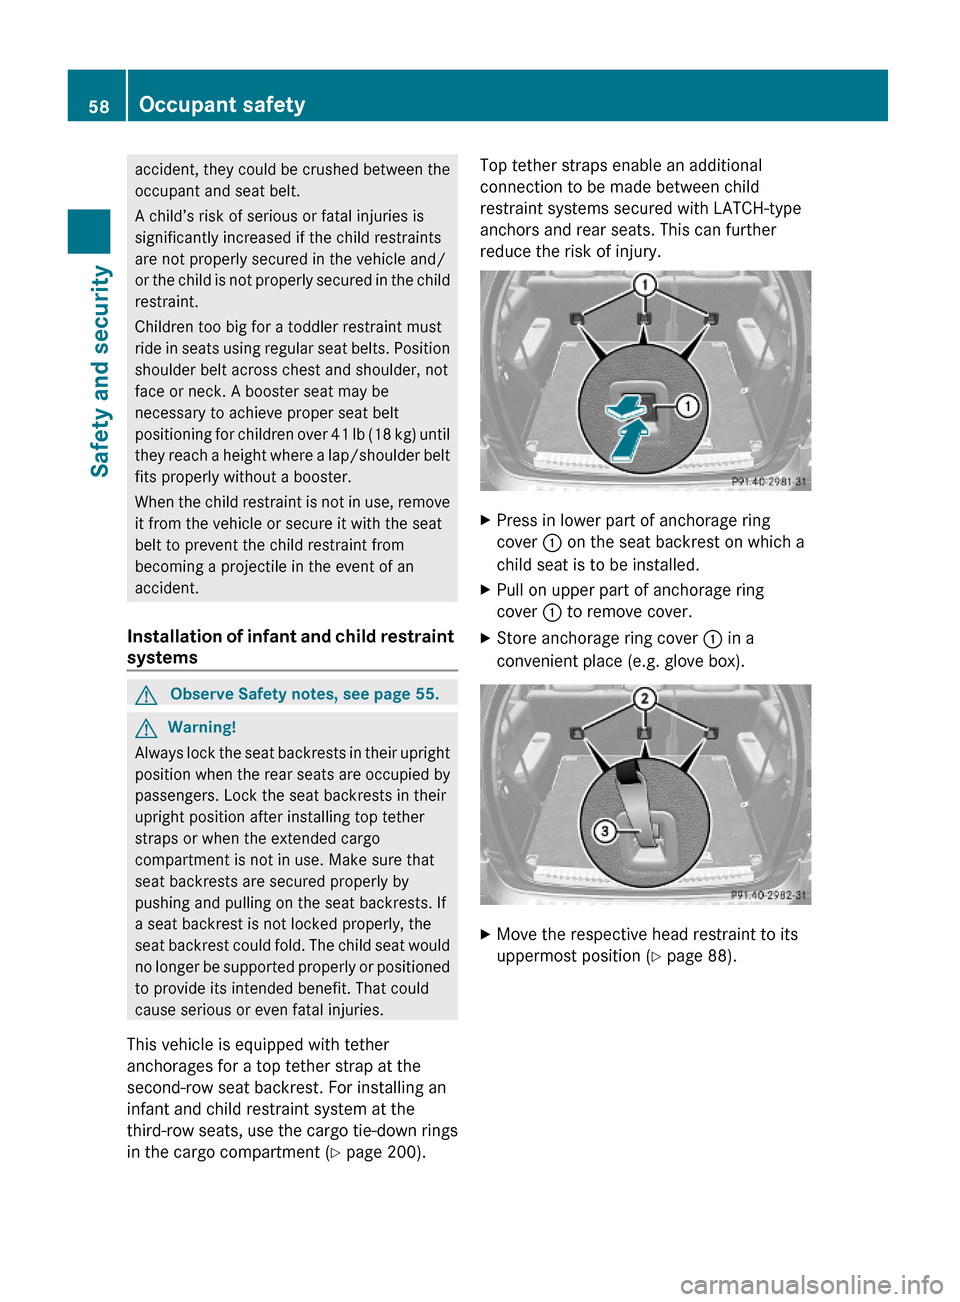
XPress in lower part of anchorage ring
cover : on the seat backrest on which a
child seat is to be installed.
XPull on upper part of anchorage ring
cover : to remove cover.
XStore anchorage ring cover : in a
convenient place (e.g. glove box).
XMove the respective head restraint to its
uppermost position (Y page 88).
58Occupant safetySafety and security
X164_AKB; 5; 31, en-USd2ureepe,Version: 2.11.8.12009-09-11T12:30:16+02:00 - Seite 58
Page 62 of 380
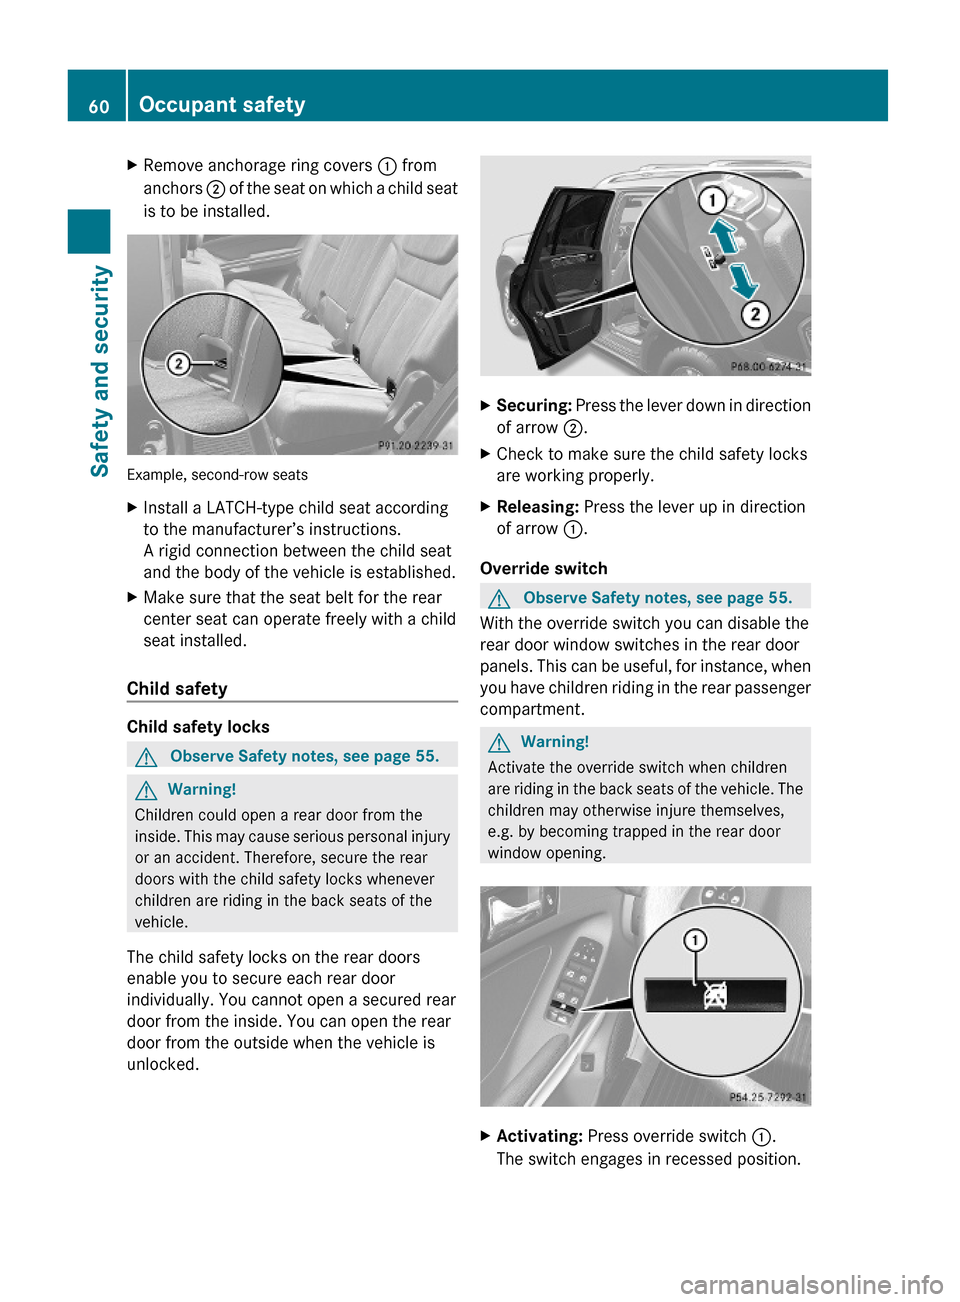
XRemove anchorage ring covers : from
anchors ; of the seat on which a child seat
is to be installed.
Example, second-row seats
XInstall a LATCH-type child seat according
to the manufacturer’s instructions.
A rigid connection between the child seat
and the body of the vehicle is established.
XMake sure that the seat belt for the rear
center seat can operate freely with a child
seat installed.
Child safety
Child safety locks
GObserve Safety notes, see page 55.GWarning!
Children could open a rear door from the
inside. This may cause serious personal injury
or an accident. Therefore, secure the rear
doors with the child safety locks whenever
children are riding in the back seats of the
vehicle.
The child safety locks on the rear doors
enable you to secure each rear door
individually. You cannot open a secured rear
door from the inside. You can open the rear
door from the outside when the vehicle is
unlocked.
XSecuring: Press the lever down in direction
of arrow ;.
XCheck to make sure the child safety locks
are working properly.
XReleasing: Press the lever up in direction
of arrow :.
Override switch
GObserve Safety notes, see page 55.
With the override switch you can disable the
rear door window switches in the rear door
panels. This can be useful, for instance, when
you have children riding in the rear passenger
compartment.
GWarning!
Activate the override switch when children
are riding in the back seats of the vehicle. The
children may otherwise injure themselves,
e.g. by becoming trapped in the rear door
window opening.
XActivating: Press override switch :.
The switch engages in recessed position.
60Occupant safetySafety and security
X164_AKB; 5; 31, en-USd2ureepe,Version: 2.11.8.12009-09-11T12:30:16+02:00 - Seite 60
Page 85 of 380
Do not drive the vehicle without the seat head
restraints. Head restraints are intended to
help reduce injuries during an accident.
Seat adjustment
! When moving the seats, make sure there
are no items in the footwell or behind the
seats. Otherwise, you could damage the
seats and/or the items.
Power seats
! When the second-row seats are folded
forward, e.g. for cargo volume expansion,
the front seats may not be moved to the
rearmost position. Otherwise you could
damage the front and second-row seats.
! When adjusting the seat backrest tilt and
head restraint height, make sure the sun
visor is folded up. If the head restraint is in
the uppermost position, it could hit and
damage the sun visor.
iVehicles without memory function:
The seats can be adjusted within 5 minutes
after either front door has been opened.
The counter resets each time
Ryou open or close a front door
Ryou insert the SmartKey into the starter
switch
Ryou remove the SmartKey from the
starter switch
Ryou switch the ignition on or off
Just like in vehicles with memory function,
the power seats can be operated at any
time when the ignition is switched on.
iThe memory function (Y page 96) lets
you store the settings for the seat position
together with the settings for the steering
wheel (electrical) and exterior rear view
mirrors.
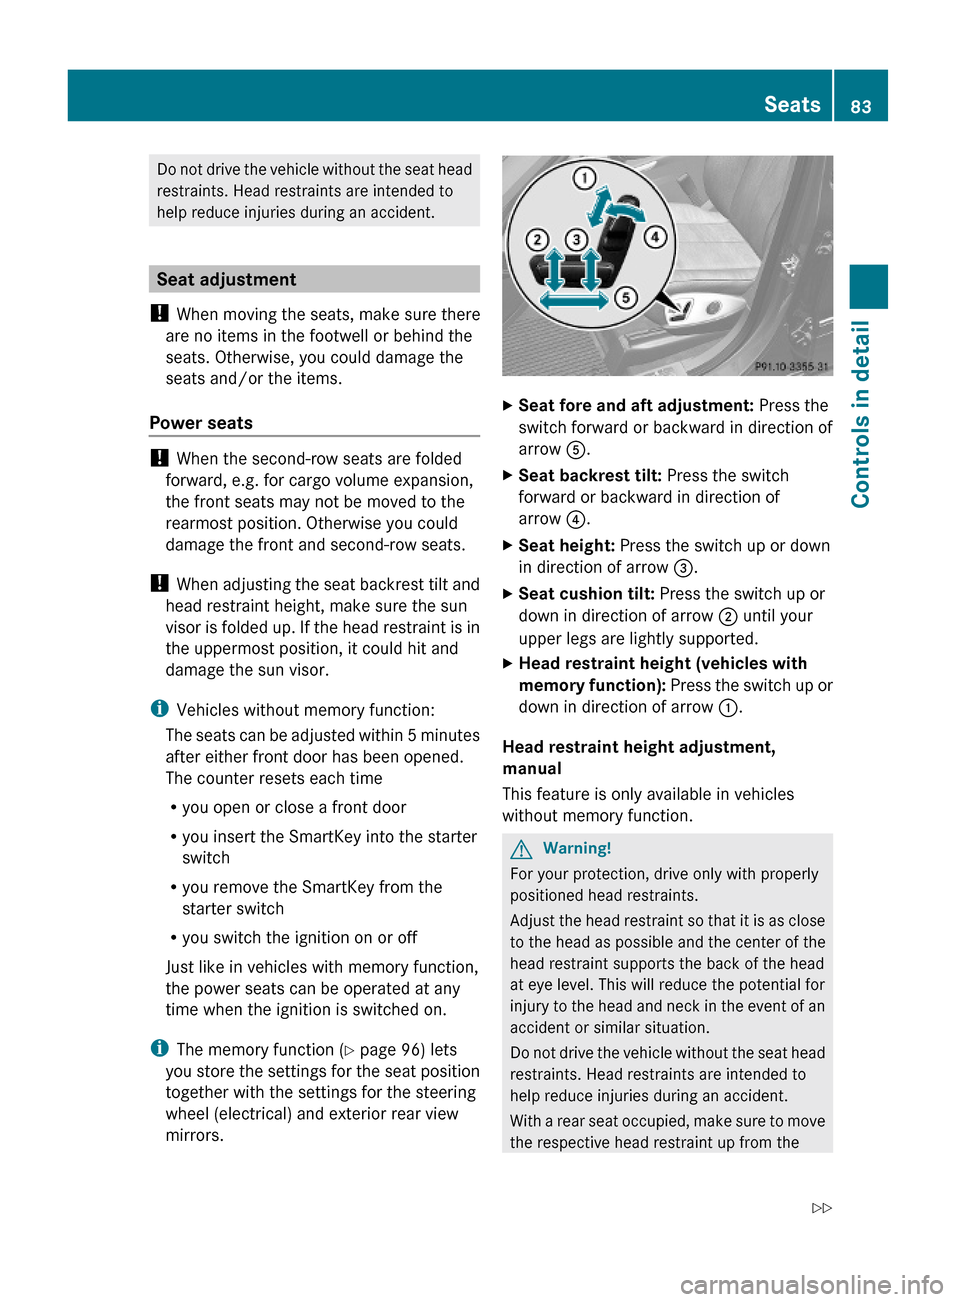
XSeat fore and aft adjustment: Press the
switch forward or backward in direction of
arrow A.
XSeat backrest tilt: Press the switch
forward or backward in direction of
arrow ?.
XSeat height: Press the switch up or down
in direction of arrow =.
XSeat cushion tilt: Press the switch up or
down in direction of arrow ; until your
upper legs are lightly supported.
XHead restraint height (vehicles with
memory function): Press the switch up or
down in direction of arrow :.
Head restraint height adjustment,
manual
This feature is only available in vehicles
without memory function.
GWarning!
For your protection, drive only with properly
positioned head restraints.
Adjust the head restraint so that it is as close
to the head as possible and the center of the
head restraint supports the back of the head
at eye level. This will reduce the potential for
injury to the head and neck in the event of an
accident or similar situation.
Do not drive the vehicle without the seat head
restraints. Head restraints are intended to
help reduce injuries during an accident.
With a rear seat occupied, make sure to move
the respective head restraint up from the
Seats83Controls in detailX164_AKB; 5; 31, en-USd2ureepe,Version: 2.11.8.12009-09-11T12:30:16+02:00 - Seite 83Z
Page 86 of 380
lowest non-use position and have the
occupant adjust the head restraint properly.
! Do not attempt to remove front seat head
restraints. They can only be removed by
qualified technicians. We recommend that
you have this work carried out by an
authorized Mercedes-Benz Center.
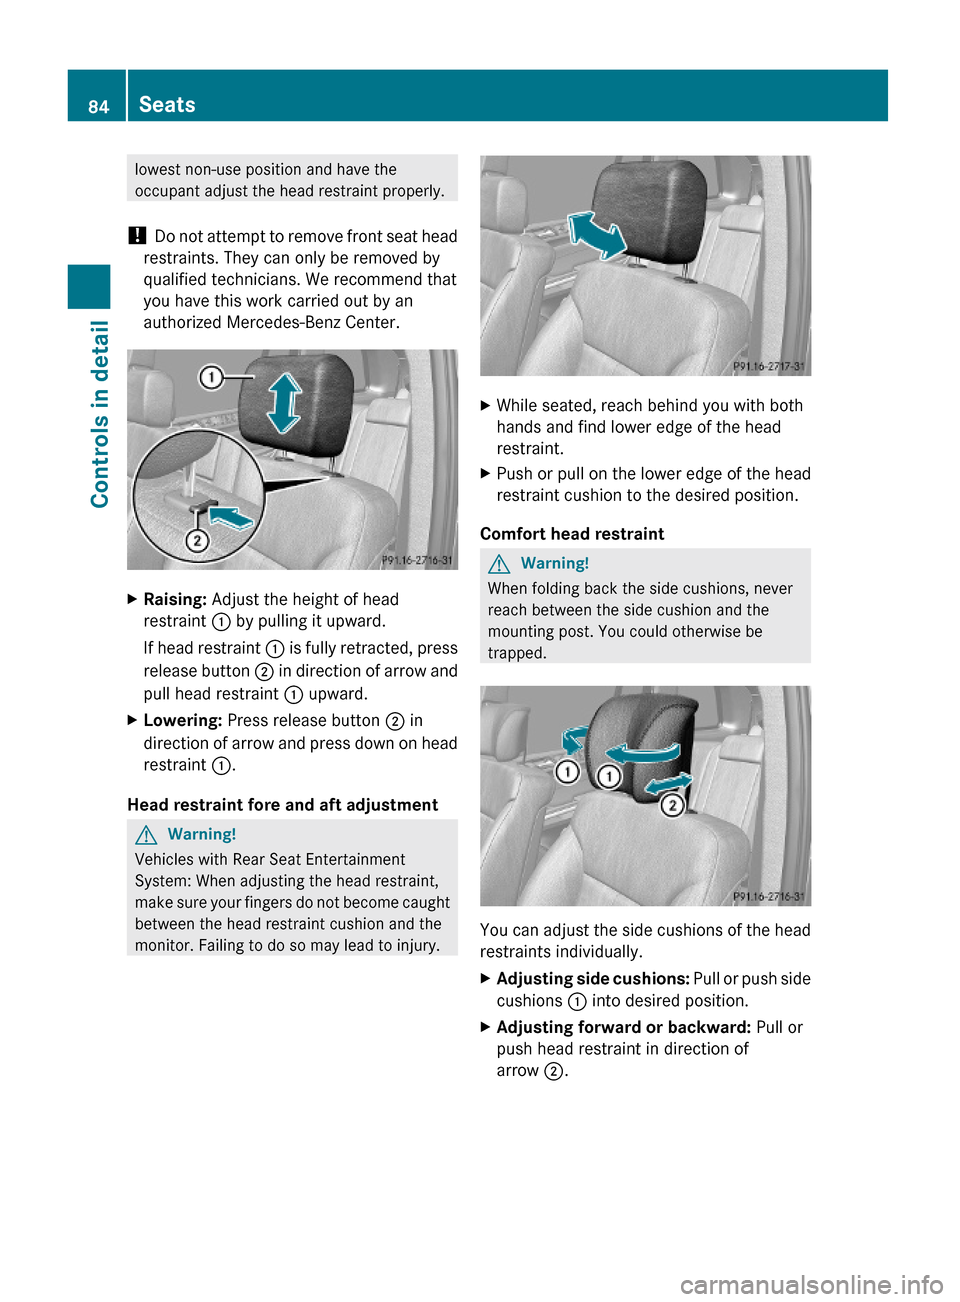
XRaising: Adjust the height of head
restraint : by pulling it upward.
If head restraint : is fully retracted, press
release button ; in direction of arrow and
pull head restraint : upward.
XLowering: Press release button ; in
direction of arrow and press down on head
restraint :.
Head restraint fore and aft adjustment
GWarning!
Vehicles with Rear Seat Entertainment
System: When adjusting the head restraint,
make sure your fingers do not become caught
between the head restraint cushion and the
monitor. Failing to do so may lead to injury.
XWhile seated, reach behind you with both
hands and find lower edge of the head
restraint.
XPush or pull on the lower edge of the head
restraint cushion to the desired position.
Comfort head restraint
GWarning!
When folding back the side cushions, never
reach between the side cushion and the
mounting post. You could otherwise be
trapped.
You can adjust the side cushions of the head
restraints individually.
XAdjusting side cushions: Pull or push side
cushions : into desired position.
XAdjusting forward or backward: Pull or
push head restraint in direction of
arrow ;.
84SeatsControls in detail
X164_AKB; 5; 31, en-USd2ureepe,Version: 2.11.8.12009-09-11T12:30:16+02:00 - Seite 84
Page 107 of 380
For information on filling up the washer
reservoir, see “Washer system and headlamp
cleaning system” ( Y page 232).
Problems with wipers
! If anything blocks the wipers (leaves,
snow, etc.), switch them off immediately.
For safety reasons, do the following before
attempting to remove any blockage:
R Stop the vehicle in a safe location.
R Remove the SmartKey from the starter
switch.
or
R Turn off the engine by pressing the
KEYLESS-GO start/stop button and
open the driver’s door (with the driver’s
door open, starter switch is in position
0 , same as with SmartKey removed from
starter switch).
R Engage the parking brake.
R Remove blockage.
R Turn the wipers on again.
If the windshield wipers fail to function at
all with the combination switch in position
Ä or Å ,
R set the combination switch to the next
higher wiper speed
R have the windshield wipers checked at
the nearest authorized Mercedes-Benz
Center
Power windows
Opening and closing
The door windows and the hinged quarter
windows are opened and closed electrically.
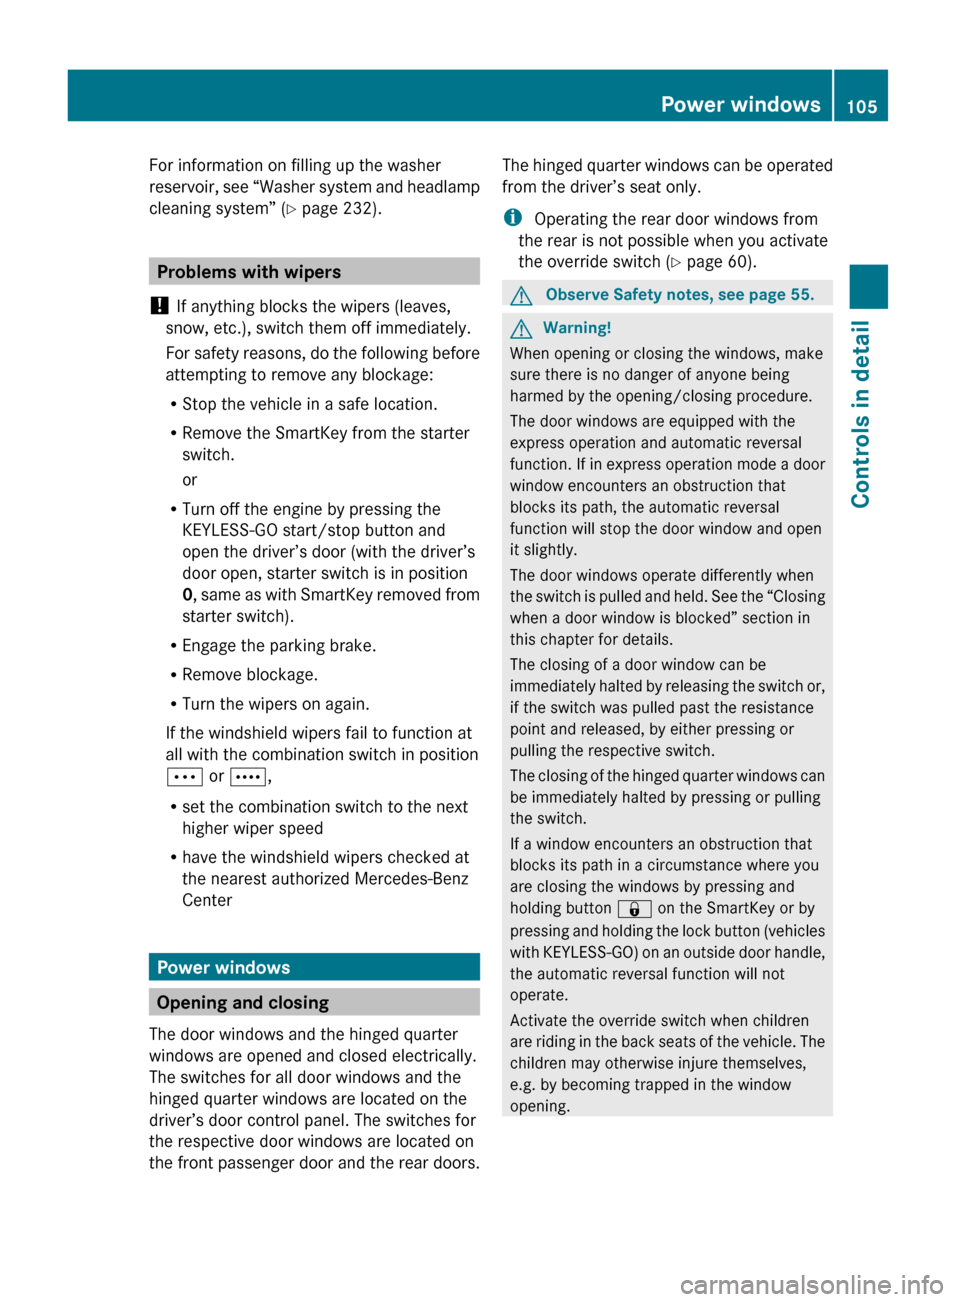
The switches for all door windows and the
hinged quarter windows are located on the
driver’s door control panel. The switches for
the respective door windows are located on
the front passenger door and the rear doors.
The hinged quarter windows can be operated
from the driver’s seat only.
i Operating the rear door windows from
the rear is not possible when you activate
the override switch ( Y page 60).GObserve Safety notes, see page 55.GWarning!
When opening or closing the windows, make
sure there is no danger of anyone being
harmed by the opening/closing procedure.
The door windows are equipped with the
express operation and automatic reversal
function. If in express operation mode a door
window encounters an obstruction that
blocks its path, the automatic reversal
function will stop the door window and open
it slightly.
The door windows operate differently when
the switch is pulled and held. See the “Closing
when a door window is blocked” section in
this chapter for details.
The closing of a door window can be
immediately halted by releasing the switch or,
if the switch was pulled past the resistance
point and released, by either pressing or
pulling the respective switch.
The closing of the hinged quarter windows can
be immediately halted by pressing or pulling
the switch.
If a window encounters an obstruction that
blocks its path in a circumstance where you
are closing the windows by pressing and
holding button & on the SmartKey or by
pressing and holding the lock button (vehicles
with KEYLESS-GO) on an outside door handle,
the automatic reversal function will not
operate.
Activate the override switch when children
are riding in the back seats of the vehicle. The
children may otherwise injure themselves,
e.g. by becoming trapped in the window
opening.
Power windows105Controls in detailX164_AKB; 5; 31, en-USd2ureepe,Version: 2.11.8.12009-09-11T12:30:16+02:00 - Seite 105Z