2010 MERCEDES-BENZ GL ECO mode
[x] Cancel search: ECO modePage 266 of 380
Checklist before off-road driving
Engine oil level
RCheck the engine oil level (Y page 230).
Only with a proper oil level can the vehicle
obtain a trouble-free oil supply, even on
steep gradients.
! If the engine oil level warning lamp comes
on while driving, stop the vehicle in a safe
location or as soon at is safe to do so.
Check the engine oil level.
The engine oil level warnings should not be
ignored. Extended driving with the symbol
displayed could result in serious engine
damage that is not covered by the
Mercedes-Benz Limited Warranty.
Tires
RCheck the tread depth and maintain
specified tire inflation pressure. A placard
with the recommended tire inflation
pressures is located on the driver’s door B-
pillar (Y page 243).
RCheck tires for possible damage and
remove foreign objects.
RReplace missing valve caps.
Rims
RDented or bent rims can cause tire inflation
pressure loss and damage the tire beads.
For this reason, check and, if necessary,
change rims before driving off-road.
Vehicle tool kit
RCheck if the jack (Y page 286) is
functional.
RAlways take the vehicle tool kit, a strong
tow rope, a shovel and a small plank (to put
under the jack on sandy soil) with you.
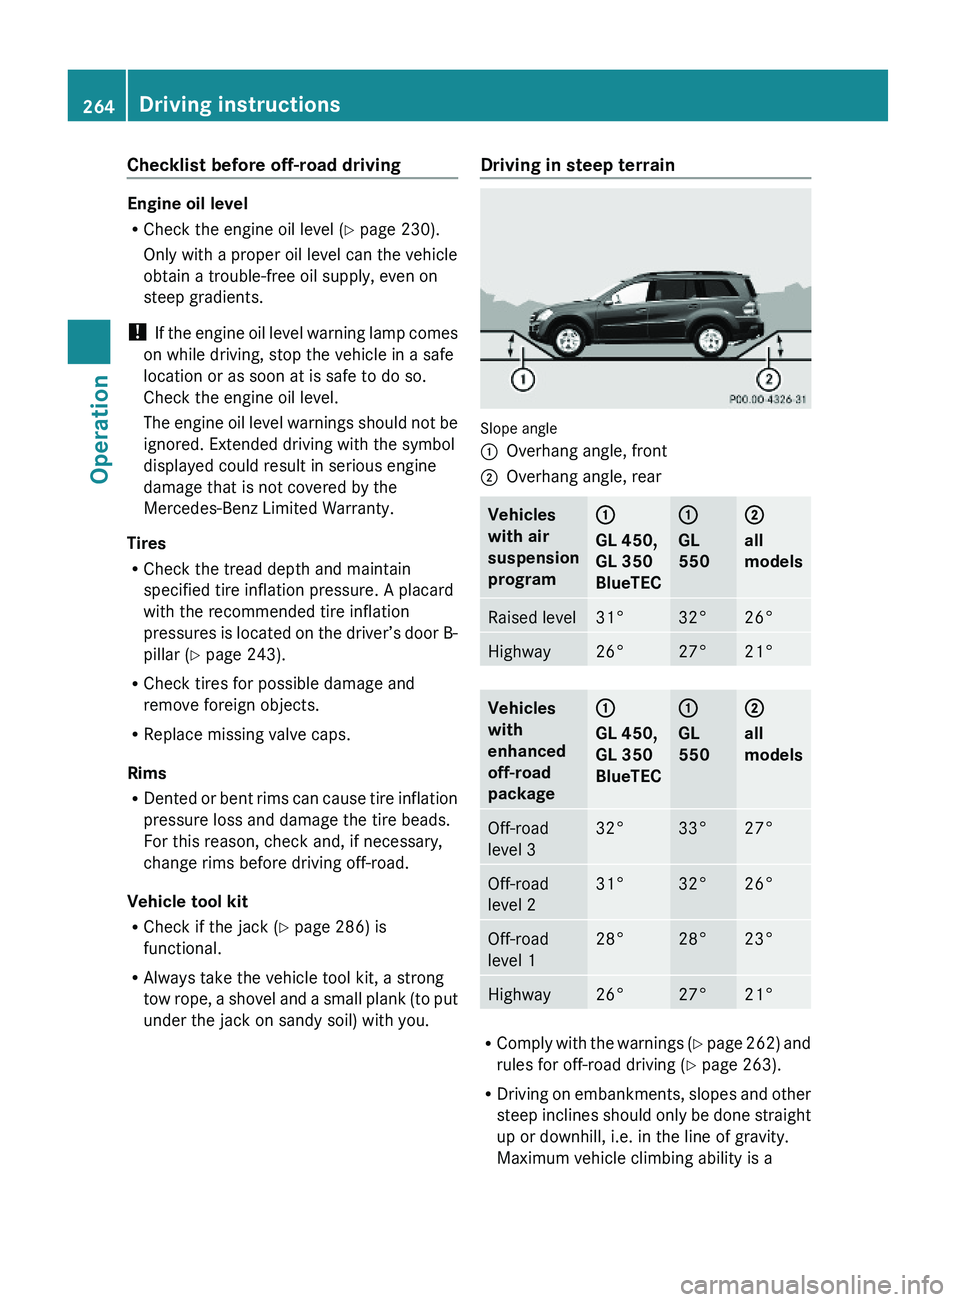
Driving in steep terrain
Slope angle
:Overhang angle, front;Overhang angle, rearVehicles
with air
suspension
program
:
GL 450,
GL 350
BlueTEC
:
GL
550
;
all
models
Raised level31°32°26°Highway26°27°21°Vehicles
with
enhanced
off-road
package
:
GL 450,
GL 350
BlueTEC
:
GL
550
;
all
models
Off-road
level 3
32°33°27°Off-road
level 2
31°32°26°Off-road
level 1
28°28°23°Highway26°27°21°
RComply with the warnings (Y page 262) and
rules for off-road driving (Y page 263).
RDriving on embankments, slopes and other
steep inclines should only be done straight
up or downhill, i.e. in the line of gravity.
Maximum vehicle climbing ability is a
264Driving instructionsOperation
X164_AKB; 5; 31, en-USd2ureepe,Version: 2.11.8.12009-09-11T12:30:16+02:00 - Seite 264
Page 267 of 380
100% grade which is equivalent to a slope
angle of 45°. Keep in mind that the
climbing ability of the vehicle depends on
terrain conditions.
R Shift automatic transmission into gear
range 1 (Y page 118).
R Drive slowly.
R Avoid excessive engine speeds – drive with
moderate engine speeds (max. 3 000 rpm).
R Utilize the engine’s braking power when
descending a slope, observe the engine
speed (do not overrev the engine). Apply
the service brake as needed.
i For maximum engine speed, see
“Tachometer” (Y page 125) and see vehicle
specification for your vehicle
( Y page 362).
R Check the brakes after a lengthy
downgrade drive.GWarning!
Never turn the vehicle around on steep
inclines. The vehicle might roll over. If the
vehicle cannot complete the attempted climb,
back it down in reverse gear.
i The hill-start assist system supports you
when driving uphill.
For more information, see “Hill-start assist
system” ( Y page 155).
Traction in steep terrain
The maximum vehicle climbing ability is a
100% grade which is equivalent to a slope
angle of 45°. Keep in mind that the climbing
ability of the vehicle depends on terrain
conditions.
Be easy on the accelerator and watch for
continuous wheel traction when driving in
steep terrain.
i The 4-ETS helps greatly when starting out
on a steep incline when the front wheels
have then the tendency to slip due to the
weight shifting towards the rear axle.
The 4-ETS recognizes the situation and
limits the torque for the front wheels by
braking them.
Simultaneously the torque for the rear
wheels is increased.
i Vehicles with enhanced off-road package
are equipped with automatic locks for the
center and rear axle differential to improve
vehicle traction.
Driving across a hilltop
Decelerate just ahead of a hilltop (do not shift
automatic transmission into neutral position
N ), to prevent the vehicle from speeding up
too much after climbing a hill.
Use the momentum of the vehicle to drive
across the hilltop.
After climbing a hill, driving in this manner
prevents the vehicle from:
R losing ground contact when cresting hills
R losing its forward momentum
R speeding up too much after climbing the hill
Driving downhill
R Drive slowly.
R Do not drive at an angle to the incline. Steer
into the line of gravity and drive with the
front wheels pointing straight downhill.
Otherwise, the vehicle may slide sideways
off the path and roll over.
R Shift automatic transmission into gear
range 1 (Y page 118).
R On steep inclines, use the Downhill Speed
Regulation ( Y page 155).
R Utilize the engine’s braking power to
reduce vehicle speed.
If this is insufficient, apply the brakes
gently. Make sure the vehicle is moving in
the line of gravity.
R Check the brakes after a lengthy
downgrade drive.
Driving instructions265OperationX164_AKB; 5; 31, en-USd2ureepe,Version: 2.11.8.12009-09-11T12:30:16+02:00 - Seite 265Z
Page 269 of 380
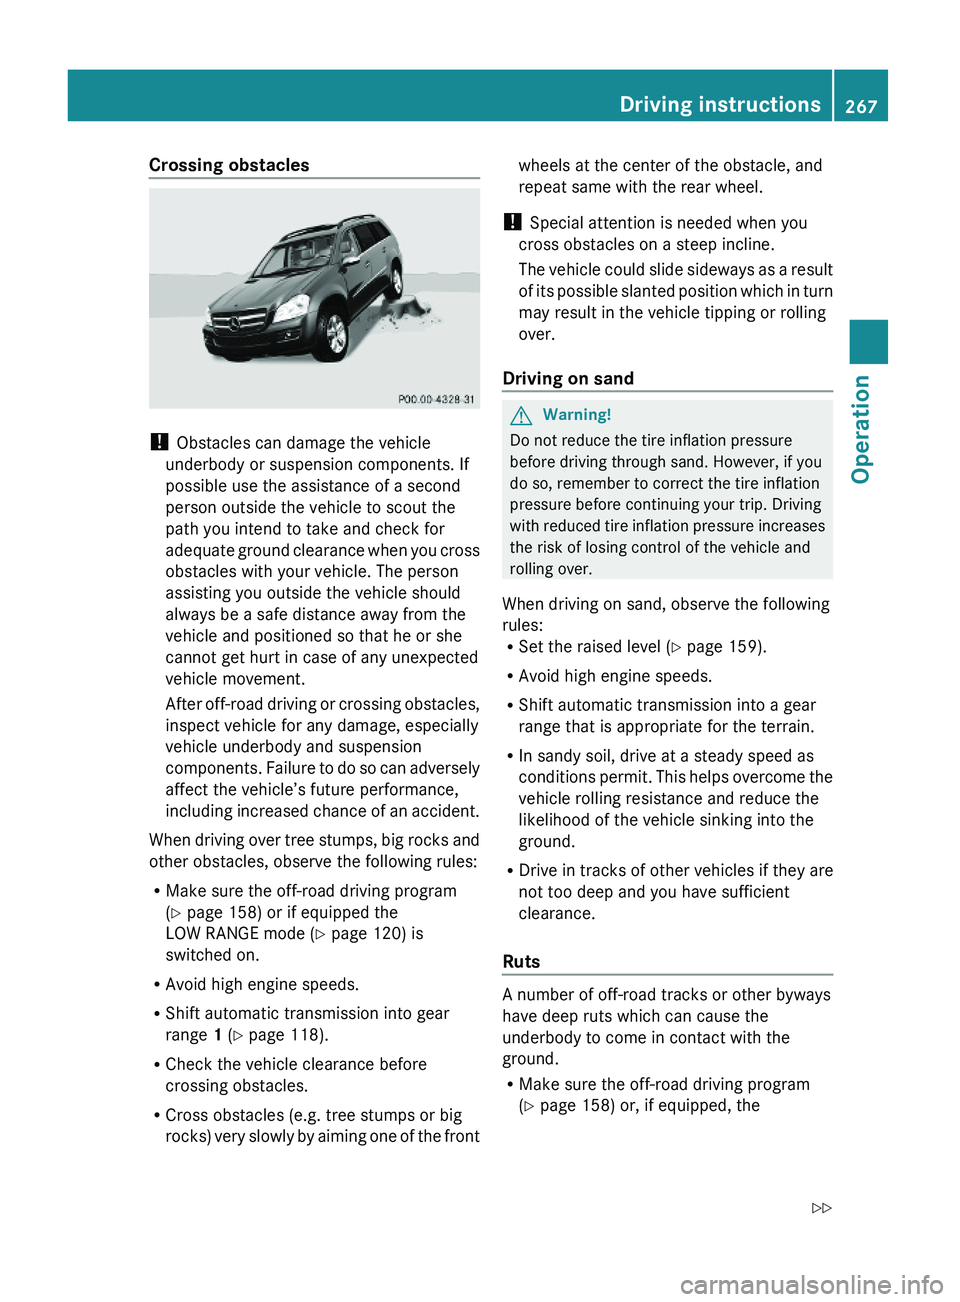
Crossing obstacles
! Obstacles can damage the vehicle
underbody or suspension components. If
possible use the assistance of a second
person outside the vehicle to scout the
path you intend to take and check for
adequate ground clearance when you cross
obstacles with your vehicle. The person
assisting you outside the vehicle should
always be a safe distance away from the
vehicle and positioned so that he or she
cannot get hurt in case of any unexpected
vehicle movement.
After off-road driving or crossing obstacles,
inspect vehicle for any damage, especially
vehicle underbody and suspension
components. Failure to do so can adversely
affect the vehicle’s future performance,
including increased chance of an accident.
When driving over tree stumps, big rocks and
other obstacles, observe the following rules:
RMake sure the off-road driving program
(Y page 158) or if equipped the
LOW RANGE mode (Y page 120) is
switched on.
RAvoid high engine speeds.
RShift automatic transmission into gear
range 1 (Y page 118).
RCheck the vehicle clearance before
crossing obstacles.
RCross obstacles (e.g. tree stumps or big
rocks) very slowly by aiming one of the front
wheels at the center of the obstacle, and
repeat same with the rear wheel.
! Special attention is needed when you
cross obstacles on a steep incline.
The vehicle could slide sideways as a result
of its possible slanted position which in turn
may result in the vehicle tipping or rolling
over.
Driving on sand
GWarning!
Do not reduce the tire inflation pressure
before driving through sand. However, if you
do so, remember to correct the tire inflation
pressure before continuing your trip. Driving
with reduced tire inflation pressure increases
the risk of losing control of the vehicle and
rolling over.
When driving on sand, observe the following
rules:RSet the raised level (Y page 159).
RAvoid high engine speeds.
RShift automatic transmission into a gear
range that is appropriate for the terrain.
RIn sandy soil, drive at a steady speed as
conditions permit. This helps overcome the
vehicle rolling resistance and reduce the
likelihood of the vehicle sinking into the
ground.
RDrive in tracks of other vehicles if they are
not too deep and you have sufficient
clearance.
Ruts
A number of off-road tracks or other byways
have deep ruts which can cause the
underbody to come in contact with the
ground.
RMake sure the off-road driving program
(Y page 158) or, if equipped, the
Driving instructions267OperationX164_AKB; 5; 31, en-USd2ureepe,Version: 2.11.8.12009-09-11T12:30:16+02:00 - Seite 267Z
Page 270 of 380
LOW RANGE mode (Y page 120) is
switched on.
R Set the raised level ( Y page 159).
! Check that the ruts are not too deep and
your vehicle’s clearance is sufficient.
Otherwise:
R your vehicle may be damaged
R the underbody of the vehicle may come
in contact with the ground and you may
get stuck
R Avoid high engine speeds.
R Shift automatic transmission into gear
range 1 (Y page 118).
R Drive next to the ruts rather than through
them if at all possible.
R If the ruts are too deep to drive in, drive with
one side of the vehicle on the grassy center
strip if the route permits.
Returning from off-road driving GWarning!
If you feel a sudden significant vibration or
ride disturbance, or you suspect that possible
damage to your vehicle has occurred, you
should turn on the hazard warning flashers,
carefully slow down, and drive with caution to
an area which is a safe distance from the road.
Inspect the tires and the vehicle underbody
for possible damage. If the vehicle or tires
appear unsafe, have the vehicle towed to the
nearest authorized Mercedes-Benz Center or
tire dealer for repairs.
Off-road driving increases strain on the
vehicle.
We recommend that you inspect the vehicle
for possible damage after each off-road trip.
Recognizing any damage and a subsequent
timely repair reduces the chance of a possible
breakdown or accident later on.
Proceed as follows:
R Switch off the off-road driving program
( Y page 158) or the LOW RANGE mode
( Y page 120).
R Switch off the DSR ( Y page 156).
R Set the differential locks to AUTO
( Y page 122).
R Lower the vehicle back to a level suitable
for road conditions, e.g. highway/high-
speed level ( Y page 159).
R Clean all exterior lamps and check for
possible damage.
R Clean the front and rear license plate.
R Remove excessive dirt from tires, wheels,
wheel housings, and underbody.
For instance, after driving in mud, clean the
radiator, chassis, engine, brakes, and
wheels from extreme dirt using a strong jet
of water.
R Check tires for possible damage.
R Inspect vehicle underbody, oil pan, brake
hoses, etc., as well as vehicle underbody
for possible damage.
R Check for brush or branches caught in the
underbody.
! Brush or branches could increase the
possibility of a fire, as well as cut fuel and/
or brake lines, puncture rubber bellows of
the axles or drive shafts.
R After continued operation in mud, sand,
water or other dirty conditions clean the
brake discs, wheels, brake pads and check
and clean axle joints.
R Conduct a brake test.268Driving instructionsOperation
X164_AKB; 5; 31, en-USd2ureepe,Version: 2.11.8.12009-09-11T12:30:16+02:00 - Seite 268
Page 273 of 380
practice turning, stopping and backing up
in an area which is free of traffic.
R Before you start driving check the
- trailer hitch
- break-away switch
- safety chains
- electrical connections
- lighting
- tires
R Adjust the mirrors ( Y page 94) to permit
unobstructed view beyond rear of trailer.
R If the trailer has electric brakes, start your
vehicle and trailer moving slowly, and then
apply only the trailer brake controller by
hand to make sure the brakes are working
properly.
R Always secure items in the trailer to
prevent load shifts while driving.
R When towing a trailer, check occasionally
to make sure the load is secure, and that
trailer lighting and brakes (if so equipped)
are functioning properly.
R Take into consideration that when towing a
trailer, the handling characteristics are
different and less stable from those when
operating the vehicle without a trailer.
It is important to avoid sudden maneuvers.
R The vehicle and trailer combination is
heavier, and therefore limited in
acceleration and climbing ability, and has a
larger braking distance.
It is more prone to reacting to cross wind
gusts, and requires more sensitive steering
input.
R If possible, do not brake abruptly, but
rather engage the brake slightly at first to
permit the trailer to activate its brake. Then
increase the braking force.
! If the trailer should begin to sway, reduce
the vehicle’s speed immediately.Do not attempt to straighten out the tow
vehicle and trailer by increasing the speed.
R If the transmission shifts between gears on
inclines repeatedly, shift to a lower gear
range manually ( Y page 118). Select 4, 3 ,
2 or 1.
A lower gear and reduction of speed
reduces the chance of engine overloading
and/or overheating.
R On very steep inclines, not manageable
with automatic transmission in gear range
1 , switch on off-road driving program
( Y page 158) or LOW RANGE mode
( Y page 120).
R When going down an incline, shift into a
lower gear and use the engine’s braking
effect.
Avoid riding the brakes, thus overheating
the vehicle and trailer brakes (if so
equipped).
R If the engine coolant rises to an extremely
high temperature when the air conditioning
is on, turn off the air conditioning system.
Engine coolant heat can be additionally
vented by opening the windows, switching
the climate control fan speed to high and
setting the temperature control to the
maximum.
R During a passing maneuver extreme care
must be exercised since your vehicle with
a trailer will require additional passing
distance ahead than when driving without
a trailer.
Because your vehicle and trailer is longer
than your vehicle alone, you will also need
to go much farther ahead of the passed
vehicle before you can return to your lane.
Decoupling a trailer GWarning!
While you are coupling or decoupling a trailer,
make sure nobody locks or unlocks the
Driving instructions271OperationX164_AKB; 5; 31, en-USd2ureepe,Version: 2.11.8.12009-09-11T12:30:16+02:00 - Seite 271Z
Page 282 of 380
Steering wheelXWipe with a damp cloth and dry thoroughly
or clean with Mercedes-Benz approved
Leather Care.
Carpets
XUse Mercedes-Benz approved Carpet and
Fabric Care for cleaning the carpets.
Headliner
XUse a soft bristle brush or a dry-shampoo
cleaner in case of excessive dirt.
Seat belts
XOnly use clear, lukewarm water and soap.
! The seat belts must not be treated with
chemical cleaning agents. Do not dry the
seat belts at temperatures above 176‡
(80†) or in direct sunlight.
GWarning!
Do not bleach or dye seat belts as this may
severely weaken them. In a crash they may
not be able to provide adequate protection.
Upholstery
Using aftermarket seat covers or wearing
clothing that have the tendency to give off
coloring (e.g. when wet, etc.) may cause the
upholstery to become permanently
discolored. By lining the seats with a proper
intermediate cover, contact-discoloration will
be prevented.
GWarning!
Only use seat or head restraint covers which
have been tested and approved by Mercedes-
Benz for your vehicle model.
Using other seat or head restraint covers may
interfere with or prevent
R deployment of the front side impact air
bags
R deployment of the rear side impact air bags
R activation of the NECK-PRO active front
head restraints
Contact an authorized Mercedes-Benz Center
for availability.
Leather upholstery
Please note that leather upholstery is a
natural product and is therefore subject to a
natural aging process. Leather upholstery
may also react to certain ambient influences
such as high humidity or high temperature by
showing wrinkles for example.XWipe leather upholstery with a damp cloth
and dry thoroughly or clean with Mercedes-
Benz approved Leather Care.
! To avoid damage to leather upholstery:
R Wipe with light pressure only.
R Do not clean with abrasive cleaning
agents such as scouring milk or powder.
R Do not soak the leather upholstery.
As leather is a natural product, it could
otherwise harden or become porous.
R Exercise particular care when cleaning
perforated leather as its underside
should not become wet.
MB Tex upholstery
XUse Mercedes-Benz approved Interior Care
onto a soft, lint-free cloth and apply with
light pressure for cleaning the upholstery.
Wood trims
XOnly use water and a damp cloth to clean
wood trims in your vehicle.
! Do not use solvents like tar remover or
wheel cleaner nor polishes or waxes as
these may be abrasive.
280Vehicle careOperation
X164_AKB; 5; 31, en-USd2ureepe,Version: 2.11.8.12009-09-11T12:30:16+02:00 - Seite 280
Page 347 of 380
GWarning!
Have the tightening torque checked after
changing a wheel. The wheels could come
loose if they are not tightened to a torque of
110 lb-ft (150 Nm).
XFully collapse the jack to storage position,
see ( Y page 286).XStore the jack and the other vehicle tools
in the designated storage space.
For information on storing the spare wheel
after it has been replaced by a regular road
wheel, see ( Y page 286).
i The damaged road wheel cannot be
stored in the spare wheel well under the
cargo compartment floor. It should be
transported in the cargo compartment
wrapped in a protective wrap.
i USA only:
Do not restart the tire inflation pressure
monitor until a full size wheel/tire with
functioning sensor has been placed back
into service on the vehicle.
MOExtended system
The MOExtended system allows you to
continue driving your vehicle even if there is
a total loss of pressure in one or more tires.
You may only use the MOExtended system in
conjunction with the tire pressure loss
warning system ( Y page 237) or the
Advanced TPMS ( Y page 239).
The maximum distance in emergency mode
depends on the vehicle’s load. It is 50 miles
(80 km) if the vehicle is partially loaded and
18 miles (30 km) if the vehicle is fully loaded.
The point at which the maximum driving
distance in emergency mode begins is when
the warning message appears in the
multifunction display indicating that there is
a loss of tire inflation pressure.
XDo not exceed the maximum speed of
50 mph (80 km/h).GWarning!
In emergency mode, your vehicle’s driving
characteristics are diminished in such
situations as:
R driving around curves
R while braking
R while accelerating rapidly
Therefore, your driving style must be adapted
accordingly. Avoid abrupt steering and driving
maneuvers, as well as driving over obstacles
(road curbs, potholes, or off-road areas). This
is especially important if the vehicle is heavily
loaded.
The emergency driving distance that can be
achieved greatly depends on the demands
placed on the vehicle. Depending on speed,
load, driving maneuvers, road conditions,
outside temperature, etc., the distance can be
significantly shorter or, if the vehicle is driven
cautiously, somewhat longer.
Do not continue driving in emergency mode if
R you notice knocking sounds
R the vehicle starts to shake
R smoke develops and you smell rubber
R ESP ®
is intervening continuously
R you notice tears on the tire sidewalls
After driving in emergency mode, you must
have the rims inspected by an authorized
Mercedes-Benz Center to check if they are
suitable for further use. The failed tire must
be replaced in any case.
When replacing individual or all tires on the
vehicle, make sure only tires marked with
“MOExtended” are mounted in the size
specified for your vehicle ( Y page 365).
Bleeding the fuel system (diesel
engine only)
Driving the vehicle until the fuel tank is empty
is not recommended. Otherwise, air may be
Bleeding the fuel system (diesel engine only)345Practical hintsX164_AKB; 5; 31, en-USd2ureepe,Version: 2.11.8.12009-09-11T12:30:16+02:00 - Seite 345Z
Page 364 of 380
Vehicle specification GL 350 BlueTEC
(164.825)
The quoted data apply only to the standard
vehicle. Contact an authorized Mercedes-
Benz Center for the corresponding data of all
special bodies and special equipment.Engine GL 350 BlueTECEngine, type642Mode of operationDiesel 4-stroke engineNo. of cylinders6Bore3.27 in (83.00 mm)Stroke3.62 in (92.00 mm)Total piston
displacement182.3 cu in
(2 987 cm 3
)Compression
ratio16.5:1Output acc. to
SAE J 1349210 hp/3 400 rpm
(157 kW/3 400 rpm)Maximum torque
acc. to SAE J 1349400 lb-ft/
1 600 - 2 400 rpm
(543 Nm/
1 600 - 2 400 rpm)Maximum engine
speed4 500 rpmFiring order1-4-2-5-3-6Poly-V-belt2 035 mmElectrical system GL 350 BlueTECAlternator14 V/220 AStarter motor12 V/2.0 kWBattery12 V/95 AhMain dimensions GL 350 BlueTECOverall vehicle
length201.1 in (5 108 mm)Overall vehicle
width 2383.6 in (2
124 mm)Overall vehicle
height72.4 - 75.6 in
(1 840 - 1 920 mm) 2472.4 - 76.8 in
(1 840 - 1 950 mm) 25Wheelbase121.1 in (3
075 mm)Track, front64.8 in (1 645 mm)Track, rear64.9 in (1 648 mm)Ground clearance8.0 - 10.9 in
(202 - 277 mm) 248.0 - 12.1 in
(202 - 307 mm) 2529Turning circle39.7 ft (12.1 m)Weights GL 350 BlueTECRoof loadmax. 198 lb (90 kg)
Vehicle specification GL 450
(164.871)
The quoted data apply only to the standard
vehicle. Contact an authorized Mercedes-
Benz Center for the corresponding data of all
special bodies and special equipment.
Engine GL 450Engine, type273Mode of operation4-stroke engine,
gasoline injection23 Exterior rear view mirrors folded out.
24 Depending on the set vehicle level (vehicles without enhanced off-road package).
25 Depending on the set vehicle level (vehicles with enhanced off-road package).
29 Depending on the set vehicle level (vehicles with enhanced off-road package).362Vehicle specification GL 450 (164.871)Technical data
X164_AKB; 5; 31, en-USd2ureepe,Version: 2.11.8.12009-09-11T12:30:16+02:00 - Seite 362