2010 MERCEDES-BENZ GL clock
[x] Cancel search: clockPage 336 of 380
Correct headlamp adjustment is extremely
important. High beam adjustments
simultaneously aim the low beam. To check
and readjust a headlamp, follow the steps
described:
XPark the vehicle on a level surface 25 feet
(7.6 m) from a vertical test screen or wall.
XMake sure the vehicle has a normal tailgate
load.
XSwitch on the low beam headlamps L.
If the beam does not show a beam pattern as
indicated in the figure left, then follow the
steps below:
XOpen the hood (Y page 228).
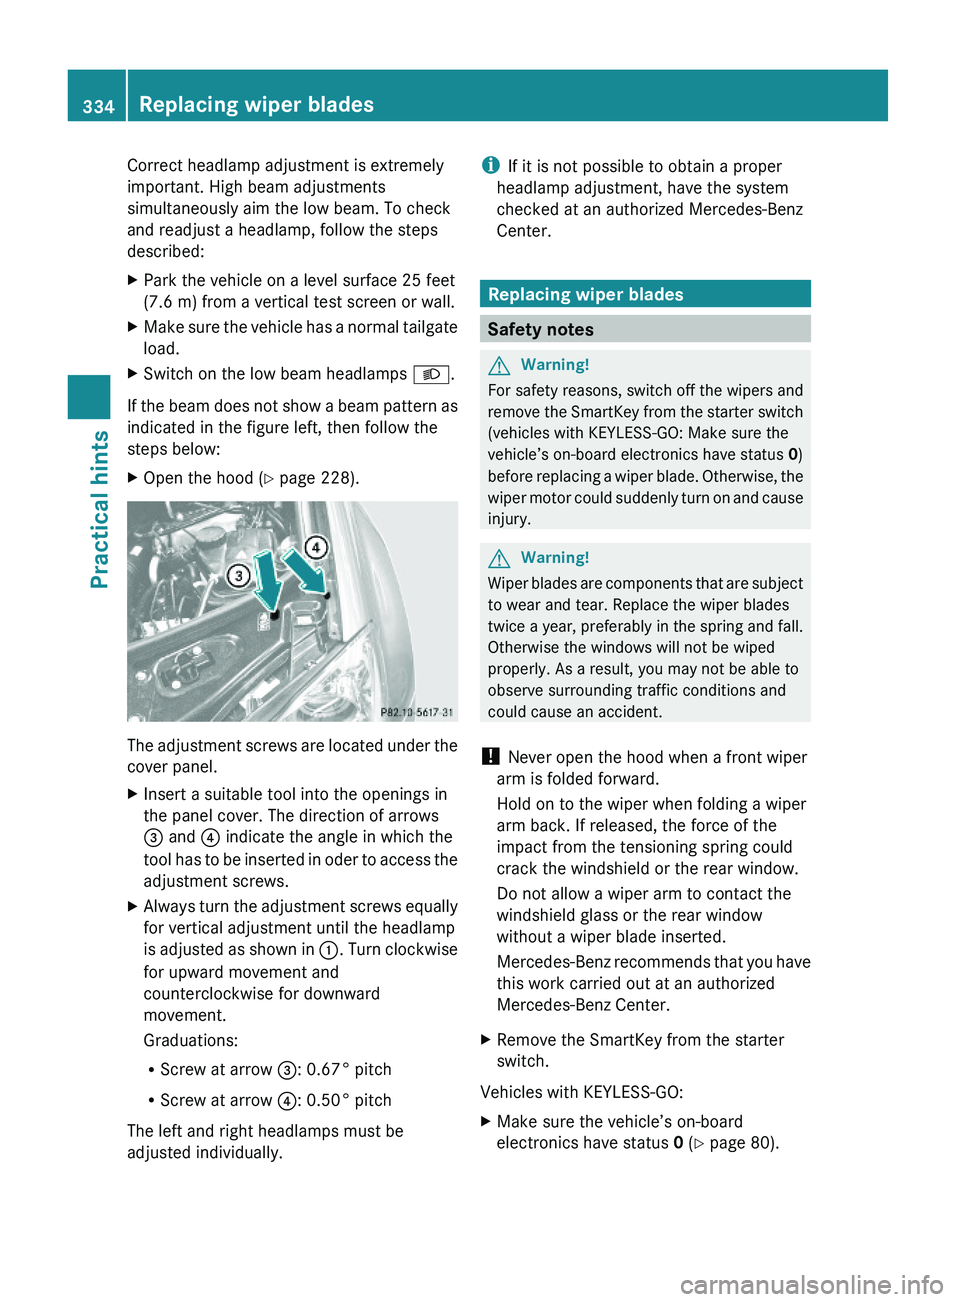
The adjustment screws are located under the
cover panel.
XInsert a suitable tool into the openings in
the panel cover. The direction of arrows
= and ? indicate the angle in which the
tool has to be inserted in oder to access the
adjustment screws.
XAlways turn the adjustment screws equally
for vertical adjustment until the headlamp
is adjusted as shown in :. Turn clockwise
for upward movement and
counterclockwise for downward
movement.
Graduations:
RScrew at arrow =: 0.67° pitch
RScrew at arrow ?: 0.50° pitch
The left and right headlamps must be
adjusted individually.
iIf it is not possible to obtain a proper
headlamp adjustment, have the system
checked at an authorized Mercedes-Benz
Center.
Replacing wiper blades
Safety notes
GWarning!
For safety reasons, switch off the wipers and
remove the SmartKey from the starter switch
(vehicles with KEYLESS-GO: Make sure the
vehicle’s on-board electronics have status 0)
before replacing a wiper blade. Otherwise, the
wiper motor could suddenly turn on and cause
injury.
GWarning!
Wiper blades are components that are subject
to wear and tear. Replace the wiper blades
twice a year, preferably in the spring and fall.
Otherwise the windows will not be wiped
properly. As a result, you may not be able to
observe surrounding traffic conditions and
could cause an accident.
! Never open the hood when a front wiper
arm is folded forward.
Hold on to the wiper when folding a wiper
arm back. If released, the force of the
impact from the tensioning spring could
crack the windshield or the rear window.
Do not allow a wiper arm to contact the
windshield glass or the rear window
without a wiper blade inserted.
Mercedes-Benz recommends that you have
this work carried out at an authorized
Mercedes-Benz Center.
XRemove the SmartKey from the starter
switch.
Vehicles with KEYLESS-GO:
XMake sure the vehicle’s on-board
electronics have status 0 (Y page 80).
334Replacing wiper bladesPractical hints
X164_AKB; 5; 31, en-USd2ureepe,Version: 2.11.8.12009-09-11T12:30:16+02:00 - Seite 334
Page 349 of 380
Refilling with AdBlue® GWarning!
Make sure
RAdBlue® does not come into contact with
skin, eyes, or clothing
Rto keep AdBlue® out of the reach of children
If you and/or others have come into contact
with AdBlue®:
RIf AdBlue® has gotten into contact with
eyes, flush with plenty of water immediately
and seek medical help.
RClean affected skin immediately with plenty
of water.
RIf AdBlue® was swallowed, rinse mouth
immediately with plenty of water and drink
plenty of water. Consult a physician.
GWarning!
When opening the filler cap of the AdBlue®
tank ammonia gas vapors may escape. Refill
AdBlue® in a well ventilated area only.
Ammonia gas vapors have a pungent odor and
are particularly irritating for your skin,
mucous membranes, and eyes. Inhaling
ammonia gas vapors will cause burning eyes,
nose, and throat, as well as coughing and
watering eyes.
! Only use AdBlue® complying with
ISO 22241. Do not add additives to
AdBlue® and do not dilute AdBlue® with
water. Otherwise, the BlueTEC exhaust gas
aftertreatment system could be damaged.
Damage caused by using additives or
diluting with water are not covered by the
Mercedes-Benz Limited Warranty.
! Rinse surfaces that have come into
contact with AdBlue®, or remove AdBlue®
with a moist cloth and cold water
immediately. If AdBlue® has crystallized
already, use cold water and a sponge.
AdBlue® residues will crystallize and soil
the affected surfaces.
! AdBlue® is not a fuel additive and must
not be added to the diesel fuel tank. If
AdBlue® reaches the diesel fuel tank, the
engine could be damaged which is not
covered by the Mercedes-Benz Limited
Warranty.
For more information on AdBlue®, see
(Y page 373).
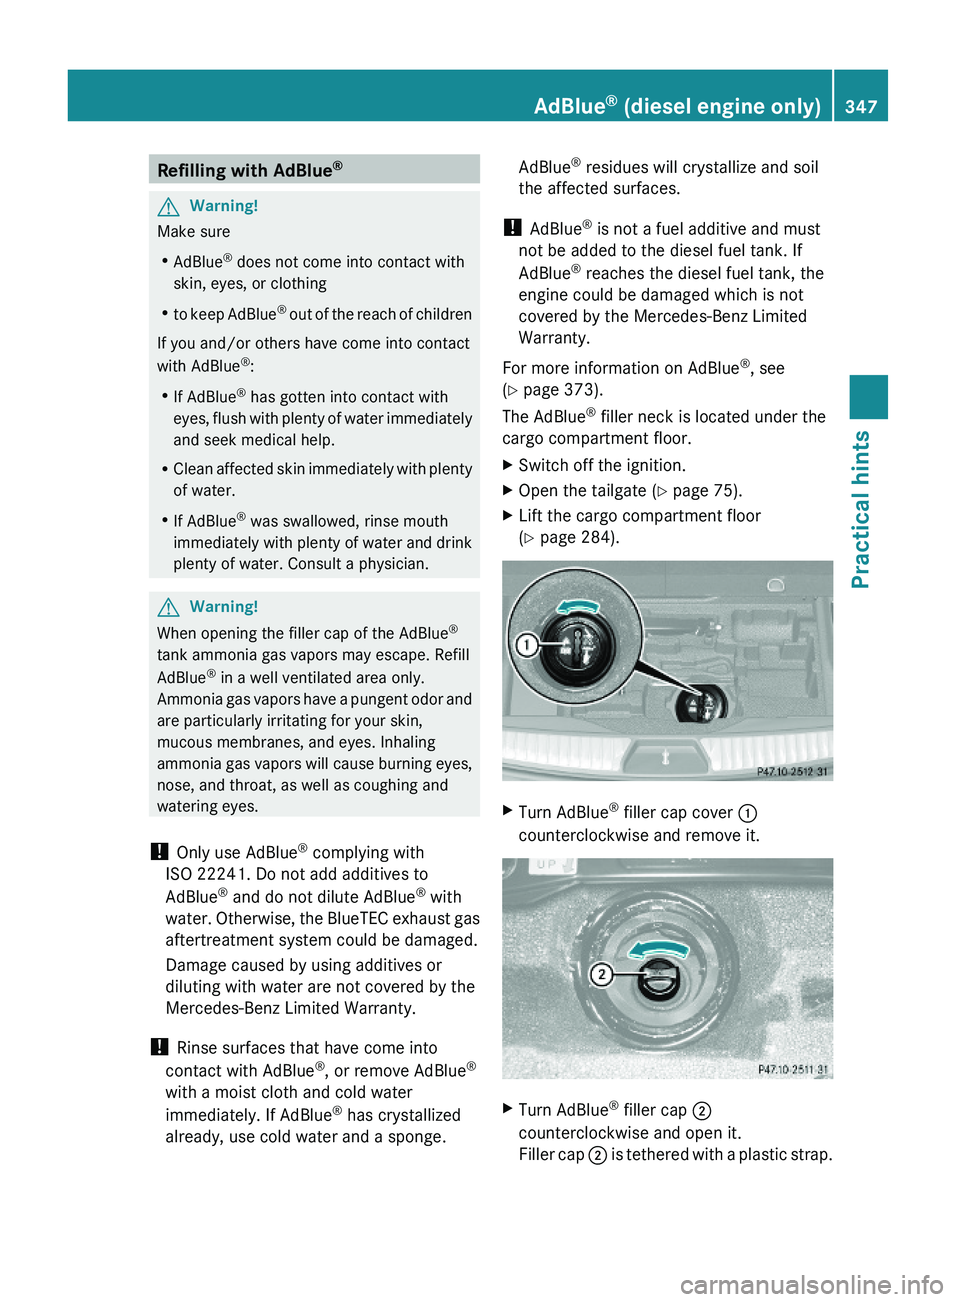
The AdBlue® filler neck is located under the
cargo compartment floor.
XSwitch off the ignition.XOpen the tailgate (Y page 75).XLift the cargo compartment floor
(Y page 284).
XTurn AdBlue® filler cap cover :
counterclockwise and remove it.
XTurn AdBlue® filler cap ;
counterclockwise and open it.
Filler cap ; is tethered with a plastic strap.
AdBlue® (diesel engine only)347Practical hintsX164_AKB; 5; 31, en-USd2ureepe,Version: 2.11.8.12009-09-11T12:30:16+02:00 - Seite 347Z
Page 350 of 380
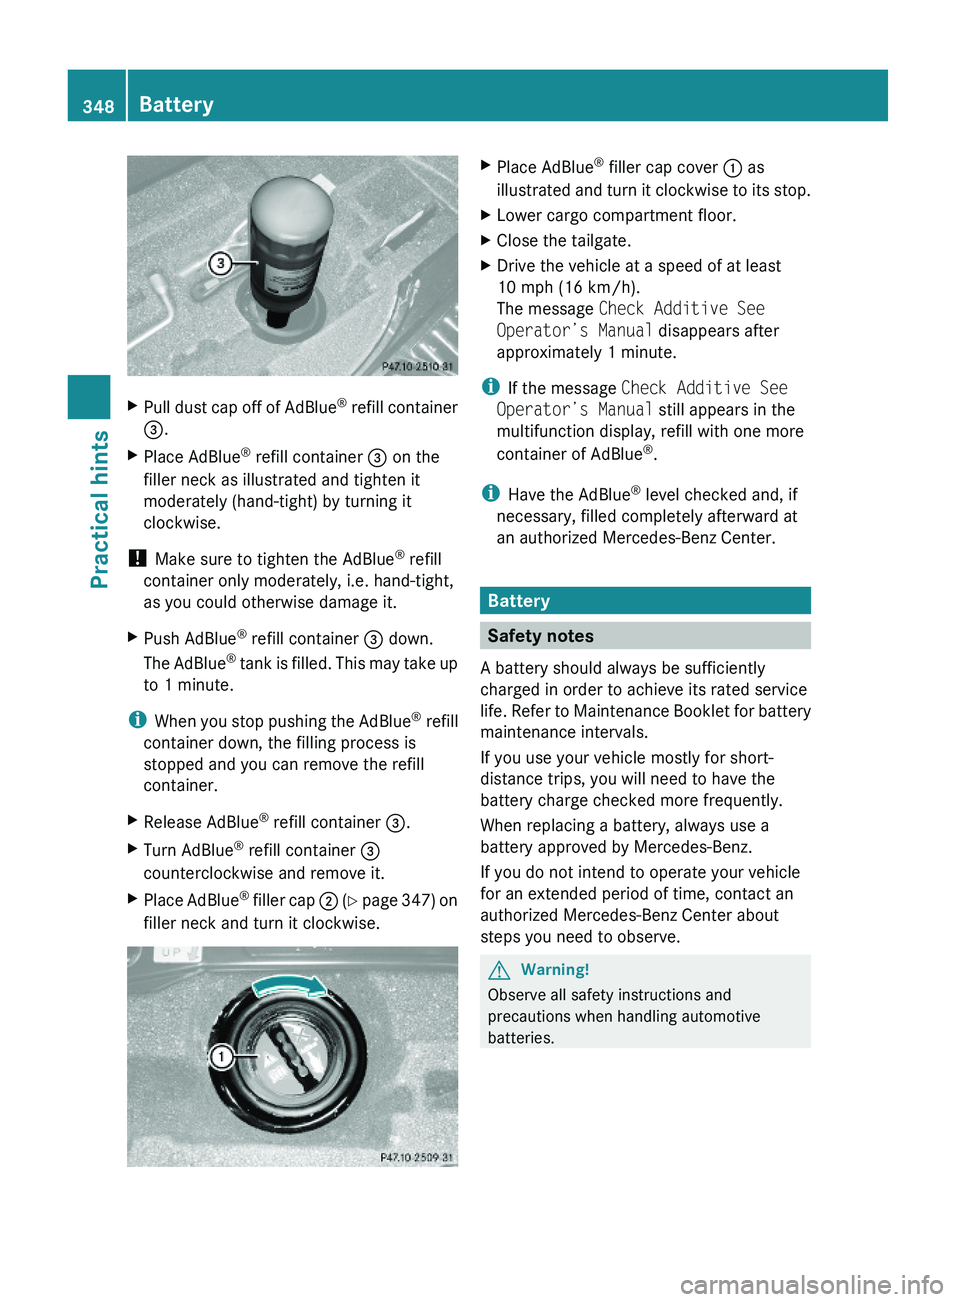
XPull dust cap off of AdBlue® refill container
=.
XPlace AdBlue® refill container = on the
filler neck as illustrated and tighten it
moderately (hand-tight) by turning it
clockwise.
! Make sure to tighten the AdBlue® refill
container only moderately, i.e. hand-tight,
as you could otherwise damage it.
XPush AdBlue® refill container = down.
The AdBlue® tank is filled. This may take up
to 1 minute.
iWhen you stop pushing the AdBlue® refill
container down, the filling process is
stopped and you can remove the refill
container.
XRelease AdBlue® refill container =.XTurn AdBlue® refill container =
counterclockwise and remove it.
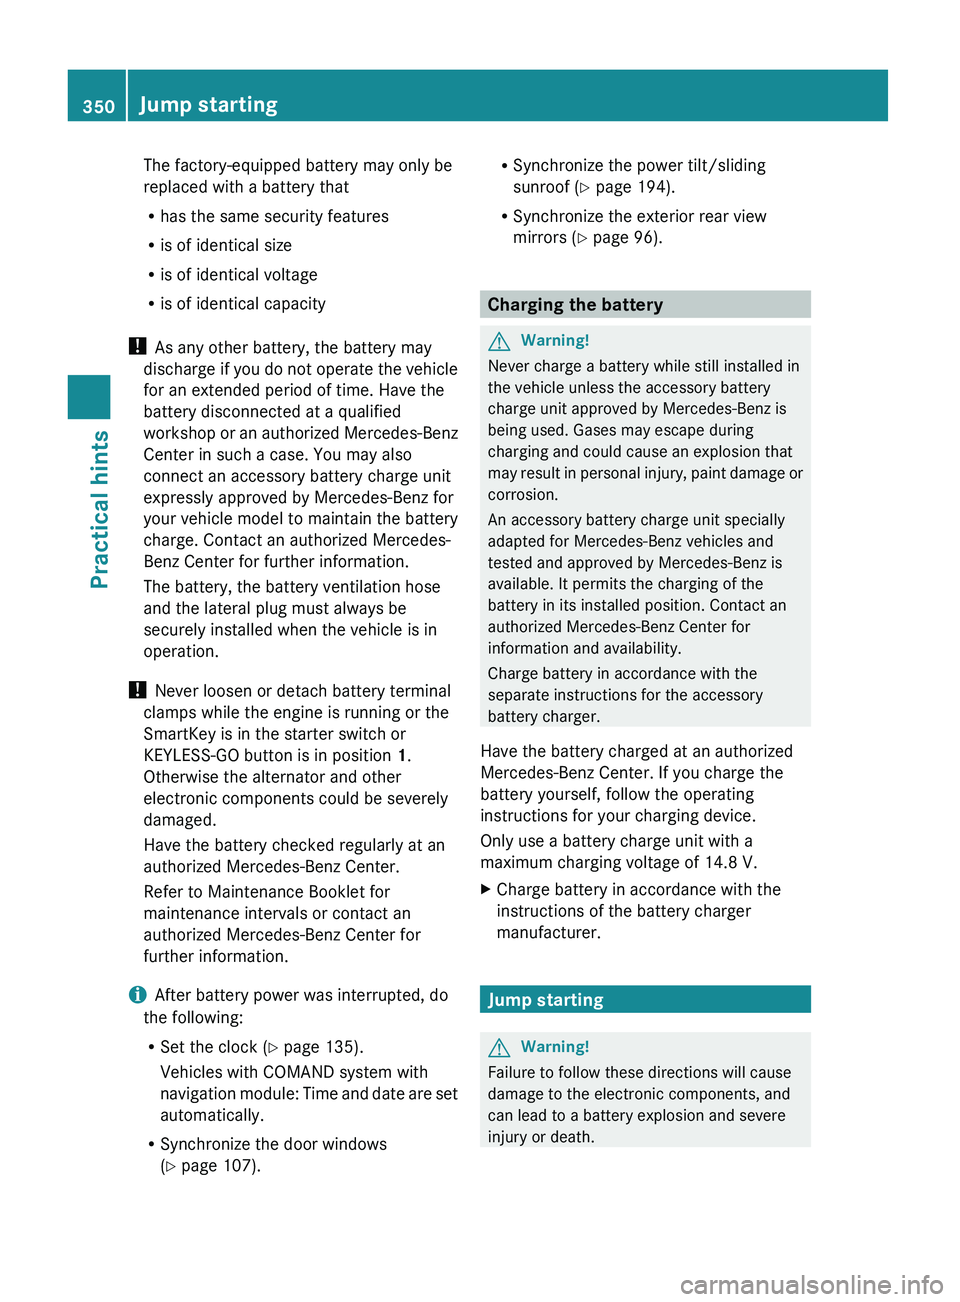
XPlace AdBlue® filler cap ; (Y page 347) on
filler neck and turn it clockwise.
XPlace AdBlue® filler cap cover : as
illustrated and turn it clockwise to its stop.
XLower cargo compartment floor.XClose the tailgate.XDrive the vehicle at a speed of at least
10 mph (16 km/h).
The message Check Additive See
Operator’s Manual disappears after
approximately 1 minute.
iIf the message Check Additive See
Operator’s Manual still appears in the
multifunction display, refill with one more
container of AdBlue®.
iHave the AdBlue® level checked and, if
necessary, filled completely afterward at
an authorized Mercedes-Benz Center.
Battery
Safety notes
A battery should always be sufficiently
charged in order to achieve its rated service
life. Refer to Maintenance Booklet for battery
maintenance intervals.
If you use your vehicle mostly for short-
distance trips, you will need to have the
battery charge checked more frequently.
When replacing a battery, always use a
battery approved by Mercedes-Benz.
If you do not intend to operate your vehicle
for an extended period of time, contact an
authorized Mercedes-Benz Center about
steps you need to observe.
GWarning!
Observe all safety instructions and
precautions when handling automotive
batteries.
348BatteryPractical hints
X164_AKB; 5; 31, en-USd2ureepe,Version: 2.11.8.12009-09-11T12:30:16+02:00 - Seite 348
Page 352 of 380
The factory-equipped battery may only be
replaced with a battery that
R has the same security features
R is of identical size
R is of identical voltage
R is of identical capacity
! As any other battery, the battery may
discharge if you do not operate the vehicle
for an extended period of time. Have the
battery disconnected at a qualified
workshop or an authorized Mercedes-Benz
Center in such a case. You may also
connect an accessory battery charge unit
expressly approved by Mercedes-Benz for
your vehicle model to maintain the battery
charge. Contact an authorized Mercedes-
Benz Center for further information.
The battery, the battery ventilation hose
and the lateral plug must always be
securely installed when the vehicle is in
operation.
! Never loosen or detach battery terminal
clamps while the engine is running or the
SmartKey is in the starter switch or
KEYLESS-GO button is in position 1.
Otherwise the alternator and other
electronic components could be severely
damaged.
Have the battery checked regularly at an
authorized Mercedes-Benz Center.
Refer to Maintenance Booklet for
maintenance intervals or contact an
authorized Mercedes-Benz Center for
further information.
i After battery power was interrupted, do
the following:
R Set the clock ( Y page 135).
Vehicles with COMAND system with
navigation module: Time and date are set
automatically.
R Synchronize the door windows
( Y page 107).R
Synchronize the power tilt/sliding
sunroof ( Y page 194).
R Synchronize the exterior rear view
mirrors ( Y page 96).
Charging the battery
GWarning!
Never charge a battery while still installed in
the vehicle unless the accessory battery
charge unit approved by Mercedes-Benz is
being used. Gases may escape during
charging and could cause an explosion that
may result in personal injury, paint damage or
corrosion.
An accessory battery charge unit specially
adapted for Mercedes-Benz vehicles and
tested and approved by Mercedes-Benz is
available. It permits the charging of the
battery in its installed position. Contact an
authorized Mercedes-Benz Center for
information and availability.
Charge battery in accordance with the
separate instructions for the accessory
battery charger.
Have the battery charged at an authorized
Mercedes-Benz Center. If you charge the
battery yourself, follow the operating
instructions for your charging device.
Only use a battery charge unit with a
maximum charging voltage of 14.8 V.
XCharge battery in accordance with the
instructions of the battery charger
manufacturer.
Jump starting
GWarning!
Failure to follow these directions will cause
damage to the electronic components, and
can lead to a battery explosion and severe
injury or death.
350Jump startingPractical hints
X164_AKB; 5; 31, en-USd2ureepe,Version: 2.11.8.12009-09-11T12:30:16+02:00 - Seite 350
Page 356 of 380
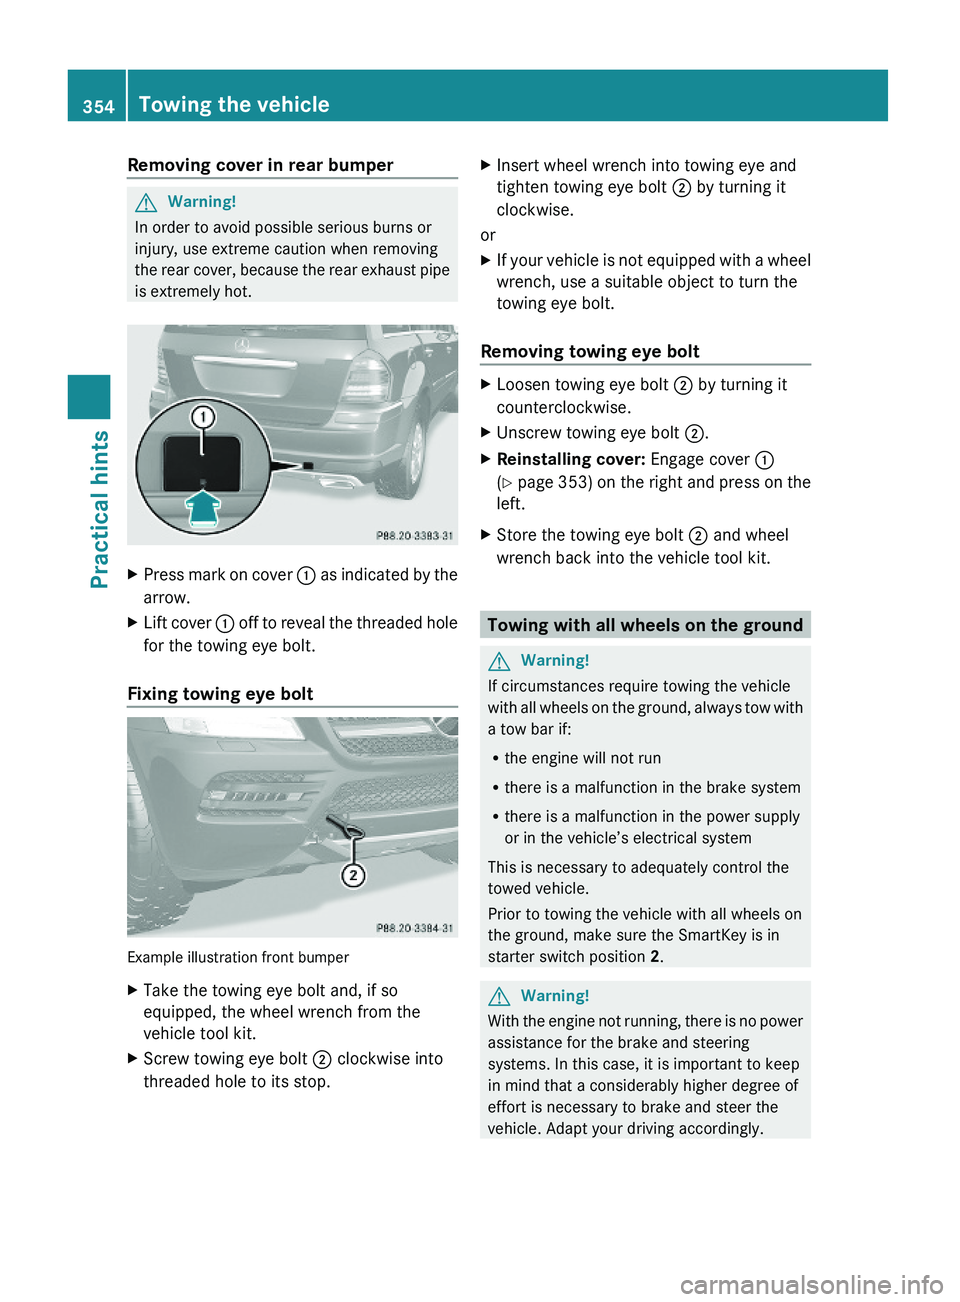
Removing cover in rear bumperGWarning!
In order to avoid possible serious burns or
injury, use extreme caution when removing
the rear cover, because the rear exhaust pipe
is extremely hot.
XPress mark on cover : as indicated by the
arrow.
XLift cover : off to reveal the threaded hole
for the towing eye bolt.
Fixing towing eye bolt
Example illustration front bumper
XTake the towing eye bolt and, if so
equipped, the wheel wrench from the
vehicle tool kit.
XScrew towing eye bolt ; clockwise into
threaded hole to its stop.
XInsert wheel wrench into towing eye and
tighten towing eye bolt ; by turning it
clockwise.
or
XIf your vehicle is not equipped with a wheel
wrench, use a suitable object to turn the
towing eye bolt.
Removing towing eye bolt
XLoosen towing eye bolt ; by turning it
counterclockwise.
XUnscrew towing eye bolt ;.XReinstalling cover: Engage cover :
(Y page 353) on the right and press on the
left.
XStore the towing eye bolt ; and wheel
wrench back into the vehicle tool kit.
Towing with all wheels on the ground
GWarning!
If circumstances require towing the vehicle
with all wheels on the ground, always tow with
a tow bar if:
Rthe engine will not run
Rthere is a malfunction in the brake system
Rthere is a malfunction in the power supply
or in the vehicle’s electrical system
This is necessary to adequately control the
towed vehicle.
Prior to towing the vehicle with all wheels on
the ground, make sure the SmartKey is in
starter switch position 2.
GWarning!
With the engine not running, there is no power
assistance for the brake and steering
systems. In this case, it is important to keep
in mind that a considerably higher degree of
effort is necessary to brake and steer the
vehicle. Adapt your driving accordingly.
354Towing the vehiclePractical hints
X164_AKB; 5; 31, en-USd2ureepe,Version: 2.11.8.12009-09-11T12:30:16+02:00 - Seite 354