2010 MERCEDES-BENZ GL clock
[x] Cancel search: clockPage 202 of 380
XUnlock cover cap ; with key :.XRemove cover cap ;.XTurn screws for clamping claws A
counterclockwise until the crossbars can
be lifted from the roof rails.
Shortening the cover strip
The cover strips reduce the wind noise
caused by the crossbars. In order to install
add-on roof equipment, it may be necessary
to shorten the cover strips.
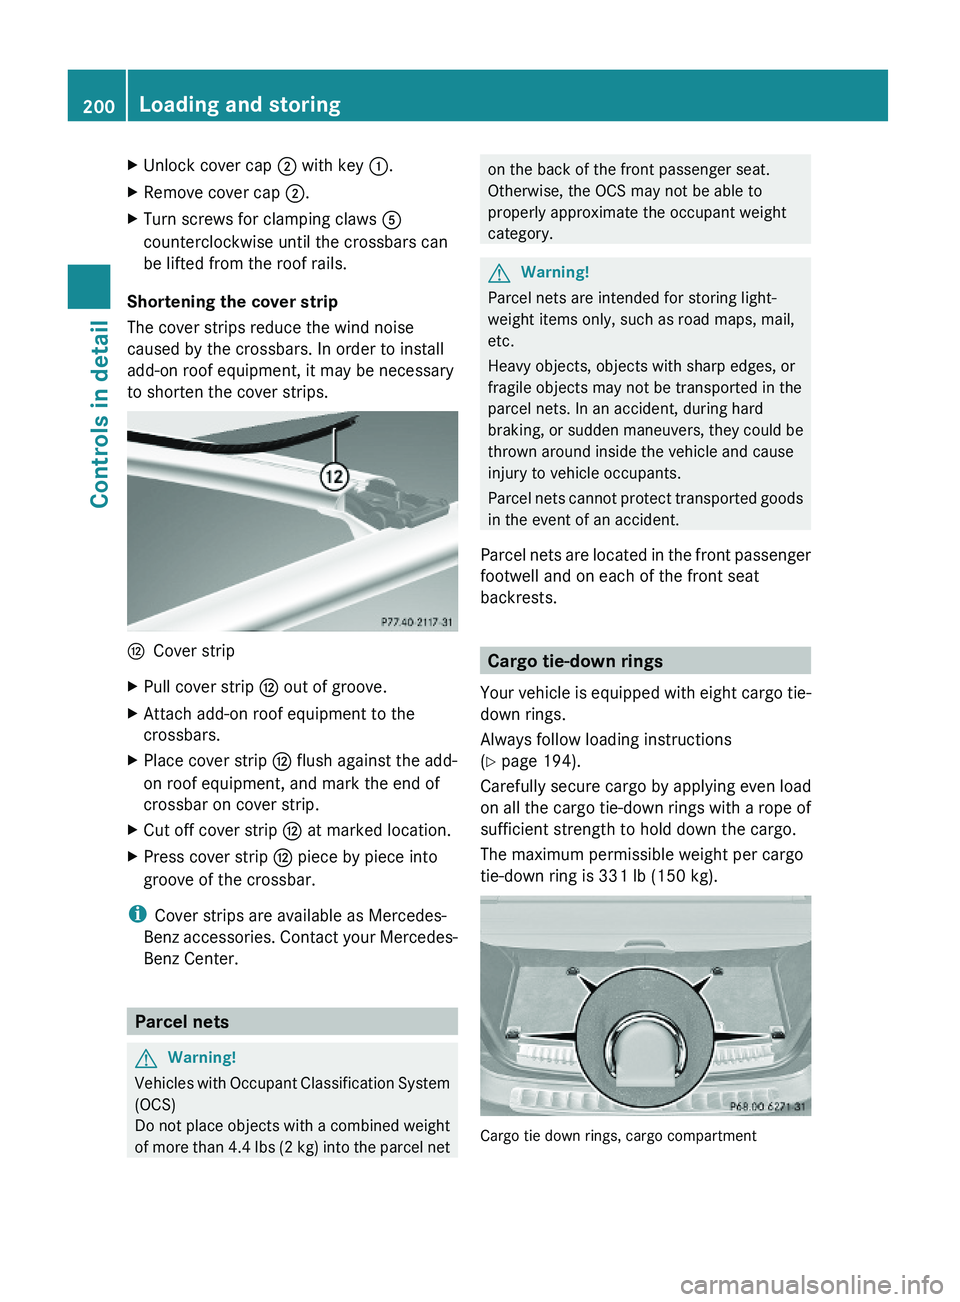
HCover stripXPull cover strip H out of groove.XAttach add-on roof equipment to the
crossbars.
XPlace cover strip H flush against the add-
on roof equipment, and mark the end of
crossbar on cover strip.
XCut off cover strip H at marked location.XPress cover strip H piece by piece into
groove of the crossbar.
iCover strips are available as Mercedes-
Benz accessories. Contact your Mercedes-
Benz Center.
Parcel nets
GWarning!
Vehicles with Occupant Classification System
(OCS)
Do not place objects with a combined weight
of more than 4.4 lbs (2 kg) into the parcel net
on the back of the front passenger seat.
Otherwise, the OCS may not be able to
properly approximate the occupant weight
category.
GWarning!
Parcel nets are intended for storing light-
weight items only, such as road maps, mail,
etc.
Heavy objects, objects with sharp edges, or
fragile objects may not be transported in the
parcel nets. In an accident, during hard
braking, or sudden maneuvers, they could be
thrown around inside the vehicle and cause
injury to vehicle occupants.
Parcel nets cannot protect transported goods
in the event of an accident.
Parcel nets are located in the front passenger
footwell and on each of the front seat
backrests.
Cargo tie-down rings
Your vehicle is equipped with eight cargo tie-
down rings.
Always follow loading instructions
(Y page 194).
Carefully secure cargo by applying even load
on all the cargo tie-down rings with a rope of
sufficient strength to hold down the cargo.
The maximum permissible weight per cargo
tie-down ring is 331 lb (150 kg).
Cargo tie down rings, cargo compartment
200Loading and storingControls in detail
X164_AKB; 5; 31, en-USd2ureepe,Version: 2.11.8.12009-09-11T12:30:16+02:00 - Seite 200
Page 230 of 380
iLeaving the engine running and the fuel
filler cap open can cause the yellow fuel
tank reserve warning lamp to flash and the
malfunction indicator lamp ! (USA
only) or ; (Canada only) to illuminate.
For more information, see also “Practical
hints” ( Y page 320).XRemove the SmartKey from the starter
switch.
KEYLESS-GO: Open the driver’s door. This
puts the starter switch in position 0, same
as with the SmartKey removed from the
starter switch. The driver’s door then can
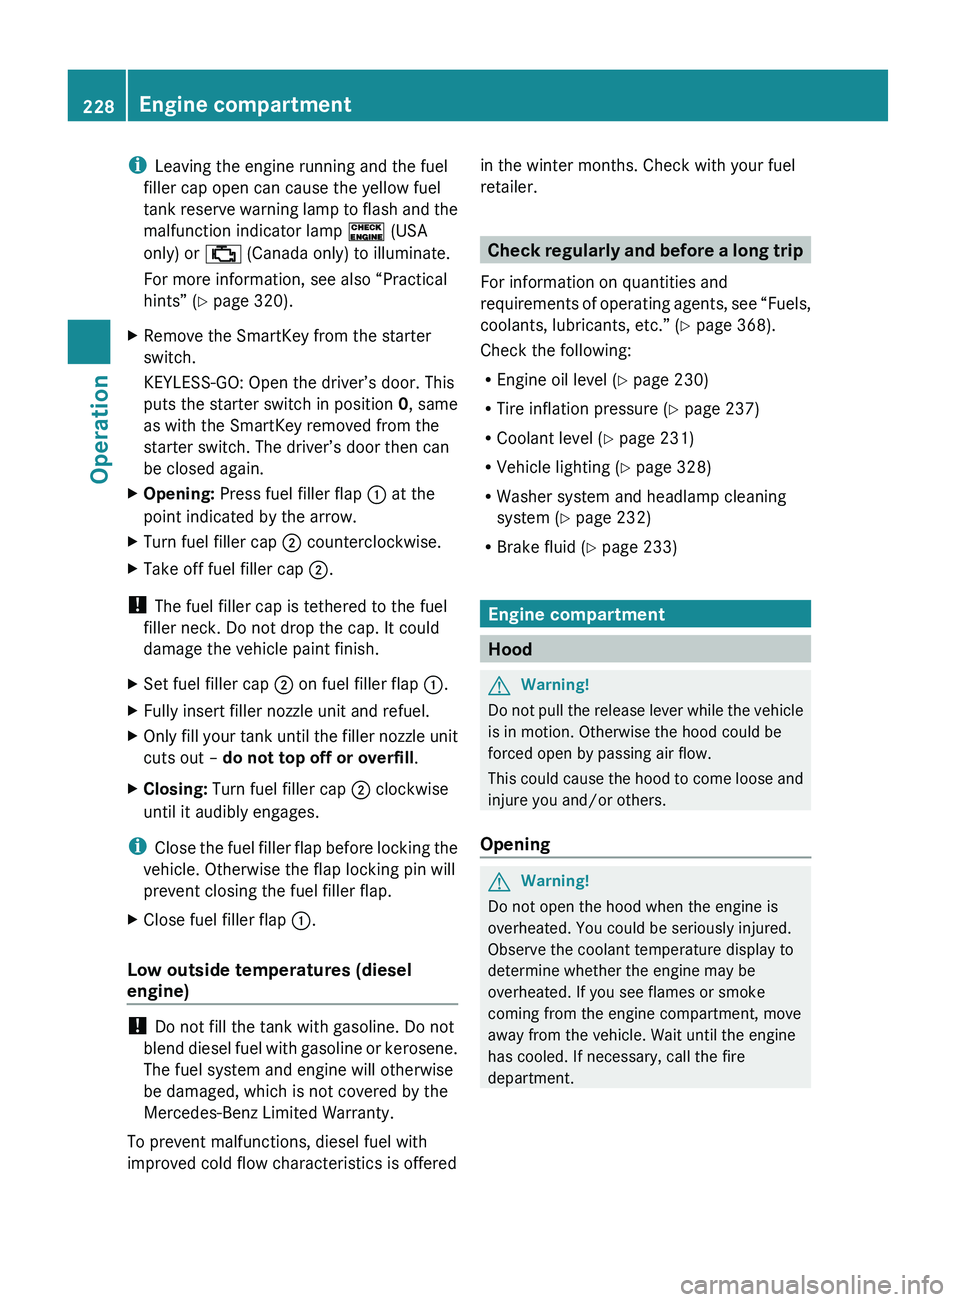
be closed again.XOpening: Press fuel filler flap : at the
point indicated by the arrow.XTurn fuel filler cap ; counterclockwise.XTake off fuel filler cap ;.
!
The fuel filler cap is tethered to the fuel
filler neck. Do not drop the cap. It could
damage the vehicle paint finish.
XSet fuel filler cap ; on fuel filler flap :.XFully insert filler nozzle unit and refuel.XOnly fill your tank until the filler nozzle unit
cuts out – do not top off or overfill .XClosing: Turn fuel filler cap ; clockwise
until it audibly engages.
i Close the fuel filler flap before locking the
vehicle. Otherwise the flap locking pin will
prevent closing the fuel filler flap.
XClose fuel filler flap :.
Low outside temperatures (diesel
engine)
! Do not fill the tank with gasoline. Do not
blend diesel fuel with gasoline or kerosene.
The fuel system and engine will otherwise
be damaged, which is not covered by the
Mercedes-Benz Limited Warranty.
To prevent malfunctions, diesel fuel with
improved cold flow characteristics is offered
in the winter months. Check with your fuel
retailer.
Check regularly and before a long trip
For information on quantities and
requirements of operating agents, see “Fuels,
coolants, lubricants, etc.” ( Y page 368).
Check the following:
R Engine oil level ( Y page 230)
R Tire inflation pressure ( Y page 237)
R Coolant level ( Y page 231)
R Vehicle lighting ( Y page 328)
R Washer system and headlamp cleaning
system ( Y page 232)
R Brake fluid ( Y page 233)
Engine compartment
Hood
GWarning!
Do not pull the release lever while the vehicle
is in motion. Otherwise the hood could be
forced open by passing air flow.
This could cause the hood to come loose and
injure you and/or others.
Opening
GWarning!
Do not open the hood when the engine is
overheated. You could be seriously injured.
Observe the coolant temperature display to
determine whether the engine may be
overheated. If you see flames or smoke
coming from the engine compartment, move
away from the vehicle. Wait until the engine
has cooled. If necessary, call the fire
department.
228Engine compartmentOperation
X164_AKB; 5; 31, en-USd2ureepe,Version: 2.11.8.12009-09-11T12:30:16+02:00 - Seite 228
Page 234 of 380
RUsing a rag, slowly open the cap
approximately 1/2 turn to relieve excess
pressure. If opened immediately, scalding
hot fluid and steam will be blown out under
pressure.
RDo not spill antifreeze on hot engine parts.
Antifreeze contains ethylene glycol which
may burn if it comes into contact with hot
engine parts.
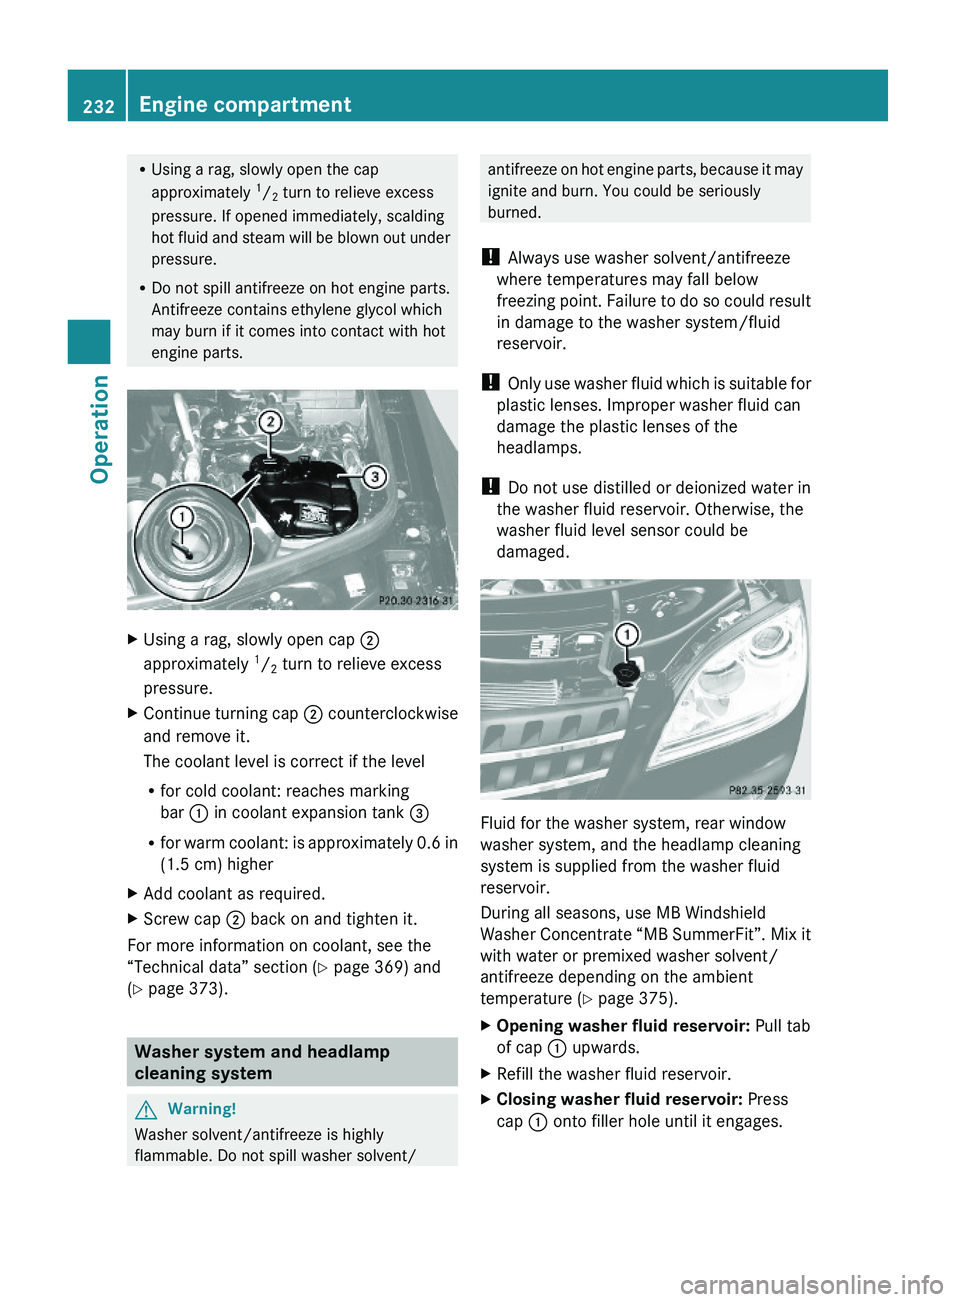
XUsing a rag, slowly open cap ;
approximately 1/2 turn to relieve excess
pressure.
XContinue turning cap ; counterclockwise
and remove it.
The coolant level is correct if the level
Rfor cold coolant: reaches marking
bar : in coolant expansion tank =
Rfor warm coolant: is approximately 0.6 in
(1.5 cm) higher
XAdd coolant as required.XScrew cap ; back on and tighten it.
For more information on coolant, see the
“Technical data” section (Y page 369) and
(Y page 373).
Washer system and headlamp
cleaning system
GWarning!
Washer solvent/antifreeze is highly
flammable. Do not spill washer solvent/
antifreeze on hot engine parts, because it may
ignite and burn. You could be seriously
burned.
! Always use washer solvent/antifreeze
where temperatures may fall below
freezing point. Failure to do so could result
in damage to the washer system/fluid
reservoir.
! Only use washer fluid which is suitable for
plastic lenses. Improper washer fluid can
damage the plastic lenses of the
headlamps.
! Do not use distilled or deionized water in
the washer fluid reservoir. Otherwise, the
washer fluid level sensor could be
damaged.
Fluid for the washer system, rear window
washer system, and the headlamp cleaning
system is supplied from the washer fluid
reservoir.
During all seasons, use MB Windshield
Washer Concentrate “MB SummerFit”. Mix it
with water or premixed washer solvent/
antifreeze depending on the ambient
temperature (Y page 375).
XOpening washer fluid reservoir: Pull tab
of cap : upwards.
XRefill the washer fluid reservoir.XClosing washer fluid reservoir: Press
cap : onto filler hole until it engages.
232Engine compartmentOperation
X164_AKB; 5; 31, en-USd2ureepe,Version: 2.11.8.12009-09-11T12:30:16+02:00 - Seite 232
Page 289 of 380
XRemoving: Open the tailgate (Y page 75).XLift the cargo compartment floor and
secure it on the upper cargo compartment
lip (Y page 284).
! To prevent damage, always disengage the
securing hook from upper cargo
compartment lip and lower the cargo
compartment floor before closing the
tailgate.
XRemove the jack from the vehicle tool kit
(Y page 285).
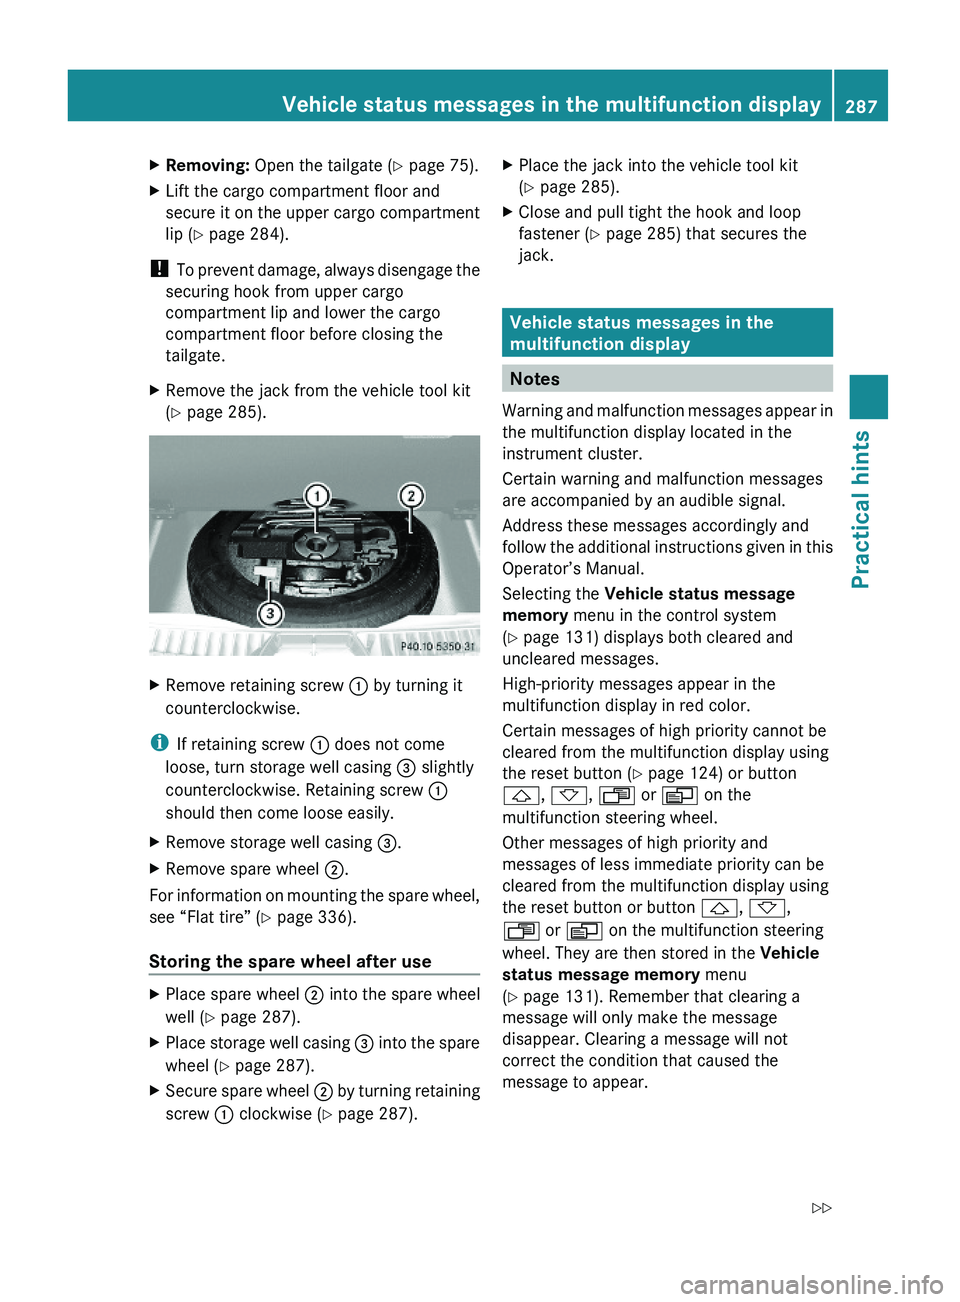
XRemove retaining screw : by turning it
counterclockwise.
iIf retaining screw : does not come
loose, turn storage well casing = slightly
counterclockwise. Retaining screw :
should then come loose easily.
XRemove storage well casing =.XRemove spare wheel ;.
For information on mounting the spare wheel,
see “Flat tire” (Y page 336).
Storing the spare wheel after use
XPlace spare wheel ; into the spare wheel
well (Y page 287).
XPlace storage well casing = into the spare
wheel (Y page 287).
XSecure spare wheel ; by turning retaining
screw : clockwise (Y page 287).
XPlace the jack into the vehicle tool kit
(Y page 285).
XClose and pull tight the hook and loop
fastener (Y page 285) that secures the
jack.
Vehicle status messages in the
multifunction display
Notes
Warning and malfunction messages appear in
the multifunction display located in the
instrument cluster.
Certain warning and malfunction messages
are accompanied by an audible signal.
Address these messages accordingly and
follow the additional instructions given in this
Operator’s Manual.
Selecting the Vehicle status message
memory menu in the control system
(Y page 131) displays both cleared and
uncleared messages.
High-priority messages appear in the
multifunction display in red color.
Certain messages of high priority cannot be
cleared from the multifunction display using
the reset button (Y page 124) or button
&, *, U or V on the
multifunction steering wheel.
Other messages of high priority and
messages of less immediate priority can be
cleared from the multifunction display using
the reset button or button &, *,
U or V on the multifunction steering
wheel. They are then stored in the Vehicle
status message memory menu
(Y page 131). Remember that clearing a
message will only make the message
disappear. Clearing a message will not
correct the condition that caused the
message to appear.
Vehicle status messages in the multifunction display287Practical hintsX164_AKB; 5; 31, en-USd2ureepe,Version: 2.11.8.12009-09-11T12:30:16+02:00 - Seite 287Z
Page 326 of 380
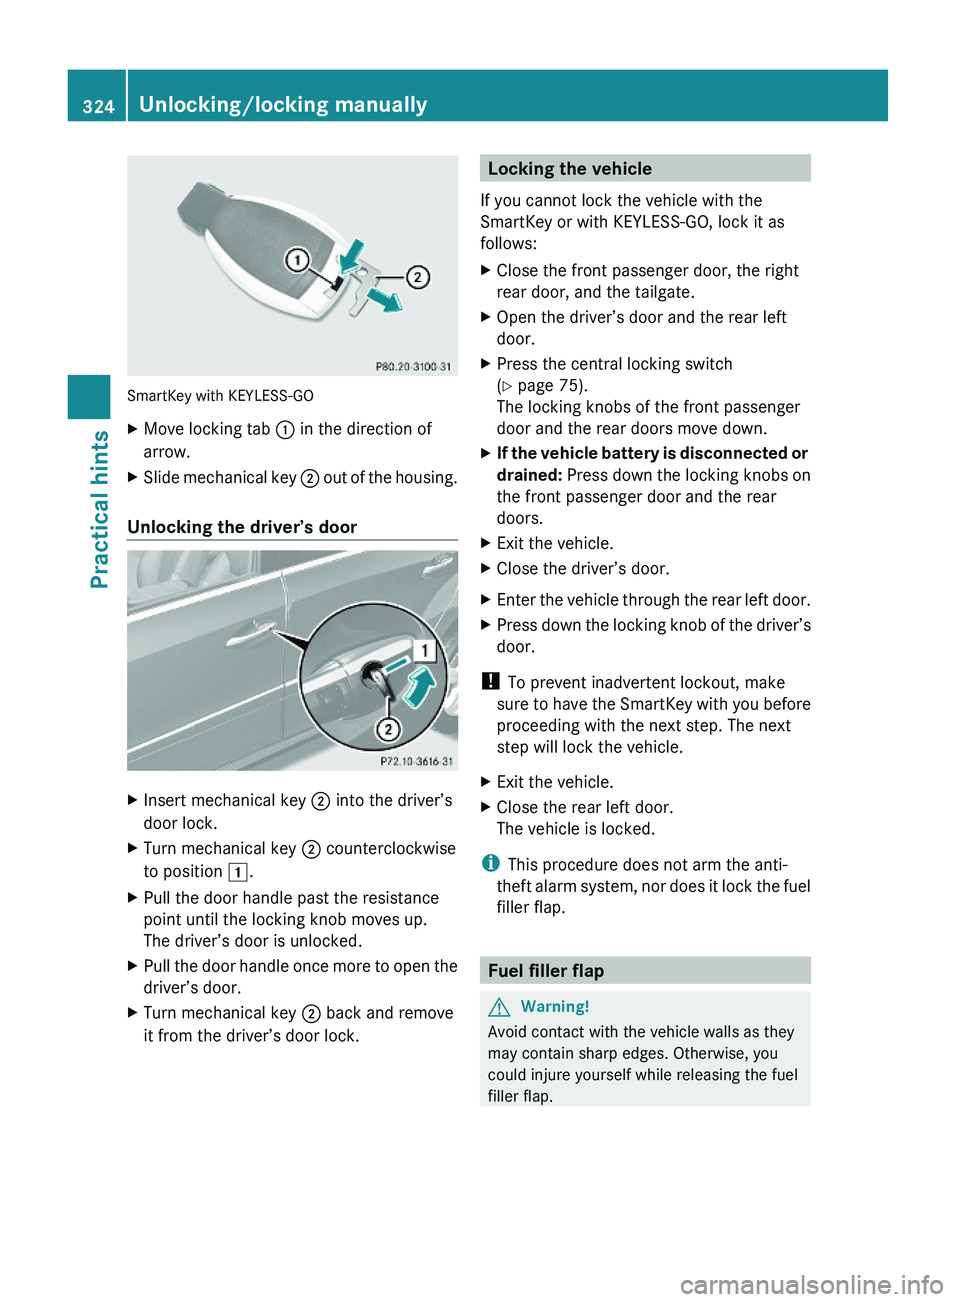
SmartKey with KEYLESS-GO
XMove locking tab : in the direction of
arrow.
XSlide mechanical key ; out of the housing.
Unlocking the driver’s door
XInsert mechanical key ; into the driver’s
door lock.
XTurn mechanical key ; counterclockwise
to position 1.
XPull the door handle past the resistance
point until the locking knob moves up.
The driver’s door is unlocked.
XPull the door handle once more to open the
driver’s door.
XTurn mechanical key ; back and remove
it from the driver’s door lock.Locking the vehicle
If you cannot lock the vehicle with the
SmartKey or with KEYLESS-GO, lock it as
follows:
XClose the front passenger door, the right
rear door, and the tailgate.
XOpen the driver’s door and the rear left
door.
XPress the central locking switch
(Y page 75).
The locking knobs of the front passenger
door and the rear doors move down.
XIf the vehicle battery is disconnected or
drained: Press down the locking knobs on
the front passenger door and the rear
doors.
XExit the vehicle.XClose the driver’s door.XEnter the vehicle through the rear left door.XPress down the locking knob of the driver’s
door.
! To prevent inadvertent lockout, make
sure to have the SmartKey with you before
proceeding with the next step. The next
step will lock the vehicle.
XExit the vehicle.XClose the rear left door.
The vehicle is locked.
iThis procedure does not arm the anti-
theft alarm system, nor does it lock the fuel
filler flap.
Fuel filler flap
GWarning!
Avoid contact with the vehicle walls as they
may contain sharp edges. Otherwise, you
could injure yourself while releasing the fuel
filler flap.
324Unlocking/locking manuallyPractical hints
X164_AKB; 5; 31, en-USd2ureepe,Version: 2.11.8.12009-09-11T12:30:16+02:00 - Seite 324
Page 333 of 380
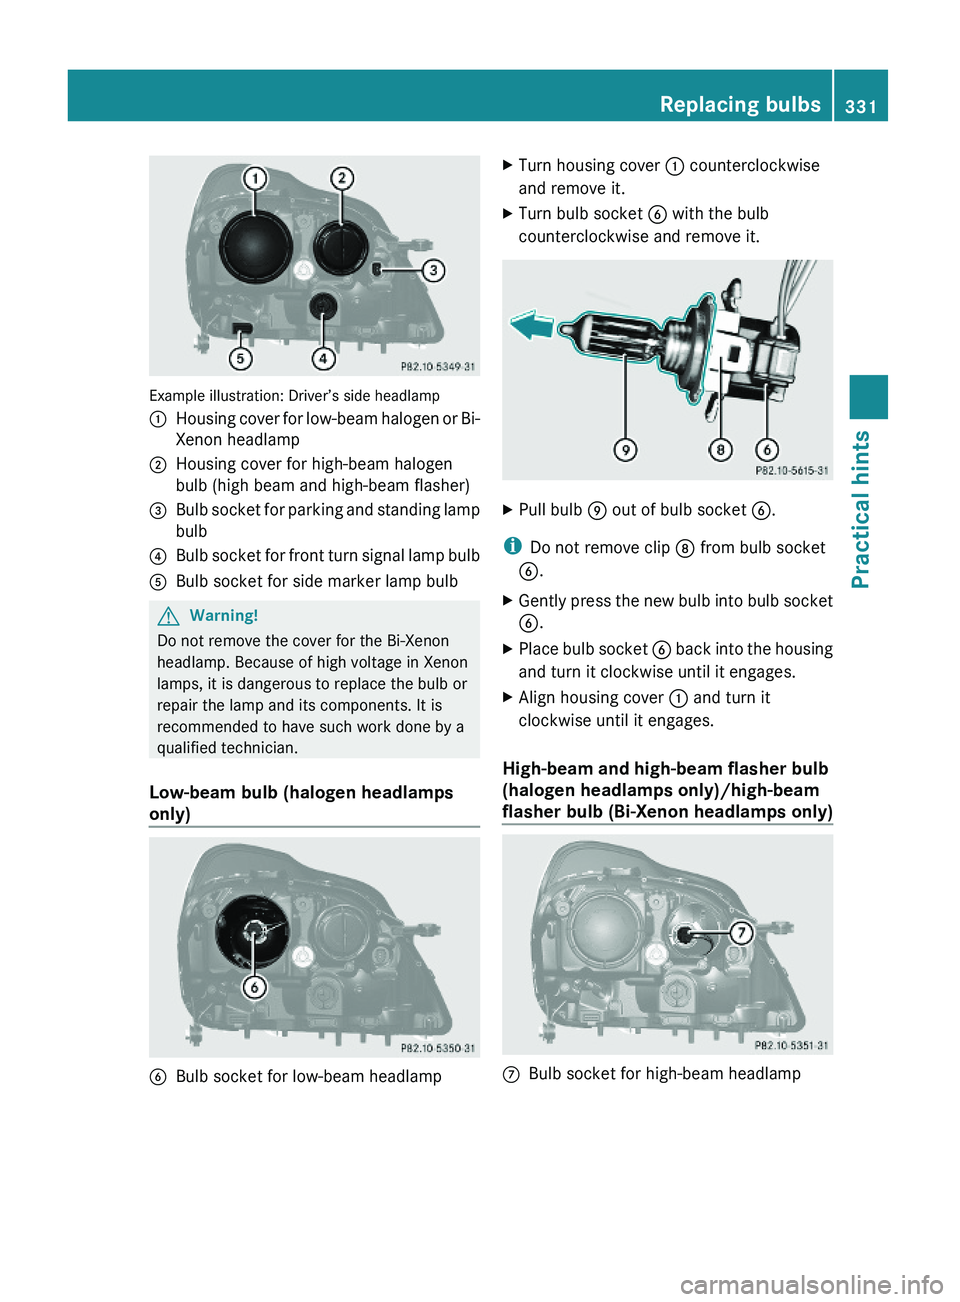
Example illustration: Driver’s side headlamp
:Housing cover for low-beam halogen or Bi-
Xenon headlamp
;Housing cover for high-beam halogen
bulb (high beam and high-beam flasher)
=Bulb socket for parking and standing lamp
bulb
?Bulb socket for front turn signal lamp bulbABulb socket for side marker lamp bulbGWarning!
Do not remove the cover for the Bi-Xenon
headlamp. Because of high voltage in Xenon
lamps, it is dangerous to replace the bulb or
repair the lamp and its components. It is
recommended to have such work done by a
qualified technician.
Low-beam bulb (halogen headlamps
only)
BBulb socket for low-beam headlampXTurn housing cover : counterclockwise
and remove it.
XTurn bulb socket B with the bulb
counterclockwise and remove it.
XPull bulb E out of bulb socket B.
iDo not remove clip D from bulb socket
B.
XGently press the new bulb into bulb socket
B.
XPlace bulb socket B back into the housing
and turn it clockwise until it engages.
XAlign housing cover : and turn it
clockwise until it engages.
High-beam and high-beam flasher bulb
(halogen headlamps only)/high-beam
flasher bulb (Bi-Xenon headlamps only)
CBulb socket for high-beam headlampReplacing bulbs331Practical hintsX164_AKB; 5; 31, en-USd2ureepe,Version: 2.11.8.12009-09-11T12:30:16+02:00 - Seite 331Z
Page 334 of 380
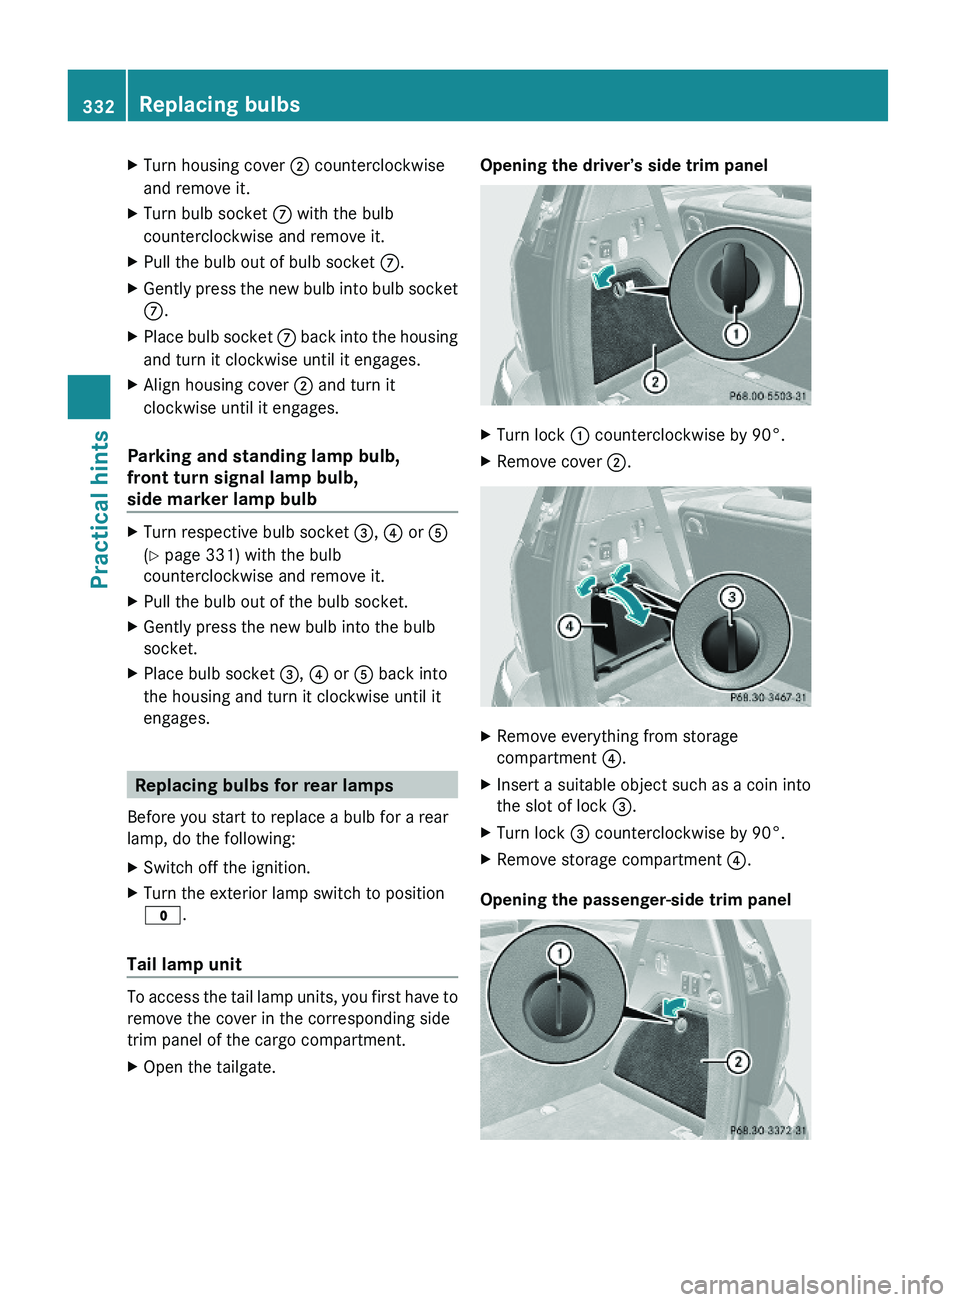
XTurn housing cover ; counterclockwise
and remove it.
XTurn bulb socket C with the bulb
counterclockwise and remove it.
XPull the bulb out of bulb socket C.XGently press the new bulb into bulb socket
C.
XPlace bulb socket C back into the housing
and turn it clockwise until it engages.
XAlign housing cover ; and turn it
clockwise until it engages.
Parking and standing lamp bulb,
front turn signal lamp bulb,
side marker lamp bulb
XTurn respective bulb socket =, ? or A
(Y page 331) with the bulb
counterclockwise and remove it.
XPull the bulb out of the bulb socket.XGently press the new bulb into the bulb
socket.
XPlace bulb socket =, ? or A back into
the housing and turn it clockwise until it
engages.
Replacing bulbs for rear lamps
Before you start to replace a bulb for a rear
lamp, do the following:
XSwitch off the ignition.XTurn the exterior lamp switch to position
$.
Tail lamp unit
To access the tail lamp units, you first have to
remove the cover in the corresponding side
trim panel of the cargo compartment.
XOpen the tailgate.Opening the driver’s side trim panelXTurn lock : counterclockwise by 90°.XRemove cover ;.XRemove everything from storage
compartment ?.
XInsert a suitable object such as a coin into
the slot of lock =.
XTurn lock = counterclockwise by 90°.XRemove storage compartment ?.
Opening the passenger-side trim panel
332Replacing bulbsPractical hints
X164_AKB; 5; 31, en-USd2ureepe,Version: 2.11.8.12009-09-11T12:30:16+02:00 - Seite 332
Page 335 of 380
XInsert a suitable object such as a coin into
the slot of lock :.
XTurn lock : by 90° in direction of the
arrow.
XRemove cover ;.
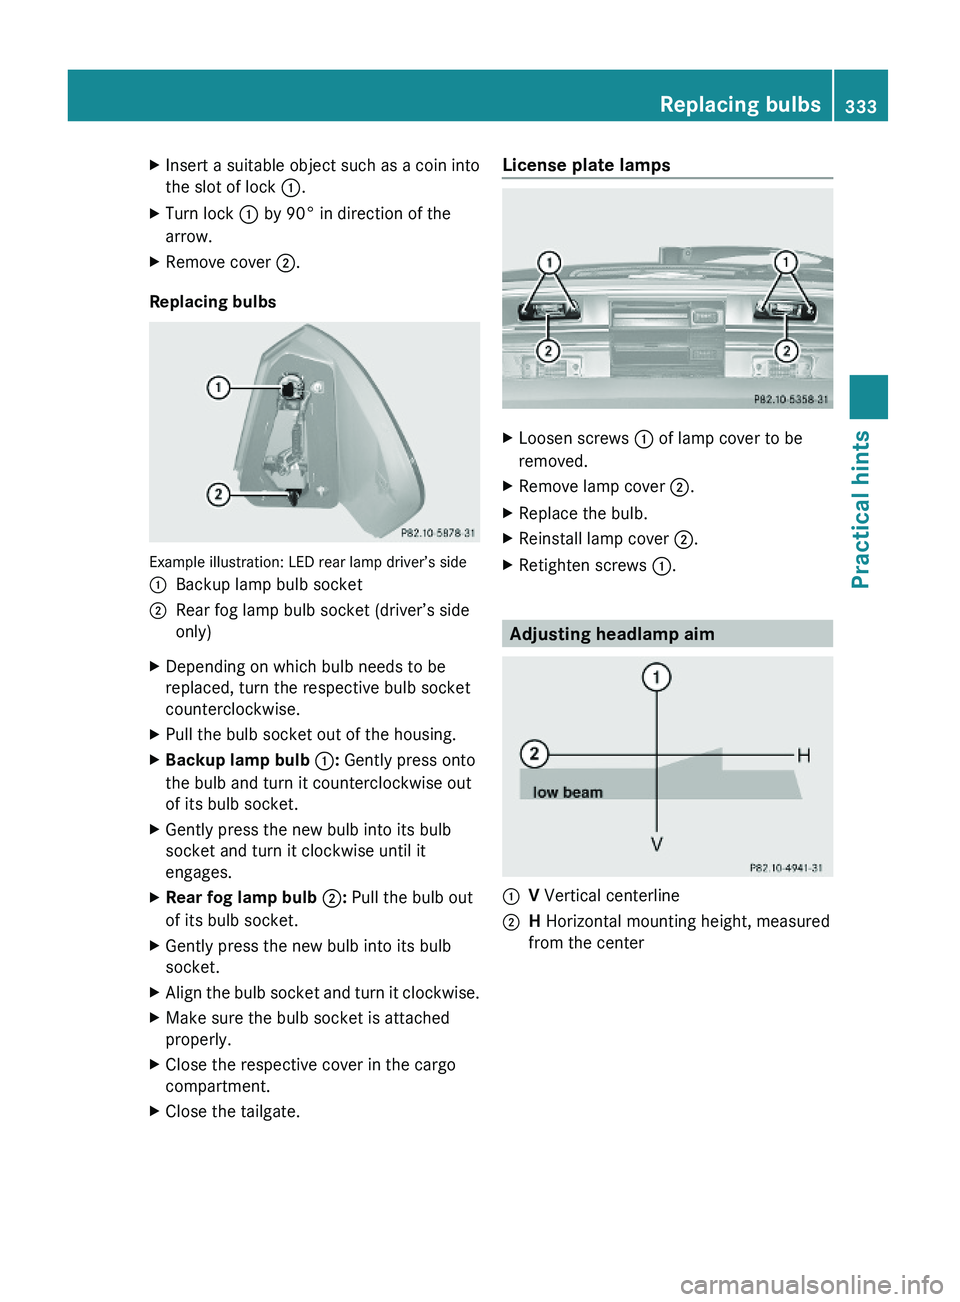
Replacing bulbs
Example illustration: LED rear lamp driver’s side
:Backup lamp bulb socket;Rear fog lamp bulb socket (driver’s side
only)
XDepending on which bulb needs to be
replaced, turn the respective bulb socket
counterclockwise.
XPull the bulb socket out of the housing.XBackup lamp bulb :: Gently press onto
the bulb and turn it counterclockwise out
of its bulb socket.
XGently press the new bulb into its bulb
socket and turn it clockwise until it
engages.
XRear fog lamp bulb ;: Pull the bulb out
of its bulb socket.
XGently press the new bulb into its bulb
socket.
XAlign the bulb socket and turn it clockwise.XMake sure the bulb socket is attached
properly.
XClose the respective cover in the cargo
compartment.
XClose the tailgate.License plate lampsXLoosen screws : of lamp cover to be
removed.
XRemove lamp cover ;.XReplace the bulb.XReinstall lamp cover ;.XRetighten screws :.
Adjusting headlamp aim
:V Vertical centerline;H Horizontal mounting height, measured
from the center
Replacing bulbs333Practical hintsX164_AKB; 5; 31, en-USd2ureepe,Version: 2.11.8.12009-09-11T12:30:16+02:00 - Seite 333Z