2010 MERCEDES-BENZ GL brake light
[x] Cancel search: brake lightPage 273 of 380
practice turning, stopping and backing up
in an area which is free of traffic.
R Before you start driving check the
- trailer hitch
- break-away switch
- safety chains
- electrical connections
- lighting
- tires
R Adjust the mirrors ( Y page 94) to permit
unobstructed view beyond rear of trailer.
R If the trailer has electric brakes, start your
vehicle and trailer moving slowly, and then
apply only the trailer brake controller by
hand to make sure the brakes are working
properly.
R Always secure items in the trailer to
prevent load shifts while driving.
R When towing a trailer, check occasionally
to make sure the load is secure, and that
trailer lighting and brakes (if so equipped)
are functioning properly.
R Take into consideration that when towing a
trailer, the handling characteristics are
different and less stable from those when
operating the vehicle without a trailer.
It is important to avoid sudden maneuvers.
R The vehicle and trailer combination is
heavier, and therefore limited in
acceleration and climbing ability, and has a
larger braking distance.
It is more prone to reacting to cross wind
gusts, and requires more sensitive steering
input.
R If possible, do not brake abruptly, but
rather engage the brake slightly at first to
permit the trailer to activate its brake. Then
increase the braking force.
! If the trailer should begin to sway, reduce
the vehicle’s speed immediately.Do not attempt to straighten out the tow
vehicle and trailer by increasing the speed.
R If the transmission shifts between gears on
inclines repeatedly, shift to a lower gear
range manually ( Y page 118). Select 4, 3 ,
2 or 1.
A lower gear and reduction of speed
reduces the chance of engine overloading
and/or overheating.
R On very steep inclines, not manageable
with automatic transmission in gear range
1 , switch on off-road driving program
( Y page 158) or LOW RANGE mode
( Y page 120).
R When going down an incline, shift into a
lower gear and use the engine’s braking
effect.
Avoid riding the brakes, thus overheating
the vehicle and trailer brakes (if so
equipped).
R If the engine coolant rises to an extremely
high temperature when the air conditioning
is on, turn off the air conditioning system.
Engine coolant heat can be additionally
vented by opening the windows, switching
the climate control fan speed to high and
setting the temperature control to the
maximum.
R During a passing maneuver extreme care
must be exercised since your vehicle with
a trailer will require additional passing
distance ahead than when driving without
a trailer.
Because your vehicle and trailer is longer
than your vehicle alone, you will also need
to go much farther ahead of the passed
vehicle before you can return to your lane.
Decoupling a trailer GWarning!
While you are coupling or decoupling a trailer,
make sure nobody locks or unlocks the
Driving instructions271OperationX164_AKB; 5; 31, en-USd2ureepe,Version: 2.11.8.12009-09-11T12:30:16+02:00 - Seite 271Z
Page 281 of 380
XFold the wiper arms forward until they snap
into place.XClean the windshield and the wiper blade
inserts with a clean cloth and mild
detergent solution.XUse a soft, clean cloth and a mild window
cleaning solution on all outside and inside
glass surfaces.
An automotive glass cleaner is
recommended.
! Fold the windshield wiper arms back onto
the windshield before turning the SmartKey
in the starter switch or pressing the
KEYLESS-GO start/stop button.
Hold on to the wiper when folding the wiper
arm back. If released, the force of the
impact from the tensioning spring could
crack the windshield.
! To clean the window interior, do not use
a dry cloth, abrasives, solvents or cleaners
containing solvents. Do not touch the
inside of the windows with hard objects
such as an ice scraper or ring. Doing so may
damage the windows.
Light alloy wheels
If possible, clean wheels once a week.
XUse Mercedes-Benz approved Wheel Care,
a soft bristle brush and a strong spray of
water for cleaning the light alloy wheels.
! Only use acid-free cleaning materials.
Acid may cause corrosion or damage the
clear coat.
! The vehicle should not be parked for an
extended period of time immediately after
it has been cleaned. This applies especially
after the wheel rims have been cleaned
with wheel rim cleaner. Wheel rim cleaners
can lead to increased corrosion of the
brake disks and brake pads. Non-approved
wheel cleaners may also damage the wheel
paint if the vehicle is not driven after
cleaning.
Therefore, the vehicle’s brake system
should always be warmed-up before it is
parked after cleaning. Drive your vehicle for
several minutes to allow the brakes to dry.
When applying Mercedes-Benz approved
Tire Care and Mercedes-Benz approved
Wheel Care products, take care not to
spray them on the brake disks.
Plastic and rubber partsXUse a gentle dishwashing detergent or mild
detergent for delicate fabrics as a washing
solution.XWipe with a cloth moistened in a lukewarm
solution.
The surface may temporarily change color.
If this is the case, wait for it to dry.GWarning!
Do not use cleaners or cockpit care sprays
containing solvents to clean the cockpit or the
steering wheel. Cleaners containing solvents
will make the surface porous and vehicle
occupants could suffer serious injuries from
plastic parts coming loose in the event of air
bag deployment.
! Do not use oil, wax or scouring agents.
Otherwise you may scratch or damage the
surface.
Hard plastic trim items
XUse Mercedes-Benz approved Interior Care
on a soft, lint-free cloth and apply with light
pressure.
COMAND display
! You must switch off the COMAND display
and allow it to cool prior to cleaning.
! Do not use any liquids or cleaning agents.
These can damage or even destroy the
COMAND display screen.
XUse a standard microfiber cloth and apply
with light pressure.Vehicle care279OperationX164_AKB; 5; 31, en-USd2ureepe,Version: 2.11.8.12009-09-11T12:30:16+02:00 - Seite 279Z
Page 312 of 380
Center. After AdBlue®
was refilled, the
engine can be started again.
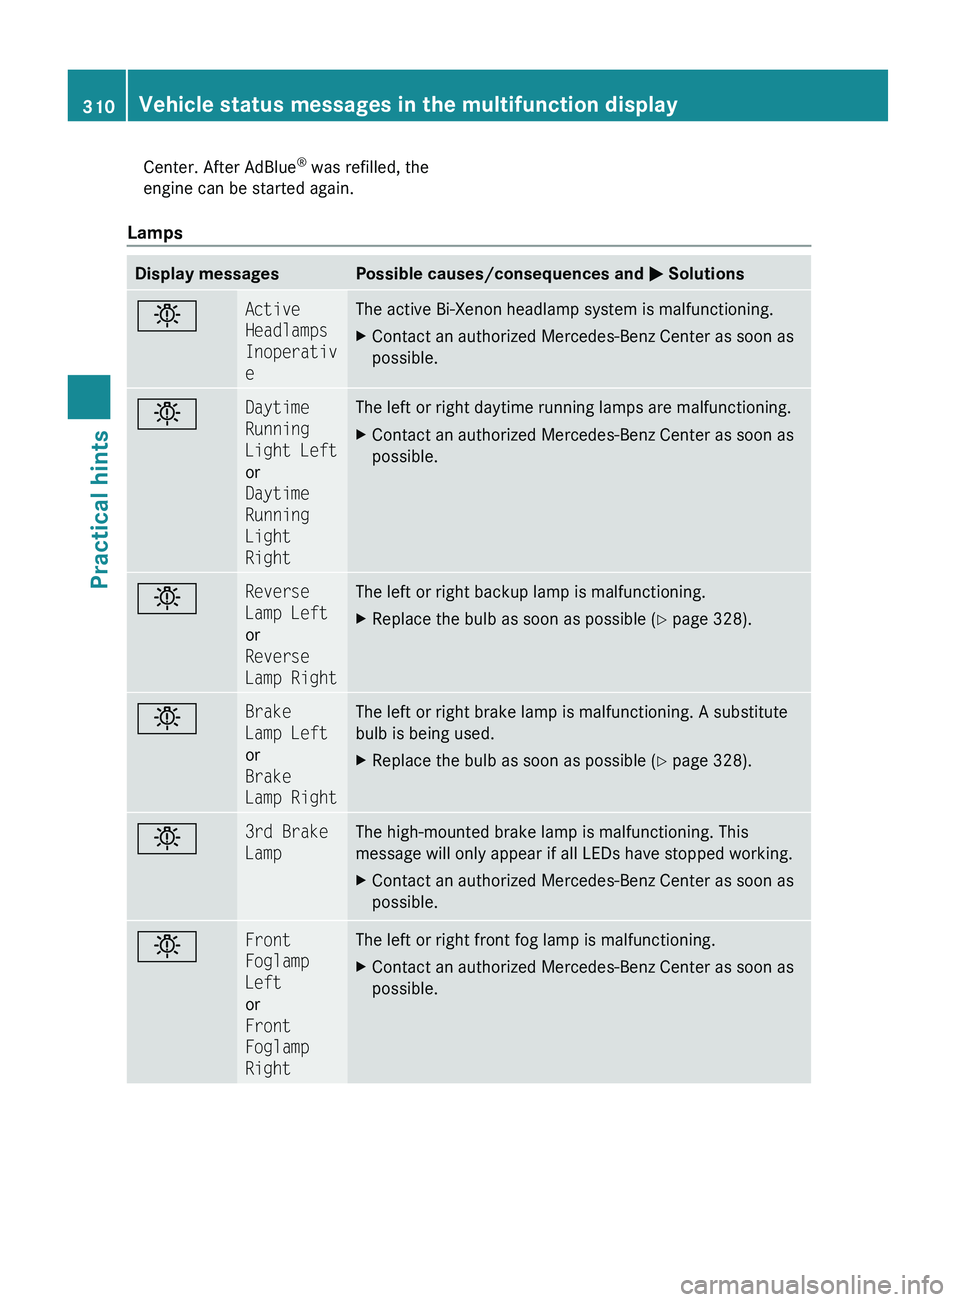
Lamps
Display messagesPossible causes/consequences and M SolutionsbActive
Headlamps
Inoperativ
eThe active Bi-Xenon headlamp system is malfunctioning.XContact an authorized Mercedes-Benz Center as soon as
possible.bDaytime
Running
Light Left
or
Daytime
Running
Light
RightThe left or right daytime running lamps are malfunctioning.XContact an authorized Mercedes-Benz Center as soon as
possible.bReverse
Lamp Left
or
Reverse
Lamp RightThe left or right backup lamp is malfunctioning.XReplace the bulb as soon as possible ( Y page 328).bBrake
Lamp Left
or
Brake
Lamp RightThe left or right brake lamp is malfunctioning. A substitute
bulb is being used.XReplace the bulb as soon as possible ( Y page 328).b3rd Brake
LampThe high-mounted brake lamp is malfunctioning. This
message will only appear if all LEDs have stopped working.XContact an authorized Mercedes-Benz Center as soon as
possible.bFront
Foglamp
Left
or
Front
Foglamp
RightThe left or right front fog lamp is malfunctioning.XContact an authorized Mercedes-Benz Center as soon as
possible.310Vehicle status messages in the multifunction displayPractical hints
X164_AKB; 5; 31, en-USd2ureepe,Version: 2.11.8.12009-09-11T12:30:16+02:00 - Seite 310
Page 314 of 380
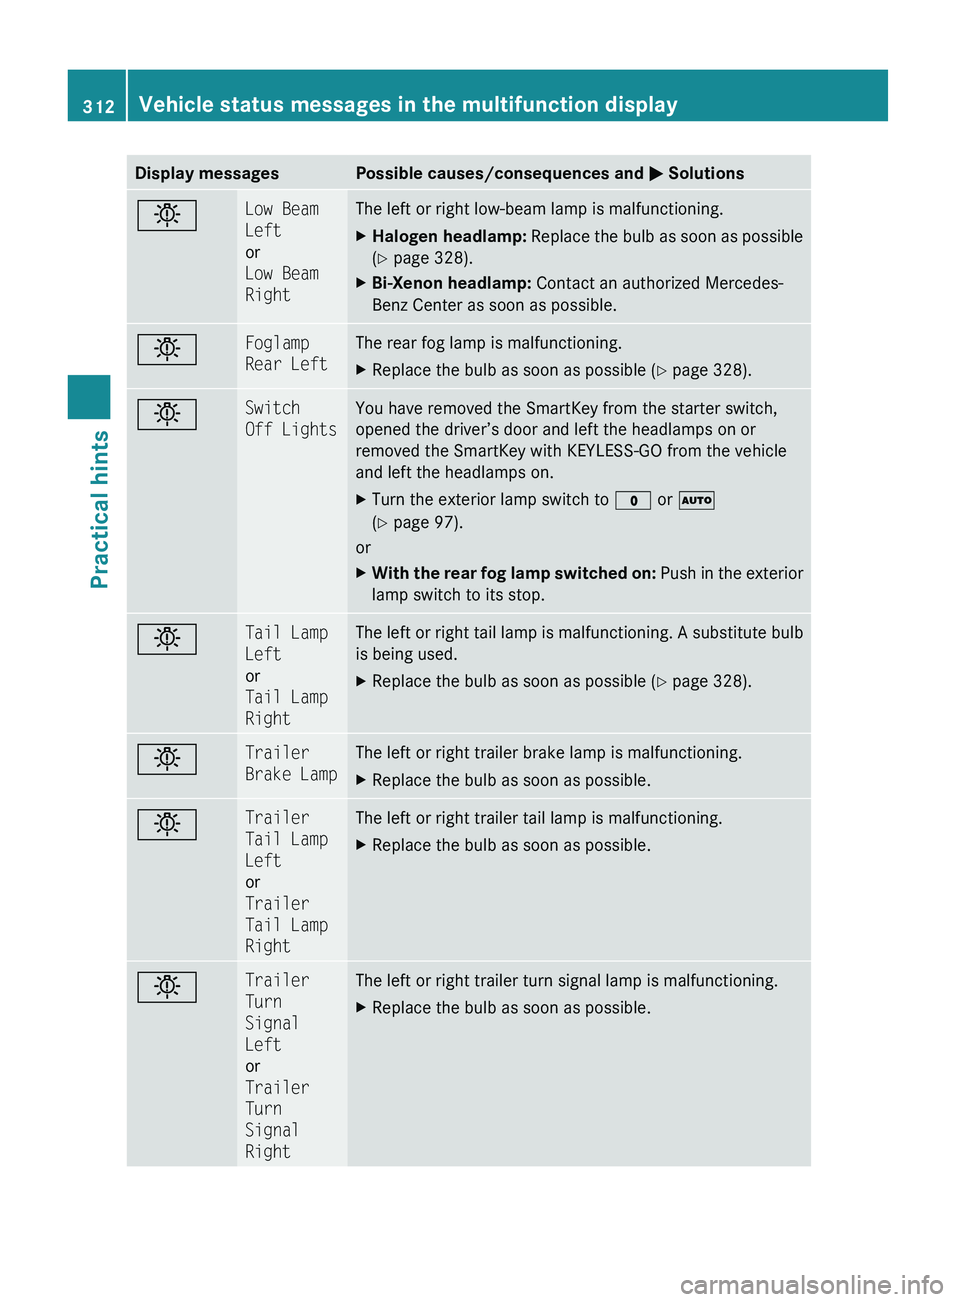
Display messagesPossible causes/consequences and M SolutionsbLow Beam
Left
or
Low Beam
RightThe left or right low-beam lamp is malfunctioning.XHalogen headlamp: Replace the bulb as soon as possible
( Y page 328).XBi-Xenon headlamp: Contact an authorized Mercedes-
Benz Center as soon as possible.bFoglamp
Rear LeftThe rear fog lamp is malfunctioning.XReplace the bulb as soon as possible ( Y page 328).bSwitch
Off LightsYou have removed the SmartKey from the starter switch,
opened the driver’s door and left the headlamps on or
removed the SmartKey with KEYLESS-GO from the vehicle
and left the headlamps on.XTurn the exterior lamp switch to $ or Ã
( Y page 97).
or
XWith the rear fog lamp switched on: Push in the exterior
lamp switch to its stop.bTail Lamp
Left
or
Tail Lamp
RightThe left or right tail lamp is malfunctioning. A substitute bulb
is being used.XReplace the bulb as soon as possible ( Y page 328).bTrailer
Brake LampThe left or right trailer brake lamp is malfunctioning.XReplace the bulb as soon as possible.bTrailer
Tail Lamp
Left
or
Trailer
Tail Lamp
RightThe left or right trailer tail lamp is malfunctioning.XReplace the bulb as soon as possible.bTrailer
Turn
Signal
Left
or
Trailer
Turn
Signal
RightThe left or right trailer turn signal lamp is malfunctioning.XReplace the bulb as soon as possible.312Vehicle status messages in the multifunction displayPractical hints
X164_AKB; 5; 31, en-USd2ureepe,Version: 2.11.8.12009-09-11T12:30:16+02:00 - Seite 312
Page 343 of 380
Lifting the vehicleGWarning!
When jacking up the vehicle, only use the jack
which has been specifically approved by
Mercedes-Benz for your vehicle.
The jack is designed exclusively for jacking up
the vehicle at the jack take-up brackets built
into both sides of the vehicle. Make sure the
jack arm is fully seated in the jack take-up
bracket. The jack must always be vertical
when in use, especially on inclines or
declines.
The jack is intended only for lifting the vehicle
briefly for wheel changes. It is not suited for
performing maintenance work under the
vehicle. To help avoid personal injury, use the
jack only to lift the vehicle during a wheel
change.
Never get beneath the vehicle while it is
supported by the jack. Keep hands and feet
away from the area under the lifted vehicle.
Always lower the vehicle onto sufficient
capacity jackstands before working under the
vehicle.
Always engage the parking brake firmly and
block the wheels with wheel chocks or other
sizeable objects before raising the vehicle
with the jack. Do not disengage the parking
brake while the vehicle is raised.
Make sure that the ground on which the
vehicle is standing and where you place the
jack is solid, level and not slippery. If
necessary, use a large underlay. On slippery
surfaces, such as tiled floors, you should use
a non-slip underlay, for example a rubber mat.
Do not use wooden blocks or similar objects
to support the jack. Otherwise the jack may
not be able to achieve its load-bearing
capacity if it is not at its full height.
Never start the engine when the vehicle is
raised.
Also observe the notes on the jack.
XPrevent the vehicle from rolling away by
blocking wheels with wheel chocks or other
sizeable objects.
When your vehicle is equipped with a wheel
chock, it is included with the vehicle tool kit
(Y page 284). For information on setting up
the collapsible wheel chock, see
(Y page 286).
GWarning!
Only jack up the vehicle on level ground or on
slight inclines/declines. Otherwise, the
vehicle could fall off the jack and injure you or
others.
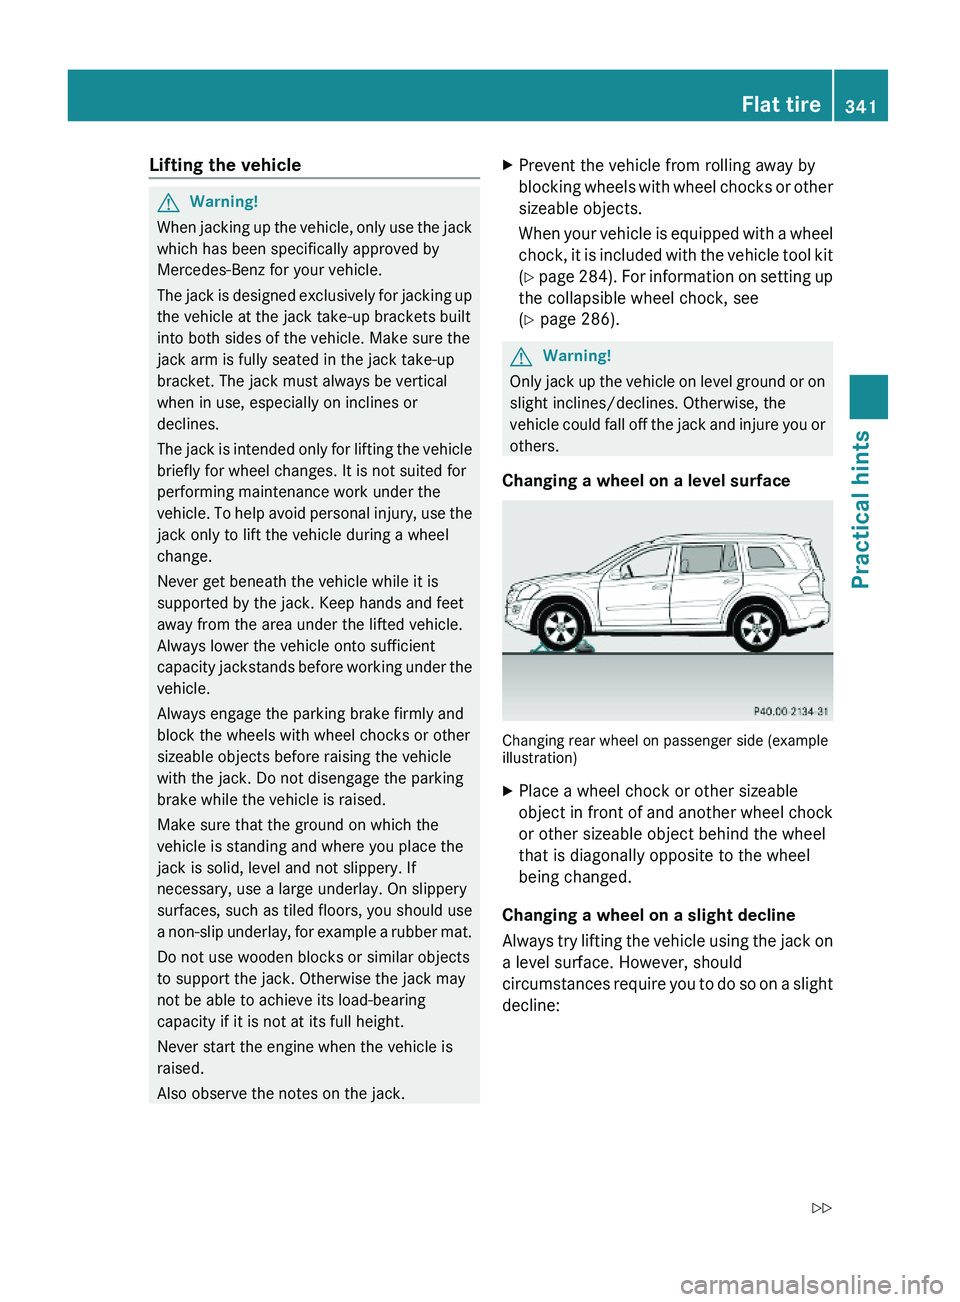
Changing a wheel on a level surface
Changing rear wheel on passenger side (exampleillustration)
XPlace a wheel chock or other sizeable
object in front of and another wheel chock
or other sizeable object behind the wheel
that is diagonally opposite to the wheel
being changed.
Changing a wheel on a slight decline
Always try lifting the vehicle using the jack on
a level surface. However, should
circumstances require you to do so on a slight
decline:
Flat tire341Practical hintsX164_AKB; 5; 31, en-USd2ureepe,Version: 2.11.8.12009-09-11T12:30:16+02:00 - Seite 341Z
Page 346 of 380
Do not tighten the wheel bolts when the
vehicle is raised. Otherwise the vehicle could
fall off the jack.
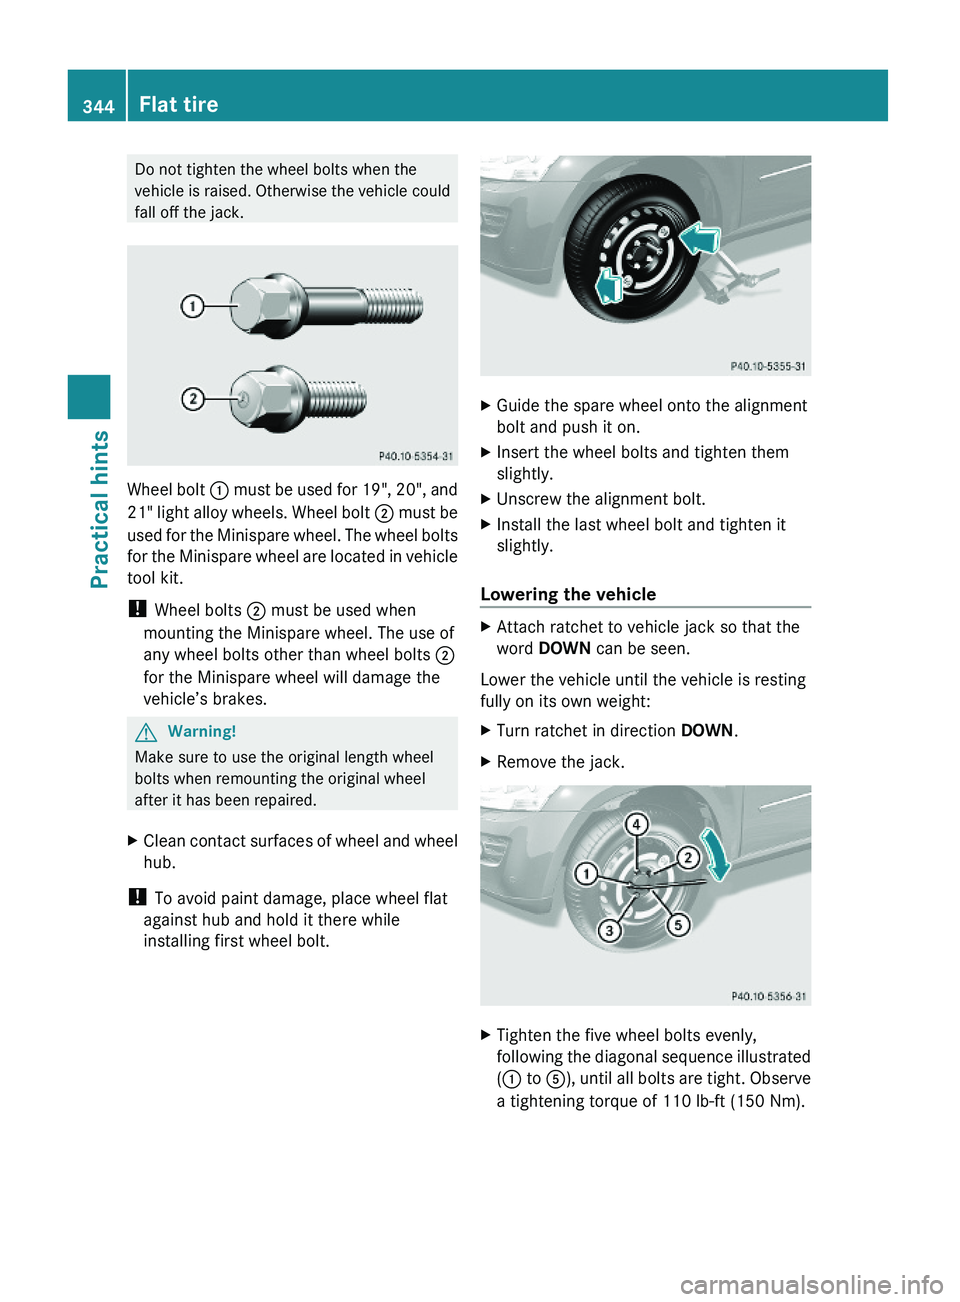
Wheel bolt : must be used for 19", 20", and
21" light alloy wheels. Wheel bolt ; must be
used for the Minispare wheel. The wheel bolts
for the Minispare wheel are located in vehicle
tool kit.
! Wheel bolts ; must be used when
mounting the Minispare wheel. The use of
any wheel bolts other than wheel bolts ;
for the Minispare wheel will damage the
vehicle’s brakes.
GWarning!
Make sure to use the original length wheel
bolts when remounting the original wheel
after it has been repaired.
XClean contact surfaces of wheel and wheel
hub.
! To avoid paint damage, place wheel flat
against hub and hold it there while
installing first wheel bolt.
XGuide the spare wheel onto the alignment
bolt and push it on.
XInsert the wheel bolts and tighten them
slightly.
XUnscrew the alignment bolt.XInstall the last wheel bolt and tighten it
slightly.
Lowering the vehicle
XAttach ratchet to vehicle jack so that the
word DOWN can be seen.
Lower the vehicle until the vehicle is resting
fully on its own weight:
XTurn ratchet in direction DOWN.XRemove the jack.XTighten the five wheel bolts evenly,
following the diagonal sequence illustrated
(: to A), until all bolts are tight. Observe
a tightening torque of 110 lb-ft (150 Nm).
344Flat tirePractical hints
X164_AKB; 5; 31, en-USd2ureepe,Version: 2.11.8.12009-09-11T12:30:16+02:00 - Seite 344
Page 373 of 380
Engine oil additives
! Do not blend oil additives with engine oil.
They may damage the engine. Damage or
malfunctions resulting from blending oil
additives are not covered by the Mercedes-
Benz Limited Warranty.
Air conditioning refrigerant
R134a (HFC) refrigerant and special PAG
lubricating oil are used in the air conditioning
system.
! Never use R 12 (CFC) or mineral-based
lubricating oil. Otherwise damage to the
system will occur.
Brake fluid
GWarning!
During vehicle operation, the boiling point of
the brake fluid is continuously reduced
through the absorption of moisture from the
atmosphere.
Under extremely strenuous operating
conditions, this moisture content can lead to
the formation of bubbles in the system, thus
reducing the system’s efficiency.
Therefore, the brake fluid must be replaced
regularly. Refer to your vehicle’s Maintenance
Booklet for replacement interval.
Only brake fluid approved by Mercedes-Benz
is recommended. Any authorized Mercedes-
Benz Center will provide you with additional
information.
Premium unleaded gasoline (gasoline
engine)
GWarning!
Gasoline is highly flammable and poisonous.
It burns violently and can cause serious
personal injury.
Never allow sparks, flames or smoking
materials near gasoline!
Turn off the engine before refueling.
Whenever you are around gasoline, avoid
inhaling fumes and any skin or clothing
contact. Extinguish all smoking materials.
Direct skin contact with fuels and the
inhalation of fuel vapors are damaging your
health.
! To maintain the engine’s durability and
performance, premium unleaded gasoline
must be used.
If premium unleaded gasoline is not
available and low octane gasoline is used,
follow these precautions:
R Have the fuel tank only partially filled
with unleaded regular gasoline and fill up
with premium unleaded gasoline as soon
as possible.
R Avoid full throttle driving and abrupt
acceleration.
R Do not exceed an engine speed of
3 000 rpm if the vehicle is loaded with a
light load such as two persons and no
luggage.
R Do not exceed 2
/ 3 of maximum
accelerator pedal position if the vehicle
is fully loaded or operating in
mountainous terrain.
Fuel requirements
Gasoline engine
Only use premium unleaded gasoline. The
octane number (posted at the pump) must be
91 min. It is an average of both the Research
Octane Number (RON) and the Motor Octane
Number (MON): (RON+MON)/2. This is also
known as the ANTI-KNOCK INDEX.
Reformulated gasolines (RFG) and/or
unleaded gasoline containing oxygenates
such as ethanol, TAME, ETBE, IPA, IBA, and
Fuels, coolants, lubricants, etc.371Technical dataX164_AKB; 5; 31, en-USd2ureepe,Version: 2.11.8.12009-09-11T12:30:16+02:00 - Seite 371Z