2010 MERCEDES-BENZ GL brake light
[x] Cancel search: brake lightPage 84 of 380
Seats
Safety notes
GWarning!
In order to avoid possible loss of vehicle
control the following must be done before the
vehicle is put into motion:
R seat adjustment
R head restraint adjustment
R steering wheel adjustment
R rear view mirror adjustment
R fastening of seat belts
GWarning!
Do not adjust the driver’s seat while driving.
Adjusting the seat while driving could cause
the driver to lose control of the vehicle.
Never ride in a moving vehicle with the seat
backrest in an excessively reclined position as
this can be dangerous. You could slide under
the seat belt in a collision. If you slide under
it, the seat belt would apply force at the
abdomen or neck. That could cause serious
or fatal injuries. The seat backrest and seat
belts provide the best restraint when the
wearer is in a position that is as upright as
possible and seat belts are properly
positioned on the body.
GWarning!
Your seat must be adjusted so that you can
correctly fasten your seat belt.
Observe the following points:
R Adjust the seat backrest until your arms are
slightly angled when holding the steering
wheel.
R Adjust the seat to a comfortable seating
position that still allows you to reach the
accelerator/brake pedal safely. The
position should be as far back as possible
with the driver still able to operate the
controls properly.
R Adjust the head restraint so that it is as
close to the head as possible. The center of
the head restraint must support the back of
the head at eye level.
R Never place hands under the seat or near
any moving parts while a seat is being
adjusted.
Failure to do so could result in an accident
and/or serious personal injury.GWarning!
The power seats can be operated at any time.
Therefore, do not leave children unattended
in the vehicle, or with access to an unlocked
vehicle. A child’s unsupervised access to a
vehicle could result in an accident and/or
serious personal injury.
GWarning!
According to accident statistics, children are
safer when properly restrained in the rear
seating positions than in the front seating
position. Thus, we strongly recommend that
children be placed in the rear seats whenever
possible. Regardless of seating position,
children 12 years old and under must be
seated and properly secured in an
appropriately sized infant restraint, toddler
restraint, or booster seat recommended for
the size and weight of the child. For additional
information, see “Children in the vehicle”.
A child’s risk of serious or fatal injuries is
significantly increased if the child restraints
are not properly secured in the vehicle and/
or the child is not properly secured in the child
restraint.
GWarning!
For your protection, drive only with properly
positioned head restraints.
Adjust the head restraint so that it is as close
to the head as possible and the center of the
head restraint supports the back of the head
at eye level. This will reduce the potential for
injury to the head and neck in the event of an
accident or similar situation.
82SeatsControls in detail
X164_AKB; 5; 31, en-USd2ureepe,Version: 2.11.8.12009-09-11T12:30:16+02:00 - Seite 82
Page 101 of 380
Daytime running lamp mode
In Canada, the daytime running lamp mode is
mandatory and therefore in a constant mode.
In the USA, the daytime running lamp mode
is deactivated by default.
XActivate the daytime running lamp mode
using the control system, see “Switching
daytime running lamp mode on or off (USA
only)” ( Y page 136).XTurn the exterior lamp switch to position
$ or à .
When the engine is running and the
ambient light is bright, the daytime running
lamps come on.
In low ambient lighting conditions, the
following lamps will come on additionally:
R Low-beam headlamps
R Parking lamps 6
R green indicator lamp L in the
instrument cluster
You can only switch on the high-beam
headlamps when the low-beam headlamps
are on.
The high-beam flasher is available at all times.
Canada only
When the engine is running, and you
R shift from a driving position to park
position P with the vehicle at a standstill or
the parking brake is engaged, daytime
running lamps or the low-beam headlamps
will go out with a delay of 3 minutes
R turn the exterior lamp switch to position
T , the daytime running lamps and the
parking lamps 6
come on in bright ambient
lighting conditions.
R turn the exterior lamp switch to position
L , the manual headlamp mode has
priority over the daytime running lamp
mode
The corresponding exterior lamps come on
( Y page 97).
USA only
When the engine is running, and you turn the
exterior lamp switch to position T or
L , the manual headlamp mode has
priority over the daytime running lamp mode.
The corresponding exterior lamps come on
( Y page 97).
Fog lamps
Fog lamps cannot be switched on with the
exterior lamp switch in position à or
$ .
GWarning!
In low ambient lighting or foggy conditions,
only switch from position à to L with
the vehicle at a standstill in a safe location.
Switching from à to L will briefly
switch off the headlamps. Doing so while
driving in low ambient lighting conditions may
result in an accident.
Front fog lamps will operate with the parking
lamps and/or the low-beam headlamps on.
The rear fog lamp can only be switched on
with the exterior lamp switch in position
L . Fog lamps should only be used in
conjunction with low-beam headlamps.
Consult your State or Province Motor Vehicle
Regulations regarding permissible lamp
operation.
XSwitch on the ignition.XTurn the exterior lamp switch to position
T or L (Y page 97).6
When the parking lamps are on, the tail lamps, the license plate lamps, the side marker lamps, and the
instrument cluster illumination are also on.Lighting99Controls in detailX164_AKB; 5; 31, en-USd2ureepe,Version: 2.11.8.12009-09-11T12:30:16+02:00 - Seite 99Z
Page 107 of 380
For information on filling up the washer
reservoir, see “Washer system and headlamp
cleaning system” ( Y page 232).
Problems with wipers
! If anything blocks the wipers (leaves,
snow, etc.), switch them off immediately.
For safety reasons, do the following before
attempting to remove any blockage:
R Stop the vehicle in a safe location.
R Remove the SmartKey from the starter
switch.
or
R Turn off the engine by pressing the
KEYLESS-GO start/stop button and
open the driver’s door (with the driver’s
door open, starter switch is in position
0 , same as with SmartKey removed from
starter switch).
R Engage the parking brake.
R Remove blockage.
R Turn the wipers on again.
If the windshield wipers fail to function at
all with the combination switch in position
Ä or Å ,
R set the combination switch to the next
higher wiper speed
R have the windshield wipers checked at
the nearest authorized Mercedes-Benz
Center
Power windows
Opening and closing
The door windows and the hinged quarter
windows are opened and closed electrically.
The switches for all door windows and the
hinged quarter windows are located on the
driver’s door control panel. The switches for
the respective door windows are located on
the front passenger door and the rear doors.
The hinged quarter windows can be operated
from the driver’s seat only.
i Operating the rear door windows from
the rear is not possible when you activate
the override switch ( Y page 60).GObserve Safety notes, see page 55.GWarning!
When opening or closing the windows, make
sure there is no danger of anyone being
harmed by the opening/closing procedure.
The door windows are equipped with the
express operation and automatic reversal
function. If in express operation mode a door
window encounters an obstruction that
blocks its path, the automatic reversal
function will stop the door window and open
it slightly.
The door windows operate differently when
the switch is pulled and held. See the “Closing
when a door window is blocked” section in
this chapter for details.
The closing of a door window can be
immediately halted by releasing the switch or,
if the switch was pulled past the resistance
point and released, by either pressing or
pulling the respective switch.
The closing of the hinged quarter windows can
be immediately halted by pressing or pulling
the switch.
If a window encounters an obstruction that
blocks its path in a circumstance where you
are closing the windows by pressing and
holding button & on the SmartKey or by
pressing and holding the lock button (vehicles
with KEYLESS-GO) on an outside door handle,
the automatic reversal function will not
operate.
Activate the override switch when children
are riding in the back seats of the vehicle. The
children may otherwise injure themselves,
e.g. by becoming trapped in the window
opening.
Power windows105Controls in detailX164_AKB; 5; 31, en-USd2ureepe,Version: 2.11.8.12009-09-11T12:30:16+02:00 - Seite 105Z
Page 114 of 380
In case of accident
If the vehicle is leaking fuel:
XDo not start the engine under any
circumstances.
XExit the vehicle at a safe distance from the
roadway.
XNotify local fire and/or police authorities.
If the extent of the damage cannot be
determined:
XContact an authorized Mercedes-Benz
Center or call Roadside Assistance.
If no damage on major assemblies, fuel
system, and engine mount can be
determined:
XStart the engine in the usual manner.
Parking
GWarning!
Do not park this vehicle in areas where
combustible materials such as grass, hay or
leaves can come into contact with the hot
exhaust system. These materials could be
ignited and cause a vehicle fire.
Vehicle movement may result in serious
personal injury or damage to the vehicle or
vehicle drivetrain. Therefore, always do the
following before turning off the engine and
leaving the vehicle:
RKeep right foot on the brake pedal.
REngage the parking brake.
RShift the automatic transmission into park
position P.
RSlowly release the brake pedal.
RWhen parked on an incline, always turn the
front wheels towards the road curb.
RTurn the SmartKey in the starter switch to
position 0 and remove the SmartKey from
the starter switch, or press the KEYLESS-
GO start/stop button.
RTake the SmartKey with you and lock the
vehicle when leaving.
Parking brake
GWarning!
Engaging the parking brake while the vehicle
is in motion can cause the rear wheels to lock
up. You could lose control of the vehicle and
cause an accident. In addition, the vehicle’s
brake lights do not light up when the parking
brake is engaged.
GWarning!
When leaving the vehicle, always remove the
SmartKey from the starter switch, take it with
you, and lock the vehicle. Do not leave
children unattended in the vehicle, or with
access to an unlocked vehicle. Children could
release the parking brake and/or shift the
automatic transmission out of park position
P, either of which could result in an accident
and/or serious personal injury.
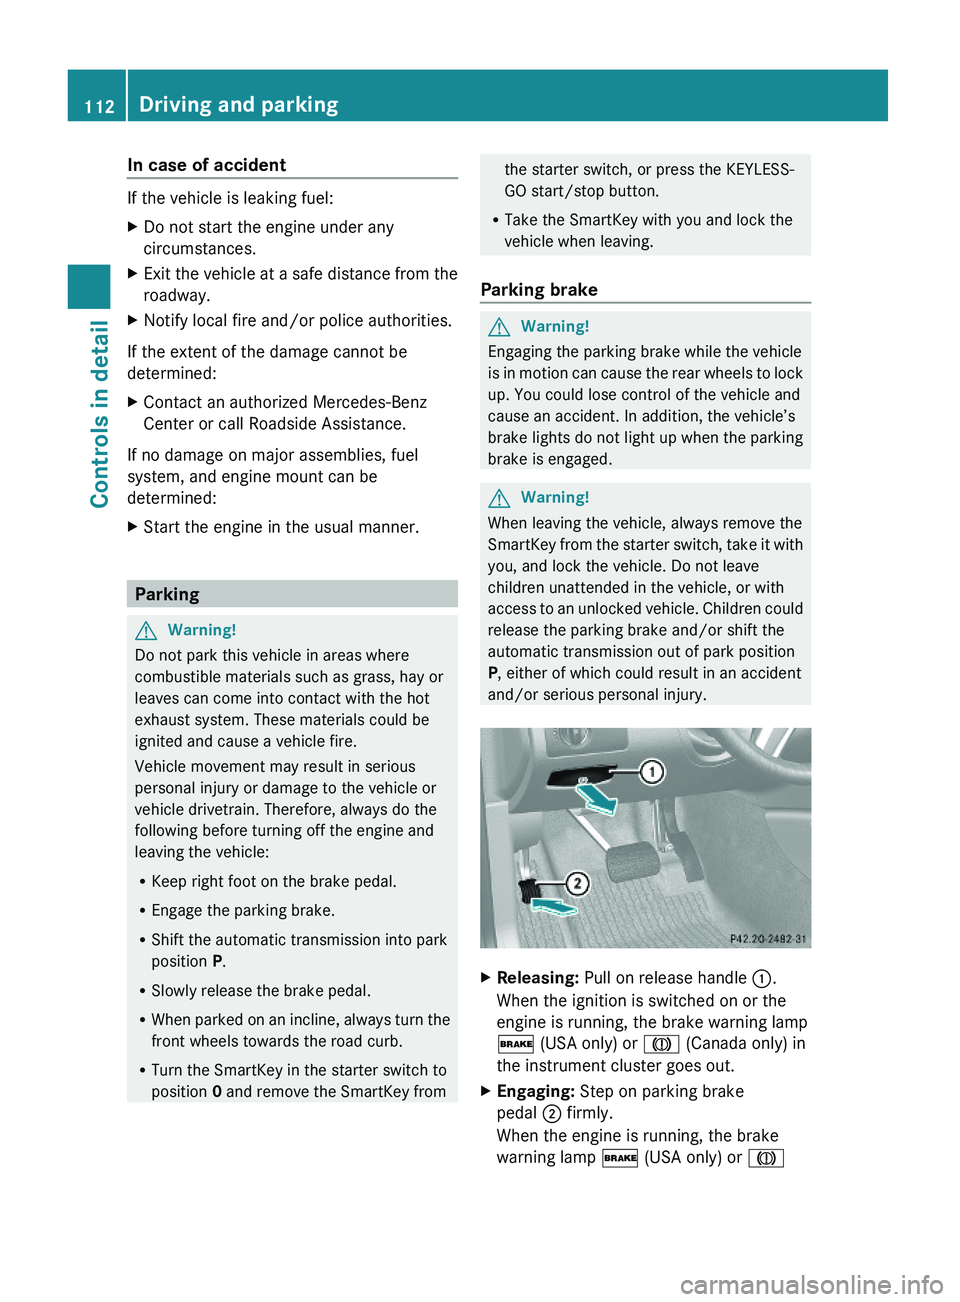
XReleasing: Pull on release handle :.
When the ignition is switched on or the
engine is running, the brake warning lamp
$ (USA only) or J (Canada only) in
the instrument cluster goes out.
XEngaging: Step on parking brake
pedal ; firmly.
When the engine is running, the brake
warning lamp $ (USA only) or J
112Driving and parkingControls in detail
X164_AKB; 5; 31, en-USd2ureepe,Version: 2.11.8.12009-09-11T12:30:16+02:00 - Seite 112
Page 158 of 380
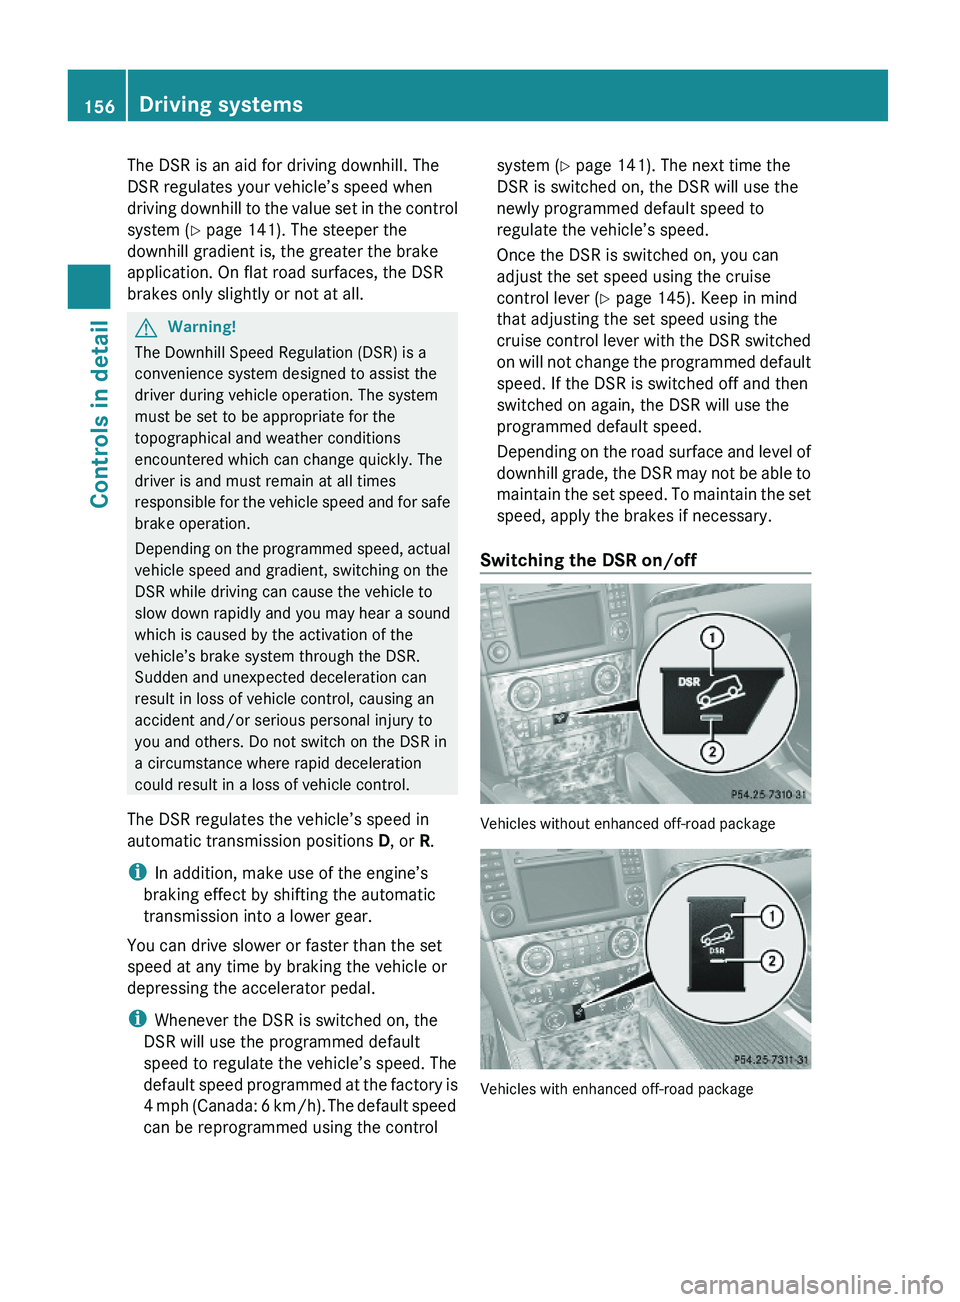
The DSR is an aid for driving downhill. The
DSR regulates your vehicle’s speed when
driving downhill to the value set in the control
system (Y page 141). The steeper the
downhill gradient is, the greater the brake
application. On flat road surfaces, the DSR
brakes only slightly or not at all.
GWarning!
The Downhill Speed Regulation (DSR) is a
convenience system designed to assist the
driver during vehicle operation. The system
must be set to be appropriate for the
topographical and weather conditions
encountered which can change quickly. The
driver is and must remain at all times
responsible for the vehicle speed and for safe
brake operation.
Depending on the programmed speed, actual
vehicle speed and gradient, switching on the
DSR while driving can cause the vehicle to
slow down rapidly and you may hear a sound
which is caused by the activation of the
vehicle’s brake system through the DSR.
Sudden and unexpected deceleration can
result in loss of vehicle control, causing an
accident and/or serious personal injury to
you and others. Do not switch on the DSR in
a circumstance where rapid deceleration
could result in a loss of vehicle control.
The DSR regulates the vehicle’s speed in
automatic transmission positions D, or R.
iIn addition, make use of the engine’s
braking effect by shifting the automatic
transmission into a lower gear.
You can drive slower or faster than the set
speed at any time by braking the vehicle or
depressing the accelerator pedal.
iWhenever the DSR is switched on, the
DSR will use the programmed default
speed to regulate the vehicle’s speed. The
default speed programmed at the factory is
4 mph (Canada: 6 km/h). The default speed
can be reprogrammed using the control
system (Y page 141). The next time the
DSR is switched on, the DSR will use the
newly programmed default speed to
regulate the vehicle’s speed.
Once the DSR is switched on, you can
adjust the set speed using the cruise
control lever (Y page 145). Keep in mind
that adjusting the set speed using the
cruise control lever with the DSR switched
on will not change the programmed default
speed. If the DSR is switched off and then
switched on again, the DSR will use the
programmed default speed.
Depending on the road surface and level of
downhill grade, the DSR may not be able to
maintain the set speed. To maintain the set
speed, apply the brakes if necessary.
Switching the DSR on/off
Vehicles without enhanced off-road package
Vehicles with enhanced off-road package
156Driving systemsControls in detail
X164_AKB; 5; 31, en-USd2ureepe,Version: 2.11.8.12009-09-11T12:30:16+02:00 - Seite 156
Page 230 of 380
iLeaving the engine running and the fuel
filler cap open can cause the yellow fuel
tank reserve warning lamp to flash and the
malfunction indicator lamp ! (USA
only) or ; (Canada only) to illuminate.
For more information, see also “Practical
hints” ( Y page 320).XRemove the SmartKey from the starter
switch.
KEYLESS-GO: Open the driver’s door. This
puts the starter switch in position 0, same
as with the SmartKey removed from the
starter switch. The driver’s door then can
be closed again.XOpening: Press fuel filler flap : at the
point indicated by the arrow.XTurn fuel filler cap ; counterclockwise.XTake off fuel filler cap ;.
!
The fuel filler cap is tethered to the fuel
filler neck. Do not drop the cap. It could
damage the vehicle paint finish.
XSet fuel filler cap ; on fuel filler flap :.XFully insert filler nozzle unit and refuel.XOnly fill your tank until the filler nozzle unit
cuts out – do not top off or overfill .XClosing: Turn fuel filler cap ; clockwise
until it audibly engages.
i Close the fuel filler flap before locking the
vehicle. Otherwise the flap locking pin will
prevent closing the fuel filler flap.
XClose fuel filler flap :.
Low outside temperatures (diesel
engine)
! Do not fill the tank with gasoline. Do not
blend diesel fuel with gasoline or kerosene.
The fuel system and engine will otherwise
be damaged, which is not covered by the
Mercedes-Benz Limited Warranty.
To prevent malfunctions, diesel fuel with
improved cold flow characteristics is offered
in the winter months. Check with your fuel
retailer.
Check regularly and before a long trip
For information on quantities and
requirements of operating agents, see “Fuels,
coolants, lubricants, etc.” ( Y page 368).
Check the following:
R Engine oil level ( Y page 230)
R Tire inflation pressure ( Y page 237)
R Coolant level ( Y page 231)
R Vehicle lighting ( Y page 328)
R Washer system and headlamp cleaning
system ( Y page 232)
R Brake fluid ( Y page 233)
Engine compartment
Hood
GWarning!
Do not pull the release lever while the vehicle
is in motion. Otherwise the hood could be
forced open by passing air flow.
This could cause the hood to come loose and
injure you and/or others.
Opening
GWarning!
Do not open the hood when the engine is
overheated. You could be seriously injured.
Observe the coolant temperature display to
determine whether the engine may be
overheated. If you see flames or smoke
coming from the engine compartment, move
away from the vehicle. Wait until the engine
has cooled. If necessary, call the fire
department.
228Engine compartmentOperation
X164_AKB; 5; 31, en-USd2ureepe,Version: 2.11.8.12009-09-11T12:30:16+02:00 - Seite 228
Page 253 of 380
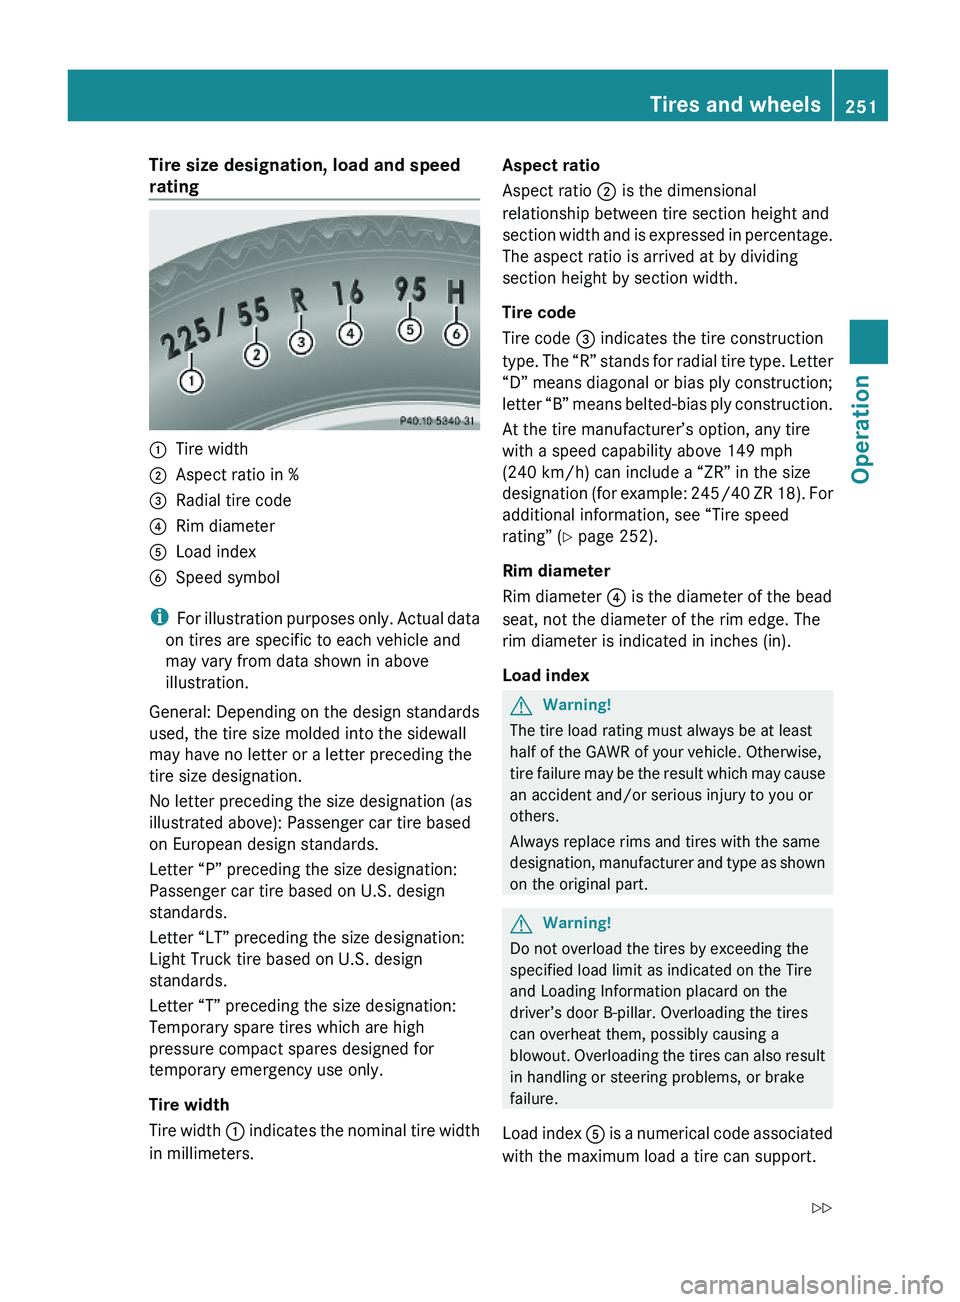
Tire size designation, load and speed
rating:Tire width;Aspect ratio in %=Radial tire code?Rim diameterALoad index BSpeed symbol
iFor illustration purposes only. Actual data
on tires are specific to each vehicle and
may vary from data shown in above
illustration.
General: Depending on the design standards
used, the tire size molded into the sidewall
may have no letter or a letter preceding the
tire size designation.
No letter preceding the size designation (as
illustrated above): Passenger car tire based
on European design standards.
Letter “P” preceding the size designation:
Passenger car tire based on U.S. design
standards.
Letter “LT” preceding the size designation:
Light Truck tire based on U.S. design
standards.
Letter “T” preceding the size designation:
Temporary spare tires which are high
pressure compact spares designed for
temporary emergency use only.
Tire width
Tire width : indicates the nominal tire width
in millimeters.
Aspect ratio
Aspect ratio ; is the dimensional
relationship between tire section height and
section width and is expressed in percentage.
The aspect ratio is arrived at by dividing
section height by section width.
Tire code
Tire code = indicates the tire construction
type. The “R” stands for radial tire type. Letter
“D” means diagonal or bias ply construction;
letter “B” means belted-bias ply construction.
At the tire manufacturer’s option, any tire
with a speed capability above 149 mph
(240 km/h) can include a “ZR” in the size
designation (for example: 245/40 ZR 18). For
additional information, see “Tire speed
rating” (Y page 252).
Rim diameter
Rim diameter ? is the diameter of the bead
seat, not the diameter of the rim edge. The
rim diameter is indicated in inches (in).
Load index
GWarning!
The tire load rating must always be at least
half of the GAWR of your vehicle. Otherwise,
tire failure may be the result which may cause
an accident and/or serious injury to you or
others.
Always replace rims and tires with the same
designation, manufacturer and type as shown
on the original part.
GWarning!
Do not overload the tires by exceeding the
specified load limit as indicated on the Tire
and Loading Information placard on the
driver’s door B-pillar. Overloading the tires
can overheat them, possibly causing a
blowout. Overloading the tires can also result
in handling or steering problems, or brake
failure.
Load index A is a numerical code associated
with the maximum load a tire can support.
Tires and wheels251OperationX164_AKB; 5; 31, en-USd2ureepe,Version: 2.11.8.12009-09-11T12:30:16+02:00 - Seite 251Z
Page 263 of 380
Have the brake system inspected
immediately. Contact an authorized
Mercedes-Benz Center.
All checks and service work on the brake
system should be carried out by qualified
technicians only. Contact an authorized
Mercedes-Benz Center.
Only install brake pads and use brake fluid
recommended by Mercedes-Benz.GWarning!
If other than recommended brake pads are
installed, or other than recommended brake
fluid is used, the braking properties of the
vehicle can be degraded to an extent that safe
braking is substantially impaired. This could
result in an accident.
! Only conduct operational or performance
tests on a two-axle dynamometer. If such
tests are necessary, contact an authorized
Mercedes-Benz Center. You could
otherwise seriously damage the brake
system or the transfer case which is not
covered by the Mercedes-Benz Limited
Warranty.
! Because the ESP ®
operates
automatically, the engine and ignition must
be shut off (SmartKey in starter switch
position 0 or 1 or KEYLESS-GO start/stop
button in position 0 or 1) when the parking
brake is being tested on a brake test
dynamometer. Such testing should be no
longer than 10 seconds.
Active braking action through the ESP ®
may otherwise seriously damage the brake
system which is not covered by the
Mercedes-Benz Limited Warranty.
If your brake system is only subjected to
moderate loads, you should occasionally test
the effectiveness of the brakes by applying
above-normal braking pressure at higher
speeds. This will also enhance the grip of the
brake pads.
GWarning!
Make sure not to endanger any other road
users when carrying out these braking
maneuvers.
Refer to the description of the Brake Assist
System (BAS) ( Y page 63).
Parking brake
When driving on wet roads or dirt covered
surfaces, road salt and/or dirt can get into
the parking brake.
To prevent corrosion and a reduction in the
braking power of the parking brake, observe
the following:
XFrom time to time, lightly engage the
parking brake before driving off.XDrive a distance of approximately 110 yds
(100 m) at a maximum speed of 12 mph
(20 km/h).GWarning!
While performing this procedure please
assure that the vehicle is stopped before
applying the parking brake. Otherwise the
rear wheels could lock up. You could lose
control of the vehicle and cause an accident.
In addition, the vehicle’s brake lights do not
light up when the parking brake is engaged.
Make sure not to endanger any other road
users when you engage the parking brake.
Driving off
Warm up the engine smoothly. Do not place
full load on the engine until the operating
temperature has been reached.
! When driving off on a slippery surface, do
not allow a drive wheel to spin for an
extended period with the ESP ®
switched
off. Doing so may cause serious damage to
the drivetrain which is not covered by the
Mercedes-Benz Limited Warranty.
Driving instructions261OperationX164_AKB; 5; 31, en-USd2ureepe,Version: 2.11.8.12009-09-11T12:30:16+02:00 - Seite 261Z