2010 MERCEDES-BENZ G55AMG tailgate
[x] Cancel search: tailgatePage 187 of 272

Off-road driving rules
REngage the transfer case in position LOW
before driving under off-road conditions
( Y page 93).
R If necessary, activate differential locks
( Y page 95).
The ABS, BAS and ESP ®
are switched off
automatically when the differential locks
are activated.
R Fasten items being carried as securely as
possible ( Y page 129).
! Observe the following during off-road
driving:
R Keep doors, tailgate, windows, and tilt/
sliding sunroof closed whenever driving
off-road.
R Switch the cruise control off.
R Adjust vehicle speed to condition of
terrain. The more uneven, rutty and
steeper the terrain, the lower the speed
should be. Drive through water slowly at
an even speed, avoiding a bow wave.
R Be especially careful when driving in
unknown territory. It may be necessary
to get out of the vehicle and scout the
path you intend to take.
R Watch out for obstacles, such as rocks,
holes, tree stumps and ruts.
R Avoid excessive engine speeds – drive at
moderate engine speeds (max. 3 000
rpm).
R Before driving through water, determine
its depth.
R Do not stop vehicle while immersed in
water, and do not shut off the engine.
R In sandy soil, drive at a steady speed as
allowed by conditions. This helps
overcome the vehicle rolling resistance
and reduces the likelihood of the vehicle
sinking into the ground.
R Do not initiate jumps with the vehicle. It
interrupts the forward momentum of the
vehicle.
R Always drive onto slopes with the engine
running and the vehicle in gear.
R Do not shift automatic transmission into
neutral position N.
R Inspect the vehicle for possible damage
after each off-road trip.GWarning!
Do not reduce the tire inflation pressure
before driving through sand. However, if you
do so, remember to correct the tire inflation
pressure before continuing your trip. Driving
with reduced tire inflation pressure increases
the risk of losing control of the vehicle and
rolling over.
Checklist before off-road driving
Engine oil level
R Check the engine oil level ( Y page 153).
Only with a proper oil level can the vehicle
obtain a trouble-free oil supply, even on
steep gradients.
! If an engine oil level warning message
appears in the multifunction display while
driving, stop the vehicle in a safe location
or as soon at is safe to do so. Check the
engine oil level.
The engine oil level warning messages
should not be ignored. Extended driving
with the message displayed could result in
serious engine damage that is not covered
by the Mercedes-Benz Limited Warranty.
Tires
R Check the tread depth and maintain
specified tire inflation pressure. A placard
with the recommended tire inflation
Driving instructions185Operation463_AKB; 3; 35, en-USd2ureepe,Version: 2.11.8.12009-07-16T20:59:56+02:00 - Seite 185Z
Page 203 of 272

Jack
XOpen cover =.XOpen tab ?.XRemove the jack from the storage
compartment.
Jack
GWarning!
Only use the jack supplied with your vehicle
to lift the vehicle briefly for wheel changes. If
you use the jack for any other purpose, you or
others could be injured, as the jack is
designed only for the purpose of changing a
wheel.
When using the jack, observe the safety notes
in the “Mounting the spare wheel” section and
the notes on the jack.
XTake the pump handle (three pieces) and
jack from the vehicle tool kit (Y page 200).
Pump handle
XAssemble the pump handle.
Jack
XSet indent : of the pump handle onto
release bolt ; of the jack.
XUsing the pump handle, turn release
bolt ; clockwise until its stop.
Release bolt ; is closed.
XRemove the pump handle from release
bolt ;.
XSet the pump handle into the pump lever
as indicated by the arrow.
Before placing the pump handle and the jack
back into the vehicle tool kit:
XPress the jack piston in again and close the
release bolt by using the pump handle.
XDisassemble the pump handle.
Spare wheel
GObserve Safety notes, see page 239.
The spare wheel is located under a cover on
the outside of the vehicle’s tailgate.
XRemoving: Take the screwdriver from the
vehicle tool kit (Y page 200).
Where will I find ...?201Practical hints463_AKB; 3; 35, en-USd2ureepe,Version: 2.11.8.12009-07-16T20:59:56+02:00 - Seite 201Z
Page 212 of 272

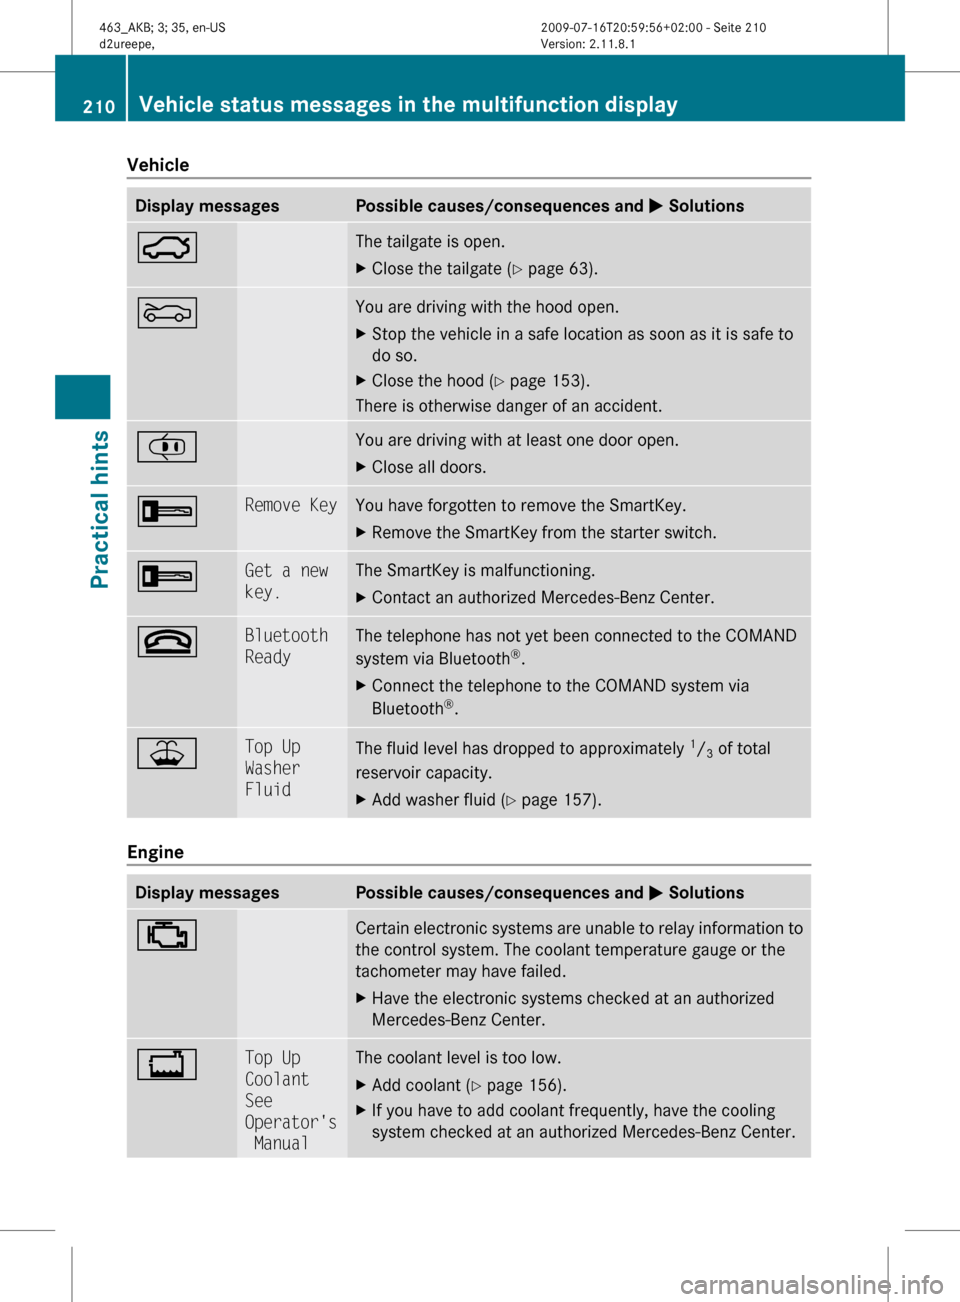
VehicleDisplay messagesPossible causes/consequences and M Solutions:The tailgate is open.XClose the tailgate ( Y page 63).MYou are driving with the hood open.XStop the vehicle in a safe location as soon as it is safe to
do so.XClose the hood ( Y page 153).
There is otherwise danger of an accident.
¡You are driving with at least one door open.XClose all doors.+Remove KeyYou have forgotten to remove the SmartKey.XRemove the SmartKey from the starter switch.+Get a new
key.The SmartKey is malfunctioning.XContact an authorized Mercedes-Benz Center.~Bluetooth
ReadyThe telephone has not yet been connected to the COMAND
system via Bluetooth ®
.XConnect the telephone to the COMAND system via
Bluetooth ®
.¥Top Up
Washer
FluidThe fluid level has dropped to approximately 1
/ 3 of total
reservoir capacity.XAdd washer fluid ( Y page 157).
Engine
Display messagesPossible causes/consequences and M Solutions;Certain electronic systems are unable to relay information to
the control system. The coolant temperature gauge or the
tachometer may have failed.XHave the electronic systems checked at an authorized
Mercedes-Benz Center.+Top Up
Coolant
See
Operator's
ManualThe coolant level is too low.XAdd coolant ( Y page 156).XIf you have to add coolant frequently, have the cooling
system checked at an authorized Mercedes-Benz Center.210Vehicle status messages in the multifunction displayPractical hints
463_AKB; 3; 35, en-USd2ureepe,Version: 2.11.8.12009-07-16T20:59:56+02:00 - Seite 210
Page 230 of 272

ProblemPossible causes/consequences and M Solutions4/
The front passenger
front air bag off
indicator lamp does not
illuminate or does not
remain illuminated with
a BabySmart™ child
seat properly installed
on the front passenger
seat or with an empty
front passenger seat.
The system is malfunctioning.XMake sure there is nothing between seat cushion and child seat.XCheck installation of the child seat (Y page 48).
If the front passenger front air bag off indicator lamp remains out:
XHave the system checked as soon as possible at an authorized
Mercedes-Benz Center.
Do not use the BabySmart™ restraint to transport children on the
front passenger seat until the system has been repaired.
GWarning!
If the 4/ indicator lamp does not
illuminate or remains out with a BabySmart™
child seat properly installed on the front
passenger seat or with an empty front
passenger seat, do not transport a child or a
passenger on the front passenger seat until
the system has been repaired.
Unlocking/locking manually
Unlocking the vehicle
If you cannot unlock the vehicle with the
SmartKey, unlock the driver’s door and the
tailgate using the mechanical key.
The anti-theft alarm system will trigger when
you
Runlock the driver’s door or the tailgate with
the mechanical key
and
Ropen the driver’s door or the tailgate
To cancel the alarm, insert the SmartKey into
the starter switch.
Removing the mechanical key XMove locking tab : in the direction of
arrow.
XSlide mechanical key ; out of the housing.
Unlocking the driver’s door
228Unlocking/locking manuallyPractical hints
463_AKB; 3; 35, en-USd2ureepe,Version: 2.11.8.12009-07-16T20:59:56+02:00 - Seite 228
Page 231 of 272

XInsert mechanical key ; into the lock
cylinder.
XTurn mechanical key ; counterclockwise
to position 1 until the locking knob moves
up.
The driver’s door is unlocked.
XRemove mechanical key ;.XPress lock cylinder and pull on door handle
to open the driver’s door.
Unlocking the tailgate
GWarning!
The tailgate swings open to one side. Always
make sure there is sufficient clearance for the
tailgate.
Make sure the tailgate is closed when the
engine is running and while driving. Among
other dangers, deadly carbon monoxide (CO)
gases may enter vehicle interior resulting in
unconsciousness and death.
XInsert mechanical key = into the lock
cylinder.
XTurn mechanical key = counterclockwise
to position 2.
XRemove mechanical key =.XPress lock cylinder and pull on door
handle : to open the tailgate.
Locking the vehicle
If you cannot lock the vehicle with the
SmartKey, lock it as follows:
XOpen the driver’s door.XClose the front passenger door, the rear
doors, and the tailgate.
XPress the central locking switch
(Y page 63).
The locking knobs of the front passenger
door, the rear doors, and the tailgate move
down.
XIf the vehicle battery is disconnected or
drained: Press down the locking knobs on
the front passenger door, the rear doors,
and the tailgate.
XExit the vehicle.XClose the driver’s door.XRemove mechanical key ; from the
SmartKey (Y page 228).
XInsert mechanical key ; into the lock
cylinder.
XTurn mechanical key ; clockwise to
position 1.
The vehicle is locked.
XTurn mechanical key ; back and remove
it from the lock cylinder.
XCheck if the tailgate is locked.XIf necessary, lock the tailgate with the
mechanical key (Y page 64).
iThis procedure does not arm the anti-
theft alarm system, nor does it lock the fuel
filler flap.
Unlocking/locking manually229Practical hints463_AKB; 3; 35, en-USd2ureepe,Version: 2.11.8.12009-07-16T20:59:56+02:00 - Seite 229Z
Page 232 of 272

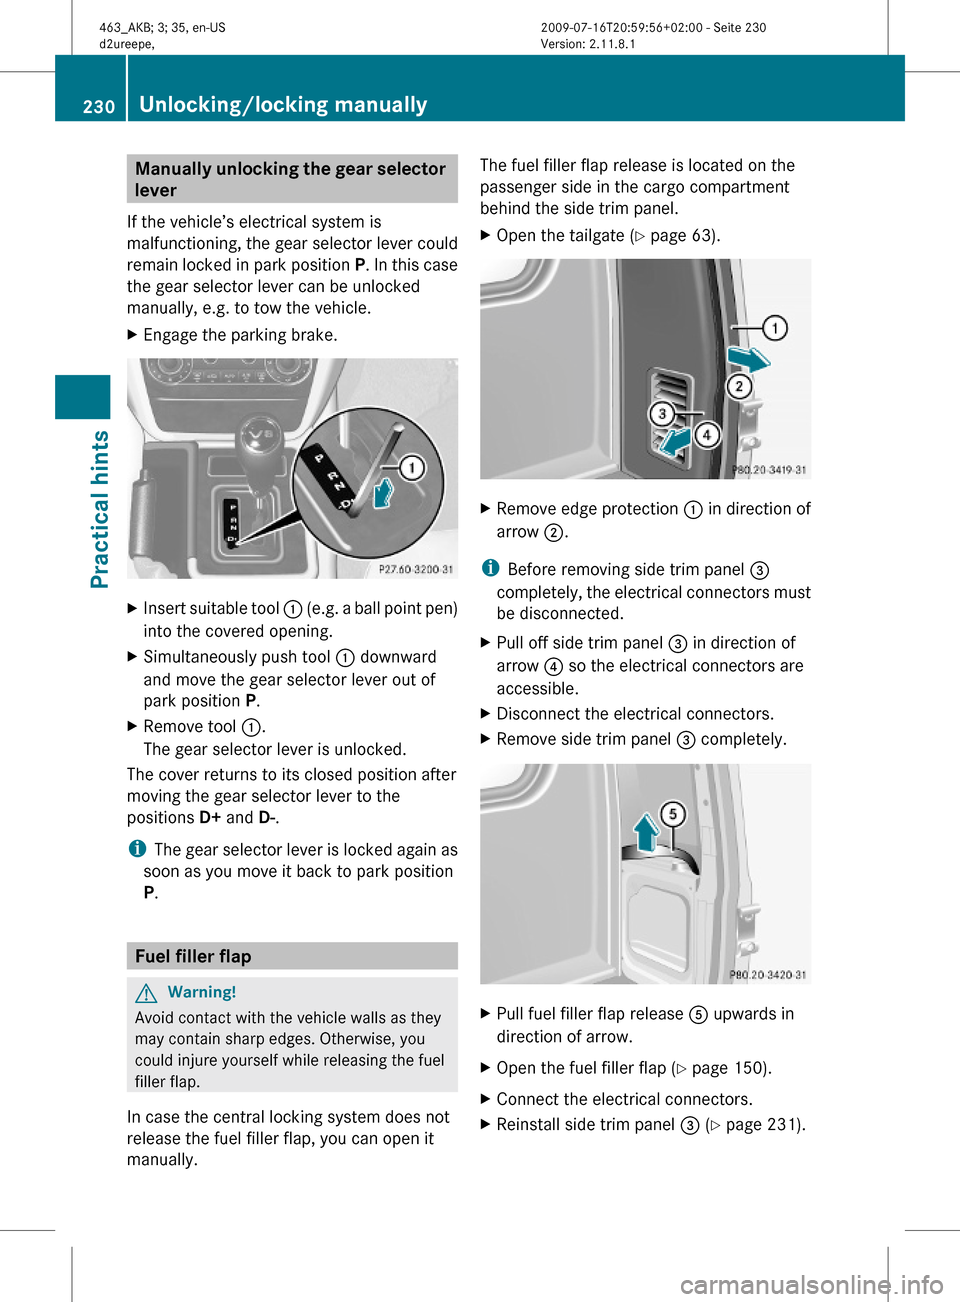
Manually unlocking the gear selector
lever
If the vehicle’s electrical system is
malfunctioning, the gear selector lever could
remain locked in park position P. In this case
the gear selector lever can be unlocked
manually, e.g. to tow the vehicle.
XEngage the parking brake.XInsert suitable tool : (e.g. a ball point pen)
into the covered opening.
XSimultaneously push tool : downward
and move the gear selector lever out of
park position P.
XRemove tool :.
The gear selector lever is unlocked.
The cover returns to its closed position after
moving the gear selector lever to the
positions D+ and D-.
iThe gear selector lever is locked again as
soon as you move it back to park position
P.
Fuel filler flap
GWarning!
Avoid contact with the vehicle walls as they
may contain sharp edges. Otherwise, you
could injure yourself while releasing the fuel
filler flap.
In case the central locking system does not
release the fuel filler flap, you can open it
manually.
The fuel filler flap release is located on the
passenger side in the cargo compartment
behind the side trim panel.
XOpen the tailgate (Y page 63).XRemove edge protection : in direction of
arrow ;.
iBefore removing side trim panel =
completely, the electrical connectors must
be disconnected.
XPull off side trim panel = in direction of
arrow ? so the electrical connectors are
accessible.
XDisconnect the electrical connectors.XRemove side trim panel = completely.XPull fuel filler flap release A upwards in
direction of arrow.
XOpen the fuel filler flap (Y page 150).XConnect the electrical connectors.XReinstall side trim panel = (Y page 231).230Unlocking/locking manuallyPractical hints
463_AKB; 3; 35, en-USd2ureepe,Version: 2.11.8.12009-07-16T20:59:56+02:00 - Seite 230
Page 233 of 272

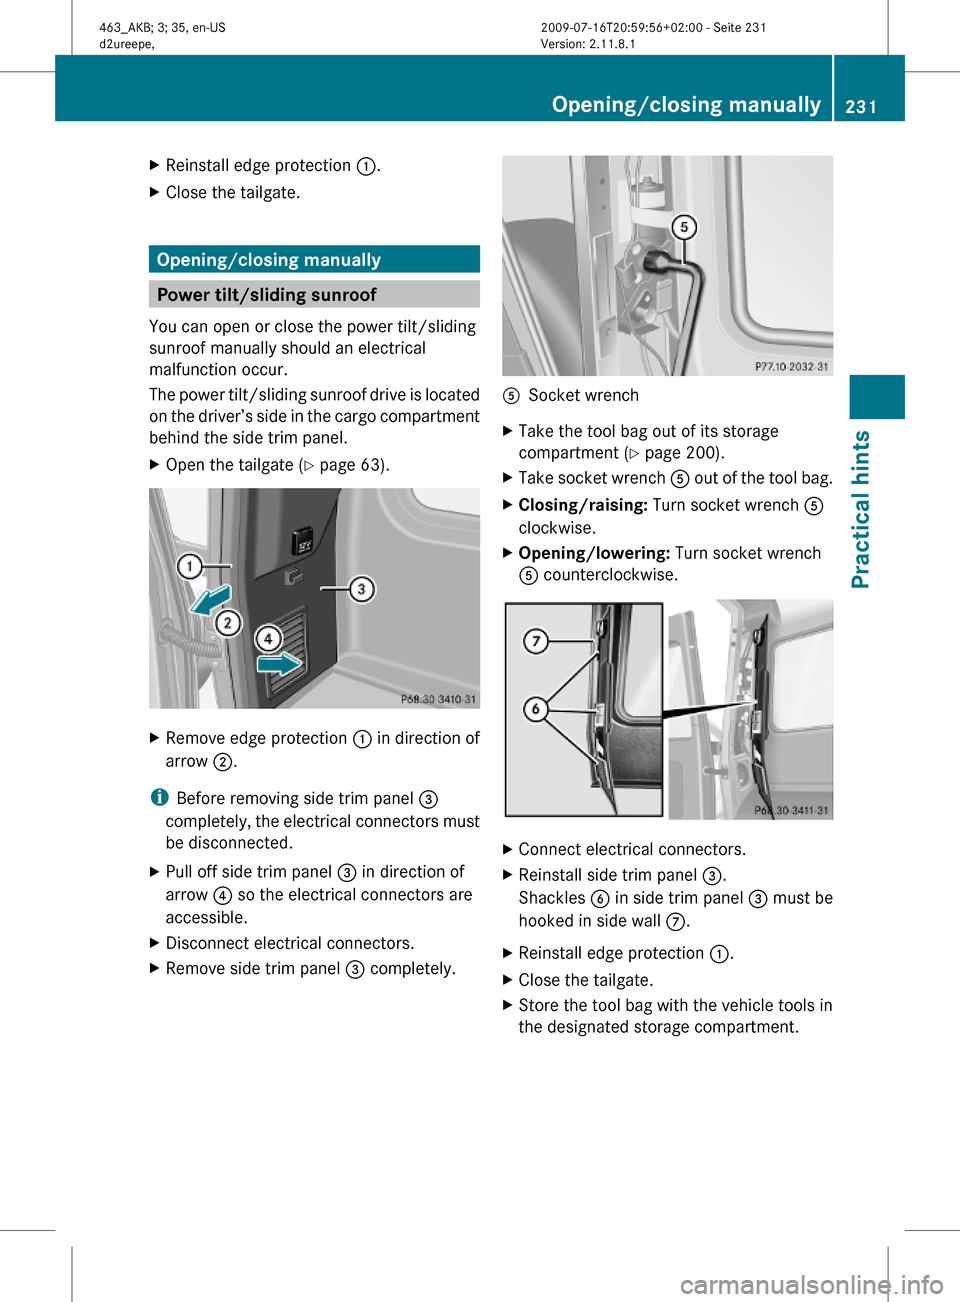
XReinstall edge protection :.XClose the tailgate.
Opening/closing manually
Power tilt/sliding sunroof
You can open or close the power tilt/sliding
sunroof manually should an electrical
malfunction occur.
The power tilt/sliding sunroof drive is located
on the driver’s side in the cargo compartment
behind the side trim panel.
XOpen the tailgate (Y page 63).XRemove edge protection : in direction of
arrow ;.
iBefore removing side trim panel =
completely, the electrical connectors must
be disconnected.
XPull off side trim panel = in direction of
arrow ? so the electrical connectors are
accessible.
XDisconnect electrical connectors.XRemove side trim panel = completely.ASocket wrenchXTake the tool bag out of its storage
compartment (Y page 200).
XTake socket wrench A out of the tool bag.XClosing/raising: Turn socket wrench A
clockwise.
XOpening/lowering: Turn socket wrench
A counterclockwise.
XConnect electrical connectors.XReinstall side trim panel =.
Shackles B in side trim panel = must be
hooked in side wall C.
XReinstall edge protection :.XClose the tailgate.XStore the tool bag with the vehicle tools in
the designated storage compartment.
Opening/closing manually231Practical hints463_AKB; 3; 35, en-USd2ureepe,Version: 2.11.8.12009-07-16T20:59:56+02:00 - Seite 231Z