2010 MERCEDES-BENZ G550 warning light
[x] Cancel search: warning lightPage 204 of 272

XOpen lock : using the screwdriver.
iYou can also use a coin to open the lock.
XFold tab ; downwards.XPull cover ring = slightly outwards in
direction of arrows and remove.
XPull cover plate ? towards you.XRemove cover plate ?.XUnscrew mounting screws C.XRemove the spare wheel.GWarning!
Make sure no one is injured when removing
the spare wheel.
Grip wheel from the sides.
Keep hands from beneath the wheel.
After mounting the spare wheel:
XTransport the damaged wheel on the spare
wheel carrier, see “Storing the spare wheel
after use” for instructions.
XRepair or replace the damaged tire as soon
as possible and return the spare tire as
original spare.
For information on mounting the spare wheel,
see “Flat tire” (Y page 239).
Storing the spare wheel after use
XSecure the spare wheel with mounting
screws C on the spare wheel carrier
(Y page 202). Make sure the spare wheel
cannot come loose.
XMake sure catch B engages in recess A
when mounting cover plate 4
(Y page 202).
XMake sure tab ; (Y page 202) faces
downwards when mounting cover ring =
(Y page 202).
XFor safety reasons, check regularly that the
spare wheel is securely fastened.
202Where will I find ...?Practical hints
463_AKB; 3; 35, en-USd2ureepe,Version: 2.11.8.12009-07-16T20:59:56+02:00 - Seite 202
Page 234 of 272
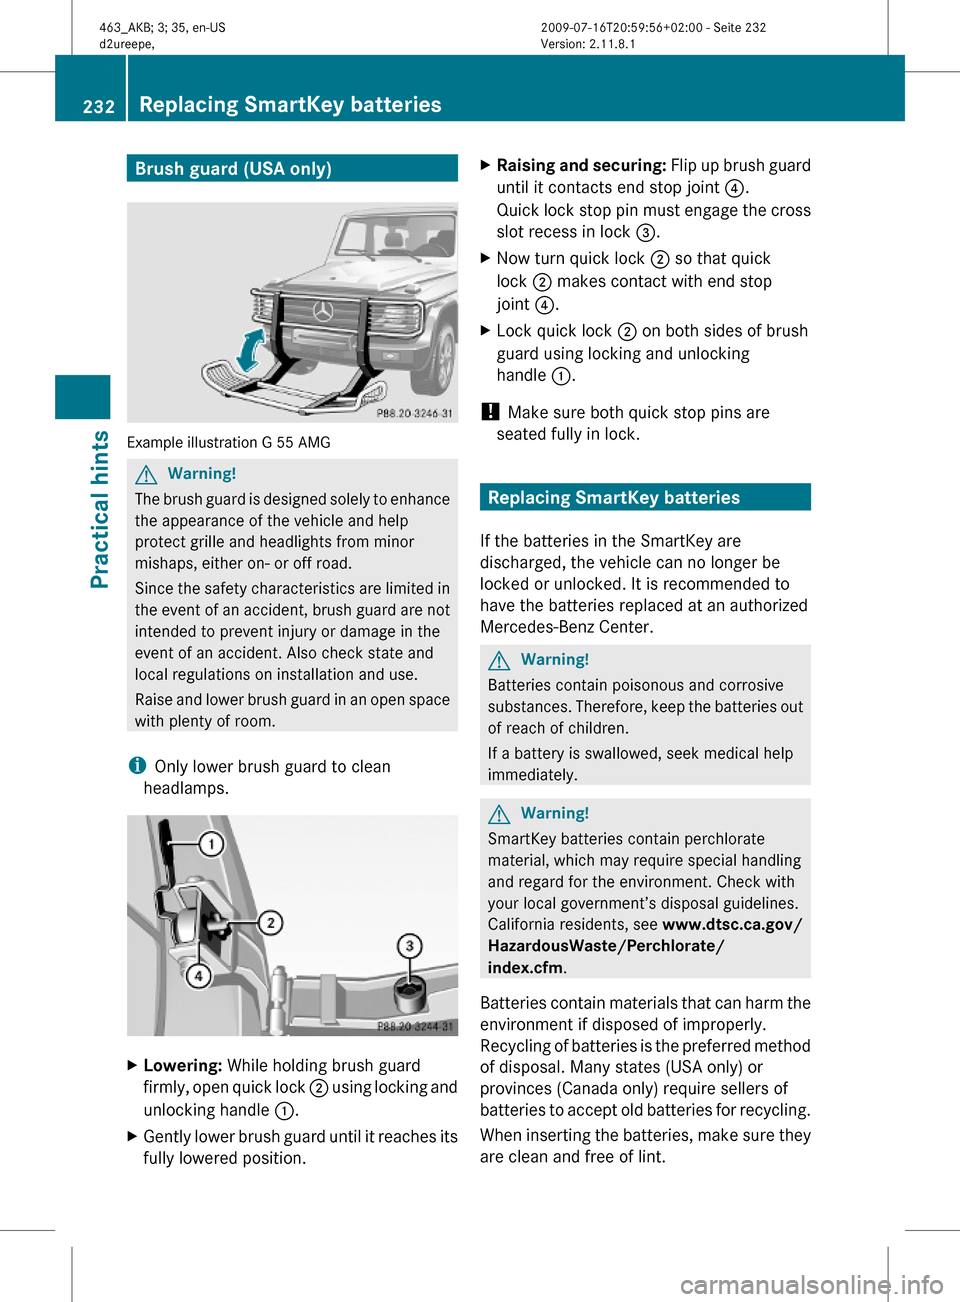
Brush guard (USA only)
Example illustration G 55 AMG
GWarning!
The brush guard is designed solely to enhance
the appearance of the vehicle and help
protect grille and headlights from minor
mishaps, either on- or off road.
Since the safety characteristics are limited in
the event of an accident, brush guard are not
intended to prevent injury or damage in the
event of an accident. Also check state and
local regulations on installation and use.
Raise and lower brush guard in an open space
with plenty of room.
iOnly lower brush guard to clean
headlamps.
XLowering: While holding brush guard
firmly, open quick lock ; using locking and
unlocking handle :.
XGently lower brush guard until it reaches its
fully lowered position.
XRaising and securing: Flip up brush guard
until it contacts end stop joint ?.
Quick lock stop pin must engage the cross
slot recess in lock =.
XNow turn quick lock ; so that quick
lock ; makes contact with end stop
joint ?.
XLock quick lock ; on both sides of brush
guard using locking and unlocking
handle :.
! Make sure both quick stop pins are
seated fully in lock.
Replacing SmartKey batteries
If the batteries in the SmartKey are
discharged, the vehicle can no longer be
locked or unlocked. It is recommended to
have the batteries replaced at an authorized
Mercedes-Benz Center.
GWarning!
Batteries contain poisonous and corrosive
substances. Therefore, keep the batteries out
of reach of children.
If a battery is swallowed, seek medical help
immediately.
GWarning!
SmartKey batteries contain perchlorate
material, which may require special handling
and regard for the environment. Check with
your local government’s disposal guidelines.
California residents, see www.dtsc.ca.gov/
HazardousWaste/Perchlorate/
index.cfm.
Batteries contain materials that can harm the
environment if disposed of improperly.
Recycling of batteries is the preferred method
of disposal. Many states (USA only) or
provinces (Canada only) require sellers of
batteries to accept old batteries for recycling.
When inserting the batteries, make sure they
are clean and free of lint.
232Replacing SmartKey batteriesPractical hints
463_AKB; 3; 35, en-USd2ureepe,Version: 2.11.8.12009-07-16T20:59:56+02:00 - Seite 232
Page 235 of 272

When replacing batteries, always replace
both batteries.
iThe required replacement batteries are
available at any authorized Mercedes-Benz
Center.
Replacement batteries: Lithium, type
CR 2025 or equivalent.
XRemove the mechanical key from the
SmartKey (Y page 228).
XPress mechanical key ; into the SmartKey
opening until battery compartment
cover : opens. Do not keep the cover
shut.
XRemove the battery compartment cover.XPat the SmartKey against the palm of your
hand until battery = falls out.
XInsert the new battery with the positive
terminal (+) facing up. Use a lint-free cloth.
XInsert the tabs of the battery compartment
cover into the housing and press the cover
closed.
XCheck the operation of the SmartKey.
Replacing bulbs
Safety notes
Safe vehicle operation depends on proper
exterior lighting and signaling to a large
degree.
Correct headlamp adjustment is extremely
important. Have headlamps checked and
readjusted at regular intervals and when a
bulb has been replaced. Contact an
authorized Mercedes-Benz Center for
headlamp adjustment.
GWarning!
Bulbs and bulb sockets can be very hot. Allow
the lamp to cool down before changing a bulb.
Keep bulbs out of reach of children.
Halogen lamps contain pressurized gas. A
bulb can explode if you
Rtouch or move it when hot
Rdrop the bulb
Rscratch the bulb
Wear eye and hand protection.
Because of high voltage in Xenon lamps, it is
dangerous to replace the bulb or repair the
lamp and its components. We recommend
that you have such work done by a qualified
technician.
iSince replacing bulbs is a technically
highly demanding process, we recommend
to have them replaced at an authorized
Mercedes-Benz Center.
iIf the headlamps or front fog lamps are
fogged up on the inside as a result of high
humidity, driving the vehicle a distance with
the lights on should clear up the fogging.
Replacing bulbs233Practical hints463_AKB; 3; 35, en-USd2ureepe,Version: 2.11.8.12009-07-16T20:59:56+02:00 - Seite 233Z
Page 243 of 272

Always lower the vehicle onto sufficient
capacity jackstands before working under the
vehicle.
Always firmly engage the parking brake and
block the wheels with wheel chocks or other
sizeable objects before raising the vehicle
with the jack. Do not disengage the parking
brake while the vehicle is raised.
Make sure that the ground on which the
vehicle is standing and where you place the
jack is solid, level and not slippery. If
necessary, use a large underlay. On slippery
surfaces, such as tiled floors, you should use
a non-slip underlay, for example a rubber mat.
Do not use wooden blocks or similar objects
to support the jack. Otherwise the jack may
not be able to achieve its load-bearing
capacity if it is not at its full height.
Never start the engine when the vehicle is
raised.
Also observe the notes on the jack.
XPrevent the vehicle from rolling away by
blocking wheels with wheel chocks (not
included) or other sizeable objects.
When changing a wheel on a level surface:
XPlace a wheel chock or other sizeable
object in front of and another wheel chock
or other sizeable object behind the wheel
that is diagonally opposite to the wheel
being changed.
Always try lifting the vehicle using the jack on
a level surface. However, should
circumstances require you to do so on a hill:
XPlace wheel chocks or other sizeable
objects on the downhill side in front of both
wheels on the side opposite to the side on
which the wheel is to be changed.
GWarning!
Only jack up the vehicle on level ground or on
slight inclines/declines. Otherwise, the
vehicle could fall off the jack and injure you or
others.
XOn the wheel to be changed, loosen but do
not yet remove the wheel bolts
(approximately one full turn with wheel
wrench :).
! Do not position the jack on the body of
the vehicle, as this may cause damage to
the vehicle.
XPlace the jack on firm ground.XPosition the jack under the axle housing so
that it is always vertical as seen from the
side, even if the vehicle is parked on an
incline.
Make sure the the jack is positioned
correctly under the axle housing. The axle
must fall into the jack contour.
XJack up the vehicle until the wheel is a
maximum of 1.2 in (3 cm) from the ground.
Removing the wheel
XUnscrew and remove the wheel bolts.Flat tire241Practical hints463_AKB; 3; 35, en-USd2ureepe,Version: 2.11.8.12009-07-16T20:59:56+02:00 - Seite 241Z
Page 244 of 272

! Do not place wheel bolts in sand or dirt.
This could result in damage to the wheel
bolts and wheel hub threads.
XRemove the wheel.
Attaching the spare wheel
GWarning!
Always replace wheel bolts that are damaged
or rusted.
Never apply oil or grease to wheel bolts.
Damaged wheel hub threads should be
repaired immediately. Do not continue to
drive under these circumstances! Contact an
authorized Mercedes-Benz Center or call
Roadside Assistance.
Incorrect wheel bolts or improperly tightened
wheel bolts can cause the wheel to come off.
This could cause an accident. Make sure to
use the correct wheel bolts.
GWarning!
Only use genuine Mercedes-Benz wheel bolts.
Other wheel bolts may come loose.
Do not tighten the wheel bolts when the
vehicle is raised. Otherwise the vehicle could
fall off the jack.
XClean contact surfaces of wheel and wheel
hub.
! To avoid paint damage, place wheel flat
against hub and hold it there while
installing first wheel bolt.
XGuide the spare wheel onto the wheel hub
and push it on.
XInsert the wheel bolts and tighten them
slightly.
Lowering the vehicle
XUsing the pump handle, turn the release
bolt of the jack counterclockwise
approximately one turn.
iNever turn the release bolt of the jack
more than one or two revolutions.
Otherwise hydraulic fluid can escape.
XLower the vehicle until the vehicle is resting
fully on its own weight.
XRemove the jack.XTighten the five wheel bolts evenly,
following the diagonal sequence illustrated
(: to A), until all bolts are tight. Observe
a tightening torque of 96 lb-ft (130 Nm).
GWarning!
Have the tightening torque checked after
changing a wheel. The wheels could come
loose if they are not tightened to a torque of
96 lb-ft (130 Nm).
XDisassemble the pump handle.XPress the jack piston in and close the
release bolt.
XStore the jack and the other vehicle tools
in the designated storage space.
XAfter changing the wheel, secure the
damaged wheel on the spare wheel carrier
(Y page 201). Make sure the wheel cannot
come loose.
XCheck the tire inflation pressure and
correct it if necessary.
Follow recommended cold tire inflation
pressures listed on the Tire and Loading
Information placard on the driver’s door
B-pillar (Y page 166).
242Flat tirePractical hints
463_AKB; 3; 35, en-USd2ureepe,Version: 2.11.8.12009-07-16T20:59:56+02:00 - Seite 242
Page 252 of 272
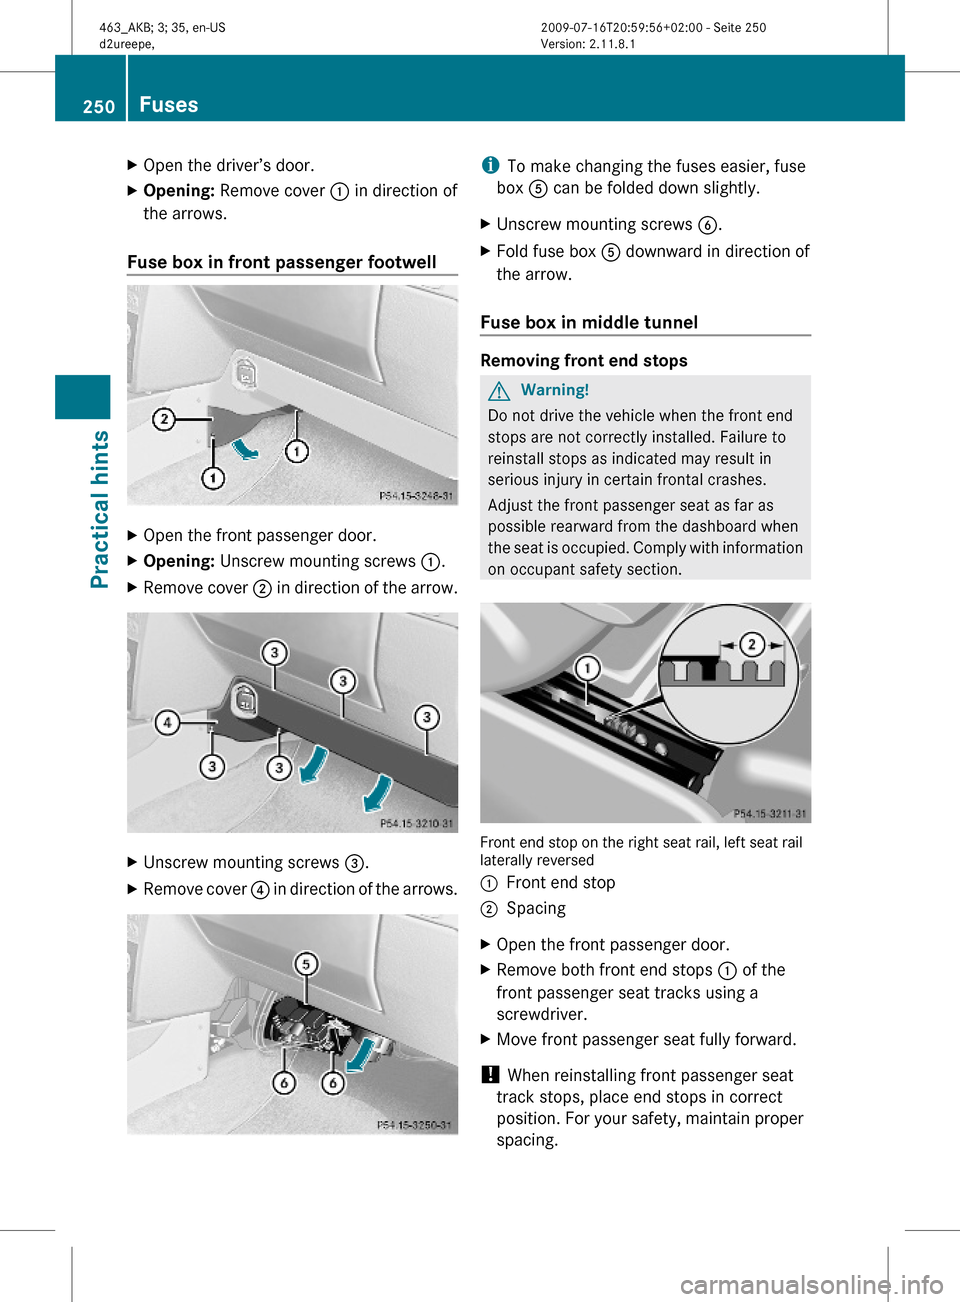
XOpen the driver’s door.XOpening: Remove cover : in direction of
the arrows.
Fuse box in front passenger footwell
XOpen the front passenger door.XOpening: Unscrew mounting screws :.XRemove cover ; in direction of the arrow.XUnscrew mounting screws =.XRemove cover ? in direction of the arrows.iTo make changing the fuses easier, fuse
box A can be folded down slightly.
XUnscrew mounting screws B.XFold fuse box A downward in direction of
the arrow.
Fuse box in middle tunnel
Removing front end stops
GWarning!
Do not drive the vehicle when the front end
stops are not correctly installed. Failure to
reinstall stops as indicated may result in
serious injury in certain frontal crashes.
Adjust the front passenger seat as far as
possible rearward from the dashboard when
the seat is occupied. Comply with information
on occupant safety section.
Front end stop on the right seat rail, left seat raillaterally reversed
:Front end stop;SpacingXOpen the front passenger door.XRemove both front end stops : of the
front passenger seat tracks using a
screwdriver.
XMove front passenger seat fully forward.
! When reinstalling front passenger seat
track stops, place end stops in correct
position. For your safety, maintain proper
spacing.
250FusesPractical hints
463_AKB; 3; 35, en-USd2ureepe,Version: 2.11.8.12009-07-16T20:59:56+02:00 - Seite 250