2010 MERCEDES-BENZ E63AMG Head rest
[x] Cancel search: Head restPage 89 of 372

Position 0
Before you press the KEYLESS-GO start/stop
button, the vehicle’s on-board electronics
have status 0 (as with SmartKey removed).
Position 1
XPress the KEYLESS-GO start/stop button
once.
This supplies power for some electrical
consumers, e.g. wipers.
i When you now open the driver’s door, the
power supply is switched off.
Ignition (or position 2)
XPress the KEYLESS-GO start/stop button
twice.
This supplies power for all electrical
consumers.
When you switch on the ignition, all lamps
in the instrument cluster come on. The low-
beam headlamp indicator lamp, high-beam
headlamp indicator lamp, turn signal
indicator lamps, and the indicator lamps for
the fog lamps will only come on if activated.
If a lamp in the instrument cluster fails to
come on when the ignition is switched on,
have it checked and replaced if necessary.
If a lamp in the instrument cluster remains
on after starting the engine or comes on
while driving, refer to “Lamps in instrument
cluster” ( Y page 304).
i
When you now press the KEYLESS-GO
start/stop button once and the driver’s
door is open, the power supply is switched
off.
Seats
Safety notes
GWarning!
In order to avoid possible loss of vehicle
control the following must be done before the
vehicle is put into motion:
R seat adjustment
R head restraint adjustment
R steering wheel adjustment
R rear view mirror adjustment
R fastening of seat belts
GWarning!
Do not adjust the driver’s seat while driving.
Adjusting the seat while driving could cause
the driver to lose control of the vehicle.
Never ride in a moving vehicle with the seat
backrest in an excessively reclined position as
this can be dangerous. You could slide under
the seat belt in a collision. If you slide under
it, the seat belt would apply force at the
abdomen or neck. That could cause serious
or fatal injuries. The seat backrest and seat
belts provide the best restraint when the
wearer is in a position that is as upright as
possible and seat belts are properly
positioned on the body.
GWarning!
Your seat must be adjusted so that you can
correctly fasten your seat belt.
Observe the following points:
R Adjust the seat backrest until your arms are
slightly angled when holding the steering
wheel.
R Adjust the seat to a comfortable seating
position that still allows you to reach the
accelerator/brake pedal safely. The
position should be as far back as possible
with the driver still able to operate the
controls properly.
Seats87Controls in detail212_AKB; 2; 41, en-USd2ureepe,Version: 2.11.8.12009-07-17T09:14:21+02:00 - Seite 87Z
Page 90 of 372

RAdjust the head restraint so that it is as
close to the head as possible. The center of
the head restraint must support the back of
the head at eye level.
RNever place hands under the seat or near
any moving parts while a seat is being
adjusted.
Failure to do so could result in an accident
and/or serious personal injury.
GWarning!
The power seats can be operated at any time.
Therefore, do not leave children unattended
in the vehicle, or with access to an unlocked
vehicle. A child’s unsupervised access to a
vehicle could result in an accident and/or
serious personal injury.
GWarning!
According to accident statistics, children are
safer when properly restrained in the rear
seating positions than in the front seating
position. Thus, we strongly recommend that
children be placed in the rear seats whenever
possible. Regardless of seating position,
children 12 years old and under must be
seated and properly secured in an
appropriately sized infant restraint, toddler
restraint, or booster seat recommended for
the size and weight of the child. For additional
information, see “Children in the vehicle”.
A child’s risk of serious or fatal injuries is
significantly increased if the child restraints
are not properly secured in the vehicle and/
or the child is not properly secured in the child
restraint.
GWarning!
For your protection, drive only with properly
positioned head restraints.
Adjust the head restraint so that it is as close
to the head as possible and the center of the
head restraint supports the back of the head
at eye level. This will reduce the potential for
injury to the head and neck in the event of an
accident or similar situation.
Do not drive the vehicle without the seat head
restraints. Head restraints are intended to
help reduce injuries during an accident.
Seat adjustment
! When moving the seats, make sure there
are no items in the footwell or behind the
seats. Otherwise, you could damage the
seats and/or the items.
Power seats
iThe memory function (Y page 96) lets
you store the settings for the seat position
together with the settings for the steering
wheel and the exterior rear view mirrors.
iVehicles with split rear seat bench:
If you fold down one or both sections of the
rear seat backrest, the respective front
seat is moved forward slightly, if necessary,
to prevent contact with the rear seat
backrest.
XSeat fore and aft adjustment: Press the
switch forward or backward in direction of
arrow ?.
XSeat backrest tilt: Press the switch
forward or backward in direction of arrow
A.
XSeat height: Press the switch up or down
in direction of arrow =.
88SeatsControls in detail
212_AKB; 2; 41, en-USd2ureepe,Version: 2.11.8.12009-07-17T09:14:21+02:00 - Seite 88
Page 91 of 372

XSeat cushion tilt: Press the switch up or
down in direction of arrow ; until your
upper legs are lightly supported.
XHead restraint height: Press the switch
up or down in direction of arrow :.
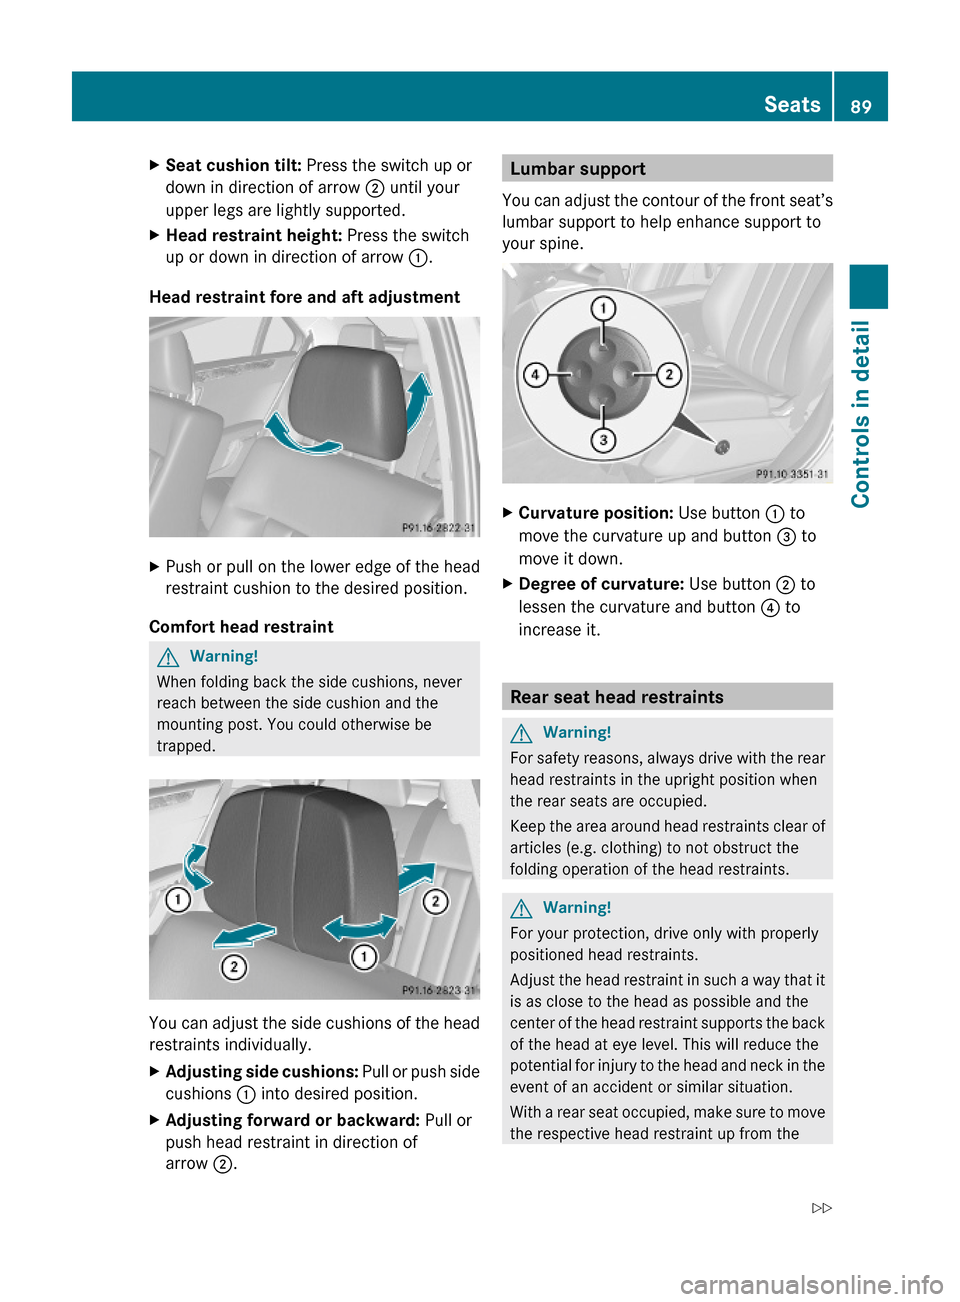
Head restraint fore and aft adjustment
XPush or pull on the lower edge of the head
restraint cushion to the desired position.
Comfort head restraint
GWarning!
When folding back the side cushions, never
reach between the side cushion and the
mounting post. You could otherwise be
trapped.
You can adjust the side cushions of the head
restraints individually.
XAdjusting side cushions: Pull or push side
cushions : into desired position.
XAdjusting forward or backward: Pull or
push head restraint in direction of
arrow ;.
Lumbar support
You can adjust the contour of the front seat’s
lumbar support to help enhance support to
your spine.
XCurvature position: Use button : to
move the curvature up and button = to
move it down.
XDegree of curvature: Use button ; to
lessen the curvature and button ? to
increase it.
Rear seat head restraints
GWarning!
For safety reasons, always drive with the rear
head restraints in the upright position when
the rear seats are occupied.
Keep the area around head restraints clear of
articles (e.g. clothing) to not obstruct the
folding operation of the head restraints.
GWarning!
For your protection, drive only with properly
positioned head restraints.
Adjust the head restraint in such a way that it
is as close to the head as possible and the
center of the head restraint supports the back
of the head at eye level. This will reduce the
potential for injury to the head and neck in the
event of an accident or similar situation.
With a rear seat occupied, make sure to move
the respective head restraint up from the
Seats89Controls in detail212_AKB; 2; 41, en-USd2ureepe,Version: 2.11.8.12009-07-17T09:14:21+02:00 - Seite 89Z
Page 92 of 372

lowest non-use position and have the
occupant adjust the head restraint properly.
Do not drive the vehicle without the seat head
restraints installed when the rear seats are
occupied. Head restraints are intended to
help reduce injuries during an accident.
GWarning!
Make sure the rear seat head restraints
engage when placing them upright manually.
Otherwise their protective function cannot be
ensured.
The back of the head will not be supported in
the event of a collision. That could cause
serious or even fatal injuries. Rear seat
occupants can be seriously injured or killed.
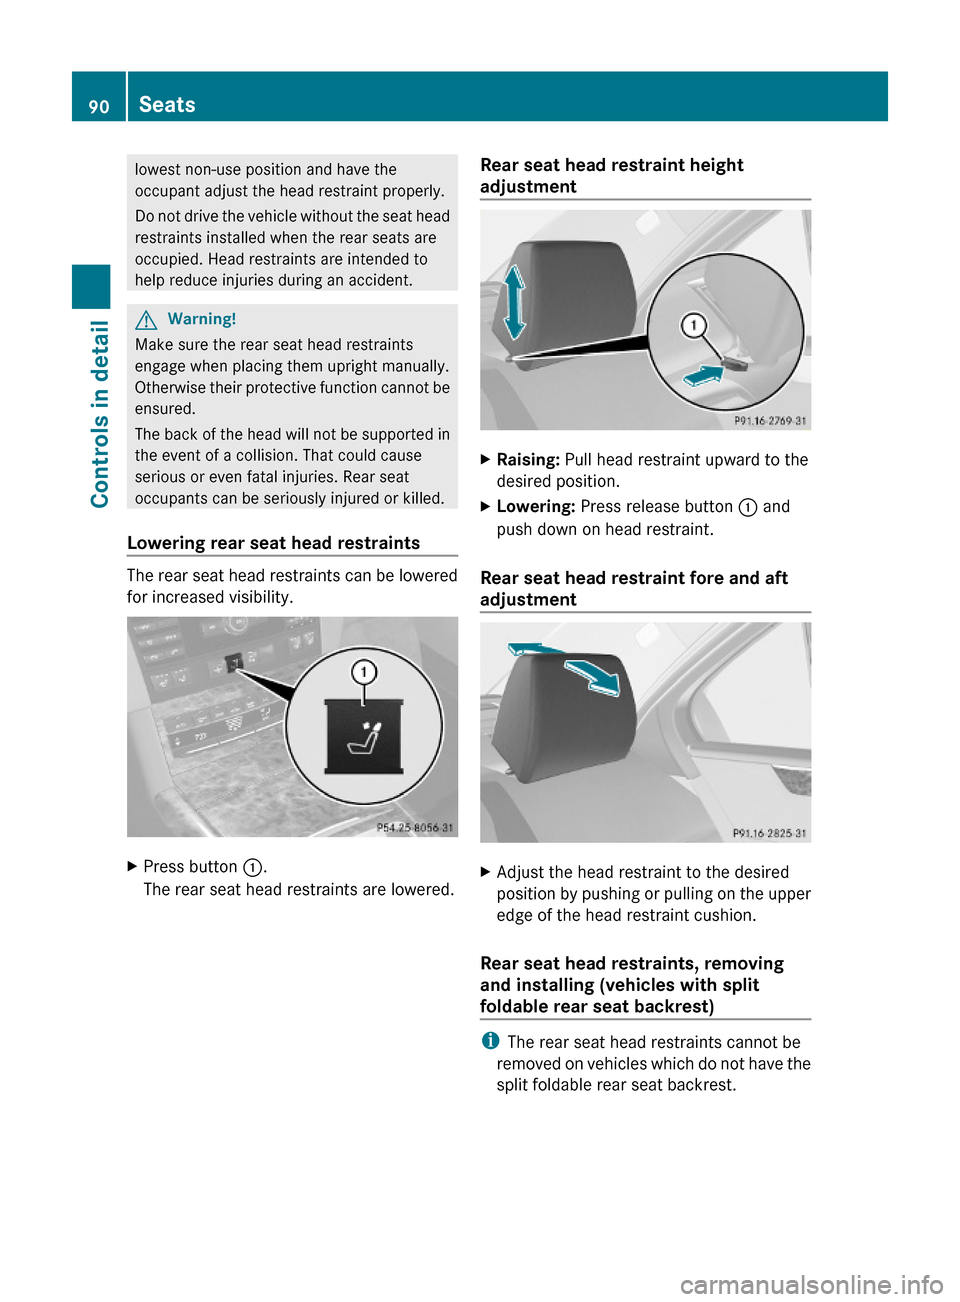
Lowering rear seat head restraints
The rear seat head restraints can be lowered
for increased visibility.
XPress button :.
The rear seat head restraints are lowered.
Rear seat head restraint height
adjustment
XRaising: Pull head restraint upward to the
desired position.
XLowering: Press release button : and
push down on head restraint.
Rear seat head restraint fore and aft
adjustment
XAdjust the head restraint to the desired
position by pushing or pulling on the upper
edge of the head restraint cushion.
Rear seat head restraints, removing
and installing (vehicles with split
foldable rear seat backrest)
iThe rear seat head restraints cannot be
removed on vehicles which do not have the
split foldable rear seat backrest.
90SeatsControls in detail
212_AKB; 2; 41, en-USd2ureepe,Version: 2.11.8.12009-07-17T09:14:21+02:00 - Seite 90
Page 93 of 372

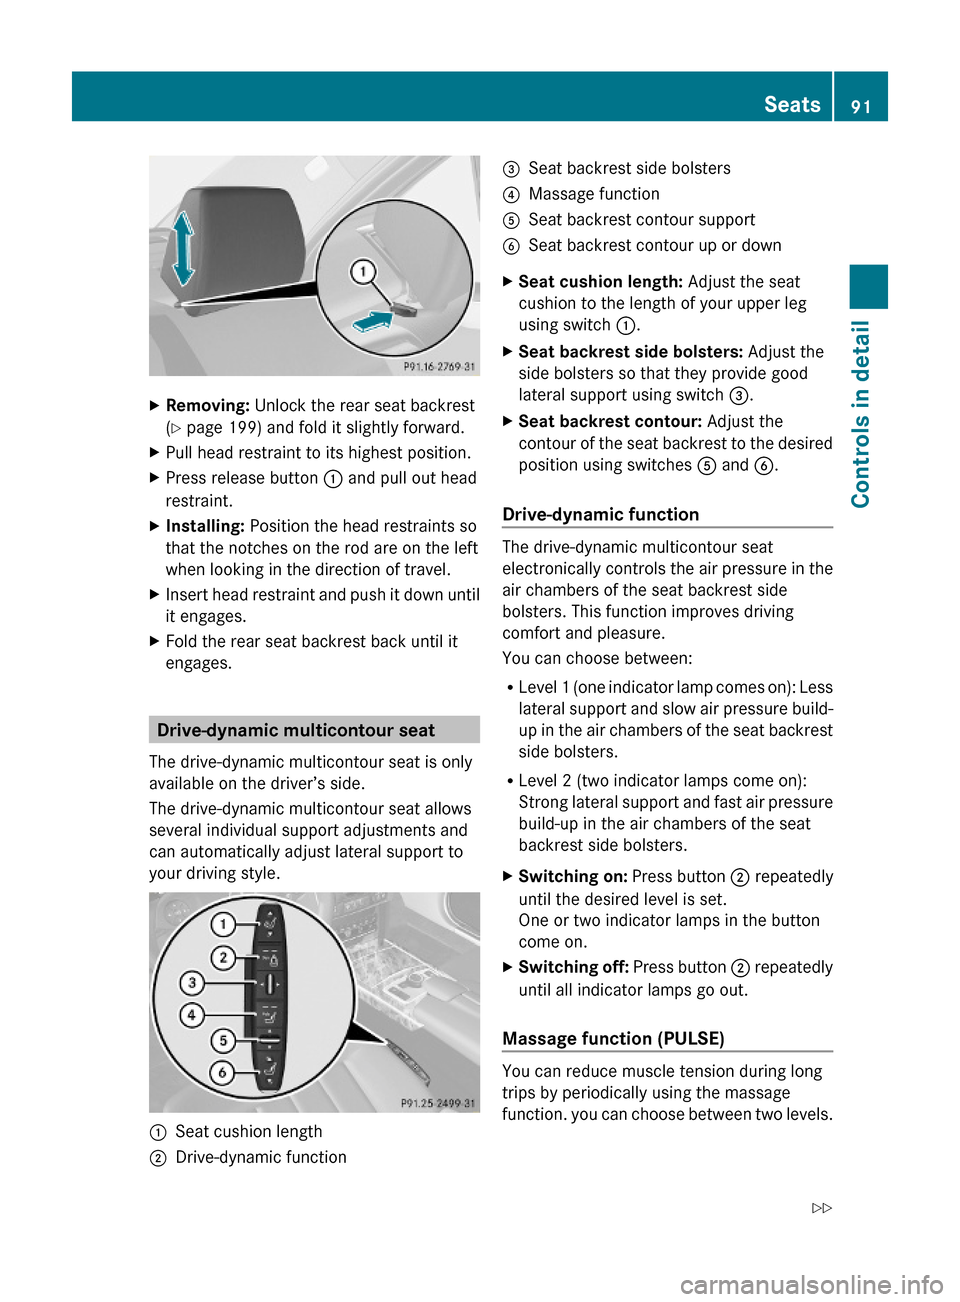
XRemoving: Unlock the rear seat backrest
(Y page 199) and fold it slightly forward.
XPull head restraint to its highest position.XPress release button : and pull out head
restraint.
XInstalling: Position the head restraints so
that the notches on the rod are on the left
when looking in the direction of travel.
XInsert head restraint and push it down until
it engages.
XFold the rear seat backrest back until it
engages.
Drive-dynamic multicontour seat
The drive-dynamic multicontour seat is only
available on the driver’s side.
The drive-dynamic multicontour seat allows
several individual support adjustments and
can automatically adjust lateral support to
your driving style.
:Seat cushion length;Drive-dynamic function=Seat backrest side bolsters?Massage functionASeat backrest contour supportBSeat backrest contour up or downXSeat cushion length: Adjust the seat
cushion to the length of your upper leg
using switch :.
XSeat backrest side bolsters: Adjust the
side bolsters so that they provide good
lateral support using switch =.
XSeat backrest contour: Adjust the
contour of the seat backrest to the desired
position using switches A and B.
Drive-dynamic function
The drive-dynamic multicontour seat
electronically controls the air pressure in the
air chambers of the seat backrest side
bolsters. This function improves driving
comfort and pleasure.
You can choose between:
RLevel 1 (one indicator lamp comes on): Less
lateral support and slow air pressure build-
up in the air chambers of the seat backrest
side bolsters.
RLevel 2 (two indicator lamps come on):
Strong lateral support and fast air pressure
build-up in the air chambers of the seat
backrest side bolsters.
XSwitching on: Press button ; repeatedly
until the desired level is set.
One or two indicator lamps in the button
come on.
XSwitching off: Press button ; repeatedly
until all indicator lamps go out.
Massage function (PULSE)
You can reduce muscle tension during long
trips by periodically using the massage
function. you can choose between two levels.
Seats91Controls in detail212_AKB; 2; 41, en-USd2ureepe,Version: 2.11.8.12009-07-17T09:14:21+02:00 - Seite 91Z
Page 107 of 372

! If you have set intermittent wiping, dirt on
the surface of the rain sensor or optical
effects may cause the windshield wipers to
wipe in an undesired fashion. This could
then damage the windshield wiper blades
or scratch the windshield. You should
therefore switch off the windshield wipers
when weather conditions are dry.XTurn the combination switch to position
Ä or Å .
After the initial wipe, pauses between
wipes are controlled by the rain sensor
automatically.
Intermittent wiping is interrupted when the
vehicle is at a standstill and a front door is
opened. This protects persons getting into or
out of the vehicle from being sprayed.
Intermittent wiping will be continued when all
doors are closed and
R the automatic transmission is in drive
position D or reverse gear R
or
R the wiper setting is changed using the
combination switch
Single wipe
XPress the combination switch briefly in
direction of arrow B to the resistance
point.
The windshield wipers wipe one time
without washer fluid.
Wiping with washer fluid
XPress the combination switch in direction
of arrow B past the resistance point.
The windshield wipers operate with washer
fluid.
i To prevent smears on the windshield or
noisy/chattering wiper blades, wipe with
washer fluid every now and then even when
it is raining.
For information on filling up the washer
reservoir, see “Washer system and headlamp
cleaning system” ( Y page 227).
For information on cleaning the headlamps
with washer fluid, see “Headlamp cleaning
system” ( Y page 102).
Problems with wipers
! If anything blocks the windshield wipers
(leaves, snow, etc.), switch them off
immediately.
For safety reasons, do the following before
attempting to remove any blockage:
R Stop the vehicle in a safe location.
R Remove the SmartKey from the starter
switch.
or
R Turn off the engine by pressing the
KEYLESS-GO start/stop button and
open the driver’s door (with the driver’s
door open, starter switch is in position
0 , same as with SmartKey removed from
starter switch).
R Engage the parking brake.
R Remove blockage.
R Turn the windshield wipers on again.
If the windshield wipers fail to function at
all with the combination switch in position
Ä or Å ,
R set the combination switch to the next
higher wiper speed
R have the windshield wipers checked at
the nearest authorized Mercedes-Benz
Center
Power windows
Opening and closing
The door windows are opened and closed
electrically. The switches for all door windows
are located on the driver’s door control panel.
Power windows105Controls in detail212_AKB; 2; 41, en-USd2ureepe,Version: 2.11.8.12009-07-17T09:14:21+02:00 - Seite 105Z
Page 154 of 372

vehicle ahead and your vehicle’s current
speed indicate that the DISTRONIC PLUS will
not be capable of slowing the vehicle
sufficiently to maintain the preset following
distance, which creates a danger of a
collision.
Immediately brake the vehicle to increase
your distance to the preceding vehicle. The
warning sound is intended as a final caution
in which you should intercede with your own
braking inputs to avoid a potentially
dangerous situation. Do not wait for the
operation of the warning signal to intercede
with your own braking. This will result in
potentially dangerous emergency braking
which will not always result in an impact being
avoided.
Tailgating increases the risk of an accident.
GWarning!
The DISTRONIC PLUS brakes your vehicle
with a maximum deceleration of 13 ft/s2
(4 m/s2). This corresponds to approximately
40% of the maximum deceleration of your
vehicle.
You must also apply the brakes yourself to
avoid a collision. The DISTRONIC PLUS brakes
the vehicle in an effort to restore the preset
distance or to maintain the set speed.
GWarning!
If you do not receive visual or acoustic
warning signals during a critical traffic
situation, DISTRONIC PLUS has either not
recognized the collision risk, has been
deactivated or is malfunctioning.
Remember, whether or not DISTRONIC PLUS
is operating, it is ultimately always the drivers
responsibility to apply the brakes in order to
control the vehicle and avoid a collision.
Displaying the distance graphic
In the DriveAssist menu under Distance
Display you see the current settings for
DISTRONIC PLUS. The Information shown in
the multifunction display depends on whether
DISTRONIC PLUS is activated or deactivated.
For activating or deactivating the DISTRONIC
PLUS system, see “Activating DISTRONIC
PLUS” (Y page 153) or “Deactivating
DISTRONIC PLUS” (Y page 156).
The menu overview can be found on
(Y page 129).
XPress = or ; to select the
DriveAssist menu.
XPress : or 9 to select the
Distance Display function.
XPress a.
The DISTRONIC PLUS distance graphic
appears and you will see one of the
following displays in the multifunction
display.
DISTRONIC PLUS activated
If you switch on the DISTRONIC PLUS, you will
see the set speed in the multifunction display
for approximately 5 seconds. When the
DISTRONIC PLUS is activated the following
display appears in the multifunction display.
Example illustration
:DISTRONIC PLUS activated;Your vehicle=Preset distance threshold to the
preceding vehicle
?Preceding vehicle, if detected152Driving systemsControls in detail
212_AKB; 2; 41, en-USd2ureepe,Version: 2.11.8.12009-07-17T09:14:21+02:00 - Seite 152
Page 202 of 372

The two sections can be folded down
separately.
GWarning!
When expanding the cargo volume, always
fold the seat backrests fully forward.
Unless you are transporting cargo, the seat
backrests must remain properly locked in the
upright position.
In an accident, during hard braking or sudden
maneuvers, loose items will be thrown around
inside the vehicle. This can cause injury to
vehicle occupants unless the items are
securely fastened in the vehicle.
Always use the cargo tie-down rings.
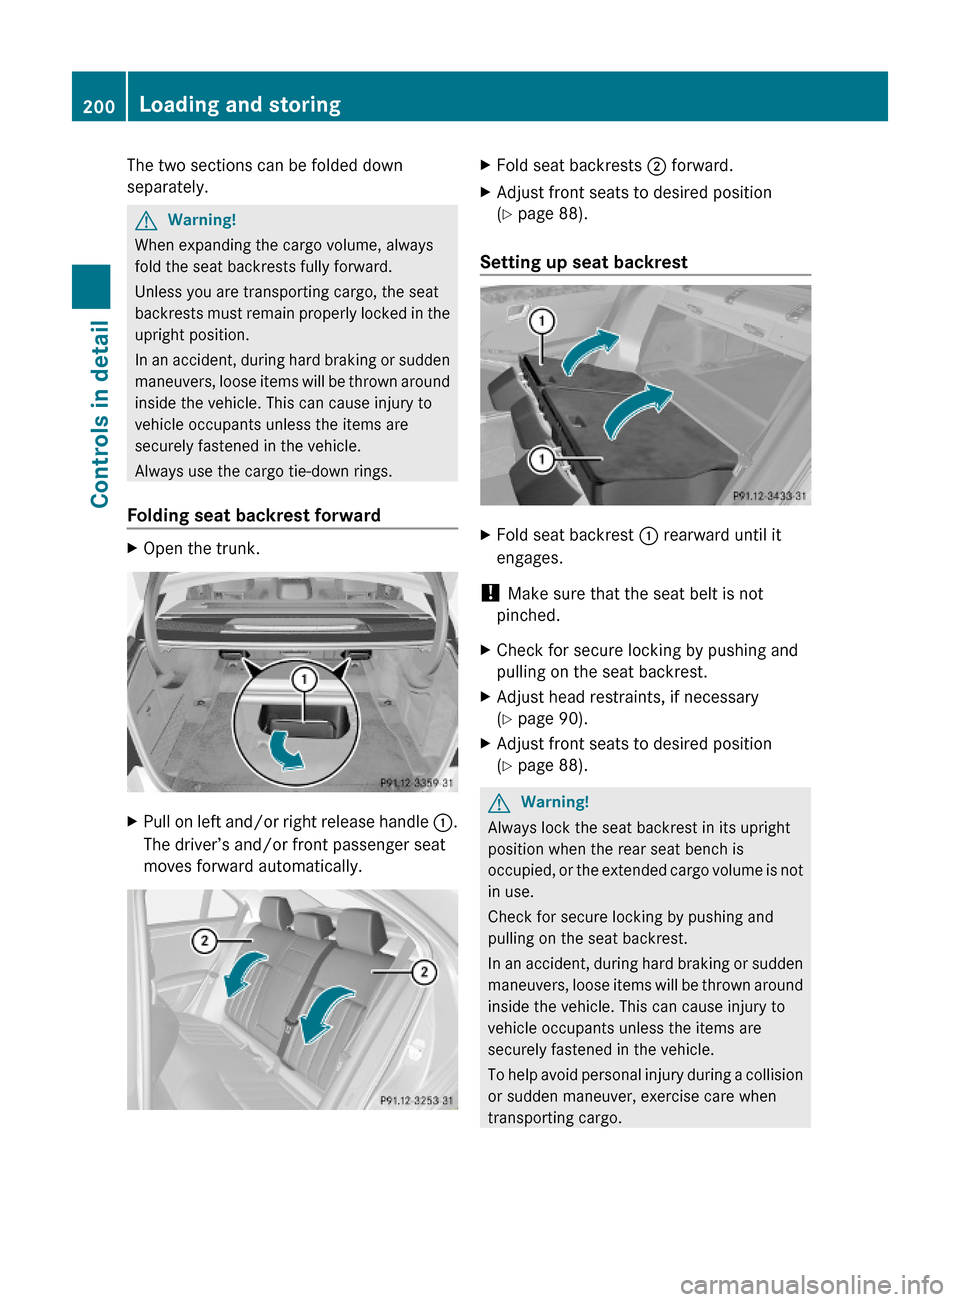
Folding seat backrest forward
XOpen the trunk.XPull on left and/or right release handle :.
The driver’s and/or front passenger seat
moves forward automatically.
XFold seat backrests ; forward.XAdjust front seats to desired position
(Y page 88).
Setting up seat backrest
XFold seat backrest : rearward until it
engages.
! Make sure that the seat belt is not
pinched.
XCheck for secure locking by pushing and
pulling on the seat backrest.
XAdjust head restraints, if necessary
(Y page 90).
XAdjust front seats to desired position
(Y page 88).
GWarning!
Always lock the seat backrest in its upright
position when the rear seat bench is
occupied, or the extended cargo volume is not
in use.
Check for secure locking by pushing and
pulling on the seat backrest.
In an accident, during hard braking or sudden
maneuvers, loose items will be thrown around
inside the vehicle. This can cause injury to
vehicle occupants unless the items are
securely fastened in the vehicle.
To help avoid personal injury during a collision
or sudden maneuver, exercise care when
transporting cargo.
200Loading and storingControls in detail
212_AKB; 2; 41, en-USd2ureepe,Version: 2.11.8.12009-07-17T09:14:21+02:00 - Seite 200