2010 MERCEDES-BENZ E63AMG page 200
[x] Cancel search: page 200Page 134 of 372

SETUPXPress button = or ; to select the
AMG menu.
XPress button 9 to select SETUP.
or
XTap the AMG button on the center console
(Y page 165).
iYou can store and call up automatic
transmission program mode and
suspension style settings with the AMG
button on the center console. For more
information, see (Y page 165).
:Automatic transmission program mode
indicator
;ESC mode indicator=Suspension style indicator
RACETIMER
GWarning!
The RACETIMER feature is only for use on
roads and in conditions where high speed
driving is permitted. Racing on public roads is
prohibited under all circumstances. The driver
is and must always remain responsible for
following posted speed limits.
The RACETIMER allows you to time and save
driving stretches.
XPress button = or ; to select the
AMG menu.
XPress button 9 repeatedly until the
RACETIMER appears in the multifunction
display.
:RACETIMER;Lap number
You can start the RACETIMER when the
engine is running or the starter switch is in
position 2 (Y page 85).
While the RACETIMER is being displayed, you
cannot adjust the audio volume using buttons
W or X.
XStarting: Press button W.XDisplaying intermediate time: Press
button X while the timer is running.
The intermediate time is shown for
5 seconds.
XStopping: Press button W.
When you stop the vehicle and turn the
SmartKey to position 1 (Y page 85) or, in
vehicles with KEYLESS-GO, turn off the
engine and do not open the driver’s door, the
RACETIMER stops timing. Timing is resumed
when you press button W after switching
the ignition back on or restarting the engine.
Saving lap time and starting a new lap
You can save up to 16 laps.
XPress button X while the timer is
running.
The intermediate time will be shown for
5 seconds.
XPress button X within 5 seconds.
The intermediate time shown will be saved
as a lap time.
The RACETIMER begins timing the new lap.
The new lap begins to be timed as soon as
the intermediate time is called up.
132Control systemControls in detail
212_AKB; 2; 41, en-USd2ureepe,Version: 2.11.8.12009-07-17T09:14:21+02:00 - Seite 132
Page 136 of 372

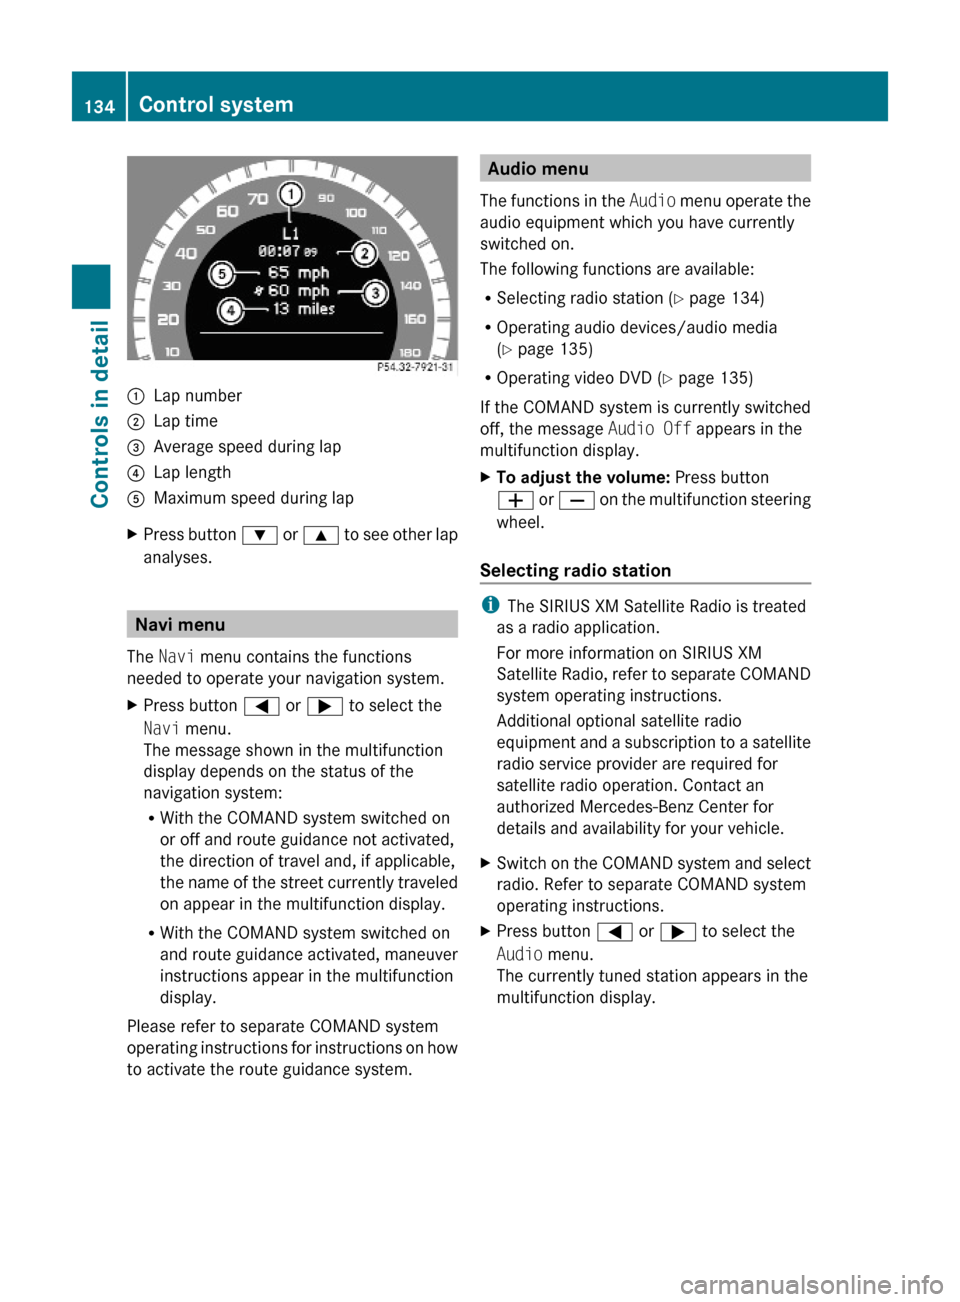
:Lap number;Lap time=Average speed during lap?Lap lengthAMaximum speed during lapXPress button : or 9 to see other lap
analyses.
Navi menu
The Navi menu contains the functions
needed to operate your navigation system.
XPress button = or ; to select the
Navi menu.
The message shown in the multifunction
display depends on the status of the
navigation system:
RWith the COMAND system switched on
or off and route guidance not activated,
the direction of travel and, if applicable,
the name of the street currently traveled
on appear in the multifunction display.
RWith the COMAND system switched on
and route guidance activated, maneuver
instructions appear in the multifunction
display.
Please refer to separate COMAND system
operating instructions for instructions on how
to activate the route guidance system.
Audio menu
The functions in the Audio menu operate the
audio equipment which you have currently
switched on.
The following functions are available:
RSelecting radio station (Y page 134)
ROperating audio devices/audio media
(Y page 135)
ROperating video DVD (Y page 135)
If the COMAND system is currently switched
off, the message Audio Off appears in the
multifunction display.
XTo adjust the volume: Press button
W or X on the multifunction steering
wheel.
Selecting radio station
iThe SIRIUS XM Satellite Radio is treated
as a radio application.
For more information on SIRIUS XM
Satellite Radio, refer to separate COMAND
system operating instructions.
Additional optional satellite radio
equipment and a subscription to a satellite
radio service provider are required for
satellite radio operation. Contact an
authorized Mercedes-Benz Center for
details and availability for your vehicle.
XSwitch on the COMAND system and select
radio. Refer to separate COMAND system
operating instructions.
XPress button = or ; to select the
Audio menu.
The currently tuned station appears in the
multifunction display.
134Control systemControls in detail
212_AKB; 2; 41, en-USd2ureepe,Version: 2.11.8.12009-07-17T09:14:21+02:00 - Seite 134
Page 139 of 372

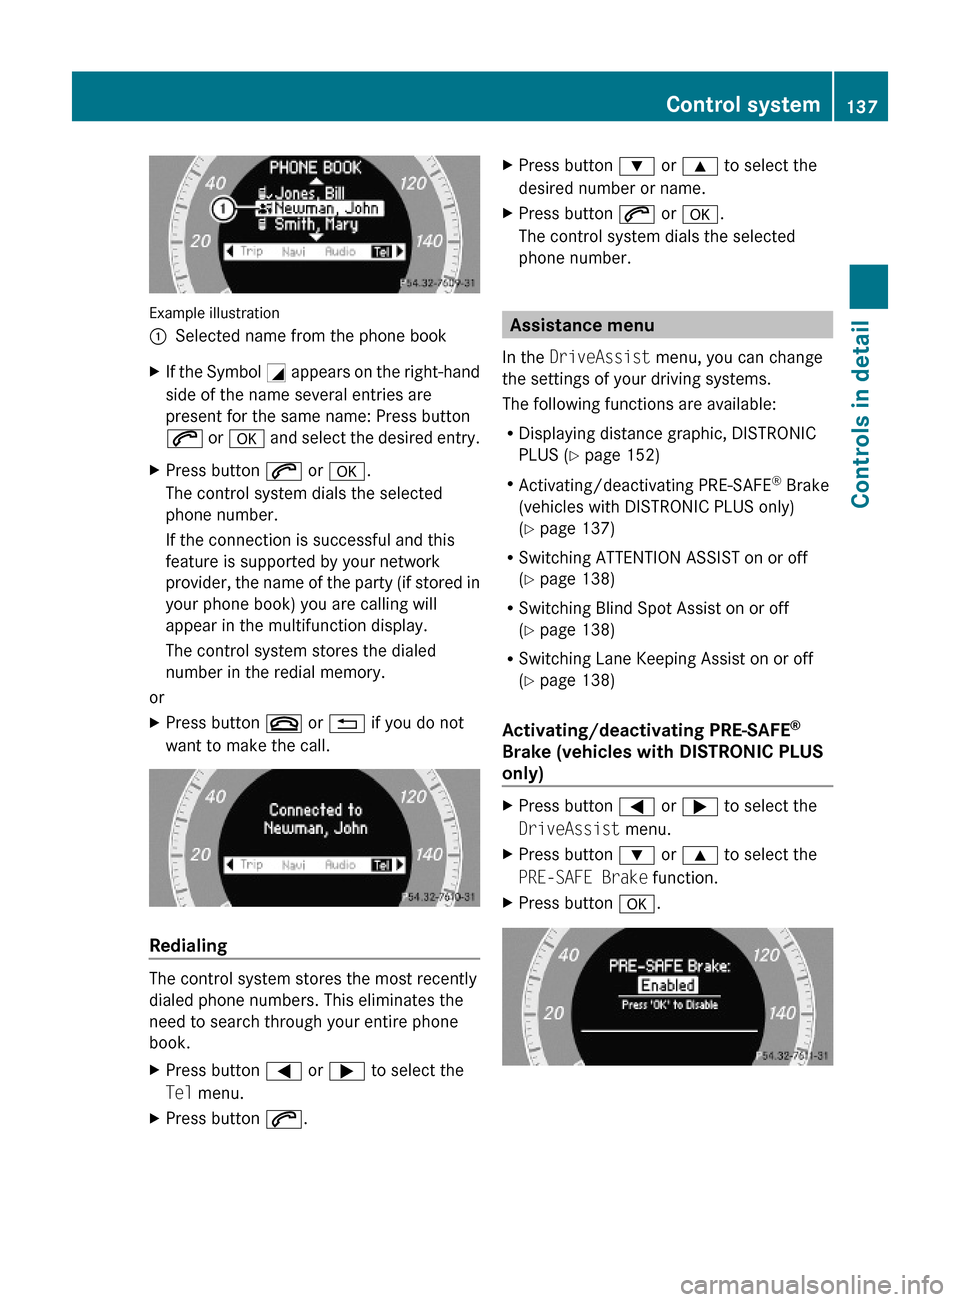
Example illustration
:Selected name from the phone bookXIf the Symbol G appears on the right-hand
side of the name several entries are
present for the same name: Press button
6 or a and select the desired entry.
XPress button 6 or a.
The control system dials the selected
phone number.
If the connection is successful and this
feature is supported by your network
provider, the name of the party (if stored in
your phone book) you are calling will
appear in the multifunction display.
The control system stores the dialed
number in the redial memory.
or
XPress button ~ or % if you do not
want to make the call.
Redialing
The control system stores the most recently
dialed phone numbers. This eliminates the
need to search through your entire phone
book.
XPress button = or ; to select the
Tel menu.
XPress button 6.XPress button : or 9 to select the
desired number or name.
XPress button 6 or a.
The control system dials the selected
phone number.
Assistance menu
In the DriveAssist menu, you can change
the settings of your driving systems.
The following functions are available:
RDisplaying distance graphic, DISTRONIC
PLUS (Y page 152)
RActivating/deactivating PRE-SAFE® Brake
(vehicles with DISTRONIC PLUS only)
(Y page 137)
RSwitching ATTENTION ASSIST on or off
(Y page 138)
RSwitching Blind Spot Assist on or off
(Y page 138)
RSwitching Lane Keeping Assist on or off
(Y page 138)
Activating/deactivating PRE-SAFE®
Brake (vehicles with DISTRONIC PLUS
only)
XPress button = or ; to select the
DriveAssist menu.
XPress button : or 9 to select the
PRE-SAFE Brake function.
XPress button a.Control system137Controls in detail212_AKB; 2; 41, en-USd2ureepe,Version: 2.11.8.12009-07-17T09:14:21+02:00 - Seite 137Z
Page 140 of 372

XPress button a again if you would like
to change the current status.
After the function has been activated, the
PRE-SAFE® Brake indicator Ä appears
in the lower part of the multifunction
display. When the HOLD function is
switched on, the PRE-SAFE® Brake
indicator Ä will not appear.
For more information on PRE-SAFE® Brake,
see (Y page 69).
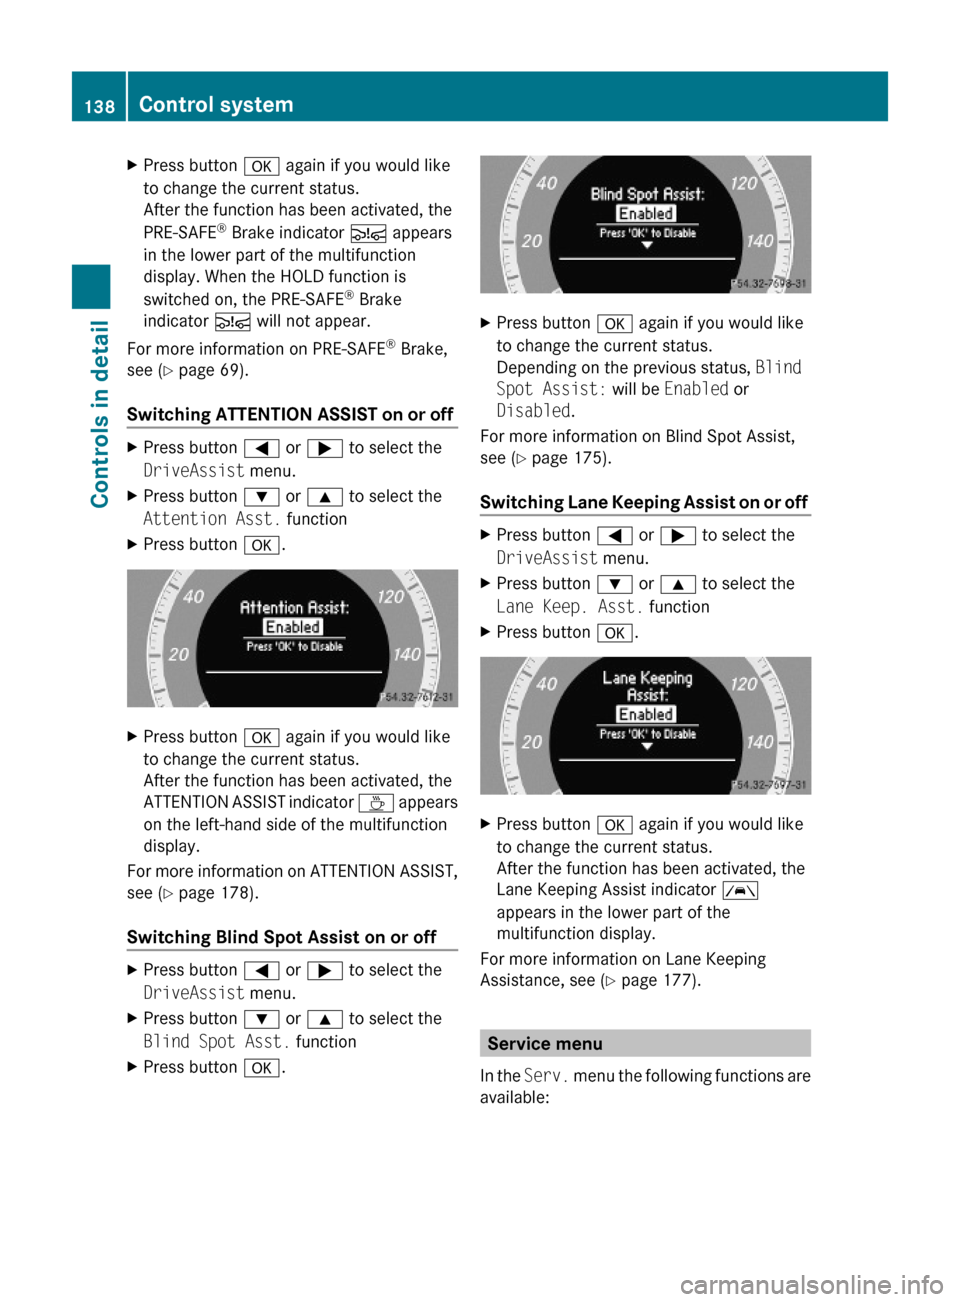
Switching ATTENTION ASSIST on or off
XPress button = or ; to select the
DriveAssist menu.
XPress button : or 9 to select the
Attention Asst. function
XPress button a.XPress button a again if you would like
to change the current status.
After the function has been activated, the
ATTENTION ASSIST indicator À appears
on the left-hand side of the multifunction
display.
For more information on ATTENTION ASSIST,
see (Y page 178).
Switching Blind Spot Assist on or off
XPress button = or ; to select the
DriveAssist menu.
XPress button : or 9 to select the
Blind Spot Asst. function
XPress button a.XPress button a again if you would like
to change the current status.
Depending on the previous status, Blind
Spot Assist: will be Enabled or
Disabled.
For more information on Blind Spot Assist,
see (Y page 175).
Switching Lane Keeping Assist on or off
XPress button = or ; to select the
DriveAssist menu.
XPress button : or 9 to select the
Lane Keep. Asst. function
XPress button a.XPress button a again if you would like
to change the current status.
After the function has been activated, the
Lane Keeping Assist indicator Ã
appears in the lower part of the
multifunction display.
For more information on Lane Keeping
Assistance, see (Y page 177).
Service menu
In the Serv. menu the following functions are
available:
138Control systemControls in detail
212_AKB; 2; 41, en-USd2ureepe,Version: 2.11.8.12009-07-17T09:14:21+02:00 - Seite 138
Page 141 of 372

RVehicle status message memory
(Y page 139)
RRestarting the tire pressure loss warning
system (Canada only) (Y page 233)
RChecking tire inflation pressure
electronically with the Advanced TPMS
(Y page 233)
RCalling up the maintenance service
indicator display (Y page 259)
Vehicle status message memory
Use the vehicle status message memory
function to scan malfunction and warning
messages that may be stored in the system.
Such messages appear in the multifunction
display and are based on conditions or
system status the vehicle’s system has
recorded.
GWarning!
Malfunction and warning messages are only
indicated for certain systems and are
intentionally not very detailed. The
malfunction and warning messages are
simply a reminder with respect to the
operation of certain systems. They do not
replace the owner’s and/or driver’s
responsibility to maintain the vehicle’s
operating safety. Have all required
maintenance and safety checks performed on
the vehicle. Bring the vehicle to an authorized
Mercedes-Benz Center to address the
malfunction and warning messages.
XPress button = or ; to select the
Serv. menu.
If conditions have occurred causing status
messages to be recorded, the number of
messages appears in the multifunction
display:
XPress button : or 9 to select the
messages function.
XPress button a to confirm.
The stored messages will now be displayed
in the order in which they have occurred.
For malfunction and warning messages,
see “Vehicle status messages in the
multifunction display” (Y page 272).
XUse button : or 9 to scroll through
the messages.
If you turn the SmartKey in the starter switch
to position 0 and then back to position 2, all
messages will be deleted from the message
memory.
Settings menu
Introduction
In the Sett. menu there are two functions:
The function Factory Setting
(Y page 139), with which you can reset the
settings to the original factory settings and a
collection of submenus (Y page 140) with
which you can make individual settings for
your vehicle.
Resetting to factory settings
You can reset most of the settings of the
submenus to the factory settings.
For safety reasons, the function Daytime
Running Lamps in the Lights submenu
cannot be reset while driving.
XPress button = or ; to select the
Sett. menu.
Control system139Controls in detail212_AKB; 2; 41, en-USd2ureepe,Version: 2.11.8.12009-07-17T09:14:21+02:00 - Seite 139Z
Page 142 of 372

XPress button : or 9 to select the
Factory Setting function.
XPress button a.
The function Reset All Settings?
appears in the multifunction display.
XPress button : or 9 to select Yes or
No. Select Yes if you want to reset to
factory settings.
XPress button a to confirm.
The confirmation message appears in the
multifunction display.
Submenus in the Settings menu
XPress button = or ; to select the
Sett. menu.
XPress button : or 9 to select a
submenu.
Scroll down with button :, scroll up with
button 9.
With the selection marker on the desired
submenu, use the button a to access the
individual functions within that submenu.
Once within the submenu, you can use button
9 to move to the next function or
button : to move to the previous function
within that submenu.
The following lists show what settings can be
changed within the various menus. Detailed
instructions on making individual settings can
be found on the following pages.
Instrument cluster submenu
RSelecting speedometer display mode
(Y page 141)
RPermanent display (speed display or
outside temperature) (Y page 141)
Lights submenu
RSwitching daytime running lamp mode on
or off (USA only) (Y page 141)
RSwitching Adaptive Highbeam Assist on or
off (Y page 142)
RSwitching locator lighting on or off
(Y page 142)
RSetting ambient lighting (Y page 143)
RSwitching interior lighting delayed shut-off
on or off (Y page 143)
Vehicle submenu
RSwitching automatic central locking on or
off (Y page 144)
RSwitching the radar sensors on or off
(Y page 144)
Convenience submenu
RActivating easy-entry/exit feature
(Y page 145)
RActivating/deactivating seat belt
adjustment function (Y page 145)
Instrument cluster submenu
Access the Instr. Cluster submenu via
the Sett. menu. Use the Instr. Cluster
submenu to change the instrument cluster
display settings.
The following functions are available:
RSelecting speedometer display mode
(Y page 141)
RPermanent display (speed display or
outside temperature) (Y page 141)
140Control systemControls in detail
212_AKB; 2; 41, en-USd2ureepe,Version: 2.11.8.12009-07-17T09:14:21+02:00 - Seite 140
Page 143 of 372

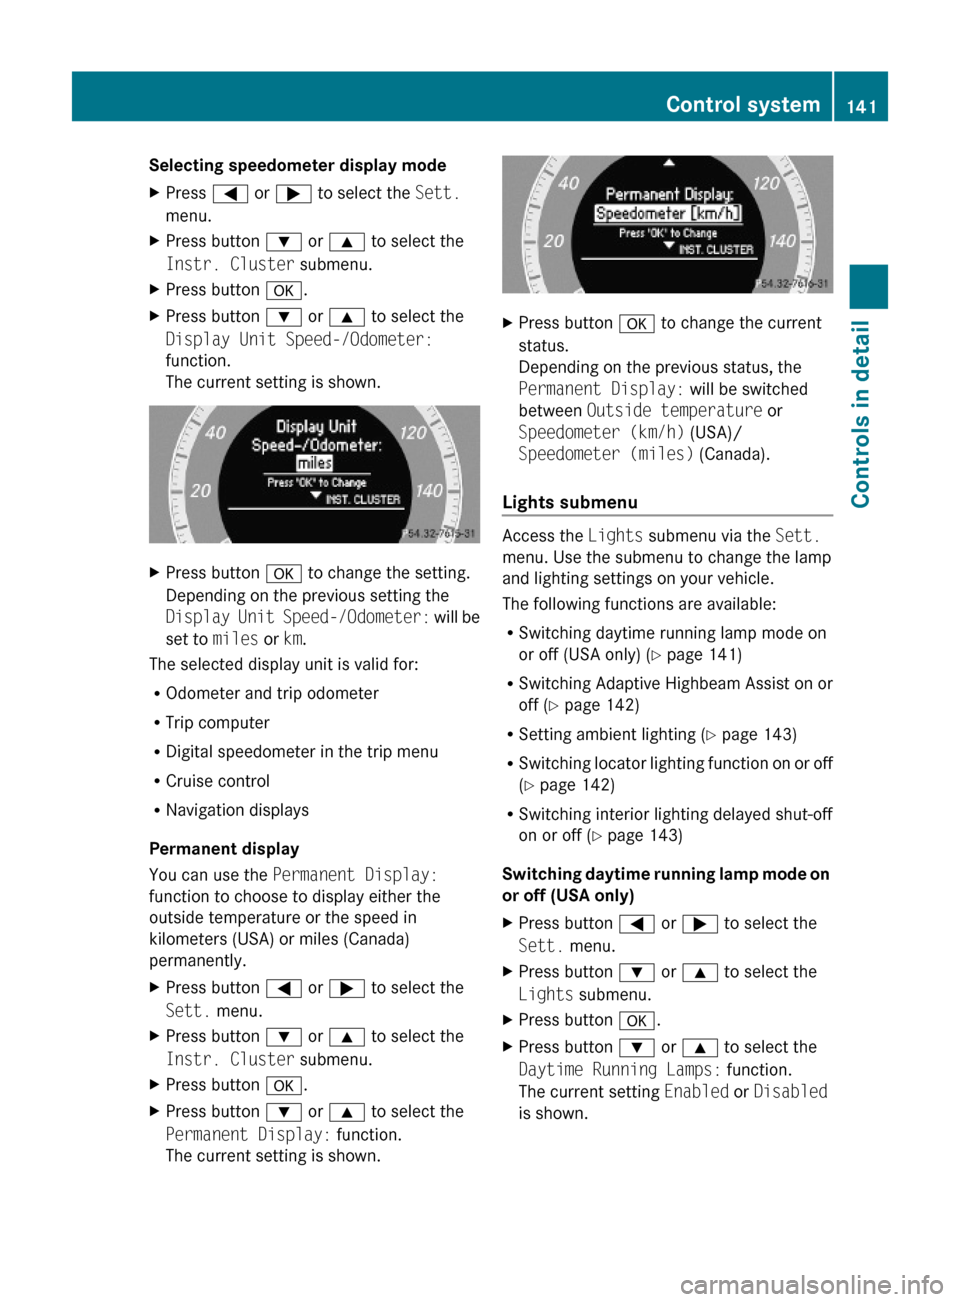
Selecting speedometer display mode XPress = or ; to select the Sett.
menu.
XPress button : or 9 to select the
Instr. Cluster submenu.
XPress button a.XPress button : or 9 to select the
Display Unit Speed-/Odometer:
function.
The current setting is shown.
XPress button a to change the setting.
Depending on the previous setting the
Display Unit Speed-/Odometer: will be
set to miles or km.
The selected display unit is valid for:
ROdometer and trip odometer
RTrip computer
RDigital speedometer in the trip menu
RCruise control
RNavigation displays
Permanent display
You can use the Permanent Display:
function to choose to display either the
outside temperature or the speed in
kilometers (USA) or miles (Canada)
permanently.
XPress button = or ; to select the
Sett. menu.
XPress button : or 9 to select the
Instr. Cluster submenu.
XPress button a.XPress button : or 9 to select the
Permanent Display: function.
The current setting is shown.
XPress button a to change the current
status.
Depending on the previous status, the
Permanent Display: will be switched
between Outside temperature or
Speedometer (km/h) (USA)/
Speedometer (miles) (Canada).
Lights submenu
Access the Lights submenu via the Sett.
menu. Use the submenu to change the lamp
and lighting settings on your vehicle.
The following functions are available:
RSwitching daytime running lamp mode on
or off (USA only) (Y page 141)
RSwitching Adaptive Highbeam Assist on or
off (Y page 142)
RSetting ambient lighting (Y page 143)
RSwitching locator lighting function on or off
(Y page 142)
RSwitching interior lighting delayed shut-off
on or off (Y page 143)
Switching daytime running lamp mode on
or off (USA only)
XPress button = or ; to select the
Sett. menu.
XPress button : or 9 to select the
Lights submenu.
XPress button a.XPress button : or 9 to select the
Daytime Running Lamps: function.
The current setting Enabled or Disabled
is shown.
Control system141Controls in detail212_AKB; 2; 41, en-USd2ureepe,Version: 2.11.8.12009-07-17T09:14:21+02:00 - Seite 141Z
Page 144 of 372

XPress button a to change the current
status.
Depending on the previous status, the
Daytime Running Lamps: mode will be
Enabled or Disabled.
With Daytime Running Lamps mode
enabled and the exterior lamp switch at
position $ or c, the daytime running
lamps are switched on when the engine is
running.
In low ambient light conditions the following
lamps will come on additionally:
RLow-beam headlamps
RParking lamps
RTail lamps
RLicense plate lamps
RSide marker lamps
For more information on the daytime running
lamp mode, see (Y page 98).
iMake sure the exterior lamp switch is set
to M or c when you switch off the
daytime running lamps while driving at
night.
For safety reasons, resetting all the functions
of all submenus to the factory settings while
driving (Y page 139) will not deactivate the
daytime running lamp mode.
The following message appears in the
multifunction display:
Cannot Be Completely Reset to
Factory Settings while Driving..
Switching Adaptive Highbeam Assist on
or off
XPress button = or ; to select the
Sett. menu.
XPress button : or 9 to select the
Lights submenu.
XPress button a.XPress button : or 9 to select the
Adaptive Highbeam Assist: function.
The current setting Enabled or Disabled
is shown.
XPress button a to change the current
status.
Depending on the previous status, the
Adaptive Highbeam Assist: function
will be Enabled or Disabled.
For more information on the Adaptive
Highbeam Assist, see (Y page 100).
Switching locator lighting on or off
With the Locator Lighting: function
activated and the exterior lamp switch in
position c
Rthe exterior lamps will come on during
darkness when the vehicle is unlocked with
the SmartKey.
The lamps will go out when the driver’s door
is opened.
If you do not open the driver’s door after
unlocking the vehicle with the SmartKey,
the lamps will go out automatically after
approximately 40 seconds.
Rthe exterior lamps will remain on for
15 seconds during darkness after exiting
the vehicle and closing all doors.
142Control systemControls in detail
212_AKB; 2; 41, en-USd2ureepe,Version: 2.11.8.12009-07-17T09:14:21+02:00 - Seite 142