2010 MERCEDES-BENZ E550 Sport
[x] Cancel search: SportPage 199 of 372
if the tilt/sliding panel does not open
smoothly.
! Do not attempt to open the tilt/sliding
panel before the tilt/sliding panel is
properly synchronized. The tilt/sliding
panel could otherwise lock-up in the open
position.
If the tilt/sliding panel cannot be closed or
synchronized, contact an authorized
Mercedes-Benz Center or call Roadside
Assistance.
XSwitch on the ignition.XPull the roof panel switch repeatedly in
direction of arrow = to the resistance
point until the tilt/sliding panel is closed
completely.
XPull and hold the roof panel switch in
direction of arrow = for 1 more second.
XPull the roof panel switch repeatedly in
direction of arrow = to the resistance
point until the roller sunblinds are closed
completely.
XPull and hold the roof panel switch in
direction of arrow = for 1 more second.
XCheck whether the tilt/sliding panel and
the roller sunblinds can be opened
completely (Y page 195).
Loading and storing
Loading instructions
GWarning!
Always fasten items being carried as securely
as possible. Use cargo tie-down rings and
fastening materials appropriate for the weight
and size of the load.
In an accident, during hard braking or sudden
maneuvers, loose items will be thrown around
inside the vehicle. This can cause injury to
vehicle occupants unless the items are
securely fastened in the vehicle.
To help avoid personal injury during a collision
or sudden maneuver, exercise care when
transporting cargo. Do not pile luggage or
cargo higher than the seat backrests.
The trunk is the preferred place to carry
objects.
Never drive a vehicle with the trunk open.
Deadly carbon monoxide (CO) gases may
enter vehicle interior resulting in
unconsciousness and death.
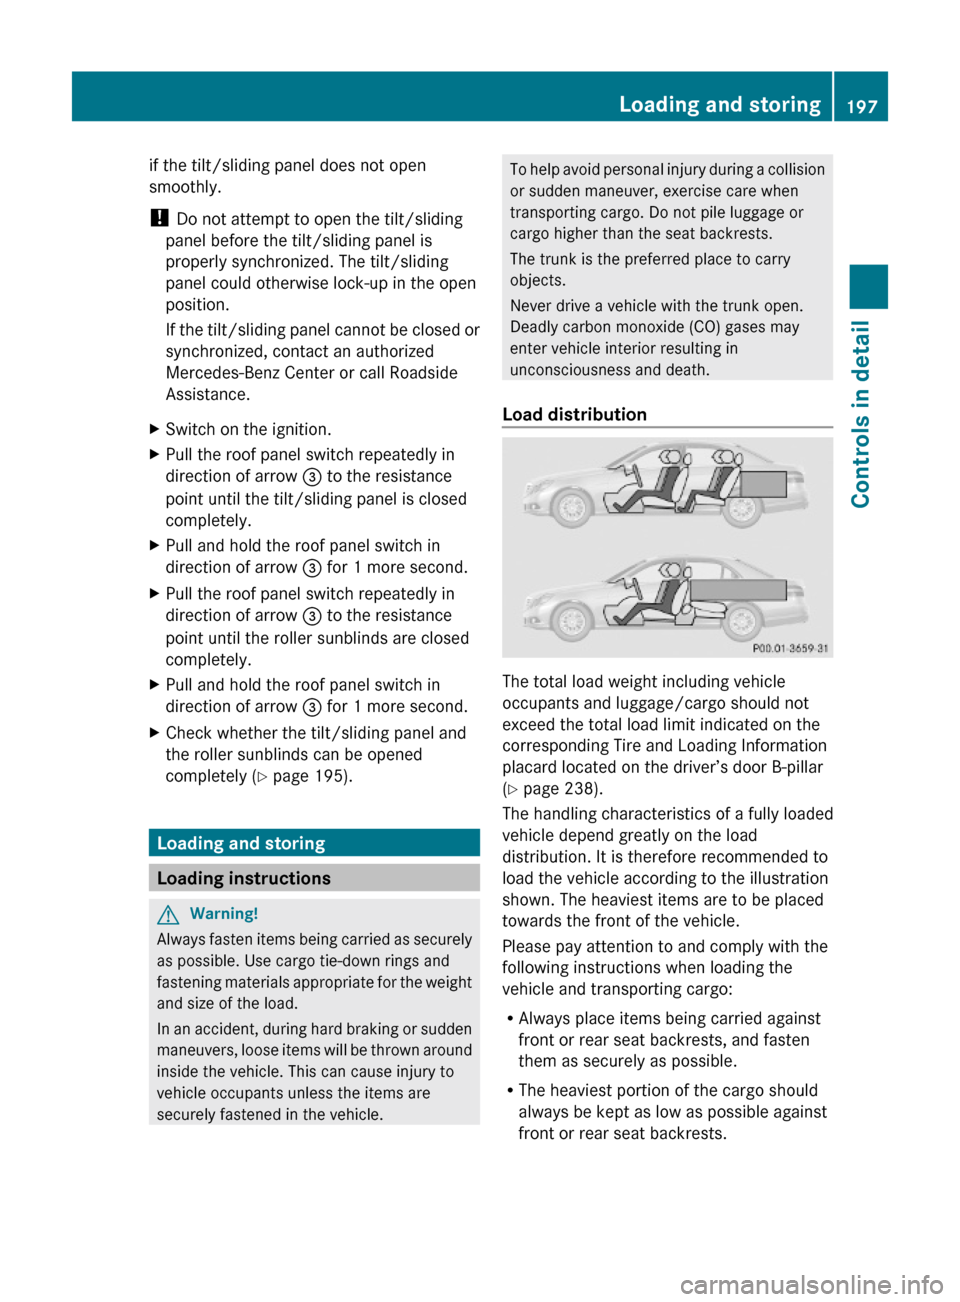
Load distribution
The total load weight including vehicle
occupants and luggage/cargo should not
exceed the total load limit indicated on the
corresponding Tire and Loading Information
placard located on the driver’s door B-pillar
(Y page 238).
The handling characteristics of a fully loaded
vehicle depend greatly on the load
distribution. It is therefore recommended to
load the vehicle according to the illustration
shown. The heaviest items are to be placed
towards the front of the vehicle.
Please pay attention to and comply with the
following instructions when loading the
vehicle and transporting cargo:
RAlways place items being carried against
front or rear seat backrests, and fasten
them as securely as possible.
RThe heaviest portion of the cargo should
always be kept as low as possible against
front or rear seat backrests.
Loading and storing197Controls in detail212_AKB; 2; 41, en-USd2ureepe,Version: 2.11.8.12009-07-17T09:14:21+02:00 - Seite 197Z
Page 200 of 372
Roof rack
For information about further roof rack
equipment, contact an authorized Mercedes-
Benz Center.
GWarning!
Only use roof racks approved by Mercedes-
Benz for your vehicle model to avoid damage
to the vehicle.
Follow the manufacturer’s installation
instructions. Otherwise, an improperly
attached roof rack system or its load could
become detached from the vehicle.
Do not exceed the maximum roof load of
220 lb (100 kg).
Take into consideration that when the roof
rack is loaded, the handling characteristics
are different from those when operating the
vehicle without the roof rack loaded.
Make sure
Ryou can raise the power tilt/sliding sunroof
or the panorama roof with tilt/sliding panel
completely
Ryou can open the trunk completely
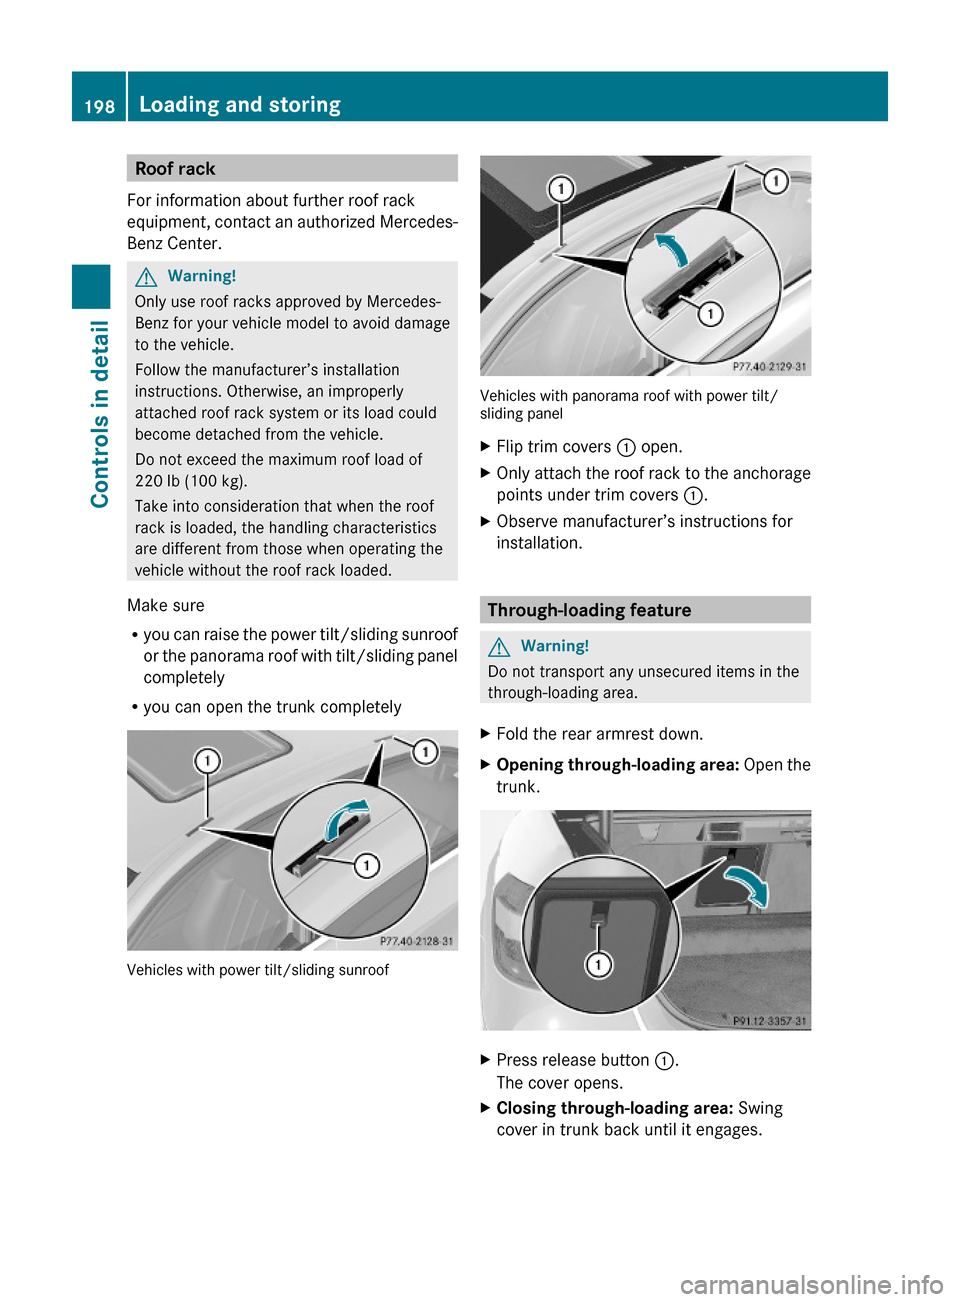
Vehicles with power tilt/sliding sunroof
Vehicles with panorama roof with power tilt/sliding panel
XFlip trim covers : open.XOnly attach the roof rack to the anchorage
points under trim covers :.
XObserve manufacturer’s instructions for
installation.
Through-loading feature
GWarning!
Do not transport any unsecured items in the
through-loading area.
XFold the rear armrest down.XOpening through-loading area: Open the
trunk.
XPress release button :.
The cover opens.
XClosing through-loading area: Swing
cover in trunk back until it engages.
198Loading and storingControls in detail
212_AKB; 2; 41, en-USd2ureepe,Version: 2.11.8.12009-07-17T09:14:21+02:00 - Seite 198
Page 201 of 372
Parcel netsGWarning!
Parcel nets are intended for storing light-
weight items only, such as road maps, mail,
etc.
Heavy objects, objects with sharp edges, or
fragile objects may not be transported in the
parcel nets. In an accident, during hard
braking, or sudden maneuvers, they could be
thrown around inside the vehicle and cause
injury to vehicle occupants.
Parcel nets cannot protect transported goods
in the event of an accident.
Parcel nets are located:
Rin the front passenger footwell
Rbehind the rear armrest
Rat each side of the left and right trunk side
walls
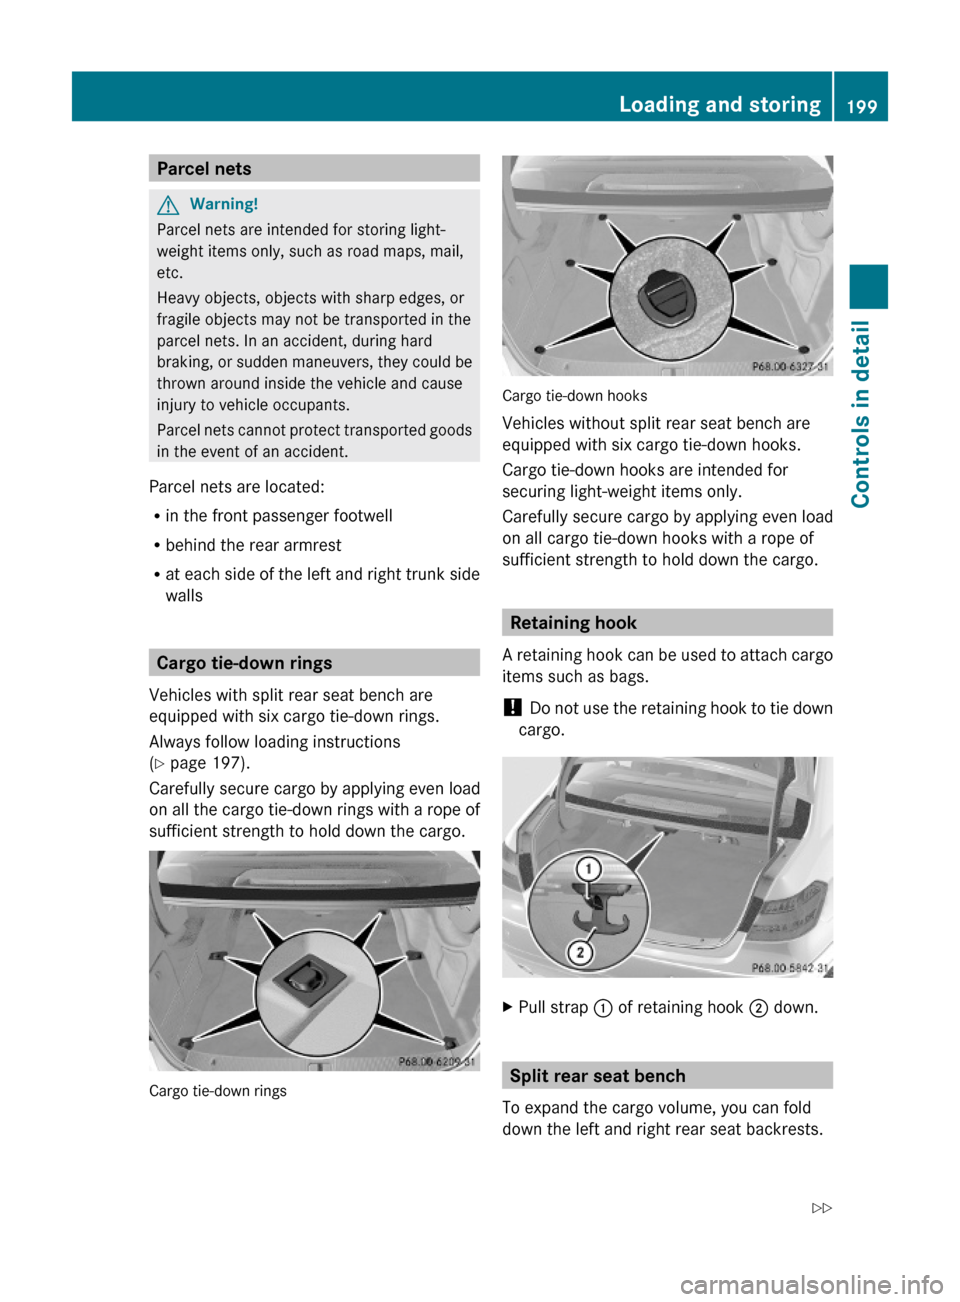
Cargo tie-down rings
Vehicles with split rear seat bench are
equipped with six cargo tie-down rings.
Always follow loading instructions
(Y page 197).
Carefully secure cargo by applying even load
on all the cargo tie-down rings with a rope of
sufficient strength to hold down the cargo.
Cargo tie-down rings
Cargo tie-down hooks
Vehicles without split rear seat bench are
equipped with six cargo tie-down hooks.
Cargo tie-down hooks are intended for
securing light-weight items only.
Carefully secure cargo by applying even load
on all cargo tie-down hooks with a rope of
sufficient strength to hold down the cargo.
Retaining hook
A retaining hook can be used to attach cargo
items such as bags.
! Do not use the retaining hook to tie down
cargo.
XPull strap : of retaining hook ; down.
Split rear seat bench
To expand the cargo volume, you can fold
down the left and right rear seat backrests.
Loading and storing199Controls in detail212_AKB; 2; 41, en-USd2ureepe,Version: 2.11.8.12009-07-17T09:14:21+02:00 - Seite 199Z
Page 202 of 372
The two sections can be folded down
separately.
GWarning!
When expanding the cargo volume, always
fold the seat backrests fully forward.
Unless you are transporting cargo, the seat
backrests must remain properly locked in the
upright position.
In an accident, during hard braking or sudden
maneuvers, loose items will be thrown around
inside the vehicle. This can cause injury to
vehicle occupants unless the items are
securely fastened in the vehicle.
Always use the cargo tie-down rings.
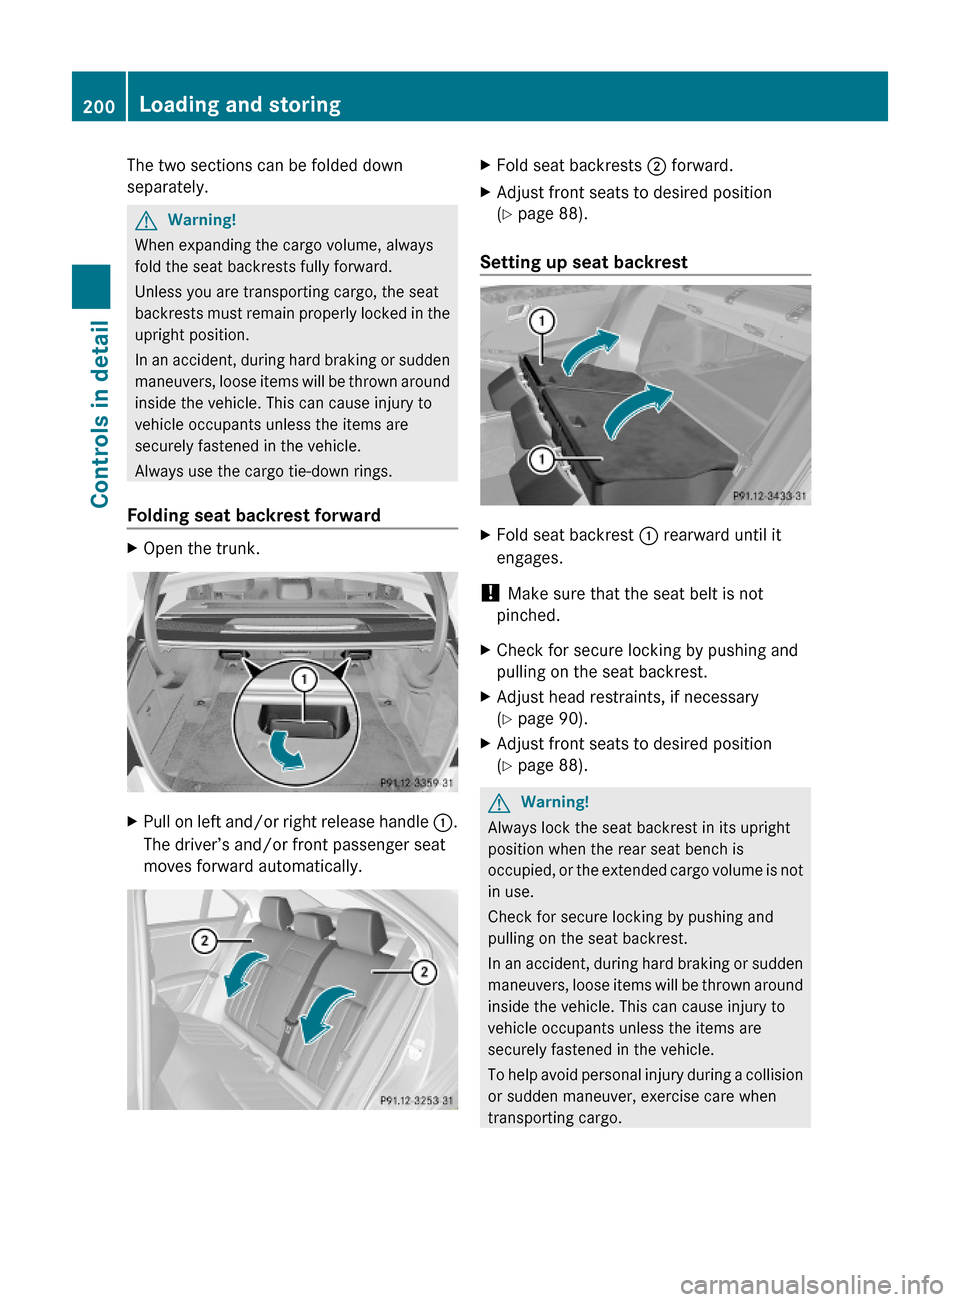
Folding seat backrest forward
XOpen the trunk.XPull on left and/or right release handle :.
The driver’s and/or front passenger seat
moves forward automatically.
XFold seat backrests ; forward.XAdjust front seats to desired position
(Y page 88).
Setting up seat backrest
XFold seat backrest : rearward until it
engages.
! Make sure that the seat belt is not
pinched.
XCheck for secure locking by pushing and
pulling on the seat backrest.
XAdjust head restraints, if necessary
(Y page 90).
XAdjust front seats to desired position
(Y page 88).
GWarning!
Always lock the seat backrest in its upright
position when the rear seat bench is
occupied, or the extended cargo volume is not
in use.
Check for secure locking by pushing and
pulling on the seat backrest.
In an accident, during hard braking or sudden
maneuvers, loose items will be thrown around
inside the vehicle. This can cause injury to
vehicle occupants unless the items are
securely fastened in the vehicle.
To help avoid personal injury during a collision
or sudden maneuver, exercise care when
transporting cargo.
200Loading and storingControls in detail
212_AKB; 2; 41, en-USd2ureepe,Version: 2.11.8.12009-07-17T09:14:21+02:00 - Seite 200
Page 205 of 372
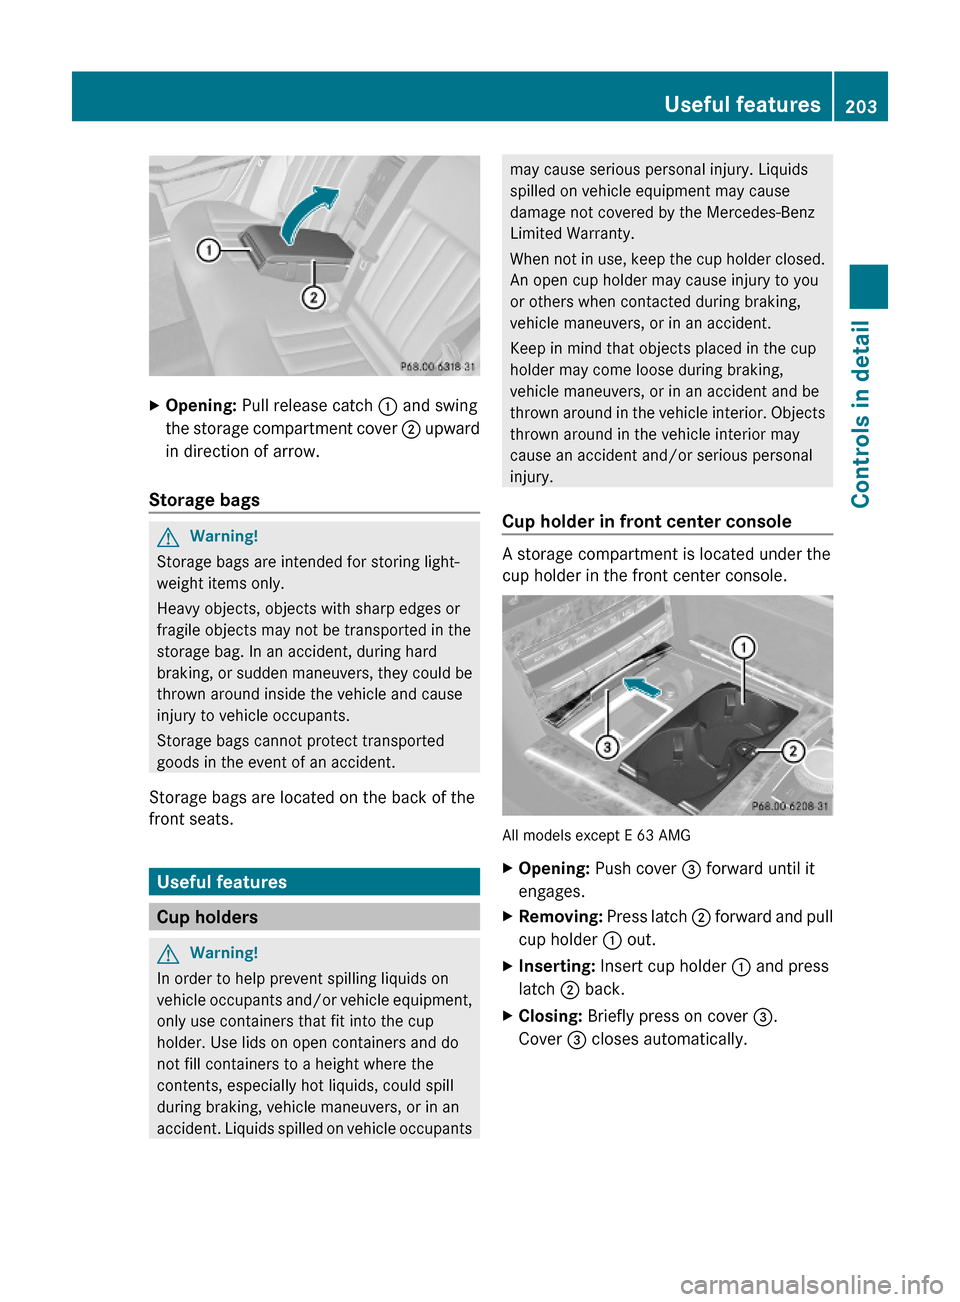
XOpening: Pull release catch : and swing
the storage compartment cover ; upward
in direction of arrow.
Storage bags
GWarning!
Storage bags are intended for storing light-
weight items only.
Heavy objects, objects with sharp edges or
fragile objects may not be transported in the
storage bag. In an accident, during hard
braking, or sudden maneuvers, they could be
thrown around inside the vehicle and cause
injury to vehicle occupants.
Storage bags cannot protect transported
goods in the event of an accident.
Storage bags are located on the back of the
front seats.
Useful features
Cup holders
GWarning!
In order to help prevent spilling liquids on
vehicle occupants and/or vehicle equipment,
only use containers that fit into the cup
holder. Use lids on open containers and do
not fill containers to a height where the
contents, especially hot liquids, could spill
during braking, vehicle maneuvers, or in an
accident. Liquids spilled on vehicle occupants
may cause serious personal injury. Liquids
spilled on vehicle equipment may cause
damage not covered by the Mercedes-Benz
Limited Warranty.
When not in use, keep the cup holder closed.
An open cup holder may cause injury to you
or others when contacted during braking,
vehicle maneuvers, or in an accident.
Keep in mind that objects placed in the cup
holder may come loose during braking,
vehicle maneuvers, or in an accident and be
thrown around in the vehicle interior. Objects
thrown around in the vehicle interior may
cause an accident and/or serious personal
injury.
Cup holder in front center console
A storage compartment is located under the
cup holder in the front center console.
All models except E 63 AMG
XOpening: Push cover = forward until it
engages.
XRemoving: Press latch ; forward and pull
cup holder : out.
XInserting: Insert cup holder : and press
latch ; back.
XClosing: Briefly press on cover =.
Cover = closes automatically.
Useful features203Controls in detail212_AKB; 2; 41, en-USd2ureepe,Version: 2.11.8.12009-07-17T09:14:21+02:00 - Seite 203Z
Page 206 of 372
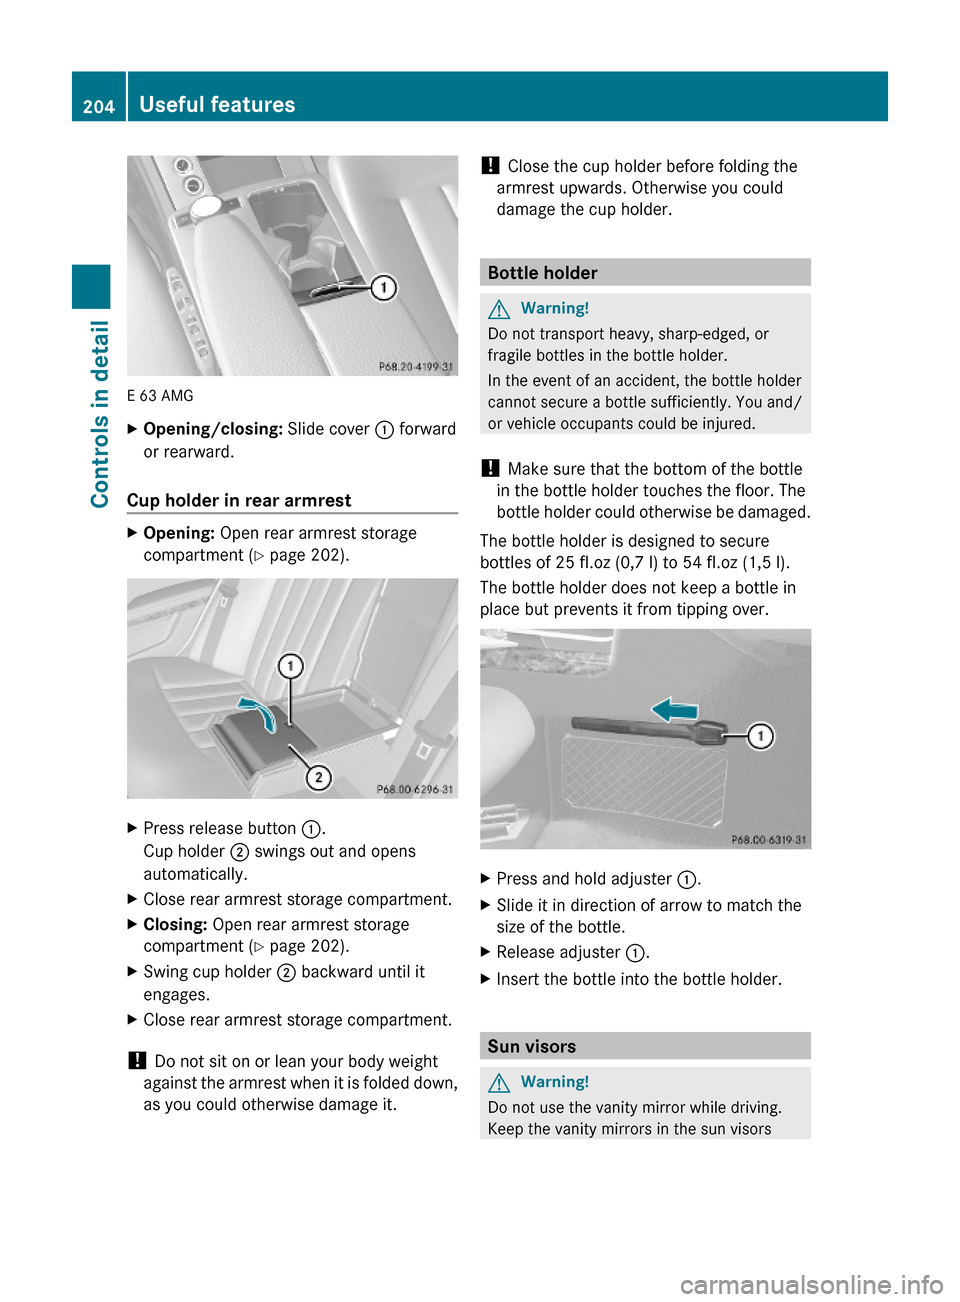
E 63 AMG
XOpening/closing: Slide cover : forward
or rearward.
Cup holder in rear armrest
XOpening: Open rear armrest storage
compartment (Y page 202).
XPress release button :.
Cup holder ; swings out and opens
automatically.
XClose rear armrest storage compartment.XClosing: Open rear armrest storage
compartment (Y page 202).
XSwing cup holder ; backward until it
engages.
XClose rear armrest storage compartment.
! Do not sit on or lean your body weight
against the armrest when it is folded down,
as you could otherwise damage it.
! Close the cup holder before folding the
armrest upwards. Otherwise you could
damage the cup holder.
Bottle holder
GWarning!
Do not transport heavy, sharp-edged, or
fragile bottles in the bottle holder.
In the event of an accident, the bottle holder
cannot secure a bottle sufficiently. You and/
or vehicle occupants could be injured.
! Make sure that the bottom of the bottle
in the bottle holder touches the floor. The
bottle holder could otherwise be damaged.
The bottle holder is designed to secure
bottles of 25 fl.oz (0,7 l) to 54 fl.oz (1,5 l).
The bottle holder does not keep a bottle in
place but prevents it from tipping over.
XPress and hold adjuster :.XSlide it in direction of arrow to match the
size of the bottle.
XRelease adjuster :.XInsert the bottle into the bottle holder.
Sun visors
GWarning!
Do not use the vanity mirror while driving.
Keep the vanity mirrors in the sun visors
204Useful featuresControls in detail
212_AKB; 2; 41, en-USd2ureepe,Version: 2.11.8.12009-07-17T09:14:21+02:00 - Seite 204
Page 234 of 372
Tire and Loading Information placard on the
driver’s door B-pillar ( Y page 237). If
necessary, add air to achieve the
recommended tire inflation pressure.XIf you have overfilled the tire, release tire
inflation pressure by pushing the metal
stem of the valve with e.g. a tip of a pen.
Then recheck the tire inflation pressure
with the tire gauge.XInstall the valve cap.XRepeat this procedure for each tire.
Tire pressure loss warning system
(Canada only)
While the vehicle is being driven, the tire
pressure loss warning system monitors the
set tire inflation pressures by evaluating each
wheel’s rotational speed. This allows the
system to detect a significant loss of pressure
in a tire. If a wheel’s rotational speed changes
due to falling tire inflation pressure, you will
see a corresponding warning message in the
multifunction display.
The tire pressure loss warning system may
function in a restricted manner or with a delay
R when snow chains are mounted to the
vehicle
R in the presence of ice and snow
R when you are driving on a loose surface
(e.g. sand or gravel)
R when you are driving in a very sporty
manner (involving rapid acceleration or
high speeds in curves)
GWarning!
When the multifunction display shows the
message Check Tire Pressure Soon , one
or more of your tires are significantly
underinflated. You should stop and check
your tires as soon as possible, and inflate
them to the proper tire inflation pressure as
indicated on the vehicle’s Tire and Loading
Information placard or, if available, on the tire
inflation pressure label.
Driving on a significantly underinflated tire
causes the tire to overheat and can lead to
tire failure. Underinflation also reduces fuel
efficiency and tire tread life, and may affect
the vehicle’s handling and stopping ability.
Each tire, including the spare, should be
checked at least once a month when cold.
Inflate the tires to the recommended tire
inflation pressure as specified on
R the Tire and Loading Information placard on
the driver’s door B-pillar
or
R the tire inflation pressure label located on
the inside of the fuel filler flap
i The recommended tire inflation pressures
for your vehicle can be found on
R the Tire and Loading Information placard
located on the driver’s door B-pillar
( Y page 237)
R the tire inflation pressure label on the
inside of the fuel filler flap
The tire inflation pressures are not listed in
the Operator’s Manual.GWarning!
The tire pressure loss warning system does
not provide a warning for wrongly selected tire
inflation pressures. Always adjust tire
inflation pressure according to the Tire and
Loading Information placard on the driver’s
door B-pillar or on the tire inflation pressure
label located on the inside of the fuel filler flap.
The tire pressure loss warning system does
not replace regular checks of the tire inflation
pressures since a gradual pressure loss in
more than one tire cannot be detected by the
tire pressure loss warning system.
The tire pressure loss warning system is not
able to issue a warning due to a sudden
dramatic loss of tire inflation pressure (e.g.
tire blowout caused by a foreign object). In
this case bring the vehicle to a halt by carefully
232Tires and wheelsOperation
212_AKB; 2; 41, en-USd2ureepe,Version: 2.11.8.12009-07-17T09:14:21+02:00 - Seite 232
Page 251 of 372
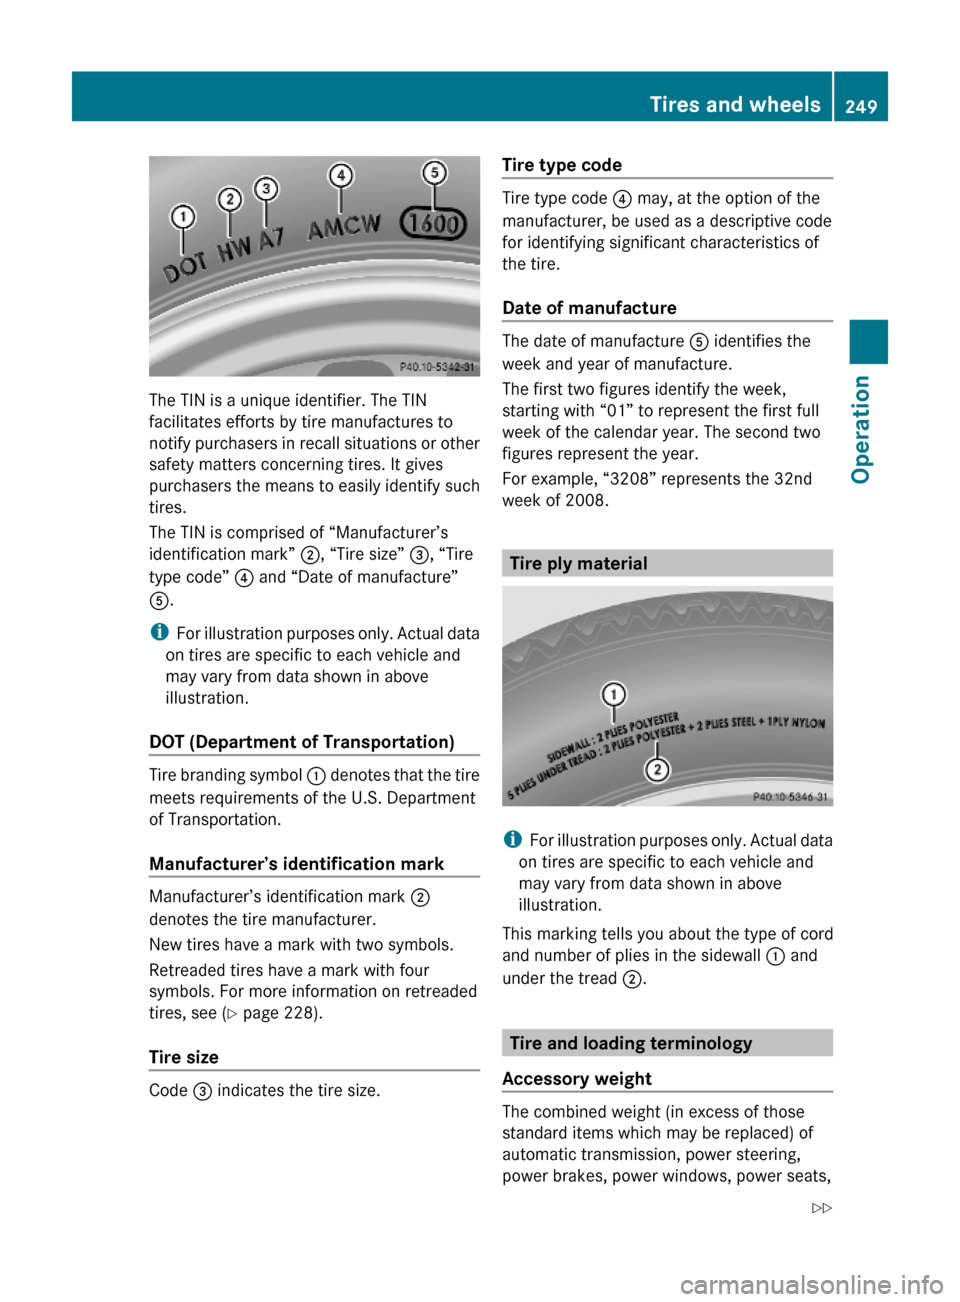
The TIN is a unique identifier. The TIN
facilitates efforts by tire manufactures to
notify purchasers in recall situations or other
safety matters concerning tires. It gives
purchasers the means to easily identify such
tires.
The TIN is comprised of “Manufacturer’s
identification mark” ;, “Tire size” =, “Tire
type code” ? and “Date of manufacture”
A.
iFor illustration purposes only. Actual data
on tires are specific to each vehicle and
may vary from data shown in above
illustration.
DOT (Department of Transportation)
Tire branding symbol : denotes that the tire
meets requirements of the U.S. Department
of Transportation.
Manufacturer’s identification mark
Manufacturer’s identification mark ;
denotes the tire manufacturer.
New tires have a mark with two symbols.
Retreaded tires have a mark with four
symbols. For more information on retreaded
tires, see (Y page 228).
Tire size
Code = indicates the tire size.
Tire type code
Tire type code ? may, at the option of the
manufacturer, be used as a descriptive code
for identifying significant characteristics of
the tire.
Date of manufacture
The date of manufacture A identifies the
week and year of manufacture.
The first two figures identify the week,
starting with “01” to represent the first full
week of the calendar year. The second two
figures represent the year.
For example, “3208” represents the 32nd
week of 2008.
Tire ply material
iFor illustration purposes only. Actual data
on tires are specific to each vehicle and
may vary from data shown in above
illustration.
This marking tells you about the type of cord
and number of plies in the sidewall : and
under the tread ;.
Tire and loading terminology
Accessory weight
The combined weight (in excess of those
standard items which may be replaced) of
automatic transmission, power steering,
power brakes, power windows, power seats,
Tires and wheels249Operation212_AKB; 2; 41, en-USd2ureepe,Version: 2.11.8.12009-07-17T09:14:21+02:00 - Seite 249Z