2010 MERCEDES-BENZ E550 warning
[x] Cancel search: warningPage 327 of 372
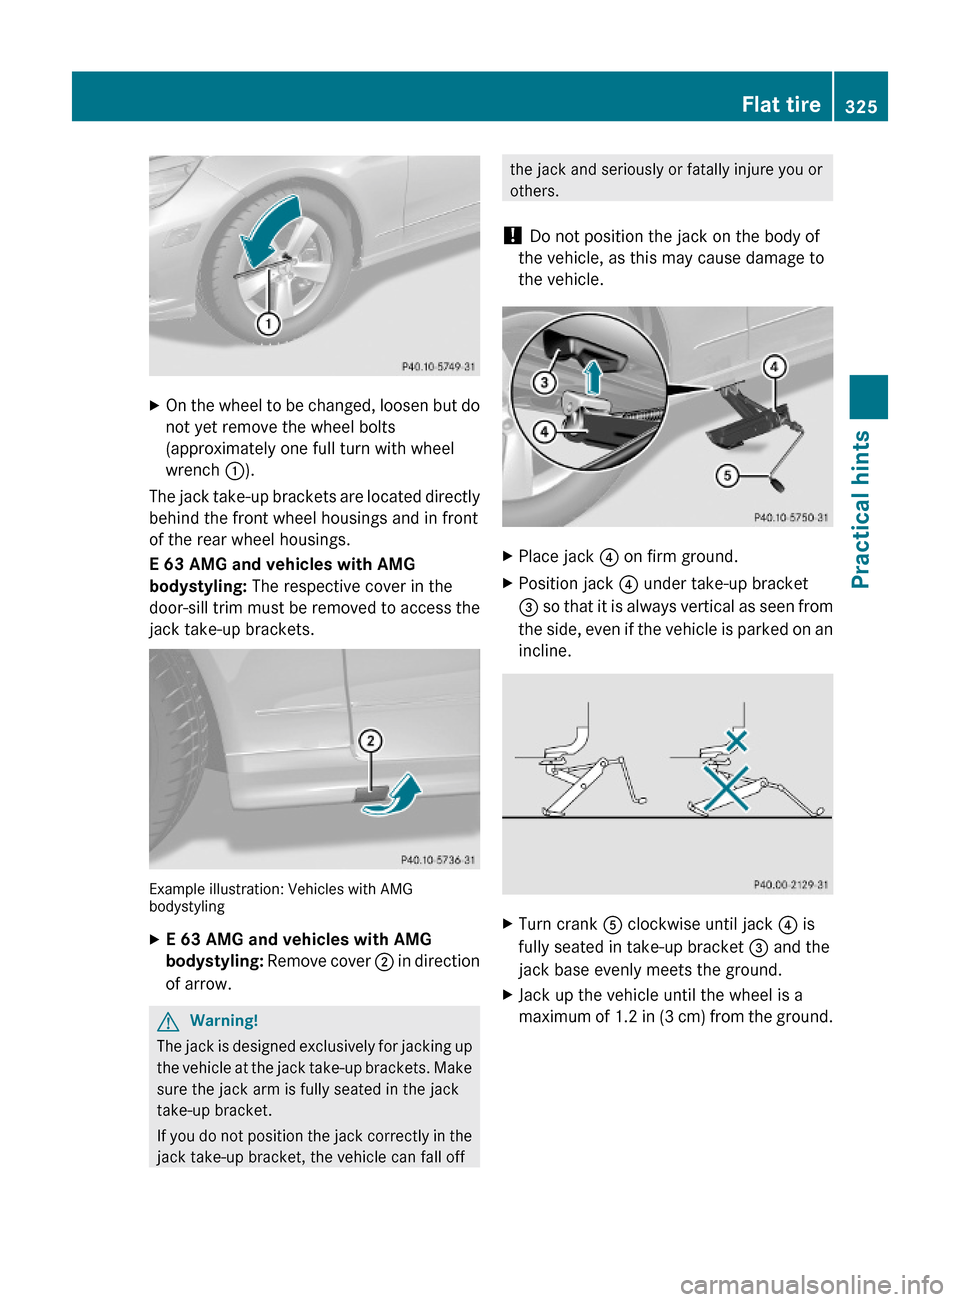
XOn the wheel to be changed, loosen but do
not yet remove the wheel bolts
(approximately one full turn with wheel
wrench :).
The jack take-up brackets are located directly
behind the front wheel housings and in front
of the rear wheel housings.
E 63 AMG and vehicles with AMG
bodystyling: The respective cover in the
door-sill trim must be removed to access the
jack take-up brackets.
Example illustration: Vehicles with AMGbodystyling
XE 63 AMG and vehicles with AMG
bodystyling: Remove cover ; in direction
of arrow.
GWarning!
The jack is designed exclusively for jacking up
the vehicle at the jack take-up brackets. Make
sure the jack arm is fully seated in the jack
take-up bracket.
If you do not position the jack correctly in the
jack take-up bracket, the vehicle can fall off
the jack and seriously or fatally injure you or
others.
! Do not position the jack on the body of
the vehicle, as this may cause damage to
the vehicle.
XPlace jack ? on firm ground.XPosition jack ? under take-up bracket
= so that it is always vertical as seen from
the side, even if the vehicle is parked on an
incline.
XTurn crank A clockwise until jack ? is
fully seated in take-up bracket = and the
jack base evenly meets the ground.
XJack up the vehicle until the wheel is a
maximum of 1.2 in (3 cm) from the ground.
Flat tire325Practical hints212_AKB; 2; 41, en-USd2ureepe,Version: 2.11.8.12009-07-17T09:14:21+02:00 - Seite 325Z
Page 328 of 372
Removing the wheel
! E 63 AMG with ceramic composite
brake disk: The rim could strike the
ceramic composite brake disk when
removing and attaching the spare wheel.
The ceramic composite brake disk could be
damaged. Exercise appropriate care and
have a second person assist you if possible
or use a second alignment bolt.
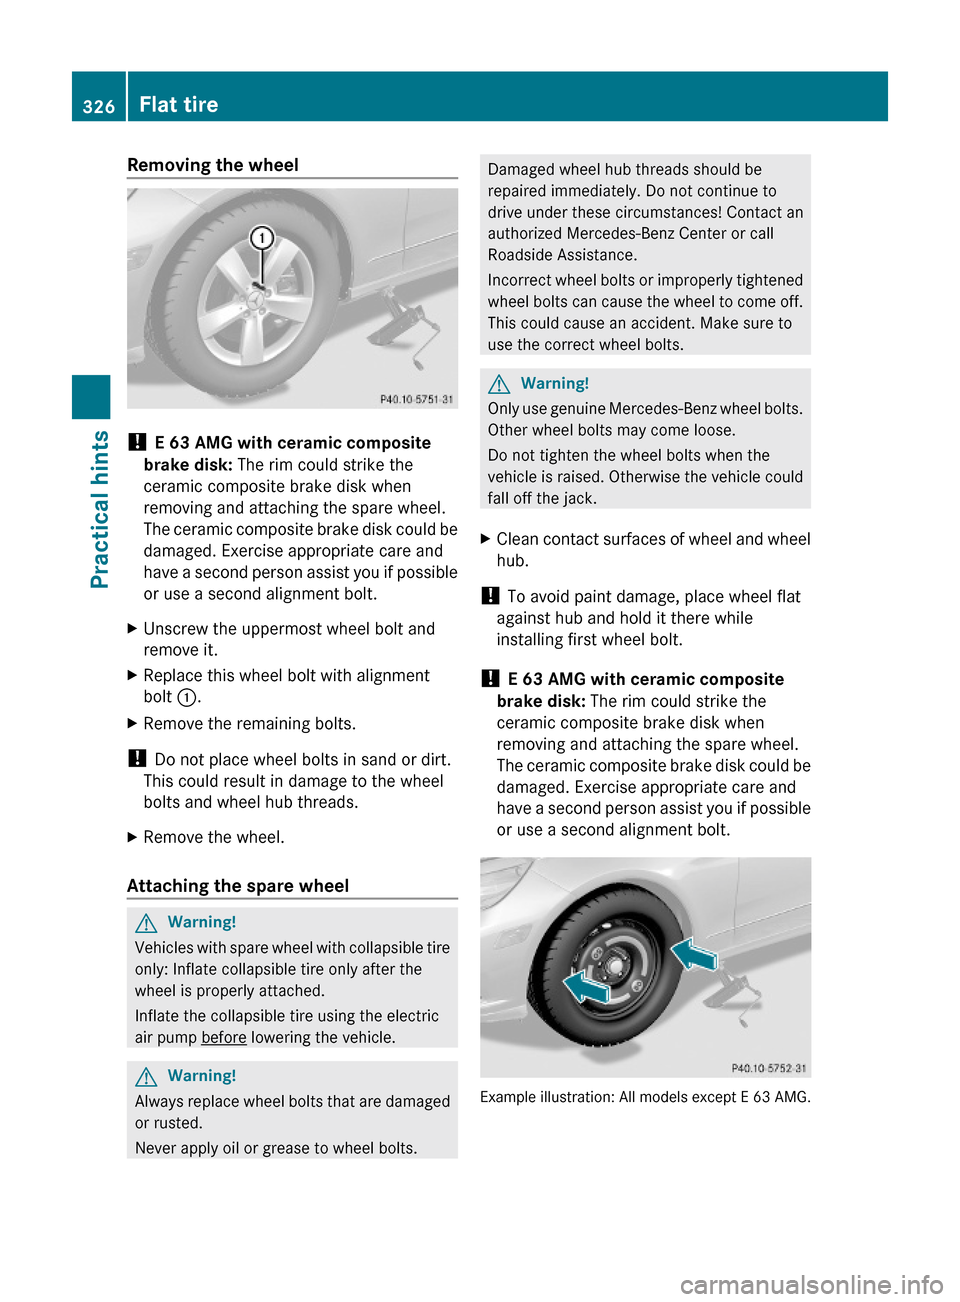
XUnscrew the uppermost wheel bolt and
remove it.
XReplace this wheel bolt with alignment
bolt :.
XRemove the remaining bolts.
! Do not place wheel bolts in sand or dirt.
This could result in damage to the wheel
bolts and wheel hub threads.
XRemove the wheel.
Attaching the spare wheel
GWarning!
Vehicles with spare wheel with collapsible tire
only: Inflate collapsible tire only after the
wheel is properly attached.
Inflate the collapsible tire using the electric
air pump before lowering the vehicle.
GWarning!
Always replace wheel bolts that are damaged
or rusted.
Never apply oil or grease to wheel bolts.
Damaged wheel hub threads should be
repaired immediately. Do not continue to
drive under these circumstances! Contact an
authorized Mercedes-Benz Center or call
Roadside Assistance.
Incorrect wheel bolts or improperly tightened
wheel bolts can cause the wheel to come off.
This could cause an accident. Make sure to
use the correct wheel bolts.
GWarning!
Only use genuine Mercedes-Benz wheel bolts.
Other wheel bolts may come loose.
Do not tighten the wheel bolts when the
vehicle is raised. Otherwise the vehicle could
fall off the jack.
XClean contact surfaces of wheel and wheel
hub.
! To avoid paint damage, place wheel flat
against hub and hold it there while
installing first wheel bolt.
! E 63 AMG with ceramic composite
brake disk: The rim could strike the
ceramic composite brake disk when
removing and attaching the spare wheel.
The ceramic composite brake disk could be
damaged. Exercise appropriate care and
have a second person assist you if possible
or use a second alignment bolt.
Example illustration: All models except E 63 AMG.
326Flat tirePractical hints
212_AKB; 2; 41, en-USd2ureepe,Version: 2.11.8.12009-07-17T09:14:21+02:00 - Seite 326
Page 329 of 372
XGuide the spare wheel onto the alignment
bolt and push it on.
XInsert the wheel bolts and tighten them
slightly.
XUnscrew the alignment bolt.XInstall the last wheel bolt and tighten it
slightly.
XVehicles with spare wheel with
collapsible tire: Continue the procedure
by following the instructions under
“Inflating the collapsible tire”
(Y page 327) and then “Lowering the
vehicle” (Y page 328).
or
XVehicles with Minispare wheel: Continue
the procedure by following the instructions
under “Lowering the vehicle”
(Y page 328).
Inflating the collapsible tire
GWarning!
Inflate collapsible tire only after the wheel is
properly attached.
Inflate the collapsible tire using the electric
air pump before lowering the vehicle.
GWarning!
Observe safety instructions on air pump label.
! Do not lower the vehicle before inflating
the collapsible tire. Otherwise the rim may
be damaged.
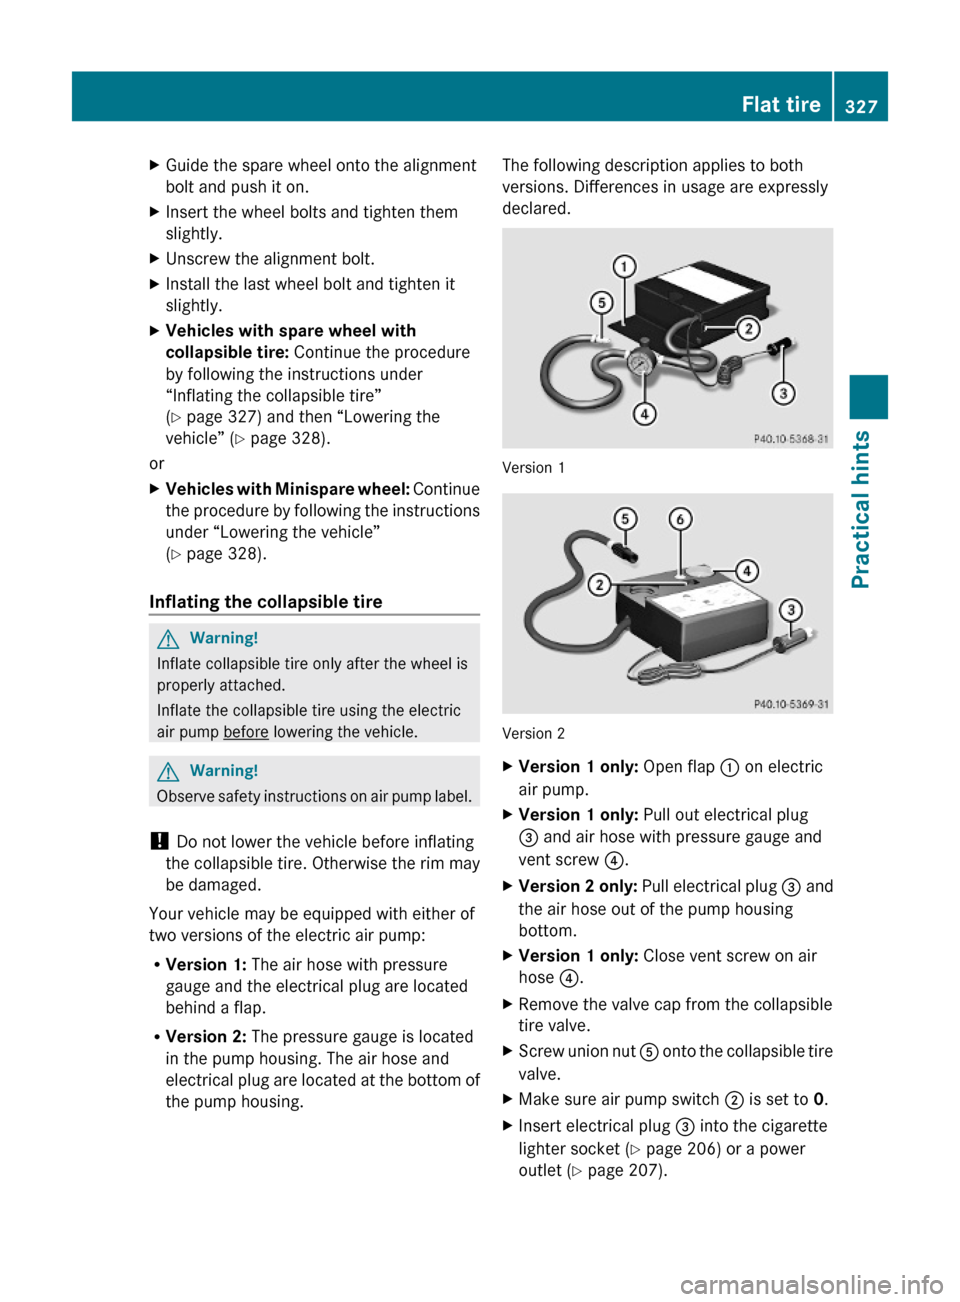
Your vehicle may be equipped with either of
two versions of the electric air pump:
RVersion 1: The air hose with pressure
gauge and the electrical plug are located
behind a flap.
RVersion 2: The pressure gauge is located
in the pump housing. The air hose and
electrical plug are located at the bottom of
the pump housing.
The following description applies to both
versions. Differences in usage are expressly
declared.
Version 1
Version 2
XVersion 1 only: Open flap : on electric
air pump.
XVersion 1 only: Pull out electrical plug
= and air hose with pressure gauge and
vent screw ?.
XVersion 2 only: Pull electrical plug = and
the air hose out of the pump housing
bottom.
XVersion 1 only: Close vent screw on air
hose ?.
XRemove the valve cap from the collapsible
tire valve.
XScrew union nut A onto the collapsible tire
valve.
XMake sure air pump switch ; is set to 0.XInsert electrical plug = into the cigarette
lighter socket (Y page 206) or a power
outlet (Y page 207).
Flat tire327Practical hints212_AKB; 2; 41, en-USd2ureepe,Version: 2.11.8.12009-07-17T09:14:21+02:00 - Seite 327Z
Page 330 of 372
XTurn the SmartKey in the starter switch to
position 1.
or
XVehicles with KEYLESS-GO: Press the
KEYLESS-GO start/stop button once. Do
not depress the brake pedal.
XPress I on electric air pump switch ;.
The electric air pump switches on and
inflates the collapsible tire.
XInflate the collapsible tire to the
recommended tire inflation pressure as
specified for your vehicle (Y page 358).
This should take approximately 5 minutes.
GWarning!
The air hose and the union nut can become
hot during inflation. Exercise proper caution
to avoid burning yourself when using the
equipment.
! Do not operate the electric air pump
longer than 8 minutes without interruption.
Otherwise it may overheat.
You may operate the air pump again after
it has cooled off.
! Compare the recommended tire inflation
pressure for your vehicle with the tire
inflation pressure on the yellow label
located on the spare wheel rim.
If the tire inflation pressure on the yellow
label on the spare wheel rim differs from
the values given in this Operator’s Manual,
inflate the tire to the recommended tire
inflation pressure given on the yellow label
on the spare wheel rim.
XPress 0 on electric air pump switch ;.XTurn the SmartKey in the starter switch to
position 0.
or
XVehicles with KEYLESS-GO: Press the
KEYLESS-GO start/stop button twice. Do
not depress the brake pedal.
XVersion 1 only: If the tire inflation pressure
is above the recommended tire inflation
pressure as specified for your vehicle
(Y page 358), decrease tire pressure using
the vent screw on air hose ?.
XVersion 2 only: If the tire inflation pressure
is above the recommended tire inflation
pressure as specified for your vehicle
(Y page 358), decrease tire pressure using
deflate button B.
GObserve Safety notes, see page 231.XDetach the electric air pump.XReinstall collapsible tire valve cap.XVersion 1 only: Store electrical plug =
and air hose ? behind flap :.
XVersion 2 only: Store electrical plug =
and the air hose back into the pump
housing bottom.
XPlace the electric air pump back in its
designated storage space.
XLower the vehicle.
Lowering the vehicle
XLower the vehicle by turning the crank
counterclockwise until the vehicle is
resting fully on its own weight.
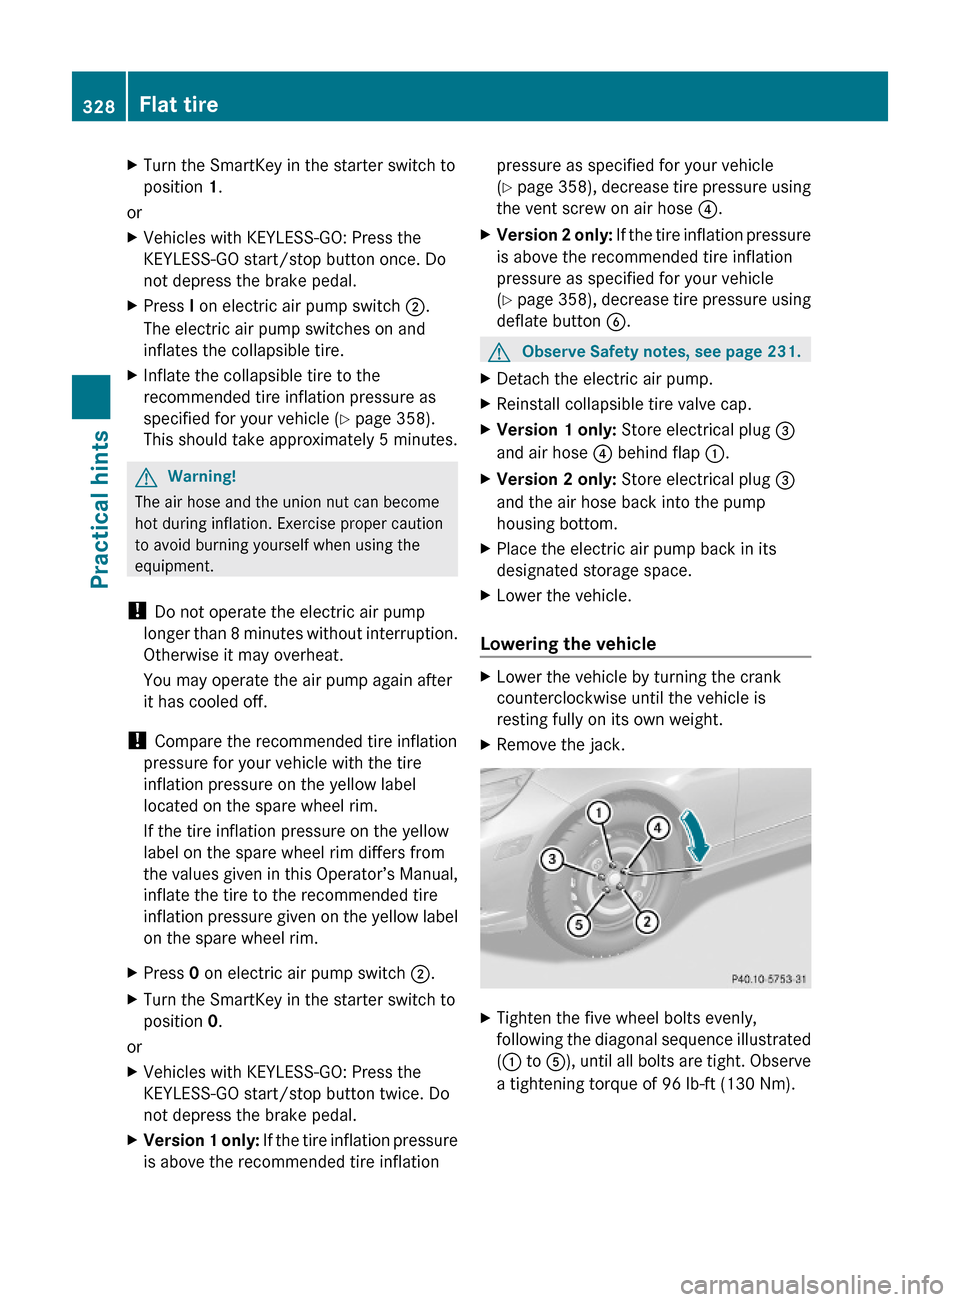
XRemove the jack.XTighten the five wheel bolts evenly,
following the diagonal sequence illustrated
(: to A), until all bolts are tight. Observe
a tightening torque of 96 lb-ft (130 Nm).
328Flat tirePractical hints
212_AKB; 2; 41, en-USd2ureepe,Version: 2.11.8.12009-07-17T09:14:21+02:00 - Seite 328
Page 331 of 372
GWarning!
Have the tightening torque checked after
changing a wheel. The wheels could come
loose if they are not tightened to a torque of
96 lb-ft (130 Nm).
XFully collapse the jack, with handle folded
in (storage position), see ( Y page 270).XStore the jack and the other vehicle tools
in the designated storage space.XE 63 AMG and vehicles with AMG
bodystyling: Reinstall the respective
cover of the door-sill trim.
i Vehicles with Advanced TPMS:
Do not restart the Advanced TPMS until a
full size wheel/tire with functioning sensor
has been placed back into service on the
vehicle.
XDo not exceed the maximum speed of
50 mph (80 km/h).
MOExtended system
The MOExtended system allows you to
continue driving your vehicle even if there is
a total loss of pressure in one or more tires.
You may only use the MOExtended system in
conjunction with the tire pressure loss
warning system ( Y page 232) or the
Advanced TPMS ( Y page 233).
The maximum distance in emergency mode
depends on the vehicle’s load. It is 50 miles
(80 km) if the vehicle is partially loaded and
18 miles (30 km) if the vehicle is fully loaded.
The point at which the maximum driving
distance in emergency mode begins is when
the warning message appears in the
multifunction display indicating that there is
a loss of tire inflation pressure.
XDo not exceed the maximum speed of
50 mph (80 km/h).GWarning!
In emergency mode, your vehicle’s driving
characteristics are diminished in such
situations as:
R driving around curves
R while braking
R while accelerating rapidly
Therefore, your driving style must be adapted
accordingly. Avoid abrupt steering and driving
maneuvers, as well as driving over obstacles
(road curbs, potholes, or off-road areas). This
is especially important if the vehicle is heavily
loaded.
The emergency driving distance that can be
achieved greatly depends on the demands
placed on the vehicle. Depending on speed,
load, driving maneuvers, road conditions,
outside temperature, etc., the distance can be
significantly shorter or, if the vehicle is driven
cautiously, somewhat longer.
Do not continue driving in emergency mode if
R you notice knocking sounds
R the vehicle starts to shake
R smoke develops and you smell rubber
R ESC is intervening continuously
R you notice tears on the tire sidewalls
After driving in emergency mode, you must
have the rims inspected by an authorized
Mercedes-Benz Center to check if they are
suitable for further use. The failed tire must
be replaced in any case.
When replacing individual or all tires on the
vehicle, make sure only tires marked with
“MOExtended” are mounted in the size
specified for your vehicle ( Y page 353).
Sealing tires with TIREFIT
This section applies to vehicles that are
factory equipped 20
or retrofitted with a
TIREFIT kit only.
20 Canada only.Flat tire329Practical hints212_AKB; 2; 41, en-USd2ureepe,Version: 2.11.8.12009-07-17T09:14:21+02:00 - Seite 329Z
Page 332 of 372
Small tire punctures, particularly those in the
tread, can be sealed with TIREFIT.
TIREFIT can be used in ambient temperatures
down to -4‡ (-20†).
GWarning!
TIREFIT is a limited repair device. TIREFIT
cannot be used for cuts or punctures larger
than approximately 0.16 in (4 mm) and tire
damage caused by driving with extremely low
tire inflation pressure, or on a flat tire, or a
damaged wheel.
Do not drive the vehicle under such
circumstances.
Contact the nearest authorized Mercedes-
Benz Center for assistance or call Roadside
Assistance.
XForeign objects (e.g. screws or nails)
should not be removed from the tire.
XTake the TIREFIT kit, the sticker, and the
electric air pump out of the vehicle.
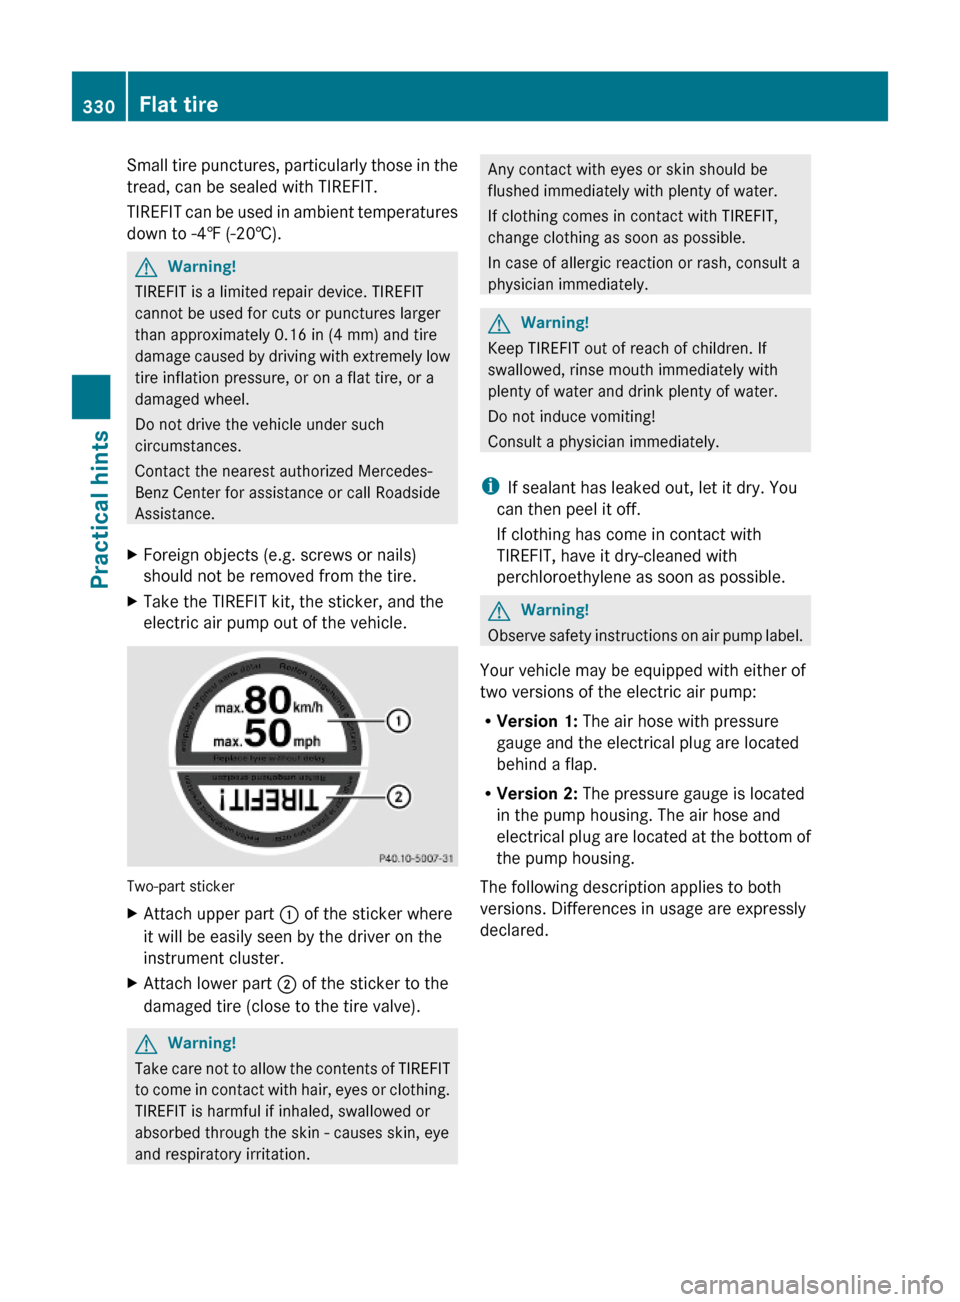
Two-part sticker
XAttach upper part : of the sticker where
it will be easily seen by the driver on the
instrument cluster.
XAttach lower part ; of the sticker to the
damaged tire (close to the tire valve).
GWarning!
Take care not to allow the contents of TIREFIT
to come in contact with hair, eyes or clothing.
TIREFIT is harmful if inhaled, swallowed or
absorbed through the skin - causes skin, eye
and respiratory irritation.
Any contact with eyes or skin should be
flushed immediately with plenty of water.
If clothing comes in contact with TIREFIT,
change clothing as soon as possible.
In case of allergic reaction or rash, consult a
physician immediately.
GWarning!
Keep TIREFIT out of reach of children. If
swallowed, rinse mouth immediately with
plenty of water and drink plenty of water.
Do not induce vomiting!
Consult a physician immediately.
iIf sealant has leaked out, let it dry. You
can then peel it off.
If clothing has come in contact with
TIREFIT, have it dry-cleaned with
perchloroethylene as soon as possible.
GWarning!
Observe safety instructions on air pump label.
Your vehicle may be equipped with either of
two versions of the electric air pump:
RVersion 1: The air hose with pressure
gauge and the electrical plug are located
behind a flap.
RVersion 2: The pressure gauge is located
in the pump housing. The air hose and
electrical plug are located at the bottom of
the pump housing.
The following description applies to both
versions. Differences in usage are expressly
declared.
330Flat tirePractical hints
212_AKB; 2; 41, en-USd2ureepe,Version: 2.11.8.12009-07-17T09:14:21+02:00 - Seite 330
Page 333 of 372
Version 1
Version 2
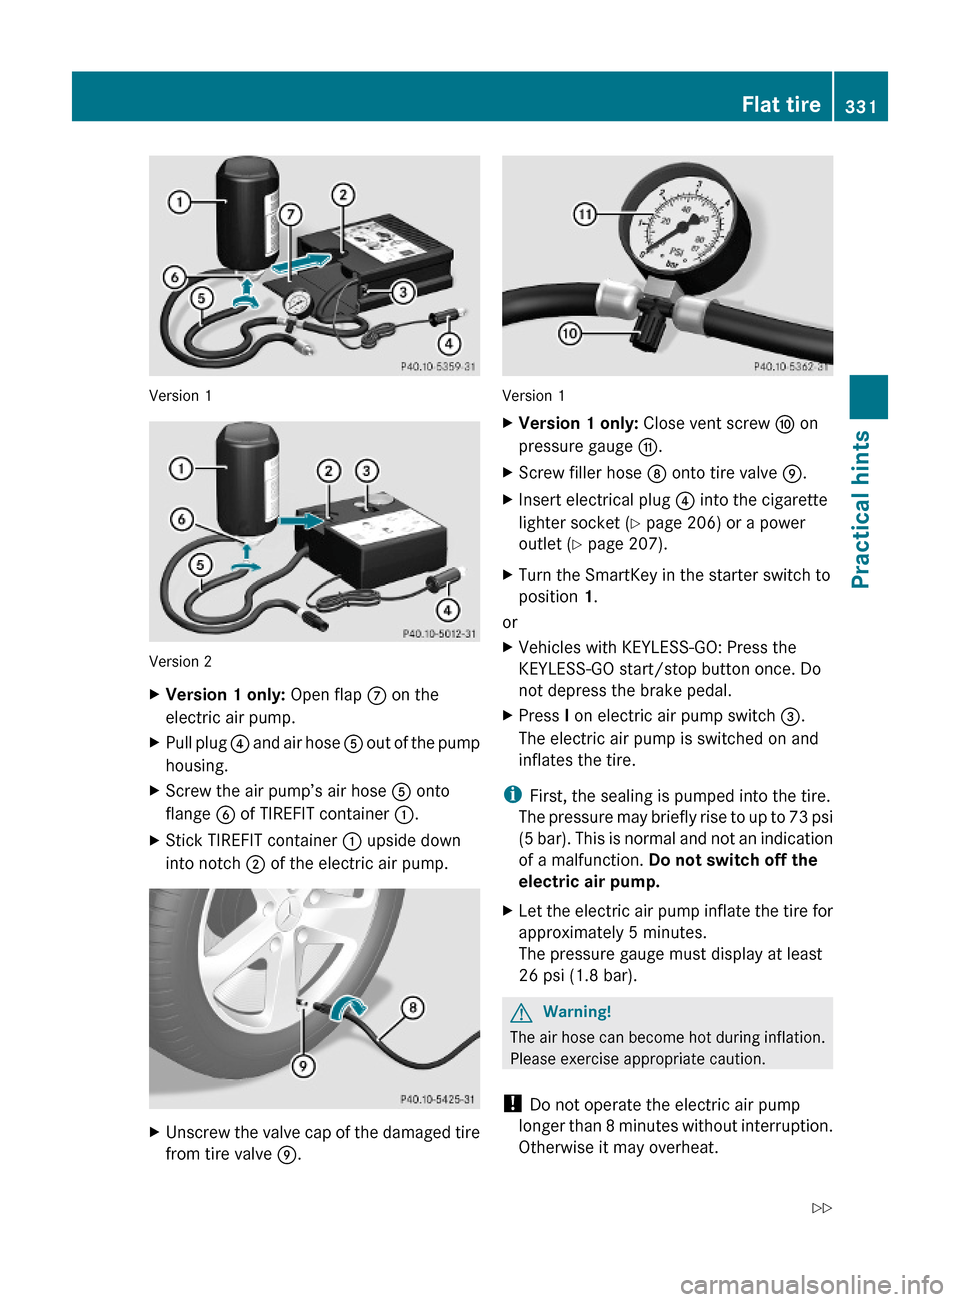
XVersion 1 only: Open flap C on the
electric air pump.
XPull plug ? and air hose A out of the pump
housing.
XScrew the air pump’s air hose A onto
flange B of TIREFIT container :.
XStick TIREFIT container : upside down
into notch ; of the electric air pump.
XUnscrew the valve cap of the damaged tire
from tire valve E.
Version 1
XVersion 1 only: Close vent screw F on
pressure gauge G.
XScrew filler hose D onto tire valve E.XInsert electrical plug ? into the cigarette
lighter socket (Y page 206) or a power
outlet (Y page 207).
XTurn the SmartKey in the starter switch to
position 1.
or
XVehicles with KEYLESS-GO: Press the
KEYLESS-GO start/stop button once. Do
not depress the brake pedal.
XPress I on electric air pump switch =.
The electric air pump is switched on and
inflates the tire.
iFirst, the sealing is pumped into the tire.
The pressure may briefly rise to up to 73 psi
(5 bar). This is normal and not an indication
of a malfunction. Do not switch off the
electric air pump.
XLet the electric air pump inflate the tire for
approximately 5 minutes.
The pressure gauge must display at least
26 psi (1.8 bar).
GWarning!
The air hose can become hot during inflation.
Please exercise appropriate caution.
! Do not operate the electric air pump
longer than 8 minutes without interruption.
Otherwise it may overheat.
Flat tire331Practical hints212_AKB; 2; 41, en-USd2ureepe,Version: 2.11.8.12009-07-17T09:14:21+02:00 - Seite 331Z
Page 334 of 372
You may operate the air pump again after
it has cooled off.
If the tire inflation pressure of at least
26 psi (1.8 bar) is not attained:
XTurn off the electric air pump by pressing
0 on electric air pump switch =.
XDetach filler hose D from tire valve E.XDrive vehicle back or forth very slowly
approximately 30 ft (10 m).
This serves to better distribute the TIREFIT
sealant material inside the tire.
XInflate the tire again.GWarning!
If a tire inflation pressure of 26 psi (1.8 bar)
is not attained, the tire is too severely
damaged for TIREFIT to provide a reliable tire
repair.
In this case, TIREFIT cannot properly seal the
tire.
Do not drive the vehicle.
Contact the nearest Mercedes-Benz Center or
call Roadside Assistance.
After attaining a tire inflation pressure of
at least 26 psi (1.8 bar):
XPress 0 on electric air pump switch =.
The electric air pump is switched off.
XDetach the TIREFIT kit from the tire valve.GWarning!
The air hose may still be hot. Exercise proper
caution to avoid burning yourself when
detaching the electric air pump.
! Remaining TIREFIT sealant could escape
from the filler hose after it has been
detached from the tire valve. TIREFIT
sealant may cause stains.
Therefore, cover the filler hose, e.g. by
inserting it into the plastic bag the TIREFIT
kit was packed in.
XDrive off immediately.GWarning!
Do not exceed a vehicle speed of 50 mph
(80 km/h). A TIREFIT repair is not designed to
operate at higher speeds.
The sticker must be attached on the
instrument cluster where it will be easily seen
by the driver.
Vehicle handling characteristics of a TIREFIT
repaired tire may change. Adapt your driving
accordingly.
XAfter driving the vehicle for an initial
10 minutes, check the tire inflation
pressure using the pressure gauge.
GWarning!
If tire inflation pressure has fallen below
20 psi (1.3 bar) do not continue to drive the
vehicle.
Park your vehicle safely away from the
roadway and contact the nearest authorized
Mercedes-Benz Center or Roadside
Assistance.
Have the damaged tire replaced.
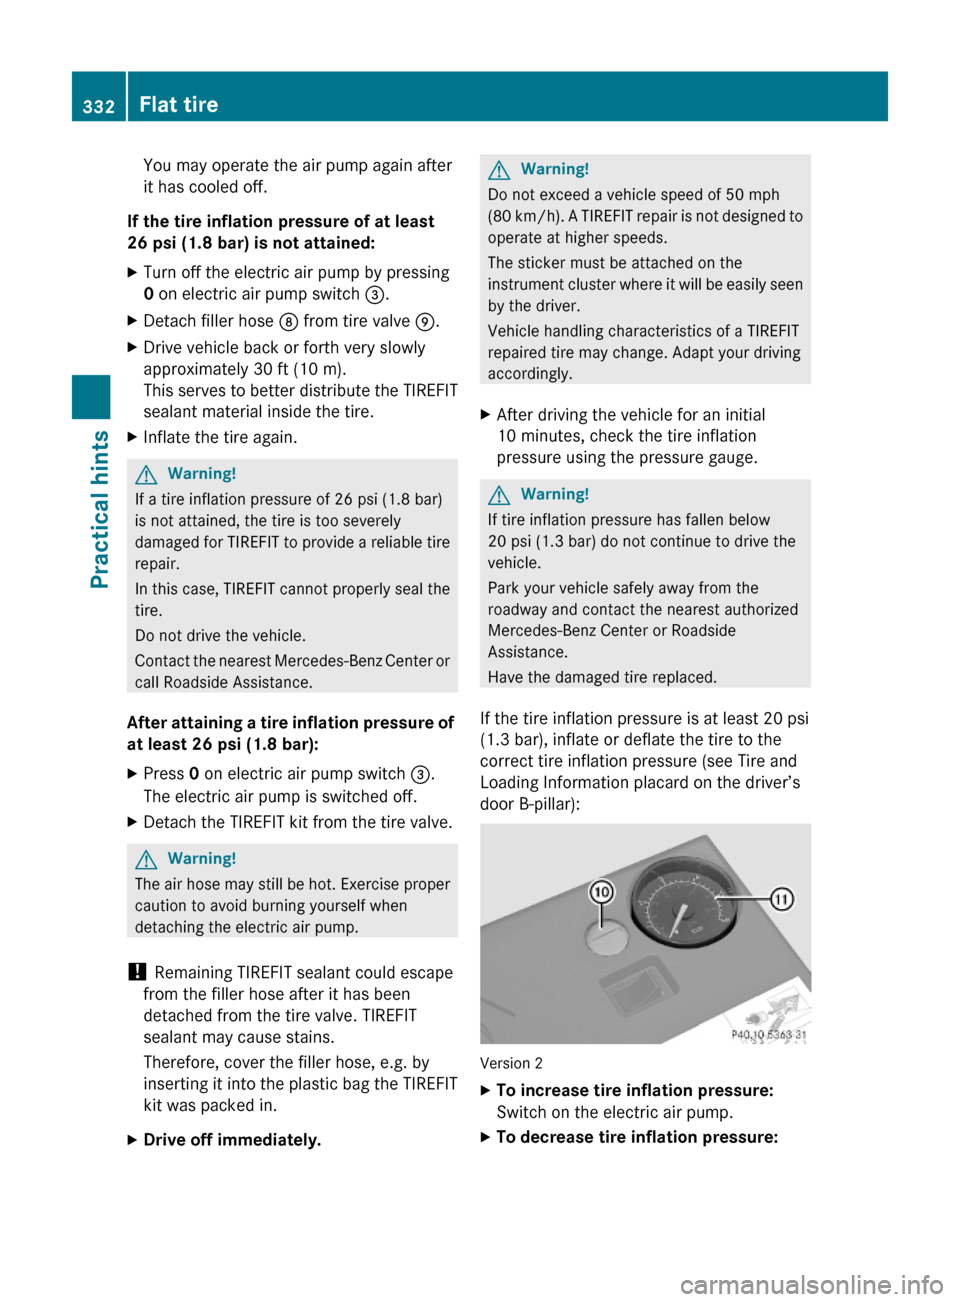
If the tire inflation pressure is at least 20 psi
(1.3 bar), inflate or deflate the tire to the
correct tire inflation pressure (see Tire and
Loading Information placard on the driver’s
door B-pillar):
Version 2
XTo increase tire inflation pressure:
Switch on the electric air pump.
XTo decrease tire inflation pressure:332Flat tirePractical hints
212_AKB; 2; 41, en-USd2ureepe,Version: 2.11.8.12009-07-17T09:14:21+02:00 - Seite 332