2010 MERCEDES-BENZ E550 warning
[x] Cancel search: warningPage 260 of 372

Emission control
Certain systems of the engine serve to keep
the toxic components of the exhaust gases
within permissible limits required by law.
These systems will function properly only
when maintained strictly according to factory
specifications. Any adjustments on the
engine should, therefore, be carried out only
by qualified Mercedes-Benz Center
authorized technicians.
Engine adjustments should not be altered in
any way. Moreover, the specified service
procedures must be carried out regularly
according to Mercedes-Benz servicing
requirements. For details refer to the
Maintenance Booklet.
GWarning!
Inhalation of exhaust gas is hazardous to your
health. All exhaust gas contains carbon
monoxide (CO), and inhaling it can cause
unconsciousness and possible death.
Do not run the engine in confined areas (such
as a garage) which are not properly ventilated.
If you think that exhaust gas fumes are
entering the vehicle while driving, have the
cause determined and corrected
immediately. If you must drive under these
conditions, drive only with at least one
window fully open at all times.
Maintenance
Notes
The Maintenance System in your vehicle
tracks the distance driven and the time
elapsed since the last maintenance service.
It calculates other maintenance service work
required, and calls for the next maintenance
service accordingly.
We strongly recommend that you have your
vehicle serviced at an authorized Mercedes-
Benz Center. Have it serviced in accordance
with the Maintenance Booklet at the times
called for by the maintenance service
indicator.
iFailure to have the vehicle maintained in
accordance with the Maintenance Booklet
and maintenance service indicator at the
designated times/mileage will result in
vehicle damage not covered by the
Mercedes-Benz Limited Warranty.
Maintenance service indicator
message
Information on maintenance work and
maintenance intervals are specified in the
Maintenance Booklet. Contact an authorized
Mercedes-Benz Center, or visit
www.mbusa.com (USA only) for additional
information.
The maintenance service indicator message
will notify you when the next maintenance
service is required.
Starting approximately 1 month before the
next maintenance service is required, one of
the following messages will appear in the
multifunction display. The messages will
appear while you are driving or when you
switch on the ignition (example service A):
Next Service A in XXXX miles (km)
Next Service A in XX days
Service A Due
An additional number or a further letter in
combination with the maintenance type can
be indicated. This indicates that further
auxiliary maintenance work is required.
Contact an authorized Mercedes-Benz Center
for more information.
258MaintenanceOperation
212_AKB; 2; 41, en-USd2ureepe,Version: 2.11.8.12009-07-17T09:14:21+02:00 - Seite 258
Page 262 of 372
engine damage and/or other vehicle
damage not covered by the Mercedes-Benz
Limited Warranty.
Vehicle care
Cleaning and care of the vehicle
Notes
Regular and proper care will help to maintain
the value of your vehicle.
GWarning!
Many cleaning products can be hazardous.
Some are poisonous, others are flammable.
Always follow the instructions on the
particular container. Always open your
vehicle’s doors or windows when cleaning the
inside.
Never use fluids or solvents that are not
designed for cleaning your vehicle.
Always lock away cleaning products and keep
them out of reach of children.
! When cleaning the vehicle, do not use
scouring agents. Never apply strong force
and only use a soft, wet cloth or sponge.
Otherwise you may scratch or damage the
surface to be cleaned.
While in operation, even while parked, your
vehicle is subjected to varying external
influences which, if gone unchecked, can
attack the paintwork as well as the vehicle
underbody and cause lasting damage.
Such damage is caused not only by extreme
and varying climatic conditions, but also by:
R Air pollution
R Road salt
R Tar
R Gravel and stone chipping
To avoid paint damage, you should
immediately remove:
R Grease and oil
R Fuel
R Coolant
R Brake fluid
R Bird droppings
R Insects
R Tree resins etc.
Frequent washing reduces and/or eliminates
the aggressiveness and potency of the above
adverse influences.
More frequent washings are necessary to
deal with unfavorable conditions:
R near the ocean
R in industrial areas (smoke, exhaust
emissions)
R during winter operation
You should check your vehicle from time to
time for stone chipping or other damage. Any
damage should be repaired as soon as
possible to prevent corrosion.
In doing so, do not neglect the underbody of
the vehicle. A prerequisite for a thorough
check is a washing of the underbody followed
by a thorough inspection. Damaged areas
need to be re-undercoated.
Your vehicle has been treated at the factory
with a wax-base rustproofing in the body
cavities which will last for the lifetime of the
vehicle. Post-production treatment is neither
necessary nor recommended by Mercedes-
Benz because of the possibility of
incompatibility between materials used in the
production process and others applied later.
We have selected vehicle-care products and
compiled recommendations which are
specially matched to our vehicles and which
always reflect the latest technology. You can
obtain Mercedes-Benz approved vehicle-care
products at an authorized Mercedes-Benz
Center.260Vehicle careOperation
212_AKB; 2; 41, en-USd2ureepe,Version: 2.11.8.12009-07-17T09:14:21+02:00 - Seite 260
Page 264 of 372

XOnly use a mild vehicle wash detergent,
such as Mercedes-Benz approved Car
Shampoo.XThoroughly spray the vehicle with a
diffused jet of water.XDo not spray directly towards the
ventilation intake.XUse plenty of water and rinse the sponge
and chamois frequently.XRinse with clean water and dry with a
chamois thoroughly.
Do not allow cleaning agents to dry on the
finish.
Automatic car wash
GWarning!
The vehicle is braked when the HOLD function
or DISTRONIC PLUS is activated. Therefore,
deactivate the HOLD function or DISTRONIC
PLUS before the vehicle is washed in an
automatic car wash.
You can have your vehicle washed in an
automatic car wash from the start. Brushless
car washes are preferable.
XTo protect the filter system, activate the air
recirculation mode using button g on
the climate control panel.
! Do not clean your vehicle in an automatic
touchless car wash which uses caustic
spray. Caustic spray will damage the paint
or ornamental moldings.
If the vehicle is very dirty, prewash it before
running it through the automatic car wash.
! Make sure the combination switch is set
to wiper setting $. Otherwise, the rain
sensor could activate and cause the wipers
to move unintentionally. This may lead to
vehicle damage.
Due to the width of the vehicle, fold in
exterior rear view mirrors prior to running
the vehicle through an automatic car wash
to prevent damage to the mirrors.
XWhen taking the vehicle through an
automatic conveyor-type car wash:
Make sure the automatic transmission
remains in neutral position N. Observe
instructions, see “Remaining in neutral
position N” ( Y page 117).
When leaving the automatic car wash, make
sure the mirrors are folded out.
After running the vehicle through an
automatic car wash, wipe any wax off of the
windshield and the wiper blade inserts. This
will prevent smears and reduce wiping noise
which can be caused by residual wax on the
windshield.
Ornamental moldings
XFor regular cleaning and care of ornamental
moldings, use a damp cloth.
! Do not use chrome cleaner on ornamental
moldings. Although ornamental moldings
may have chrome appearance, they could
be made of anodized aluminum that will be
damaged when cleaned with chrome
cleaner. Instead, use a damp cloth to clean
those ornamental moldings.
For very dirty ornamental moldings of
which you are sure are chrome-plated, use
a chrome cleaner. If in doubt whether an
ornamental molding is chrome-plated,
contact an authorized Mercedes-Benz
Center.
Headlamps, brake lamps, tail lamps,
side markers, turn signal lenses
XUse a mild vehicle wash detergent, such as
Mercedes-Benz approved Car Shampoo,
with plenty of water.
! Only use window cleaning solutions that
are suitable for plastic lamp lenses.
Window cleaning solutions which are not
suitable may damage the plastic lamp
lenses of the headlamps. Therefore, do not
use abrasives, solvents or cleaners that
contain solvents.
262Vehicle careOperation
212_AKB; 2; 41, en-USd2ureepe,Version: 2.11.8.12009-07-17T09:14:21+02:00 - Seite 262
Page 265 of 372
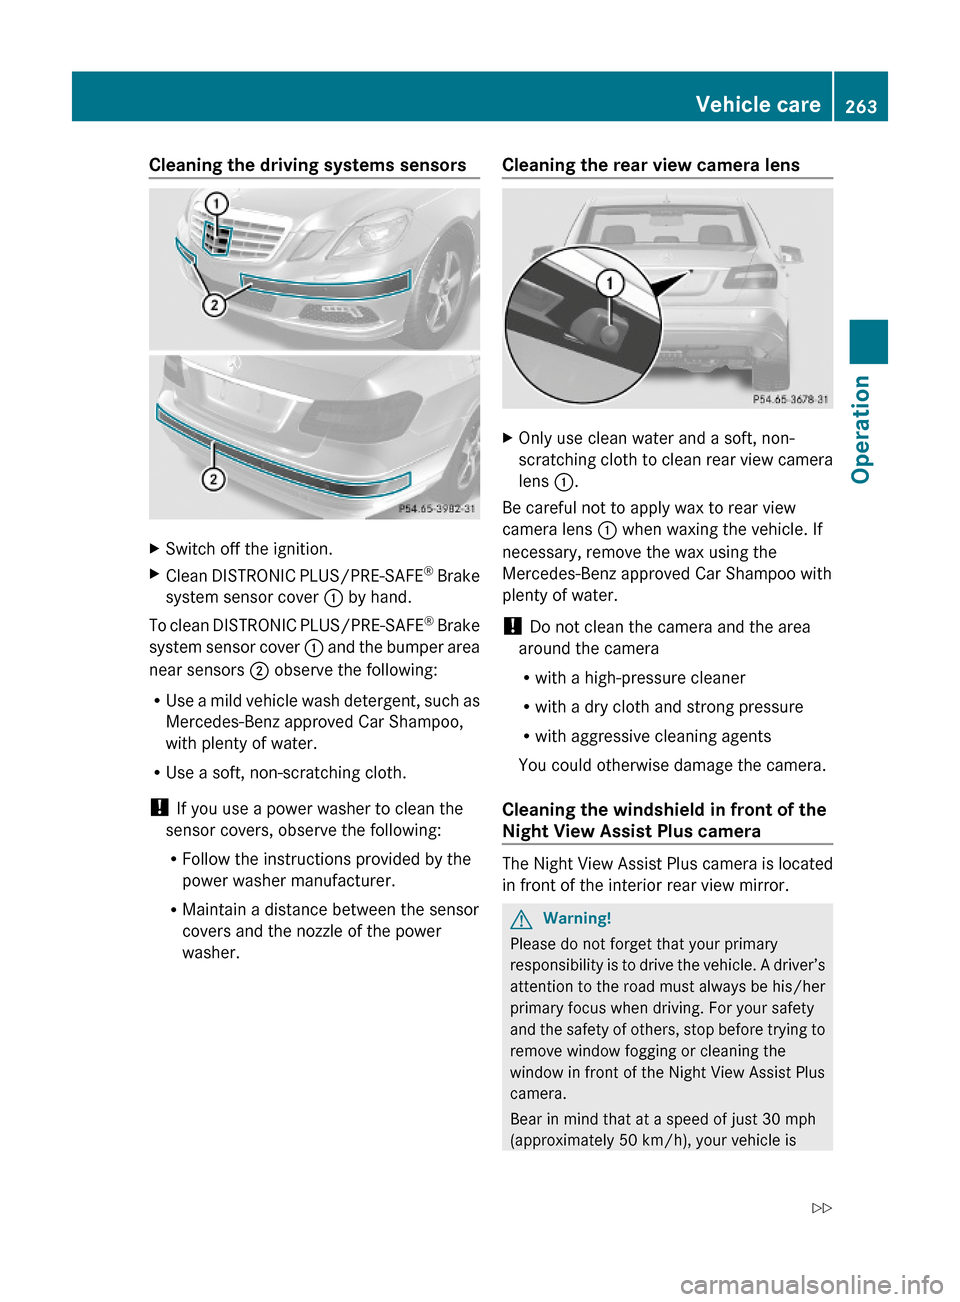
Cleaning the driving systems sensorsXSwitch off the ignition.XClean DISTRONIC PLUS/PRE-SAFE® Brake
system sensor cover : by hand.
To clean DISTRONIC PLUS/PRE-SAFE® Brake
system sensor cover : and the bumper area
near sensors ; observe the following:
RUse a mild vehicle wash detergent, such as
Mercedes-Benz approved Car Shampoo,
with plenty of water.
RUse a soft, non-scratching cloth.
! If you use a power washer to clean the
sensor covers, observe the following:
RFollow the instructions provided by the
power washer manufacturer.
RMaintain a distance between the sensor
covers and the nozzle of the power
washer.
Cleaning the rear view camera lensXOnly use clean water and a soft, non-
scratching cloth to clean rear view camera
lens :.
Be careful not to apply wax to rear view
camera lens : when waxing the vehicle. If
necessary, remove the wax using the
Mercedes-Benz approved Car Shampoo with
plenty of water.
! Do not clean the camera and the area
around the camera
Rwith a high-pressure cleaner
Rwith a dry cloth and strong pressure
Rwith aggressive cleaning agents
You could otherwise damage the camera.
Cleaning the windshield in front of the
Night View Assist Plus camera
The Night View Assist Plus camera is located
in front of the interior rear view mirror.
GWarning!
Please do not forget that your primary
responsibility is to drive the vehicle. A driver’s
attention to the road must always be his/her
primary focus when driving. For your safety
and the safety of others, stop before trying to
remove window fogging or cleaning the
window in front of the Night View Assist Plus
camera.
Bear in mind that at a speed of just 30 mph
(approximately 50 km/h), your vehicle is
Vehicle care263Operation212_AKB; 2; 41, en-USd2ureepe,Version: 2.11.8.12009-07-17T09:14:21+02:00 - Seite 263Z
Page 266 of 372

covering a distance of 44 feet (approximately
14 m) every second.
! Do not clean the lens of the Night View
Assist Plus camera. If the camera lens is
dirty, please contact an authorized
Mercedes-Benz Center.
XUse recessed handle : of camera cover to
swing camera cover downward.
XClean inside of windshield in front of
camera ; with a soft, non-scratching
cloth.
! If you use a windshield cleaning product,
make sure that none of the cleaning
product comes into contact with the lens
of the Night View Assist Plus camera.
XUse recessed handle : of camera cover to
swing camera cover up.
Cleaning the windows and the wiper
blades
! Never open the hood when the wiper arms
are folded forward.
GWarning!
For safety reasons, switch off wipers and
remove SmartKey from starter switch before
cleaning the windshield and/or the wiper
blades. Vehicles with KEYLESS-GO: Make
sure the vehicle’s on-board electronics have
status 0. Otherwise, the wiper motor could
suddenly turn on and cause injury.
! Do not pull on the wiper blade inserts.
They could tear.
XFold the wiper arms forward until they snap
into place.
XClean the windshield and the wiper blade
inserts with a clean cloth and mild
detergent solution.
XUse a soft, clean cloth and a mild window
cleaning solution on all outside and inside
glass surfaces.
An automotive glass cleaner is
recommended.
! Fold the windshield wiper arms back onto
the windshield before turning the SmartKey
in the starter switch or pressing the
KEYLESS-GO start/stop button.
Hold on to the wiper when folding the wiper
arm back. If released, the force of the
impact from the tensioning spring could
crack the windshield.
! To clean the window interior, do not use
a dry cloth, abrasives, solvents or cleaners
containing solvents. Do not touch the
inside of the windows with hard objects
such as an ice scraper or ring. Doing so may
damage the windows.
264Vehicle careOperation
212_AKB; 2; 41, en-USd2ureepe,Version: 2.11.8.12009-07-17T09:14:21+02:00 - Seite 264
Page 267 of 372
Cleaning the panorama roof
The rear part of the tilt/sliding panel has a
protective layer on the inside.
XUse a soft, clean cloth and a mild window
cleaning solution.
An automotive glass cleaner is
recommended.
! Do not use a dry cloth, abrasives, solvents
or cleaners containing solvents. Do not
touch the protective layer with hard objects
such as an ice scraper or ring. Never apply
strong force and only use a soft, non-
scratching cloth when cleaning the rear
part of the tilt/sliding panel.
Otherwise you may scratch or damage the
protective layer.
Light alloy wheels
If possible, clean wheels once a week.
XUse Mercedes-Benz approved Wheel Care,
a soft bristle brush and a strong spray of
water for cleaning the light alloy wheels.
! Only use acid-free cleaning materials.
Acid may cause corrosion or damage the
clear coat.
! The vehicle should not be parked for an
extended period of time immediately after
it has been cleaned. This applies especially
after the wheel rims have been cleaned
with wheel rim cleaner. Wheel rim cleaners
can lead to increased corrosion of the
brake disks and brake pads. Non-approved
wheel cleaners may also damage the wheel
paint if the vehicle is not driven after
cleaning.
Therefore, the vehicle’s brake system
should always be warmed-up before it is
parked after cleaning. Drive your vehicle for
several minutes to allow the brakes to dry.
When applying Mercedes-Benz approved
Tire Care and Mercedes-Benz approved
Wheel Care products, take care not to
spray them on the brake disks.
Plastic and rubber partsXUse a gentle dishwashing detergent or mild
detergent for delicate fabrics as a washing
solution.XWipe with a cloth moistened in a lukewarm
solution.
The surface may temporarily change color.
If this is the case, wait for it to dry.GWarning!
Do not use cleaners or cockpit care sprays
containing solvents to clean the cockpit or the
steering wheel. Cleaners containing solvents
will make the surface porous and vehicle
occupants could suffer serious injuries from
plastic parts coming loose in the event of air
bag deployment.
! Do not use oil, wax or scouring agents.
Otherwise you may scratch or damage the
surface.
Hard plastic trim items
XUse Mercedes-Benz approved Interior Care
on a soft, lint-free cloth and apply with light
pressure.
COMAND display
! You must switch off the COMAND display
and allow it to cool prior to cleaning.
! Do not use any liquids or cleaning agents.
These can damage or even destroy the
COMAND display screen.
XUse a standard microfiber cloth and apply
with light pressure.
Steering wheel and gear selector lever
XWipe with a damp cloth and dry thoroughly
or clean with Mercedes-Benz approved
Leather Care.Vehicle care265Operation212_AKB; 2; 41, en-USd2ureepe,Version: 2.11.8.12009-07-17T09:14:21+02:00 - Seite 265Z
Page 268 of 372
CarpetsXUse Mercedes-Benz approved Carpet and
Fabric Care for cleaning the carpets.
Headliner and shelf below rear window
XUse a soft bristle brush or a dry-shampoo
cleaner in case of excessive dirt.
Seat belts
XOnly use clear, lukewarm water and soap.
! The seat belts must not be treated with
chemical cleaning agents. Do not dry the
seat belts at temperatures above 176‡
(80†) or in direct sunlight.
GWarning!
Do not bleach or dye seat belts as this may
severely weaken them. In a crash they may
not be able to provide adequate protection.
Upholstery
Using aftermarket seat covers or wearing
clothing that have the tendency to give off
coloring (e.g. when wet, etc.) may cause the
upholstery to become permanently
discolored. By lining the seats with a proper
intermediate cover, contact-discoloration will
be prevented.
GWarning!
Only use seat or head restraint covers which
have been tested and approved by Mercedes-
Benz for your vehicle model.
Using other seat or head restraint covers may
interfere with or prevent
R deployment of the front side impact air
bags
R deployment of the rear side impact air bags
R deployment of the pelvis air bags
R activation of the NECK-PRO active front
head restraints
Contact an authorized Mercedes-Benz Center
for availability.
Leather upholstery
Please note that leather upholstery is a
natural product and is therefore subject to a
natural aging process. Leather upholstery
may also react to certain ambient influences
such as high humidity or high temperature by
showing wrinkles for example.XWipe leather upholstery with a damp cloth
and dry thoroughly or clean with Mercedes-
Benz approved Leather Care.
! To avoid damage to leather upholstery:
R Wipe with light pressure only.
R Do not clean with abrasive cleaning
agents such as scouring milk or powder.
R Do not soak the leather upholstery.
As leather is a natural product, it could
otherwise harden or become porous.
R Exercise particular care when cleaning
perforated leather as its underside
should not become wet.
Wood trims
XOnly use water and a damp cloth to clean
wood trims in your vehicle.
! Do not use solvents like tar remover or
wheel cleaner nor polishes or waxes as
these may be abrasive.
Chrome-plated exhaust tip
Regular cleaning and care of chrome-plated
exhaust tips will help to maintain their shine
and the classy appearance.
XUse Mercedes-Benz approved Chrome
Polishing Paste each time the vehicle has
been washed, especially during the winter.
! Do not use alkaline cleaners such as
wheel cleaners as they could cause
corrosion.
266Vehicle careOperation
212_AKB; 2; 41, en-USd2ureepe,Version: 2.11.8.12009-07-17T09:14:21+02:00 - Seite 266
Page 272 of 372
XRemoving vehicle tool kit box: Pull
tab : in direction of arrow ; and lift
vehicle tool kit box D.
XRemove vehicle tool kit box D from
luggage bowl E.
XOpening vehicle tool kit box cover: Pull
tab B in direction of arrow A and open
vehicle tool kit box cover =.
XClosing vehicle tool kit box cover: Push
vehicle tool kit box cover = downward
until it engages into vehicle tool kit box
D.
XInstalling vehicle tool kit box: Slide
vehicle tool kit box D into the recess of
luggage bowl E.
XPush vehicle tool kit box D downward until
it engages into luggage bowl E.
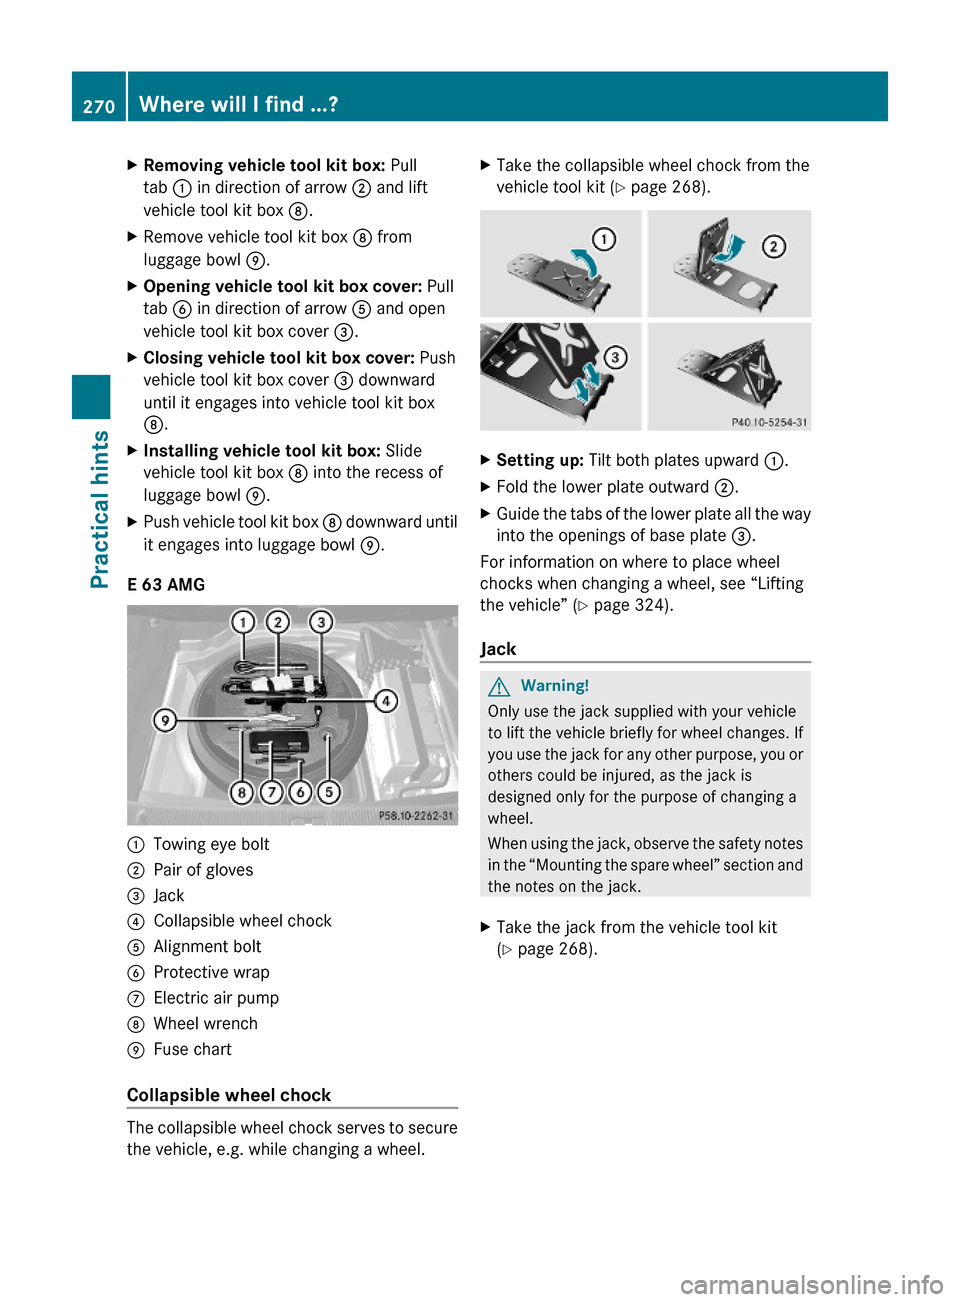
E 63 AMG
:Towing eye bolt;Pair of gloves=Jack?Collapsible wheel chockAAlignment boltBProtective wrapCElectric air pumpDWheel wrenchEFuse chart
Collapsible wheel chock
The collapsible wheel chock serves to secure
the vehicle, e.g. while changing a wheel.
XTake the collapsible wheel chock from the
vehicle tool kit (Y page 268).
XSetting up: Tilt both plates upward :.XFold the lower plate outward ;.XGuide the tabs of the lower plate all the way
into the openings of base plate =.
For information on where to place wheel
chocks when changing a wheel, see “Lifting
the vehicle” (Y page 324).
Jack
GWarning!
Only use the jack supplied with your vehicle
to lift the vehicle briefly for wheel changes. If
you use the jack for any other purpose, you or
others could be injured, as the jack is
designed only for the purpose of changing a
wheel.
When using the jack, observe the safety notes
in the “Mounting the spare wheel” section and
the notes on the jack.
XTake the jack from the vehicle tool kit
(Y page 268).
270Where will I find ...?Practical hints
212_AKB; 2; 41, en-USd2ureepe,Version: 2.11.8.12009-07-17T09:14:21+02:00 - Seite 270