2010 MERCEDES-BENZ E350 Air pump
[x] Cancel search: Air pumpPage 6 of 372

1, 2, 3 ...
4-ETS see ETS/4-ETS
4MATIC
see All-wheel drive (4MATIC)
A
ABS (Antilock Brake System) ............. 62
Indicator lamp ................................ 305
Messages in the multifunction
display ................................... 288, 289
Accessory weight .............................. 249
Accidents ........................................... 112
Air bags ........................................... 37
Emergency calls (Tele Aid) .............208
NECK-PRO active front head
restraints ........................................ 54
Active Bi-Xenon headlamps
see Headlamps
Adaptive Brake .................................... 64
Adaptive Highbeam Assist ............... 100
Switching on or off ......................... 142
AdBlue ®
...................................... 333, 364
Refilling ......................................... 334
Additives
Engine oil ....................................... 362
Gasoline ......................................... 364
Address change ................................... 21
Advanced Tire Pressure
Monitoring System (Advanced
TPMS) ................................................. 233
Messages in the multifunction
display ........................................... 285
Air bags ................................................ 37
Emergency call upon deployment ..208
Front, driver and passenger .............40
Front passenger front air bag off
indicator lamp (Canada
only) ........................................ 46, 313
Front passenger front air bag off
indicator lamp (USA only) ........43, 314
Knee bag .......................................... 40
Messages in the multifunction
display ........................................... 276
OCS (Occupant Classification
System) ........................................... 43
Pelvis ............................................... 42
Safety guidelines ............................. 39
Side impact ...................................... 41
Window curtain ................................ 42
Air conditioning refrigerant and
lubricant ............................................. 362
Air distribution .................................. 189
Air filter .............................................. 299
AIRMATIC
Damping system ............................ 163
Introduction ................................... 163
Messages in the multifunction
display ........................................... 292
Vehicle level control ......................163
Air pressure
see Tire inflation pressure
Air pressure (tires) ............................ 250
Air pump (electric) ............................ 327
Air recirculation mode ...................... 190
Air volume .......................................... 189
Alarm system see Anti-theft systems
Alignment bolt (vehicle tool kit) ...... 326
All-wheel drive (4MATIC) .................. 161
Alternator
Messages in the multifunction
display ................................... 284, 297
Alternator (Technical data)
see Vehicle specification
AMG adaptive sport suspension
system (E 63 AMG) ............................ 164
AMG menu ......................................... 131
Anticorrosion/antifreeze .................. 365
Antilock Brake System see ABS
Anti-theft systems ............................... 71
Anti-theft alarm system ...................72
Immobilizer ...................................... 71
Aquaplaning
see Hydroplaning
Armrest, front
Storage compartment ....................202
Armrest, rear
Storage compartment ....................202
Ashtrays ............................................. 206
Aspect ratio (tires) ............................ 250
Assistance menu ............................... 1374Index212_AKB; 2; 41, en-USd2ureepe,Version: 2.11.8.12009-07-17T09:14:21+02:00 - Seite 4
Page 223 of 372

! Never refuel vehicles with gasoline engine
with diesel fuel. Never refuel vehicles with
diesel engine with gasoline. Even small
amounts of incorrect fuel will damage the
fuel system and engine. Damage resulting
from the use of non-approved fuels or fuel
additives or resulting from mixing gasoline
with diesel fuel or vice versa is not covered
by the Mercedes-Benz Limited Warranty.
! If you have accidentally filled the tank
with incorrect or non-approved fuel, do not
switch on the ignition. Otherwise the
incorrect or non-approved fuel will get into
the fuel lines. The fuel system must be
drained completely. Contact an authorized
Mercedes-Benz Center to have the fuel
system drained completely.
! Gasoline engine:
To prevent damage to the catalytic
converters, only use premium unleaded
gasoline in this vehicle.
Any noticeable irregularities in engine
operation should be repaired promptly.
Otherwise, excessive unburned fuel may
reach the catalytic converter, causing it to
overheat and potentially start a fire.
! Diesel engine:
When filling the diesel fuel tank using fuel
containers, place a filling filter, a suede
cloth or a clean flannel cloth as a filter.
Otherwise, particles from the fuel container
could clog the fuel lines and/or the diesel
injection system.
! Diesel engine:
The engine is more susceptible to wear and
damage if you use
R marine diesel fuel
R heating oil
R additives
The exhaust aftertreatment device will be
seriously damaged if you use any other
diesel fuel than ULTRA-LOW SULFURHIGHWAY DIESEL FUEL (ULSD, 15 ppm
SULFUR MAXIMUM).
The use of such non-approved fuels and/or
special additives is not covered by the
Mercedes-Benz Limited Warranty.
i Gasoline engine:
Only use premium unleaded gasoline with
a minimum Posted Octane Rating of 91
(average of 96 RON/86 MON).
Information on gasoline quality can
normally be found on the fuel pump. Please
contact gas station personnel in case
labels on the pump cannot be found.
For more information on gasoline, see
“Premium unleaded gasoline (gasoline
engine)” ( Y page 362), see “Fuel
requirements” ( Y page 363), or contact an
authorized Mercedes-Benz Center, or visit
www.mbusa.com (USA only).
i Diesel engine:
Only use commercially available vehicular
ULTRA-LOW SULFUR HIGHWAY DIESEL
FUEL (ULSD, 15 ppm SULFUR MAXIMUM).
Information on diesel quality can normally
be found on the fuel pump. Please contact
gas station personnel in case labels on the
pump cannot be found.
For more information on diesel fuels, see
“Fuel requirements” ( Y page 363), or
contact an authorized Mercedes-Benz
Center, or visit www.mbusa.com (USA
only).
i Diesel engine:
If you have driven the vehicle until the tank
is empty, the fuel system needs to be bled
( Y page 333).
Locking/unlocking the vehicle with the
SmartKey or KEYLESS-GO automatically
locks/unlocks the fuel filler flap.
i In case the central locking system does
not release the fuel filler flap, see “Fuel filler
flap” ( Y page 316).At the gas station221Operation212_AKB; 2; 41, en-USd2ureepe,Version: 2.11.8.12009-07-17T09:14:21+02:00 - Seite 221Z
Page 270 of 372
Vehicle equipment
iThis Operator’s Manual describes all
features, standard or optional, potentially
available for your vehicle at the time of
purchase. Please be aware that your
vehicle might not be equipped with all
features described in this manual.
Where will I find ...?
First aid kit
iCheck expiration dates and contents for
completeness at least once a year and
replace missing/expired items.
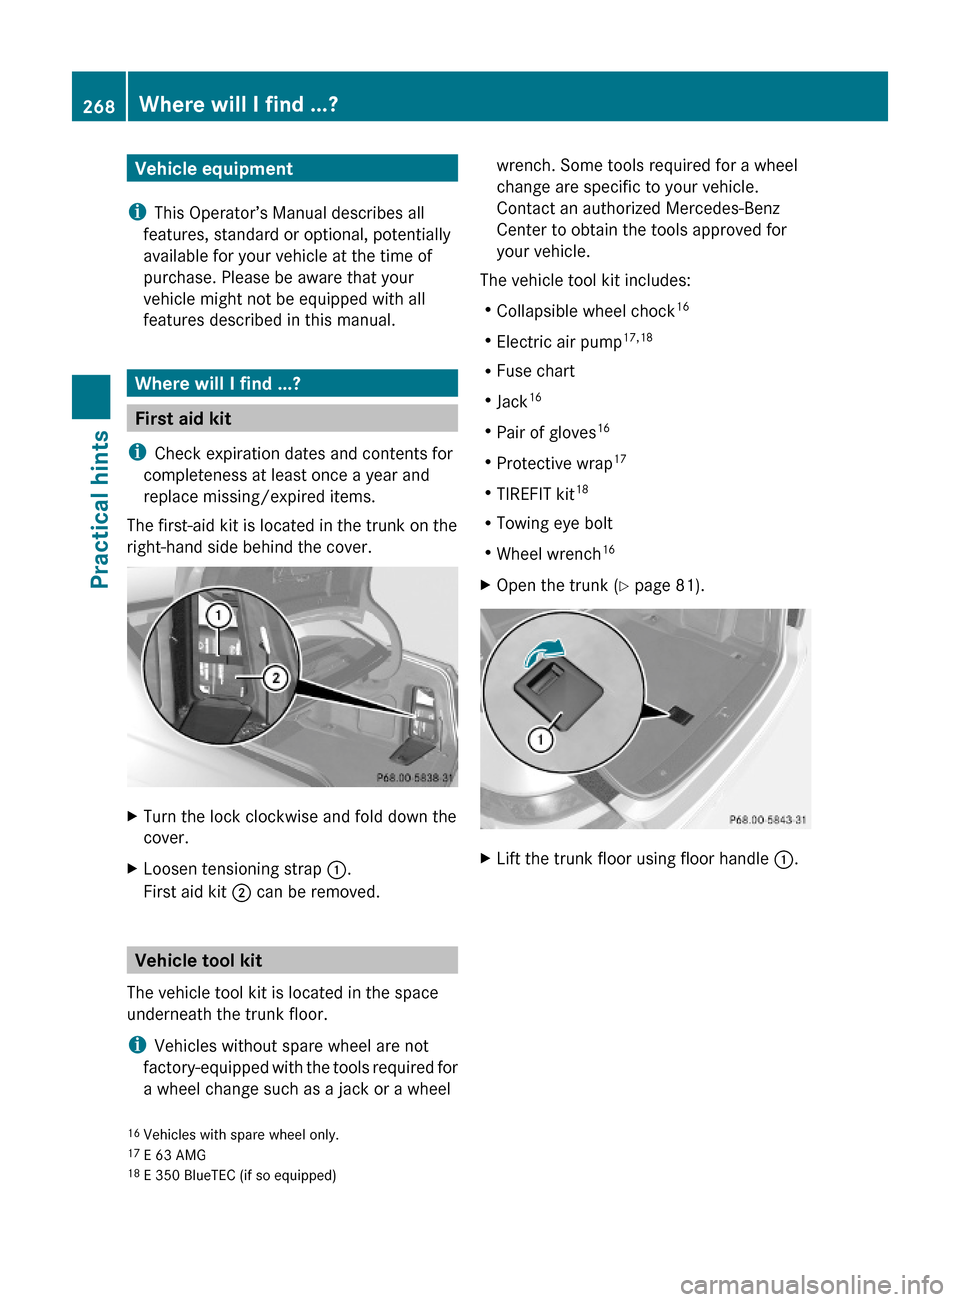
The first-aid kit is located in the trunk on the
right-hand side behind the cover.
XTurn the lock clockwise and fold down the
cover.
XLoosen tensioning strap :.
First aid kit ; can be removed.
Vehicle tool kit
The vehicle tool kit is located in the space
underneath the trunk floor.
iVehicles without spare wheel are not
factory-equipped with the tools required for
a wheel change such as a jack or a wheel
wrench. Some tools required for a wheel
change are specific to your vehicle.
Contact an authorized Mercedes-Benz
Center to obtain the tools approved for
your vehicle.
The vehicle tool kit includes:
RCollapsible wheel chock16
RElectric air pump17,18
RFuse chart
RJack16
RPair of gloves16
RProtective wrap17
RTIREFIT kit18
RTowing eye bolt
RWheel wrench16
XOpen the trunk (Y page 81).XLift the trunk floor using floor handle :.16Vehicles with spare wheel only.17E 63 AMG18E 350 BlueTEC (if so equipped)
268Where will I find ...?Practical hints
212_AKB; 2; 41, en-USd2ureepe,Version: 2.11.8.12009-07-17T09:14:21+02:00 - Seite 268
Page 271 of 372
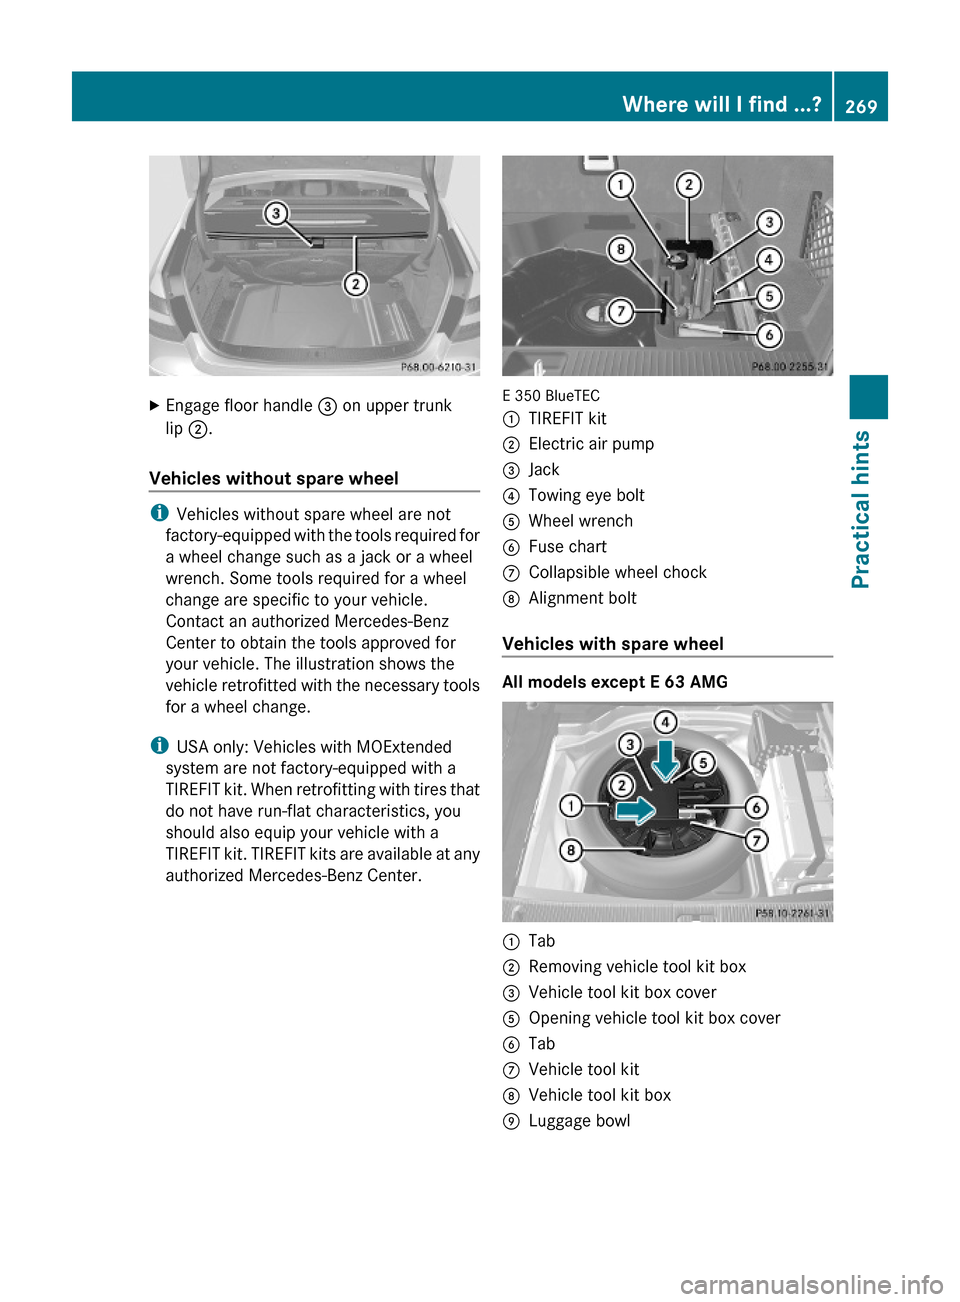
XEngage floor handle = on upper trunk
lip ;.
Vehicles without spare wheel
iVehicles without spare wheel are not
factory-equipped with the tools required for
a wheel change such as a jack or a wheel
wrench. Some tools required for a wheel
change are specific to your vehicle.
Contact an authorized Mercedes-Benz
Center to obtain the tools approved for
your vehicle. The illustration shows the
vehicle retrofitted with the necessary tools
for a wheel change.
iUSA only: Vehicles with MOExtended
system are not factory-equipped with a
TIREFIT kit. When retrofitting with tires that
do not have run-flat characteristics, you
should also equip your vehicle with a
TIREFIT kit. TIREFIT kits are available at any
authorized Mercedes-Benz Center.
E 350 BlueTEC
:TIREFIT kit;Electric air pump=Jack?Towing eye boltAWheel wrenchBFuse chartCCollapsible wheel chockDAlignment bolt
Vehicles with spare wheel
All models except E 63 AMG
:Tab;Removing vehicle tool kit box=Vehicle tool kit box coverAOpening vehicle tool kit box coverBTabCVehicle tool kitDVehicle tool kit boxELuggage bowlWhere will I find ...?269Practical hints212_AKB; 2; 41, en-USd2ureepe,Version: 2.11.8.12009-07-17T09:14:21+02:00 - Seite 269Z
Page 272 of 372
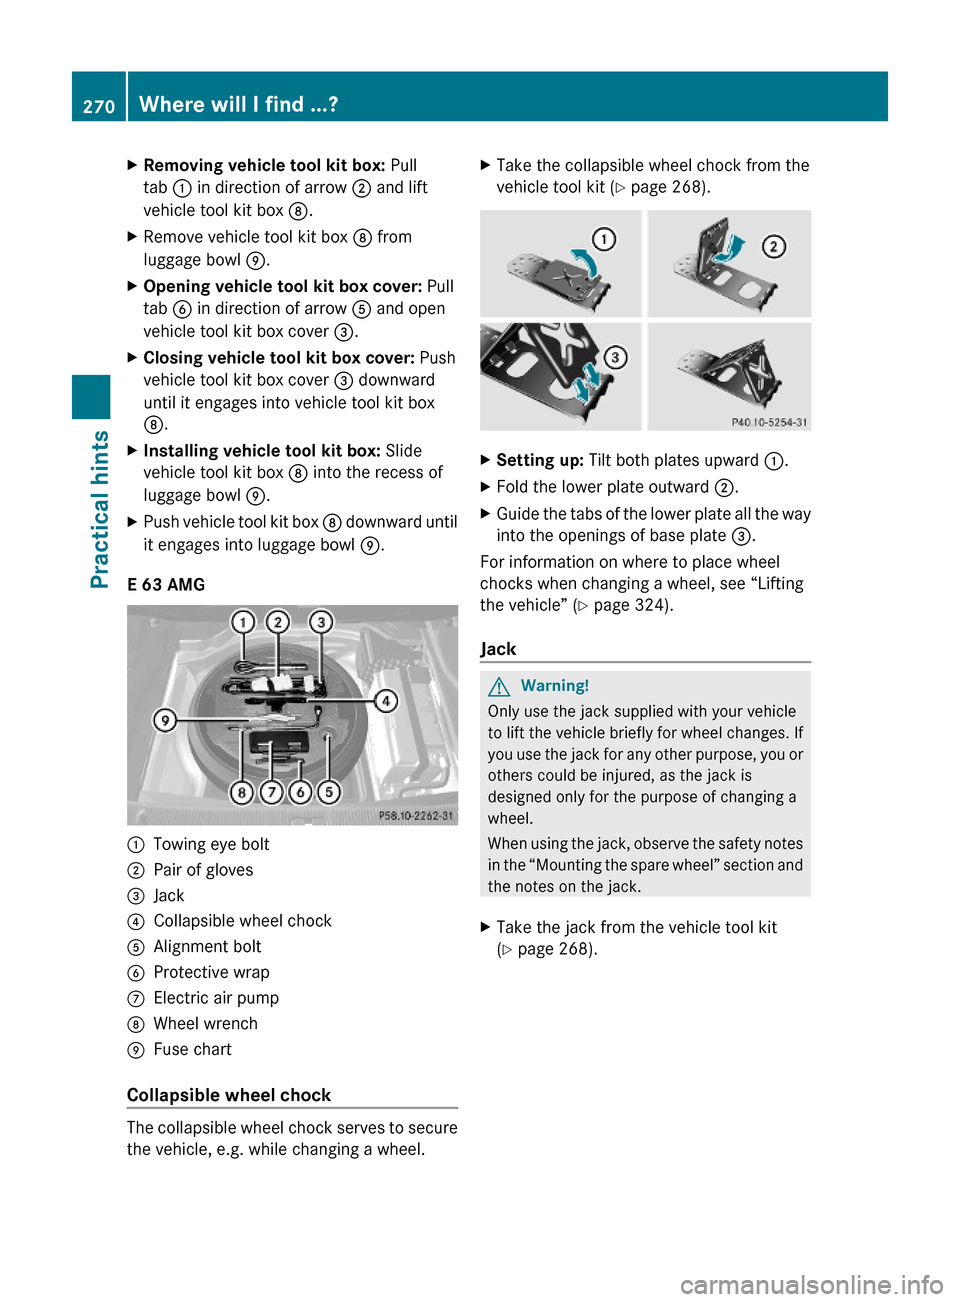
XRemoving vehicle tool kit box: Pull
tab : in direction of arrow ; and lift
vehicle tool kit box D.
XRemove vehicle tool kit box D from
luggage bowl E.
XOpening vehicle tool kit box cover: Pull
tab B in direction of arrow A and open
vehicle tool kit box cover =.
XClosing vehicle tool kit box cover: Push
vehicle tool kit box cover = downward
until it engages into vehicle tool kit box
D.
XInstalling vehicle tool kit box: Slide
vehicle tool kit box D into the recess of
luggage bowl E.
XPush vehicle tool kit box D downward until
it engages into luggage bowl E.
E 63 AMG
:Towing eye bolt;Pair of gloves=Jack?Collapsible wheel chockAAlignment boltBProtective wrapCElectric air pumpDWheel wrenchEFuse chart
Collapsible wheel chock
The collapsible wheel chock serves to secure
the vehicle, e.g. while changing a wheel.
XTake the collapsible wheel chock from the
vehicle tool kit (Y page 268).
XSetting up: Tilt both plates upward :.XFold the lower plate outward ;.XGuide the tabs of the lower plate all the way
into the openings of base plate =.
For information on where to place wheel
chocks when changing a wheel, see “Lifting
the vehicle” (Y page 324).
Jack
GWarning!
Only use the jack supplied with your vehicle
to lift the vehicle briefly for wheel changes. If
you use the jack for any other purpose, you or
others could be injured, as the jack is
designed only for the purpose of changing a
wheel.
When using the jack, observe the safety notes
in the “Mounting the spare wheel” section and
the notes on the jack.
XTake the jack from the vehicle tool kit
(Y page 268).
270Where will I find ...?Practical hints
212_AKB; 2; 41, en-USd2ureepe,Version: 2.11.8.12009-07-17T09:14:21+02:00 - Seite 270
Page 325 of 372
Flat tire
Safety notes
Your vehicle may be equipped with:
R a Minispare wheel
R a spare wheel with collapsible tire
R an MOExtended system (your vehicle does
not have a spare wheel or a TIREFIT kit)
R a TIREFIT kit 19
(your vehicle does not have
a spare wheel)
GWarning!
The dimensions of the spare wheel are
different from those of the road wheels. As a
result, the vehicle handling characteristics
change when driving with a spare wheel
mounted. Adapt your driving style
accordingly.
The spare wheel is for temporary use only.
When driving with a spare wheel mounted,
ensure proper tire inflation pressure and do
not exceed a vehicle speed of 50 mph
(80 km/h).
Contact the nearest authorized Mercedes-
Benz Center as soon as possible to have the
spare wheel replaced with a regular road
wheel.
Never operate the vehicle with more than one
spare wheel mounted.
Do not switch off the ESC when a spare wheel
is mounted.
Preparing the vehicle
XVehicles with AIRMATIC:
Make sure the vehicle level is set to normal
level ( Y page 163).XWhenever possible, park the vehicle in a
safe distance from moving traffic on a hard,
flat surface.XTurn on the hazard warning flasher.XTurn the steering wheel so that the front
wheels are in a straight-ahead position.XEngage the parking brake.XShift the automatic transmission into park
position P.XTurn off the engine.XRemove the SmartKey from the starter
switch.
or
XVehicles with KEYLESS-GO: Open the
driver’s door (this puts the starter switch in
position 0, same as with the SmartKey
removed from the starter switch). The
driver’s door can then be closed again.
Open doors only when conditions are safe
to do so.XVehicles with KEYLESS-GO: Remove the
KEYLESS-GO start/stop button from the
starter switch.XHave any passenger exit the vehicle at a
safe distance from the roadway. Open
doors only when conditions are safe to do
so.
Mounting the spare wheel
Introduction
XPrepare the vehicle as described
( Y page 323).XTake the following out of the vehicle:
R spare wheel
R jack
R vehicle tool kit
R collapsible wheel chock
R electric air pump (required for vehicles
with spare wheel with collapsible tire
only)
For information on where to find the
respective items, see “Where will I find ...?”
( Y page 268) and ( Y page 271).
19
Canada only.Flat tire323Practical hints212_AKB; 2; 41, en-USd2ureepe,Version: 2.11.8.12009-07-17T09:14:21+02:00 - Seite 323Z
Page 328 of 372
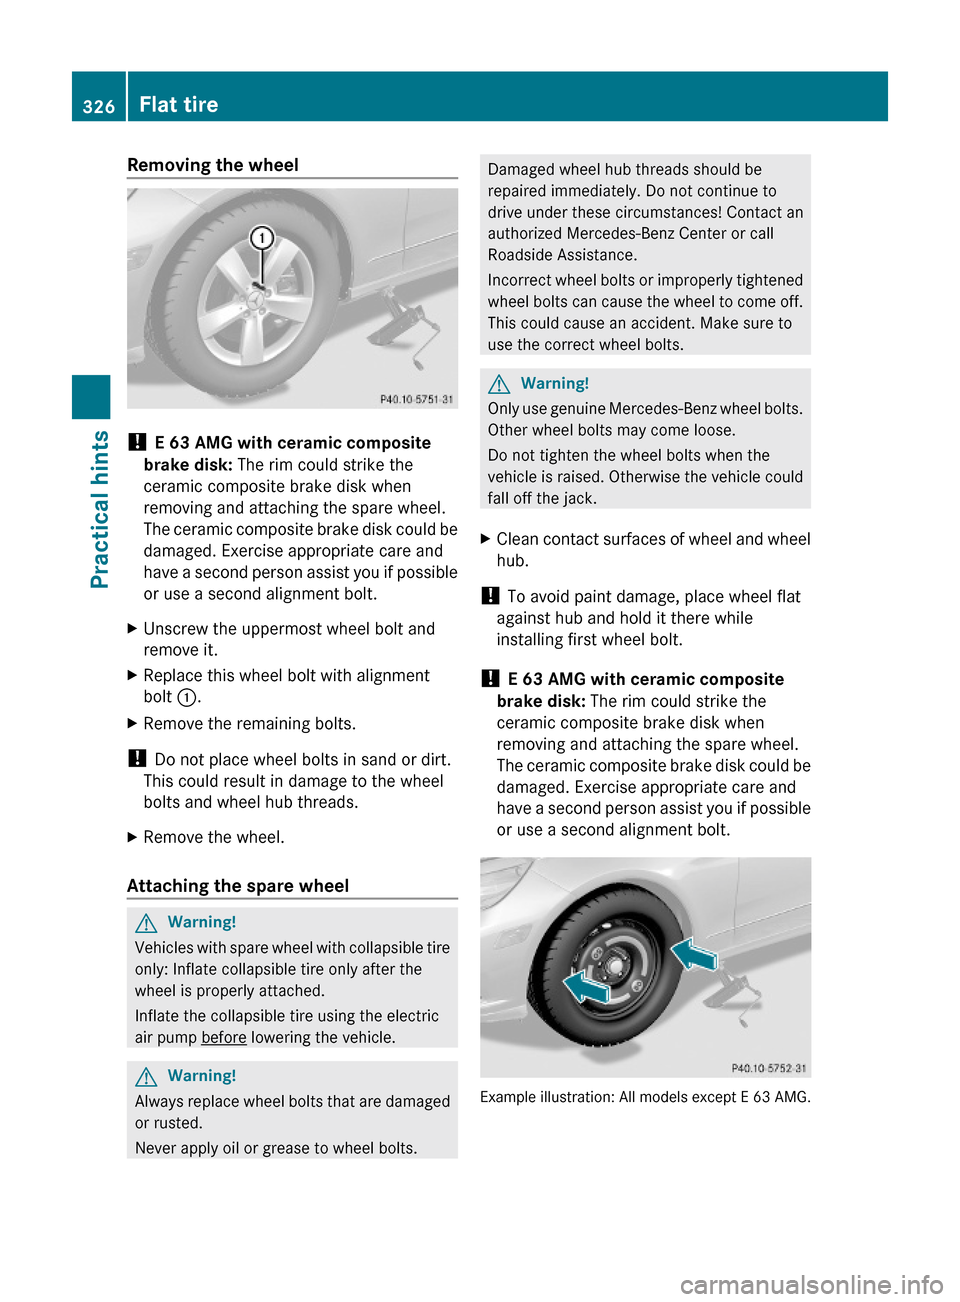
Removing the wheel
! E 63 AMG with ceramic composite
brake disk: The rim could strike the
ceramic composite brake disk when
removing and attaching the spare wheel.
The ceramic composite brake disk could be
damaged. Exercise appropriate care and
have a second person assist you if possible
or use a second alignment bolt.
XUnscrew the uppermost wheel bolt and
remove it.
XReplace this wheel bolt with alignment
bolt :.
XRemove the remaining bolts.
! Do not place wheel bolts in sand or dirt.
This could result in damage to the wheel
bolts and wheel hub threads.
XRemove the wheel.
Attaching the spare wheel
GWarning!
Vehicles with spare wheel with collapsible tire
only: Inflate collapsible tire only after the
wheel is properly attached.
Inflate the collapsible tire using the electric
air pump before lowering the vehicle.
GWarning!
Always replace wheel bolts that are damaged
or rusted.
Never apply oil or grease to wheel bolts.
Damaged wheel hub threads should be
repaired immediately. Do not continue to
drive under these circumstances! Contact an
authorized Mercedes-Benz Center or call
Roadside Assistance.
Incorrect wheel bolts or improperly tightened
wheel bolts can cause the wheel to come off.
This could cause an accident. Make sure to
use the correct wheel bolts.
GWarning!
Only use genuine Mercedes-Benz wheel bolts.
Other wheel bolts may come loose.
Do not tighten the wheel bolts when the
vehicle is raised. Otherwise the vehicle could
fall off the jack.
XClean contact surfaces of wheel and wheel
hub.
! To avoid paint damage, place wheel flat
against hub and hold it there while
installing first wheel bolt.
! E 63 AMG with ceramic composite
brake disk: The rim could strike the
ceramic composite brake disk when
removing and attaching the spare wheel.
The ceramic composite brake disk could be
damaged. Exercise appropriate care and
have a second person assist you if possible
or use a second alignment bolt.
Example illustration: All models except E 63 AMG.
326Flat tirePractical hints
212_AKB; 2; 41, en-USd2ureepe,Version: 2.11.8.12009-07-17T09:14:21+02:00 - Seite 326
Page 329 of 372
XGuide the spare wheel onto the alignment
bolt and push it on.
XInsert the wheel bolts and tighten them
slightly.
XUnscrew the alignment bolt.XInstall the last wheel bolt and tighten it
slightly.
XVehicles with spare wheel with
collapsible tire: Continue the procedure
by following the instructions under
“Inflating the collapsible tire”
(Y page 327) and then “Lowering the
vehicle” (Y page 328).
or
XVehicles with Minispare wheel: Continue
the procedure by following the instructions
under “Lowering the vehicle”
(Y page 328).
Inflating the collapsible tire
GWarning!
Inflate collapsible tire only after the wheel is
properly attached.
Inflate the collapsible tire using the electric
air pump before lowering the vehicle.
GWarning!
Observe safety instructions on air pump label.
! Do not lower the vehicle before inflating
the collapsible tire. Otherwise the rim may
be damaged.
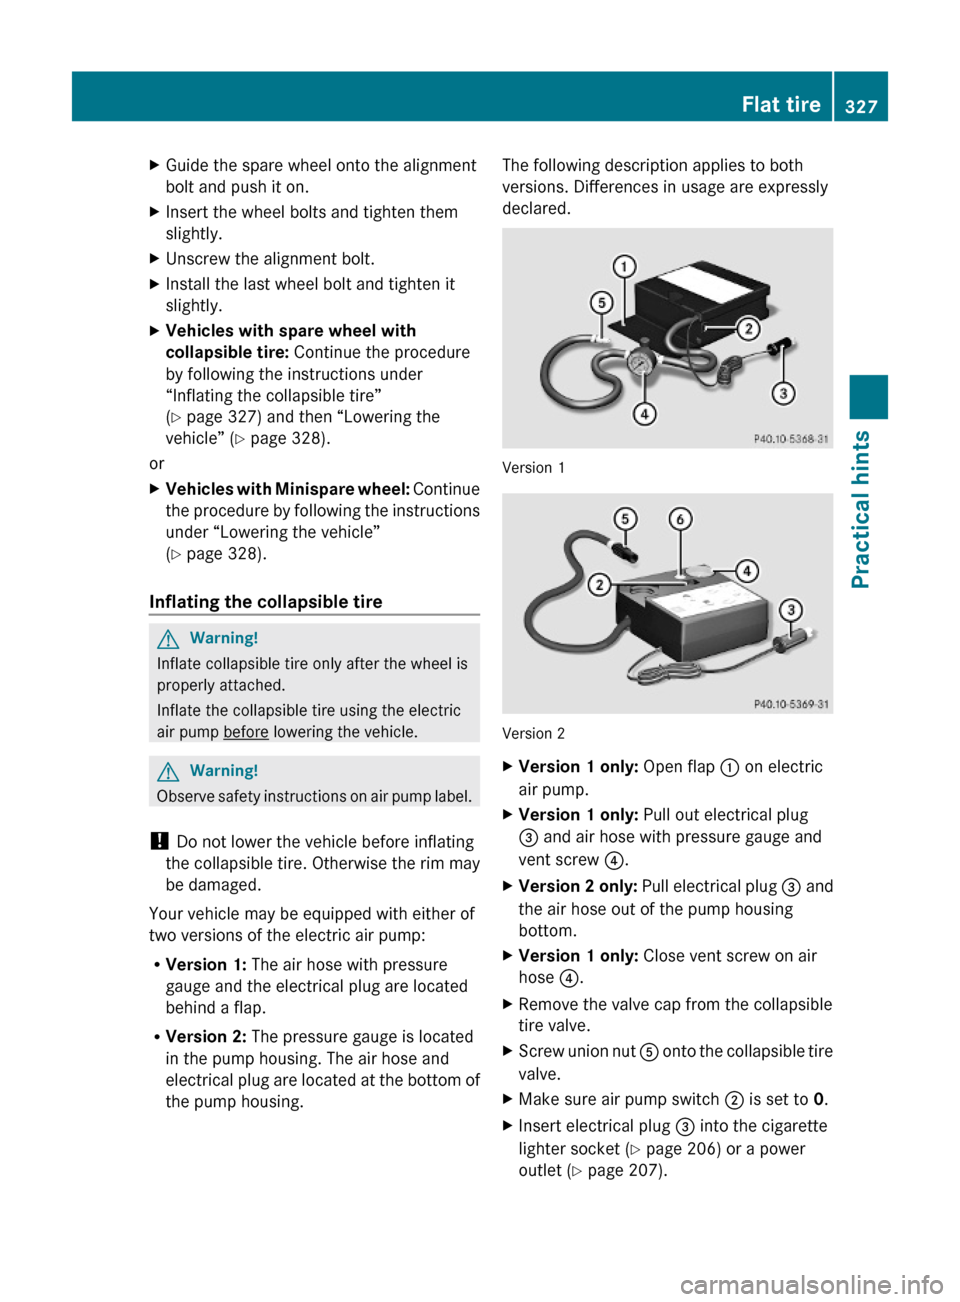
Your vehicle may be equipped with either of
two versions of the electric air pump:
RVersion 1: The air hose with pressure
gauge and the electrical plug are located
behind a flap.
RVersion 2: The pressure gauge is located
in the pump housing. The air hose and
electrical plug are located at the bottom of
the pump housing.
The following description applies to both
versions. Differences in usage are expressly
declared.
Version 1
Version 2
XVersion 1 only: Open flap : on electric
air pump.
XVersion 1 only: Pull out electrical plug
= and air hose with pressure gauge and
vent screw ?.
XVersion 2 only: Pull electrical plug = and
the air hose out of the pump housing
bottom.
XVersion 1 only: Close vent screw on air
hose ?.
XRemove the valve cap from the collapsible
tire valve.
XScrew union nut A onto the collapsible tire
valve.
XMake sure air pump switch ; is set to 0.XInsert electrical plug = into the cigarette
lighter socket (Y page 206) or a power
outlet (Y page 207).
Flat tire327Practical hints212_AKB; 2; 41, en-USd2ureepe,Version: 2.11.8.12009-07-17T09:14:21+02:00 - Seite 327Z