2010 MERCEDES-BENZ E350 seat adjust
[x] Cancel search: seat adjustPage 142 of 372

XPress button : or 9 to select the
Factory Setting function.
XPress button a.
The function Reset All Settings?
appears in the multifunction display.
XPress button : or 9 to select Yes or
No. Select Yes if you want to reset to
factory settings.
XPress button a to confirm.
The confirmation message appears in the
multifunction display.
Submenus in the Settings menu
XPress button = or ; to select the
Sett. menu.
XPress button : or 9 to select a
submenu.
Scroll down with button :, scroll up with
button 9.
With the selection marker on the desired
submenu, use the button a to access the
individual functions within that submenu.
Once within the submenu, you can use button
9 to move to the next function or
button : to move to the previous function
within that submenu.
The following lists show what settings can be
changed within the various menus. Detailed
instructions on making individual settings can
be found on the following pages.
Instrument cluster submenu
RSelecting speedometer display mode
(Y page 141)
RPermanent display (speed display or
outside temperature) (Y page 141)
Lights submenu
RSwitching daytime running lamp mode on
or off (USA only) (Y page 141)
RSwitching Adaptive Highbeam Assist on or
off (Y page 142)
RSwitching locator lighting on or off
(Y page 142)
RSetting ambient lighting (Y page 143)
RSwitching interior lighting delayed shut-off
on or off (Y page 143)
Vehicle submenu
RSwitching automatic central locking on or
off (Y page 144)
RSwitching the radar sensors on or off
(Y page 144)
Convenience submenu
RActivating easy-entry/exit feature
(Y page 145)
RActivating/deactivating seat belt
adjustment function (Y page 145)
Instrument cluster submenu
Access the Instr. Cluster submenu via
the Sett. menu. Use the Instr. Cluster
submenu to change the instrument cluster
display settings.
The following functions are available:
RSelecting speedometer display mode
(Y page 141)
RPermanent display (speed display or
outside temperature) (Y page 141)
140Control systemControls in detail
212_AKB; 2; 41, en-USd2ureepe,Version: 2.11.8.12009-07-17T09:14:21+02:00 - Seite 140
Page 147 of 372
Removal, tampering, or altering of the
device will void any warranties, and is not
permitted. Do not tamper with, alter, or use
in any non-approved way.
Any unauthorized modification to this
device could void the user’s authority to
operate the equipment.
XPress button = or ; to select the
Sett. menu.
XPress button : or 9 to select the
Vehicle submenu.
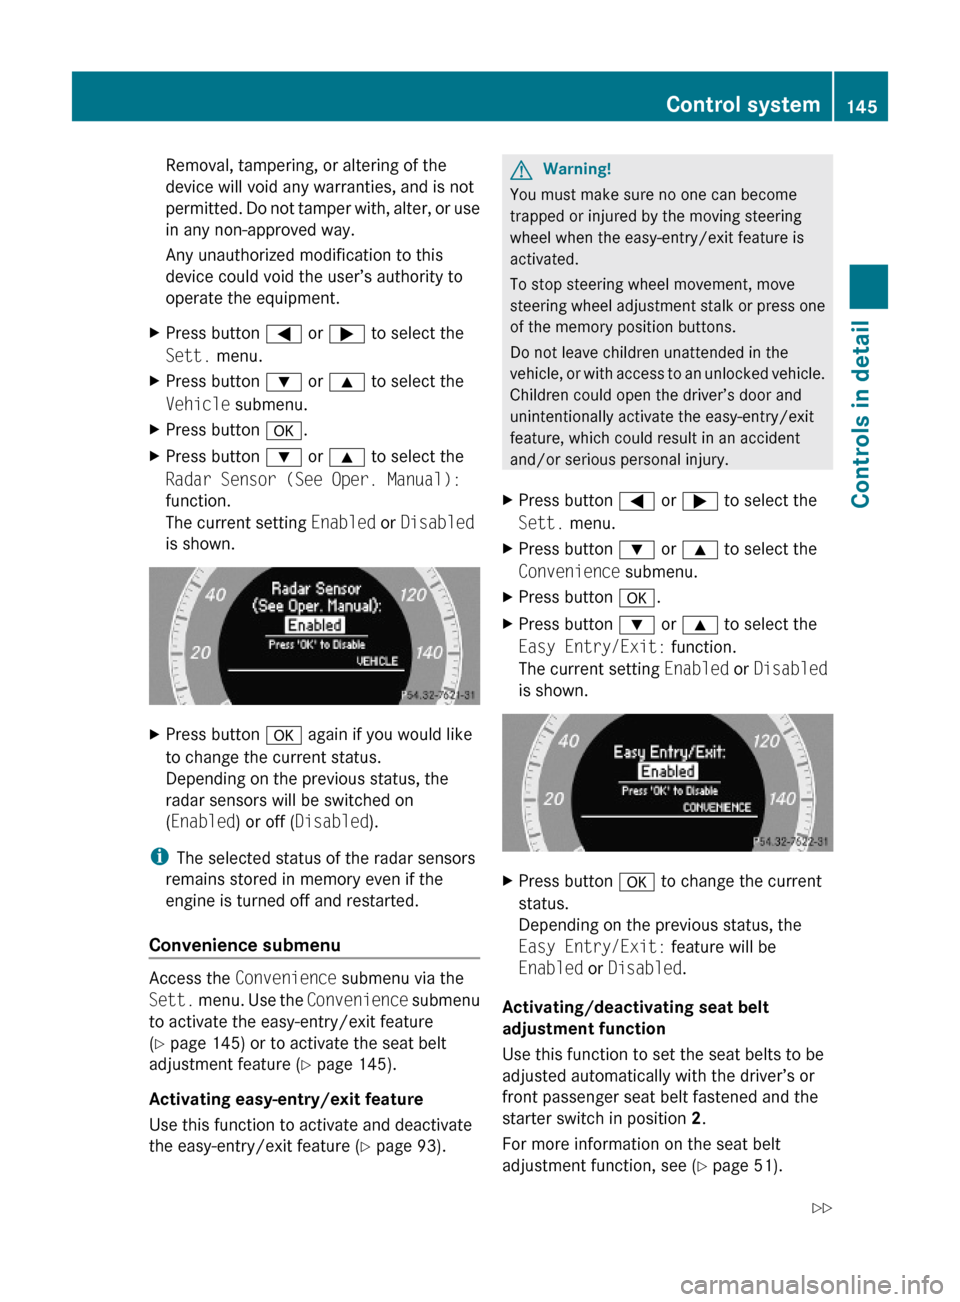
XPress button a.XPress button : or 9 to select the
Radar Sensor (See Oper. Manual):
function.
The current setting Enabled or Disabled
is shown.
XPress button a again if you would like
to change the current status.
Depending on the previous status, the
radar sensors will be switched on
(Enabled) or off (Disabled).
iThe selected status of the radar sensors
remains stored in memory even if the
engine is turned off and restarted.
Convenience submenu
Access the Convenience submenu via the
Sett. menu. Use the Convenience submenu
to activate the easy-entry/exit feature
(Y page 145) or to activate the seat belt
adjustment feature (Y page 145).
Activating easy-entry/exit feature
Use this function to activate and deactivate
the easy-entry/exit feature (Y page 93).
GWarning!
You must make sure no one can become
trapped or injured by the moving steering
wheel when the easy-entry/exit feature is
activated.
To stop steering wheel movement, move
steering wheel adjustment stalk or press one
of the memory position buttons.
Do not leave children unattended in the
vehicle, or with access to an unlocked vehicle.
Children could open the driver’s door and
unintentionally activate the easy-entry/exit
feature, which could result in an accident
and/or serious personal injury.
XPress button = or ; to select the
Sett. menu.
XPress button : or 9 to select the
Convenience submenu.
XPress button a.XPress button : or 9 to select the
Easy Entry/Exit: function.
The current setting Enabled or Disabled
is shown.
XPress button a to change the current
status.
Depending on the previous status, the
Easy Entry/Exit: feature will be
Enabled or Disabled.
Activating/deactivating seat belt
adjustment function
Use this function to set the seat belts to be
adjusted automatically with the driver’s or
front passenger seat belt fastened and the
starter switch in position 2.
For more information on the seat belt
adjustment function, see (Y page 51).
Control system145Controls in detail212_AKB; 2; 41, en-USd2ureepe,Version: 2.11.8.12009-07-17T09:14:21+02:00 - Seite 145Z
Page 157 of 372

will no longer brake your vehicle. You are
always responsible for maintaining a distance
from other vehicles, observing road speeds
and braking well in advance.
StoppingGWarning!
The braking effect of the DISTRONIC PLUS is
canceled and the vehicle can start to roll if
R the DISTRONIC PLUS is switched off using
the DISTRONIC PLUS lever
R you accelerate
R the DISTRONIC PLUS system or the power
supply is malfunctioning, e.g. due to battery
failure
R the electrical components in the engine
compartment or the fuses have been
manipulated
R the battery is disconnected
GWarning!
Never get out of the vehicle while the
DISTRONIC PLUS is switched on!
The DISTRONIC PLUS must never be operated
or switched off by passengers or from outside
the vehicle.
The DISTRONIC PLUS is not a substitute for
the parking brake. It must not be used to
secure the vehicle when parking.
When you get out of the vehicle or switch off
the engine, deactivate the DISTRONIC PLUS
and secure the vehicle from rolling away by
engaging the parking brake.
When the DISTRONIC PLUS detects that the
preceding vehicle is stopping, the vehicle
brakes until it also stops. Once the vehicle is
at a standstill, it remains stationary, without
depressing the brake pedal.
Depending on the following distance set
using the distance setting switch on the
DISTRONIC PLUS lever ( Y page 157), the
vehicle will stop adequate away from the
preceding vehicle.
When the DISTRONIC PLUS is activated and
the vehicle is at a standstill, the automatic
transmission shifts into park position P
automatically when
R opening the driver’s door and releasing the
seat belt
R turning off the engine
R opening the hood
R a system malfunction occurs
R the on-board voltage is insufficient
The DISTRONIC PLUS is deactivated.
Setting the current speedXAccelerate or decelerate to the desired
speed.XBriefly lift the DISTRONIC PLUS lever in
direction of arrow : or depress in
direction of arrow ; (Y page 153).
The current speed is set.XRemove your foot from the accelerator
pedal.
i If you do not take your foot off of the
accelerator pedal and continue to
accelerate past the set speed, the following
message will appear in the multifunction
display:
DISTRONIC PLUS Override
The distance to a slower moving vehicle in
front of you will not be set. Your vehicle
speed will then be determined only by the
accelerator pedal position.
Changing the set speed
GWarning!
Keep in mind that it may take a brief moment
until the vehicle has made the necessary
adjustments.
Increase or decrease the set vehicle speed to
a value that the prevailing road conditions and
legal speed limits permit. Otherwise, sudden
and unexpected acceleration or deceleration
Driving systems155Controls in detail212_AKB; 2; 41, en-USd2ureepe,Version: 2.11.8.12009-07-17T09:14:21+02:00 - Seite 155Z
Page 202 of 372
The two sections can be folded down
separately.
GWarning!
When expanding the cargo volume, always
fold the seat backrests fully forward.
Unless you are transporting cargo, the seat
backrests must remain properly locked in the
upright position.
In an accident, during hard braking or sudden
maneuvers, loose items will be thrown around
inside the vehicle. This can cause injury to
vehicle occupants unless the items are
securely fastened in the vehicle.
Always use the cargo tie-down rings.
Folding seat backrest forward
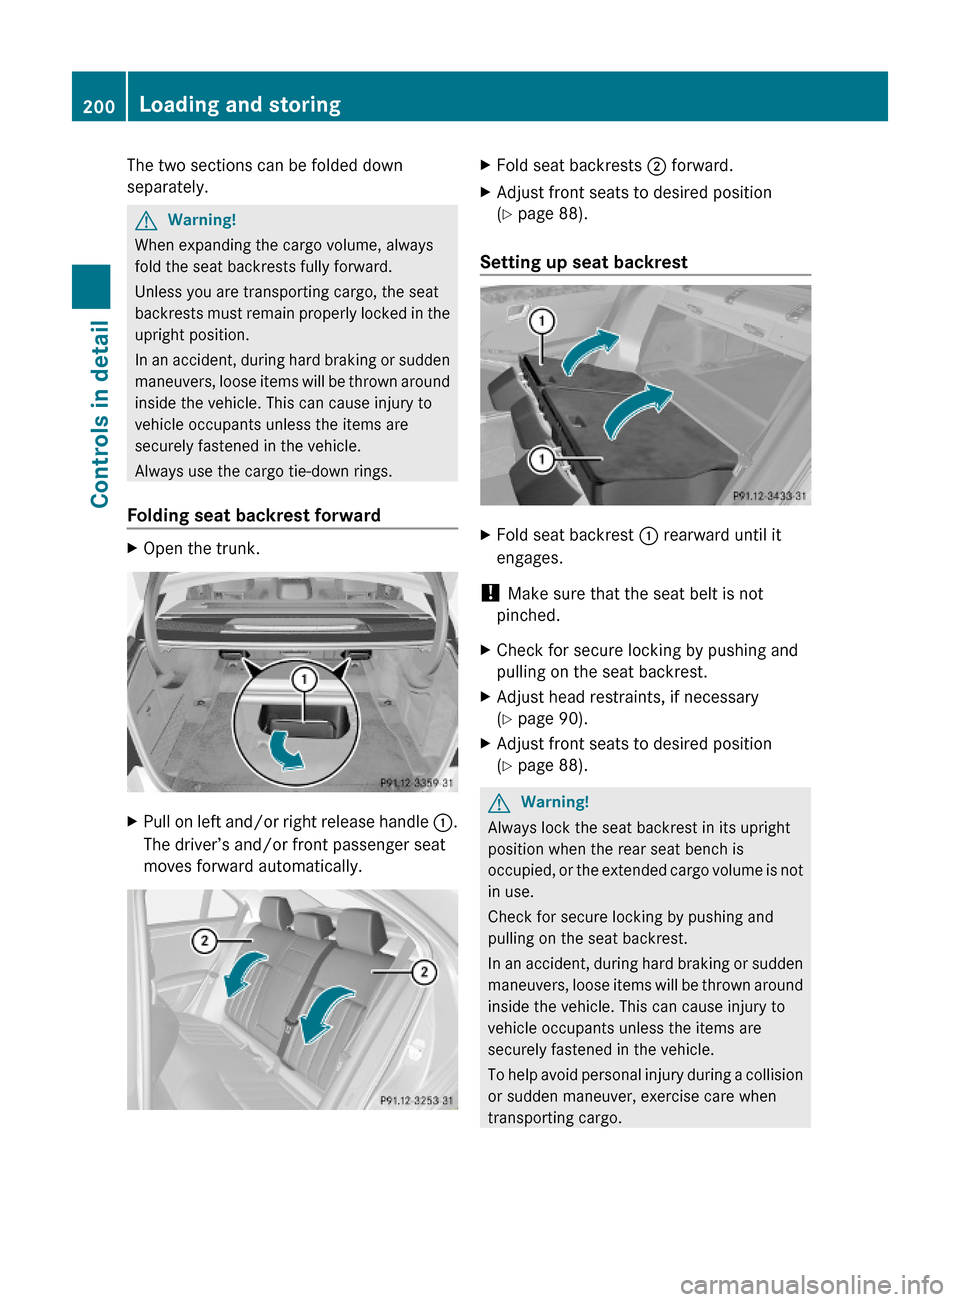
XOpen the trunk.XPull on left and/or right release handle :.
The driver’s and/or front passenger seat
moves forward automatically.
XFold seat backrests ; forward.XAdjust front seats to desired position
(Y page 88).
Setting up seat backrest
XFold seat backrest : rearward until it
engages.
! Make sure that the seat belt is not
pinched.
XCheck for secure locking by pushing and
pulling on the seat backrest.
XAdjust head restraints, if necessary
(Y page 90).
XAdjust front seats to desired position
(Y page 88).
GWarning!
Always lock the seat backrest in its upright
position when the rear seat bench is
occupied, or the extended cargo volume is not
in use.
Check for secure locking by pushing and
pulling on the seat backrest.
In an accident, during hard braking or sudden
maneuvers, loose items will be thrown around
inside the vehicle. This can cause injury to
vehicle occupants unless the items are
securely fastened in the vehicle.
To help avoid personal injury during a collision
or sudden maneuver, exercise care when
transporting cargo.
200Loading and storingControls in detail
212_AKB; 2; 41, en-USd2ureepe,Version: 2.11.8.12009-07-17T09:14:21+02:00 - Seite 200
Page 219 of 372
XPress button = approximately 3 seconds.
The currently selected zone appears in
compass display ;.
XSelecting zone: Press button = until the
desired zone is selected.
Do not press the button again until the
direction is indicated.
XCompass calibration: Make sure you are
in an area where you can drive a full circle
with your vehicle without disturbing traffic
in order to calibrate the compass.
In order to calibrate the compass properly,
mind the following:
RCalibrate the compass in open terrain.
Nearby buildings, bridges, power lines and
large antenna masts, for example, could
impair compass calibration.
RSwitch off electrical consumers (e.g.
climate control, windshield wipers, or rear
window defroster).
RClose all doors and the trunk.
XStart the engine.XPress button = approximately 6 seconds
until symbol C appears in compass
display ;.
XDrive a full circle at a vehicle speed of
between 3 mph (5 km/h) and 6 mph
(10 km/h).
When calibration was successful, the
current direction appears in compass
display ;.
Floormat (driver’s side only)
GWarning!
Whenever you are using a floormat, make sure
there is enough clearance and that the
floormat is securely fastened.
The floormat should always be securely
fastened using the fastening equipment.
Before driving off, check that the floormat is
securely in place and adjust it if necessary. A
loose floormat could slip and hinder proper
functioning of the pedals.
Do not place several floormats on top of each
other as this may impair pedal movement.
XMove the driver’s seat as far to the rear as
possible.
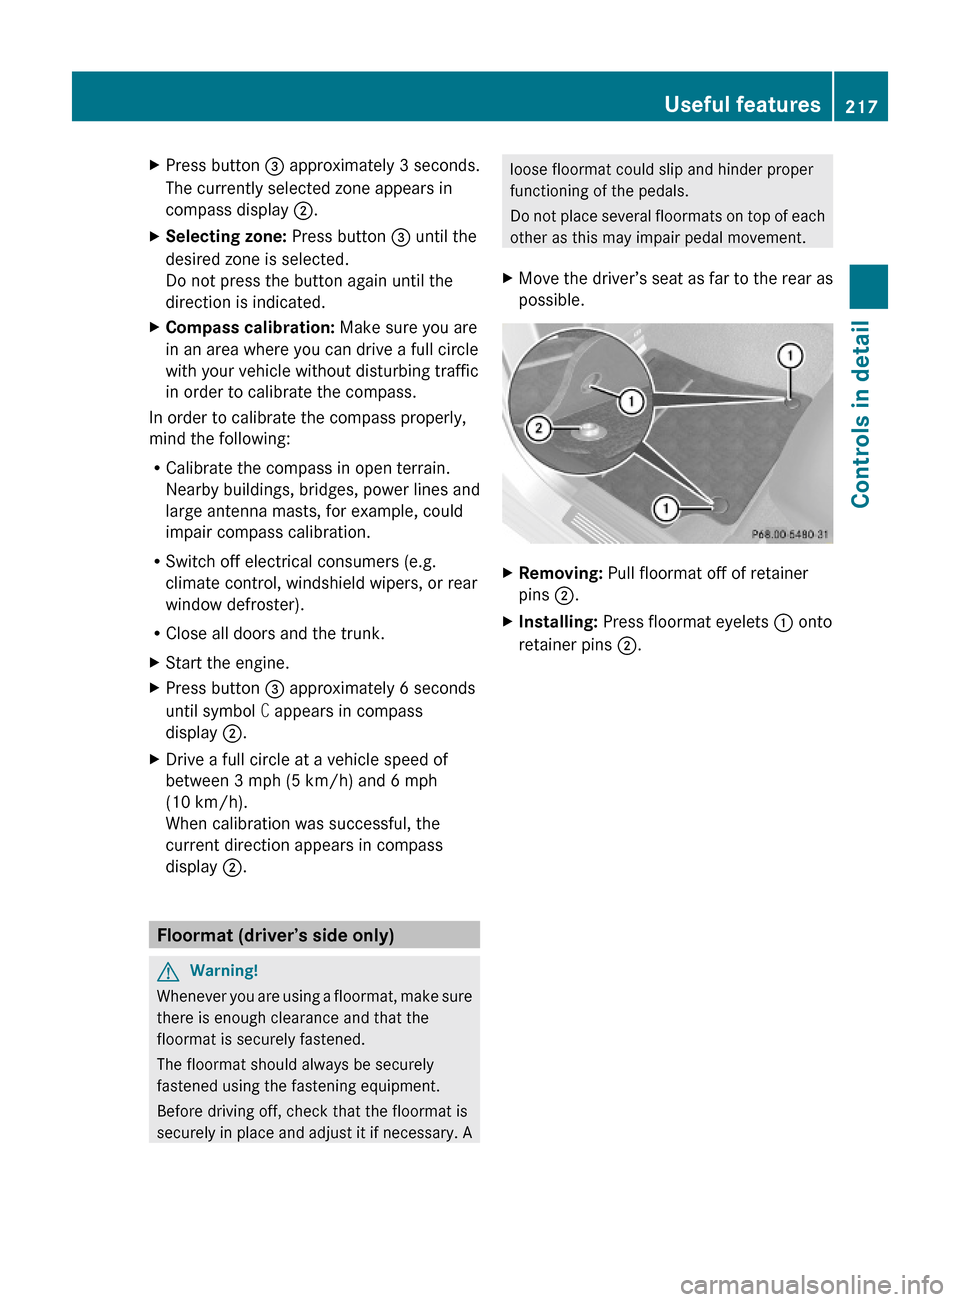
XRemoving: Pull floormat off of retainer
pins ;.
XInstalling: Press floormat eyelets : onto
retainer pins ;.
Useful features217Controls in detail212_AKB; 2; 41, en-USd2ureepe,Version: 2.11.8.12009-07-17T09:14:21+02:00 - Seite 217Z
Page 295 of 372
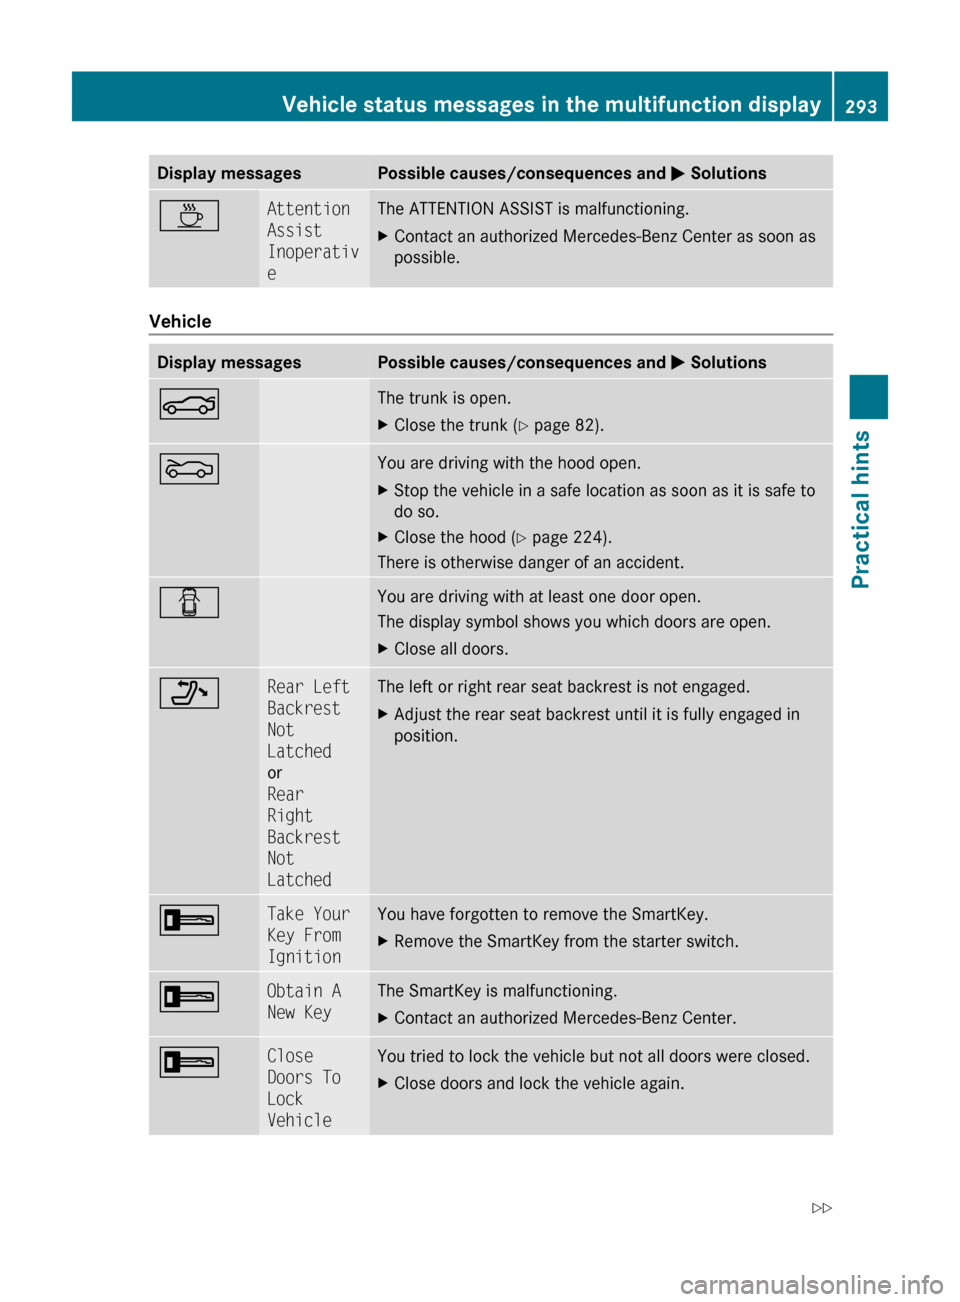
Display messagesPossible causes/consequences and M SolutionsÀAttention
Assist
Inoperativ
eThe ATTENTION ASSIST is malfunctioning.XContact an authorized Mercedes-Benz Center as soon as
possible.
Vehicle
Display messagesPossible causes/consequences and M SolutionsNThe trunk is open.XClose the trunk ( Y page 82).MYou are driving with the hood open.XStop the vehicle in a safe location as soon as it is safe to
do so.XClose the hood ( Y page 224).
There is otherwise danger of an accident.
CYou are driving with at least one door open.
The display symbol shows you which doors are open.XClose all doors._Rear Left
Backrest
Not
Latched
or
Rear
Right
Backrest
Not
LatchedThe left or right rear seat backrest is not engaged.XAdjust the rear seat backrest until it is fully engaged in
position.+Take Your
Key From
IgnitionYou have forgotten to remove the SmartKey.XRemove the SmartKey from the starter switch.+Obtain A
New KeyThe SmartKey is malfunctioning.XContact an authorized Mercedes-Benz Center.+Close
Doors To
Lock
VehicleYou tried to lock the vehicle but not all doors were closed.XClose doors and lock the vehicle again.Vehicle status messages in the multifunction display293Practical hints212_AKB; 2; 41, en-USd2ureepe,Version: 2.11.8.12009-07-17T09:14:21+02:00 - Seite 293Z
Page 319 of 372
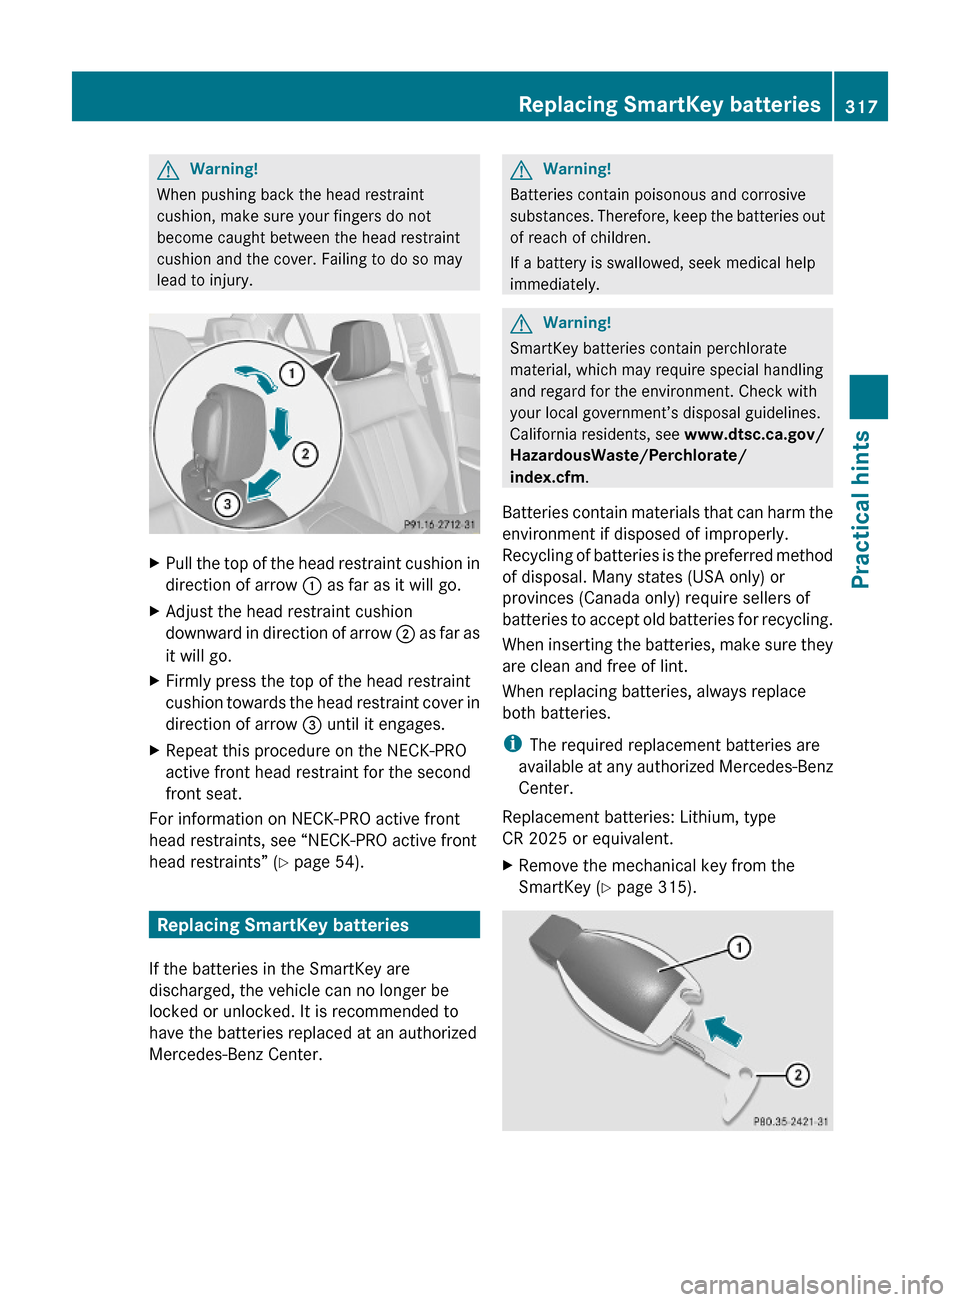
GWarning!
When pushing back the head restraint
cushion, make sure your fingers do not
become caught between the head restraint
cushion and the cover. Failing to do so may
lead to injury.
XPull the top of the head restraint cushion in
direction of arrow : as far as it will go.
XAdjust the head restraint cushion
downward in direction of arrow ; as far as
it will go.
XFirmly press the top of the head restraint
cushion towards the head restraint cover in
direction of arrow = until it engages.
XRepeat this procedure on the NECK-PRO
active front head restraint for the second
front seat.
For information on NECK-PRO active front
head restraints, see “NECK-PRO active front
head restraints” (Y page 54).
Replacing SmartKey batteries
If the batteries in the SmartKey are
discharged, the vehicle can no longer be
locked or unlocked. It is recommended to
have the batteries replaced at an authorized
Mercedes-Benz Center.
GWarning!
Batteries contain poisonous and corrosive
substances. Therefore, keep the batteries out
of reach of children.
If a battery is swallowed, seek medical help
immediately.
GWarning!
SmartKey batteries contain perchlorate
material, which may require special handling
and regard for the environment. Check with
your local government’s disposal guidelines.
California residents, see www.dtsc.ca.gov/
HazardousWaste/Perchlorate/
index.cfm.
Batteries contain materials that can harm the
environment if disposed of improperly.
Recycling of batteries is the preferred method
of disposal. Many states (USA only) or
provinces (Canada only) require sellers of
batteries to accept old batteries for recycling.
When inserting the batteries, make sure they
are clean and free of lint.
When replacing batteries, always replace
both batteries.
iThe required replacement batteries are
available at any authorized Mercedes-Benz
Center.
Replacement batteries: Lithium, type
CR 2025 or equivalent.
XRemove the mechanical key from the
SmartKey (Y page 315).
Replacing SmartKey batteries317Practical hints212_AKB; 2; 41, en-USd2ureepe,Version: 2.11.8.12009-07-17T09:14:21+02:00 - Seite 317Z