2010 MERCEDES-BENZ E350 wheel bolt
[x] Cancel search: wheel boltPage 6 of 372

1, 2, 3 ...
4-ETS see ETS/4-ETS
4MATIC
see All-wheel drive (4MATIC)
A
ABS (Antilock Brake System) ............. 62
Indicator lamp ................................ 305
Messages in the multifunction
display ................................... 288, 289
Accessory weight .............................. 249
Accidents ........................................... 112
Air bags ........................................... 37
Emergency calls (Tele Aid) .............208
NECK-PRO active front head
restraints ........................................ 54
Active Bi-Xenon headlamps
see Headlamps
Adaptive Brake .................................... 64
Adaptive Highbeam Assist ............... 100
Switching on or off ......................... 142
AdBlue ®
...................................... 333, 364
Refilling ......................................... 334
Additives
Engine oil ....................................... 362
Gasoline ......................................... 364
Address change ................................... 21
Advanced Tire Pressure
Monitoring System (Advanced
TPMS) ................................................. 233
Messages in the multifunction
display ........................................... 285
Air bags ................................................ 37
Emergency call upon deployment ..208
Front, driver and passenger .............40
Front passenger front air bag off
indicator lamp (Canada
only) ........................................ 46, 313
Front passenger front air bag off
indicator lamp (USA only) ........43, 314
Knee bag .......................................... 40
Messages in the multifunction
display ........................................... 276
OCS (Occupant Classification
System) ........................................... 43
Pelvis ............................................... 42
Safety guidelines ............................. 39
Side impact ...................................... 41
Window curtain ................................ 42
Air conditioning refrigerant and
lubricant ............................................. 362
Air distribution .................................. 189
Air filter .............................................. 299
AIRMATIC
Damping system ............................ 163
Introduction ................................... 163
Messages in the multifunction
display ........................................... 292
Vehicle level control ......................163
Air pressure
see Tire inflation pressure
Air pressure (tires) ............................ 250
Air pump (electric) ............................ 327
Air recirculation mode ...................... 190
Air volume .......................................... 189
Alarm system see Anti-theft systems
Alignment bolt (vehicle tool kit) ...... 326
All-wheel drive (4MATIC) .................. 161
Alternator
Messages in the multifunction
display ................................... 284, 297
Alternator (Technical data)
see Vehicle specification
AMG adaptive sport suspension
system (E 63 AMG) ............................ 164
AMG menu ......................................... 131
Anticorrosion/antifreeze .................. 365
Antilock Brake System see ABS
Anti-theft systems ............................... 71
Anti-theft alarm system ...................72
Immobilizer ...................................... 71
Aquaplaning
see Hydroplaning
Armrest, front
Storage compartment ....................202
Armrest, rear
Storage compartment ....................202
Ashtrays ............................................. 206
Aspect ratio (tires) ............................ 250
Assistance menu ............................... 1374Index212_AKB; 2; 41, en-USd2ureepe,Version: 2.11.8.12009-07-17T09:14:21+02:00 - Seite 4
Page 230 of 372
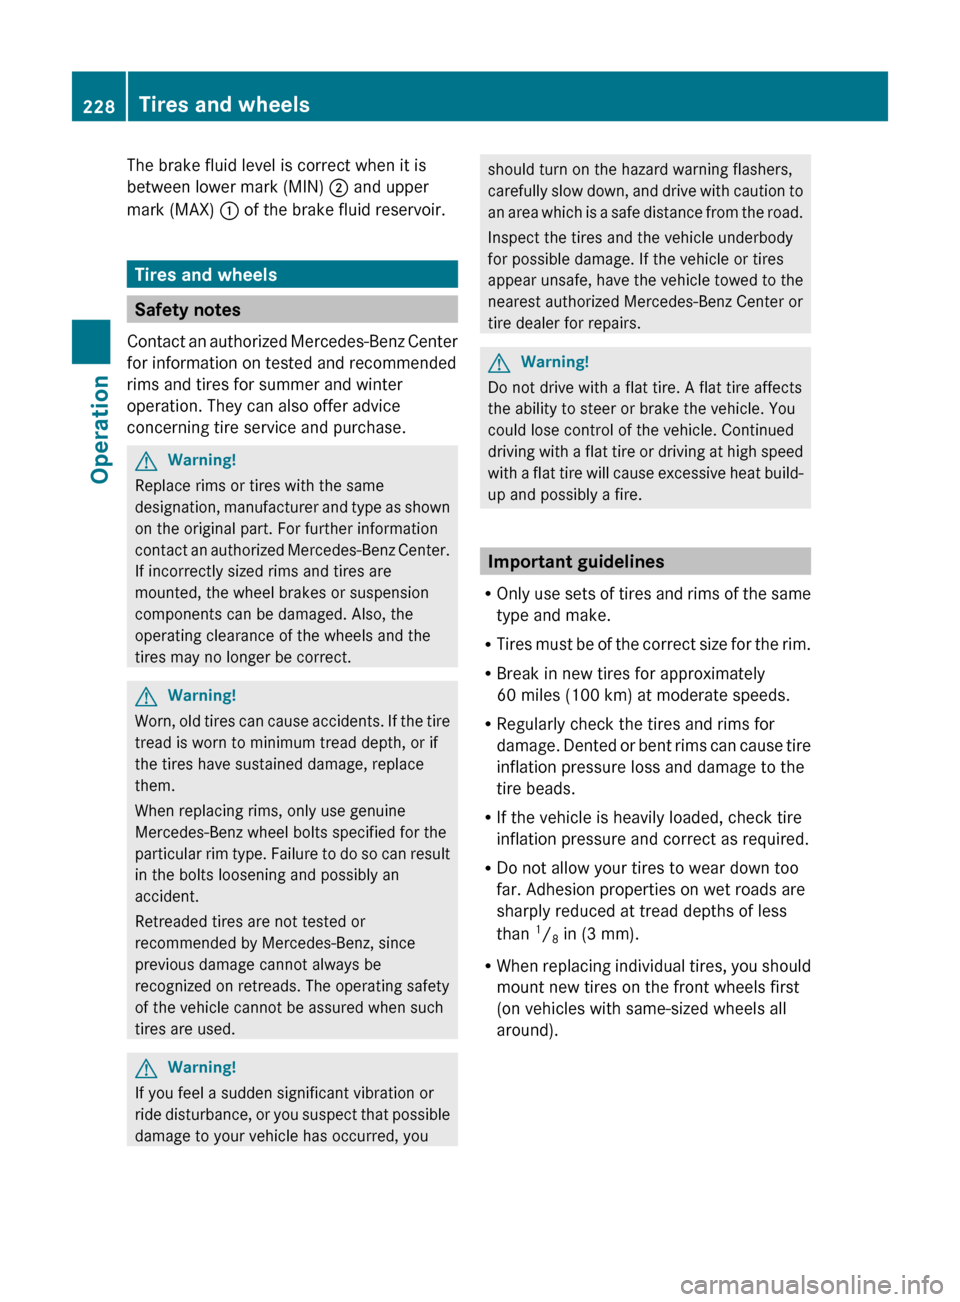
The brake fluid level is correct when it is
between lower mark (MIN) ; and upper
mark (MAX) : of the brake fluid reservoir.
Tires and wheels
Safety notes
Contact an authorized Mercedes-Benz Center
for information on tested and recommended
rims and tires for summer and winter
operation. They can also offer advice
concerning tire service and purchase.
GWarning!
Replace rims or tires with the same
designation, manufacturer and type as shown
on the original part. For further information
contact an authorized Mercedes-Benz Center.
If incorrectly sized rims and tires are
mounted, the wheel brakes or suspension
components can be damaged. Also, the
operating clearance of the wheels and the
tires may no longer be correct.
GWarning!
Worn, old tires can cause accidents. If the tire
tread is worn to minimum tread depth, or if
the tires have sustained damage, replace
them.
When replacing rims, only use genuine
Mercedes-Benz wheel bolts specified for the
particular rim type. Failure to do so can result
in the bolts loosening and possibly an
accident.
Retreaded tires are not tested or
recommended by Mercedes-Benz, since
previous damage cannot always be
recognized on retreads. The operating safety
of the vehicle cannot be assured when such
tires are used.
GWarning!
If you feel a sudden significant vibration or
ride disturbance, or you suspect that possible
damage to your vehicle has occurred, you
should turn on the hazard warning flashers,
carefully slow down, and drive with caution to
an area which is a safe distance from the road.
Inspect the tires and the vehicle underbody
for possible damage. If the vehicle or tires
appear unsafe, have the vehicle towed to the
nearest authorized Mercedes-Benz Center or
tire dealer for repairs.GWarning!
Do not drive with a flat tire. A flat tire affects
the ability to steer or brake the vehicle. You
could lose control of the vehicle. Continued
driving with a flat tire or driving at high speed
with a flat tire will cause excessive heat build-
up and possibly a fire.
Important guidelines
R Only use sets of tires and rims of the same
type and make.
R Tires must be of the correct size for the rim.
R Break in new tires for approximately
60 miles (100 km) at moderate speeds.
R Regularly check the tires and rims for
damage. Dented or bent rims can cause tire
inflation pressure loss and damage to the
tire beads.
R If the vehicle is heavily loaded, check tire
inflation pressure and correct as required.
R Do not allow your tires to wear down too
far. Adhesion properties on wet roads are
sharply reduced at tread depths of less
than 1
/ 8 in (3 mm).
R When replacing individual tires, you should
mount new tires on the front wheels first
(on vehicles with same-sized wheels all
around).
228Tires and wheelsOperation
212_AKB; 2; 41, en-USd2ureepe,Version: 2.11.8.12009-07-17T09:14:21+02:00 - Seite 228
Page 247 of 372

GWarning!
Have the tightening torque checked after
changing a wheel. Wheels could become
loose if not tightened with a torque of
96 lb-ft (130 Nm).
Only use genuine Mercedes-Benz wheel bolts
specified for your vehicle’s rims.
Tire rotation can be performed on vehicles
with tires of the same dimension all around.
If your vehicle is equipped with tires of the
same dimension all around, tires can be
rotated, observing a front-to-rear rotation
pattern that will maintain the intended
rotation (spinning) direction of the tire
(Y page 241).
In some cases, such as when your vehicle is
equipped with mixed-size tires (different tire
dimension front vs. rear), tire rotation is not
possible.
If applicable to your vehicle’s tire
configuration, tires can be rotated according
to the tire manufacturer’s recommended
intervals in the tire manufacturer’s warranty
pamphlet located in your vehicle literature
portfolio. If none is available, tires should be
rotated every 3 000 to 6 000 miles (5 000 to
10 000 km), or sooner if necessary, according
to the degree of tire wear. The same rotation
(spinning) direction must be maintained.
Rotate tires before the characteristic tire
wear pattern becomes visible (shoulder wear
on front tires and tread center wear on rear
tires).
Thoroughly clean the mounting face of wheels
and brake disks, i.e. the inner side of the
wheels/tires, during each rotation. Check for
and ensure proper tire inflation pressure.
For information on wheel change, see “Flat
tire” (Y page 323).
Tire labeling
Besides tire name (sales designation) and
manufacturer name, a number of markings
can be found on a tire.
Following are some explanations for the
markings on your vehicle’s tires::Uniform Tire Quality Grading Standards
(Y page 243)
;DOT, Tire Identification Number
(Y page 248)
=Maximum tire load (Y page 241)?Maximum tire inflation pressure
(Y page 237)
AManufacturerBTire ply material (Y page 249)CTire size designation, load and speed
rating (Y page 246)
DLoad identification (Y page 248)ETire name
iFor illustration purposes only. Actual data
on tires are specific to each vehicle and
may vary from data shown in above
illustration.
For more information, see “Rims and tires”
(Y page 353).
Tires and wheels245Operation212_AKB; 2; 41, en-USd2ureepe,Version: 2.11.8.12009-07-17T09:14:21+02:00 - Seite 245Z
Page 270 of 372
Vehicle equipment
iThis Operator’s Manual describes all
features, standard or optional, potentially
available for your vehicle at the time of
purchase. Please be aware that your
vehicle might not be equipped with all
features described in this manual.
Where will I find ...?
First aid kit
iCheck expiration dates and contents for
completeness at least once a year and
replace missing/expired items.
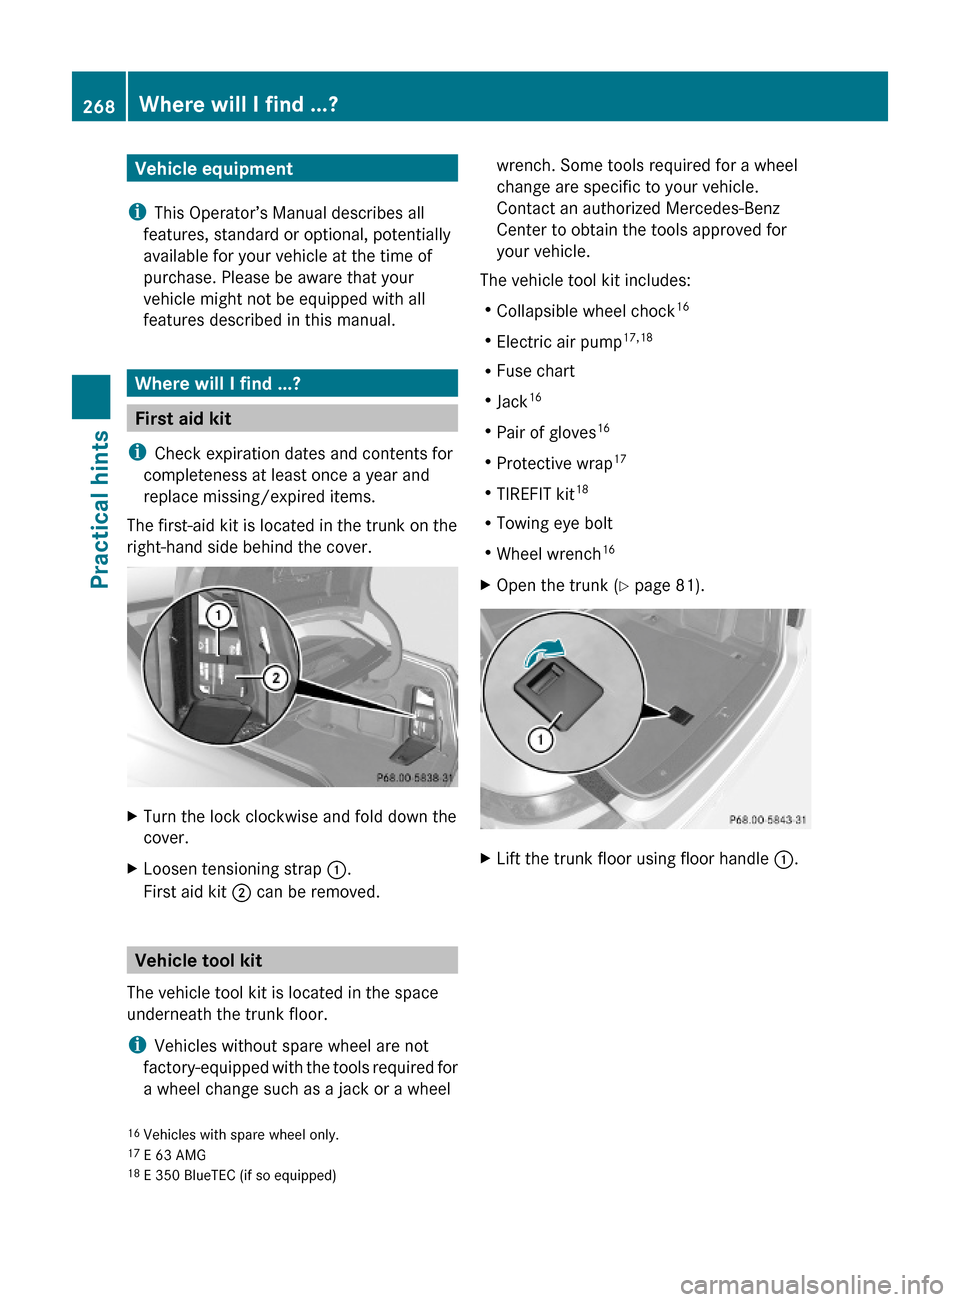
The first-aid kit is located in the trunk on the
right-hand side behind the cover.
XTurn the lock clockwise and fold down the
cover.
XLoosen tensioning strap :.
First aid kit ; can be removed.
Vehicle tool kit
The vehicle tool kit is located in the space
underneath the trunk floor.
iVehicles without spare wheel are not
factory-equipped with the tools required for
a wheel change such as a jack or a wheel
wrench. Some tools required for a wheel
change are specific to your vehicle.
Contact an authorized Mercedes-Benz
Center to obtain the tools approved for
your vehicle.
The vehicle tool kit includes:
RCollapsible wheel chock16
RElectric air pump17,18
RFuse chart
RJack16
RPair of gloves16
RProtective wrap17
RTIREFIT kit18
RTowing eye bolt
RWheel wrench16
XOpen the trunk (Y page 81).XLift the trunk floor using floor handle :.16Vehicles with spare wheel only.17E 63 AMG18E 350 BlueTEC (if so equipped)
268Where will I find ...?Practical hints
212_AKB; 2; 41, en-USd2ureepe,Version: 2.11.8.12009-07-17T09:14:21+02:00 - Seite 268
Page 271 of 372
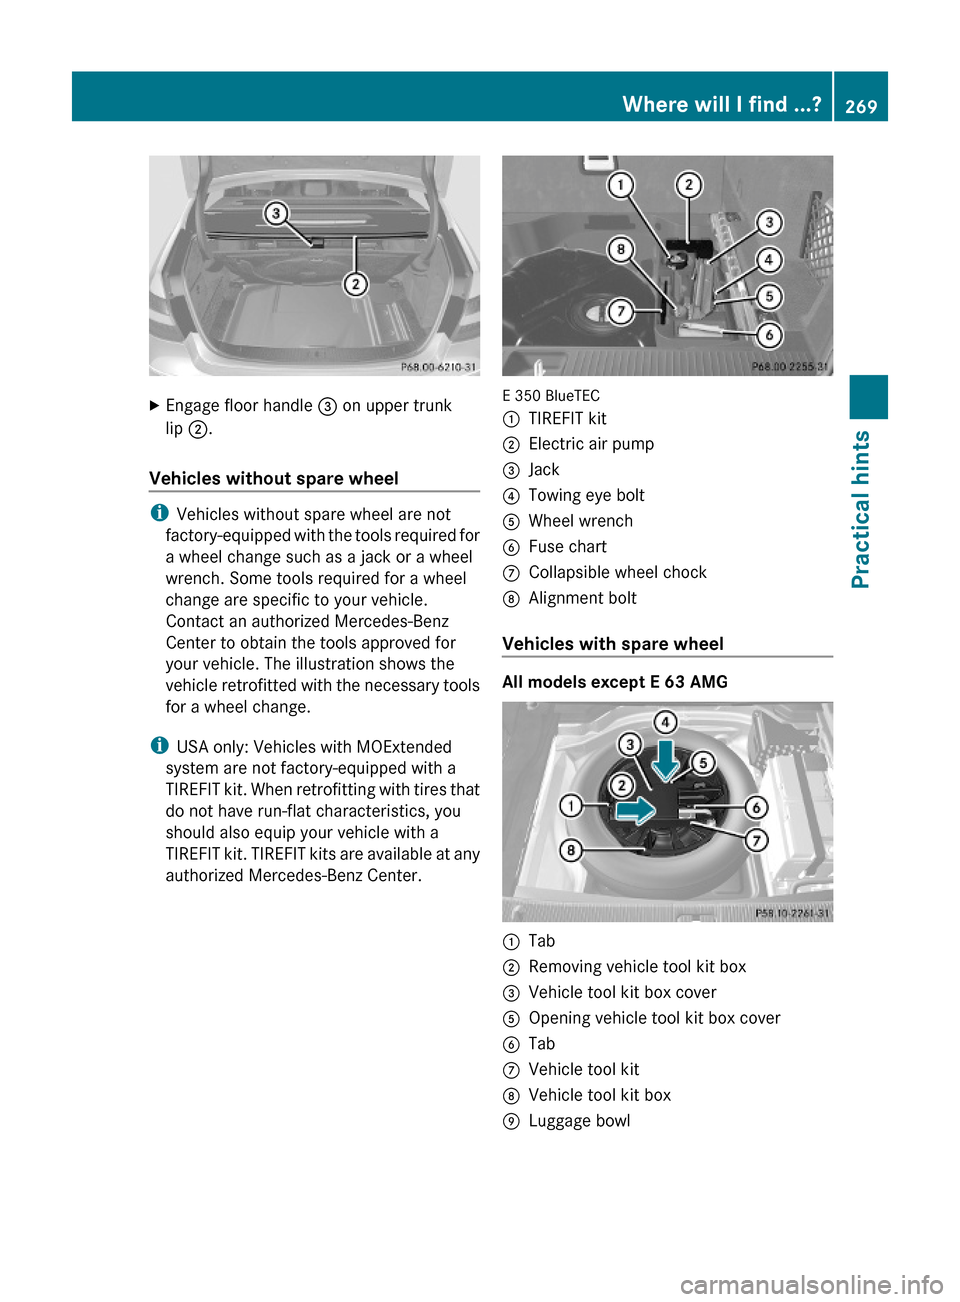
XEngage floor handle = on upper trunk
lip ;.
Vehicles without spare wheel
iVehicles without spare wheel are not
factory-equipped with the tools required for
a wheel change such as a jack or a wheel
wrench. Some tools required for a wheel
change are specific to your vehicle.
Contact an authorized Mercedes-Benz
Center to obtain the tools approved for
your vehicle. The illustration shows the
vehicle retrofitted with the necessary tools
for a wheel change.
iUSA only: Vehicles with MOExtended
system are not factory-equipped with a
TIREFIT kit. When retrofitting with tires that
do not have run-flat characteristics, you
should also equip your vehicle with a
TIREFIT kit. TIREFIT kits are available at any
authorized Mercedes-Benz Center.
E 350 BlueTEC
:TIREFIT kit;Electric air pump=Jack?Towing eye boltAWheel wrenchBFuse chartCCollapsible wheel chockDAlignment bolt
Vehicles with spare wheel
All models except E 63 AMG
:Tab;Removing vehicle tool kit box=Vehicle tool kit box coverAOpening vehicle tool kit box coverBTabCVehicle tool kitDVehicle tool kit boxELuggage bowlWhere will I find ...?269Practical hints212_AKB; 2; 41, en-USd2ureepe,Version: 2.11.8.12009-07-17T09:14:21+02:00 - Seite 269Z
Page 272 of 372
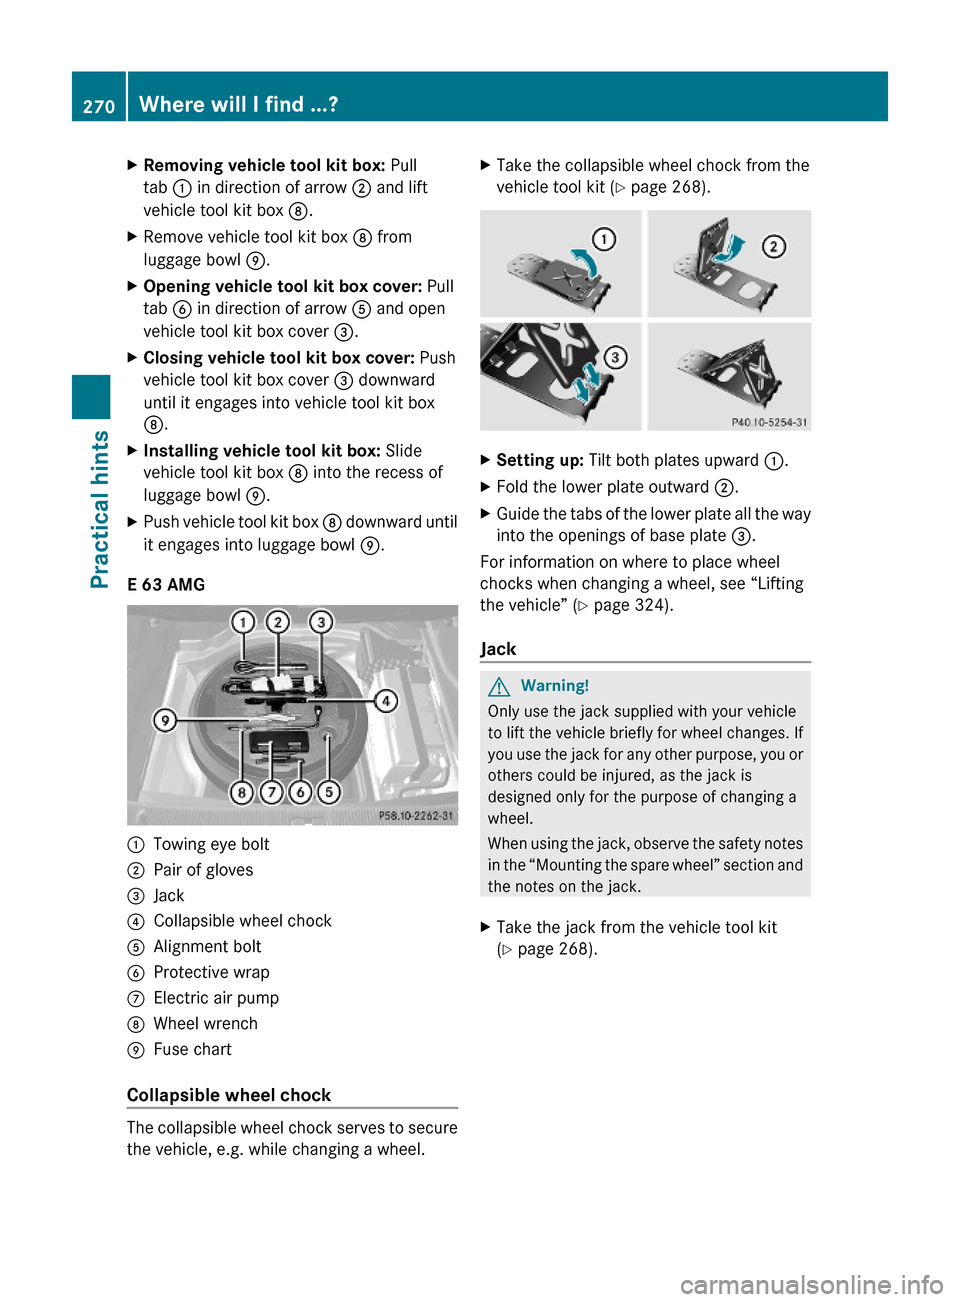
XRemoving vehicle tool kit box: Pull
tab : in direction of arrow ; and lift
vehicle tool kit box D.
XRemove vehicle tool kit box D from
luggage bowl E.
XOpening vehicle tool kit box cover: Pull
tab B in direction of arrow A and open
vehicle tool kit box cover =.
XClosing vehicle tool kit box cover: Push
vehicle tool kit box cover = downward
until it engages into vehicle tool kit box
D.
XInstalling vehicle tool kit box: Slide
vehicle tool kit box D into the recess of
luggage bowl E.
XPush vehicle tool kit box D downward until
it engages into luggage bowl E.
E 63 AMG
:Towing eye bolt;Pair of gloves=Jack?Collapsible wheel chockAAlignment boltBProtective wrapCElectric air pumpDWheel wrenchEFuse chart
Collapsible wheel chock
The collapsible wheel chock serves to secure
the vehicle, e.g. while changing a wheel.
XTake the collapsible wheel chock from the
vehicle tool kit (Y page 268).
XSetting up: Tilt both plates upward :.XFold the lower plate outward ;.XGuide the tabs of the lower plate all the way
into the openings of base plate =.
For information on where to place wheel
chocks when changing a wheel, see “Lifting
the vehicle” (Y page 324).
Jack
GWarning!
Only use the jack supplied with your vehicle
to lift the vehicle briefly for wheel changes. If
you use the jack for any other purpose, you or
others could be injured, as the jack is
designed only for the purpose of changing a
wheel.
When using the jack, observe the safety notes
in the “Mounting the spare wheel” section and
the notes on the jack.
XTake the jack from the vehicle tool kit
(Y page 268).
270Where will I find ...?Practical hints
212_AKB; 2; 41, en-USd2ureepe,Version: 2.11.8.12009-07-17T09:14:21+02:00 - Seite 270
Page 327 of 372
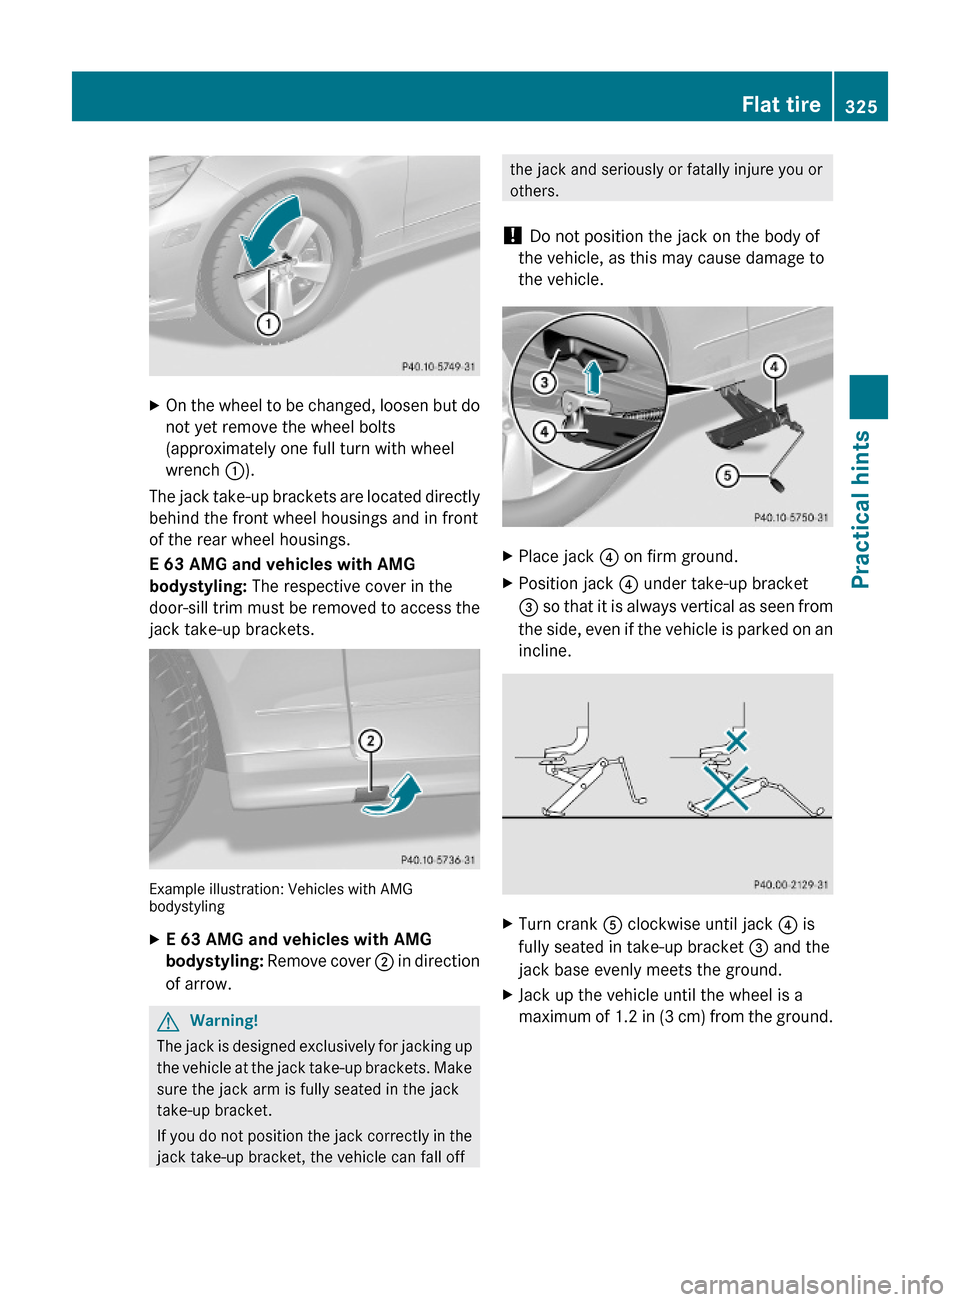
XOn the wheel to be changed, loosen but do
not yet remove the wheel bolts
(approximately one full turn with wheel
wrench :).
The jack take-up brackets are located directly
behind the front wheel housings and in front
of the rear wheel housings.
E 63 AMG and vehicles with AMG
bodystyling: The respective cover in the
door-sill trim must be removed to access the
jack take-up brackets.
Example illustration: Vehicles with AMGbodystyling
XE 63 AMG and vehicles with AMG
bodystyling: Remove cover ; in direction
of arrow.
GWarning!
The jack is designed exclusively for jacking up
the vehicle at the jack take-up brackets. Make
sure the jack arm is fully seated in the jack
take-up bracket.
If you do not position the jack correctly in the
jack take-up bracket, the vehicle can fall off
the jack and seriously or fatally injure you or
others.
! Do not position the jack on the body of
the vehicle, as this may cause damage to
the vehicle.
XPlace jack ? on firm ground.XPosition jack ? under take-up bracket
= so that it is always vertical as seen from
the side, even if the vehicle is parked on an
incline.
XTurn crank A clockwise until jack ? is
fully seated in take-up bracket = and the
jack base evenly meets the ground.
XJack up the vehicle until the wheel is a
maximum of 1.2 in (3 cm) from the ground.
Flat tire325Practical hints212_AKB; 2; 41, en-USd2ureepe,Version: 2.11.8.12009-07-17T09:14:21+02:00 - Seite 325Z
Page 328 of 372
Removing the wheel
! E 63 AMG with ceramic composite
brake disk: The rim could strike the
ceramic composite brake disk when
removing and attaching the spare wheel.
The ceramic composite brake disk could be
damaged. Exercise appropriate care and
have a second person assist you if possible
or use a second alignment bolt.
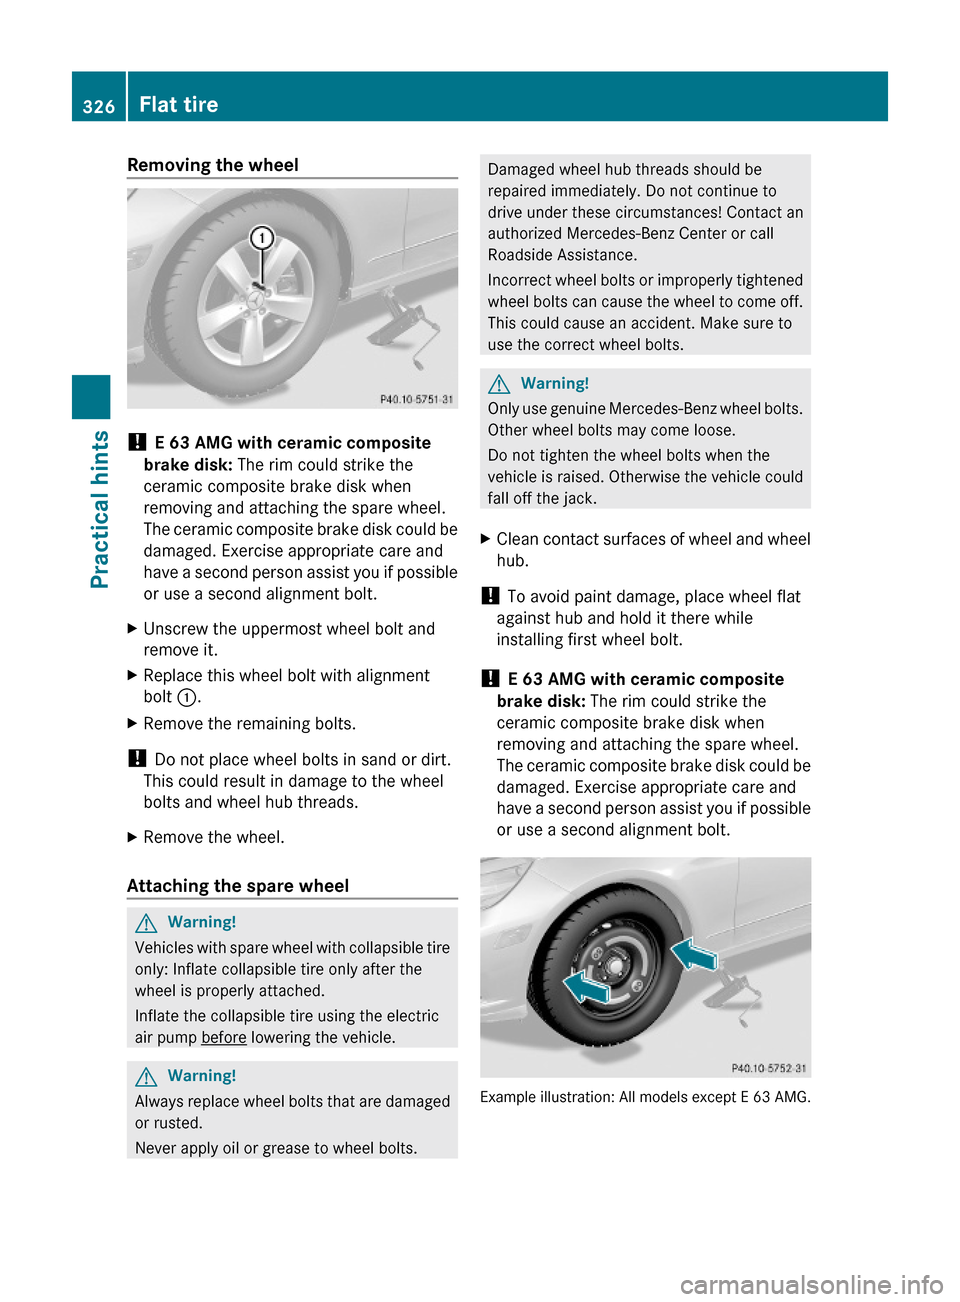
XUnscrew the uppermost wheel bolt and
remove it.
XReplace this wheel bolt with alignment
bolt :.
XRemove the remaining bolts.
! Do not place wheel bolts in sand or dirt.
This could result in damage to the wheel
bolts and wheel hub threads.
XRemove the wheel.
Attaching the spare wheel
GWarning!
Vehicles with spare wheel with collapsible tire
only: Inflate collapsible tire only after the
wheel is properly attached.
Inflate the collapsible tire using the electric
air pump before lowering the vehicle.
GWarning!
Always replace wheel bolts that are damaged
or rusted.
Never apply oil or grease to wheel bolts.
Damaged wheel hub threads should be
repaired immediately. Do not continue to
drive under these circumstances! Contact an
authorized Mercedes-Benz Center or call
Roadside Assistance.
Incorrect wheel bolts or improperly tightened
wheel bolts can cause the wheel to come off.
This could cause an accident. Make sure to
use the correct wheel bolts.
GWarning!
Only use genuine Mercedes-Benz wheel bolts.
Other wheel bolts may come loose.
Do not tighten the wheel bolts when the
vehicle is raised. Otherwise the vehicle could
fall off the jack.
XClean contact surfaces of wheel and wheel
hub.
! To avoid paint damage, place wheel flat
against hub and hold it there while
installing first wheel bolt.
! E 63 AMG with ceramic composite
brake disk: The rim could strike the
ceramic composite brake disk when
removing and attaching the spare wheel.
The ceramic composite brake disk could be
damaged. Exercise appropriate care and
have a second person assist you if possible
or use a second alignment bolt.
Example illustration: All models except E 63 AMG.
326Flat tirePractical hints
212_AKB; 2; 41, en-USd2ureepe,Version: 2.11.8.12009-07-17T09:14:21+02:00 - Seite 326