2010 MERCEDES-BENZ E350 Rear view
[x] Cancel search: Rear viewPage 182 of 372

Climate control system
Overview of climate control system functions
Your vehicle is equipped with either of the following climate control systems:
Dual-zone automatic climate control
USA only
Canada only
3-zone automatic climate control
Canada only
The dual-zone automatic climate control
combines an automatic heating and
ventilation system with a cooling system.
You can adjust the dual-zone automatic
climate control separately for the driver’s
and passenger side.
The 3-zone automatic climate control
combines an automatic heating and
ventilation system with a cooling system.
You can adjust the 3-zone automatic climate
control separately for each zone in the
vehicle.
Rear climate control
Canada only
The rear climate control allows separate climate settings for the rear compartment.180Climate control systemControls in detail
212_AKB; 2; 41, en-USd2ureepe,Version: 2.11.8.12009-07-17T09:14:21+02:00 - Seite 180
Page 215 of 372

When programming a garage door opener,
park vehicle outside the garage.
Do not run the engine while programming the
integrated remote control. Inhalation of
exhaust gas is hazardous to your health. All
exhaust gas contains carbon monoxide (CO),
and inhaling it can cause unconsciousness
and possible death.
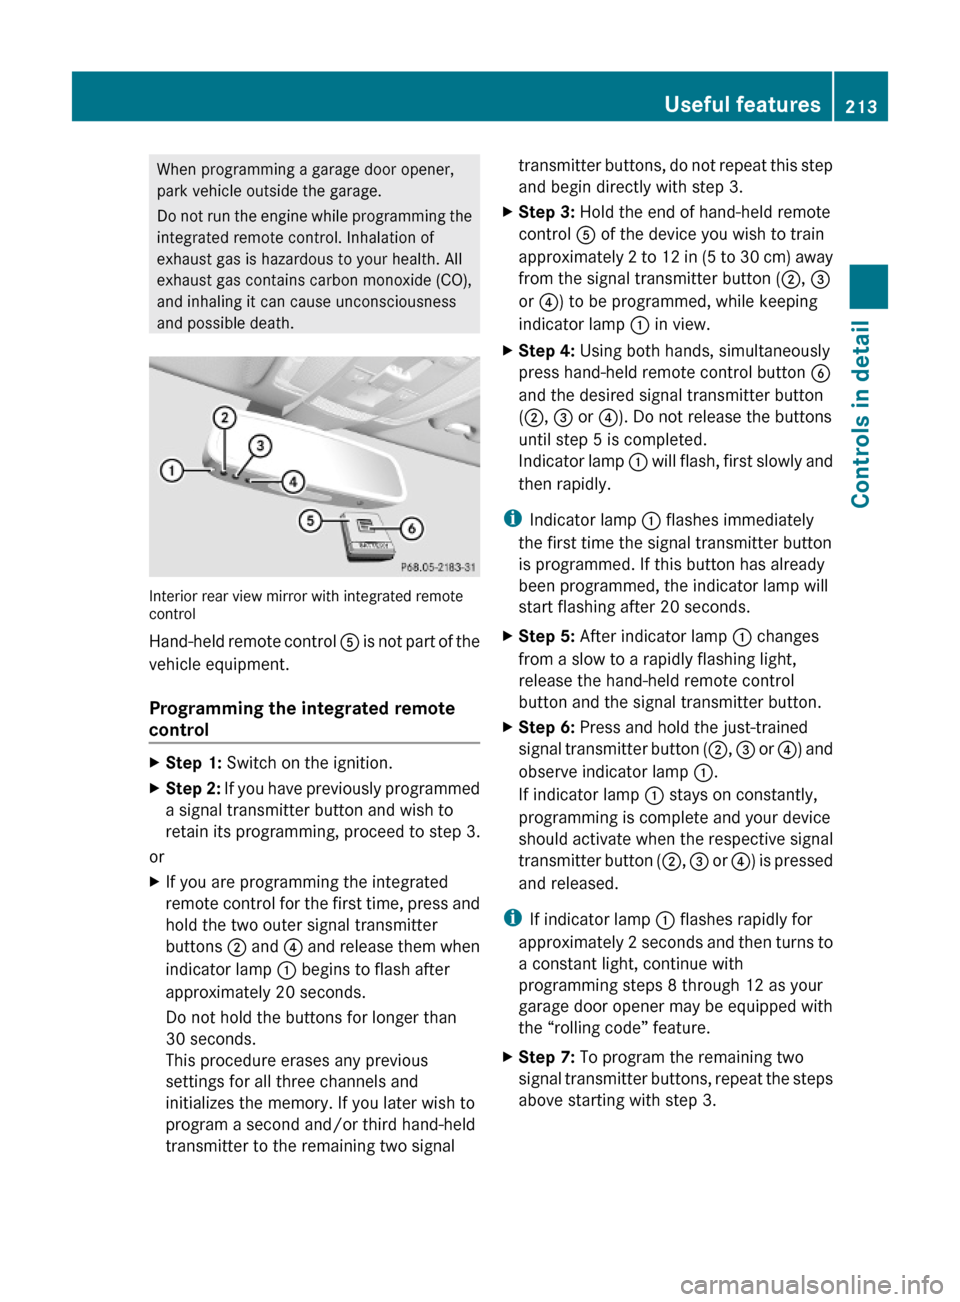
Interior rear view mirror with integrated remotecontrol
Hand-held remote control A is not part of the
vehicle equipment.
Programming the integrated remote
control
XStep 1: Switch on the ignition.XStep 2: If you have previously programmed
a signal transmitter button and wish to
retain its programming, proceed to step 3.
or
XIf you are programming the integrated
remote control for the first time, press and
hold the two outer signal transmitter
buttons ; and ? and release them when
indicator lamp : begins to flash after
approximately 20 seconds.
Do not hold the buttons for longer than
30 seconds.
This procedure erases any previous
settings for all three channels and
initializes the memory. If you later wish to
program a second and/or third hand-held
transmitter to the remaining two signal
transmitter buttons, do not repeat this step
and begin directly with step 3.
XStep 3: Hold the end of hand-held remote
control A of the device you wish to train
approximately 2 to 12 in (5 to 30 cm) away
from the signal transmitter button (;, =
or ?) to be programmed, while keeping
indicator lamp : in view.
XStep 4: Using both hands, simultaneously
press hand-held remote control button B
and the desired signal transmitter button
(;, = or ?). Do not release the buttons
until step 5 is completed.
Indicator lamp : will flash, first slowly and
then rapidly.
iIndicator lamp : flashes immediately
the first time the signal transmitter button
is programmed. If this button has already
been programmed, the indicator lamp will
start flashing after 20 seconds.
XStep 5: After indicator lamp : changes
from a slow to a rapidly flashing light,
release the hand-held remote control
button and the signal transmitter button.
XStep 6: Press and hold the just-trained
signal transmitter button (;, = or ?) and
observe indicator lamp :.
If indicator lamp : stays on constantly,
programming is complete and your device
should activate when the respective signal
transmitter button (;, = or ?) is pressed
and released.
iIf indicator lamp : flashes rapidly for
approximately 2 seconds and then turns to
a constant light, continue with
programming steps 8 through 12 as your
garage door opener may be equipped with
the “rolling code” feature.
XStep 7: To program the remaining two
signal transmitter buttons, repeat the steps
above starting with step 3.
Useful features213Controls in detail212_AKB; 2; 41, en-USd2ureepe,Version: 2.11.8.12009-07-17T09:14:21+02:00 - Seite 213Z
Page 218 of 372

iUSA only:
This device complies with Part 15 of the
FCC Rules. Operation is subject to the
following two conditions:
1. This device may not cause harmful
interference, and
2. this device must accept any
interference received, including
interference that may cause undesired
operation.
Any unauthorized modification to this
device could void the user’s authority to
operate the equipment.
iCanada only:
This device complies with RSS-210 of
Industry Canada. Operation is subject to
the following two conditions:
1.This device may not cause interference,
and
2. this device must accept any
interference received, including
interference that may cause undesired
operation of the device.
Any unauthorized modification to this
device could void the user’s authority to
operate the equipment.
Compass
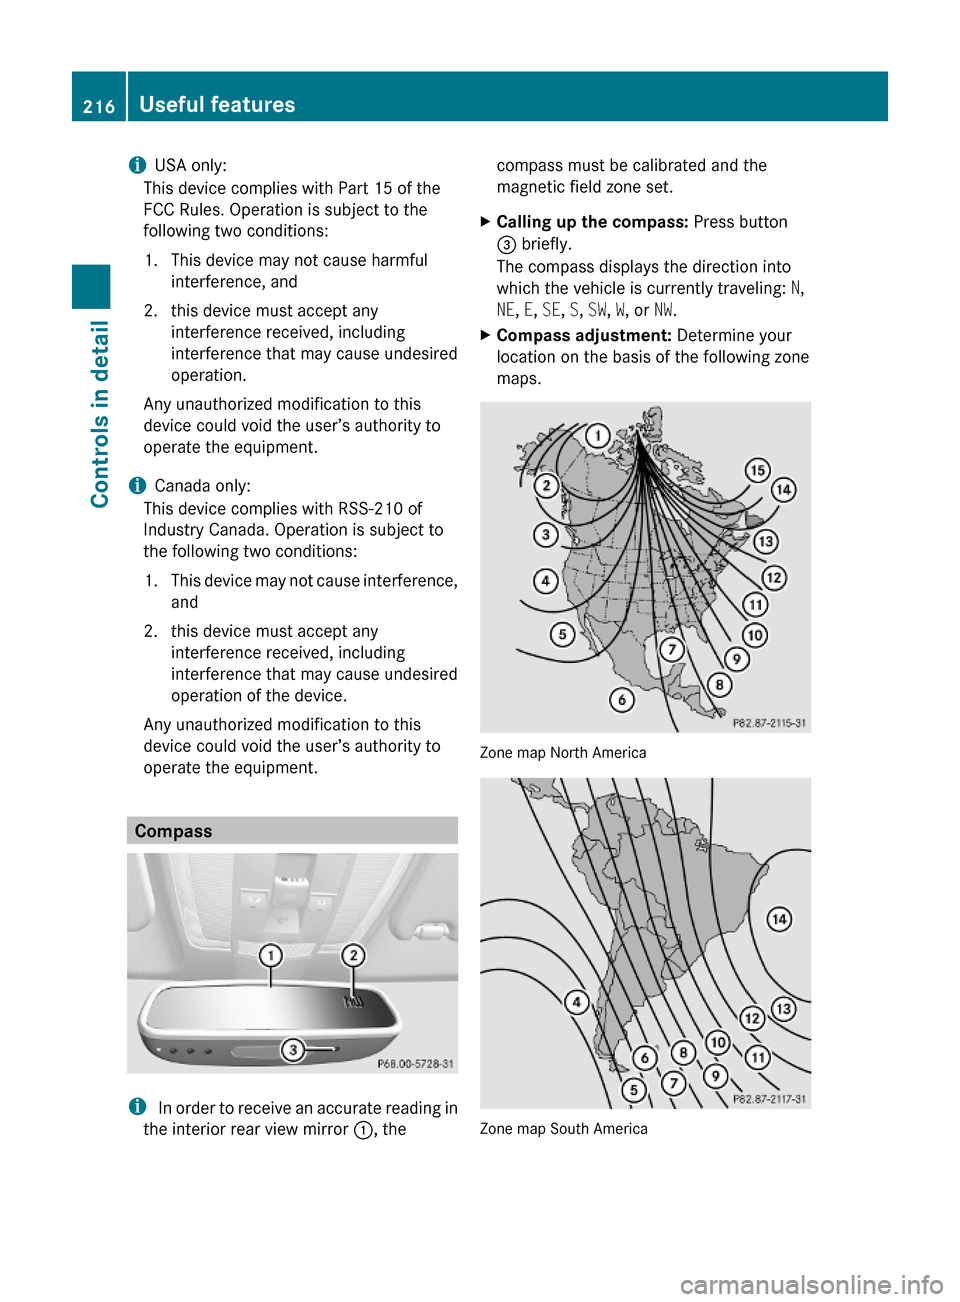
i In order to receive an accurate reading in
the interior rear view mirror :, the
compass must be calibrated and the
magnetic field zone set.
XCalling up the compass: Press button
= briefly.
The compass displays the direction into
which the vehicle is currently traveling: N,
NE, E, SE, S, SW, W, or NW.
XCompass adjustment: Determine your
location on the basis of the following zone
maps.
Zone map North America
Zone map South America
216Useful featuresControls in detail
212_AKB; 2; 41, en-USd2ureepe,Version: 2.11.8.12009-07-17T09:14:21+02:00 - Seite 216
Page 264 of 372

XOnly use a mild vehicle wash detergent,
such as Mercedes-Benz approved Car
Shampoo.XThoroughly spray the vehicle with a
diffused jet of water.XDo not spray directly towards the
ventilation intake.XUse plenty of water and rinse the sponge
and chamois frequently.XRinse with clean water and dry with a
chamois thoroughly.
Do not allow cleaning agents to dry on the
finish.
Automatic car wash
GWarning!
The vehicle is braked when the HOLD function
or DISTRONIC PLUS is activated. Therefore,
deactivate the HOLD function or DISTRONIC
PLUS before the vehicle is washed in an
automatic car wash.
You can have your vehicle washed in an
automatic car wash from the start. Brushless
car washes are preferable.
XTo protect the filter system, activate the air
recirculation mode using button g on
the climate control panel.
! Do not clean your vehicle in an automatic
touchless car wash which uses caustic
spray. Caustic spray will damage the paint
or ornamental moldings.
If the vehicle is very dirty, prewash it before
running it through the automatic car wash.
! Make sure the combination switch is set
to wiper setting $. Otherwise, the rain
sensor could activate and cause the wipers
to move unintentionally. This may lead to
vehicle damage.
Due to the width of the vehicle, fold in
exterior rear view mirrors prior to running
the vehicle through an automatic car wash
to prevent damage to the mirrors.
XWhen taking the vehicle through an
automatic conveyor-type car wash:
Make sure the automatic transmission
remains in neutral position N. Observe
instructions, see “Remaining in neutral
position N” ( Y page 117).
When leaving the automatic car wash, make
sure the mirrors are folded out.
After running the vehicle through an
automatic car wash, wipe any wax off of the
windshield and the wiper blade inserts. This
will prevent smears and reduce wiping noise
which can be caused by residual wax on the
windshield.
Ornamental moldings
XFor regular cleaning and care of ornamental
moldings, use a damp cloth.
! Do not use chrome cleaner on ornamental
moldings. Although ornamental moldings
may have chrome appearance, they could
be made of anodized aluminum that will be
damaged when cleaned with chrome
cleaner. Instead, use a damp cloth to clean
those ornamental moldings.
For very dirty ornamental moldings of
which you are sure are chrome-plated, use
a chrome cleaner. If in doubt whether an
ornamental molding is chrome-plated,
contact an authorized Mercedes-Benz
Center.
Headlamps, brake lamps, tail lamps,
side markers, turn signal lenses
XUse a mild vehicle wash detergent, such as
Mercedes-Benz approved Car Shampoo,
with plenty of water.
! Only use window cleaning solutions that
are suitable for plastic lamp lenses.
Window cleaning solutions which are not
suitable may damage the plastic lamp
lenses of the headlamps. Therefore, do not
use abrasives, solvents or cleaners that
contain solvents.
262Vehicle careOperation
212_AKB; 2; 41, en-USd2ureepe,Version: 2.11.8.12009-07-17T09:14:21+02:00 - Seite 262
Page 265 of 372

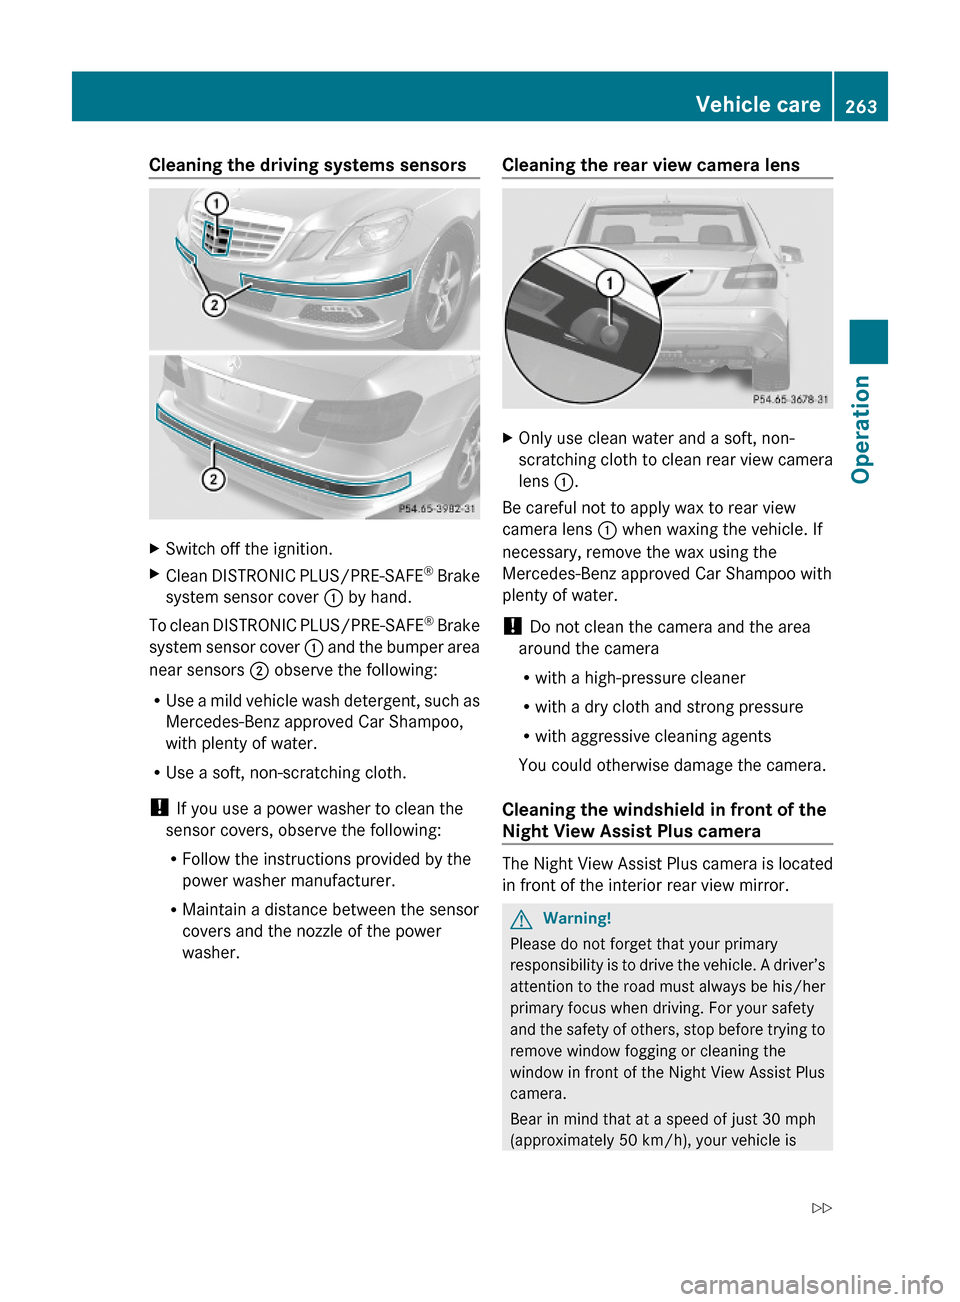
Cleaning the driving systems sensorsXSwitch off the ignition.XClean DISTRONIC PLUS/PRE-SAFE® Brake
system sensor cover : by hand.
To clean DISTRONIC PLUS/PRE-SAFE® Brake
system sensor cover : and the bumper area
near sensors ; observe the following:
RUse a mild vehicle wash detergent, such as
Mercedes-Benz approved Car Shampoo,
with plenty of water.
RUse a soft, non-scratching cloth.
! If you use a power washer to clean the
sensor covers, observe the following:
RFollow the instructions provided by the
power washer manufacturer.
RMaintain a distance between the sensor
covers and the nozzle of the power
washer.
Cleaning the rear view camera lensXOnly use clean water and a soft, non-
scratching cloth to clean rear view camera
lens :.
Be careful not to apply wax to rear view
camera lens : when waxing the vehicle. If
necessary, remove the wax using the
Mercedes-Benz approved Car Shampoo with
plenty of water.
! Do not clean the camera and the area
around the camera
Rwith a high-pressure cleaner
Rwith a dry cloth and strong pressure
Rwith aggressive cleaning agents
You could otherwise damage the camera.
Cleaning the windshield in front of the
Night View Assist Plus camera
The Night View Assist Plus camera is located
in front of the interior rear view mirror.
GWarning!
Please do not forget that your primary
responsibility is to drive the vehicle. A driver’s
attention to the road must always be his/her
primary focus when driving. For your safety
and the safety of others, stop before trying to
remove window fogging or cleaning the
window in front of the Night View Assist Plus
camera.
Bear in mind that at a speed of just 30 mph
(approximately 50 km/h), your vehicle is
Vehicle care263Operation212_AKB; 2; 41, en-USd2ureepe,Version: 2.11.8.12009-07-17T09:14:21+02:00 - Seite 263Z
Page 305 of 372

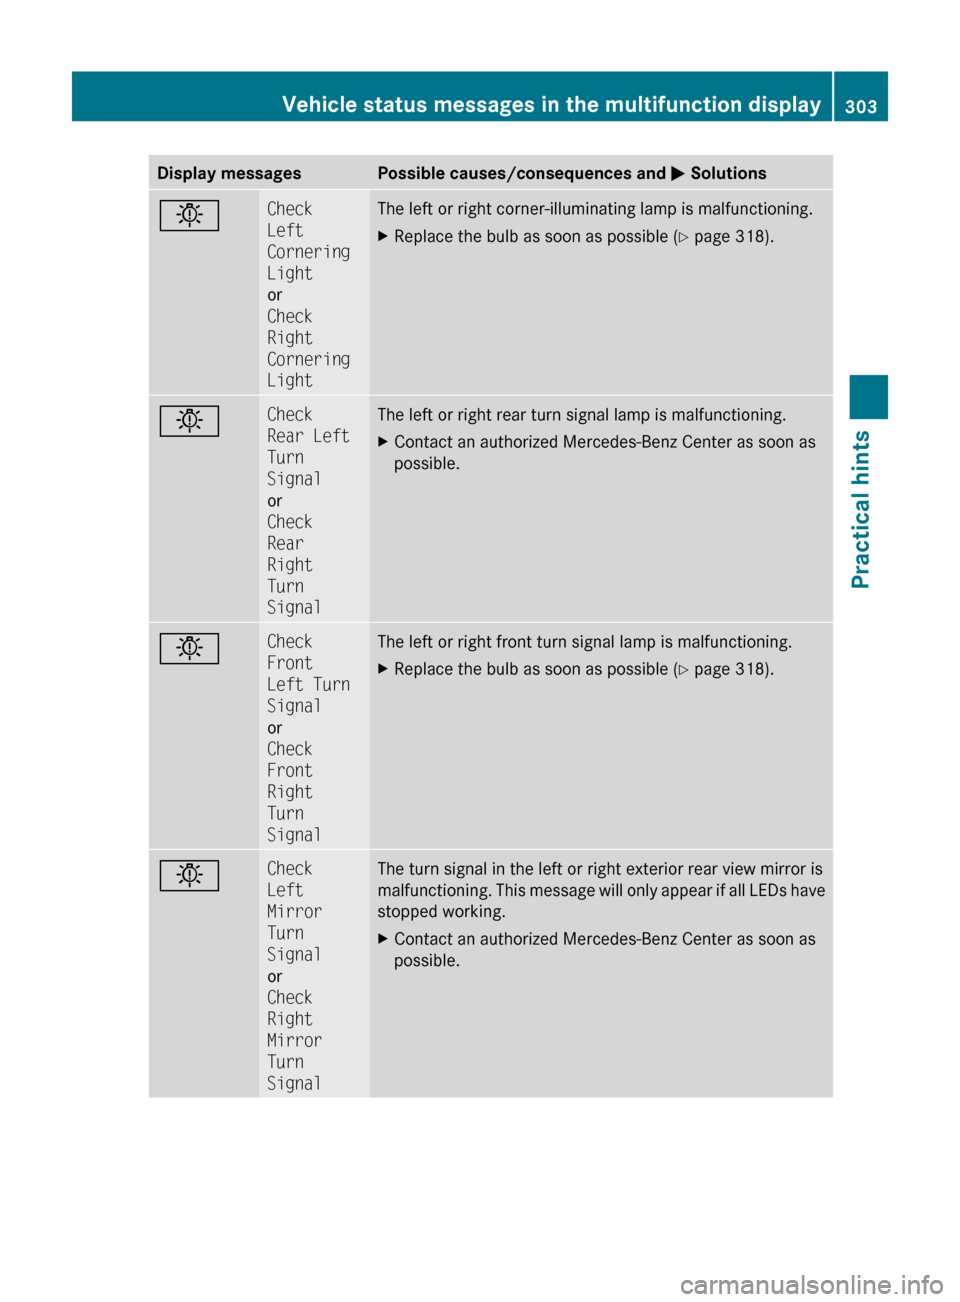
Display messagesPossible causes/consequences and M SolutionsbCheck
Left
Cornering
Light
or
Check
Right
Cornering
LightThe left or right corner-illuminating lamp is malfunctioning.XReplace the bulb as soon as possible ( Y page 318).bCheck
Rear Left
Turn
Signal
or
Check
Rear
Right
Turn
SignalThe left or right rear turn signal lamp is malfunctioning.XContact an authorized Mercedes-Benz Center as soon as
possible.bCheck
Front
Left Turn
Signal
or
Check
Front
Right
Turn
SignalThe left or right front turn signal lamp is malfunctioning.XReplace the bulb as soon as possible ( Y page 318).bCheck
Left
Mirror
Turn
Signal
or
Check
Right
Mirror
Turn
SignalThe turn signal in the left or right exterior rear view mirror is
malfunctioning. This message will only appear if all LEDs have
stopped working.XContact an authorized Mercedes-Benz Center as soon as
possible.Vehicle status messages in the multifunction display303Practical hints212_AKB; 2; 41, en-USd2ureepe,Version: 2.11.8.12009-07-17T09:14:21+02:00 - Seite 303Z
Page 350 of 372

Vehicle specification E 350 (212.056)
The quoted data apply only to the standard
vehicle. Contact an authorized Mercedes-
Benz Center for the corresponding data of all
special bodies and special equipment.Engine E 350Engine, type272Mode of operation4-stroke engine,
gasoline injectionNo. of cylinders6Bore3.66 in (92.90 mm)Stroke3.39 in (86.00 mm)Total piston
displacement213.5 cu in
(3 498 cm 3
)Compression
ratio10.7:1Output acc. to
SAE J 1349 23268 hp/6
000 rpm
(200 kW/6 000 rpm)Maximum torque
acc. to SAE J 1349258 lb-ft/
2 400 - 5 000 rpm
(350 Nm/
2 400 - 5 000 rpm)Maximum engine
speed6 500 rpmFiring order1-4-3-6-2-5Poly-V-belt2 392 mmElectrical system E 350Alternator14 V/180 AStarter motor12 V/1.4 kWBattery12 V/70 AhSpark plugs, typeBosch Y 7 MPP33Electrical system E 350Spark plugs,
electrode gap0.031 in (0.8 mm)Spark plugs,
tightening torque15 - 18 lb-ft
(20 - 25 Nm)Main dimensions E 350Overall vehicle
length191.9 in (4 874 mm)Overall vehicle
width 2481.5 in (2
071 mm)Overall vehicle
height57.8 in (1 467 mm)Wheelbase113.1 in (2 874 mm)Track, front62.2 in (1 580 mm)Track, rear63.0 in (1 599 mm)Ground clearance4.1 in (104 mm)Turning circle36.9 ft (11.3 m)Weights E 350Roof loadmax. 220 lb (100 kg)Trunk loadmax. 220 lb (100 kg)
Vehicle specification E 350 BlueTEC
(212.024)
The quoted data apply only to the standard
vehicle. Contact an authorized Mercedes-
Benz Center for the corresponding data of all
special bodies and special equipment.
23 Premium fuel required. Performance may vary with fuel octane rating.
24 Exterior rear view mirrors folded out.348Vehicle specification E 350 BlueTEC (212.024)Technical data
212_AKB; 2; 41, en-USd2ureepe,Version: 2.11.8.12009-07-17T09:14:21+02:00 - Seite 348
Page 351 of 372

Engine E 350 BlueTECEngine, type642Mode of operationDiesel 4-strokeengineNo. of cylinders6Bore3.27 in (83.00 mm)Stroke3.62 in (92.00 mm)Total piston
displacement182.3 cu in
(2 987 cm 3
)Compression
ratio16.5:1Output acc. to
SAE J 1349210 hp/3 400 rpm
(157 kW/3 400 rpm)Maximum torque
acc. to SAE J 1349400 lb-ft/
1 600 - 2 400 rpm
(543 Nm/
1 600 - 2 400 rpm)Maximum engine
speed4 500 rpmFiring order1-4-2-5-3-6Poly-V-belt2 035 mmElectrical system E 350 BlueTECAlternator14 V/180 AStarter motor12 V/2.0 kWBattery12 V/95 AhMain dimensions E 350 BlueTECOverall vehicle
length191.9 in (4 874 mm)Overall vehicle
width 2581.5 in (2
071 mm)Main dimensions E 350 BlueTECOverall vehicle
height 2657.8 in (1
467 mm)Wheelbase113.1 in (2 874 mm)Track, front62.2 in (1 580 mm)Track, rear63.0 in (1 599 mm)Ground
clearance 263.5 in (89 mm)Turning circle36.9 ft (11.3 m)Weights E 350 BlueTECRoof loadmax. 220 lb (100 kg)Trunk loadmax. 220 lb (100 kg)
Vehicle specification E 350 4MATIC
(212.087)
The quoted data apply only to the standard
vehicle. Contact an authorized Mercedes-
Benz Center for the corresponding data of all
special bodies and special equipment.
Engine E 350 4MATICEngine, type272Mode of operation4-stroke engine,
gasoline injectionNo. of cylinders6Bore3.66 in (92.90 mm)Stroke3.39 in (86.00 mm)Total piston
displacement213.5 cu in
(3 498 cm 3
)Compression
ratio10.7:125 Exterior rear view mirrors folded out.
26 Data apply to unladen vehicle with standard equipment. Data may vary in vehicles equipped with AIRMATIC
depending on the selected damping settings and the current vehicle level.Vehicle specification E 350 4MATIC (212.087)349Technical data212_AKB; 2; 41, en-USd2ureepe,Version: 2.11.8.12009-07-17T09:14:21+02:00 - Seite 349Z