2010 MERCEDES-BENZ E350 unlock
[x] Cancel search: unlockPage 21 of 372
V
Valet locking ........................................ 85
Vehicle
Battery ........................................... 336
Care ............................................... 260
Control system .............................. 126
Identification Number (VIN) ...........346
Locking/unlocking ........................... 76
Lowering (wheel change) ...............328
Modifications and alterations,
Operating safety .............................. 22
Towing ........................................... 340
Unlocking/locking manually ..........314
Vehicle dimensions
see Vehicle specification
Vehicle Identification Number
(VIN) ................................................... 346
Vehicle jack see Jack
Vehicle level control
see AIRMATIC
Vehicle lighting .................................... 97
Vehicle loading
Cargo tie-down rings ...................... 199
Instructions .................................... 197
Load limit ....................................... 238
Roof rack ....................................... 198
Split rear seat bench .....................199
Terminology ................................... 249
Vehicle maximum load on the tire ... 252
Vehicle specification
E 350 ............................................. 348
E 350 4MATIC ................................ 349
E 350 BlueTEC ............................... 348
E 550 ............................................. 350
E 550 4MATIC ................................ 351
E 63 AMG ...................................... 352
Vehicle status message memory .... 139
Vehicle tool kit .................................. 268
Vehicle washing see Vehicle care
Vehicle weights
see Vehicle specification W
Warning sounds
DISTRONIC PLUS ........................... 151
Driver’s or passenger’s seat belt .....52
Parking brake ................................ 289
Parking Guidance ........................... 170
Parktronic system ..........................168
Seat belt telltale ............................ 307
Warranty coverage ............................ 346
Washer and headlamp cleaning
system ................................................ 367
Washer fluid
Messages in the multifunction
display ........................................... 294
Mixing ratio .................................... 367
Refilling .......................................... 227
Washing the vehicle .......................... 260
Wear pattern (tires) .......................... 244
Weights (vehicle) see Vehicle specification
Wheel
Changing ....................................... 323
Removing ....................................... 326
Spare ............................................. 323
Tightening torque ........................... 328
Wheels, sizes ..................................... 353
Wheels, Tires and .............................. 228
Window curtain air bags ..................... 42
Windows see Power windows
Windows, cleaning ............................ 264
Windshield
Cleaning wiper blades .................... 264
Washer fluid ................................... 367
Wipers ........................................... 104
Windshield wipers
Replacing wiper blades ..................322
Winter cover .............................. 224, 252
Winter driving
Instructions .................................... 253
Radiator cover ............................... 252
Snow chains .................................. 252
Tires ............................................... 252
Winter tires ................................ 252, 353
Wood trims, cleaning ........................ 266Index19212_AKB; 2; 41, en-USd2ureepe,Version: 2.11.8.12009-07-17T09:14:21+02:00 - Seite 19
Page 28 of 372
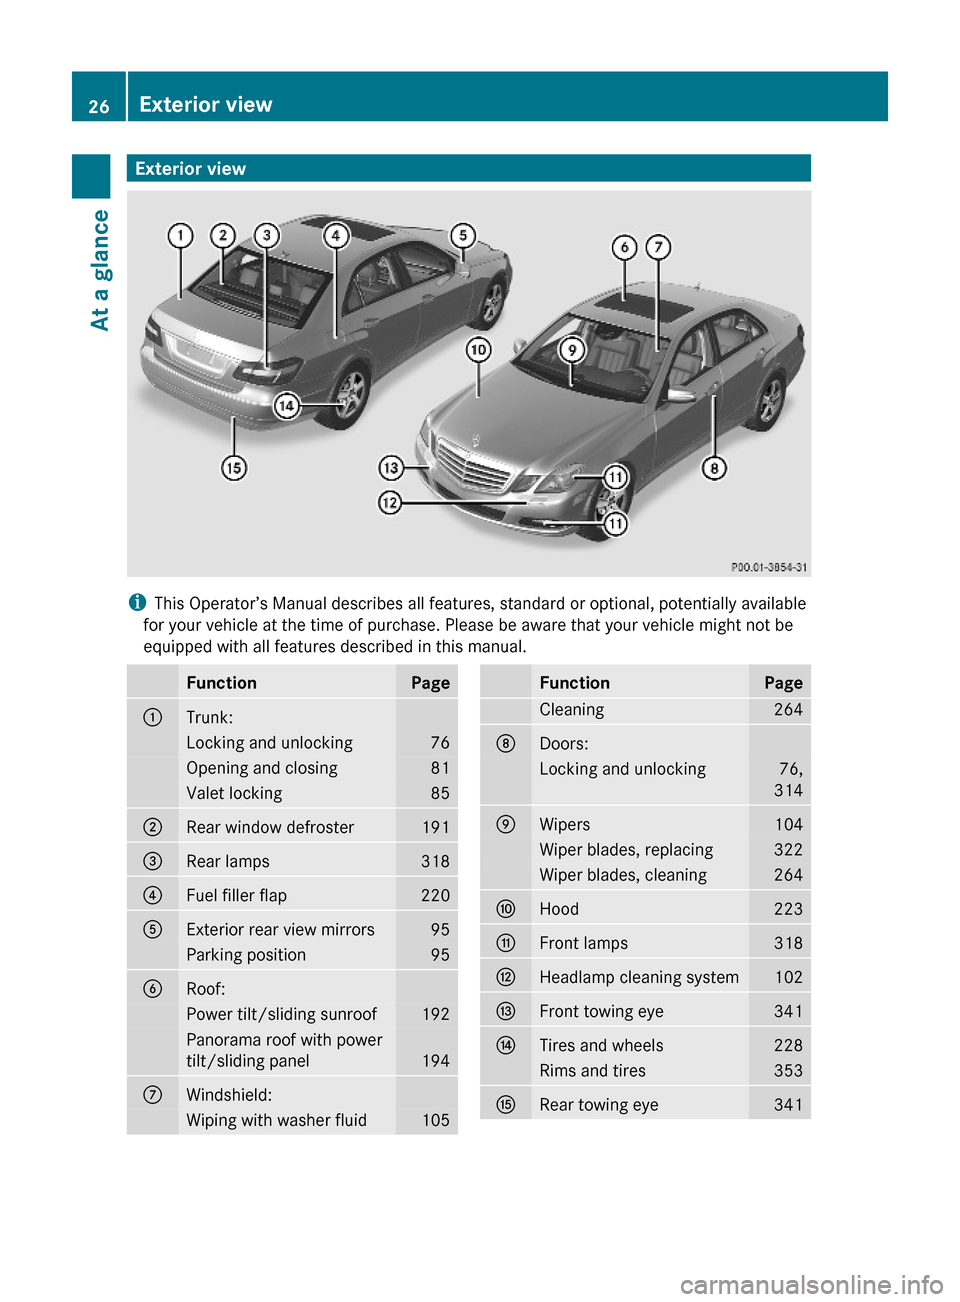
Exterior view
iThis Operator’s Manual describes all features, standard or optional, potentially available
for your vehicle at the time of purchase. Please be aware that your vehicle might not be
equipped with all features described in this manual.
FunctionPage:Trunk:Locking and unlocking76Opening and closing81Valet locking85;Rear window defroster191=Rear lamps318?Fuel filler flap220AExterior rear view mirrors95Parking position95BRoof:Power tilt/sliding sunroof192Panorama roof with power
tilt/sliding panel194
CWindshield:Wiping with washer fluid105FunctionPageCleaning264DDoors:Locking and unlocking76,
314
EWipers104Wiper blades, replacing322Wiper blades, cleaning264FHood223GFront lamps318HHeadlamp cleaning system102IFront towing eye341JTires and wheels228Rims and tires353KRear towing eye34126Exterior viewAt a glance
212_AKB; 2; 41, en-USd2ureepe,Version: 2.11.8.12009-07-17T09:14:21+02:00 - Seite 26
Page 36 of 372
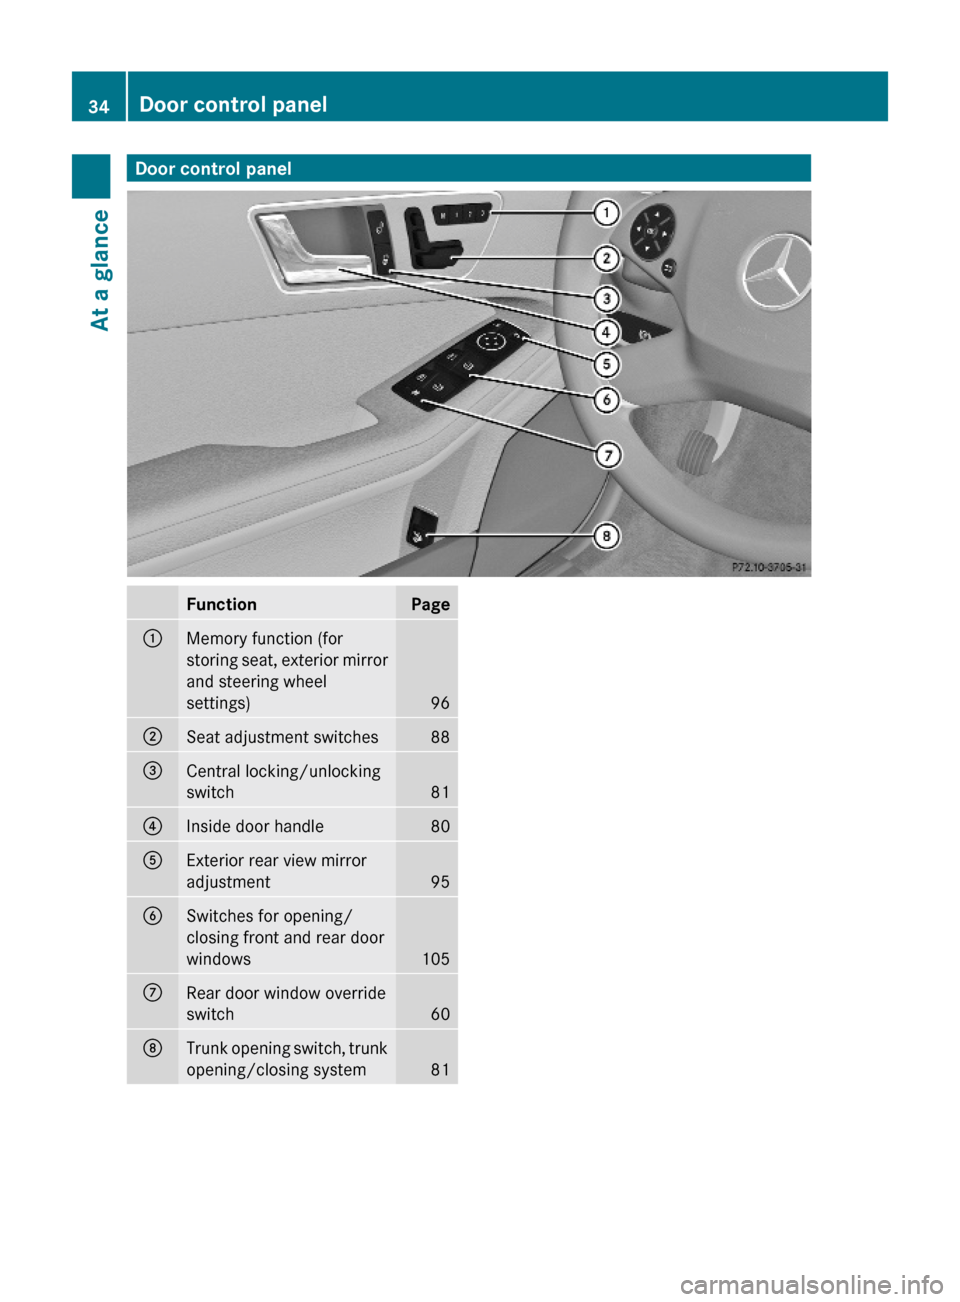
Door control panelFunctionPage:Memory function (for
storing seat, exterior mirror
and steering wheel
settings)96
;Seat adjustment switches88=Central locking/unlocking
switch81
?Inside door handle 80AExterior rear view mirror
adjustment95
BSwitches for opening/
closing front and rear door
windows105
CRear door window override
switch60
DTrunk opening switch, trunk
opening/closing system81
34Door control panelAt a glance
212_AKB; 2; 41, en-USd2ureepe,Version: 2.11.8.12009-07-17T09:14:21+02:00 - Seite 34
Page 58 of 372
Children in the vehicle
Safety notes
If an infant or child is traveling with you in the
vehicle:
XSecure the child using an infant or child
restraint appropriate to the age and size of
the child.XMake sure the infant or child is properly
secured at all times while the vehicle is in
motion.GWarning!
When leaving the vehicle, always remove the
SmartKey from the starter switch. Always
take the SmartKey with you and lock the
vehicle. Do not leave children unattended in
the vehicle, even if they are secured in a child
restraint system, or with access to an
unlocked vehicle. A child’s unsupervised
access to a vehicle could result in an accident
and/or serious personal injury. The children
could
R injure themselves on parts of the vehicle
R be seriously or fatally injured through
excessive exposure to extreme heat or cold
R injure themselves or cause an accident with
vehicle equipment that can be operated
even if the SmartKey is removed from the
starter switch or removed from the vehicle,
such as seat adjustment, steering wheel
adjustment, or the memory function
If children open a door, they could injure other
persons or get out of the vehicle and injure
themselves or be injured by following traffic.
Do not expose the child restraint system to
direct sunlight. The child restraint system’s
metal parts, for example, could become very
hot, and the child could be burned by these
parts.
GWarning!
Do not carry heavy or hard objects in the
passenger compartment or trunk unless they
are firmly secured in place.
Unsecured or improperly positioned cargo
increases a child’s risk of injury in the event
of
R strong braking maneuvers
R sudden changes of direction
R an accident
Infant and child restraint systemsGObserve Safety notes, see page 56.
We recommend all infants and children be
properly restrained at all times while the
vehicle is in motion.
Canada only:
Only use a BabySmart™ compatible child
restraint for the front passenger seat in this
vehicle.
All lap/shoulder belts except the driver’s seat
belt have special seat belt retractors for
secure fastening of child restraints.
To fasten a child restraint, follow the child
restraint manufacturer’s instructions for
mounting.
To activate the special seat belt retractor:
XPull the shoulder belt out completely and
let it retract.
During seat belt retraction, a ratcheting
sound can be heard to indicate that the
special seat belt retractor is activated.
The seat belt is now locked.XPush down on child restraint to take up any
slack.
To deactivate the special seat belt retractor:
XRelease the seat belt buckle and let the
seat belt retract completely.
The seat belt can then again be used in the
usual manner.
To deactivate the special seat belt retractor
for the front passenger seat, the front
passenger seat must be in the most backward
position.
56Occupant safetySafety and security
212_AKB; 2; 41, en-USd2ureepe,Version: 2.11.8.12009-07-17T09:14:21+02:00 - Seite 56
Page 62 of 372
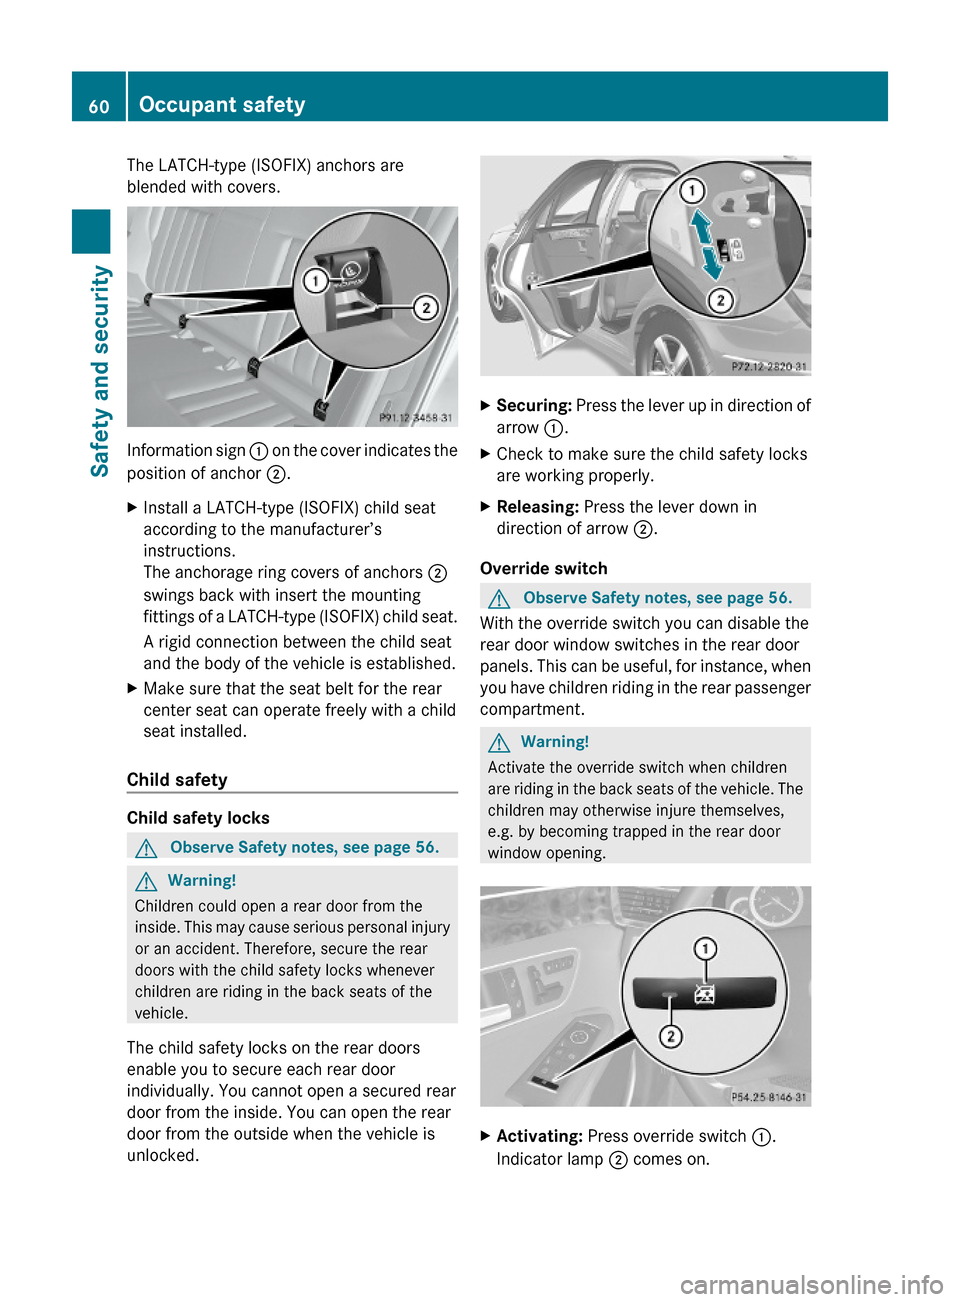
The LATCH-type (ISOFIX) anchors are
blended with covers.
Information sign : on the cover indicates the
position of anchor ;.
XInstall a LATCH-type (ISOFIX) child seat
according to the manufacturer’s
instructions.
The anchorage ring covers of anchors ;
swings back with insert the mounting
fittings of a LATCH-type (ISOFIX) child seat.
A rigid connection between the child seat
and the body of the vehicle is established.
XMake sure that the seat belt for the rear
center seat can operate freely with a child
seat installed.
Child safety
Child safety locks
GObserve Safety notes, see page 56.GWarning!
Children could open a rear door from the
inside. This may cause serious personal injury
or an accident. Therefore, secure the rear
doors with the child safety locks whenever
children are riding in the back seats of the
vehicle.
The child safety locks on the rear doors
enable you to secure each rear door
individually. You cannot open a secured rear
door from the inside. You can open the rear
door from the outside when the vehicle is
unlocked.
XSecuring: Press the lever up in direction of
arrow :.
XCheck to make sure the child safety locks
are working properly.
XReleasing: Press the lever down in
direction of arrow ;.
Override switch
GObserve Safety notes, see page 56.
With the override switch you can disable the
rear door window switches in the rear door
panels. This can be useful, for instance, when
you have children riding in the rear passenger
compartment.
GWarning!
Activate the override switch when children
are riding in the back seats of the vehicle. The
children may otherwise injure themselves,
e.g. by becoming trapped in the rear door
window opening.
XActivating: Press override switch :.
Indicator lamp ; comes on.
60Occupant safetySafety and security
212_AKB; 2; 41, en-USd2ureepe,Version: 2.11.8.12009-07-17T09:14:21+02:00 - Seite 60
Page 74 of 372

ActivatingXWith SmartKey: Remove the SmartKey
from the starter switch.
XWith KEYLESS-GO: Turn off the engine and
open the driver’s door.
Deactivating
XSwitch on the ignition.
iStarting the engine will also deactivate
the immobilizer.
In the event that the engine cannot be
started (yet the vehicle’s battery is
charged), the system is not operational.
Contact an authorized Mercedes-Benz
Center or call 1-800-FOR-MERCedes (in the
USA) or 1-800-387-0100 (in Canada).
Anti-theft alarm system
Once the alarm system has been armed, a
visual and audible alarm is triggered when
someone opens
Ra door
Rthe trunk
Rthe hood
The alarm will stay on even if the activating
element, a door, for example, is closed
immediately.
The alarm system will also be triggered when
Rthe vehicle is opened with the mechanical
key
Ra door is opened from the inside
Rthe trunk is opened with the emergency
release button
To cancel the alarm after it has been
triggered, see “Canceling the alarm”
(Y page 73).
iIf the alarm stays on for more than
30 seconds, the Tele Aid system initiates a
call to the Customer Assistance Center
automatically. The Tele Aid system will
initiate the call provided that
Ryou have subscribed to the Tele Aid
service
Rthe Tele Aid service has been activated
properly
Rthe necessary mobile phone, power
supply and GPS coverage are available
XArming: Lock the vehicle with the
SmartKey or with KEYLESS-GO.
The turn signal lamps flash three times and
an acoustic warning sounds three times to
indicate that the vehicle is locked. Indicator
lamp : flashes to indicate that the alarm
system is armed.
iIf the turn signal lamps do not flash three
times and the acoustic warning does not
sound three times, a door or the trunk may
not be properly closed.
Close the respective element.
XDisarming: Unlock the vehicle with the
SmartKey or with KEYLESS-GO.
The turn signal lamps flash once and an
acoustic warning sounds once to indicate
that the alarm system is disarmed.
72Anti-theft systemsSafety and security
212_AKB; 2; 41, en-USd2ureepe,Version: 2.11.8.12009-07-17T09:14:21+02:00 - Seite 72
Page 75 of 372
iUnless you open a door or the trunk within
approximately 40 seconds after unlocking
the vehicle:
R The vehicle will be locked again.
R The anti-theft alarm system will be
rearmed.
Canceling the alarm
To cancel the alarm, do one of the following:
XInsert the SmartKey into the starter switch.XPress button % or & on the
SmartKey.
In vehicles with KEYLESS-GO:
XGrasp an outside door handle.
The SmartKey must be within 3 ft (1 m) of
the vehicle.XPress the KEYLESS-GO start/stop button.
The SmartKey must be inside the vehicle.Anti-theft systems73Safety and security212_AKB; 2; 41, en-USd2ureepe,Version: 2.11.8.12009-07-17T09:14:21+02:00 - Seite 73Z
Page 77 of 372
Vehicle equipment ..............................76
Locking and unlocking .......................76
Starter switch positions .....................85
Seats ....................................................87
Multifunction steering wheel .............93
Mirrors .................................................94
Memory function .................................96
Lighting ................................................97
Wipers ................................................104
Power windows .................................105
Driving and parking ..........................109
Automatic transmission ...................114
Transfer case ....................................124
Instrument cluster ............................125
Control system ..................................126
Driving systems ................................146
Climate control system ....................180
Rear window defroster .....................191
Power tilt/sliding sunroof ...............192
Panorama roof with power tilt/
sliding panel ......................................194
Loading and storing ..........................197
Useful features .................................203
75Controls in detail212_AKB; 2; 41, en-USd2ureepe,Version: 2.11.8.12009-07-17T09:14:21+02:00 - Seite 75