2010 MERCEDES-BENZ E350 turn signal
[x] Cancel search: turn signalPage 86 of 372

Example: Vehicles with KEYLESS-GO
XPress trunk closing switch : briefly.
If the trunk lid comes into contact with an
object while closing, the closing procedure is
stopped and the trunk lid reopens slightly.
This will happen only while the trunk is in its
upper motion sequence. Check if luggage has
been piled too high, for example.
Closing the trunk and locking vehicle
from outside
This section applies to vehicles with trunk
opening/closing system and KEYLESS-GO
only. You can close the trunk and lock the
vehicle simultaneously from the outside using
the KEYLESS-GO locking/closing switch.
XMake sure you have the SmartKey with
KEYLESS-GO with you.
XPress KEYLESS-GO locking/closing
switch : briefly.
With all doors closed:
RThe locking knobs in the doors move
down.
RThe trunk lid starts to close
automatically.
RAll turn signal lamps flash three times to
confirm locking once the trunk has
closed completely.
RAn acoustic signal sounds three times.
RThe anti-theft alarm system is armed.
If the trunk lid comes into contact with an
object while closing, the closing procedure is
stopped and the trunk lid reopens slightly.
This will happen only while the trunk is in its
upper motion sequence. Check if luggage has
been piled too high, for example.
Trunk lid emergency release
The trunk lid can be opened from inside the
trunk with the emergency release button.
XBriefly press emergency release
button :.
The trunk lid unlocks and opens.
The emergency release button unlocks and
opens the trunk while the vehicle is standing
still or in motion.
Illumination of the emergency release button:
RThe button flashes for 30 minutes after
opening the trunk.
RThe button flashes for 60 minutes after
closing the trunk.
84Locking and unlockingControls in detail
212_AKB; 2; 41, en-USd2ureepe,Version: 2.11.8.12009-07-17T09:14:21+02:00 - Seite 84
Page 87 of 372

The emergency release button does not open
the trunk, if the vehicle battery is discharged
or disconnected.
Valet locking
You can lock the trunk separately with the
mechanical key. This denies unauthorized
access to the trunk, e.g. when you valet park
the vehicle.
XLeave only the SmartKey less its
mechanical key with the vehicle.
XValet locking: Close the trunk.XRemove the mechanical key from the
SmartKey (Y page 315).
XInsert the mechanical key in the trunk lid
lock.
XTurn the mechanical key clockwise to
position 2 and remove the mechanical
key in that position to lock the trunk.
The trunk remains locked even when the
vehicle is centrally unlocked.
You can then only open the trunk with the
mechanical key.
XCanceling: Insert the mechanical key in
the trunk lid lock.
XTurn the mechanical key counterclockwise
to neutral position 1 and remove the
mechanical key in that position to unlock
the trunk.
You can now open the trunk.
Starter switch positions
SmartKey
GObserve Safety notes, see page 56.gFor removing SmartKey (gear selector
lever must be in park position P)
1Power supply for some electrical
consumers, e.g. wipers
2Ignition (power supply for all electrical
consumers) and driving position
3Starting position
When you switch on the ignition, all lamps in
the instrument cluster come on. The low-
beam headlamp indicator lamp, high-beam
headlamp indicator lamp, turn signal
indicator lamps, and the indicator lamps for
the fog lamps will only come on if activated.
If a lamp in the instrument cluster fails to
come on when the ignition is switched on,
have it checked and replaced if necessary. If
a lamp in the instrument cluster remains on
after starting the engine or comes on while
driving, refer to “Lamps in instrument cluster”
(Y page 304).
If the SmartKey is left in starter switch
position 0 for an extended period of time, it
can no longer be turned in the starter switch.
In this case, the steering is locked. To unlock,
remove SmartKey from the starter switch and
reinsert.
The steering is locked when the SmartKey is
removed from the starter switch.
Starter switch positions85Controls in detail212_AKB; 2; 41, en-USd2ureepe,Version: 2.11.8.12009-07-17T09:14:21+02:00 - Seite 85Z
Page 89 of 372

Position 0
Before you press the KEYLESS-GO start/stop
button, the vehicle’s on-board electronics
have status 0 (as with SmartKey removed).
Position 1
XPress the KEYLESS-GO start/stop button
once.
This supplies power for some electrical
consumers, e.g. wipers.
i When you now open the driver’s door, the
power supply is switched off.
Ignition (or position 2)
XPress the KEYLESS-GO start/stop button
twice.
This supplies power for all electrical
consumers.
When you switch on the ignition, all lamps
in the instrument cluster come on. The low-
beam headlamp indicator lamp, high-beam
headlamp indicator lamp, turn signal
indicator lamps, and the indicator lamps for
the fog lamps will only come on if activated.
If a lamp in the instrument cluster fails to
come on when the ignition is switched on,
have it checked and replaced if necessary.
If a lamp in the instrument cluster remains
on after starting the engine or comes on
while driving, refer to “Lamps in instrument
cluster” ( Y page 304).
i
When you now press the KEYLESS-GO
start/stop button once and the driver’s
door is open, the power supply is switched
off.
Seats
Safety notes
GWarning!
In order to avoid possible loss of vehicle
control the following must be done before the
vehicle is put into motion:
R seat adjustment
R head restraint adjustment
R steering wheel adjustment
R rear view mirror adjustment
R fastening of seat belts
GWarning!
Do not adjust the driver’s seat while driving.
Adjusting the seat while driving could cause
the driver to lose control of the vehicle.
Never ride in a moving vehicle with the seat
backrest in an excessively reclined position as
this can be dangerous. You could slide under
the seat belt in a collision. If you slide under
it, the seat belt would apply force at the
abdomen or neck. That could cause serious
or fatal injuries. The seat backrest and seat
belts provide the best restraint when the
wearer is in a position that is as upright as
possible and seat belts are properly
positioned on the body.
GWarning!
Your seat must be adjusted so that you can
correctly fasten your seat belt.
Observe the following points:
R Adjust the seat backrest until your arms are
slightly angled when holding the steering
wheel.
R Adjust the seat to a comfortable seating
position that still allows you to reach the
accelerator/brake pedal safely. The
position should be as far back as possible
with the driver still able to operate the
controls properly.
Seats87Controls in detail212_AKB; 2; 41, en-USd2ureepe,Version: 2.11.8.12009-07-17T09:14:21+02:00 - Seite 87Z
Page 100 of 372

the driver’s door with the ignition switched
off.
When the parking lamps or the rear fog
lamp are switched on and you remove the
SmartKey from the starter switch and open
the driver’s door, an acoustic signal
sounds.
In addition the message Switch Off
Lights appears in the multifunction
display.
Switch off the parking lamps or the rear fog
lamp manually.
! Failure to switch off the parking lamps
when leaving the vehicle may result in a
discharged battery.
i Vehicles without front fog lamps: For
better detection of the vehicle, the LED
daytime running lamps are dimmed to
parking lamp level when the low-beam
headlamps are switched on.
Low-beam headlamps
The low-beam headlamps can be switched on
and off with the exterior lamp switch.
XSwitch on the ignition.XSwitching on: Turn the exterior lamp
switch to position L.
The following lamps come on:
R Low-beam headlamps
R Parking lamps 5
R Green indicator lamp L in the
instrument cluster
Automatic headlamp mode
GWarning!
If the exterior lamp switch is set to c, the
headlamps will not automatically come on
under foggy conditions.
To minimize risk to you and to others, activate
headlamps by turning exterior lamp switch to
L when driving or when traffic and/or
ambient lighting conditions require you to do
so.
In low ambient lighting conditions, only switch
from position c to L with the vehicle
at a standstill in a safe location. Switching
from c to L will briefly switch off the
headlamps. Doing so while driving in low
ambient lighting conditions may result in an
accident.
The automatic headlamp feature is only an aid
to the driver. The driver is responsible for the
operation of the vehicle’s lights at all times.XSwitching on: Turn the exterior lamp
switch to position c.
When ambient light is low: When the
SmartKey is in starter switch position 1 or
when the KEYLESS-GO start/stop button has
been pressed once, the parking lamps 5
come
on automatically.
When the engine is running, the low-beam
headlamps come on additionally.
When ambient light is bright: When the
SmartKey is in starter switch position 1 or
when the KEYLESS-GO start/stop button has
been pressed once, all lamps are off.
When the engine is running, the daytime
running lamps 6
come on automatically.
When the low-beam headlamps are switched
on, the green indicator lamp L in the
instrument cluster comes on.
Once the low-beam headlamps are on, the
high-beam headlamps are also available.
Daytime running lamp mode
In Canada, the daytime running lamp mode is
mandatory and therefore in a constant mode.
In the USA, the daytime running lamp mode
is deactivated by default.
5 When the parking lamps are on, the tail lamps, the license plate lamps, the side marker lamps, and the
instrument cluster illumination are also on.
6 USA only: The daytime running lamp mode must be activated via the control system.98LightingControls in detail
212_AKB; 2; 41, en-USd2ureepe,Version: 2.11.8.12009-07-17T09:14:21+02:00 - Seite 98
Page 102 of 372

XSwitching on rear fog lamp: Press switch
N (Y page 97).
The rear fog lamp, the front fog lamps, the
green N and the yellow indicator lamp
R in the instrument cluster come on.
XSwitching off rear fog lamp: Press switch
N (Y page 97).
The rear fog lamp, the front fog lamps, the
green N and the yellow indicator lamp
R in the instrument cluster goes out.
Vehicles without front fog lamps
XSwitching on rear fog lamp: Press switch
R (Y page 97).
The rear fog lamp and the yellow indicator
lamp R in the instrument cluster come
on.
XSwitching off rear fog lamp: Press switch
R (Y page 97).
The rear fog lamp and the yellow indicator
lamp R in the instrument cluster goes
out.
Locator lighting
The locator lighting is described in the
“Control system” section, see “Switching
locator lighting on or off” (Y page 142).
Combination switch
Turn signals XPress the combination switch in direction
of arrow ; or ?.
The corresponding turn signal indicator
lamp ! or # in the instrument
cluster flashes.
The combination switch resets automatically
after major steering wheel movements.
To signal minor directional changes:
XPress the combination switch only to the
point of resistance in direction of
arrow ; or ? and release.
The corresponding turn signal lamps will
flash three times.
High beam
XTurn the exterior lamp switch to position
L (Y page 97).
XSwitching on: Push the combination
switch in direction of arrow :.
The high-beam headlamp indicator lamp
K in the instrument cluster comes on.
XSwitching off: Pull the combination switch
in direction of arrow = to its original
position.
iAlso note the information on high-beam
headlamps with activated automatic
headlamp mode (Y page 98) or the daytime
running lamp mode (Y page 98).
Adaptive Highbeam Assist
The Adaptive Highbeam Assist is only
available in vehicles with Bi-Xenon
headlamps.
Depending on the driving and traffic situation,
low-beam leveling and the high-beam
headlamps are controlled via an optical
sensor. The sensor is located on the front of
the overhead control panel. Glare for other
road users is reduced and the illumination of
road ahead is improved. The transitions
between low-beam and high-beam
headlamps take place without a sudden
change of light.
100LightingControls in detail
212_AKB; 2; 41, en-USd2ureepe,Version: 2.11.8.12009-07-17T09:14:21+02:00 - Seite 100
Page 104 of 372

XSwitching on: Press hazard warning
flasher switch :.
All turn signal lamps are flashing.
iWith the hazard warning flasher activated
and the combination switch set for either
left or right turn, only the respective left or
right turn signals will operate when the
ignition is switched on.
XSwitching off: Press hazard warning
flasher switch : again.
iIf the hazard warning flasher has been
activated automatically, press hazard
warning flasher switch : to switch it off.
Headlamp cleaning system
The headlamps will be cleaned with a high-
pressure water jet automatically when the
engine is running and you have
Rswitched on the headlamps
and
Rthe windshield wipers have wiped the
windshield with washer fluid for the first
time
The headlamps are cleaned every tenth time
the windshield is washed with washer fluid.
The counter resets when you switch off the
ignition.
For information on filling up the washer
reservoir, see “Washer system and headlamp
cleaning system” (Y page 227).
Corner-illuminating lamps
The corner-illuminating lamps improve
illumination of the area in the direction into
which you are turning.
The corner-illuminating lamps will only
operate in low ambient lighting conditions.
If you are driving faster than 25 mph
(40 km/h) the corner-illuminating function is
not available.
Switching on
XMake sure the engine is running.XTurn the exterior lamp switch to position
L or c (Y page 97).
or
XActivate the daytime running lamp mode
(Y page 98).
XSwitch on the left or right turn signal,
depending on whether you are turning left
or right.
The respective corner-illuminating lamp
comes on. If you have switched on the turn
signal for one side but turn the steering
wheel in the other direction, the corner-
illuminating lamp comes on on the side of
the turn signal.
or
XTurn steering wheel in desired direction.
Driving forward: The corner-illuminating
lamp on the side of your steering direction
comes on.
Driving in reverse: The corner-illuminating
lamp opposite to your steering direction
comes on.
The corner-illuminating lamps will come on
automatically depending on the steering
angle, even if you did not switch on either turn
signal. If the corner-illuminating lamps came
on automatically, they will also go out
automatically depending on the steering
angle and vehicle speed.
The corner-illuminating lamps temporarily
come on on both sides of the vehicle if you
turn the steering wheel in one direction and
102LightingControls in detail
212_AKB; 2; 41, en-USd2ureepe,Version: 2.11.8.12009-07-17T09:14:21+02:00 - Seite 102
Page 105 of 372
then again in the other direction shortly
thereafter.
The corner-illuminating lamp remains lit for a
short time only. It then goes out
automatically.
Switching off
XSwitch off the left or right turn signal.
or
XSteer straight ahead.
The corner-illuminating lamp goes out.
iThere may be a brief delay before the
corner-illuminating lamps go out.
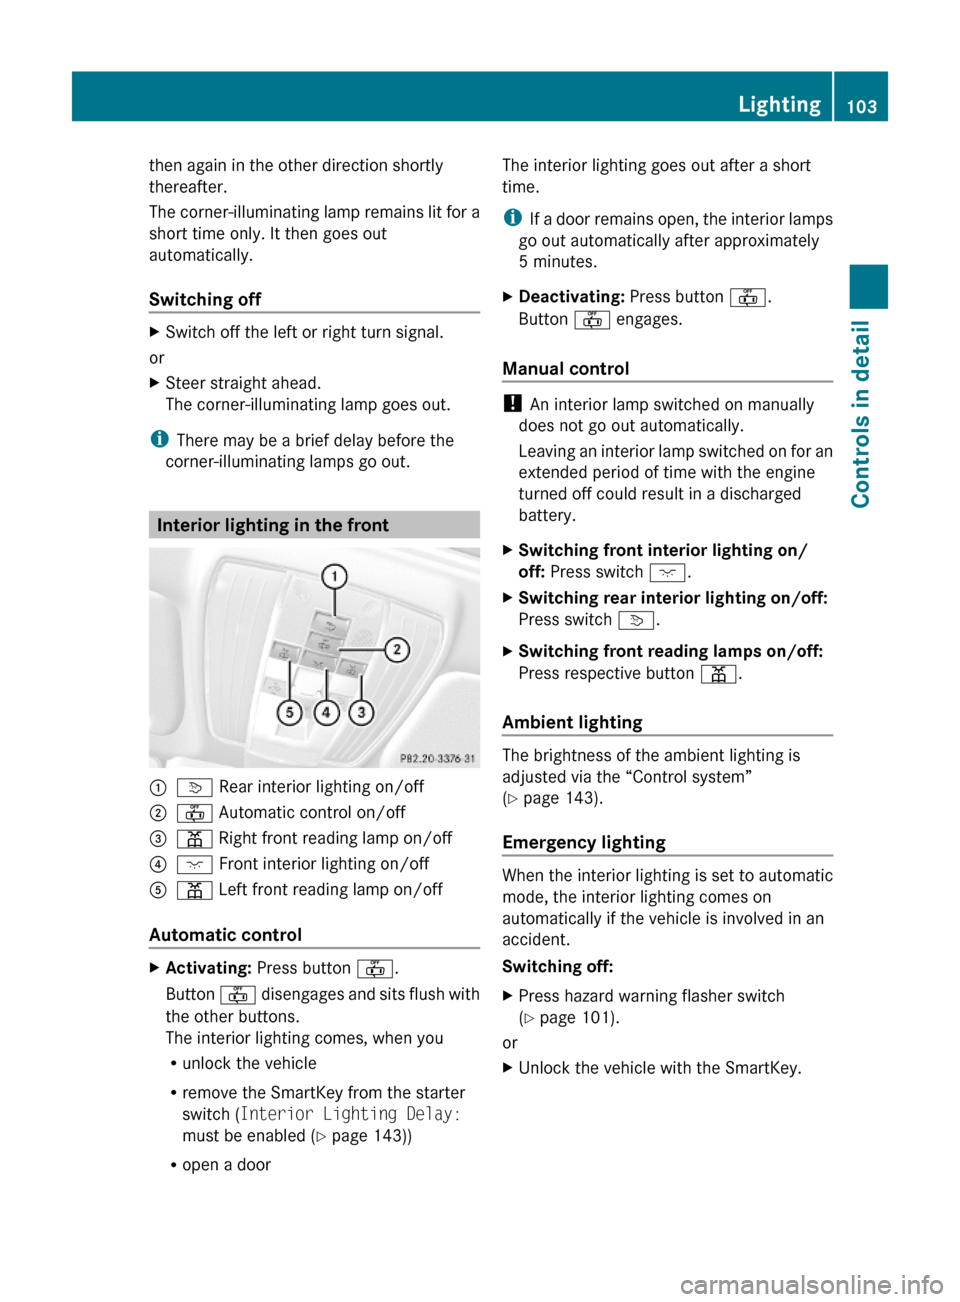
Interior lighting in the front
:v Rear interior lighting on/off;~ Automatic control on/off=p Right front reading lamp on/off ?c Front interior lighting on/off Ap Left front reading lamp on/off
Automatic control
XActivating: Press button ~.
Button ~ disengages and sits flush with
the other buttons.
The interior lighting comes, when you
Runlock the vehicle
Rremove the SmartKey from the starter
switch (Interior Lighting Delay:
must be enabled (Y page 143))
Ropen a door
The interior lighting goes out after a short
time.
iIf a door remains open, the interior lamps
go out automatically after approximately
5 minutes.
XDeactivating: Press button ~.
Button ~ engages.
Manual control
! An interior lamp switched on manually
does not go out automatically.
Leaving an interior lamp switched on for an
extended period of time with the engine
turned off could result in a discharged
battery.
XSwitching front interior lighting on/
off: Press switch c.
XSwitching rear interior lighting on/off:
Press switch v.
XSwitching front reading lamps on/off:
Press respective button p.
Ambient lighting
The brightness of the ambient lighting is
adjusted via the “Control system”
(Y page 143).
Emergency lighting
When the interior lighting is set to automatic
mode, the interior lighting comes on
automatically if the vehicle is involved in an
accident.
Switching off:
XPress hazard warning flasher switch
(Y page 101).
or
XUnlock the vehicle with the SmartKey.Lighting103Controls in detail212_AKB; 2; 41, en-USd2ureepe,Version: 2.11.8.12009-07-17T09:14:21+02:00 - Seite 103Z
Page 113 of 372

The engine does not start. You can hear
the starter.
There could be a malfunction in the engine
electronics or in the fuel supply system.
Carry out the following steps:XIf you are starting the engine with the
SmartKey: Turn the SmartKey in the starter
switch to position 0 and repeat the starting
procedure.XIf you are starting the engine with KEYLESS-
GO: Close any doors that may be open to
allow for better detection of the SmartKey.
or
XRemove the KEYLESS-GO start/stop
button from the starter switch.XStart the engine with the SmartKey as radio
signals from another source may be
interfering with the KEYLESS-GO function.XRepeat the starting procedure.
If the engine does not start after several
starting attempts:
XContact an authorized Mercedes-Benz
Center or call Roadside Assistance.
The engine does not start. You cannot
hear the starter.
The battery may not be charged sufficiently.
XGet a jump start ( Y page 338).
If the engine will not start despite a jump
start:
XContact an authorized Mercedes-Benz
Center or call Roadside Assistance.
The starter has been exposed to excessive
temperatures.
XLet the starter cool for about 2 minutes.XRepeat the starting procedure.
If the engine does not start after several
starting attempts:
XContact an authorized Mercedes-Benz
Center or call Roadside Assistance.Driving offGWarning!
On slippery road surfaces, never downshift in
order to obtain braking action. This could
result in drive wheel slip and reduced vehicle
control. Your vehicle’s ABS will not prevent
this type of loss of control.
! Do not run a cold engine at high engine
speeds. Running a cold engine at high
engine speeds may shorten the service life
of the engine. This is not covered by the
Mercedes-Benz Limited Warranty.
E 63 AMG: At engine temperatures below
68‡ (20†), the engine’s maximum speed
is restricted in order to protect it from
damage. Avoid driving your vehicle at full
speed when the engine is cold to prevent
premature engine wear and/or diminished
comfort.
! If an acoustic warning sounds and the
message Release Parking Brake
appears in the multifunction display when
driving off, you have forgotten to release
the parking brake.
Release the parking brake.
! Avoid spinning of a drive wheel. This may
cause serious damage to the drivetrain
which is not covered by the Mercedes-Benz
Limited Warranty.
! Simultaneously depressing the
accelerator pedal and applying the brakes
reduces engine performance and causes
premature brake and drivetrain wear which
is not covered by the Mercedes-Benz
Limited Warranty.
i Once the vehicle is in motion, the
automatic central locking function engages
and the locking knobs in the doors move
down.
Driving and parking111Controls in detail212_AKB; 2; 41, en-USd2ureepe,Version: 2.11.8.12009-07-17T09:14:21+02:00 - Seite 111Z