2010 MERCEDES-BENZ E350 change wheel
[x] Cancel search: change wheelPage 128 of 372
! Excessive coolant temperature triggers a
warning in the multifunction display.
The engine should not be operated with a
coolant temperature above 248‡ (120†),
i.e. in the red zone of the coolant
temperature gauge. Doing so may cause
serious engine damage which is not
covered by the Mercedes-Benz Limited
Warranty.
Tachometer
The red marking on the tachometer
( Y page 28) denotes excessive engine speed.
! Avoid driving at excessive engine speeds,
as it may result in serious engine damage
that is not covered by the Mercedes-Benz
Limited Warranty.
To help protect the engine, the fuel supply is
interrupted if the engine is operated within
the red marking.
Outside temperature indicator
The outside temperature indicator is
displayed in the multifunction display
( Y page 128).
GWarning!
The outside temperature indicator is not
designed to serve as an ice-warning device
and is therefore unsuitable for that purpose.
Indicated temperatures just above the
freezing point do not guarantee that the road
surface is free of ice. The road may still be icy,
especially in wooded areas or on bridges.
Fuel gauge
The fuel gauge is on the left-hand side of the
instrument cluster (Y page 28). Once the fuel
level has fallen below the reserve mark, the
yellow fuel tank reserve warning lamp 8
for the fuel reserve comes on.
Control system
Introduction
The control system is activated as soon as the
starter switch is in position 2.
The control system enables you to call up
information about your vehicle and to change
vehicle settings.
For example, you can use the control system
to find out when your vehicle is next due for
maintenance service, to call up statistical
data on your vehicle, and much more.
GWarning!
A driver’s attention to the road and traffic
conditions must always be his/her primary
focus when driving.
For your safety and the safety of others,
selecting features through the multifunction
steering wheel should only be done by the
driver when traffic and road conditions permit
it to be done safely.
Bear in mind that at a speed of just 30 mph
(approximately 50 km/h), your vehicle is
covering a distance of 44 feet (approximately
14 m) every second.
The control system relays information to the
multifunction display.
Multifunction steering wheel
The displays in the multifunction display and
the settings in the control system are
controlled by using the buttons on the
multifunction steering wheel.
126Control systemControls in detail
212_AKB; 2; 41, en-USd2ureepe,Version: 2.11.8.12009-07-17T09:14:21+02:00 - Seite 126
Page 147 of 372
Removal, tampering, or altering of the
device will void any warranties, and is not
permitted. Do not tamper with, alter, or use
in any non-approved way.
Any unauthorized modification to this
device could void the user’s authority to
operate the equipment.
XPress button = or ; to select the
Sett. menu.
XPress button : or 9 to select the
Vehicle submenu.
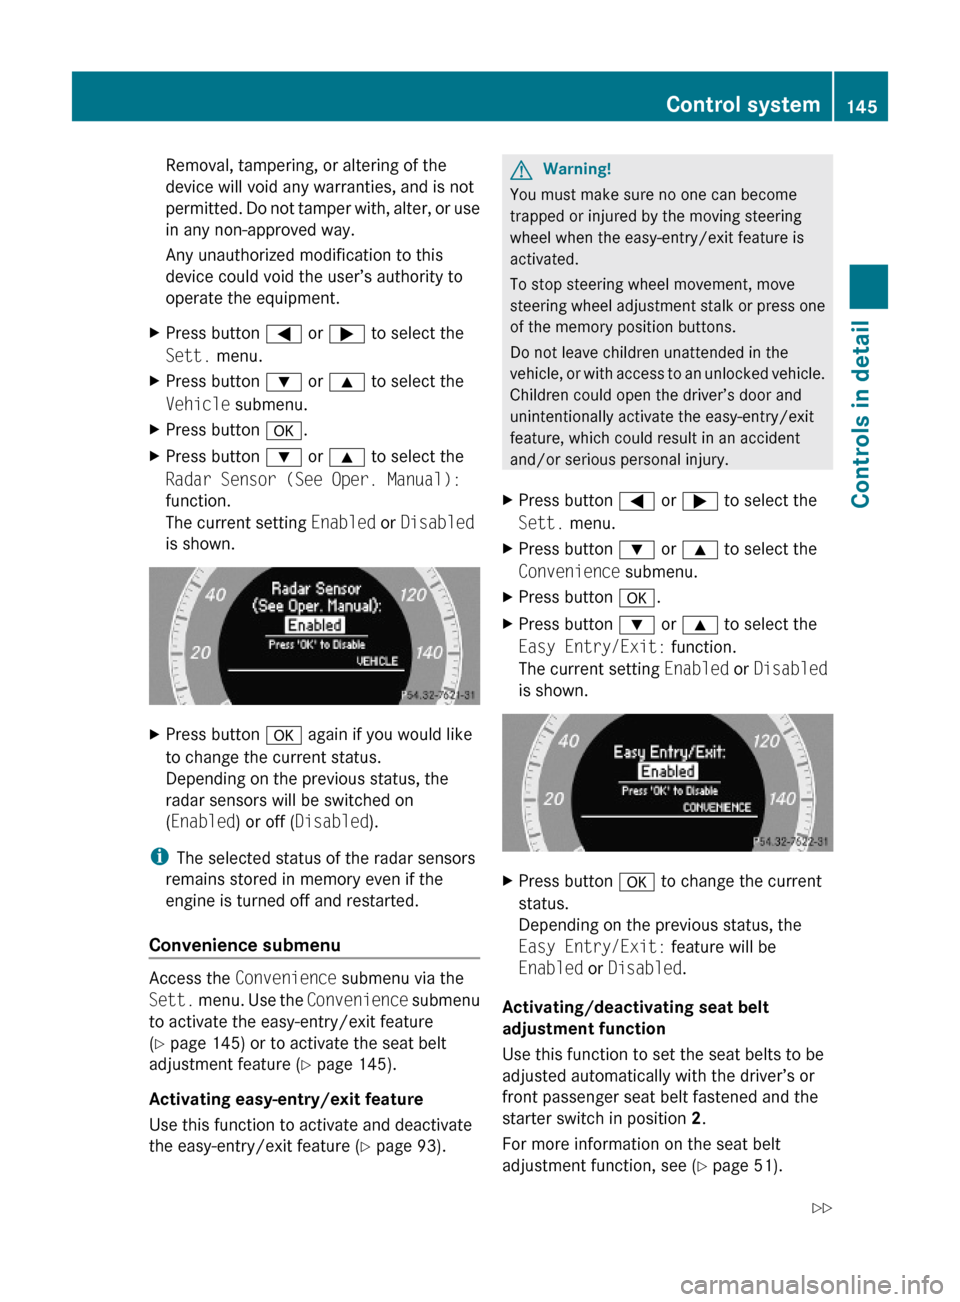
XPress button a.XPress button : or 9 to select the
Radar Sensor (See Oper. Manual):
function.
The current setting Enabled or Disabled
is shown.
XPress button a again if you would like
to change the current status.
Depending on the previous status, the
radar sensors will be switched on
(Enabled) or off (Disabled).
iThe selected status of the radar sensors
remains stored in memory even if the
engine is turned off and restarted.
Convenience submenu
Access the Convenience submenu via the
Sett. menu. Use the Convenience submenu
to activate the easy-entry/exit feature
(Y page 145) or to activate the seat belt
adjustment feature (Y page 145).
Activating easy-entry/exit feature
Use this function to activate and deactivate
the easy-entry/exit feature (Y page 93).
GWarning!
You must make sure no one can become
trapped or injured by the moving steering
wheel when the easy-entry/exit feature is
activated.
To stop steering wheel movement, move
steering wheel adjustment stalk or press one
of the memory position buttons.
Do not leave children unattended in the
vehicle, or with access to an unlocked vehicle.
Children could open the driver’s door and
unintentionally activate the easy-entry/exit
feature, which could result in an accident
and/or serious personal injury.
XPress button = or ; to select the
Sett. menu.
XPress button : or 9 to select the
Convenience submenu.
XPress button a.XPress button : or 9 to select the
Easy Entry/Exit: function.
The current setting Enabled or Disabled
is shown.
XPress button a to change the current
status.
Depending on the previous status, the
Easy Entry/Exit: feature will be
Enabled or Disabled.
Activating/deactivating seat belt
adjustment function
Use this function to set the seat belts to be
adjusted automatically with the driver’s or
front passenger seat belt fastened and the
starter switch in position 2.
For more information on the seat belt
adjustment function, see (Y page 51).
Control system145Controls in detail212_AKB; 2; 41, en-USd2ureepe,Version: 2.11.8.12009-07-17T09:14:21+02:00 - Seite 145Z
Page 148 of 372
XPress button = or ; to select the
Sett. menu.
XPress button : or 9 to select the
Convenience submenu.
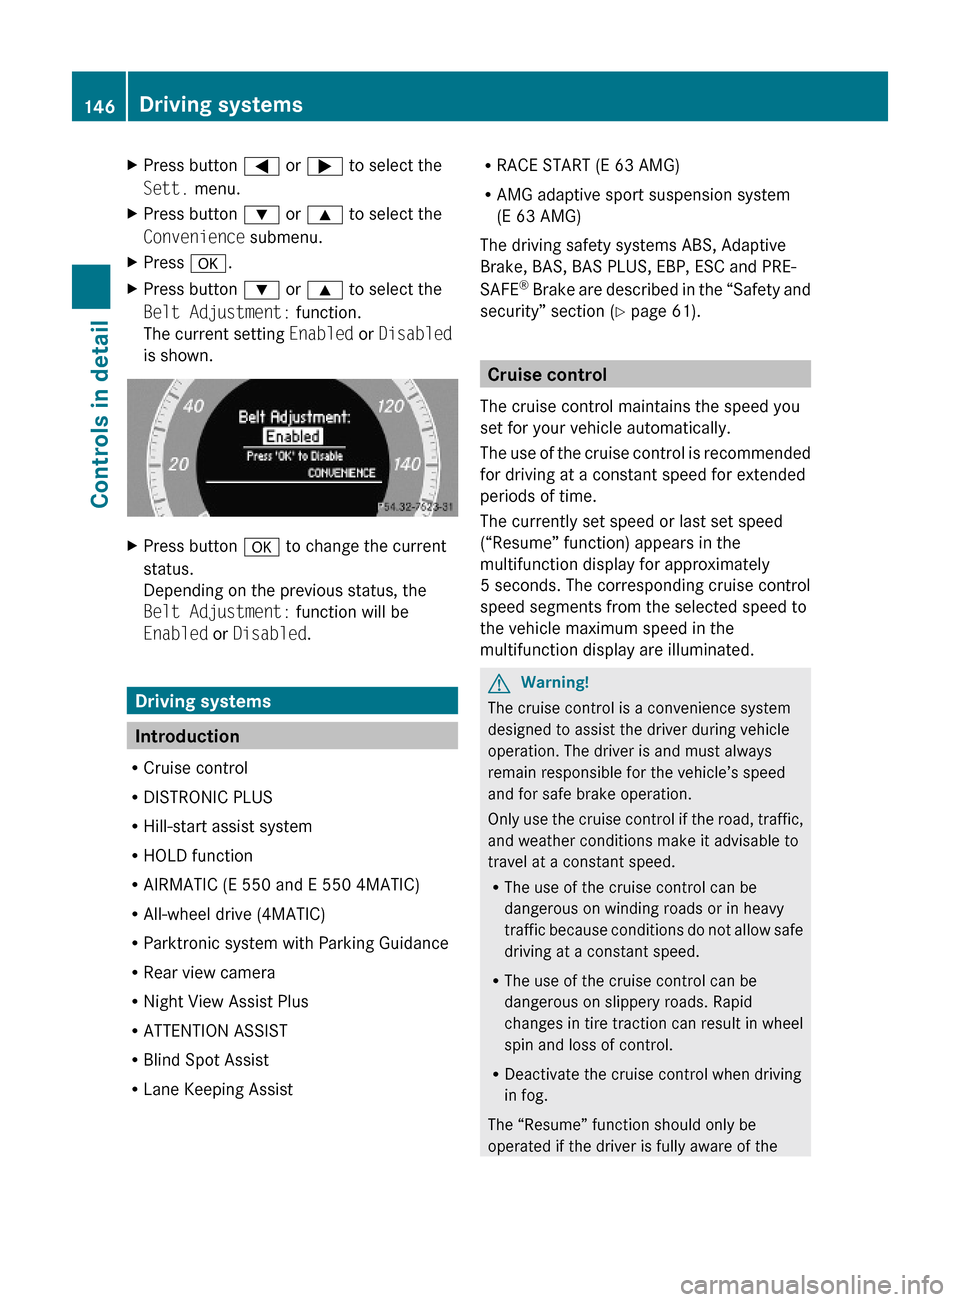
XPress a.XPress button : or 9 to select the
Belt Adjustment: function.
The current setting Enabled or Disabled
is shown.
XPress button a to change the current
status.
Depending on the previous status, the
Belt Adjustment: function will be
Enabled or Disabled.
Driving systems
Introduction
RCruise control
RDISTRONIC PLUS
RHill-start assist system
RHOLD function
RAIRMATIC (E 550 and E 550 4MATIC)
RAll-wheel drive (4MATIC)
RParktronic system with Parking Guidance
RRear view camera
RNight View Assist Plus
RATTENTION ASSIST
RBlind Spot Assist
RLane Keeping Assist
RRACE START (E 63 AMG)
RAMG adaptive sport suspension system
(E 63 AMG)
The driving safety systems ABS, Adaptive
Brake, BAS, BAS PLUS, EBP, ESC and PRE-
SAFE® Brake are described in the “Safety and
security” section (Y page 61).
Cruise control
The cruise control maintains the speed you
set for your vehicle automatically.
The use of the cruise control is recommended
for driving at a constant speed for extended
periods of time.
The currently set speed or last set speed
(“Resume” function) appears in the
multifunction display for approximately
5 seconds. The corresponding cruise control
speed segments from the selected speed to
the vehicle maximum speed in the
multifunction display are illuminated.
GWarning!
The cruise control is a convenience system
designed to assist the driver during vehicle
operation. The driver is and must always
remain responsible for the vehicle’s speed
and for safe brake operation.
Only use the cruise control if the road, traffic,
and weather conditions make it advisable to
travel at a constant speed.
RThe use of the cruise control can be
dangerous on winding roads or in heavy
traffic because conditions do not allow safe
driving at a constant speed.
RThe use of the cruise control can be
dangerous on slippery roads. Rapid
changes in tire traction can result in wheel
spin and loss of control.
RDeactivate the cruise control when driving
in fog.
The “Resume” function should only be
operated if the driver is fully aware of the
146Driving systemsControls in detail
212_AKB; 2; 41, en-USd2ureepe,Version: 2.11.8.12009-07-17T09:14:21+02:00 - Seite 146
Page 151 of 372

XBriefly pull the cruise control lever in
direction of arrow ?.
If no speed is stored, the current speed is
set and stored.XRemove your foot from the accelerator
pedal.
The last stored speed is deleted from memory
when the engine is turned off.
DISTRONIC PLUS
Safety notes
When activated, the DISTRONIC PLUS
adaptive cruise control system increases the
driving convenience afforded by the cruise
control while traveling on expressways and
other major roadways.
R If the DISTRONIC PLUS distance sensor
detects a slower moving vehicle directly
ahead, your vehicle speed will be reduced
so that you follow that vehicle at your
preset following distance.
R If there is no vehicle directly ahead of you,
the DISTRONIC PLUS will function in the
same way as standard cruise control
( Y page 146).
GWarning!
The DISTRONIC PLUS requires familiarity with
its operational characteristics. We strongly
recommend that you review the following
information carefully before operating the
system.
GWarning!
The DISTRONIC PLUS is a convenience
system. Its speed adjustment reduction
capability is intended to make cruise control
more effective and usable when traffic speeds
vary. It is not however, intended to, nor does
it, replace the need for extreme care.
The responsibility for the vehicle’s speed,
distance to the preceding vehicle and, most
importantly, brake operation to ensure a safe
stopping distance, always remains with the
driver.
The DISTRONIC PLUS cannot take street and
traffic conditions into account.
Complex driving situations are not always
fully recognized by the DISTRONIC PLUS. This
could result in wrong or missing distance
warnings.GWarning!
The DISTRONIC PLUS adaptive cruise control
is not a substitute for active driving
involvement. It does not react to pedestrians
or on stationary objects, nor does it recognize
or predict the curvature and lane layout or the
movement of preceding vehicles. The
DISTRONIC PLUS can only apply a maximum
of 40% of the vehicle’s braking power.
The DISTRONIC PLUS may not detect narrow
vehicles possibly driving in front of you, such
as motorcycles and vehicles driving in an
offset formation.
It is the driver’s responsibility at all times to
be attentive to the road, weather and traffic
conditions. Additionally, the driver must
provide the steering, braking and other driving
inputs necessary to remain in control of the
vehicle.
High-frequency sources such as toll stations,
speed measuring systems etc. can cause the
DISTRONIC PLUS system to temporarily
cease functioning.
GWarning!
The DISTRONIC PLUS cannot take road and
traffic conditions into account. Only use the
DISTRONIC PLUS if the road, weather and
traffic conditions make it advisable to travel
at a constant speed.
GWarning!
Use of the DISTRONIC PLUS can be
dangerous on slippery roads. Rapid changes
in tire traction can result in wheel spin and
loss of control.
Driving systems149Controls in detail212_AKB; 2; 41, en-USd2ureepe,Version: 2.11.8.12009-07-17T09:14:21+02:00 - Seite 149Z
Page 161 of 372
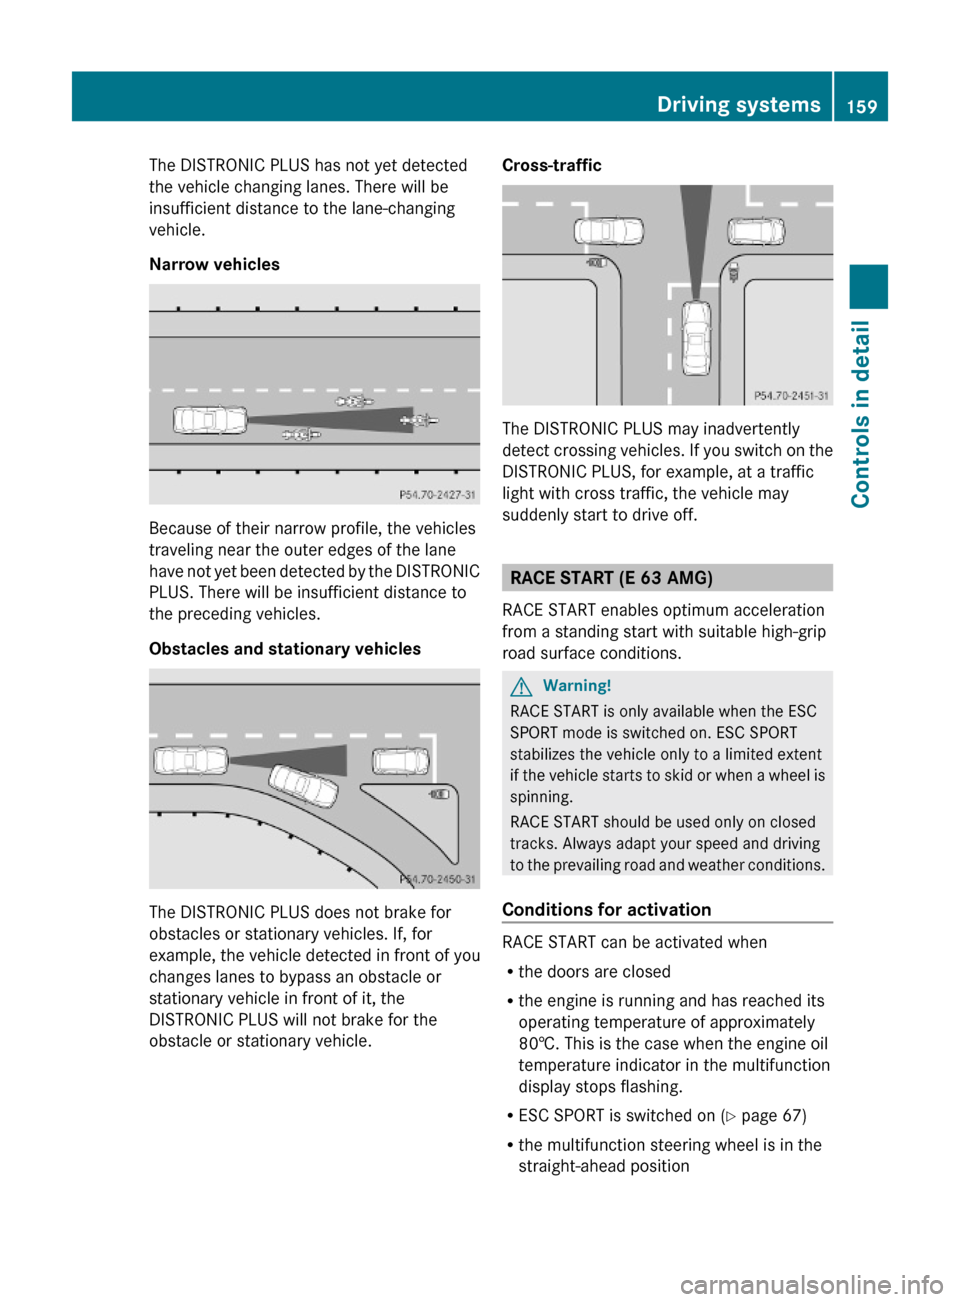
The DISTRONIC PLUS has not yet detected
the vehicle changing lanes. There will be
insufficient distance to the lane-changing
vehicle.
Narrow vehicles
Because of their narrow profile, the vehicles
traveling near the outer edges of the lane
have not yet been detected by the DISTRONIC
PLUS. There will be insufficient distance to
the preceding vehicles.
Obstacles and stationary vehicles
The DISTRONIC PLUS does not brake for
obstacles or stationary vehicles. If, for
example, the vehicle detected in front of you
changes lanes to bypass an obstacle or
stationary vehicle in front of it, the
DISTRONIC PLUS will not brake for the
obstacle or stationary vehicle.
Cross-traffic
The DISTRONIC PLUS may inadvertently
detect crossing vehicles. If you switch on the
DISTRONIC PLUS, for example, at a traffic
light with cross traffic, the vehicle may
suddenly start to drive off.
RACE START (E 63 AMG)
RACE START enables optimum acceleration
from a standing start with suitable high-grip
road surface conditions.
GWarning!
RACE START is only available when the ESC
SPORT mode is switched on. ESC SPORT
stabilizes the vehicle only to a limited extent
if the vehicle starts to skid or when a wheel is
spinning.
RACE START should be used only on closed
tracks. Always adapt your speed and driving
to the prevailing road and weather conditions.
Conditions for activation
RACE START can be activated when
Rthe doors are closed
Rthe engine is running and has reached its
operating temperature of approximately
80†. This is the case when the engine oil
temperature indicator in the multifunction
display stops flashing.
RESC SPORT is switched on (Y page 67)
Rthe multifunction steering wheel is in the
straight-ahead position
Driving systems159Controls in detail212_AKB; 2; 41, en-USd2ureepe,Version: 2.11.8.12009-07-17T09:14:21+02:00 - Seite 159Z
Page 166 of 372

iThese height adjustments are so small
that you may not notice any change.
Adjusting vehicle level manually
GWarning!
To help avoid personal injury, keep hands and
feet away from wheel housing area, and stay
away from under the vehicle when lowering
the vehicle chassis.
Select the normal level for driving on normal
roads. Select the raised level for driving on
rough roads or with snow chains. Select the
raised level only when required by current
driving conditions. Otherwise, the handling
may be impaired and the fuel consumption
may increase.
The selected vehicle level setting remains
stored in memory even if the SmartKey is
removed from the starter switch.
Selecting raised level
XStart the engine.
When indicator lamp ; is off:
XBriefly press vehicle level control
switch :.
Indicator lamp ; comes on. The vehicle
adjusts from normal level to raised level.
The message: Vehicle Rising appears in
the multifunction display when adjusting
from normal level to raised level. The
message disappears when the vehicle is
raised. Indicator lamp ; is then lit.
When the vehicle is in raised level, pressing
vehicle level control switch : will return
the vehicle to normal level.
The vehicle is lowered to the normal level
automatically when
Rthe vehicle speed is above 75 mph
(120 km/h)
Rthe vehicle speed stays between 50 mph
(80 km/h) and 75 mph (120 km/h) for
approximately 3 minutes.
Indicator lamp ; in
vehicle level control switch : goes out.
If you do not drive in this speed range, the
selected vehicle level setting remains stored
in memory even if the SmartKey is removed
from the starter switch.
Selecting normal level
XStart the engine.
When indicator lamp ; is on:
XBriefly press vehicle level control
switch :.
Indicator lamp ; goes out. The vehicle
adjusts from raised level to normal level.
AMG adaptive sport suspension
system (E 63 AMG)
Rear-axle level control
The rear-axle level control adjusts the vehicle
level for the rear axle. The rear-axle level
control is beneficial because it keeps the
vehicle level at the rear axle constant,
independent of the load. Your vehicle adjusts
its ride height automatically to increase
vehicle safety and to reduce fuel
consumption.
Damping system
The damping system is controlled
electronically and operates continuously. It
adjusts the damping characteristics to the
current operating and driving conditions. The
164Driving systemsControls in detail
212_AKB; 2; 41, en-USd2ureepe,Version: 2.11.8.12009-07-17T09:14:21+02:00 - Seite 164
Page 171 of 372
GWarning!
The Parking Guidance is only an aid and may
display parking spaces that are not suitable
for parking such as
R no-parking zones
R parking space with unsuitable road/ground
surface
R driveways
R entrances/exits
The Parking Guidance scans for and measures
potential parking spaces when driving past.
Subsequent changes to the parking space are
not taken into account. This may be the case
if the position of the vehicle parked in front or
behind the space changes or obstacles in the
parking space are moved.
The Parking Guidance does not relieve you of
the responsibility to pay attention. If you only
rely on the Parking Guidance, you may cause
an accident and injure yourself and others.
You are always responsible for safety and
must continue to pay attention to your
immediate surroundings when parking and
maneuvering.
GWarning!
The system cannot detect objects located
above the area that the sensors scan. These
objects, e.g. protruding load, overhang, or
truck tail lifts, will be ignored when computing
the parking procedure. The Parking Guidance
might therefore provide untimely steering
instructions. This could cause a collision.
Thus, do not use the Parking Guidance in such
situations.
GWarning!
Make sure no persons or animals are in the
area in which you are maneuvering. You could
otherwise injure them.
! Special attention must be paid to objects
with smooth surfaces or low silhouettes
(e.g. trailer couplings, painted posts,
elevated crossbars or road curbs). Such
objects may not be detected by the system
and can damage the vehicle.
Use the Parking Guidance for parking spaces
that are
R parallel to the direction of travel
R located on straight streets, i.e. not in
curves
R on the same level as the street, i.e. not on
sidewalks, for example.
Parking instructions:
R On narrow streets, drive by the parking
space as close as possible.
R Parking spaces that are dirty, overgrown or
located in front of trailers may not be
detected correctly.
R Snowfall or heavy rain may cause imprecise
measurement of the parking space.
R Also observe the Parktronic system
warning indicator ( Y page 167) while the
Parking Guidance is active.
R You may not use the Parking Guidance
when transporting cargo that protrudes the
vehicle.
R Do not use the Parking Guidance when
driving with snow chains or when a spare
wheel is mounted.
R How well your vehicle will be parked after
completion of the Parking Guidance
depends on the position and shape of the
vehicles parked in front of and behind the
parking space as well as the conditions of
the immediate surroundings. In certain
cases, the Parking Guidance may guide you
too far into the parking space or not far
enough. If this is the case, cancel the
parking procedure with the Parking
Guidance and correct the vehicle position
yourself.
Detecting a parking space
The Parking Guidance is active when driving
forward. The system operates at a vehicle
Driving systems169Controls in detail212_AKB; 2; 41, en-USd2ureepe,Version: 2.11.8.12009-07-17T09:14:21+02:00 - Seite 169Z
Page 172 of 372
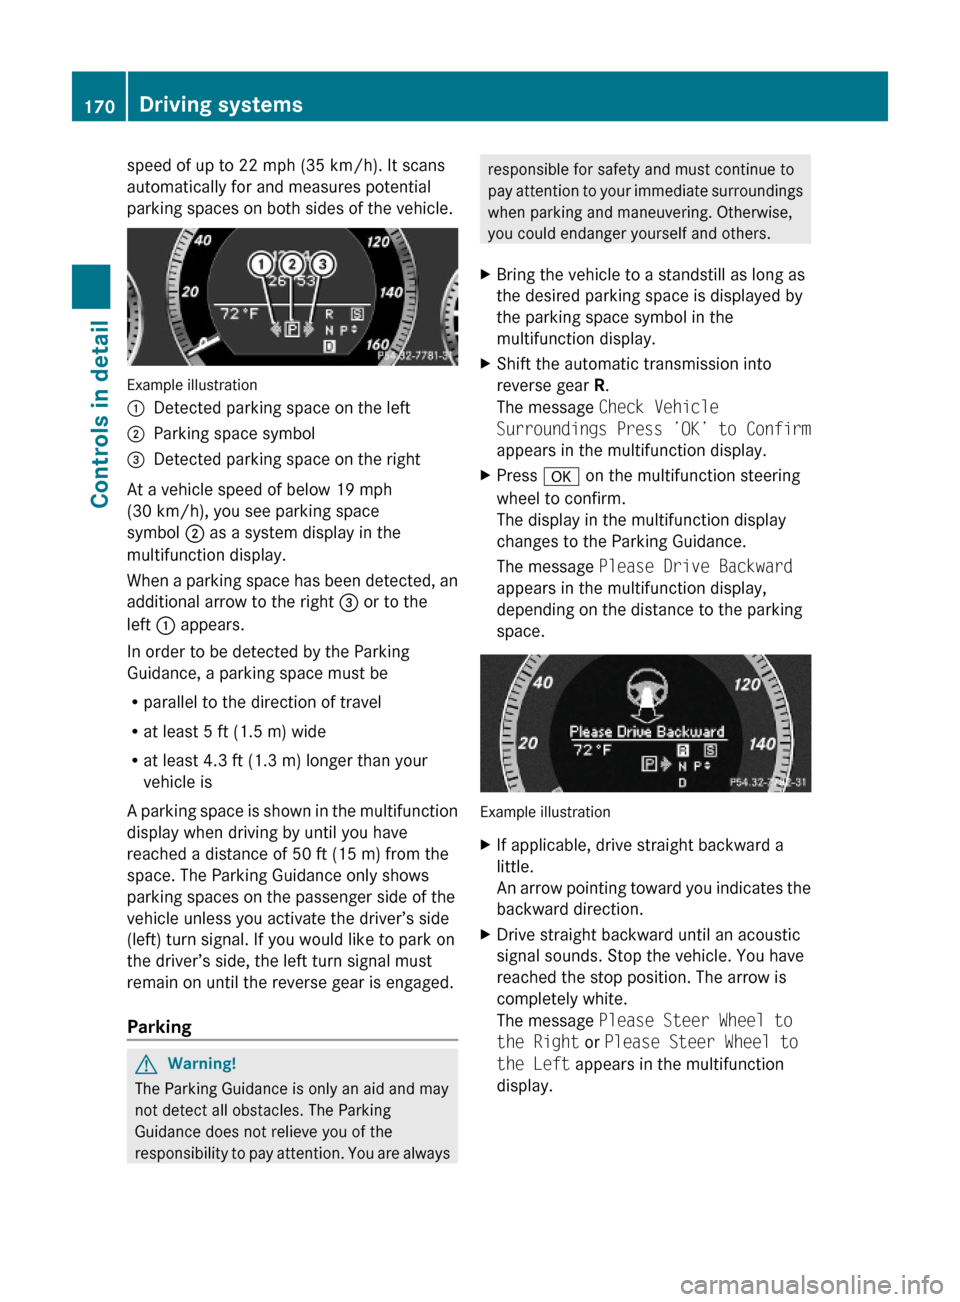
speed of up to 22 mph (35 km/h). It scans
automatically for and measures potential
parking spaces on both sides of the vehicle.
Example illustration
:Detected parking space on the left;Parking space symbol=Detected parking space on the right
At a vehicle speed of below 19 mph
(30 km/h), you see parking space
symbol ; as a system display in the
multifunction display.
When a parking space has been detected, an
additional arrow to the right = or to the
left : appears.
In order to be detected by the Parking
Guidance, a parking space must be
Rparallel to the direction of travel
Rat least 5 ft (1.5 m) wide
Rat least 4.3 ft (1.3 m) longer than your
vehicle is
A parking space is shown in the multifunction
display when driving by until you have
reached a distance of 50 ft (15 m) from the
space. The Parking Guidance only shows
parking spaces on the passenger side of the
vehicle unless you activate the driver’s side
(left) turn signal. If you would like to park on
the driver’s side, the left turn signal must
remain on until the reverse gear is engaged.
Parking
GWarning!
The Parking Guidance is only an aid and may
not detect all obstacles. The Parking
Guidance does not relieve you of the
responsibility to pay attention. You are always
responsible for safety and must continue to
pay attention to your immediate surroundings
when parking and maneuvering. Otherwise,
you could endanger yourself and others.
XBring the vehicle to a standstill as long as
the desired parking space is displayed by
the parking space symbol in the
multifunction display.
XShift the automatic transmission into
reverse gear R.
The message Check Vehicle
Surroundings Press ’OK’ to Confirm
appears in the multifunction display.
XPress a on the multifunction steering
wheel to confirm.
The display in the multifunction display
changes to the Parking Guidance.
The message Please Drive Backward
appears in the multifunction display,
depending on the distance to the parking
space.
Example illustration
XIf applicable, drive straight backward a
little.
An arrow pointing toward you indicates the
backward direction.
XDrive straight backward until an acoustic
signal sounds. Stop the vehicle. You have
reached the stop position. The arrow is
completely white.
The message Please Steer Wheel to
the Right or Please Steer Wheel to
the Left appears in the multifunction
display.
170Driving systemsControls in detail
212_AKB; 2; 41, en-USd2ureepe,Version: 2.11.8.12009-07-17T09:14:21+02:00 - Seite 170