2010 MERCEDES-BENZ E350 ad blue
[x] Cancel search: ad bluePage 269 of 372

Vehicle equipment ............................268
Where will I find ...? ..........................268
Vehicle status messages in the
multifunction display .......................272
What to do if … ..................................304
Unlocking/locking manually ...........314
Resetting activated NECK-PRO
active front head restraints .............316
Replacing SmartKey batteries .........317
Replacing bulbs .................................318
Replacing wiper blades ....................322
Flat tire ..............................................323
Bleeding the fuel system (diesel
engine only) .......................................333
AdBlue® (diesel engine only) ...........333
Battery ...............................................336
Jump starting ....................................338
Towing the vehicle ............................340
Fuses ..................................................343
267Practical hints212_AKB; 2; 41, en-USd2ureepe,Version: 2.11.8.12009-07-17T09:14:21+02:00 - Seite 267
Page 270 of 372
Vehicle equipment
iThis Operator’s Manual describes all
features, standard or optional, potentially
available for your vehicle at the time of
purchase. Please be aware that your
vehicle might not be equipped with all
features described in this manual.
Where will I find ...?
First aid kit
iCheck expiration dates and contents for
completeness at least once a year and
replace missing/expired items.
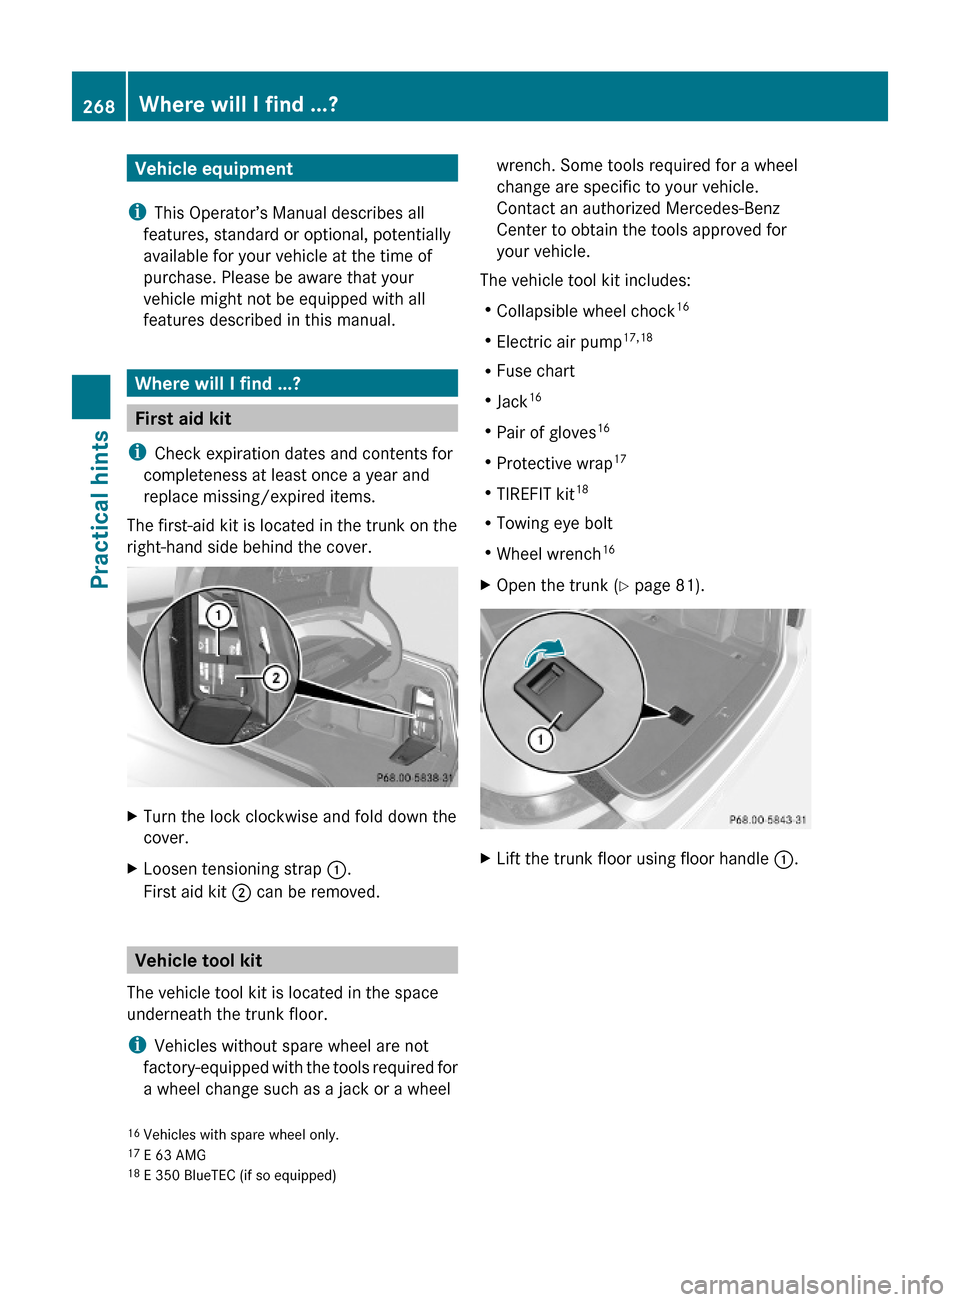
The first-aid kit is located in the trunk on the
right-hand side behind the cover.
XTurn the lock clockwise and fold down the
cover.
XLoosen tensioning strap :.
First aid kit ; can be removed.
Vehicle tool kit
The vehicle tool kit is located in the space
underneath the trunk floor.
iVehicles without spare wheel are not
factory-equipped with the tools required for
a wheel change such as a jack or a wheel
wrench. Some tools required for a wheel
change are specific to your vehicle.
Contact an authorized Mercedes-Benz
Center to obtain the tools approved for
your vehicle.
The vehicle tool kit includes:
RCollapsible wheel chock16
RElectric air pump17,18
RFuse chart
RJack16
RPair of gloves16
RProtective wrap17
RTIREFIT kit18
RTowing eye bolt
RWheel wrench16
XOpen the trunk (Y page 81).XLift the trunk floor using floor handle :.16Vehicles with spare wheel only.17E 63 AMG18E 350 BlueTEC (if so equipped)
268Where will I find ...?Practical hints
212_AKB; 2; 41, en-USd2ureepe,Version: 2.11.8.12009-07-17T09:14:21+02:00 - Seite 268
Page 271 of 372
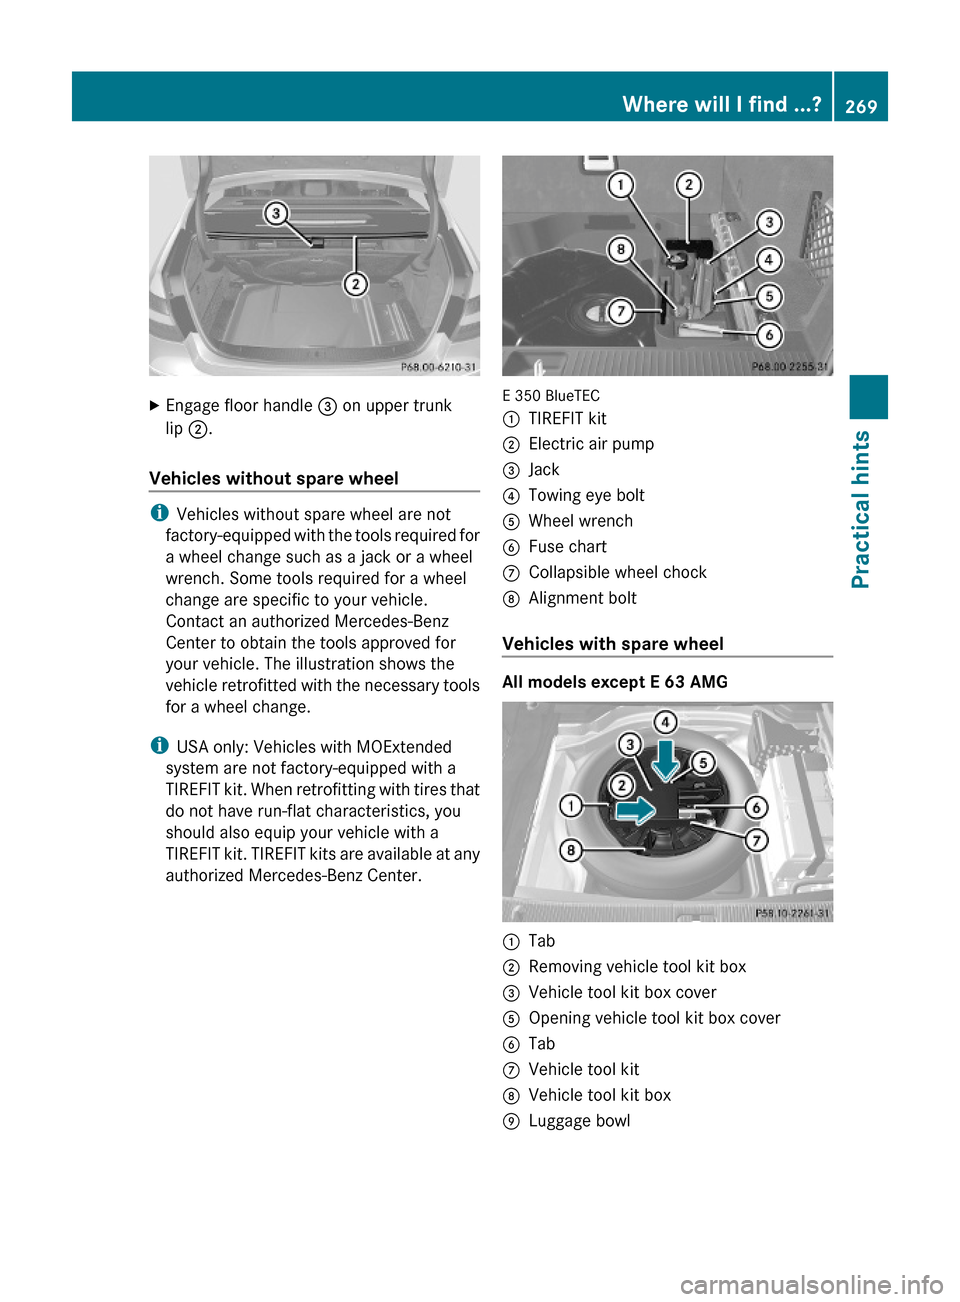
XEngage floor handle = on upper trunk
lip ;.
Vehicles without spare wheel
iVehicles without spare wheel are not
factory-equipped with the tools required for
a wheel change such as a jack or a wheel
wrench. Some tools required for a wheel
change are specific to your vehicle.
Contact an authorized Mercedes-Benz
Center to obtain the tools approved for
your vehicle. The illustration shows the
vehicle retrofitted with the necessary tools
for a wheel change.
iUSA only: Vehicles with MOExtended
system are not factory-equipped with a
TIREFIT kit. When retrofitting with tires that
do not have run-flat characteristics, you
should also equip your vehicle with a
TIREFIT kit. TIREFIT kits are available at any
authorized Mercedes-Benz Center.
E 350 BlueTEC
:TIREFIT kit;Electric air pump=Jack?Towing eye boltAWheel wrenchBFuse chartCCollapsible wheel chockDAlignment bolt
Vehicles with spare wheel
All models except E 63 AMG
:Tab;Removing vehicle tool kit box=Vehicle tool kit box coverAOpening vehicle tool kit box coverBTabCVehicle tool kitDVehicle tool kit boxELuggage bowlWhere will I find ...?269Practical hints212_AKB; 2; 41, en-USd2ureepe,Version: 2.11.8.12009-07-17T09:14:21+02:00 - Seite 269Z
Page 273 of 372
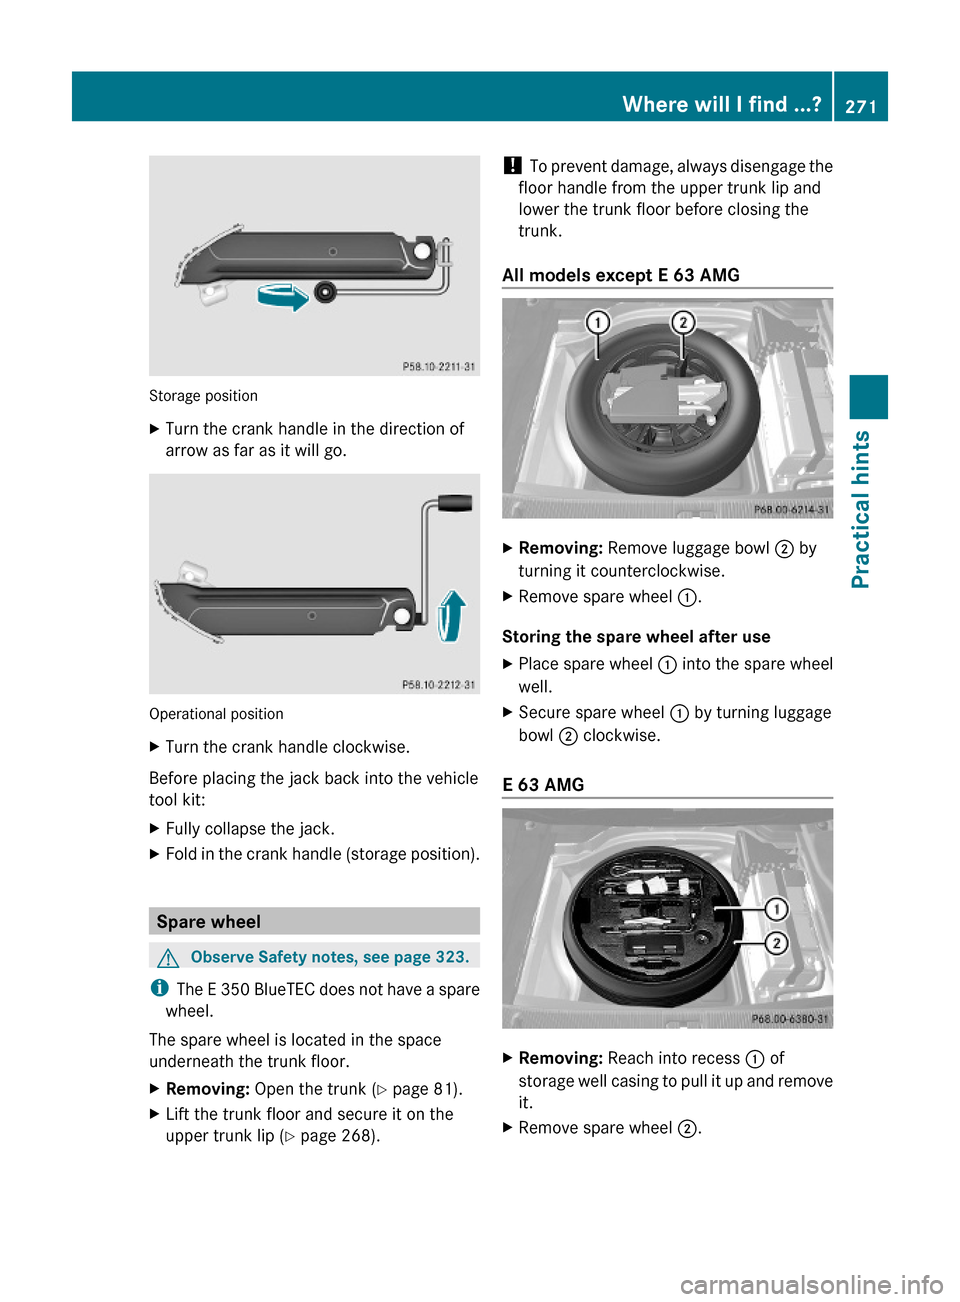
Storage position
XTurn the crank handle in the direction of
arrow as far as it will go.
Operational position
XTurn the crank handle clockwise.
Before placing the jack back into the vehicle
tool kit:
XFully collapse the jack.XFold in the crank handle (storage position).
Spare wheel
GObserve Safety notes, see page 323.
iThe E 350 BlueTEC does not have a spare
wheel.
The spare wheel is located in the space
underneath the trunk floor.
XRemoving: Open the trunk (Y page 81).XLift the trunk floor and secure it on the
upper trunk lip (Y page 268).
! To prevent damage, always disengage the
floor handle from the upper trunk lip and
lower the trunk floor before closing the
trunk.
All models except E 63 AMG
XRemoving: Remove luggage bowl ; by
turning it counterclockwise.
XRemove spare wheel :.
Storing the spare wheel after use
XPlace spare wheel : into the spare wheel
well.
XSecure spare wheel : by turning luggage
bowl ; clockwise.
E 63 AMG
XRemoving: Reach into recess : of
storage well casing to pull it up and remove
it.
XRemove spare wheel ;.Where will I find ...?271Practical hints212_AKB; 2; 41, en-USd2ureepe,Version: 2.11.8.12009-07-17T09:14:21+02:00 - Seite 271Z
Page 301 of 372
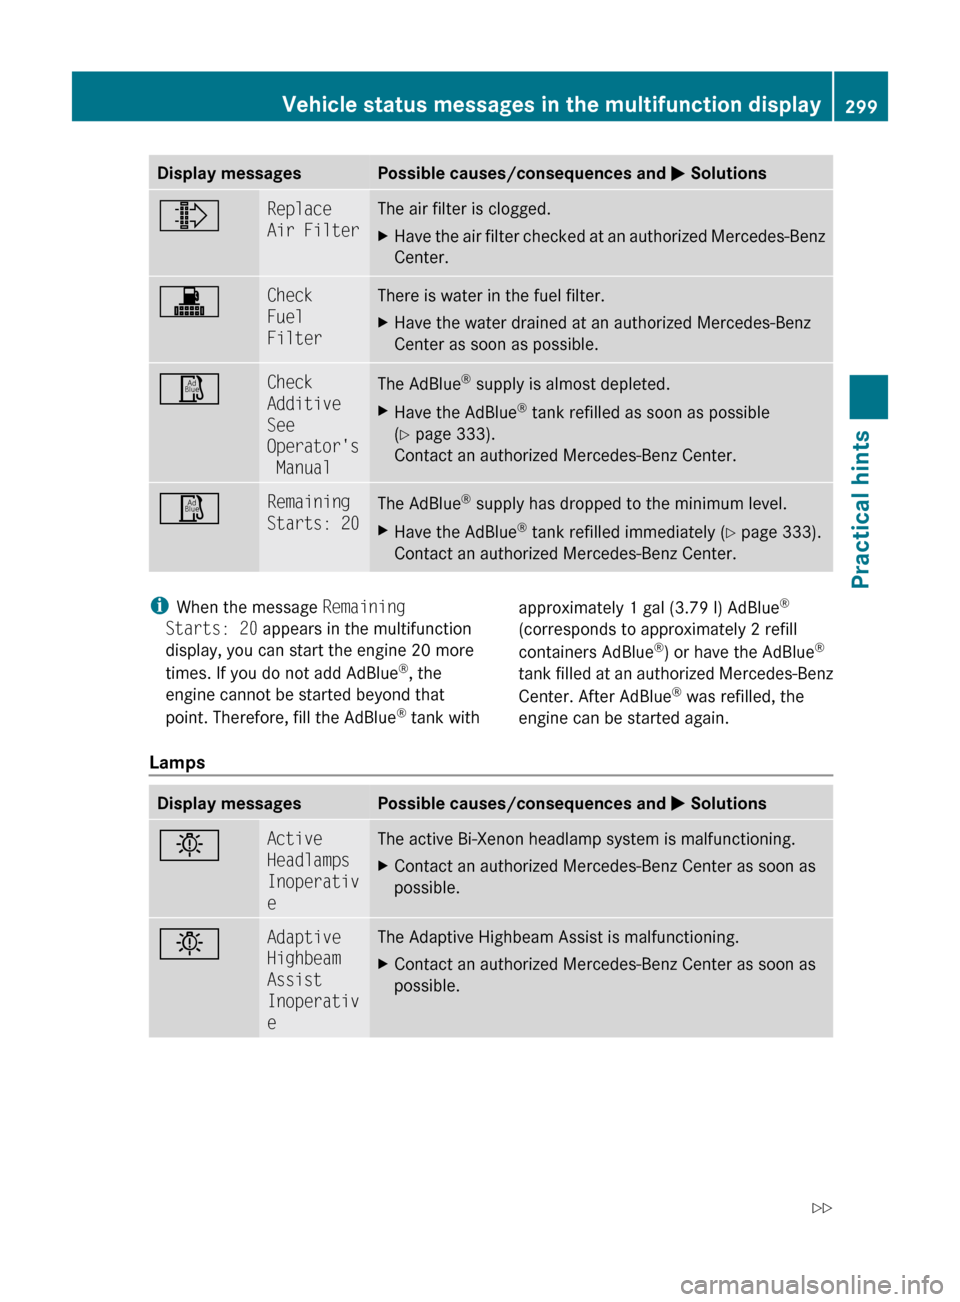
Display messagesPossible causes/consequences and M Solutions¸Replace
Air FilterThe air filter is clogged.XHave the air filter checked at an authorized Mercedes-Benz
Center.!Check
Fuel
FilterThere is water in the fuel filter.XHave the water drained at an authorized Mercedes-Benz
Center as soon as possible.ØCheck
Additive
See
Operator's
ManualThe AdBlue ®
supply is almost depleted.XHave the AdBlue ®
tank refilled as soon as possible
( Y page 333).
Contact an authorized Mercedes-Benz Center.ØRemaining
Starts: 20The AdBlue ®
supply has dropped to the minimum level.XHave the AdBlue ®
tank refilled immediately ( Y page 333).
Contact an authorized Mercedes-Benz Center.i When the message Remaining
Starts: 20 appears in the multifunction
display, you can start the engine 20 more
times. If you do not add AdBlue ®
, the
engine cannot be started beyond that
point. Therefore, fill the AdBlue ®
tank withapproximately 1 gal (3.79 l) AdBlue ®
(corresponds to approximately 2 refill
containers AdBlue ®
) or have the AdBlue ®
tank filled at an authorized Mercedes-Benz
Center. After AdBlue ®
was refilled, the
engine can be started again.
Lamps
Display messagesPossible causes/consequences and M SolutionsbActive
Headlamps
Inoperativ
eThe active Bi-Xenon headlamp system is malfunctioning.XContact an authorized Mercedes-Benz Center as soon as
possible.bAdaptive
Highbeam
Assist
Inoperativ
eThe Adaptive Highbeam Assist is malfunctioning.XContact an authorized Mercedes-Benz Center as soon as
possible.Vehicle status messages in the multifunction display299Practical hints212_AKB; 2; 41, en-USd2ureepe,Version: 2.11.8.12009-07-17T09:14:21+02:00 - Seite 299Z
Page 335 of 372
Version 1: Open vent screw F on
pressure gauge G (Y page 331).
Version 2: Press yellow deflate button a
located in air pump housing next to
pressure gauge G.XDrive to the nearest qualified workshop,
e.g. an authorized Mercedes-Benz Center,
to have the damaged tire replaced.XRecommended duration of use: A
maximum of 300 miles (500 km) at 50 mph
( 80 km/h) or below with the recommended
tire inflation pressure.XContact an authorized Mercedes-Benz
Center as soon as possible to obtain a new
TIREFIT kit.XBring used TIREFIT materials to an
authorized Mercedes-Benz Center for
proper disposal.XReplace your TIREFIT container every
4 years. Replacement containers are
available at any authorized Mercedes-Benz
Center.
Bleeding the fuel system (diesel
engine only)
Driving the vehicle until the fuel tank is empty
is not recommended. Otherwise, air may be
sucked into the fuel system. If this happens,
the malfunction indicator lamp ; comes
on and the engine may not start immediately
after refueling the vehicle.
After refueling:
XMake sure the automatic transmission is in
park position P.
The transmission position indicator in the
multifunction display should be on P.XDo not depress the accelerator.XIf necessary, remove the KEYLESS-GO
start/stop button from the starter switch.XTurn the SmartKey in the starter switch to
position 2 for at least 10 seconds.XReturn the SmartKey in the starter switch
to position 0.XTurn the SmartKey in the starter switch to
position 3 and hold it there for a maximum
of 10 seconds or until the engine runs
surge-free.
If the engine does not start:
XTurn the SmartKey in the starter switch
once more to position 2 for at least
10 seconds.XReturn the SmartKey in the starter switch
to position 0.XTurn the SmartKey in the starter switch
once more to position 3 and hold it there
for a maximum of 10 seconds or until the
engine runs surge-free.XIf necessary, repeat the above steps.
If the engine still does not start after
3 attempts:
Do not make any further attempts to start the
engine. Contact an authorized Mercedes-
Benz Center or call Roadside Assistance
( Y page 210).
i When the malfunction indicator
lamp ; in the instrument cluster has
been illuminated for the above condition, it
will remain illuminated until the engine was
cycled on and off four times in a row.
AdBlue ®
(diesel engine only)
The BlueTEC exhaust gas aftertreatment
system requires a reducing agent (AdBlue ®
)
in order to function properly. Refilling with
AdBlue ®
is part of the regular maintenance
service work. A tankful of AdBlue ®
should
suffice until the next maintenance service
under normal driving conditions.
When the AdBlue ®
tank is low, the message
Check Additive See Operator’s
Manual appears in the multifunction display.
When the AdBlue ®
level drops to the
minimum level, the message Remaining
AdBlue®
(diesel engine only)333Practical hints212_AKB; 2; 41, en-USd2ureepe,Version: 2.11.8.12009-07-17T09:14:21+02:00 - Seite 333Z
Page 336 of 372
Starts: 20 appears in the multifunction
display.
i When the message Remaining Starts:
20 appears in the multifunction display, you
can start the engine 20 more times. If you
do not add AdBlue ®
, the engine cannot be
started beyond that point. Fill the
AdBlue ®
tank with approximately 1 gal
(3.79 l) AdBlue ®
(corresponds to
approximately 2 AdBlue ®
refill containers)
or have the AdBlue ®
tank filled by an
authorized Mercedes-Benz Center.
i For refilling outside the maintenance
service intervals, refill the AdBlue ®
tank
with approximately 1 gal (3.79 l) AdBlue ®
(corresponds to approximately 2 AdBlue ®
refill containers).
Always use the particular AdBlue ®
refill
containers for refilling outside the
maintenance service interval. Contact an
authorized Mercedes-Benz Center or call
Roadside Assistance if necessary
( Y page 210).
Additional information on BlueTEC exhaust
gas aftertreatment and AdBlue ®
is available
at any authorized Mercedes-Benz Center.
Refilling with AdBlue ®
GWarning!
Make sure
R AdBlue ®
does not come into contact with
skin, eyes, or clothing
R to keep AdBlue ®
out of the reach of children
If you and/or others have come into contact
with AdBlue ®
:
R If AdBlue ®
has gotten into contact with
eyes, flush with plenty of water immediately
and seek medical help.
R Clean affected skin immediately with plenty
of water.
R If AdBlue ®
was swallowed, rinse mouth
immediately with plenty of water and drink
plenty of water. Consult a physician.GWarning!
When opening the filler cap of the AdBlue ®
tank ammonia gas vapors may escape. Refill
AdBlue ®
in a well ventilated area only.
Ammonia gas vapors have a pungent odor and
are particularly irritating for your skin,
mucous membranes, and eyes. Inhaling
ammonia gas vapors will cause burning eyes,
nose, and throat, as well as coughing and
watering eyes.
! Only use AdBlue ®
complying with
ISO 22241. Do not add additives to
AdBlue ®
and do not dilute AdBlue ®
with
water. Otherwise, the BlueTEC exhaust gas
aftertreatment system could be damaged.
Damage caused by using additives or
diluting with water are not covered by the
Mercedes-Benz Limited Warranty.
! Rinse surfaces that have come into
contact with AdBlue ®
, or remove AdBlue ®
with a moist cloth and cold water
immediately. If AdBlue ®
has crystallized
already, use cold water and a sponge.
AdBlue ®
residues will crystallize and soil
the affected surfaces.
! AdBlue ®
is not a fuel additive and must
not be added to the diesel fuel tank. If
AdBlue ®
reaches the diesel fuel tank, the
engine could be damaged which is not
covered by the Mercedes-Benz Limited
Warranty.
334AdBlue ®
(diesel engine only)Practical hints
212_AKB; 2; 41, en-USd2ureepe,Version: 2.11.8.12009-07-17T09:14:21+02:00 - Seite 334
Page 337 of 372
For more information on AdBlue®, see
(Y page 364).
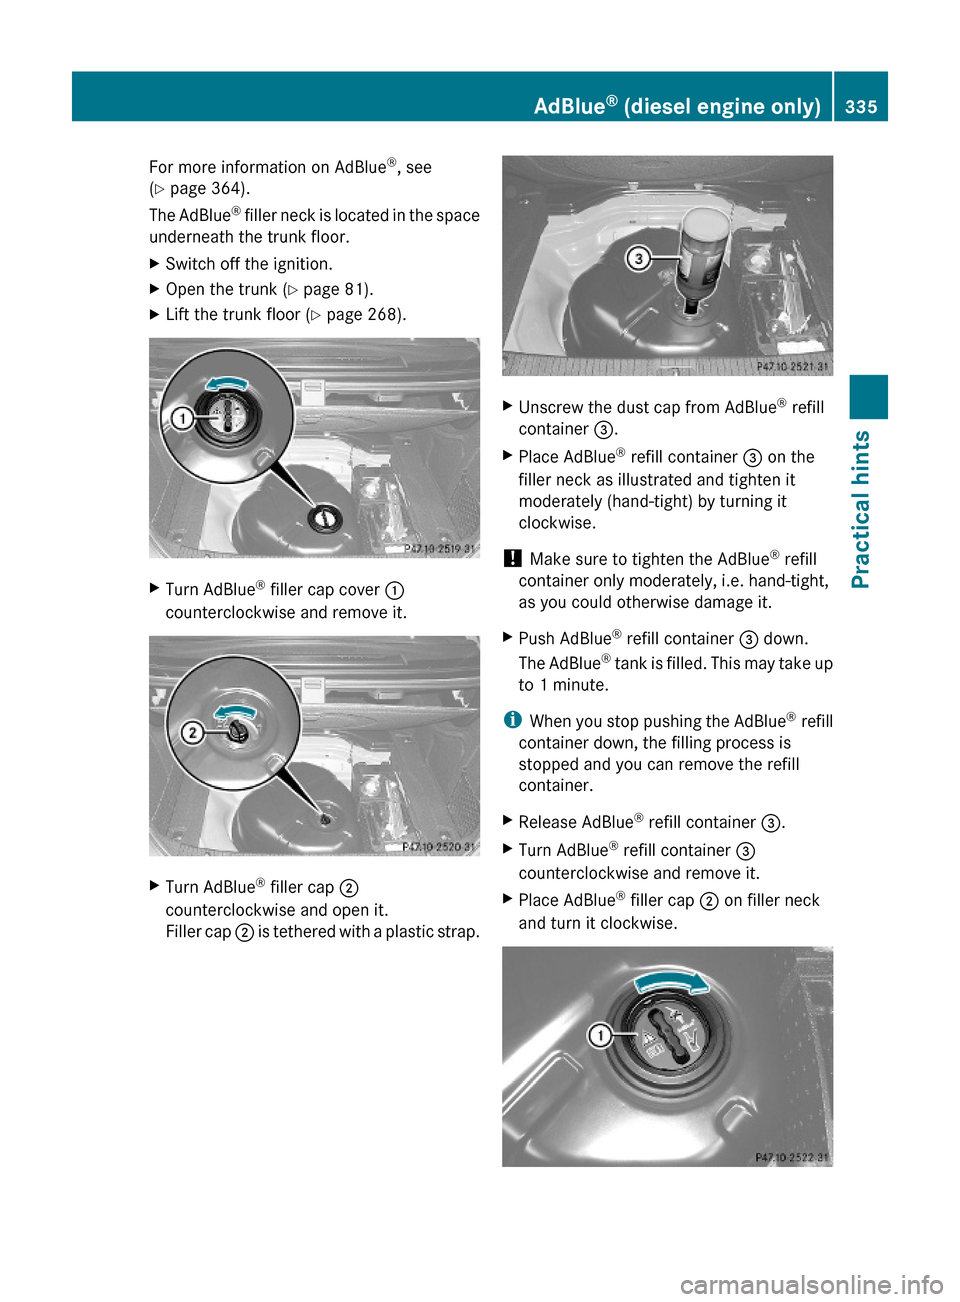
The AdBlue® filler neck is located in the space
underneath the trunk floor.
XSwitch off the ignition.XOpen the trunk (Y page 81).XLift the trunk floor (Y page 268).XTurn AdBlue® filler cap cover :
counterclockwise and remove it.
XTurn AdBlue® filler cap ;
counterclockwise and open it.
Filler cap ; is tethered with a plastic strap.
XUnscrew the dust cap from AdBlue® refill
container =.
XPlace AdBlue® refill container = on the
filler neck as illustrated and tighten it
moderately (hand-tight) by turning it
clockwise.
! Make sure to tighten the AdBlue® refill
container only moderately, i.e. hand-tight,
as you could otherwise damage it.
XPush AdBlue® refill container = down.
The AdBlue® tank is filled. This may take up
to 1 minute.
iWhen you stop pushing the AdBlue® refill
container down, the filling process is
stopped and you can remove the refill
container.
XRelease AdBlue® refill container =.XTurn AdBlue® refill container =
counterclockwise and remove it.
XPlace AdBlue® filler cap ; on filler neck
and turn it clockwise.
AdBlue® (diesel engine only)335Practical hints212_AKB; 2; 41, en-USd2ureepe,Version: 2.11.8.12009-07-17T09:14:21+02:00 - Seite 335Z