2010 MERCEDES-BENZ CLS63AMG roof
[x] Cancel search: roofPage 156 of 308
in direction of arrow
= until the tilt/sliding
sunroof is fully closed.
The tilt/sliding sunroof closes with greater
force.
If the tilt/sliding sunroof is blocked again and
opens slightly:
X Immediately after the tilt/sliding sunroof
was
blocked and has opened, pull and hold
the sunroof switch in direction of arrow
= until the tilt/sliding sunroof is fully
closed.
The tilt/sliding sunroof closes without
automatic reversal function. G
Warning!
Pulling and holding the sunroof switch to
close the tilt/sliding sunroof immediately
after
it had been blocked two times will cause
the tilt/sliding sunroof to close without any
reversal function for as long as you hold the
sunroof switch. Synchronizing
The
tilt/sliding sunroof must be synchronized
R after the battery has been disconnected or
discharged
R after a malfunction
R if the tilt/sliding sunroof does not open
smoothly
! If the tilt/sliding sunroof cannot be closed
or synchronized, contact an authorized
Mercedes-Benz Center or call Roadside
Assistance.
X Vehicles with SmartKey: Switch off the
ignition
and remove the SmartKey from the
starter switch.
X Vehicles with KEYLESS-GO: Switch off the
ignition and open the driver’s door. This
puts the starter switch in position 0, same
as with the SmartKey removed from the starter switch. The driver’s door then can
be closed again.
X Remove the fuse for the tilt/sliding sunroof
from the fuse box (Y page 284).
X Reinsert the fuse in the fuse box.
X Switch on the ignition.
X Press and hold the sunroof switch in
direction
of arrow : (Y page 152) until the
tilt/sliding sunroof is fully raised at the
rear.
X Keep holding the sunroof switch in
direction of arrow : for approximately
1 second.
X Check the express operation feature
(Y page 153).
If
the tilt/sliding sunroof opens and closes
completely, the roof is synchronized.
Otherwise repeat the above steps. Loading and storing
Loading instructions
G
Warning!
Always fasten items being carried as securely
as possible using cargo tie-down hooks and
fastening
materials appropriate for the weight
and size of the load.
In an accident, during hard braking or sudden
maneuvers, loose items will be thrown around
inside the vehicle. This can cause injury to
vehicle occupants unless the items are
securely fastened in the vehicle.
To help avoid personal injury during a collision
or sudden maneuver, exercise care when
transporting cargo. Do not pile luggage or
cargo higher than the seat backrests.
The trunk is the preferred place to carry
objects. Always use cargo tie-down hooks
when transporting cargo. Do not place
anything on the rear-window shelf.
Never drive a vehicle with the trunk open.
Deadly carbon monoxide (CO) gases may 154
Loading and storing
Controls in detail
219_AKB; 4; 54, en-US
d2ureepe,
Version: 2.11.8.1 2009-05-11T16:21:02+02:00 - Seite 154
Page 157 of 308
enter vehicle interior resulting in
unconsciousness and death.
Load distribution The total load weight including vehicle
occupants and luggage/cargo should not
exceed the total load limit indicated on the
corresponding Tire and Loading Information
placard located on the driver’s door B-pillar
(Y page 194).
The handling characteristics of a fully loaded
vehicle depends greatly on the load
distribution. It is therefore recommended to
load the vehicle accordingly with the heaviest
items being placed towards the front of the
vehicle.
Please pay attention to and comply with the
following instructions when loading the
vehicle and transporting cargo:
R
Always place items being carried against
front or rear seat backrests, and fasten
them as securely as possible.
R The heaviest portion of the cargo should
always be kept as low as possible against
front or rear seat backrests. Roof rack
For information about further roof rack
equipment, contact an authorized Mercedes-
Benz Center. G
Warning!
Only use roof racks approved by Mercedes-
Benz for your vehicle model to avoid damage
to the vehicle.
Follow the manufacturer’s installation
instructions. Otherwise, an improperly
attached roof rack system or its load could
become detached from the vehicle.
Do not exceed the maximum roof load of
220 lb (100 kg).
Take into consideration that when the roof
rack is loaded, the handling characteristics are different from those when operating the
vehicle without the roof rack loaded.
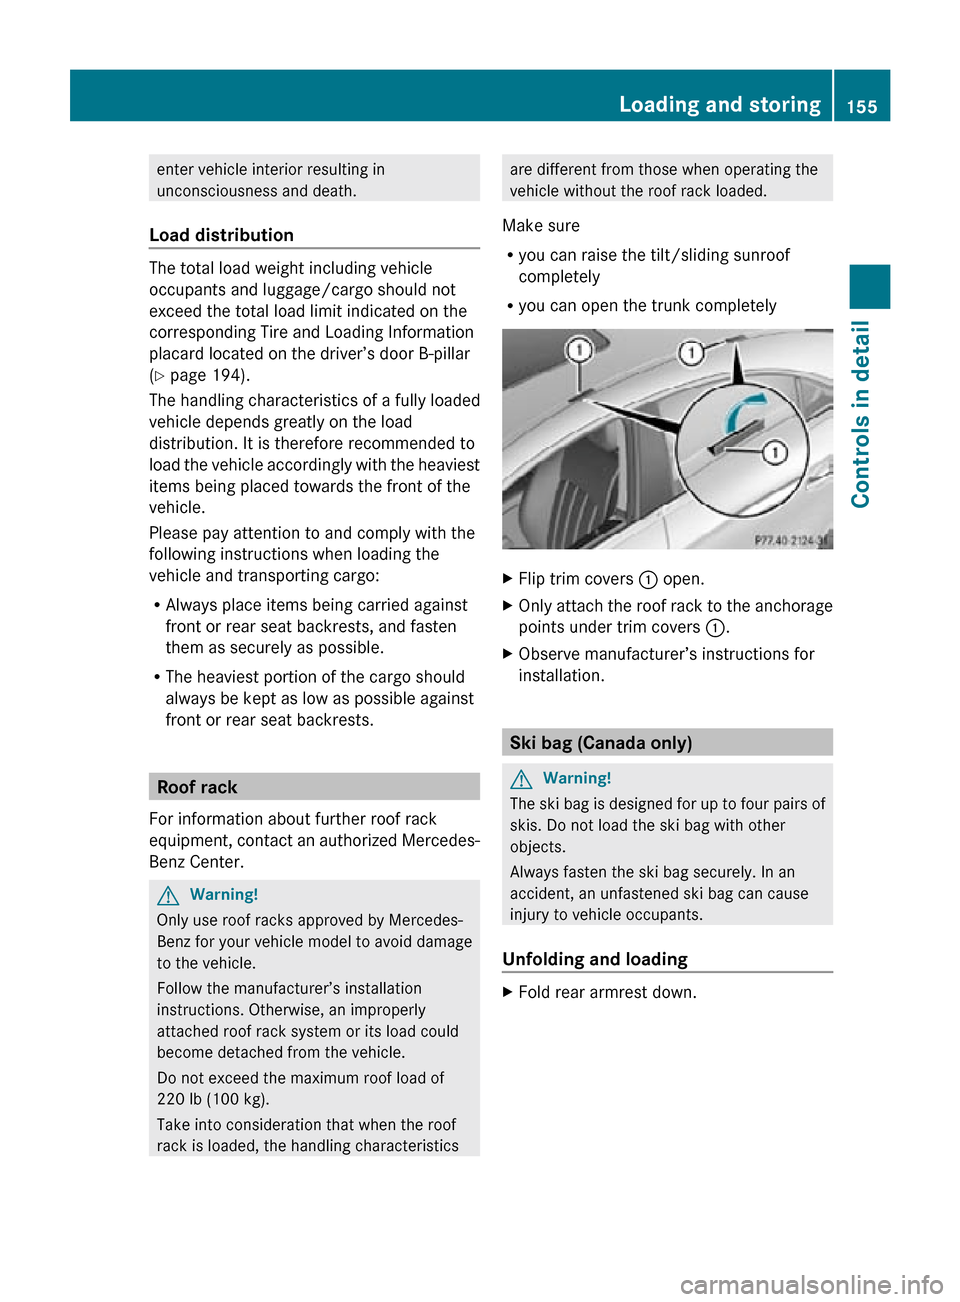
Make sure
R you can raise the tilt/sliding sunroof
completely
R you can open the trunk completely X
Flip trim covers : open.
X Only attach the roof rack to the anchorage
points under trim covers :.
X Observe manufacturer’s instructions for
installation. Ski bag (Canada only)
G
Warning!
The ski bag is designed for up to four pairs of
skis. Do not load the ski bag with other
objects.
Always fasten the ski bag securely. In an
accident, an unfastened ski bag can cause
injury to vehicle occupants.
Unfolding and loading X
Fold rear armrest down. Loading and storing
155Controls in detail
219_AKB; 4; 54, en-US
d2ureepe, Version: 2.11.8.1 2009-05-11T16:21:02+02:00 - Seite 155 Z
Page 188 of 308
Do not underinflate tires. Underinflated tires
wear excessively and/or unevenly, adversely
affect handling and fuel economy, and are
more likely to fail from being overheated.
Do
not overinflate tires. Overinflated tires can
adversely affect handling and ride comfort,
wear unevenly, increase stopping distance,
and result in sudden deflation (blowout)
because they are more likely to become
punctured or damaged by road debris,
potholes etc.
Do not overload the tires by exceeding the
specified load limit as indicated on the Tire
and Loading Information placard on the
driver’s door B-pillar. Overloading the tires
can overheat them, possibly causing a
blowout. Overloading the tires can also result
in handling or steering problems, or brake
failure.
Check the tire inflation pressure at least once
a month.
Check and adjust the tire inflation pressure
when the tires are cold ( Y page 183).
Checking tire inflation pressure
manually Follow the steps below to achieve correct tire
inflation pressure:
X
Remove the cap from the valve on one tire.
X Firmly press a tire gauge onto the valve.
X Read the tire inflation pressure on the tire
gauge and check against the
recommended
tire inflation pressure on the
Tire and Loading Information placard on the
driver’s door B-pillar ( Y page 193). If
necessary, add air to achieve the
recommended tire inflation pressure.
X If you have overfilled the tire, release tire
inflation pressure by pushing the metal
stem of the valve with e.g. a tip of a pen.
Then recheck the tire inflation pressure
with the tire gauge.
X Install the valve cap.
X Repeat this procedure for each tire. Tire pressure loss warning system
(Canada only) While the vehicle is being driven, the tire
pressure loss warning system monitors the
set
tire inflation pressures by evaluating each
wheel’s rotational speed. This allows the
system to detect a significant loss of pressure
in a tire. If a wheel’s rotational speed changes
due to falling tire inflation pressure, you will
see a corresponding warning message in the
multifunction display.
The tire pressure loss warning system may
function in a restricted manner or with a delay
R when snow chains are mounted to the
vehicle
R in the presence of ice and snow
R when you are driving on a loose surface
(e.g. sand or gravel)
R when you are driving in a very sporty
manner (involving rapid acceleration or
high speeds in curves)
R when you are driving with a loaded roof
rack or heavily laden vehicle G
Warning!
When the multifunction display shows the
message Tire
Pressure Check Tires , one
or more of your tires are significantly
underinflated. You should stop and check
your tires as soon as possible, and inflate
them to the proper tire inflation pressure as
indicated on the vehicle’s Tire and Loading
Information placard or on the tire inflation
pressure label.
Driving on a significantly underinflated tire
causes the tire to overheat and can lead to
tire failure. Underinflation also reduces fuel
efficiency and tire tread life, and may affect
the vehicle’s handling and stopping ability. 186
Tires and wheels
Operation
219_AKB; 4; 54, en-US
d2ureepe,
Version: 2.11.8.1 2009-05-11T16:21:02+02:00 - Seite 186
Page 209 of 308
Maximum permissible tire inflation
pressure
This number is the greatest amount of air
pressure that should ever be put in the tire.
Normal occupant weight
The number of occupants the vehicle is
designed to seat, multiplied by 68 kilograms
(150 lb).
Occupant distribution
The distribution of occupants in a vehicle at
their designated seating positions.
Production options weight
The combined weight of those installed
regular production options weighing over
5 lbs (2.3 kilograms) in excess of those
standard items which they replace, not
previously considered in curb weight or
accessory weight, including heavy duty
brakes, ride levelers, roof rack, heavy duty
battery, and special trim.
PSI (Pounds per square inch)
A standard unit of measure for air pressure.
Recommended tire inflation pressure
The recommended tire inflation pressure for
normal
driving conditions is listed on the Tire
and Loading Information placard located on
the driver’s door B-pillar. It provides best
handling, tread life and riding comfort.
Supplemental information pertaining to
special driving situations can be found on the
tire inflation pressure label on the inside of
the fuel filler flap.
Rim A metal support for a tire or a tire and tube
assembly upon which the tire beads are
seated. Sidewall The portion of a tire between the tread and
the bead.
TIN (Tire Identification Number)
Unique identifier which facilitates efforts by
tire manufacturers to notify purchasers in
recall situations or other safety matters
concerning tires and gives purchasers the
means
to easily identify such tires. The TIN is
comprised of “Manufacturer’s identification
mark”, “Tire size”, “Tire type code” and “Date
of manufacture”.
Tire ply composition and material used This indicates the number of plies or the
number of layers of rubber-coated fabric in
the tire tread and sidewall. Tire
manufacturers also must indicate the ply
materials in the tire and sidewall, which
include steel, nylon, polyester, and others.
Tire speed rating
Part of tire designation (speed symbol);
indicates the speed range for which a tire is
approved.
Total load limit
Rated cargo and luggage load plus
68 kilograms (150 lb) times the vehicle’s
designated seating capacity.
Traction
The adhesive friction of a tire on a surface on
which
it moves. The amount of grip provided.
Tread The portion of a tire that comes into contact
with the road. Tires and wheels
207
Operation
219_AKB; 4; 54, en-US
d2ureepe, Version: 2.11.8.1 2009-05-11T16:21:02+02:00 - Seite 207 Z
Page 212 of 308
Driving instructions
Drive sensibly – save fuel
To save fuel you should:
R Keep tires at the recommended inflation
pressures.
R Remove unnecessary loads.
R Remove roof rack when not in use.
R Allow engine to warm up under low load
use.
R Avoid frequent acceleration and
deceleration.
R Have all maintenance work performed at
the intervals specified in the Maintenance
Booklet and as required by the
Maintenance system. Contact an
authorized Mercedes-Benz Center.
Fuel
consumption is also increased by driving
in cold weather, in stop-and-go traffic, on
short trips and in mountainous areas. Drinking and driving
G
Warning!
Drinking and driving and/or taking drugs and
driving are very dangerous combinations.
Even a small amount of alcohol or drugs can
affect your reflexes, perceptions and
judgment.
The possibility of a serious or even fatal
accident
are greatly increased when you drink
or take drugs and drive.
Do not drink or take drugs and drive or allow
anyone to drive who has been drinking or
taking drugs. Pedals
G
Warning!
Make sure absolutely no objects are
obstructing the pedals’ range of movement.
Keep the driver’s footwell clear of all obstacles. If there are any floormats or
carpets in the footwell, make sure that the
pedals still have sufficient clearance.
During sudden driving or braking maneuvers,
the objects could get caught between the
pedals. You could then no longer brake or
accelerate. This could lead to accidents and
injury.
Power assistance
G
Warning!
There is no power assistance for the steering
and
the brake when the engine is not running.
Steering and braking requires significantly
more effort and you could lose control of the
vehicle and cause an accident as a result.
Do not turn off the engine while the vehicle is
in motion. Brakes
Downhill grades !
When driving down long and steep
grades, relieve the load on the brakes by
shifting into a lower gear to use the
engine’s
braking power. This helps prevent
overheating of the brakes and reduces
wear.
When using the engine’s braking power, a
drive wheel may not spin for an extended
period of time, e.g. on slippery road
surfaces. This may cause serious damage
to the drivetrain which is not covered by the
Mercedes-Benz Limited Warranty.
Continuous or hard braking G
Warning!
Resting your foot on the brake pedal will
cause excessive and premature wear of the
brake pads. 210
Driving instructions
Operation
219_AKB; 4; 54, en-US
d2ureepe,
Version: 2.11.8.1 2009-05-11T16:21:02+02:00 - Seite 210
Page 218 of 308
vehicle’s doors or windows when cleaning the
inside.
Never use fluids or solvents that are not
designed for cleaning your vehicle.
Always
lock away cleaning products and keep
them out of reach of children.
! When cleaning the vehicle, do not use
scouring agents. Never apply strong force
and only use a soft, wet cloth or sponge.
Otherwise you may scratch or damage the
surface to be cleaned.
While in operation, even while parked, your
vehicle is subjected to varying external
influences which, if gone unchecked, can
attack the paintwork as well as the vehicle
underbody and cause lasting damage.
Such damage is caused not only by extreme
and varying climatic conditions, but also by:
R Air pollution
R Road salt
R Tar
R Gravel and stone chipping
To avoid paint damage, you should
immediately remove:
R Grease and oil
R Fuel
R Coolant
R Brake fluid
R Bird droppings
R Insects
R Tree resins etc.
Frequent washing reduces and/or eliminates
the aggressiveness and potency of the above
adverse influences. More frequent washings are necessary to
deal with unfavorable conditions:
R
near the ocean
R in industrial areas (smoke, exhaust
emissions)
R during winter operation
You should check your vehicle from time to
time
for stone chipping or other damage. Any
damage should be repaired as soon as
possible to prevent corrosion.
In doing so, do not neglect the underbody of
the vehicle. A prerequisite for a thorough
check is a washing of the underbody followed
by a thorough inspection. Damaged areas
need to be re-undercoated.
Your vehicle has been treated at the factory
with a wax-base rustproofing in the body
cavities which will last for the lifetime of the
vehicle. Post-production treatment is neither
necessary nor recommended by Mercedes-
Benz because of the possibility of
incompatibility between materials used in the
production process and others applied later.
We have selected vehicle-care products and
compiled recommendations which are
specially matched to our vehicles and which
always reflect the latest technology. You can
obtain Mercedes-Benz approved vehicle-care
products at an authorized Mercedes-Benz
Center.
Scratches, corrosive deposits, corrosion or
damage due to negligent or incorrect care
cannot always be removed or repaired with
the vehicle-care products recommended
here. In such cases it is best to seek aid at an
authorized Mercedes-Benz Center.
The following topics deal with the cleaning
and care of your vehicle and give important
“how-to” information as well as references to
Mercedes-Benz approved vehicle-care
products. 216
Vehicle care
Operation
219_AKB; 4; 54, en-US
d2ureepe,
Version: 2.11.8.1 2009-05-11T16:21:02+02:00 - Seite 216
Page 232 of 308
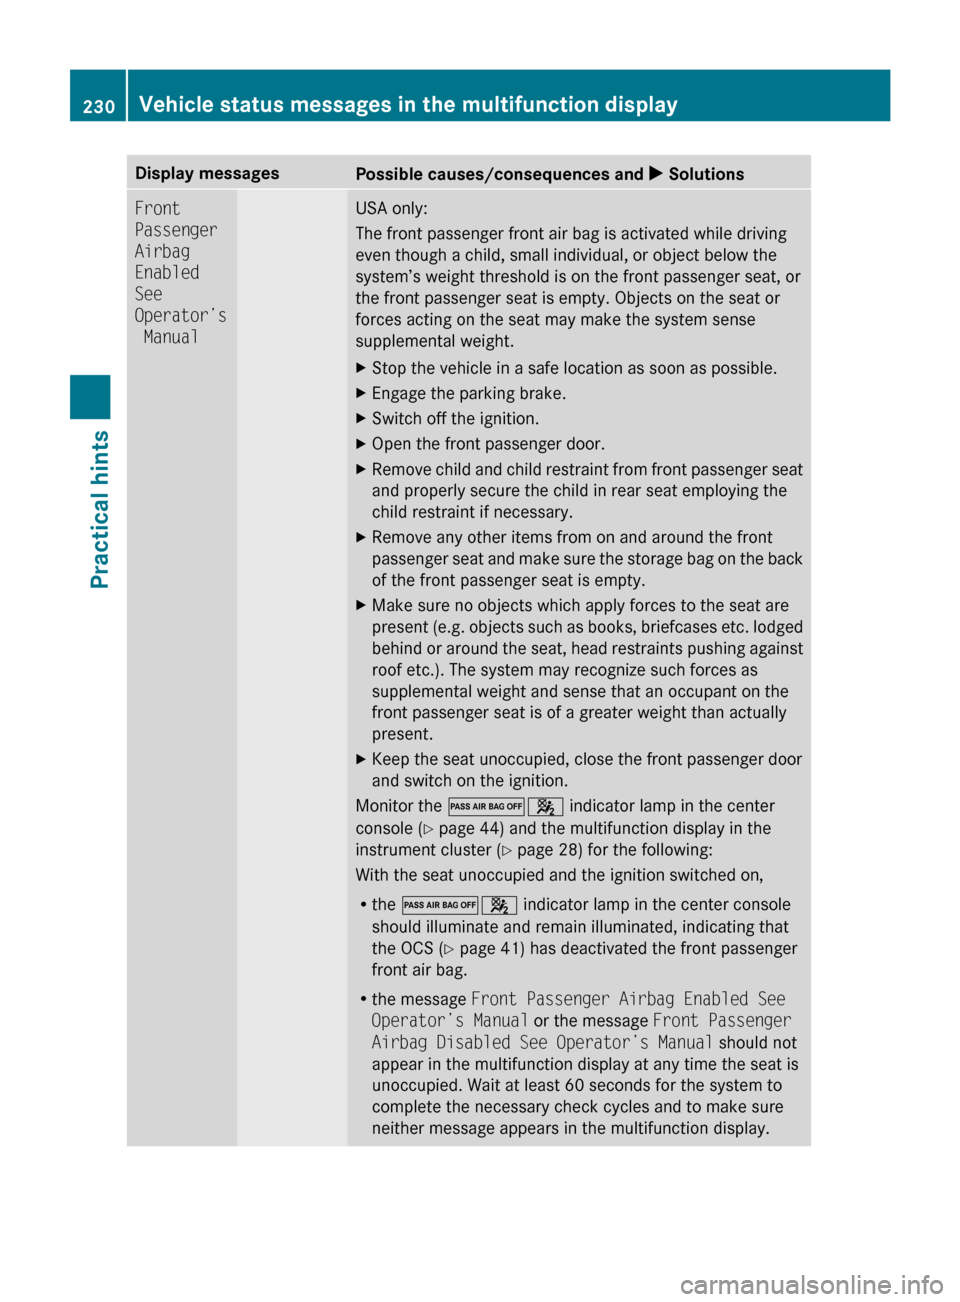
Display messages
Possible causes/consequences and
X SolutionsFront
Passenger
Airbag
Enabled
See
Operator’s
Manual USA only:
The front passenger front air bag is activated while driving
even though a child, small individual, or object below the
system’s weight threshold is on the front passenger seat, or
the front passenger seat is empty. Objects on the seat or
forces acting on the seat may make the system sense
supplemental weight.
X
Stop the vehicle in a safe location as soon as possible.
X Engage the parking brake.
X Switch off the ignition.
X Open the front passenger door.
X Remove child and child restraint from front passenger seat
and properly secure the child in rear seat employing the
child restraint if necessary.
X Remove any other items from on and around the front
passenger
seat and make sure the storage bag on the back
of the front passenger seat is empty.
X Make sure no objects which apply forces to the seat are
present
(e.g. objects such as books, briefcases etc. lodged
behind or around the seat, head restraints pushing against
roof etc.). The system may recognize such forces as
supplemental weight and sense that an occupant on the
front passenger seat is of a greater weight than actually
present.
X Keep the seat unoccupied, close the front passenger door
and switch on the ignition.
Monitor the 04 indicator lamp in the center
console (Y page 44) and the multifunction display in the
instrument cluster
(Y page 28) for the following:
With the seat unoccupied and the ignition switched on,
R the 04 indicator lamp in the center console
should illuminate and remain illuminated, indicating that
the OCS (Y page 41) has deactivated the front passenger
front air bag.
R the message Front Passenger Airbag Enabled See
Operator’s Manual or the message Front Passenger
Airbag Disabled See Operator’s Manual should not
appear in the multifunction display at any time the seat is
unoccupied. Wait at least 60 seconds for the system to
complete the necessary check cycles and to make sure
neither message appears in the multifunction display. 230
Vehicle status messages in the multifunction display
Practical hints
219_AKB; 4; 54, en-US
d2ureepe,
Version: 2.11.8.1 2009-05-11T16:21:02+02:00 - Seite 230
Page 263 of 308
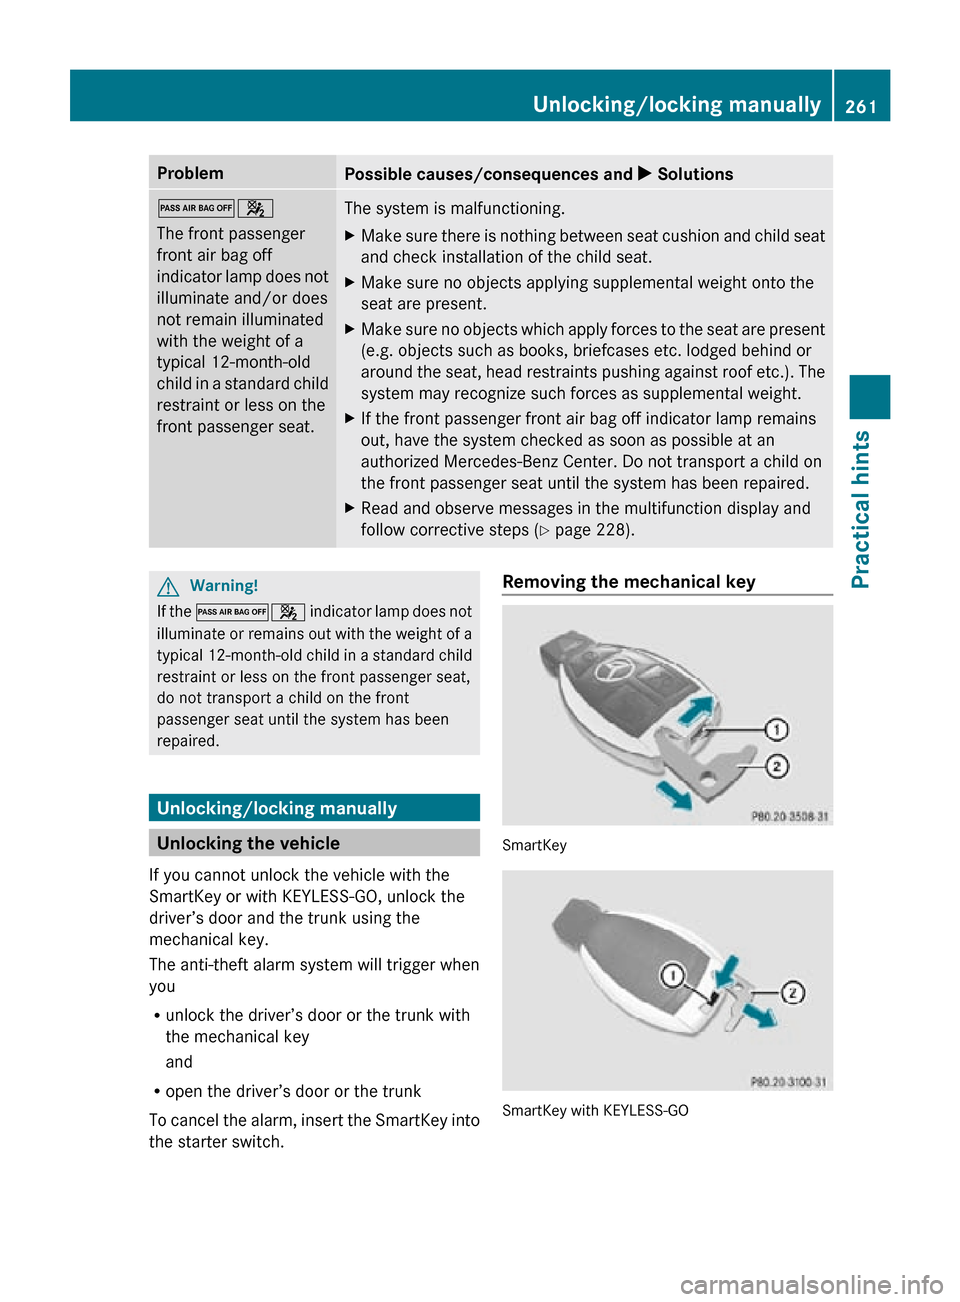
Problem
Possible causes/consequences and
X Solutions04
The front passenger
front air bag off
indicator lamp does not
illuminate and/or does
not remain illuminated
with the weight of a
typical 12-month-old
child in a standard child
restraint or less on the
front passenger seat.
The system is malfunctioning.
X
Make sure there is nothing between seat cushion and child seat
and check installation of the child seat.
X Make sure no objects applying supplemental weight onto the
seat are present.
X Make sure no objects which apply forces to the seat are present
(e.g. objects such as books, briefcases etc. lodged behind or
around the seat, head restraints pushing against roof etc.). The
system may recognize such forces as supplemental weight.
X If the front passenger front air bag off indicator lamp remains
out, have the system checked as soon as possible at an
authorized Mercedes-Benz Center. Do not transport a child on
the front passenger seat until the system has been repaired.
X Read and observe messages in the multifunction display and
follow corrective steps (Y page 228). G
Warning!
If the 04 indicator lamp does not
illuminate or remains out with the weight of a
typical 12-month-old child in a standard child
restraint or less on the front passenger seat,
do not transport a child on the front
passenger seat until the system has been
repaired. Unlocking/locking manually
Unlocking the vehicle
If you cannot unlock the vehicle with the
SmartKey or with KEYLESS-GO, unlock the
driver’s door and the trunk using the
mechanical key.
The anti-theft alarm system will trigger when
you
R unlock the driver’s door or the trunk with
the mechanical key
and
R open the driver’s door or the trunk
To cancel the alarm, insert the SmartKey into
the starter switch. Removing the mechanical key
SmartKey
SmartKey with KEYLESS-GO Unlocking/locking manually
261Practical hints
219_AKB; 4; 54, en-US
d2ureepe, Version: 2.11.8.1 2009-05-11T16:21:02+02:00 - Seite 261 Z