2010 MERCEDES-BENZ CLS63AMG roof
[x] Cancel search: roofPage 52 of 308
The PRE-SAFE
®
system takes preventive
measures to better protect the occupants
from
the possibility of personal injuries in the
following hazardous situations:
R emergency braking situations, e.g. if the
Brake Assist System (BAS) ( Y page 59) is
activated
R critical dynamic driving situations, e.g.
when the vehicle has been caused to
understeer or oversteer because it has
exceeded its physical limitations or in case
of evasive steering maneuvers at speeds
above approximately 85 mph (140 km/h)
The PRE-SAFE ®
system takes the following
measures when it is activated:
R The front seat belts are pre-tensioned
automatically.
R If the front passenger seat is in an
unfavorable position, the seat will be
adjusted to a position that seeks to better
protect the occupant.
R If the vehicle is in a critical dynamic driving
situation, the door windows and the tilt/
sliding sunroof also closes, except for a
minimal gap that remains open.
If the closing procedure of any of these
elements is blocked, it will stop and open
slightly.
Once the hazardous situation no longer exists
and an accident has been avoided, the seat
belt pre-tensioning is deactivated. All of the
PRE-SAFE ®
system settings can be re-
adjusted following the critical driving event.
If the seat belts do not release:
X Adjust the seat backrest or seat slightly to
the rear until the seat belt tension is
reduced.
The locking mechanism releases.
! When moving the seats, make sure there
are no items in the footwell or behind the
seats. Otherwise, you could damage the
seats and/or the items. NECK-PRO active front head
restraints
The NECK-PRO active front head restraints
are intended to offer the driver and front
passenger increased protection from
whiplash-type injuries. In the event of a rear-
end
collision, the NECK-PRO active front head
restraints on the front seats are designed to
move forward in the direction of travel. They
thus provide the head with increased support
earlier on in the collision sequence. The
NECK-PRO active front head restraints will
move forward whether the seats are occupied
or not. G
Warning!
Do not attach any objects (e.g. hangers) to the
head restraint posts. Otherwise, the NECK-
PRO active front head restraints may not be
able
to function properly or offer the intended
degree of protection they were designed for
in the event of a rear-end collision. G
Warning!
Only use seat or head restraint covers which
have
been tested and approved by Mercedes-
Benz for your vehicle model.
Using other seat or head restraint covers may
interfere with or prevent the activation of the
NECK-PRO active front head restraints and/
or the deployment of the front side impact air
bags.
Contact an authorized Mercedes-Benz Center
for availability.
When the NECK-PRO active front head
restraints have been triggered in an accident,
the NECK-PRO active front head restraints
must be reset. Otherwise, the NECK-PRO
active front head restraints cannot offer any
additional protection in the event of another
rear-end collision.
For information on resetting the activated
NECK-PRO active front head restraints, see
“Resetting activated head restraints”
(Y page 264). 50
Occupant safety
Safety and security
219_AKB; 4; 54, en-US
d2ureepe,
Version: 2.11.8.1 2009-05-11T16:21:02+02:00 - Seite 50
Page 67 of 308
Vehicle equipment ..............................
66
Locking and unlocking .......................66
Starter switch positions ..................... 76
Seats .................................................... 77
Multifunction steering wheel .............82
Mirrors ................................................. 84
Memory function ................................. 85
Lighting ................................................ 86
Wipers .................................................. 92
Power windows ................................... 94
Driving and parking ............................ 96
Automatic transmission ................... 101
Instrument cluster ............................108
Control system .................................. 110
Driving systems ................................ 127
Climate control system ....................143
Rear window defroster ..................... 151
Power tilt/sliding sunroof ...............152
Loading and storing ..........................154
Useful features ................................. 160 65Controls in detail
219_AKB; 4; 54, en-US
d2ureepe,
Version: 2.11.8.1 2009-05-11T16:21:02+02:00 - Seite 65
Page 72 of 308
i
If the batteries are checked within signal
range of the vehicle, pressing button
& or % will lock or unlock the vehicle
accordingly. Loss of the SmartKey
If you lose your SmartKey or mechanical key,
you should do the following:
X Have the SmartKey deactivated by an
authorized Mercedes-Benz Center.
X Report the loss of the SmartKey or the
mechanical key to your car insurance
company immediately.
X Have the mechanical lock replaced if
necessary.
Any authorized Mercedes-Benz Center will be
glad to supply you with a replacement. For
information on replacing the SmartKey, see
“Replacing the SmartKey” ( Y page 70).Replacing the SmartKey
Only you, or someone authorized by you can
order a replacement key from any Mercedes-
Benz Center. In order to do so, the Mercedes-
Benz Center will require proof of identity and
vehicle ownership with original documents,
including the following:
If you are the current owner of the vehicle:
R the vehicle’s current state registration
R a current identity card, passport, or drivers
license
If you are an authorized person:
R the vehicle’s current state registration
R a current identity card, passport, or drivers
license for the authorized individual
R signed and dated authorization from the
owner of the vehicle for which the key is
being requested
i Duplicated or photocopied
documentation will not be accepted. Activating the key Once you, or an authorized person, has
provided the appropriate documents, the
Mercedes-Benz Center will need to
synchronize the key to your vehicle before it
can be used. In order to do so, the Mercedes-
Benz Center need access to your vehicle.
Opening the doors from the inside
You can open a door from the inside even
when it is locked unless it is secured with the
child safety lock ( Y page 56).
Open door only when conditions are safe to
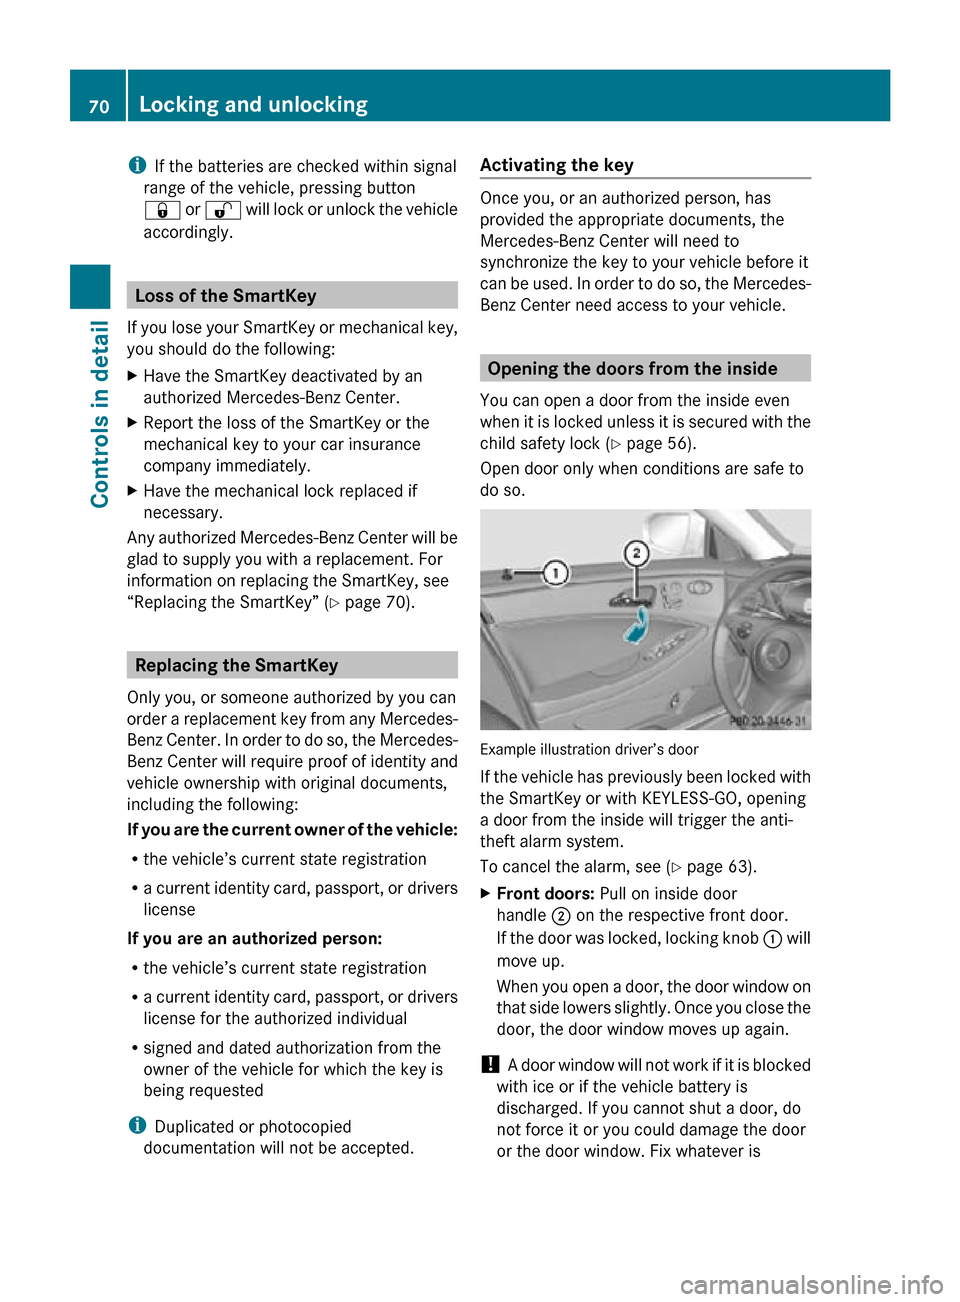
do so. Example illustration driver’s door
If the vehicle has previously been locked with
the SmartKey or with KEYLESS-GO, opening
a door from the inside will trigger the anti-
theft alarm system.
To cancel the alarm, see (
Y page 63).
X Front doors: Pull on inside door
handle ; on the respective front door.
If the door was locked, locking knob : will
move up.
When you open a door, the door window on
that side lowers slightly. Once you close the
door, the door window moves up again.
! A door window will not work if it is blocked
with ice or if the vehicle battery is
discharged. If you cannot shut a door, do
not force it or you could damage the door
or the door window. Fix whatever is 70
Locking and unlockingControls in detail
219_AKB; 4; 54, en-US
d2ureepe,
Version: 2.11.8.1 2009-05-11T16:21:02+02:00 - Seite 70
Page 98 of 308
Summer opening feature
When the weather is warm, you can ventilate
the vehicle before driving off by
simultaneously
R opening the door windows
R opening the tilt/sliding sunroof
R switching on the seat ventilation for the
driver’s seat
The summer opening feature can only be
activated via the remote control of the
SmartKey. The SmartKey must be in close
proximity to the driver’s outside door handle.
X Aim the transmitter eye of the SmartKey at
the driver’s outside door handle.
X Press and hold button % on the
SmartKey until the door windows and the
tilt/sliding sunroof have reached the
desired position.
The vehicle unlocks.
X Release button % on the SmartKey to
interrupt the opening procedure. Convenience closing feature
When locking the vehicle, you can
simultaneously close the door windows and
the tilt/sliding sunroof. G
Warning!
When closing the door windows and the tilt/
sliding
sunroof, make sure there is no danger
of anyone being harmed by the closing
procedure.
If potential danger exists, proceed as follows:
R Release button & to stop the closing
procedure. To open, press and hold button
%. To continue the closing procedure
after making sure that there is no danger of anyone being harmed by the closing
procedure, press and hold button
&.
Vehicles with KEYLESS-GO:
R Release
the lock button on the outside door
handle to stop the closing procedure.
R Immediately pull on the same outside door
handle and hold firmly. The door windows
and the tilt/sliding sunroof will open for as
long as the door handle is held but the door
not opened.
With SmartKey The SmartKey must be in close proximity to
the driver’s outside door handle.
X
Aim transmitter eye of the SmartKey at the
driver’s outside door handle.
X Press and hold button & on the
SmartKey until the door windows and the
tilt/sliding sunroof are closed completely.
With KEYLESS-GO The SmartKey with KEYLESS-GO must be
located outside the vehicle within
approximately 3 ft (1 m) of a door.
X
Close all doors.
X Press and hold the lock button on an
outside door handle
(Y page 69) until the
door windows and the tilt/sliding sunroof
are closed completely.
X Release the lock button on the outside door
handle to interrupt the closing procedure. Driving and parking
Safety notes
G
Warning!
Make sure absolutely no objects are
obstructing the pedals’ range of movement.
Keep the driver’s footwell clear of all
obstacles. If there are any floormats or 96
Driving and parking
Controls in detail
219_AKB; 4; 54, en-US
d2ureepe,
Version: 2.11.8.1 2009-05-11T16:21:02+02:00 - Seite 96
Page 147 of 308
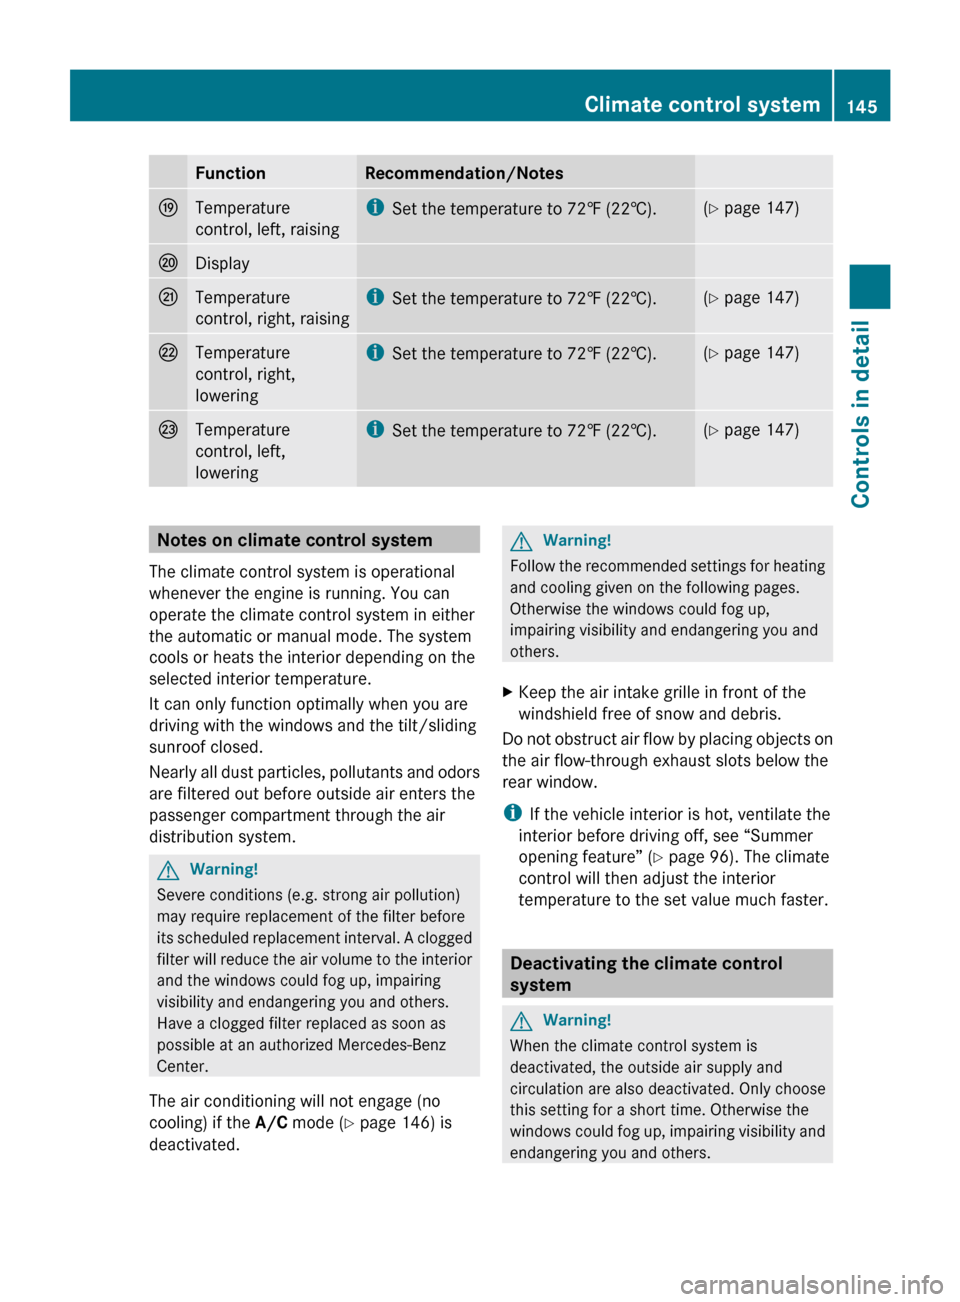
Function Recommendation/Notes
O
Temperature
control, left, raising i
Set the temperature to 72 ‡ (22†). (Y page 147)
P
Display
Q
Temperature
control, right, raising i
Set the temperature to 72
‡ (22†). (Y page 147)
R
Temperature
control, right,
lowering i
Set the temperature to 72
‡ (22†). (Y page 147)
S
Temperature
control, left,
lowering i
Set the temperature to 72
‡ (22†). (Y page 147)
Notes on climate control system
The climate control system is operational
whenever the engine is running. You can
operate the climate control system in either
the automatic or manual mode. The system
cools or heats the interior depending on the
selected interior temperature.
It can only function optimally when you are
driving with the windows and the tilt/sliding
sunroof closed.
Nearly
all dust particles, pollutants and odors
are filtered out before outside air enters the
passenger compartment through the air
distribution system. G
Warning!
Severe conditions (e.g. strong air pollution)
may require replacement of the filter before
its
scheduled replacement interval. A clogged
filter will reduce the air volume to the interior
and the windows could fog up, impairing
visibility and endangering you and others.
Have a clogged filter replaced as soon as
possible at an authorized Mercedes-Benz
Center.
The air conditioning will not engage (no
cooling) if the A/C mode (Y page 146) is
deactivated. G
Warning!
Follow the recommended settings for heating
and cooling given on the following pages.
Otherwise the windows could fog up,
impairing visibility and endangering you and
others.
X Keep the air intake grille in front of the
windshield free of snow and debris.
Do not obstruct air flow by placing objects on
the air flow-through exhaust slots below the
rear window.
i If the vehicle interior is hot, ventilate the
interior before driving off, see “Summer
opening feature” ( Y page 96). The climate
control will then adjust the interior
temperature to the set value much faster. Deactivating the climate control
system
G
Warning!
When the climate control system is
deactivated, the outside air supply and
circulation are also deactivated. Only choose
this setting for a short time. Otherwise the
windows
could fog up, impairing visibility and
endangering you and others. Climate control system
145
Controls in detail
219_AKB; 4; 54, en-US
d2ureepe, Version: 2.11.8.1 2009-05-11T16:21:02+02:00 - Seite 145 Z
Page 152 of 308
R
air flows onto the windshield and the front
door windows
R the air recirculation mode is switched off
i You can adjust the air volume, air
distribution and interior air temperature
when the front defroster is switched on.
X Deactivating: Press button ¬ again.
The indicator lamp in the button goes out.
The previous settings are once again in
effect. The cooling remains switched on.
The air recirculation remains switched off.
or
X Press button Ã.
The indicator lamp in button ¬ goes out.
Air volume and air distribution are adjusted
automatically.
Windshield fogged on the outside X
Switch the windshield wipers on
(Y page 92).
X Turn air distribution control to P or
O. Maximum cooling MAX COOL
MAX COOL is only available in U.S. vehicles.
MAX COOL is only operational when the
engine is running.
This provides the fastest possible cooling of
the vehicle interior (when windows and tilt/
sliding sunroof are closed). X
Activating: Press button Ù. MAX COOL
appears in display ? (Y page 143).
The air conditioning switches automatically to
the following functions:
R maximum cooling
R maximum blowing power
R the air recirculation mode is switched on
X Deactivating: Press button Ù again.
MAX COOL disappears in display ?.
The previous settings are once again in
effect.
i To switch the maximum cooling function
off,
you can also press button ^, Ã,
¬ or ¤. Air recirculation mode
Switch to air recirculation mode to prevent
unpleasant odors from entering the vehicle
from the outside (e. g. before driving through
a tunnel). This setting cuts off the intake of
outside air and recirculates the air in the
passenger compartment. G
Warning!
Fogged windows impair visibility,
endangering you and others. If the windows
begin to fog on the inside, switching off the
air recirculation mode immediately should
clear interior window fogging. If interior
window fogging persists, make sure the air
conditioning is activated, or press button
¬.
X Activating: Press button g.
The
indicator lamp in the button comes on.
i The air recirculation mode is activated
automatically
at high outside temperatures
and if the concentration of carbon
monoxide (CO) and nitrogen oxide in the
outside air increases, for example in a
tunnel. 150
Climate control system
Controls in detail
219_AKB; 4; 54, en-US
d2ureepe,
Version: 2.11.8.1 2009-05-11T16:21:02+02:00 - Seite 150
Page 154 of 308
Power tilt/sliding sunroof
Opening and closing
G
Observe Safety notes, see page 52. G
Warning!
When opening or closing the tilt/sliding
sunroof, make sure there is no danger of
anyone being harmed by the opening/closing
procedure.
The tilt/sliding sunroof is equipped with the
express operation and automatic reversal
function. If the movement of the tilt/sliding
sunroof is blocked during the closing
procedure, the tilt/sliding sunroof will stop
and open slightly.
The tilt/sliding sunroof operates differently
when the sunroof switch is pressed and held.
See the “Closing when the tilt/sliding sunroof
is blocked” section for details.
The opening/closing procedure of the tilt/
sliding sunroof can be immediately halted by
releasing the sunroof switch or, if the sunroof
switch was moved past the resistance point
and released, by moving the sunroof switch in
any direction. G
Warning!
The tilt/sliding sunroof is made out of glass.
In the event of an accident, the glass may
shatter. This may result in an opening in the
roof.
In a vehicle rollover, occupants not wearing
their seat belts or not wearing them properly
may be thrown out of the opening. Such an
opening also presents a potential for injury for
occupants wearing their seat belts properly as
entire body parts or portions of them may
protrude from the passenger compartment.
! To avoid damaging the seals, do not
transport any objects with sharp edges
which can stick out of the tilt/sliding
sunroof. Do not open the tilt/sliding sunroof if there
is snow or ice on the roof, as this could
result in malfunctions.
If you cannot open or close the tilt/sliding
sunroof due to a malfunction contact
Roadside Assistance or an authorized
Mercedes-Benz Center.
! Please keep in mind that weather
conditions can sometimes change rapidly.
Make sure to close the tilt/sliding sunroof
when leaving the vehicle. If water enters
the vehicle interior, vehicle electronics
could be damaged which is not covered by
the Mercedes-Benz Limited Warranty.
i You can also open or close the tilt/sliding
sunroof using the SmartKey or the
KEYLESS-GO function, see “Summer
opening feature” ( Y page 96) and
“Convenience closing feature”
(Y page 96).
i After switching off the ignition or
removing the SmartKey from the starter
switch, you can operate the tilt/sliding
sunroof until you open the driver’s or front
passenger door. If no door was opened you
can operate the tilt/sliding sunroof for up
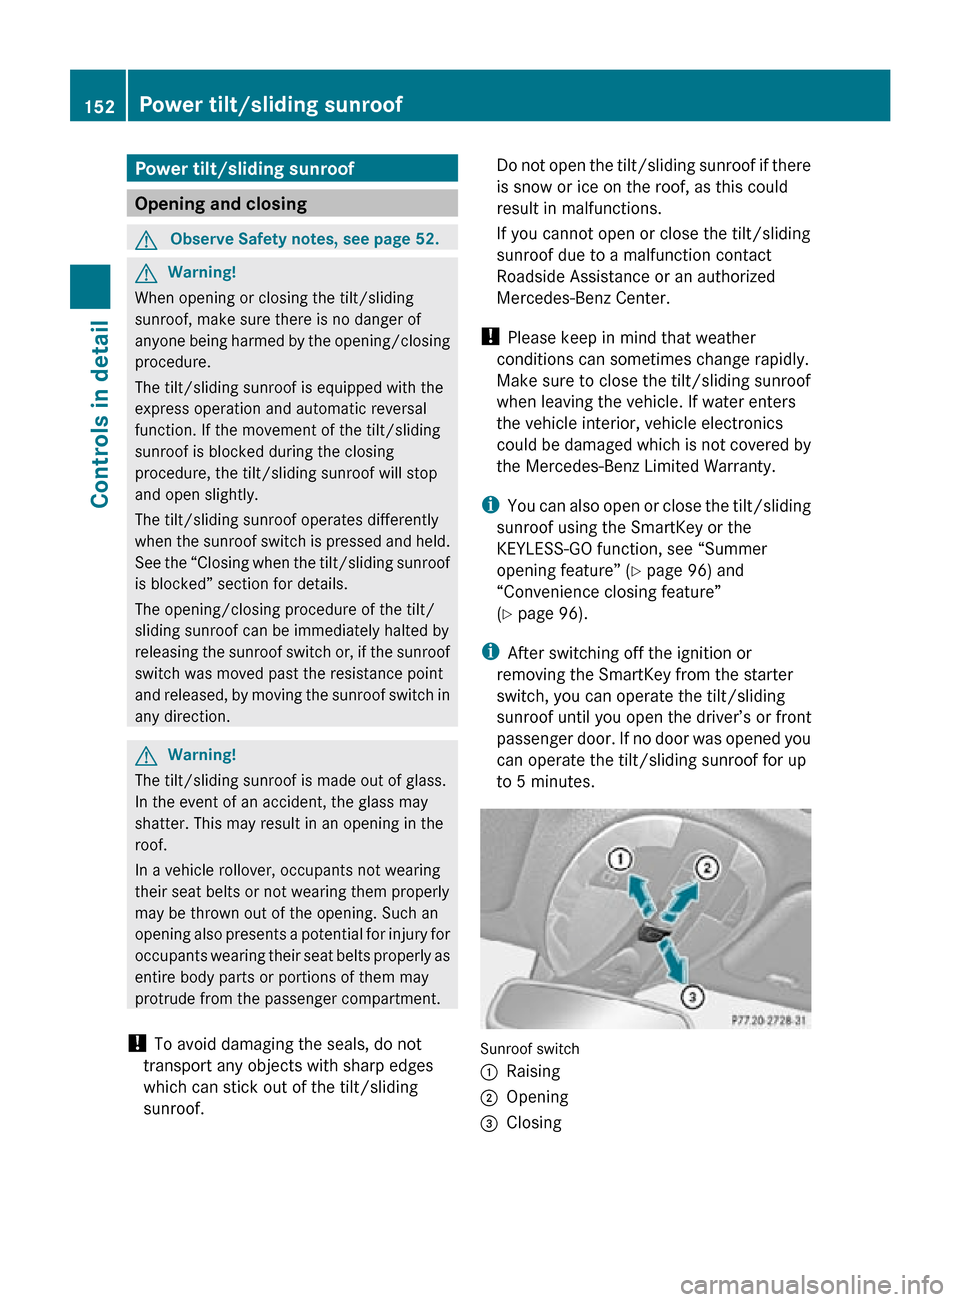
to 5 minutes. Sunroof switch
:
Raising
; Opening
= Closing 152
Power tilt/sliding sunroofControls in detail
219_AKB; 4; 54, en-US
d2ureepe,
Version: 2.11.8.1 2009-05-11T16:21:02+02:00 - Seite 152
Page 155 of 308

With the sunroof closed or raised, you can
slide the sunroof screen forward and back.
Sunroof screen
X
Switch on the ignition.
Opening X
Opening manually: Press and hold the
sunroof switch to the resistance point in
direction of arrow ;.
X Release the sunroof switch when the
desired position is reached.
X Express operation: To open the tilt/
sliding sunroof completely, press the
sunroof switch past the resistance point in
direction of arrow ; and release.
X Stopping during express operation:
Move the sunroof switch in any direction.
i Express opening is not available when the
tilt/sliding sunroof is raised. The tilt/
sliding sunroof must be closed first.
i When the tilt/sliding sunroof is open,
resonance noises may result in addition to
the usual wind noises. They are caused by
minimal pressure changes in the passenger
compartment. To reduce or eliminate these
noises, change the position of the tilt/
sliding sunroof or open a window slightly. Raising X
Raising manually: Press and hold the
sunroof switch to the resistance point in
direction of arrow :.
X Release the sunroof switch when the
desired position is reached.
X Express operation: To raise the tilt/
sliding sunroof completely, press the
sunroof switch past the resistance point in
direction of arrow : and release.
X Stopping during express operation:
Move the sunroof switch in any direction.
i Express raising is not available when the
tilt/sliding sunroof is open. The tilt/sliding
sunroof must be closed first.
Closing X
Closing manually: Pull and hold the
sunroof switch to the resistance point in
direction of arrow =.
X Release the sunroof switch when the
desired position is reached.
X Express operation: To close the tilt/
sliding sunroof completely, pull the sunroof
switch past the resistance point in
direction of arrow = and release.
X Stopping during express operation:
Move the sunroof switch in any direction.
Closing when the tilt/sliding sunroof is
blocked G
Warning!
Make sure that nobody can become trapped
and be seriously or even fatally injured when
closing the tilt/sliding sunroof with greater
force or without automatic reversal function.
If the movement of the tilt/sliding sunroof is
blocked during the closing procedure (e.g. by
ice or pollution), the tilt/sliding sunroof will
stop and open slightly.
X Immediately after the tilt/sliding sunroof
has stopped and opened because it was
blocked, pull and hold the sunroof switch Power tilt/sliding sunroof
153Controls in detail
219_AKB; 4; 54, en-US
d2ureepe, Version: 2.11.8.1 2009-05-11T16:21:02+02:00 - Seite 153 Z