2010 MERCEDES-BENZ CLS63AMG change wheel
[x] Cancel search: change wheelPage 194 of 308
Restarting Advanced TPMS
G
Warning!
It is the driver’s responsibility to set the tire
inflation pressure to the recommended cold
tire inflation pressure. Underinflated tires
affect
the ability to steer or brake the vehicle.
You might lose control over the vehicle.
When you restart the TPMS, the system sets
new reference values for each tire.
The TPMS must be restarted when you have
adjusted the tire inflation pressure to a new
level (e.g. because of different load or driving
conditions). The TPMS is then recalibrated to
the current tire inflation pressures.
Restart the TPMS after adjusting the tire
inflation pressure to the inflation pressure
recommended for the vehicle operating
condition. Tire inflation pressure should only
be adjusted on cold tires. Observe the
recommended tire inflation pressure on the
Tire and Loading Information placard on the
driver’s door B-pillar. Some vehicles may have
supplemental tire inflation pressure
information for driving at high speeds or for
vehicle loads less than the maximum loaded
vehicle condition. If such information is
provided, it can be found on the inside of the
fuel filler flap.
Canada only:
The TPMS usually recognizes tire pressure
adjustments and sets new reference values
automatically. You can, however, restart the
TPMS manually as described.
X Using the Tire and Loading Information
placard on the driver’s door
B-pillar
(Y page 193) or the supplemental tire
inflation pressure information on the inside
of the fuel filler flap, make sure the tire
inflation pressure of all four tires is correct.
X Switch on the ignition.
X Press button V or U on the
multifunction steering wheel repeatedly
until the standard display appears in the
multifunction display
(Y page 112). X
Press button &
or * repeatedly until
you see the current inflation pressures for
each tire appear in the display or the
following message appears in the
multifunction display:
Tire pressure
is only displayed
after driving for
a few minutes
X Press the reset button (Y page 108).
The following message will appear in the
multifunction display:
Restart
tire pressure
monitor?
X If you wish to confirm: Press button
W.
The following message will appear in the
multifunction display:
Tire Pressure
Monitor
Restarted
After driving a few minutes the system
verifies that the current tire inflation
pressures
are within the system’s specified
range. Afterwards the current tire inflation
pressures are accepted as reference values
and then monitored.
X If you wish to cancel:
Press button X.
i When the wheel positions have been
changed, the inflation pressure of a tire
may be displayed for the wrong position
temporarily.
After driving for a few minutes,
the inflation pressure will be shown for the
correct position. Maximum tire inflation pressure
G
Warning!
Never exceed the maximum tire inflation
pressure. Follow recommended tire inflation
pressures.
Do not underinflate tires. Underinflated tires
wear excessively and/or unevenly, adversely 192
Tires and wheels
Operation
219_AKB; 4; 54, en-US
d2ureepe,
Version: 2.11.8.1 2009-05-11T16:21:02+02:00 - Seite 192
Page 203 of 308
dimension front vs. rear), tire rotation is not
possible.
If applicable to your vehicle’s tire
configuration, tires can be rotated according
to the tire manufacturer’s recommended
intervals in the tire manufacturer’s warranty
pamphlet located in your vehicle literature
portfolio. If none is available, tires should be
rotated every 3 000 to 6
000 miles (5 000 to
10 000 km), or sooner if necessary, according
to the degree of tire wear. The same rotation
(spinning) direction must be maintained.
Rotate tires before the characteristic tire
wear pattern becomes visible (shoulder wear
on front tires and tread center wear on rear
tires).
Thoroughly clean the mounting face of wheels
and brake disks, i.e. the inner side of the
wheels/tires, during each rotation. Check for
and ensure proper tire inflation pressure.
For information on wheel change, see “Flat
tire” ( Y page 271). Tire labeling
Besides tire name (sales designation) and
manufacturer name, a number of markings
can be found on a tire.
Following are some explanations for the
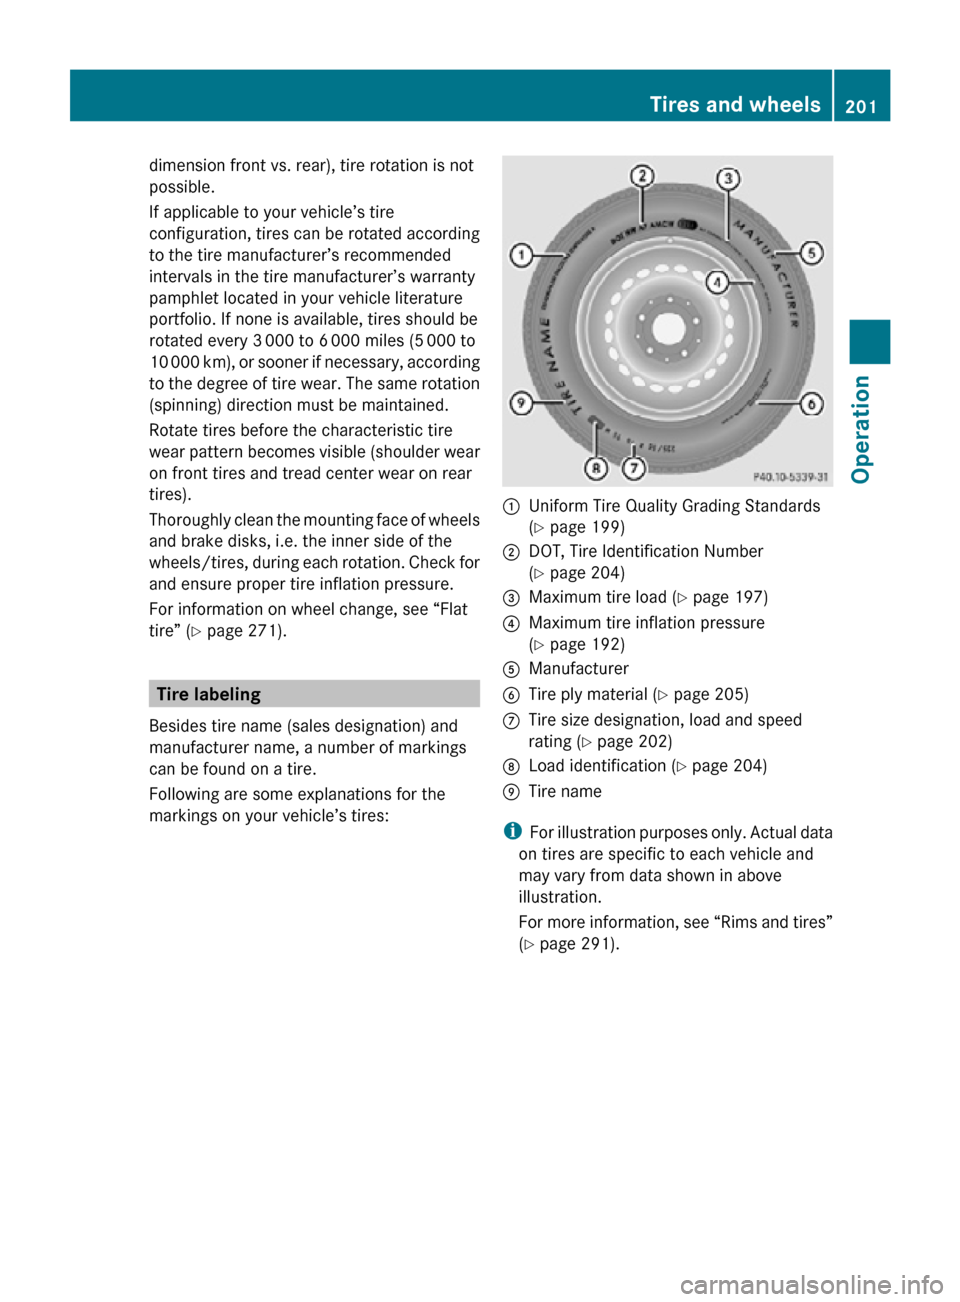
markings on your vehicle’s tires: :
Uniform Tire Quality Grading Standards
(Y page 199)
; DOT, Tire Identification Number
(Y page 204)
= Maximum tire load ( Y page 197)
? Maximum tire inflation pressure
(Y page 192)
A Manufacturer
B Tire ply material ( Y page 205)
C Tire size designation, load and speed
rating (Y page 202)
D Load identification ( Y page 204)
E Tire name
i For illustration purposes only. Actual data
on tires are specific to each vehicle and
may vary from data shown in above
illustration.
For more information, see “Rims and tires”
(Y page 291). Tires and wheels
201Operation
219_AKB; 4; 54, en-US
d2ureepe, Version: 2.11.8.1 2009-05-11T16:21:02+02:00 - Seite 201 Z
Page 222 of 308
An automotive glass cleaner is
recommended.
! Fold the windshield wiper arms back onto
the windshield before turning the SmartKey
in the starter switch or pressing the
KEYLESS-GO start/stop button.
Hold on to the wiper when folding the wiper
arm back. If released, the force of the
impact from the tensioning spring could
crack the windshield.
! To clean the window interior, do not use
a dry cloth, abrasives, solvents or cleaners
containing solvents. Do not touch the
inside of the windows with hard objects
such as an ice scraper or ring. Doing so may
damage the windows.
Light alloy wheels If possible, clean wheels once a week.
X
Use Mercedes-Benz approved Wheel Care,
a soft bristle brush and a strong spray of
water for cleaning the light alloy wheels.
! Only use acid-free cleaning materials.
Acid may cause corrosion or damage the
clear coat.
! The vehicle should not be parked for an
extended period of time immediately after
it
has been cleaned. This applies especially
after the wheel rims have been cleaned
with wheel rim cleaner. Wheel rim cleaners
can lead to increased corrosion of the
brake disks and brake pads. Non-approved
wheel cleaners may also damage the wheel
paint if the vehicle is not driven after
cleaning.
Therefore, the vehicle’s brake system
should always be warmed-up before it is
parked after cleaning. Drive your vehicle for
several minutes to allow the brakes to dry.
When applying Mercedes-Benz approved
Tire Care and Mercedes-Benz approved
Wheel Care products, take care not to
spray them on the brake disks. Plastic and rubber parts X
Use a gentle dishwashing detergent or mild
detergent
for delicate fabrics as a washing
solution.
X Wipe with a cloth moistened in a lukewarm
solution.
The
surface may temporarily change color.
If this is the case, wait for it to dry. G
Warning!
Do not use cleaners or cockpit care sprays
containing
solvents to clean the cockpit or the
steering wheel. Cleaners containing solvents
will make the surface porous and vehicle
occupants could suffer serious injuries from
plastic parts coming loose in the event of air
bag deployment.
! Do not use oil, wax or scouring agents.
Otherwise you may scratch or damage the
surface.
Hard plastic trim items
X Use Mercedes-Benz approved Interior Care
on
a soft, lint-free cloth and apply with light
pressure.
COMAND display !
You
must switch off the COMAND display
and allow it to cool prior to cleaning.
! Do not use any liquids or cleaning agents.
These can damage or even destroy the
COMAND display screen.
X Use a standard microfiber cloth and apply
with light pressure.
Steering wheel and gear selector lever X
Wipe with a damp cloth and dry thoroughly
or clean with Mercedes-Benz approved
Leather Care. 220
Vehicle care
Operation
219_AKB; 4; 54, en-US
d2ureepe,
Version: 2.11.8.1 2009-05-11T16:21:02+02:00 - Seite 220
Page 226 of 308
Vehicle equipment
i This Operator’s Manual describes all
features, standard or optional, potentially
available for your vehicle at the time of
purchase. Please be aware that your
vehicle might not be equipped with all
features described in this manual. Where will I find ...?
First aid kit
! Always keep the storage compartment
under the front passenger seat closed
while the vehicle is in motion.
i Check expiration dates and contents for
completeness at least once a year and
replace missing/expired items.
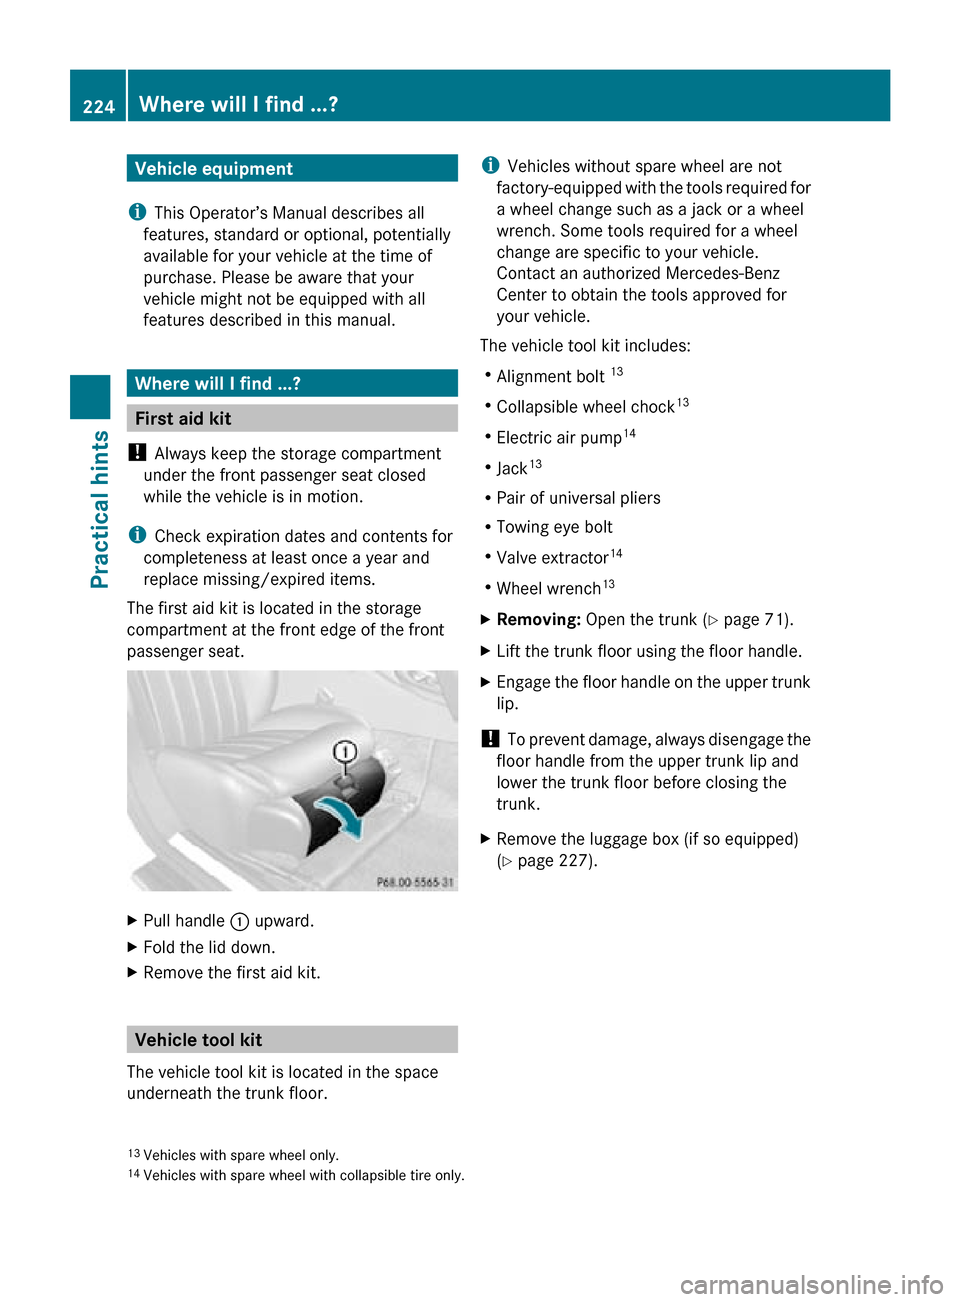
The first aid kit is located in the storage
compartment at the front edge of the front
passenger seat. X
Pull handle : upward.
X Fold the lid down.
X Remove the first aid kit. Vehicle tool kit
The vehicle tool kit is located in the space
underneath the trunk floor. i
Vehicles without spare wheel are not
factory-equipped with the tools required for
a wheel change such as a jack or a wheel
wrench. Some tools required for a wheel
change are specific to your vehicle.
Contact an authorized Mercedes-Benz
Center to obtain the tools approved for
your vehicle.
The vehicle tool kit includes:
R Alignment bolt 13
R Collapsible wheel chock 13
R Electric air pump 14
R Jack 13
R Pair of universal pliers
R Towing eye bolt
R Valve extractor 14
R Wheel wrench 13
X Removing: Open the trunk (Y page 71).
X Lift the trunk floor using the floor handle.
X Engage the floor handle on the upper trunk
lip.
! To prevent damage, always disengage the
floor handle from the upper trunk lip and
lower the trunk floor before closing the
trunk.
X Remove the luggage box (if so equipped)
(Y page 227).
13 Vehicles with spare wheel only.
14 Vehicles with spare wheel with collapsible tire only. 224
Where will I find ...?Practical hints
219_AKB; 4; 54, en-US
d2ureepe,
Version: 2.11.8.1 2009-05-11T16:21:02+02:00 - Seite 224
Page 227 of 308
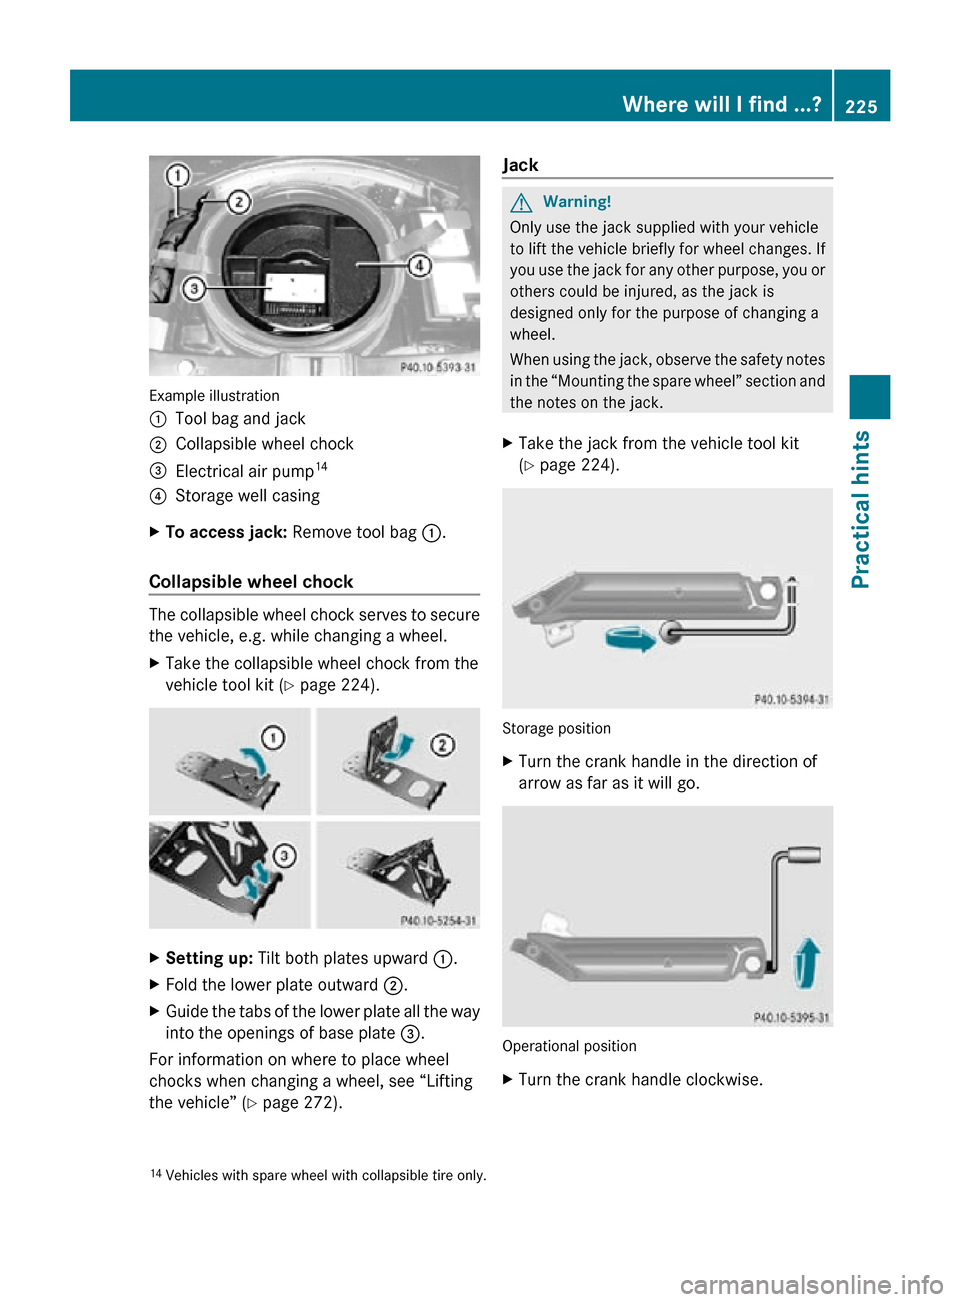
Example illustration
:
Tool bag and jack
; Collapsible wheel chock
= Electrical air pump 14
? Storage well casing
X To access jack: Remove tool bag :.
Collapsible wheel chock The collapsible wheel chock serves to secure
the vehicle, e.g. while changing a wheel.
X
Take the collapsible wheel chock from the
vehicle tool kit (Y page 224). X
Setting up: Tilt both plates upward :.
X Fold the lower plate outward ;.
X Guide the tabs of the lower plate all the way
into the openings of base plate =.
For information on where to place wheel
chocks when changing a wheel, see “Lifting
the vehicle” ( Y page 272). Jack G
Warning!
Only use the jack supplied with your vehicle
to lift the vehicle briefly for wheel changes. If
you use the jack for any other purpose, you or
others could be injured, as the jack is
designed only for the purpose of changing a
wheel.
When using the jack, observe the safety notes
in the “Mounting the spare wheel” section and
the notes on the jack.
X Take the jack from the vehicle tool kit
(Y page 224). Storage position
X
Turn the crank handle in the direction of
arrow as far as it will go. Operational position
X
Turn the crank handle clockwise.
14 Vehicles with spare wheel with collapsible tire only. Where will I find ...?
225Practical hints
219_AKB; 4; 54, en-US
d2ureepe, Version: 2.11.8.1 2009-05-11T16:21:02+02:00 - Seite 225 Z
Page 238 of 308
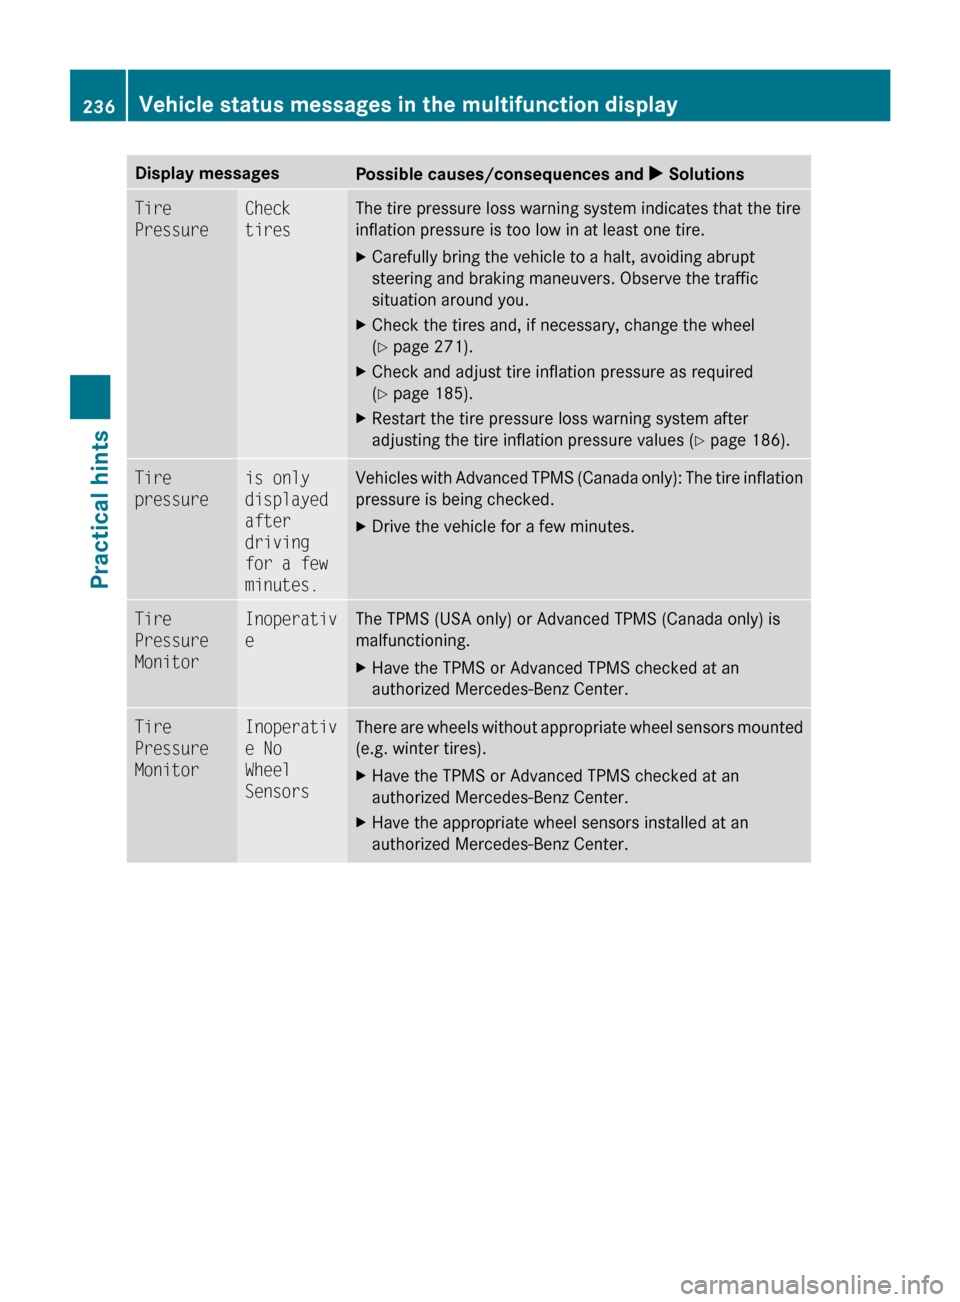
Display messages
Possible causes/consequences and
X SolutionsTire
Pressure Check
tires The tire pressure loss warning system indicates that the tire
inflation pressure is too low in at least one tire.
X
Carefully bring the vehicle to a halt, avoiding abrupt
steering and braking maneuvers. Observe the traffic
situation around you.
X Check the tires and, if necessary, change the wheel
(Y page 271).
X Check and adjust tire inflation pressure as required
(Y page 185).
X Restart the tire pressure loss warning system after
adjusting the tire inflation pressure values
(Y page 186). Tire
pressure is only
displayed
after
driving
for a few
minutes. Vehicles with Advanced TPMS (Canada only): The tire inflation
pressure is being checked.
X
Drive the vehicle for a few minutes. Tire
Pressure
Monitor Inoperativ
e The TPMS (USA only) or Advanced TPMS (Canada only) is
malfunctioning.
X
Have the TPMS or Advanced TPMS checked at an
authorized Mercedes-Benz Center. Tire
Pressure
Monitor Inoperativ
e No
Wheel
Sensors There are wheels without appropriate wheel sensors mounted
(e.g. winter tires).
X
Have the TPMS or Advanced TPMS checked at an
authorized Mercedes-Benz Center.
X Have the appropriate wheel sensors installed at an
authorized Mercedes-Benz Center. 236
Vehicle status messages in the multifunction display
Practical hints
219_AKB; 4; 54, en-US
d2ureepe,
Version: 2.11.8.1 2009-05-11T16:21:02+02:00 - Seite 236
Page 239 of 308

Display messages
Possible causes/consequences and
X SolutionsTire
Pres.
Monitor Wheel
Sensor
Missing Vehicles with Advanced TPMS (Canada only):
At least one sensor is defect (e.g. battery is empty).
The respective tire is indicated by
– – instead of the tire
inflation pressure in the multifunction display.
X Have the Advanced TPMS checked at an authorized
Mercedes-Benz Center.
X Have the wheel sensors installed at an authorized
Mercedes-Benz Center. At least one wheel without appropriate wheel sensors is
mounted (e.g. spare wheel).
The respective tire is indicated by
– – instead of the tire
inflation pressure in the multifunction display.
X Have the Advanced TPMS checked at an authorized
Mercedes-Benz Center.
X Have the wheel sensors installed at an authorized
Mercedes-Benz Center. Tire
Pressure
Monitor Currently
Unavailabl
e The TPMS (USA only) or Advanced TPMS (Canada only) cannot
monitor the tire inflation pressure due to a nearby radio
interference source or insufficient power supply.
As
soon as the causes of the malfunction have been rectified,
the TPMS or Advanced TPMS becomes active again
automatically after a few minutes of driving. Please
correct
the tire
pressure. Vehicles with Advanced TPMS (Canada only):
The tire inflation pressure is too low in at least one tire.
or
The tire inflation pressures of the individual tires differ from
each other significantly.
The tire inflation pressure values are shown in the
multifunction display.
X
Check and correct tire inflation pressure as required
(Y page 185).
X Restart the Advanced TMPS ( Y page 192).Caution
Tire
Pressure
Tire
Defect Vehicles with Advanced TPMS (Canada only):
At least one tire is deflating.
The respective tire is indicated in the multifunction display.
X
Carefully bring the vehicle to a halt, avoiding abrupt
steering and braking maneuvers.
X If necessary, change the wheel (Y page 271). Vehicle status messages in the multifunction display
237
Practical hints
219_AKB; 4; 54, en-US
d2ureepe,Version: 2.11.8.1 2009-05-11T16:21:02+02:00 - Seite 237 Z
Page 240 of 308
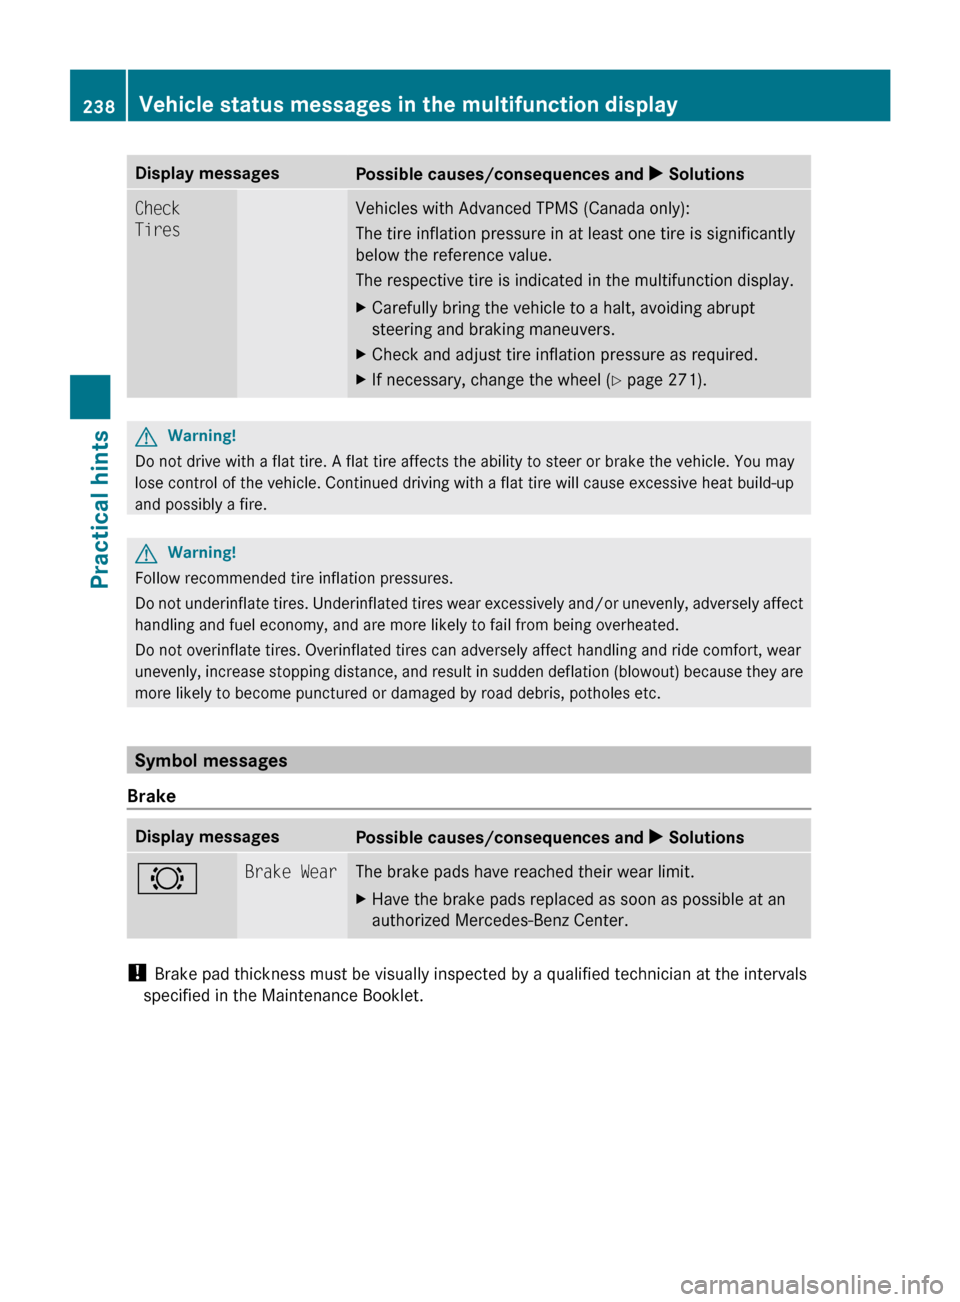
Display messages
Possible causes/consequences and
X SolutionsCheck
Tires Vehicles with Advanced TPMS (Canada only):
The tire inflation pressure in at least one tire is significantly
below the reference value.
The respective tire is indicated in the multifunction display.
X
Carefully bring the vehicle to a halt, avoiding abrupt
steering and braking maneuvers.
X Check and adjust tire inflation pressure as required.
X If necessary, change the wheel (Y page 271). G
Warning!
Do not drive with a flat tire. A flat tire affects the ability to steer or brake the vehicle. You may
lose control of the vehicle. Continued driving with a flat tire will cause excessive heat build-up
and possibly a fire. G
Warning!
Follow recommended tire inflation pressures.
Do not underinflate tires. Underinflated tires wear excessively and/or unevenly, adversely affect
handling and fuel economy, and are more likely to fail from being overheated.
Do not overinflate tires. Overinflated tires can adversely affect handling and ride comfort, wear
unevenly, increase stopping distance, and result in sudden deflation (blowout) because they are
more likely to become punctured or damaged by road debris, potholes etc. Symbol messages
Brake Display messages
Possible causes/consequences and
X Solutions# Brake Wear The brake pads have reached their wear limit.
X
Have the brake pads replaced as soon as possible at an
authorized Mercedes-Benz Center. !
Brake pad thickness must be visually inspected by a qualified technician at the intervals
specified in the Maintenance Booklet. 238
Vehicle status messages in the multifunction displayPractical hints
219_AKB; 4; 54, en-US
d2ureepe,
Version: 2.11.8.1 2009-05-11T16:21:02+02:00 - Seite 238