2010 MERCEDES-BENZ CLS63AMG change wheel
[x] Cancel search: change wheelPage 132 of 308
G
Warning!
The Distronic is a convenience system. Its
speed adjustment reduction capability is
intended to make cruise control more
effective
and usable when traffic speeds vary.
It is not however, intended to, nor does it,
replace the need for extreme care.
The responsibility for the vehicle’s speed,
distance to the preceding vehicle and, most
importantly, brake operation to ensure a safe
stopping distance, always remains with the
driver.
The Distronic cannot take street and traffic
conditions into account. Complex driving
situations are not always fully recognized by
the Distronic. This could result in wrong or
missing distance warnings. G
Warning!
The Distronic adaptive cruise control is not a
substitute for active driving involvement. It
does
not react to pedestrians or on stationary
objects, nor does it recognize or predict the
lane curvature or the movement of preceding
vehicles.
The Distronic can only apply 20% of the
maximum braking power of the vehicle.
It is the driver’s responsibility at all times to
be attentive to the road, weather and traffic
conditions. Additionally, the driver must
provide the steering, braking and other driving
inputs necessary to remain in control of the
vehicle.
High-frequency sources such as toll stations,
speed measuring systems etc. can cause the
Distronic system to malfunction. G
Warning!
The Distronic cannot take road and traffic
conditions into account. Only use the
Distronic if the road, weather and traffic
conditions make it advisable to travel at a
constant speed. G
Warning!
Use of the Distronic can be dangerous on
slippery roads. Rapid changes in tire traction
can result in wheel spin and loss of control.
The Distronic does not function in adverse
sight
and distance conditions. Do not use the
Distronic during conditions of fog, heavy rain,
snow or sleet. G
Warning!
The Distronic cannot take weather conditions
into account. Switch off the Distronic or do
not switch it on if:
R roads
are slippery or covered with snow or
ice. The wheels could lose traction while
braking or accelerating, and the vehicle
could skid.
R the Distronic system sensor cover is dirty
or visibility is diminished due to snow, rain
or fog, for example. The distance control
system functionality could be impaired.
Always pay attention to surrounding traffic
conditions even while the Distronic is
switched on. Otherwise, you may not be able
to recognize dangerous situations until it is
too late. This could cause an accident in which
you and/or others could be injured. G
Warning!
The “Resume” function should only be
operated if the driver is fully aware of the
previously set speed and wishes to resume
this particular preset speed. G
Warning!
Close attention to road and traffic conditions
is imperative at all times, regardless of
whether or not the Distronic is activated.
Use of the Distronic can be dangerous on
winding roads or in heavy traffic because
conditions do not allow safe driving at a
constant speed.
The Distronic will not react to stationary
objects
in the roadway (e.g. a stopped vehicle
in a traffic jam or a disabled vehicle). The 130
Driving systems
Controls in detail
219_AKB; 4; 54, en-US
d2ureepe,
Version: 2.11.8.1 2009-05-11T16:21:02+02:00 - Seite 130
Page 137 of 308
R
the ESP ®
has switched off due to a
malfunction
R you shift the automatic transmission into
neutral position N while driving
The cruise control speed segments in the
multifunction display goes out and an
acoustic warning will sound. Observe
additional messages in the multifunction
display that may appear. G
Warning!
Distronic switches off and releases the brakes
when the vehicle decelerates below the
minimum speed of 20 mph (30 km/h) by
operation of the system. At that time the
driver must apply the brakes in order to
reduce vehicle speed further or bring it to a
stop.
Depressing the accelerator pedal does not
deactivate the Distronic. After a brief
acceleration (e.g. for passing), the Distronic
will resume the last set speed.
Setting the following distance in
Distronic You can set the specified following distance
for Distronic by varying the time setting
between 1.0 and 2.0 seconds. Using this time
setting and the current speed of your vehicle,
Distronic calculates and sets the required
following distance to the preceding vehicle.
The set distance will be shown in the
multifunction display.
G
Warning!
It is up to the driver to exercise discretion to
select the appropriate setting given road
conditions, traffic, driver’s preferred driving
style and applicable laws and driving
recommendations for safe following distance. X
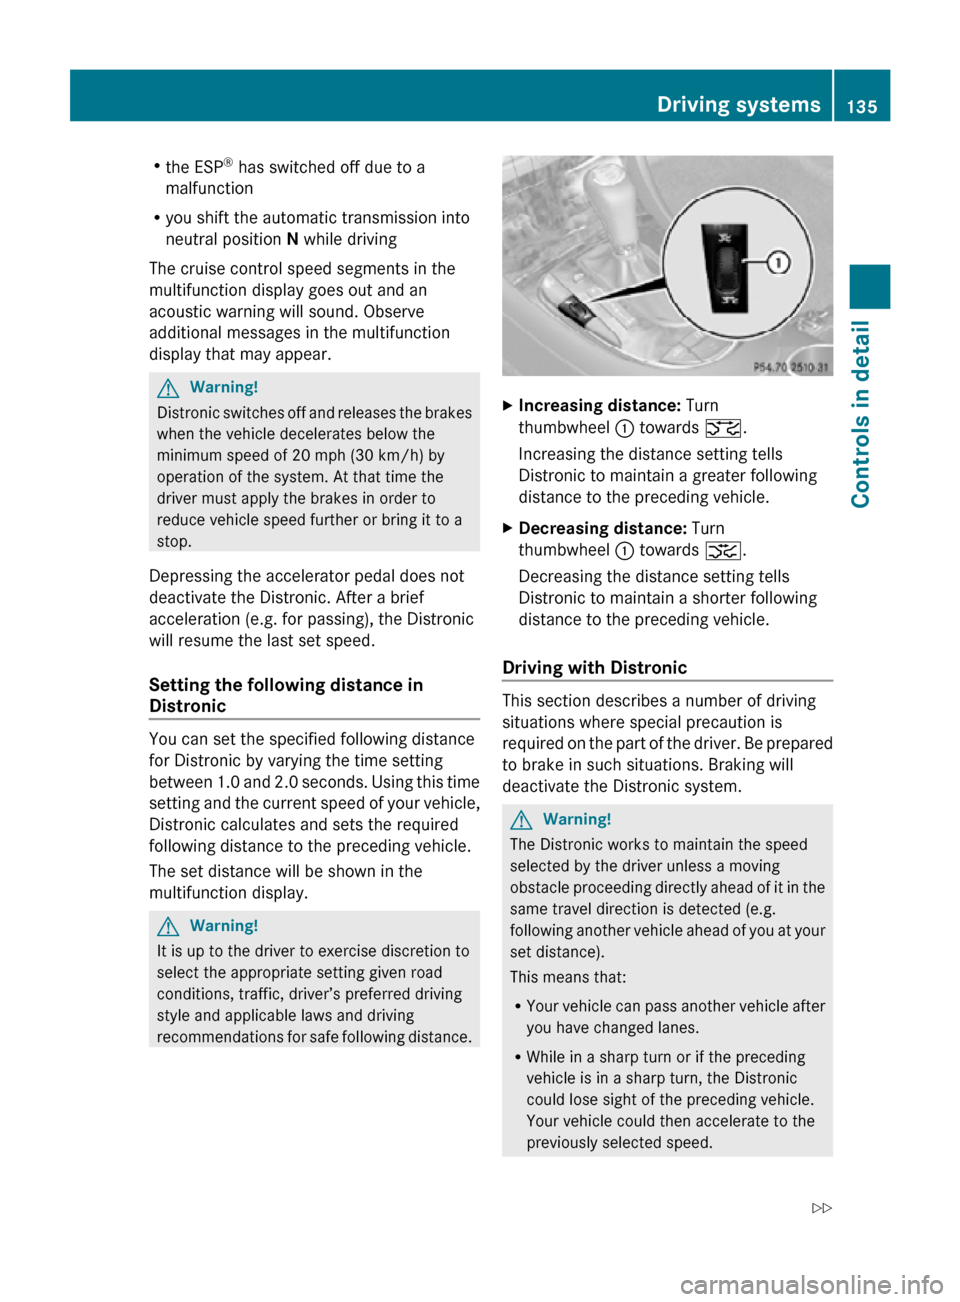
Increasing distance: Turn
thumbwheel : towards ª.
Increasing the distance setting tells
Distronic to maintain a greater following
distance to the preceding vehicle.
X Decreasing distance: Turn
thumbwheel : towards ¥.
Decreasing the distance setting tells
Distronic to maintain a shorter following
distance to the preceding vehicle.
Driving with Distronic This section describes a number of driving
situations where special precaution is
required on the part of the driver. Be prepared
to brake in such situations. Braking will
deactivate the Distronic system.
G
Warning!
The Distronic works to maintain the speed
selected by the driver unless a moving
obstacle proceeding directly ahead of it in the
same travel direction is detected (e.g.
following another vehicle ahead of you at your
set distance).
This means that:
R Your vehicle can pass another vehicle after
you have changed lanes.
R While in a sharp turn or if the preceding
vehicle is in a sharp turn, the Distronic
could lose sight of the preceding vehicle.
Your vehicle could then accelerate to the
previously selected speed. Driving systems
135Controls in detail
219_AKB; 4; 54, en-US
d2ureepe, Version: 2.11.8.1 2009-05-11T16:21:02+02:00 - Seite 135 Z
Page 140 of 308
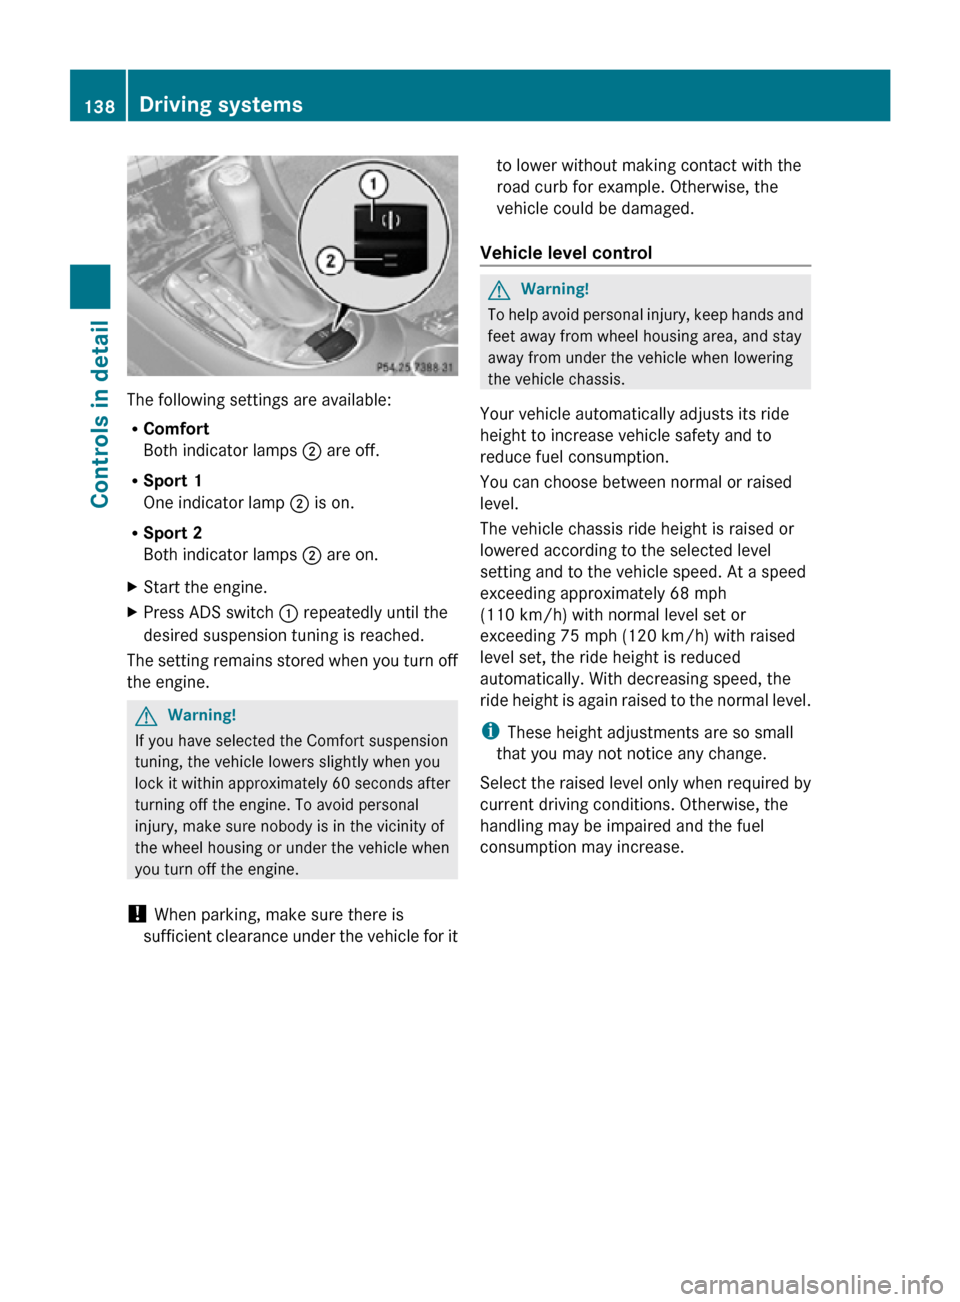
The following settings are available:
R
Comfort
Both indicator lamps ; are off.
R Sport 1
One indicator lamp ; is on.
R Sport 2
Both indicator lamps ; are on.
X Start the engine.
X Press ADS switch : repeatedly until the
desired suspension tuning is reached.
The setting remains stored when you turn off
the engine. G
Warning!
If you have selected the Comfort suspension
tuning, the vehicle lowers slightly when you
lock it within approximately 60 seconds after
turning off the engine. To avoid personal
injury, make sure nobody is in the vicinity of
the wheel housing or under the vehicle when
you turn off the engine.
! When parking, make sure there is
sufficient clearance under the vehicle for it to lower without making contact with the
road curb for example. Otherwise, the
vehicle could be damaged.
Vehicle level control G
Warning!
To help avoid personal injury, keep hands and
feet away from wheel housing area, and stay
away from under the vehicle when lowering
the vehicle chassis.
Your vehicle automatically adjusts its ride
height to increase vehicle safety and to
reduce fuel consumption.
You can choose between normal or raised
level.
The vehicle chassis ride height is raised or
lowered according to the selected level
setting and to the vehicle speed. At a speed
exceeding approximately 68 mph
(110 km/h) with normal level set or
exceeding 75 mph (120 km/h) with raised
level set, the ride height is reduced
automatically. With decreasing speed, the
ride height is again raised to the normal level.
i These height adjustments are so small
that you may not notice any change.
Select the raised level only when required by
current driving conditions. Otherwise, the
handling may be impaired and the fuel
consumption may increase. 138
Driving systemsControls in detail
219_AKB; 4; 54, en-US
d2ureepe,
Version: 2.11.8.1 2009-05-11T16:21:02+02:00 - Seite 138
Page 168 of 308
relevant cellular phone network is not
available).
The message
Call Failed appears in the
multifunction display for approximately
10 seconds.
Should this occur, assistance must be
summoned by other means.
i The “911” emergency call system is a
public service. Using it without due cause
is a criminal offense.
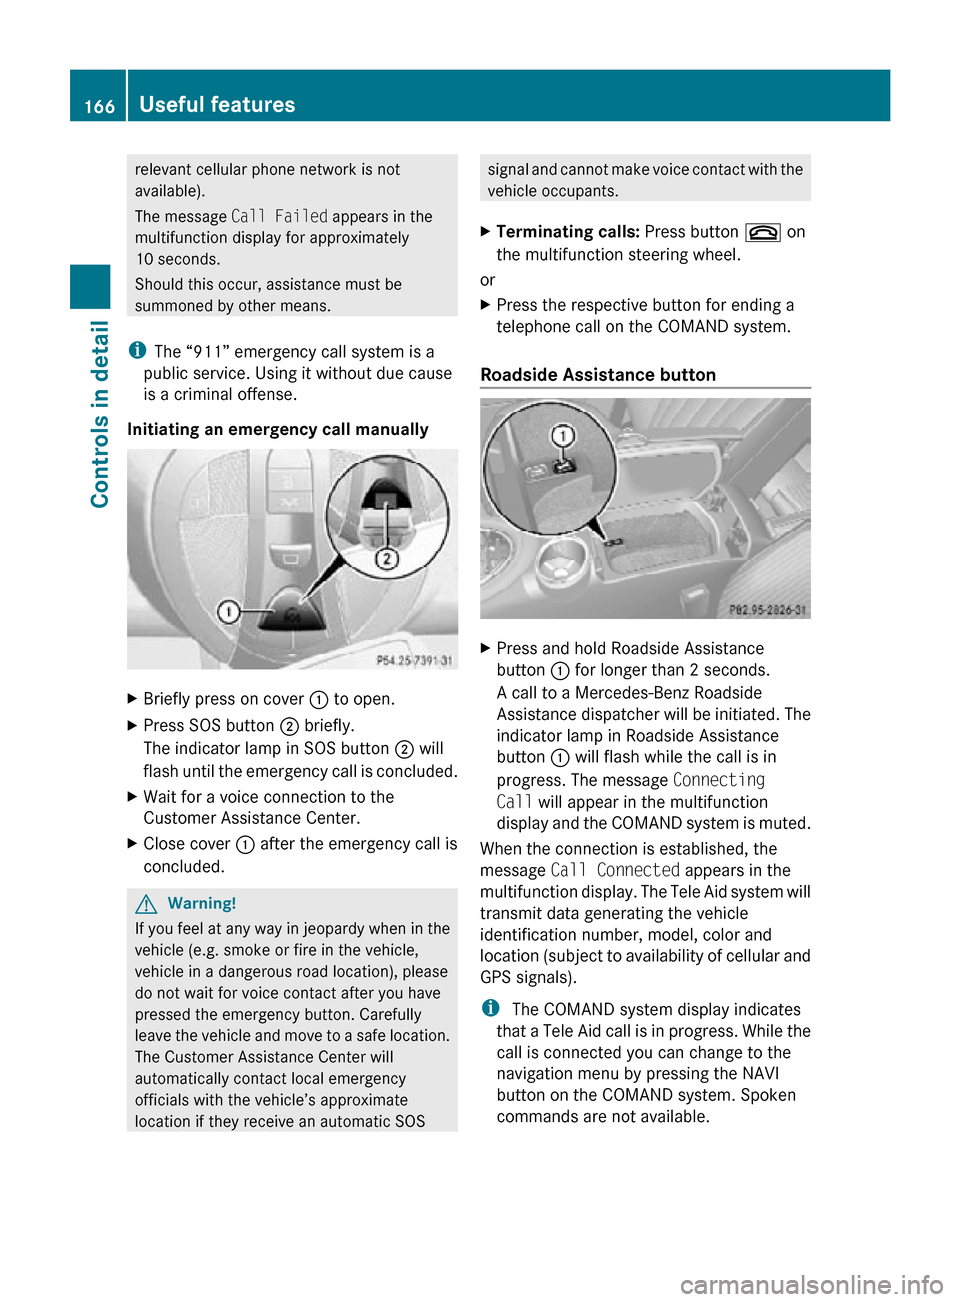
Initiating an emergency call manually X
Briefly press on cover : to open.
X Press SOS button ; briefly.
The indicator lamp in SOS button ; will
flash until the emergency call is concluded.
X Wait for a voice connection to the
Customer Assistance Center.
X Close cover : after the emergency call is
concluded. G
Warning!
If you feel at any way in jeopardy when in the
vehicle (e.g. smoke or fire in the vehicle,
vehicle in a dangerous road location), please
do not wait for voice contact after you have
pressed the emergency button. Carefully
leave the vehicle and move to a safe location.
The Customer Assistance Center will
automatically contact local emergency
officials with the vehicle’s approximate
location if they receive an automatic SOS signal and cannot make voice contact with the
vehicle occupants.
X Terminating calls: Press button ~ on
the multifunction steering wheel.
or
X Press the respective button for ending a
telephone call on the COMAND system.
Roadside Assistance button X
Press and hold Roadside Assistance
button : for longer than 2 seconds.
A call to a Mercedes-Benz Roadside
Assistance dispatcher will be initiated. The
indicator lamp in Roadside Assistance
button : will flash while the call is in
progress. The message Connecting
Call will appear in the multifunction
display and the COMAND system is muted.
When the connection is established, the
message Call Connected appears in the
multifunction display. The Tele Aid system will
transmit data generating the vehicle
identification number, model, color and
location (subject to availability of cellular and
GPS signals).
i The COMAND system display indicates
that a Tele Aid call is in progress. While the
call is connected you can change to the
navigation menu by pressing the NAVI
button on the COMAND system. Spoken
commands are not available. 166
Useful featuresControls in detail
219_AKB; 4; 54, en-US
d2ureepe,
Version: 2.11.8.1 2009-05-11T16:21:02+02:00 - Seite 166
Page 169 of 308

A voice connection between the Roadside
Assistance dispatcher and the occupants of
the vehicle will be established.
X
Describe the nature of the need for
assistance.
The Mercedes-Benz Roadside Assistance
dispatcher will either dispatch a qualified
Mercedes-Benz technician or arrange to tow
your vehicle to the nearest authorized
Mercedes-Benz Center. For services such as
labor and/or towing, charges may apply.
Refer to the Roadside Assistance manual for
more information.
Sign and Drive services (USA only):
Services such as a jump start, a few gallons
of fuel or the replacement of a flat tire with
the vehicle spare wheel are obtainable at no
charge.
i If the indicator lamp in Roadside
Assistance button : is flashing
continuously and there was no voice
connection to the Customer Assistance
Center established, then the Tele Aid
system could not initiate a Roadside
Assistance call (e.g. the relevant cellular
phone network is not available). The
message Call Failed appears in the
multifunction display.
X Terminating calls: Press button ~ on
the multifunction steering wheel.
or
X Press the respective button for ending a
telephone call on the COMAND system. Information button X
Press and hold Information button : for
longer than 2 seconds.
A call to the Customer Assistance Center
will be initiated. The indicator lamp in
Information button : will flash while the
call is in progress. The message
Connecting Call will appear in the
multifunction display and the COMAND
system is muted.
When the connection is established, the
message Call Connected appears in the
multifunction display. The Tele Aid system will
transmit data generating the vehicle
identification number, model, color and
location (subject to availability of cellular and
GPS signals).
i The COMAND system display indicates
that a Tele Aid call is in progress. While the
call is connected you can change to the
navigation menu by pressing the NAVI
button on the COMAND system. Spoken
commands are not available.
A voice connection between the Customer
Assistance Center representative and the
occupants of the vehicle will be established.
Information regarding the operation of your
vehicle, the nearest authorized Mercedes-
Benz Center or Mercedes-Benz USA products
and services is available to you.
For more details concerning the Tele Aid
system, please visit www.mbusa.com (USA
only), log in to “Owner’s Online” and visit the
“My Tele Aid” section to learn more. Useful features
167Controls in detail
219_AKB; 4; 54, en-US
d2ureepe, Version: 2.11.8.1 2009-05-11T16:21:02+02:00 - Seite 167 Z
Page 185 of 308

should turn on the hazard warning flashers,
carefully
slow down, and drive with caution to
an area which is a safe distance from the road.
Inspect the tires and the vehicle underbody
for possible damage. If the vehicle or tires
appear unsafe, have the vehicle towed to the
nearest authorized Mercedes-Benz Center or
tire dealer for repairs. G
Warning!
Do not drive with a flat tire. A flat tire affects
the ability to steer or brake the vehicle. You
could lose control of the vehicle. Continued
driving
with a flat tire or driving at high speed
with a flat tire will cause excessive heat build-
up and possibly a fire. Important guidelines
R Only
use sets of tires and rims of the same
type and make.
R Tires must be of the correct size for the rim.
R Break in new tires for approximately
60 miles (100 km) at moderate speeds.
R Regularly check the tires and rims for
damage. Dented or bent rims can cause tire
inflation pressure loss and damage to the
tire beads.
R If the vehicle is heavily loaded, check tire
inflation pressure and correct as required.
R Do not allow your tires to wear down too
far. Adhesion properties on wet roads are
sharply reduced at tread depths of less
than 1
/ 8 in (3 mm).
R When replacing individual tires, you should
mount new tires on the front wheels first
(on vehicles with same-sized wheels all
around). Recommended tire inflation pressure
G
Warning!
Follow recommended tire inflation pressures.
Do not underinflate tires. Underinflated tires
wear excessively and/or unevenly, adversely
affect handling and fuel economy, and are
more likely to fail from being overheated.
Do
not overinflate tires. Overinflated tires can
adversely affect handling and ride comfort,
wear unevenly, increase stopping distance,
and result in sudden deflation (blowout)
because they are more likely to become
punctured or damaged by road debris,
potholes etc.
Do not overload the tires by exceeding the
specified load limit as indicated on the Tire
and Loading Information placard on the
driver’s door B-pillar. Overloading the tires
can overheat them, possibly causing a
blowout. Overloading the tires can also result
in handling or steering problems, or brake
failure.
Your vehicle is equipped with the Tire and
Loading Information placard located on the
driver’s door B-pillar ( Y page 193).
The tire inflation pressure should be checked
regularly. Only adjust the tire inflation
pressure on cold tires. The tires can be
considered cold if the vehicle has been
parked for at least 3 hours or driven less than
1 mile (1.6 km). Depending on the ambient
temperature, the driving speed and the tire
load, the tire temperature changes. When the
tire temperature changes by 18‡ (10†), the
tire inflation pressure will change by
approximately 1.5 psi (0.1 bar). Keep this in
mind when checking tire inflation pressure on
warm tires and adjust the tire pressure only
if the tire inflation pressure is too low for the
current operating conditions. If you check the
tire inflation pressure when the tires are
warm, the reading will be higher than the cold
reading. This is normal. Do not let air out to
match the specified cold tire inflation Tires and wheels
183
Operation
219_AKB; 4; 54, en-US
d2ureepe, Version: 2.11.8.1 2009-05-11T16:21:02+02:00 - Seite 183 Z
Page 188 of 308
Do not underinflate tires. Underinflated tires
wear excessively and/or unevenly, adversely
affect handling and fuel economy, and are
more likely to fail from being overheated.
Do
not overinflate tires. Overinflated tires can
adversely affect handling and ride comfort,
wear unevenly, increase stopping distance,
and result in sudden deflation (blowout)
because they are more likely to become
punctured or damaged by road debris,
potholes etc.
Do not overload the tires by exceeding the
specified load limit as indicated on the Tire
and Loading Information placard on the
driver’s door B-pillar. Overloading the tires
can overheat them, possibly causing a
blowout. Overloading the tires can also result
in handling or steering problems, or brake
failure.
Check the tire inflation pressure at least once
a month.
Check and adjust the tire inflation pressure
when the tires are cold ( Y page 183).
Checking tire inflation pressure
manually Follow the steps below to achieve correct tire
inflation pressure:
X
Remove the cap from the valve on one tire.
X Firmly press a tire gauge onto the valve.
X Read the tire inflation pressure on the tire
gauge and check against the
recommended
tire inflation pressure on the
Tire and Loading Information placard on the
driver’s door B-pillar ( Y page 193). If
necessary, add air to achieve the
recommended tire inflation pressure.
X If you have overfilled the tire, release tire
inflation pressure by pushing the metal
stem of the valve with e.g. a tip of a pen.
Then recheck the tire inflation pressure
with the tire gauge.
X Install the valve cap.
X Repeat this procedure for each tire. Tire pressure loss warning system
(Canada only) While the vehicle is being driven, the tire
pressure loss warning system monitors the
set
tire inflation pressures by evaluating each
wheel’s rotational speed. This allows the
system to detect a significant loss of pressure
in a tire. If a wheel’s rotational speed changes
due to falling tire inflation pressure, you will
see a corresponding warning message in the
multifunction display.
The tire pressure loss warning system may
function in a restricted manner or with a delay
R when snow chains are mounted to the
vehicle
R in the presence of ice and snow
R when you are driving on a loose surface
(e.g. sand or gravel)
R when you are driving in a very sporty
manner (involving rapid acceleration or
high speeds in curves)
R when you are driving with a loaded roof
rack or heavily laden vehicle G
Warning!
When the multifunction display shows the
message Tire
Pressure Check Tires , one
or more of your tires are significantly
underinflated. You should stop and check
your tires as soon as possible, and inflate
them to the proper tire inflation pressure as
indicated on the vehicle’s Tire and Loading
Information placard or on the tire inflation
pressure label.
Driving on a significantly underinflated tire
causes the tire to overheat and can lead to
tire failure. Underinflation also reduces fuel
efficiency and tire tread life, and may affect
the vehicle’s handling and stopping ability. 186
Tires and wheels
Operation
219_AKB; 4; 54, en-US
d2ureepe,
Version: 2.11.8.1 2009-05-11T16:21:02+02:00 - Seite 186
Page 189 of 308
Each tire, including the spare, should be
checked at least once a month when cold.
Inflate the tires to the recommended tire
inflation pressure as specified on
R
the
Tire and Loading Information placard on
the driver’s door B-pillar
or
R the tire inflation pressure label located on
the inside of the fuel filler flap
i The recommended tire inflation pressures
for your vehicle can be found on
R the Tire and Loading Information placard
located on the driver’s door B-pillar
(Y page 193)
R the tire inflation pressure label on the
inside of the fuel filler flap
The tire inflation pressures are not listed in
the Operator’s Manual. G
Warning!
The tire pressure loss warning system does
not
provide a warning for wrongly selected tire
inflation pressures. Always adjust tire
inflation pressure according to the Tire and
Loading Information placard on the driver’s
door B-pillar or on the tire inflation pressure
label located on the inside of the fuel filler flap.
The tire pressure loss warning system does
not replace regular checks of the tire inflation
pressures since a gradual pressure loss in
more than one tire cannot be detected by the
tire pressure loss warning system.
The tire pressure loss warning system is not
able to issue a warning due to a sudden
dramatic loss of tire inflation pressure (e.g.
tire blowout caused by a foreign object). In
this case bring the vehicle to a halt by carefully
applying the brakes and avoiding abrupt
steering maneuvers. Restarting the tire pressure loss warning
system
The tire pressure loss warning system must
be restarted in the following situations:
R
after you have changed the tire inflation
pressure
R after
you have replaced the wheels or tires
R after you have installed new wheels or tires
X Using the Tire and Loading Information
placard on the driver’s door
B-pillar or, if
available, the tire inflation pressure label on
the inside of the fuel filler flap, make sure
the tire inflation pressure of all four tires is
correct. G
Warning!
The tire pressure loss warning system can
only
warn you in a reliable manner if you have
set the correct tire inflation pressures for
each tire.
If an incorrect tire inflation pressure was set,
the system will monitor the pressure
according to the incorrect value.
X Switch on the ignition.
X Make sure the standard display appears in
the multifunction display
(Y page 112).
X Press button * or & on the
multifunction steering wheel repeatedly
until the following message appears in the
multifunction display:
Run Flat Indicator
Active
Menu: R-Button
X Press the reset button (Y page 109).
The following message will appear in the
multifunction display:
Restart
Run Flat Indicator?
X If you wish to confirm: Press button
W.
The following message will appear in the
multifunction display:
Run Flat Indicator
Restarted Tires and wheels
187
Operation
219_AKB; 4; 54, en-US
d2ureepe, Version: 2.11.8.1 2009-05-11T16:21:02+02:00 - Seite 187 Z