2010 MERCEDES-BENZ CLS63AMG clock
[x] Cancel search: clockPage 229 of 308
X
Unscrew the valve cap from the valve of the
collapsible tire.
X Unscrew the valve insert from the valve
using the valve extractor integrated in the
valve cap.
X Allow the air to escape.
i It may take a few minutes for the
collapsible tire to deflate completely.
X Screw the valve insert back into the valve.
X Screw the valve cap back onto the valve.
i Vehicles with 19" spare wheel only:
Before placing the spare wheel in the spare
wheel well fasten tensioning straps, see
“Compressing the collapsible tire”
(Y page 227).
X Place spare wheel : into the spare wheel
well (Y page 226).
X Secure spare wheel : by turning retaining
screw = clockwise (Y page 226).
Compressing the collapsible tire
This description applies to vehicles with
19" spare wheel only.
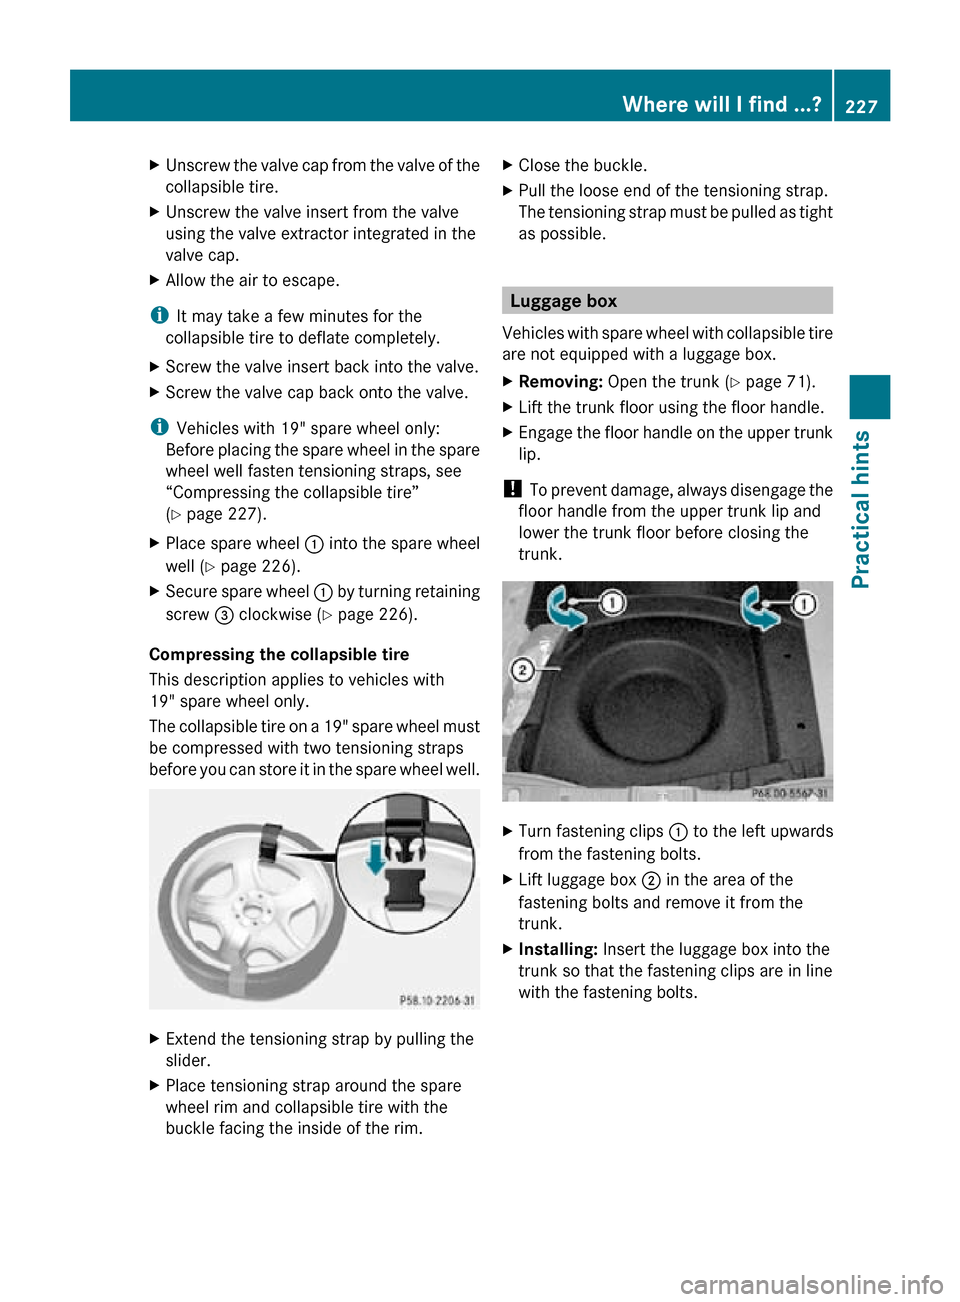
The collapsible tire on a 19" spare wheel must
be compressed with two tensioning straps
before you can store it in the spare wheel well. X
Extend the tensioning strap by pulling the
slider.
X Place tensioning strap around the spare
wheel rim and collapsible tire with the
buckle facing the inside of the rim. X
Close the buckle.
X Pull the loose end of the tensioning strap.
The tensioning strap must be pulled as tight
as possible. Luggage box
Vehicles with spare wheel with collapsible tire
are not equipped with a luggage box.
X Removing: Open the trunk (Y page 71).
X Lift the trunk floor using the floor handle.
X Engage the floor handle on the upper trunk
lip.
! To prevent damage, always disengage the
floor handle from the upper trunk lip and
lower the trunk floor before closing the
trunk. X
Turn fastening clips : to the left upwards
from the fastening bolts.
X Lift luggage box ; in the area of the
fastening bolts and remove it from the
trunk.
X Installing: Insert the luggage box into the
trunk so that the fastening clips are in line
with the fastening bolts. Where will I find ...?
227Practical hints
219_AKB; 4; 54, en-US
d2ureepe, Version: 2.11.8.1 2009-05-11T16:21:02+02:00 - Seite 227 Z
Page 264 of 308
X
Move locking tab : in the direction of
arrow.
X Slide mechanical key ; out of the housing.
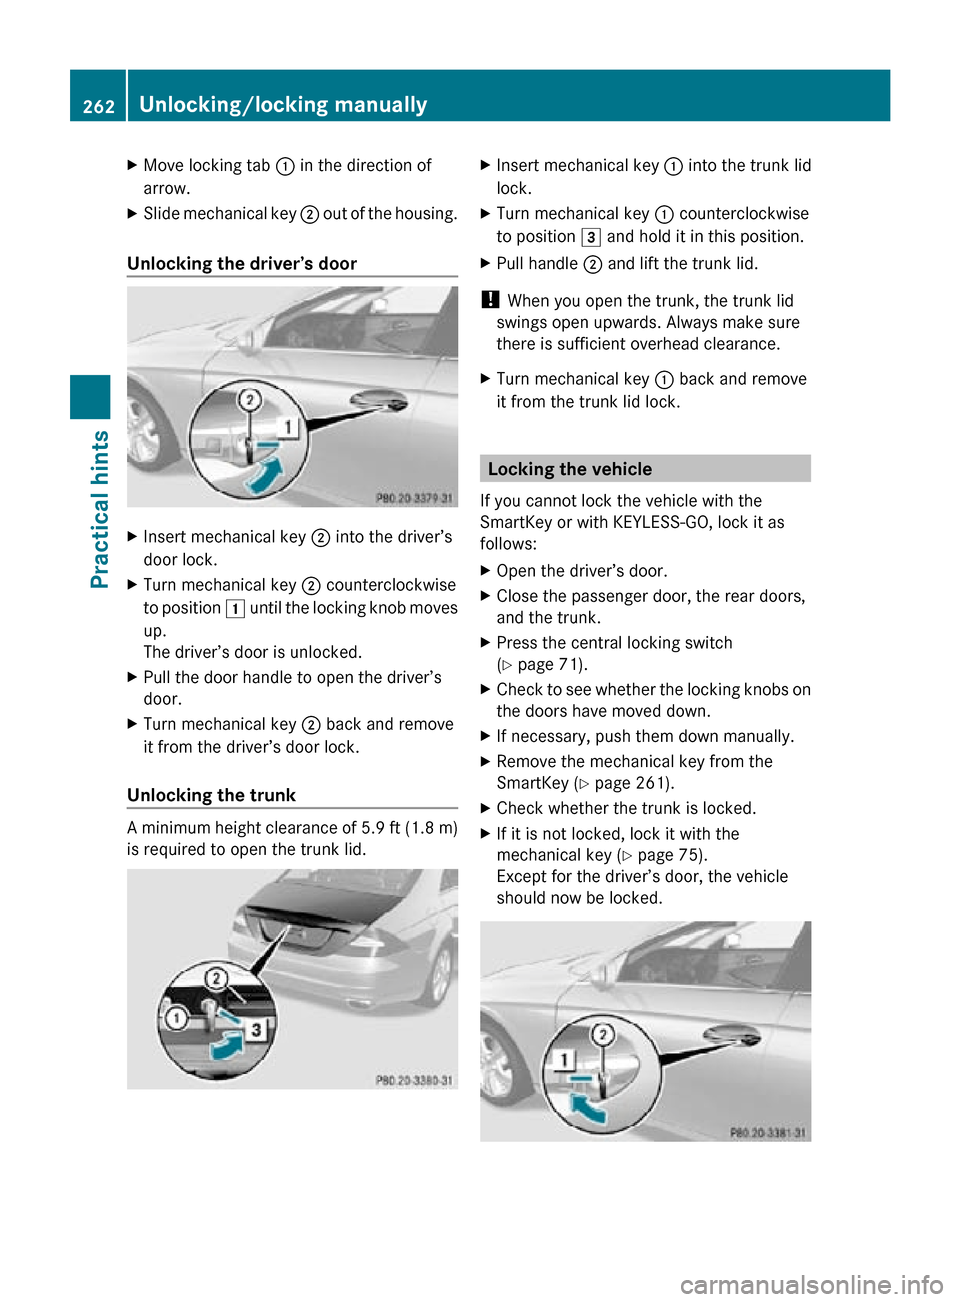
Unlocking the driver’s door X
Insert mechanical key ; into the driver’s
door lock.
X Turn mechanical key ; counterclockwise
to position 1 until the locking knob moves
up.
The driver’s door is unlocked.
X Pull the door handle to open the driver’s
door.
X Turn mechanical key ; back and remove
it from the driver’s door lock.
Unlocking the trunk A minimum height clearance of 5.9 ft (1.8 m)
is required to open the trunk lid. X
Insert mechanical key : into the trunk lid
lock.
X Turn mechanical key : counterclockwise
to position 3 and hold it in this position.
X Pull handle ; and lift the trunk lid.
! When you open the trunk, the trunk lid
swings open upwards. Always make sure
there is sufficient overhead clearance.
X Turn mechanical key : back and remove
it from the trunk lid lock. Locking the vehicle
If you cannot lock the vehicle with the
SmartKey or with KEYLESS-GO, lock it as
follows:
X Open the driver’s door.
X Close the passenger door, the rear doors,
and the trunk.
X Press the central locking switch
(Y page 71).
X Check to see whether the locking knobs on
the doors have moved down.
X If necessary, push them down manually.
X Remove the mechanical key from the
SmartKey (Y page 261).
X Check whether the trunk is locked.
X If it is not locked, lock it with the
mechanical key ( Y page 75).
Except for the driver’s door, the vehicle
should now be locked. 262
Unlocking/locking manuallyPractical hints
219_AKB; 4; 54, en-US
d2ureepe,
Version: 2.11.8.1 2009-05-11T16:21:02+02:00 - Seite 262
Page 265 of 308

X
Insert mechanical key ; into the driver’s
door lock.
X Turn mechanical key ; clockwise to
position 1.
The driver’s door is locked.
X Turn mechanical key ; back and remove
it from the driver’s door lock.
i This procedure does not arm the anti-
theft alarm system, nor does it lock the fuel
filler flap. Manually unlocking the gear selector
lever
If the vehicle’s electrical system is
malfunctioning, the gear selector lever could
remain locked in park position P. In this case
the gear selector lever can be unlocked
manually, e.g. to tow the vehicle.
X Engage the parking brake. !
Do not use sharp objects to loosen the
gear selector lever cover in the center
console, as this could damage the gear
selector lever cover or the center console.
X Insert a flat, blunt object into the left edge
of gear selector lever cover : at the
positions indicated by the arrows.
X Loosen gear selector lever cover : using
this object. X
Pull gear selector lever cover : out and
remove.
X Simultaneously push down release ; and
move the gear selector lever out of park
position P.
The gear selector lever is unlocked.
i The gear selector lever is locked again as
soon as you move it back to park position
P. Fuel filler flap
G
Warning!
Avoid contact with the vehicle walls as they
may contain sharp edges. Otherwise, you
could injure yourself while releasing the fuel
filler flap.
In case the central locking system does not
release the fuel filler flap, you can open it
manually.
The fuel filler flap release is located on the
passenger side in the trunk behind the side
trim panel.
X Open the trunk (Y page 71).
X Remove side trim panel.
i Removing the side trim panel is a
demanding process. We recommend that
you contact Roadside Assistance
(Y page 166) if you do not feel to have the
ability to perform this process. Unlocking/locking manually
263Practical hints
219_AKB; 4; 54, en-US
d2ureepe, Version: 2.11.8.1 2009-05-11T16:21:02+02:00 - Seite 263 Z
Page 270 of 308
Notes on bulb replacement
!
Do not replace LEDs or bulbs not
described in this section. You could
otherwise damage the LEDs, the bulbs or
parts of the vehicle. Only have the LEDs and
bulbs replaced at an authorized Mercedes-
Benz Center. G
Observe Safety notes, see page 266.
R Only use 12-volt bulbs of the same type and
with the specified watt rating.
R Switch the lights off before changing a bulb
to prevent short circuits.
R Always use a clean lint-free cloth when
handling bulbs.
R Your hands should be dry and free of oil and
grease.
R If the newly installed bulb does not come
on, contact an authorized Mercedes-Benz
Center.
i Mercedes-Benz recommends using
Longlife (LL) bulbs. Replacing bulbs for front lamps
G
Warning!
Do not remove the cover for the Bi-Xenon
headlamp. Because of high voltage in Xenon
lamps, it is dangerous to replace the bulb or
repair the lamp and its components. It is
recommended to have such work done by a
qualified technician.
Before you start to replace a bulb for a front
lamp, do the following:
X Switch off the ignition.
X Turn the exterior lamp switch to position
$.
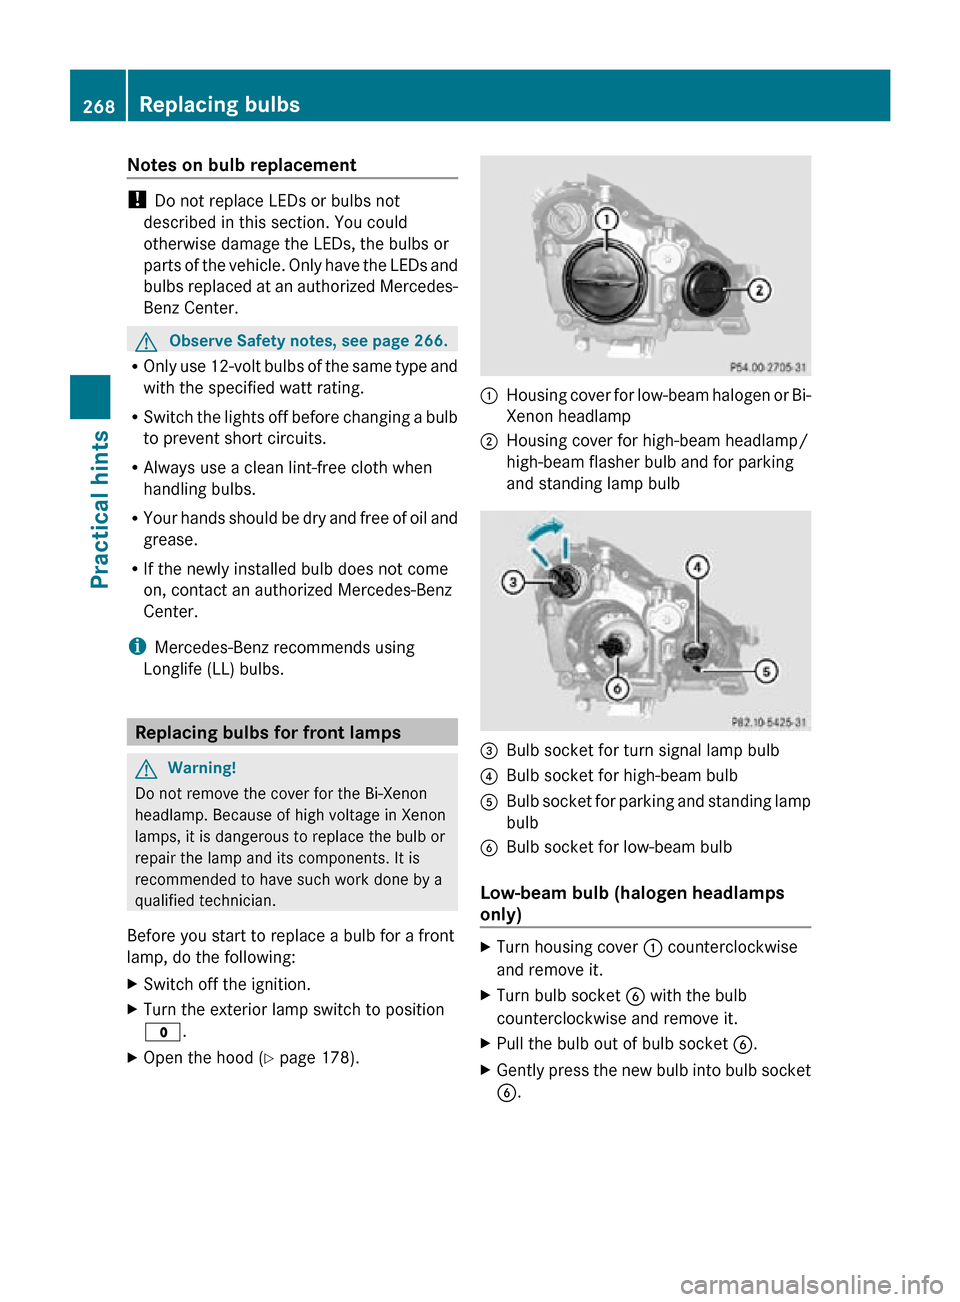
X Open the hood (Y page 178). :
Housing cover for low-beam halogen or Bi-
Xenon headlamp
; Housing cover for high-beam headlamp/
high-beam flasher bulb and for parking
and standing lamp bulb =
Bulb socket for turn signal lamp bulb
? Bulb socket for high-beam bulb
A Bulb socket for parking and standing lamp
bulb
B Bulb socket for low-beam bulb
Low-beam bulb (halogen headlamps
only) X
Turn housing cover : counterclockwise
and remove it.
X Turn bulb socket B with the bulb
counterclockwise and remove it.
X Pull the bulb out of bulb socket B.
X Gently press the new bulb into bulb socket
B. 268
Replacing bulbsPractical hints
219_AKB; 4; 54, en-US
d2ureepe,
Version: 2.11.8.1 2009-05-11T16:21:02+02:00 - Seite 268
Page 271 of 308
X
Place bulb socket B back into the housing
and turn it clockwise until it engages.
X Align housing cover : and turn it
clockwise until it engages.
High-beam and high-beam flasher bulb
(halogen headlamps only)/high-beam
flasher bulb (Bi-Xenon headlamps only) X
Turn housing cover ; counterclockwise
and remove it.
X Turn bulb socket ? with the bulb
counterclockwise and remove it.
X Pull the bulb out of bulb socket ?.
X Gently press the new bulb into bulb
socket ?.
X Place bulb socket ? back into the housing
and turn it clockwise until it engages.
X Align housing cover ; and turn it
clockwise until it engages.
Front turn signal lamp bulb X
Turn bulb socket = with the bulb
counterclockwise and remove it.
X Gently press onto the bulb and turn it
counterclockwise out of bulb socket =.
X Gently press the new bulb into bulb socket
= and turn it clockwise until it engages.
X Place bulb socket = back into the housing
and turn it clockwise until it engages.
Parking and standing lamp bulb Halogen headlamps
X
Turn housing cover ; counterclockwise
and remove it.
X Pull out bulb socket A with the bulb.
X Pull the bulb out of bulb socket A.
X Gently press the new bulb into bulb socket
A.
X Press bulb socket A back into the lamp.
X Align housing cover ; and turn it
clockwise. Bi-Xenon headlamps
In vehicles with Bi-Xenon headlamps, the
bulbs of the parking and standing lamps are
LEDs.
!
Do not replace the LEDs yourself. You
could otherwise damage the LEDs or parts
of the vehicle. Only have the LEDs replaced
at an authorized Mercedes-Benz Center. Replacing bulbs for rear lamps
Tail lamp unit The tail lamps are equipped with HiP bulbs
and LEDs. Have them replaced at an
authorized Mercedes-Benz Center.
G
Observe Safety notes, see page 266.
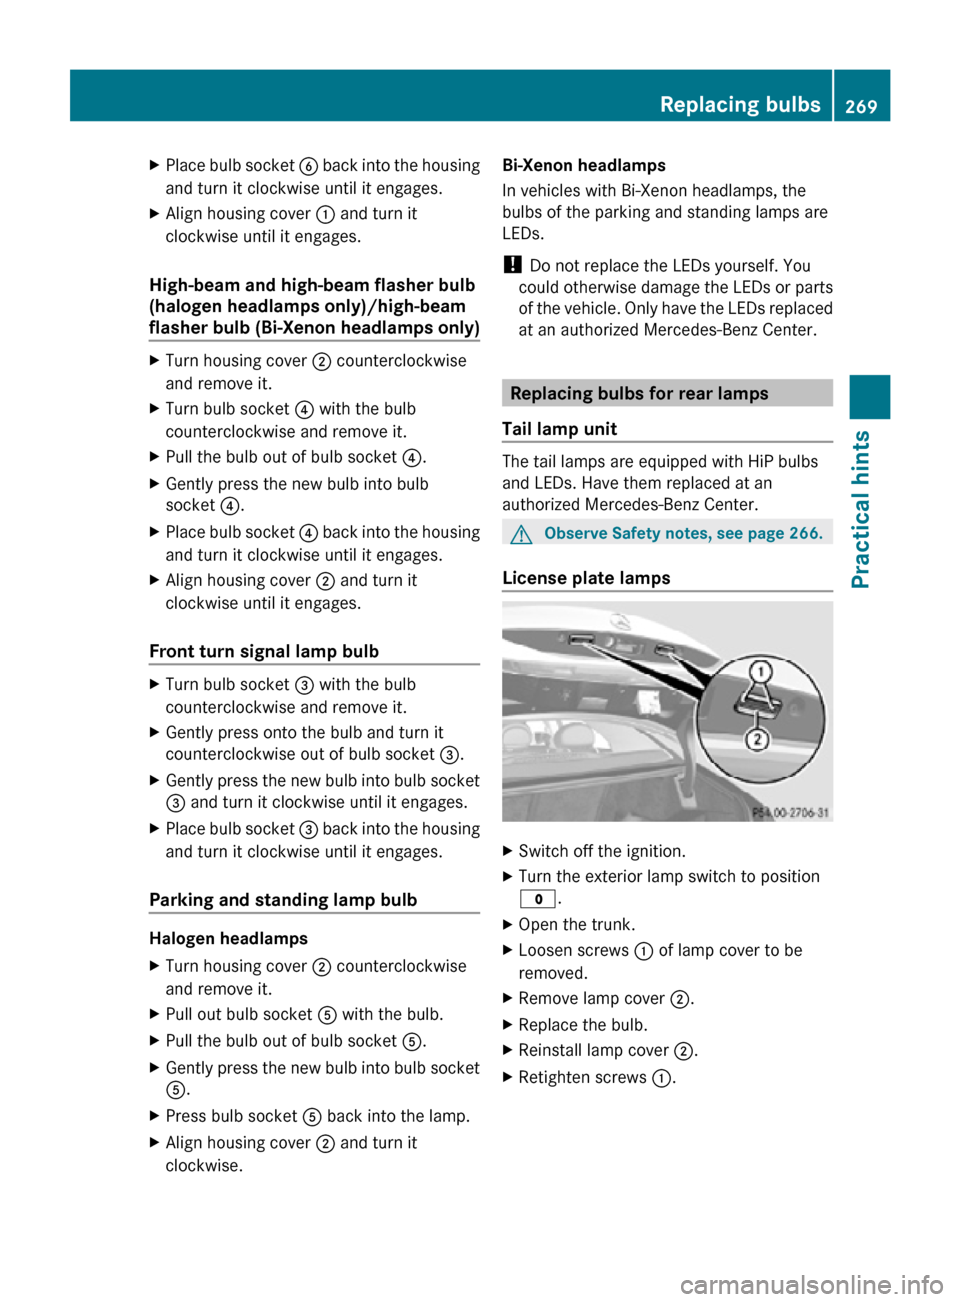
License plate lamps X
Switch off the ignition.
X Turn the exterior lamp switch to position
$.
X Open the trunk.
X Loosen screws : of lamp cover to be
removed.
X Remove lamp cover ;.
X Replace the bulb.
X Reinstall lamp cover ;.
X Retighten screws :. Replacing bulbs
269Practical hints
219_AKB; 4; 54, en-US
d2ureepe, Version: 2.11.8.1 2009-05-11T16:21:02+02:00 - Seite 269 Z
Page 276 of 308

X
Place jack = on firm ground.
X Position jack = under take-up
bracket ; so that it is always vertical as
seen from the side, even if the vehicle is
parked on an incline. X
Turn crank ? clockwise until jack = is
fully seated in take-up bracket ; and the
jack base evenly meets the ground.
X Jack up the vehicle until the wheel is a
maximum of 1.2 in (3 cm) from the ground.
Removing the wheel X
Unscrew the uppermost wheel bolt and
remove it.
X Replace this wheel bolt with alignment
bolt :.
X Remove the remaining bolts.
! Do not place wheel bolts in sand or dirt.
This could result in damage to the wheel
bolts and wheel hub threads.
X Remove the wheel. Attaching the spare wheel G
Warning!
Vehicles with spare wheel with collapsible tire
only: Inflate collapsible tire only after the
wheel is properly attached.
Inflate the collapsible tire using the electric
air pump before lowering the vehicle.
G
Warning!
Always replace wheel bolts that are damaged
or rusted.
Never apply oil or grease to wheel bolts.
Damaged wheel hub threads should be
repaired immediately. Do not continue to
drive under these circumstances! Contact an
authorized Mercedes-Benz Center or call
Roadside Assistance.
Incorrect wheel bolts or improperly tightened
wheel bolts can cause the wheel to come off.
This could cause an accident. Make sure to
use the correct wheel bolts. G
Warning!
Only use genuine Mercedes-Benz wheel bolts.
Other wheel bolts may come loose.
Do not tighten the wheel bolts when the
vehicle is raised. Otherwise the vehicle could
fall off the jack.
X Clean contact surfaces of wheel and wheel
hub.
! To avoid paint damage, place wheel flat
against hub and hold it there while
installing first wheel bolt. 274
Flat tirePractical hints
219_AKB; 4; 54, en-US
d2ureepe,
Version: 2.11.8.1 2009-05-11T16:21:02+02:00 - Seite 274
Page 278 of 308
X
Turn the SmartKey in the starter switch to
position 1.
or
X Vehicles with KEYLESS-GO: Press the
KEYLESS-GO start/stop button once. Do
not depress the brake pedal.
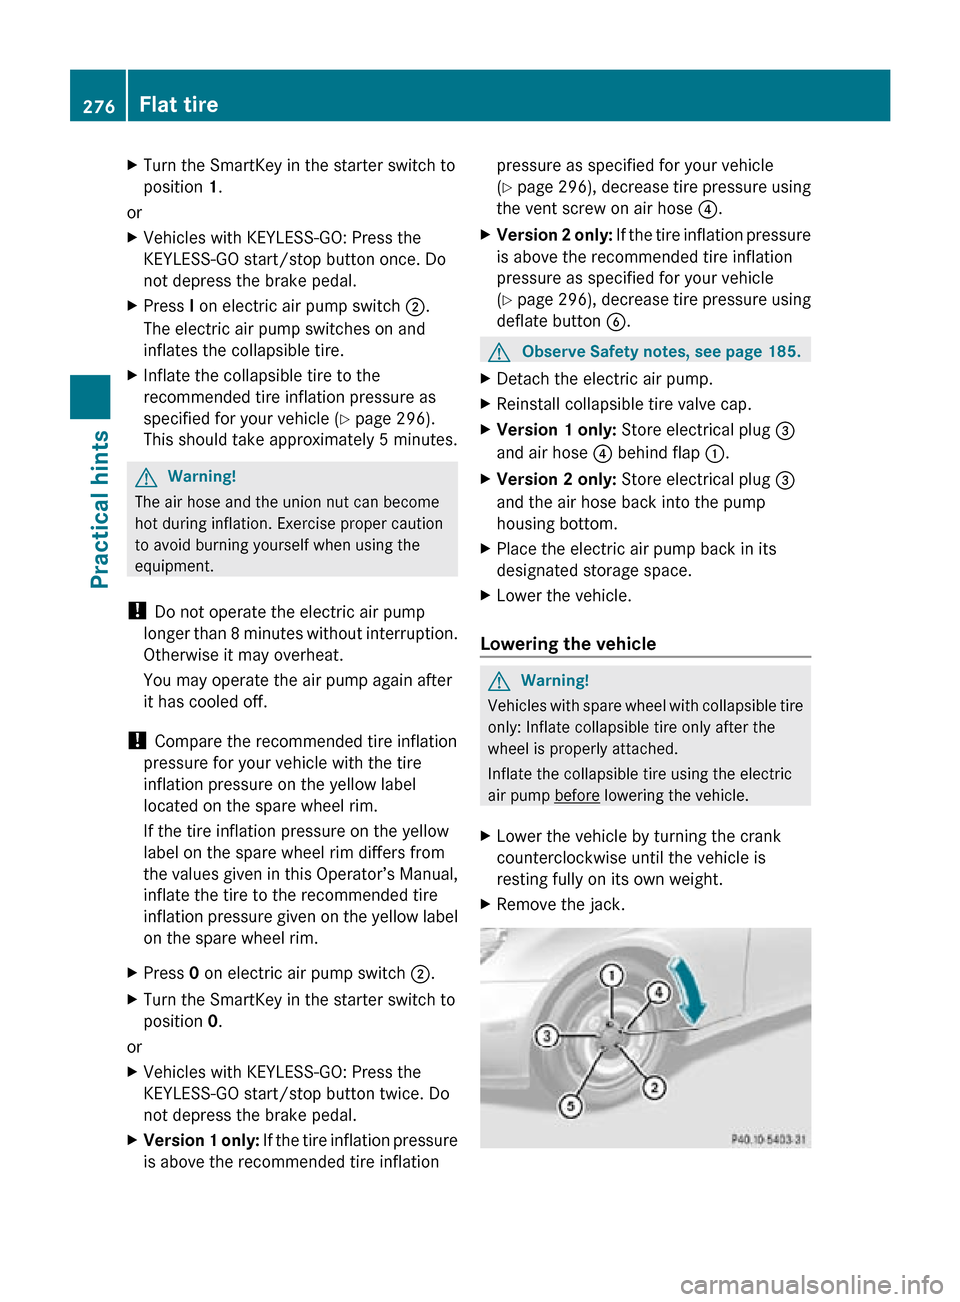
X Press I on electric air pump switch ;.
The electric air pump switches on and
inflates the collapsible tire.
X Inflate the collapsible tire to the
recommended tire inflation pressure as
specified for your vehicle ( Y page 296).
This should take approximately 5 minutes. G
Warning!
The air hose and the union nut can become
hot during inflation. Exercise proper caution
to avoid burning yourself when using the
equipment.
! Do not operate the electric air pump
longer than 8 minutes without interruption.
Otherwise it may overheat.
You may operate the air pump again after
it has cooled off.
! Compare the recommended tire inflation
pressure for your vehicle with the tire
inflation pressure on the yellow label
located on the spare wheel rim.
If the tire inflation pressure on the yellow
label on the spare wheel rim differs from
the values given in this Operator’s Manual,
inflate the tire to the recommended tire
inflation pressure given on the yellow label
on the spare wheel rim.
X Press 0 on electric air pump switch ;.
X Turn the SmartKey in the starter switch to
position 0.
or
X Vehicles with KEYLESS-GO: Press the
KEYLESS-GO start/stop button twice. Do
not depress the brake pedal.
X Version 1 only: If the tire inflation pressure
is above the recommended tire inflation pressure as specified for your vehicle
(Y page 296), decrease tire pressure using
the vent screw on air hose ?.
X Version 2 only: If the tire inflation pressure
is above the recommended tire inflation
pressure as specified for your vehicle
(Y page 296), decrease tire pressure using
deflate button B. G
Observe Safety notes, see page 185.
X Detach the electric air pump.
X Reinstall collapsible tire valve cap.
X Version 1 only: Store electrical plug =
and air hose ? behind flap :.
X Version 2 only: Store electrical plug =
and the air hose back into the pump
housing bottom.
X Place the electric air pump back in its
designated storage space.
X Lower the vehicle.
Lowering the vehicle G
Warning!
Vehicles with spare wheel with collapsible tire
only: Inflate collapsible tire only after the
wheel is properly attached.
Inflate the collapsible tire using the electric
air pump before lowering the vehicle.
X Lower the vehicle by turning the crank
counterclockwise until the vehicle is
resting fully on its own weight.
X Remove the jack. 276
Flat tirePractical hints
219_AKB; 4; 54, en-US
d2ureepe,
Version: 2.11.8.1 2009-05-11T16:21:02+02:00 - Seite 276
Page 285 of 308
Removing cover in rear bumper
G
Warning!
In order to avoid possible serious burns or
injury, use extreme caution when removing
the rear cover, because the rear exhaust pipe
is extremely hot. X
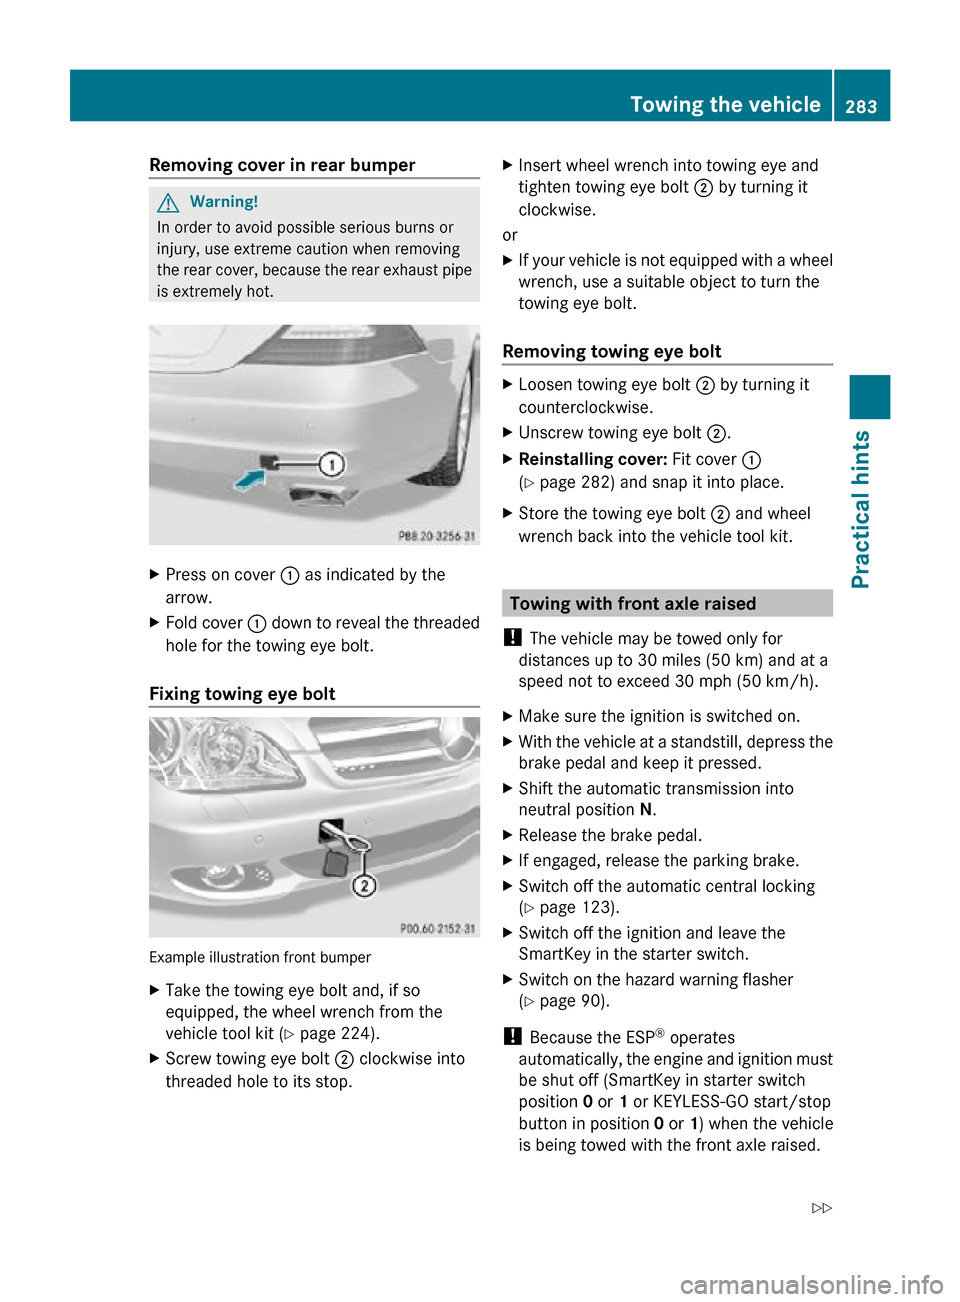
Press on cover : as indicated by the
arrow.
X Fold cover : down to reveal the threaded
hole for the towing eye bolt.
Fixing towing eye bolt Example illustration front bumper
X
Take the towing eye bolt and, if so
equipped, the wheel wrench from the
vehicle tool kit (Y page 224).
X Screw towing eye bolt ; clockwise into
threaded hole to its stop. X
Insert wheel wrench into towing eye and
tighten towing eye bolt ; by turning it
clockwise.
or
X If your vehicle is not equipped with a wheel
wrench, use a suitable object to turn the
towing eye bolt.
Removing towing eye bolt X
Loosen towing eye bolt ; by turning it
counterclockwise.
X Unscrew towing eye bolt ;.
X Reinstalling cover: Fit cover :
(Y page 282) and snap it into place.
X Store the towing eye bolt ; and wheel
wrench back into the vehicle tool kit. Towing with front axle raised
! The vehicle may be towed only for
distances up to 30 miles (50 km) and at a
speed not to exceed 30 mph (50 km/h).
X Make sure the ignition is switched on.
X With the vehicle at a standstill, depress the
brake pedal and keep it pressed.
X Shift the automatic transmission into
neutral position N.
X Release the brake pedal.
X If engaged, release the parking brake.
X Switch off the automatic central locking
(Y page 123).
X Switch off the ignition and leave the
SmartKey in the starter switch.
X Switch on the hazard warning flasher
(Y page 90).
! Because the ESP ®
operates
automatically, the engine and ignition must
be shut off (SmartKey in starter switch
position 0 or 1 or KEYLESS-GO start/stop
button in position 0 or 1) when the vehicle
is being towed with the front axle raised. Towing the vehicle
283Practical hints
219_AKB; 4; 54, en-US
d2ureepe, Version: 2.11.8.1 2009-05-11T16:21:02+02:00 - Seite 283 Z