2010 MERCEDES-BENZ CLS63AMG wheel
[x] Cancel search: wheelPage 252 of 308
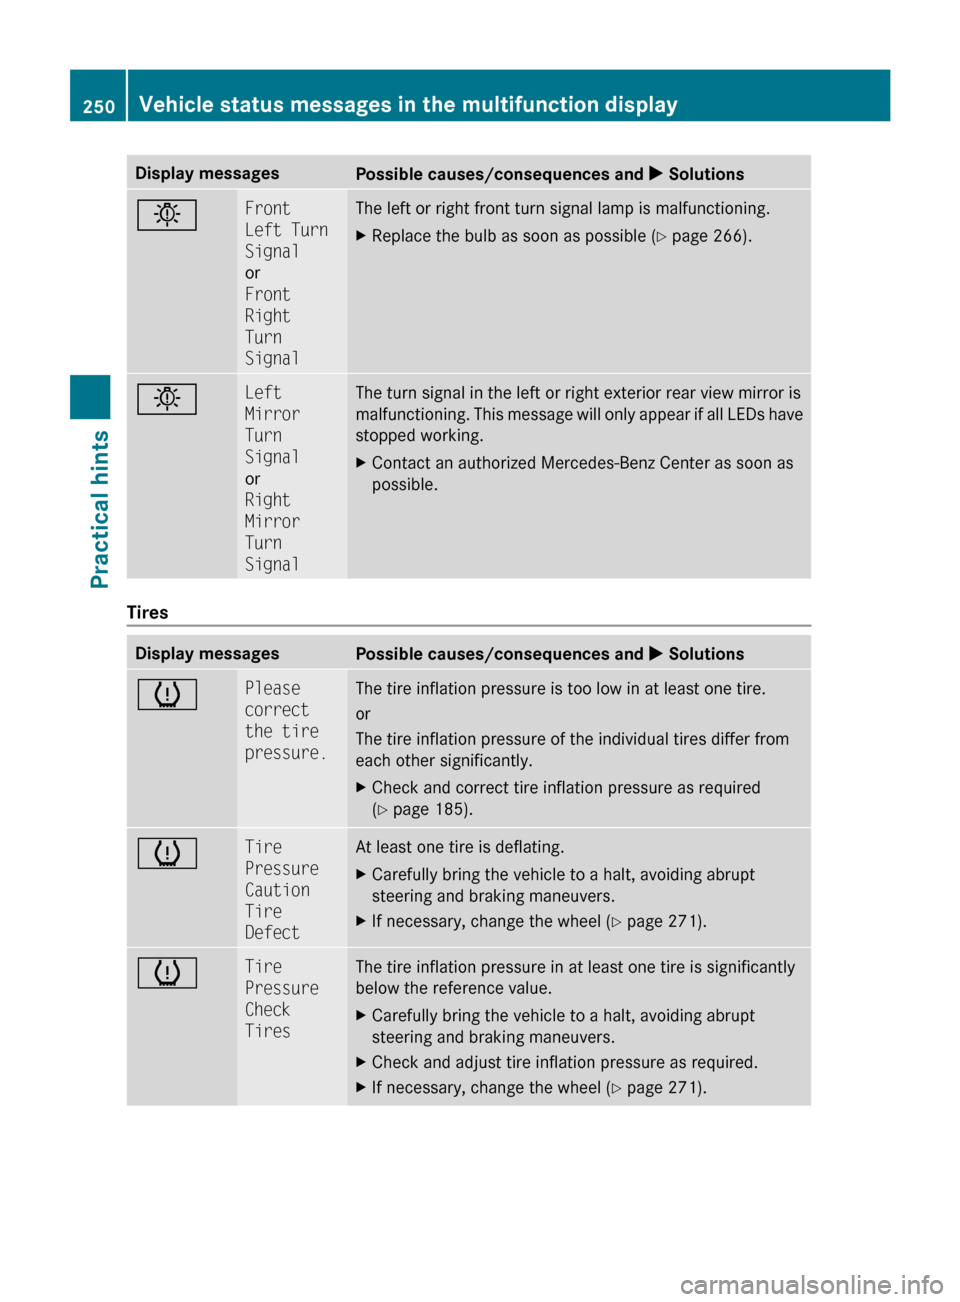
Display messages
Possible causes/consequences and
X Solutionsb Front
Left Turn
Signal
or
Front
Right
Turn
Signal The left or right front turn signal lamp is malfunctioning.
X
Replace the bulb as soon as possible (Y page 266). b Left
Mirror
Turn
Signal
or
Right
Mirror
Turn
Signal The turn signal in the left or right exterior rear view mirror is
malfunctioning.
This message will only appear if all LEDs have
stopped working.
X Contact an authorized Mercedes-Benz Center as soon as
possible. Tires
Display messages
Possible causes/consequences and
X Solutionsh Please
correct
the tire
pressure. The tire inflation pressure is too low in at least one tire.
or
The tire inflation pressure of the individual tires differ from
each other significantly.
X
Check and correct tire inflation pressure as required
(Y page 185). h Tire
Pressure
Caution
Tire
Defect At least one tire is deflating.
X
Carefully bring the vehicle to a halt, avoiding abrupt
steering and braking maneuvers.
X If necessary, change the wheel (Y page 271). h Tire
Pressure
Check
Tires The tire inflation pressure in at least one tire is significantly
below the reference value.
X
Carefully bring the vehicle to a halt, avoiding abrupt
steering and braking maneuvers.
X Check and adjust tire inflation pressure as required.
X If necessary, change the wheel (Y page 271). 250
Vehicle status messages in the multifunction display
Practical hints
219_AKB; 4; 54, en-US
d2ureepe,
Version: 2.11.8.1 2009-05-11T16:21:02+02:00 - Seite 250
Page 254 of 308

Brake
Problem
Possible causes/consequences and
X Solutions!
The yellow ABS
indicator lamp
comes on while
the engine is
running. The ABS has detected a malfunction and switched off. The BAS,
the ESP
®
, the EBP, and the PRE-SAFE ®
system are also switched
off.
The brake system is still functioning normally but without the
systems specified above available.
If the ABS control unit is malfunctioning, other systems such as
the
navigation system or the automatic transmission may also be
malfunctioning.
X Continue driving with added caution. Wheels may lock during
hard braking, reducing steering capability.
X Adjust driving to be consistent with reduced braking
responsiveness.
X Read and observe messages that may appear in the
multifunction display
(Y page 228).
X Have the system checked at an authorized Mercedes-Benz
Center as soon as possible.
Failure to follow these instructions increases the risk of an
accident. !
The yellow ABS
indicator lamp
comes on while
the engine is
running. The ABS has switched off due to insufficient power supply.
The battery might not be charged sufficiently.
When the voltage is above the required value again, the ABS is
operational again. The ABS indicator lamp should go out.
X
Continue driving with added caution. Wheels may lock during
hard braking, reducing steering capability.
X Adjust driving to be consistent with reduced braking
responsiveness.
X Read and observe messages that may appear in the
multifunction display
(Y page 228).
X If the ABS indicator lamp does not go out: Have the alternator
and the battery checked. $ (USA only)
J (Canada only)
The red brake warning
lamp comes on while
driving and an acoustic
warning sounds. You are driving with the parking brake engaged.
X
Release the parking brake. 252
What to do if …
Practical hints
219_AKB; 4; 54, en-US
d2ureepe,
Version: 2.11.8.1 2009-05-11T16:21:02+02:00 - Seite 252
Page 257 of 308
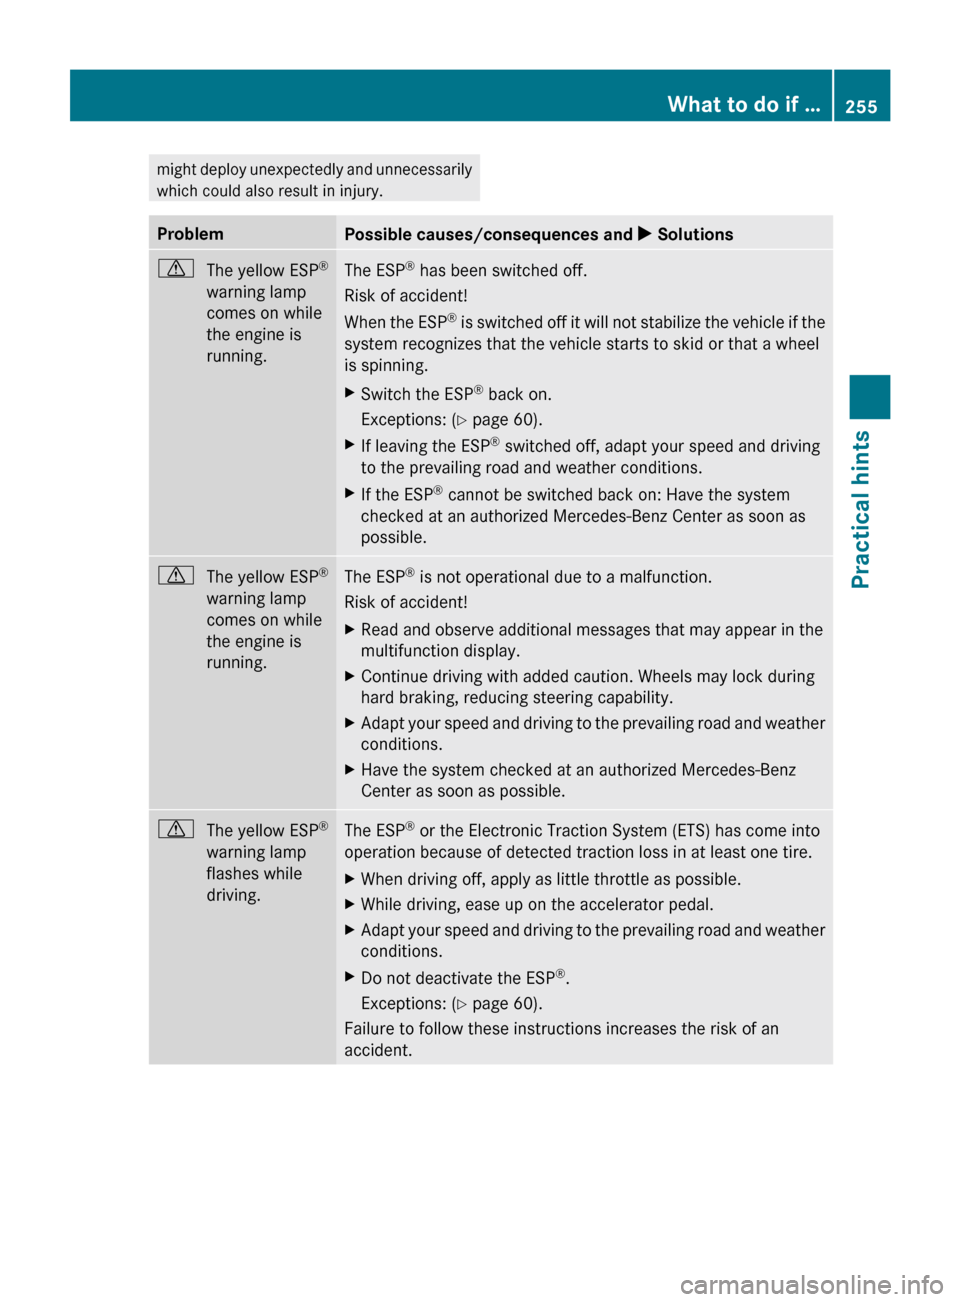
might deploy unexpectedly and unnecessarily
which could also result in injury.
Problem
Possible causes/consequences and
X Solutionsd
The yellow ESP ®
warning lamp
comes on while
the engine is
running. The ESP
®
has been switched off.
Risk of accident!
When
the ESP ®
is switched off it will not stabilize the vehicle if the
system recognizes that the vehicle starts to skid or that a wheel
is spinning.
X Switch the ESP ®
back on.
Exceptions:
(Y page 60).
X If leaving the ESP ®
switched off, adapt your speed and driving
to the prevailing road and weather conditions.
X If the ESP ®
cannot be switched back on: Have the system
checked at an authorized Mercedes-Benz Center as soon as
possible. d
The yellow ESP ®
warning lamp
comes on while
the engine is
running. The ESP
®
is not operational due to a malfunction.
Risk of accident!
X Read and observe additional messages that may appear in the
multifunction display.
X Continue driving with added caution. Wheels may lock during
hard braking, reducing steering capability.
X Adapt your speed and driving to the prevailing road and weather
conditions.
X Have the system checked at an authorized Mercedes-Benz
Center as soon as possible. d
The yellow ESP ®
warning lamp
flashes while
driving. The ESP
®
or the Electronic Traction System (ETS) has come into
operation because of detected traction loss in at least one tire.
X When driving off, apply as little throttle as possible.
X While driving, ease up on the accelerator pedal.
X Adapt your speed and driving to the prevailing road and weather
conditions.
X Do not deactivate the ESP ®
.
Exceptions:
(Y page 60).
Failure to follow these instructions increases the risk of an
accident. What to do if …
255
Practical hints
219_AKB; 4; 54, en-US
d2ureepe, Version: 2.11.8.1 2009-05-11T16:21:02+02:00 - Seite 255 Z
Page 262 of 308
the TPMS is not a substitute for proper tire
maintenance, and it is the driver’s
responsibility to maintain correct tire
pressure, even if underinflation has not
reached
the level to trigger illumination of the
TPMS low tire pressure telltale.
USA only:
Your vehicle has also been equipped with a
TPMS malfunction indicator to indicate when
the system is not operating properly. The
TPMS malfunction indicator is combined with
the low tire pressure telltale. When the
system detects a malfunction, the telltale will
flash for approximately 1 minute and then
remain continuously illuminated. This sequence will continue upon subsequent
vehicle start-ups as long as the malfunction
exists. When the malfunction indicator is
illuminated, the system may not be able to
detect
or signal low tire pressure as intended.
TPMS malfunctions may occur for a variety of
reasons, including the installation of
incompatible replacement or alternate tires
or wheels on the vehicle that prevent the
TPMS from functioning properly. Always
check the TPMS malfunction telltale after
replacing one or more tires or wheels on your
vehicle to ensure that the replacement or
alternate tires and wheels allow the TPMS to
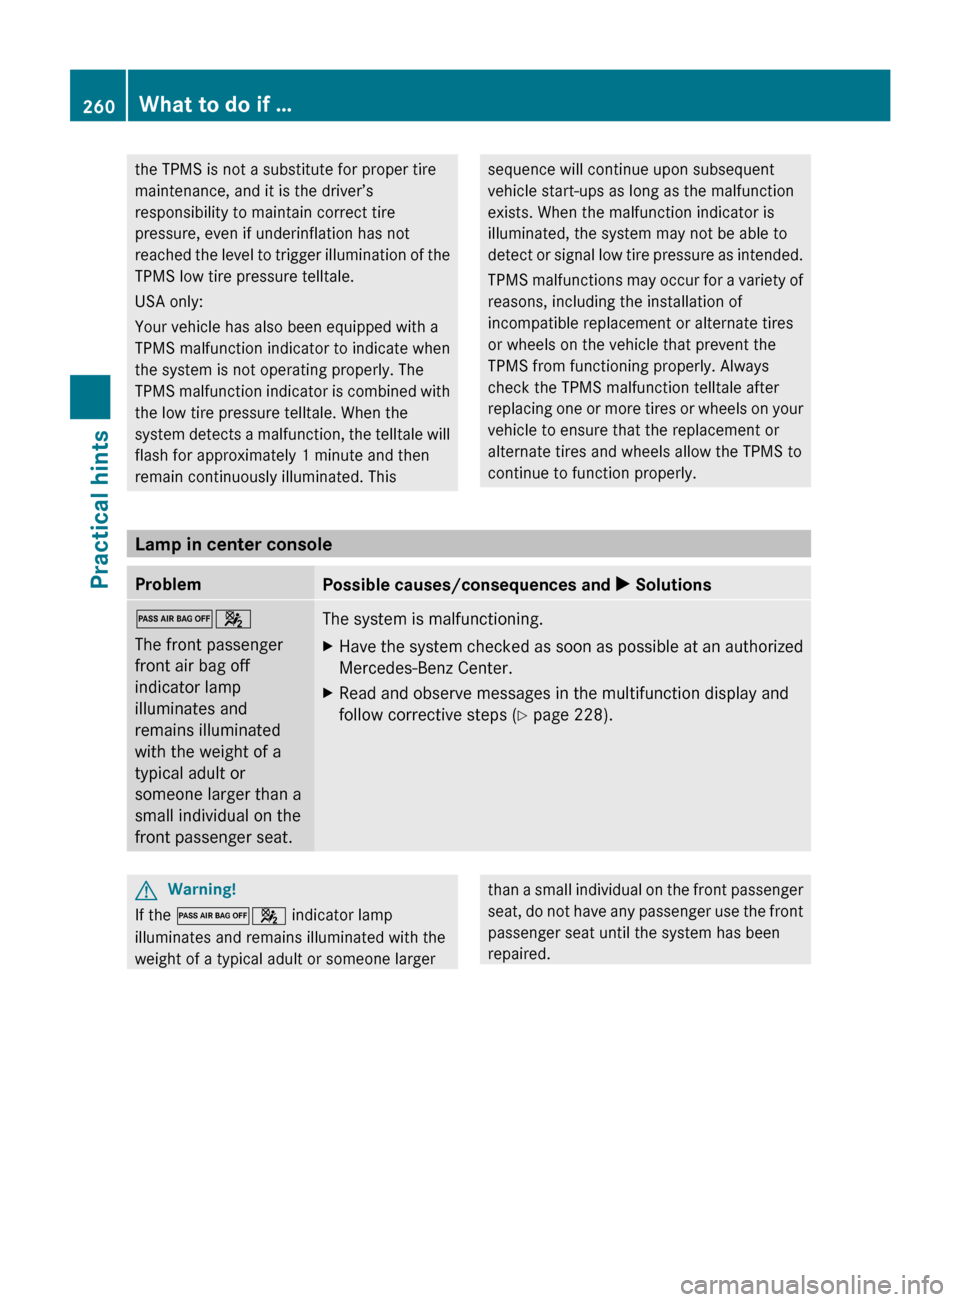
continue to function properly. Lamp in center console
Problem
Possible causes/consequences and
X Solutions04
The front passenger
front air bag off
indicator lamp
illuminates and
remains illuminated
with the weight of a
typical adult or
someone larger than a
small individual on the
front passenger seat.
The system is malfunctioning.
X
Have the system checked as soon as possible at an authorized
Mercedes-Benz Center.
X Read and observe messages in the multifunction display and
follow corrective steps (Y page 228). G
Warning!
If the 04 indicator lamp
illuminates and remains illuminated with the
weight of a typical adult or someone larger than a small individual on the front passenger
seat,
do not have any passenger use the front
passenger seat until the system has been
repaired. 260
What to do if …
Practical hints
219_AKB; 4; 54, en-US
d2ureepe,
Version: 2.11.8.1 2009-05-11T16:21:02+02:00 - Seite 260
Page 273 of 308
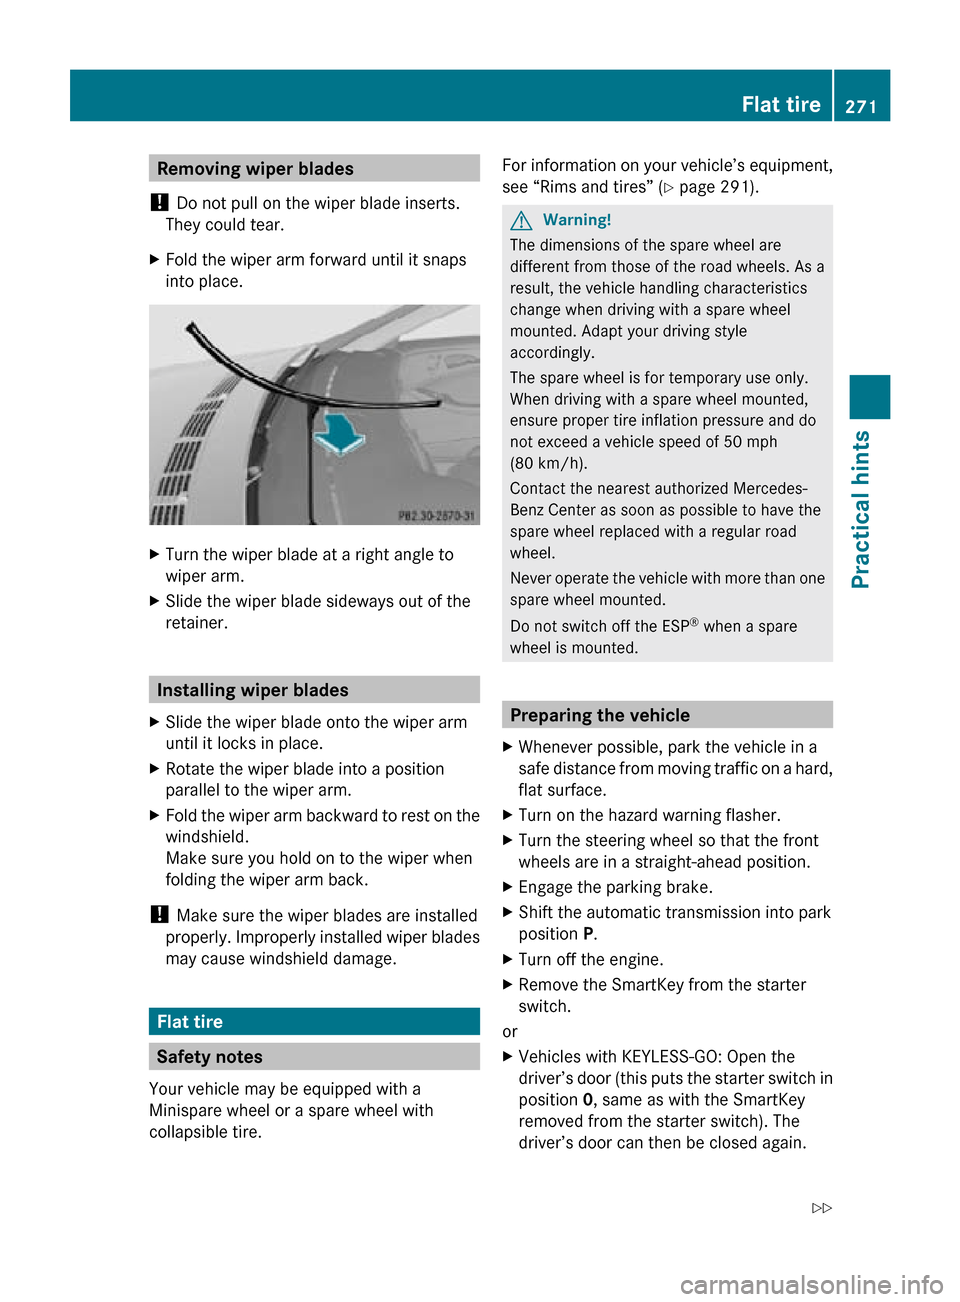
Removing wiper blades
! Do not pull on the wiper blade inserts.
They could tear.
X Fold the wiper arm forward until it snaps
into place. X
Turn the wiper blade at a right angle to
wiper arm.
X Slide the wiper blade sideways out of the
retainer. Installing wiper blades
X Slide the wiper blade onto the wiper arm
until it locks in place.
X Rotate the wiper blade into a position
parallel to the wiper arm.
X Fold the wiper arm backward to rest on the
windshield.
Make sure you hold on to the wiper when
folding the wiper arm back.
! Make sure the wiper blades are installed
properly. Improperly installed wiper blades
may cause windshield damage. Flat tire
Safety notes
Your vehicle may be equipped with a
Minispare wheel or a spare wheel with
collapsible tire. For information on your vehicle’s equipment,
see “Rims and tires” (
Y page 291). G
Warning!
The dimensions of the spare wheel are
different from those of the road wheels. As a
result, the vehicle handling characteristics
change when driving with a spare wheel
mounted. Adapt your driving style
accordingly.
The spare wheel is for temporary use only.
When driving with a spare wheel mounted,
ensure proper tire inflation pressure and do
not exceed a vehicle speed of 50 mph
(80 km/h).
Contact the nearest authorized Mercedes-
Benz Center as soon as possible to have the
spare wheel replaced with a regular road
wheel.
Never operate the vehicle with more than one
spare wheel mounted.
Do not switch off the ESP ®
when a spare
wheel is mounted. Preparing the vehicle
X Whenever possible, park the vehicle in a
safe distance from moving traffic on a hard,
flat surface.
X Turn on the hazard warning flasher.
X Turn the steering wheel so that the front
wheels are in a straight-ahead position.
X Engage the parking brake.
X Shift the automatic transmission into park
position P.
X Turn off the engine.
X Remove the SmartKey from the starter
switch.
or
X Vehicles with KEYLESS-GO: Open the
driver’s door (this puts the starter switch in
position 0, same as with the SmartKey
removed from the starter switch). The
driver’s door can then be closed again. Flat tire
271Practical hints
219_AKB; 4; 54, en-US
d2ureepe, Version: 2.11.8.1 2009-05-11T16:21:02+02:00 - Seite 271 Z
Page 274 of 308
Open doors only when conditions are safe
to do so.
X Have any passenger exit the vehicle at a
safe distance from the roadway. Open
doors only when conditions are safe to do
so. Mounting the spare wheel
Introduction X
Prepare the vehicle as described
(Y page 271).
X Take the following out of the vehicle:
R
spare wheel
R jack
R vehicle tool kit
R wheel wrench
R electric air pump (required for vehicles
with spare wheel with collapsible tire
only)
For information on where to find the
respective items, see “Where will I find ...?”
(Y page 224) and ( Y page 226).
i Vehicles without spare wheel are not
factory-equipped with the tools required for
a wheel change such as a jack or a wheel
wrench. Some tools required for a wheel
change are specific to your vehicle.
Contact an authorized Mercedes-Benz
Center to obtain the tools approved for
your vehicle. This section describes the
wheel change using the tools approved and
recommended for your vehicle.
Removing tensioning straps from spare
wheel
This description applies to vehicles with 19"
spare wheel with collapsible tire only.
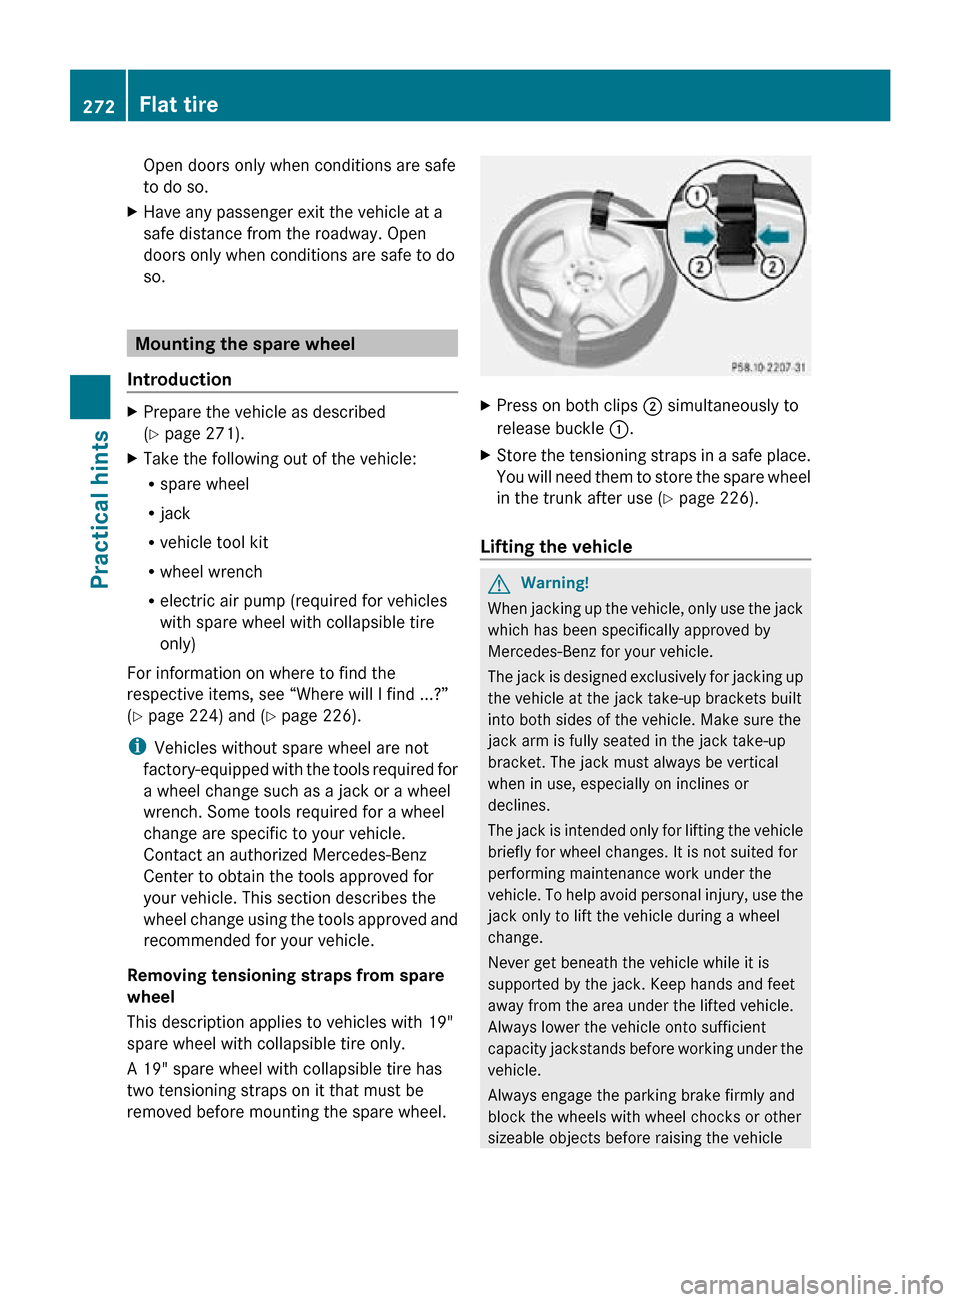
A 19" spare wheel with collapsible tire has
two tensioning straps on it that must be
removed before mounting the spare wheel. X
Press on both clips ; simultaneously to
release buckle :.
X Store the tensioning straps in a safe place.
You will need them to store the spare wheel
in the trunk after use (Y page 226).
Lifting the vehicle G
Warning!
When jacking up the vehicle, only use the jack
which has been specifically approved by
Mercedes-Benz for your vehicle.
The jack is designed exclusively for jacking up
the vehicle at the jack take-up brackets built
into both sides of the vehicle. Make sure the
jack arm is fully seated in the jack take-up
bracket. The jack must always be vertical
when in use, especially on inclines or
declines.
The jack is intended only for lifting the vehicle
briefly for wheel changes. It is not suited for
performing maintenance work under the
vehicle. To help avoid personal injury, use the
jack only to lift the vehicle during a wheel
change.
Never get beneath the vehicle while it is
supported by the jack. Keep hands and feet
away from the area under the lifted vehicle.
Always lower the vehicle onto sufficient
capacity jackstands before working under the
vehicle.
Always engage the parking brake firmly and
block the wheels with wheel chocks or other
sizeable objects before raising the vehicle 272
Flat tirePractical hints
219_AKB; 4; 54, en-US
d2ureepe,
Version: 2.11.8.1 2009-05-11T16:21:02+02:00 - Seite 272
Page 275 of 308
with the jack. Do not disengage the parking
brake while the vehicle is raised.
Make sure that the ground on which the
vehicle is standing and where you place the
jack is solid, level and not slippery. If
necessary, use a large underlay. On slippery
surfaces, such as tiled floors, you should use
a non-slip underlay, for example a rubber mat.
Do not use wooden blocks or similar objects
to support the jack. Otherwise the jack may
not be able to achieve its load-bearing
capacity if it is not at its full height.
Never start the engine when the vehicle is
raised.
Also observe the notes on the jack.
X Prevent the vehicle from rolling away by
blocking wheels with wheel chocks or other
sizeable objects.
When your vehicle is equipped with a wheel
chock, it is included with the vehicle tool kit
(Y page 224). For information on setting up
the collapsible wheel chock, see
(Y page 225).
When changing a wheel on a level surface:
X Place a wheel chock or other sizeable
object in front of and another wheel chock
or other sizeable object behind the wheel
that is diagonally opposite to the wheel
being changed.
Always try lifting the vehicle using the jack on
a level surface. However, should
circumstances require you to do so on a hill:
X Place wheel chocks or other sizeable
objects on the downhill side in front of both
wheels on the side opposite to the side on
which the wheel is to be changed. G
Warning!
Only jack up the vehicle on level ground or on
slight inclines/declines. Otherwise, the
vehicle could fall off the jack and injure you or
others. X
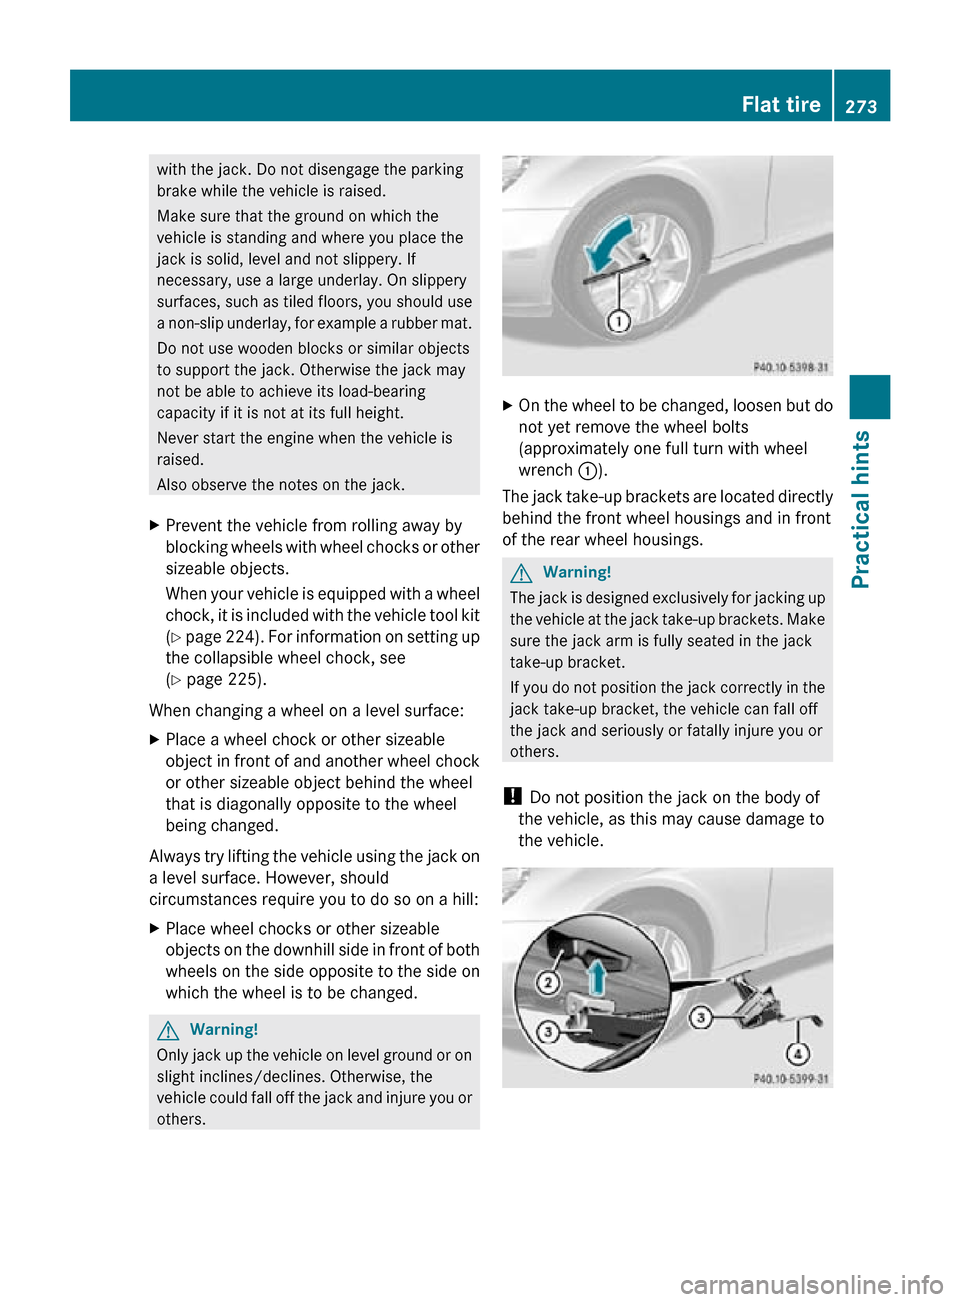
On the wheel to be changed, loosen but do
not yet remove the wheel bolts
(approximately one full turn with wheel
wrench :).
The jack take-up brackets are located directly
behind the front wheel housings and in front
of the rear wheel housings. G
Warning!
The jack is designed exclusively for jacking up
the vehicle at the jack take-up brackets. Make
sure the jack arm is fully seated in the jack
take-up bracket.
If you do not position the jack correctly in the
jack take-up bracket, the vehicle can fall off
the jack and seriously or fatally injure you or
others.
! Do not position the jack on the body of
the vehicle, as this may cause damage to
the vehicle. Flat tire
273Practical hints
219_AKB; 4; 54, en-US
d2ureepe, Version: 2.11.8.1 2009-05-11T16:21:02+02:00 - Seite 273 Z
Page 276 of 308

X
Place jack = on firm ground.
X Position jack = under take-up
bracket ; so that it is always vertical as
seen from the side, even if the vehicle is
parked on an incline. X
Turn crank ? clockwise until jack = is
fully seated in take-up bracket ; and the
jack base evenly meets the ground.
X Jack up the vehicle until the wheel is a
maximum of 1.2 in (3 cm) from the ground.
Removing the wheel X
Unscrew the uppermost wheel bolt and
remove it.
X Replace this wheel bolt with alignment
bolt :.
X Remove the remaining bolts.
! Do not place wheel bolts in sand or dirt.
This could result in damage to the wheel
bolts and wheel hub threads.
X Remove the wheel. Attaching the spare wheel G
Warning!
Vehicles with spare wheel with collapsible tire
only: Inflate collapsible tire only after the
wheel is properly attached.
Inflate the collapsible tire using the electric
air pump before lowering the vehicle.
G
Warning!
Always replace wheel bolts that are damaged
or rusted.
Never apply oil or grease to wheel bolts.
Damaged wheel hub threads should be
repaired immediately. Do not continue to
drive under these circumstances! Contact an
authorized Mercedes-Benz Center or call
Roadside Assistance.
Incorrect wheel bolts or improperly tightened
wheel bolts can cause the wheel to come off.
This could cause an accident. Make sure to
use the correct wheel bolts. G
Warning!
Only use genuine Mercedes-Benz wheel bolts.
Other wheel bolts may come loose.
Do not tighten the wheel bolts when the
vehicle is raised. Otherwise the vehicle could
fall off the jack.
X Clean contact surfaces of wheel and wheel
hub.
! To avoid paint damage, place wheel flat
against hub and hold it there while
installing first wheel bolt. 274
Flat tirePractical hints
219_AKB; 4; 54, en-US
d2ureepe,
Version: 2.11.8.1 2009-05-11T16:21:02+02:00 - Seite 274