2010 MERCEDES-BENZ CLS warning light
[x] Cancel search: warning lightPage 201 of 308
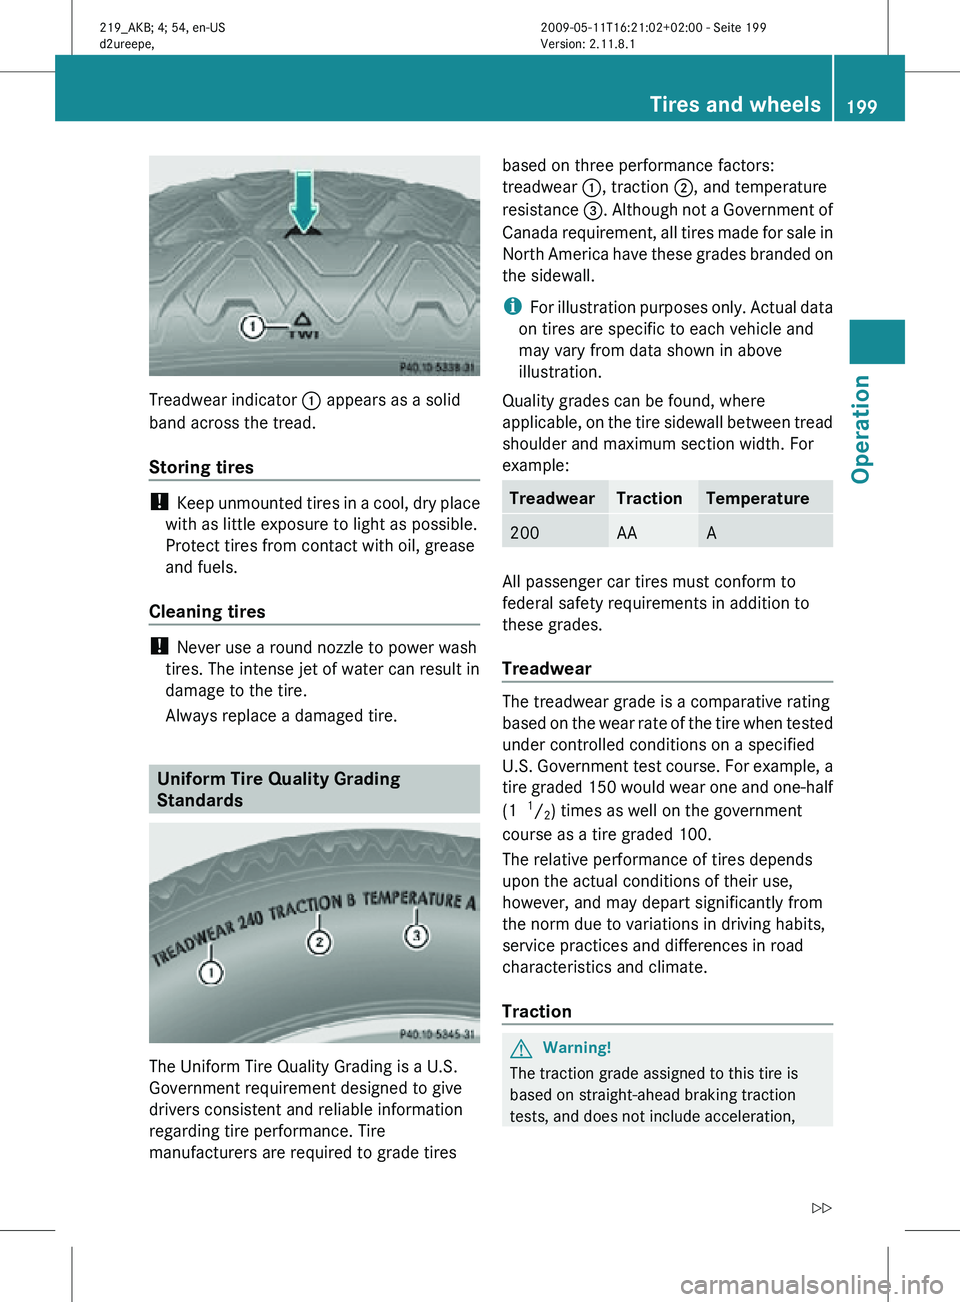
Treadwear indicator
: appears as a solid
band across the tread.
Storing tires !
Keep unmounted tires in a cool, dry place
with as little exposure to light as possible.
Protect tires from contact with oil, grease
and fuels.
Cleaning tires !
Never use a round nozzle to power wash
tires. The intense jet of water can result in
damage to the tire.
Always replace a damaged tire. Uniform Tire Quality Grading
Standards
The Uniform Tire Quality Grading is a U.S.
Government requirement designed to give
drivers consistent and reliable information
regarding tire performance. Tire
manufacturers are required to grade tires based on three performance factors:
treadwear
:, traction ;, and temperature
resistance =. Although not a Government of
Canada requirement, all tires made for sale in
North America have these grades branded on
the sidewall.
i For illustration purposes only. Actual data
on tires are specific to each vehicle and
may vary from data shown in above
illustration.
Quality grades can be found, where
applicable, on the tire sidewall between tread
shoulder and maximum section width. For
example: Treadwear Traction Temperature
200 AA A
All passenger car tires must conform to
federal safety requirements in addition to
these grades.
Treadwear
The treadwear grade is a comparative rating
based on the wear rate of the tire when tested
under controlled conditions on a specified
U.S. Government test course. For example, a
tire graded 150 would wear one and one-half
(1
1
/ 2) times as well on the government
course as a tire graded 100.
The relative performance of tires depends
upon the actual conditions of their use,
however, and may depart significantly from
the norm due to variations in driving habits,
service practices and differences in road
characteristics and climate.
Traction G
Warning!
The traction grade assigned to this tire is
based on straight-ahead braking traction
tests, and does not include acceleration, Tires and wheels
199Operation
219_AKB; 4; 54, en-US
d2ureepe, Version: 2.11.8.1 2009-05-11T16:21:02+02:00 - Seite 199 Z
Page 204 of 308
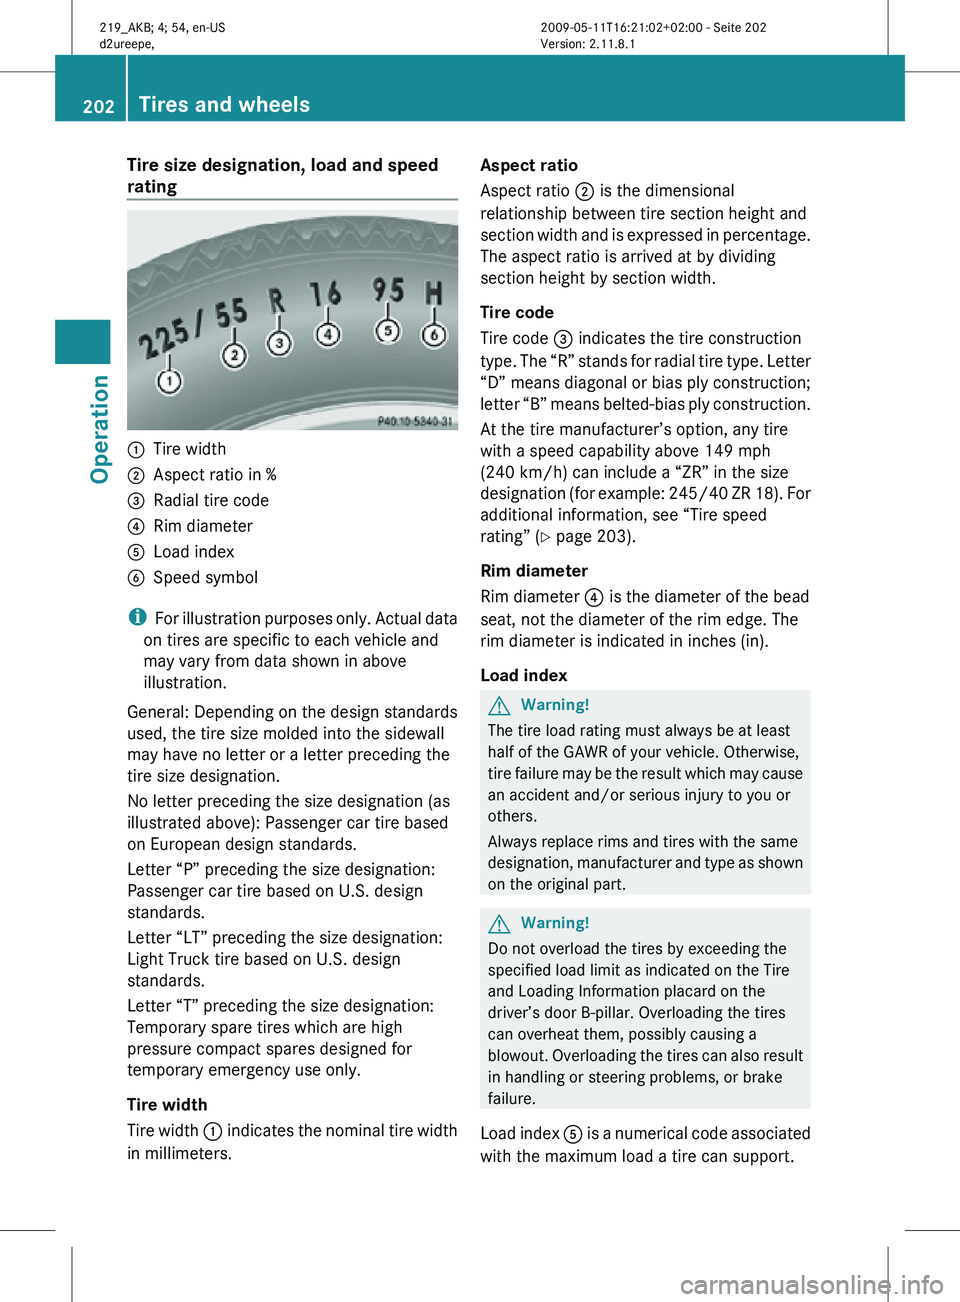
Tire size designation, load and speed
rating
:
Tire width
; Aspect ratio in %
= Radial tire code
? Rim diameter
A Load index
B Speed symbol
i For illustration purposes only. Actual data
on tires are specific to each vehicle and
may vary from data shown in above
illustration.
General: Depending on the design standards
used, the tire size molded into the sidewall
may have no letter or a letter preceding the
tire size designation.
No letter preceding the size designation (as
illustrated above): Passenger car tire based
on European design standards.
Letter “P” preceding the size designation:
Passenger car tire based on U.S. design
standards.
Letter “LT” preceding the size designation:
Light Truck tire based on U.S. design
standards.
Letter “T” preceding the size designation:
Temporary spare tires which are high
pressure compact spares designed for
temporary emergency use only.
Tire width
Tire width : indicates the nominal tire width
in millimeters. Aspect ratio
Aspect ratio
; is the dimensional
relationship between tire section height and
section width and is expressed in percentage.
The aspect ratio is arrived at by dividing
section height by section width.
Tire code
Tire code = indicates the tire construction
type. The “R” stands for radial tire type. Letter
“D” means diagonal or bias ply construction;
letter “B” means belted-bias ply construction.
At the tire manufacturer’s option, any tire
with a speed capability above 149 mph
(240 km/h) can include a “ZR” in the size
designation (for example: 245/40 ZR 18). For
additional information, see “Tire speed
rating” (Y page 203).
Rim diameter
Rim diameter ? is the diameter of the bead
seat, not the diameter of the rim edge. The
rim diameter is indicated in inches (in).
Load index G
Warning!
The tire load rating must always be at least
half of the GAWR of your vehicle. Otherwise,
tire failure may be the result which may cause
an accident and/or serious injury to you or
others.
Always replace rims and tires with the same
designation, manufacturer and type as shown
on the original part. G
Warning!
Do not overload the tires by exceeding the
specified load limit as indicated on the Tire
and Loading Information placard on the
driver’s door B-pillar. Overloading the tires
can overheat them, possibly causing a
blowout. Overloading the tires can also result
in handling or steering problems, or brake
failure.
Load index A is a numerical code associated
with the maximum load a tire can support. 202
Tires and wheelsOperation
219_AKB; 4; 54, en-US
d2ureepe,
Version: 2.11.8.1 2009-05-11T16:21:02+02:00 - Seite 202
Page 211 of 308
Observe the following guidelines when using
snow chains:
R
Use
of snow chains is not permissible with
all wheel/tire combinations ( Y page 291).
R Use snow chains in pairs and on rear
wheels only. Follow the manufacturer’s
mounting instructions.
! If snow chains are mounted to the front
wheels, they may scrape against the body
or axle components. The tires or the vehicle
could be damaged as a result.
R Only use snow chains that are approved by
Mercedes-Benz. Any authorized Mercedes-
Benz Center will be glad to advise you on
this subject.
R Use of snow chains may be prohibited
depending on location. Always check local
and state laws before installing snow
chains.
R Do not use snow chains on the spare wheel.
i When driving with snow chains, you may
wish to switch off the ESP ®
(Y page 59)
before setting the vehicle in motion. This
will improve the vehicle’s traction. Winter driving instructions
G
Warning!
If the vehicle becomes stuck in snow, make
sure snow is kept clear of the exhaust pipe
and from around the vehicle with the engine
running. Otherwise, deadly carbon monoxide
(CO) gases may enter vehicle interior
resulting in unconsciousness and death.
To
assure sufficient fresh air ventilation, open
a window slightly on the side of the vehicle
not facing the wind. G
Warning!
The outside temperature indicator is not
designed to serve as an ice-warning device
and is therefore unsuitable for that purpose. Indicated temperatures just above the
freezing
point do not guarantee that the road
surface is free of ice. The road may still be icy,
especially in wooded areas or on bridges. G
Warning!
On slippery road surfaces, never downshift in
order to obtain braking action. This could
result
in drive wheel slip and reduced vehicle
control. Your vehicle’s ABS will not prevent
this type of loss of control.
The most important rule for slippery or icy
roads is to drive sensibly and to avoid abrupt
acceleration, braking and steering
maneuvers. Do not use the cruise control
system under such conditions.
When the vehicle is in danger of skidding, shift
the automatic transmission to neutral
position N. Try to keep the vehicle under
control by corrective steering action.
i For information on driving with snow
chains, see “Snow chains” ( Y page 208).
Road salts and chemicals can adversely
affect braking efficiency. Increased pedal
force may become necessary to produce the
normal brake effect.
Depressing the brake pedal periodically when
traveling at length on salt-strewn roads can
bring road-salt-impaired braking efficiency
back to normal.
If the vehicle is parked after being driven on
salt-treated roads, the braking efficiency
should be tested as soon as possible after
driving is resumed. G
Warning!
Make sure not to endanger any other road
users when carrying out these braking
maneuvers. Winter driving
209
Operation
219_AKB; 4; 54, en-US
d2ureepe, Version: 2.11.8.1 2009-05-11T16:21:02+02:00 - Seite 209 Z
Page 222 of 308
An automotive glass cleaner is
recommended.
! Fold the windshield wiper arms back onto
the windshield before turning the SmartKey
in the starter switch or pressing the
KEYLESS-GO start/stop button.
Hold on to the wiper when folding the wiper
arm back. If released, the force of the
impact from the tensioning spring could
crack the windshield.
! To clean the window interior, do not use
a dry cloth, abrasives, solvents or cleaners
containing solvents. Do not touch the
inside of the windows with hard objects
such as an ice scraper or ring. Doing so may
damage the windows.
Light alloy wheels If possible, clean wheels once a week.
X
Use Mercedes-Benz approved Wheel Care,
a soft bristle brush and a strong spray of
water for cleaning the light alloy wheels.
! Only use acid-free cleaning materials.
Acid may cause corrosion or damage the
clear coat.
! The vehicle should not be parked for an
extended period of time immediately after
it
has been cleaned. This applies especially
after the wheel rims have been cleaned
with wheel rim cleaner. Wheel rim cleaners
can lead to increased corrosion of the
brake disks and brake pads. Non-approved
wheel cleaners may also damage the wheel
paint if the vehicle is not driven after
cleaning.
Therefore, the vehicle’s brake system
should always be warmed-up before it is
parked after cleaning. Drive your vehicle for
several minutes to allow the brakes to dry.
When applying Mercedes-Benz approved
Tire Care and Mercedes-Benz approved
Wheel Care products, take care not to
spray them on the brake disks. Plastic and rubber parts X
Use a gentle dishwashing detergent or mild
detergent
for delicate fabrics as a washing
solution.
X Wipe with a cloth moistened in a lukewarm
solution.
The
surface may temporarily change color.
If this is the case, wait for it to dry. G
Warning!
Do not use cleaners or cockpit care sprays
containing
solvents to clean the cockpit or the
steering wheel. Cleaners containing solvents
will make the surface porous and vehicle
occupants could suffer serious injuries from
plastic parts coming loose in the event of air
bag deployment.
! Do not use oil, wax or scouring agents.
Otherwise you may scratch or damage the
surface.
Hard plastic trim items
X Use Mercedes-Benz approved Interior Care
on
a soft, lint-free cloth and apply with light
pressure.
COMAND display !
You
must switch off the COMAND display
and allow it to cool prior to cleaning.
! Do not use any liquids or cleaning agents.
These can damage or even destroy the
COMAND display screen.
X Use a standard microfiber cloth and apply
with light pressure.
Steering wheel and gear selector lever X
Wipe with a damp cloth and dry thoroughly
or clean with Mercedes-Benz approved
Leather Care. 220
Vehicle care
Operation
219_AKB; 4; 54, en-US
d2ureepe,
Version: 2.11.8.1 2009-05-11T16:21:02+02:00 - Seite 220
Page 223 of 308
Carpets
X
Use Mercedes-Benz approved Carpet and
Fabric Care for cleaning the carpets.
Headliner and shelf below rear window X
Use a soft bristle brush or a dry-shampoo
cleaner in case of excessive dirt.
Seat belts X
Only use clear, lukewarm water and soap.
! The seat belts must not be treated with
chemical cleaning agents. Do not dry the
seat belts at temperatures above
176‡
(80†) or in direct sunlight. G
Warning!
Do not bleach or dye seat belts as this may
severely weaken them. In a crash they may
not be able to provide adequate protection.
Upholstery Using aftermarket seat covers or wearing
clothing that have the tendency to give off
coloring (e.g. when wet, etc.) may cause the
upholstery to become permanently
discolored. By lining the seats with a proper
intermediate
cover, contact-discoloration will
be prevented. G
Warning!
Only use seat or head restraint covers which
have
been tested and approved by Mercedes-
Benz for your vehicle model.
Using other seat or head restraint covers may
interfere with or prevent the activation of the
NECK-PRO active front head restraints and/
or the deployment of the front side impact air
bags.
Contact an authorized Mercedes-Benz Center
for availability.
Leather upholstery
Please note that leather upholstery is a
natural product and is therefore subject to a natural aging process. Leather upholstery
may also react to certain ambient influences
such
as high humidity or high temperature by
showing wrinkles for example.
X Wipe leather upholstery with a damp cloth
and
dry thoroughly or clean with Mercedes-
Benz approved Leather Care.
! To avoid damage to leather upholstery:
R Wipe with light pressure only.
R Do not clean with abrasive cleaning
agents
such as scouring milk or powder.
R Do not soak the leather upholstery.
As leather is a natural product, it could
otherwise harden or become porous.
R Exercise particular care when cleaning
perforated leather as its underside
should not become wet.
Wood trims X
Only use water and a damp cloth to clean
wood trims in your vehicle.
! Do not use solvents like tar remover or
wheel cleaner nor polishes or waxes as
these may be abrasive.
Chrome-plated exhaust tip Regular cleaning and care of chrome-plated
exhaust tips will help to maintain their shine
and the classy appearance.
X
Use Mercedes-Benz approved Chrome
Polishing Paste each time the vehicle has
been
washed, especially during the winter.
! Do not use alkaline cleaners such as
wheel cleaners as they could cause
corrosion. Vehicle care
221
Operation
219_AKB; 4; 54, en-US
d2ureepe, Version: 2.11.8.1 2009-05-11T16:21:02+02:00 - Seite 221 Z
Page 268 of 308
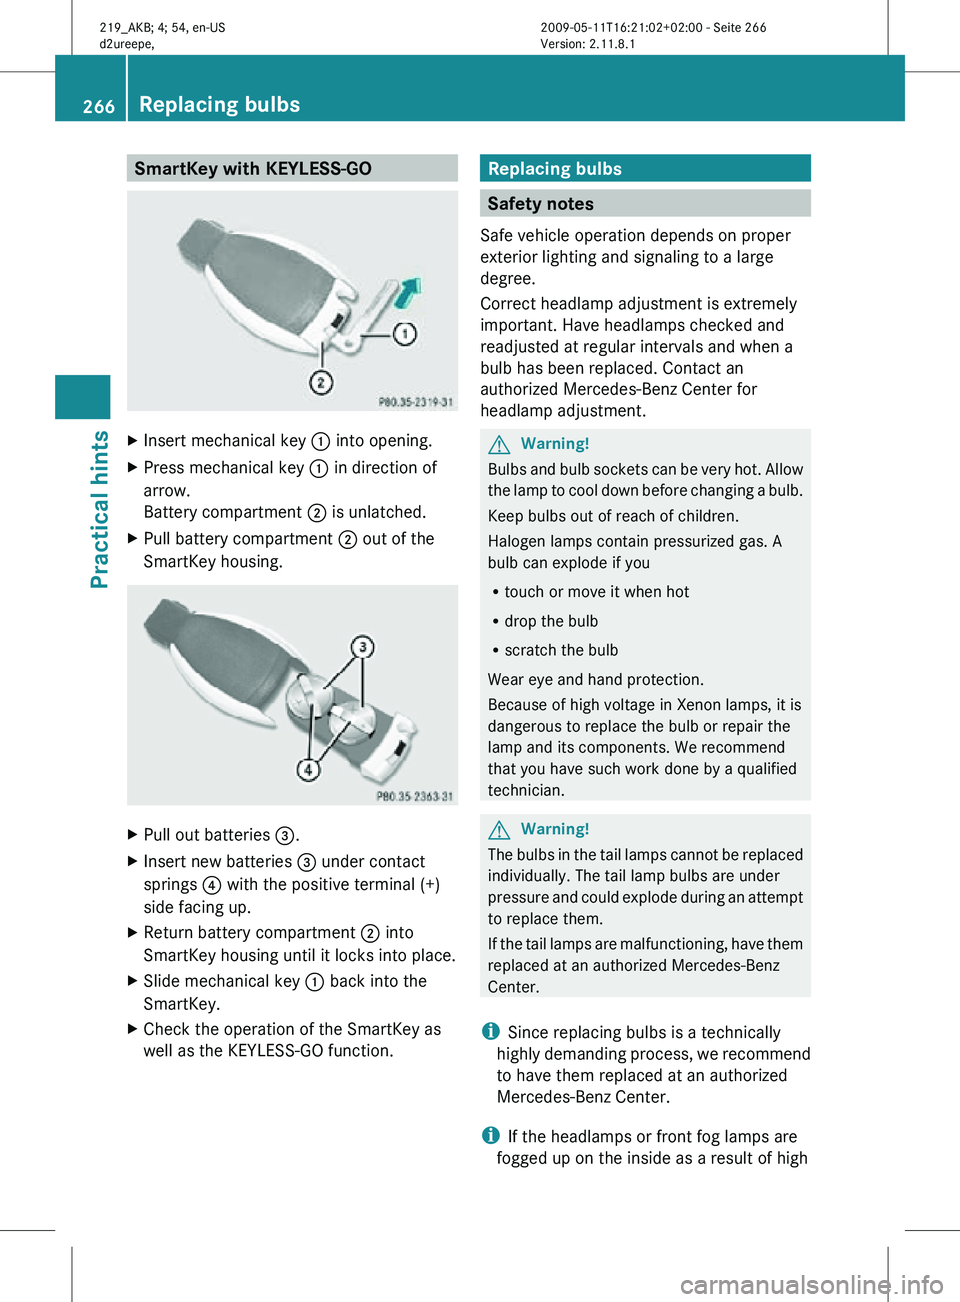
SmartKey with KEYLESS-GO
X
Insert mechanical key : into opening.
X Press mechanical key : in direction of
arrow.
Battery compartment ; is unlatched.
X Pull battery compartment ; out of the
SmartKey housing. X
Pull out batteries =.
X Insert new batteries = under contact
springs ? with the positive terminal (+)
side facing up.
X Return battery compartment ; into
SmartKey housing until it locks into place.
X Slide mechanical key : back into the
SmartKey.
X Check the operation of the SmartKey as
well as the KEYLESS-GO function. Replacing bulbs
Safety notes
Safe vehicle operation depends on proper
exterior lighting and signaling to a large
degree.
Correct headlamp adjustment is extremely
important. Have headlamps checked and
readjusted at regular intervals and when a
bulb has been replaced. Contact an
authorized Mercedes-Benz Center for
headlamp adjustment. G
Warning!
Bulbs and bulb sockets can be very hot. Allow
the lamp to cool down before changing a bulb.
Keep bulbs out of reach of children.
Halogen lamps contain pressurized gas. A
bulb can explode if you
R touch or move it when hot
R drop the bulb
R scratch the bulb
Wear eye and hand protection.
Because of high voltage in Xenon lamps, it is
dangerous to replace the bulb or repair the
lamp and its components. We recommend
that you have such work done by a qualified
technician. G
Warning!
The bulbs in the tail lamps cannot be replaced
individually. The tail lamp bulbs are under
pressure and could explode during an attempt
to replace them.
If the tail lamps are malfunctioning, have them
replaced at an authorized Mercedes-Benz
Center.
i Since replacing bulbs is a technically
highly demanding process, we recommend
to have them replaced at an authorized
Mercedes-Benz Center.
i If the headlamps or front fog lamps are
fogged up on the inside as a result of high 266
Replacing bulbsPractical hints
219_AKB; 4; 54, en-US
d2ureepe,
Version: 2.11.8.1 2009-05-11T16:21:02+02:00 - Seite 266
Page 270 of 308
Notes on bulb replacement
!
Do not replace LEDs or bulbs not
described in this section. You could
otherwise damage the LEDs, the bulbs or
parts of the vehicle. Only have the LEDs and
bulbs replaced at an authorized Mercedes-
Benz Center. G
Observe Safety notes, see page 266.
R Only use 12-volt bulbs of the same type and
with the specified watt rating.
R Switch the lights off before changing a bulb
to prevent short circuits.
R Always use a clean lint-free cloth when
handling bulbs.
R Your hands should be dry and free of oil and
grease.
R If the newly installed bulb does not come
on, contact an authorized Mercedes-Benz
Center.
i Mercedes-Benz recommends using
Longlife (LL) bulbs. Replacing bulbs for front lamps
G
Warning!
Do not remove the cover for the Bi-Xenon
headlamp. Because of high voltage in Xenon
lamps, it is dangerous to replace the bulb or
repair the lamp and its components. It is
recommended to have such work done by a
qualified technician.
Before you start to replace a bulb for a front
lamp, do the following:
X Switch off the ignition.
X Turn the exterior lamp switch to position
$.
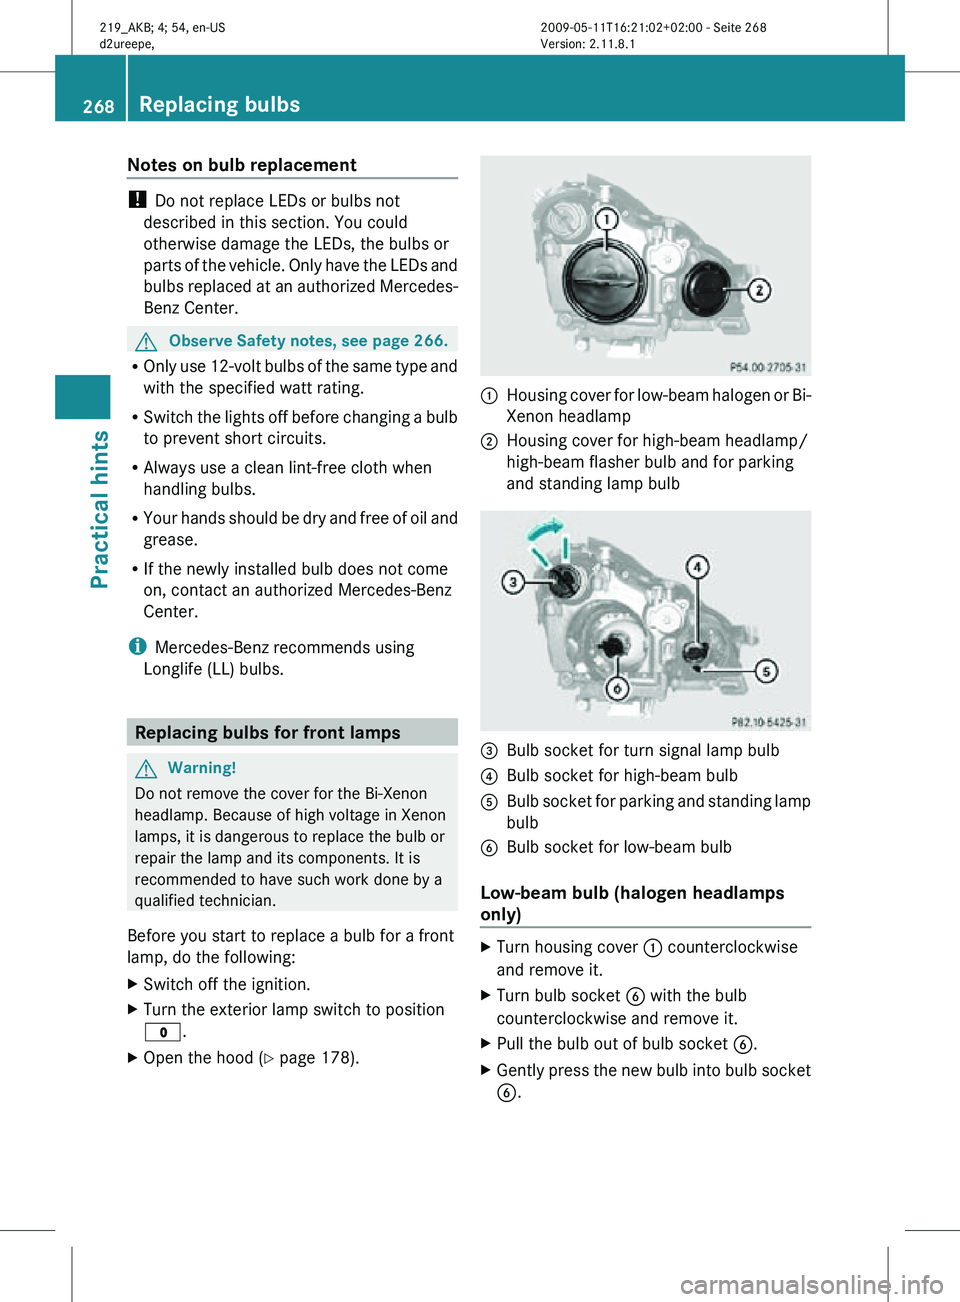
X Open the hood (Y page 178). :
Housing cover for low-beam halogen or Bi-
Xenon headlamp
; Housing cover for high-beam headlamp/
high-beam flasher bulb and for parking
and standing lamp bulb =
Bulb socket for turn signal lamp bulb
? Bulb socket for high-beam bulb
A Bulb socket for parking and standing lamp
bulb
B Bulb socket for low-beam bulb
Low-beam bulb (halogen headlamps
only) X
Turn housing cover : counterclockwise
and remove it.
X Turn bulb socket B with the bulb
counterclockwise and remove it.
X Pull the bulb out of bulb socket B.
X Gently press the new bulb into bulb socket
B. 268
Replacing bulbsPractical hints
219_AKB; 4; 54, en-US
d2ureepe,
Version: 2.11.8.1 2009-05-11T16:21:02+02:00 - Seite 268
Page 275 of 308
with the jack. Do not disengage the parking
brake while the vehicle is raised.
Make sure that the ground on which the
vehicle is standing and where you place the
jack is solid, level and not slippery. If
necessary, use a large underlay. On slippery
surfaces, such as tiled floors, you should use
a non-slip underlay, for example a rubber mat.
Do not use wooden blocks or similar objects
to support the jack. Otherwise the jack may
not be able to achieve its load-bearing
capacity if it is not at its full height.
Never start the engine when the vehicle is
raised.
Also observe the notes on the jack.
X Prevent the vehicle from rolling away by
blocking wheels with wheel chocks or other
sizeable objects.
When your vehicle is equipped with a wheel
chock, it is included with the vehicle tool kit
(Y page 224). For information on setting up
the collapsible wheel chock, see
(Y page 225).
When changing a wheel on a level surface:
X Place a wheel chock or other sizeable
object in front of and another wheel chock
or other sizeable object behind the wheel
that is diagonally opposite to the wheel
being changed.
Always try lifting the vehicle using the jack on
a level surface. However, should
circumstances require you to do so on a hill:
X Place wheel chocks or other sizeable
objects on the downhill side in front of both
wheels on the side opposite to the side on
which the wheel is to be changed. G
Warning!
Only jack up the vehicle on level ground or on
slight inclines/declines. Otherwise, the
vehicle could fall off the jack and injure you or
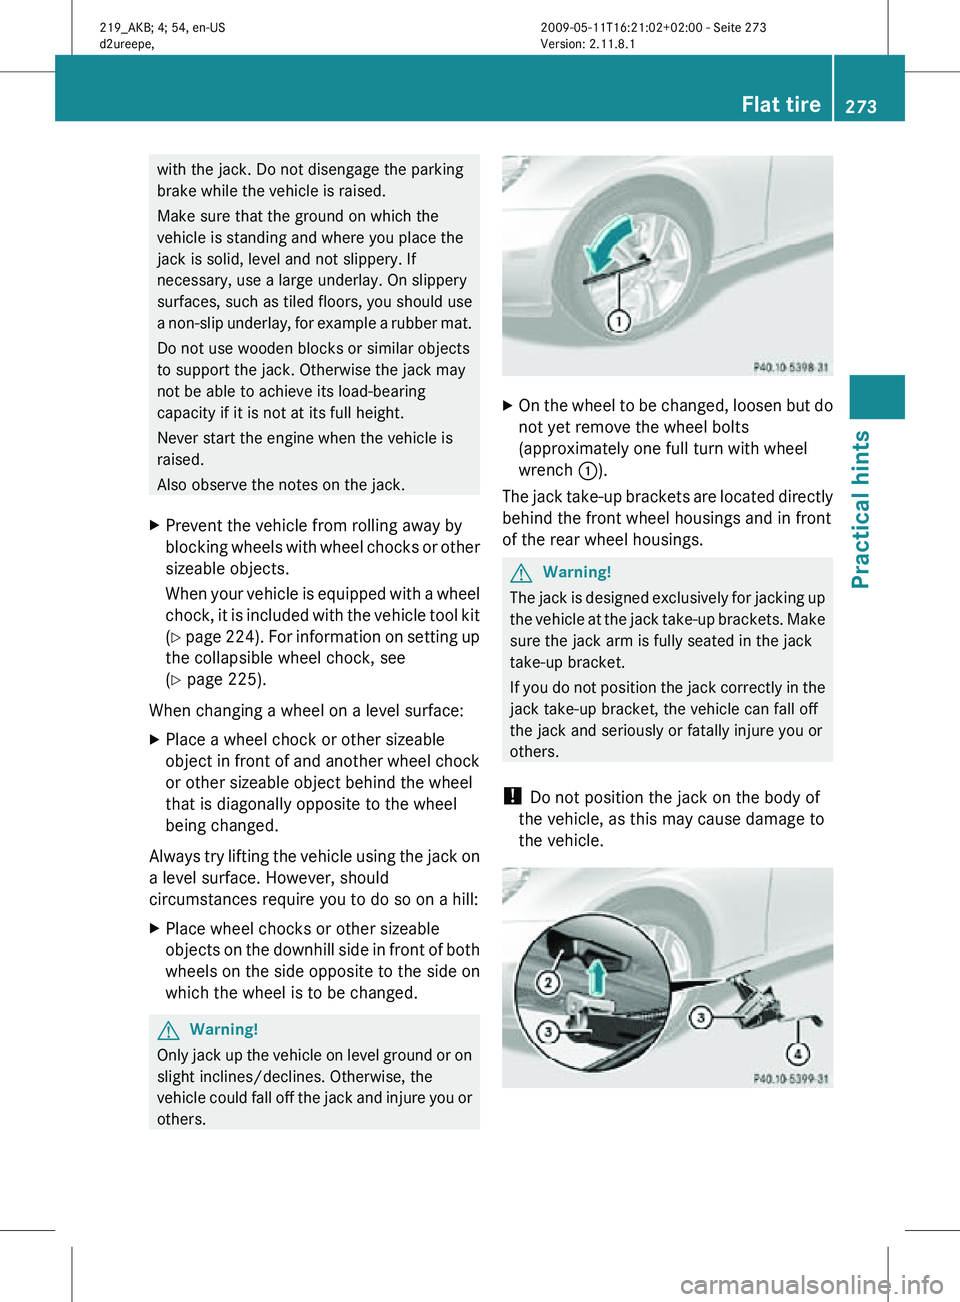
others. X
On the wheel to be changed, loosen but do
not yet remove the wheel bolts
(approximately one full turn with wheel
wrench :).
The jack take-up brackets are located directly
behind the front wheel housings and in front
of the rear wheel housings. G
Warning!
The jack is designed exclusively for jacking up
the vehicle at the jack take-up brackets. Make
sure the jack arm is fully seated in the jack
take-up bracket.
If you do not position the jack correctly in the
jack take-up bracket, the vehicle can fall off
the jack and seriously or fatally injure you or
others.
! Do not position the jack on the body of
the vehicle, as this may cause damage to
the vehicle. Flat tire
273Practical hints
219_AKB; 4; 54, en-US
d2ureepe, Version: 2.11.8.1 2009-05-11T16:21:02+02:00 - Seite 273 Z