2010 MERCEDES-BENZ CLS warning light
[x] Cancel search: warning lightPage 140 of 308
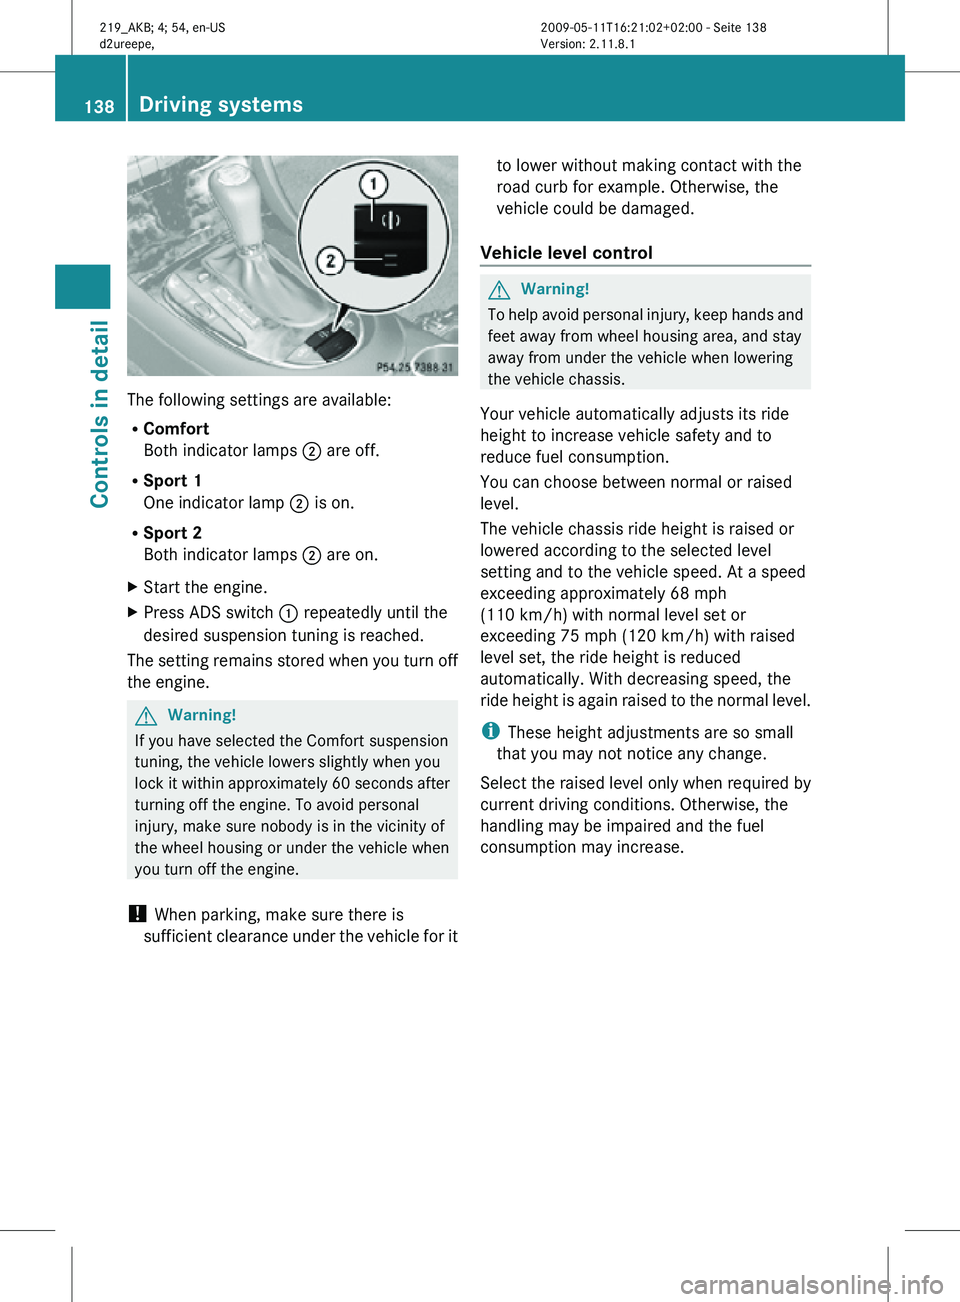
The following settings are available:
R
Comfort
Both indicator lamps ; are off.
R Sport 1
One indicator lamp ; is on.
R Sport 2
Both indicator lamps ; are on.
X Start the engine.
X Press ADS switch : repeatedly until the
desired suspension tuning is reached.
The setting remains stored when you turn off
the engine. G
Warning!
If you have selected the Comfort suspension
tuning, the vehicle lowers slightly when you
lock it within approximately 60 seconds after
turning off the engine. To avoid personal
injury, make sure nobody is in the vicinity of
the wheel housing or under the vehicle when
you turn off the engine.
! When parking, make sure there is
sufficient clearance under the vehicle for it to lower without making contact with the
road curb for example. Otherwise, the
vehicle could be damaged.
Vehicle level control G
Warning!
To help avoid personal injury, keep hands and
feet away from wheel housing area, and stay
away from under the vehicle when lowering
the vehicle chassis.
Your vehicle automatically adjusts its ride
height to increase vehicle safety and to
reduce fuel consumption.
You can choose between normal or raised
level.
The vehicle chassis ride height is raised or
lowered according to the selected level
setting and to the vehicle speed. At a speed
exceeding approximately 68 mph
(110 km/h) with normal level set or
exceeding 75 mph (120 km/h) with raised
level set, the ride height is reduced
automatically. With decreasing speed, the
ride height is again raised to the normal level.
i These height adjustments are so small
that you may not notice any change.
Select the raised level only when required by
current driving conditions. Otherwise, the
handling may be impaired and the fuel
consumption may increase. 138
Driving systemsControls in detail
219_AKB; 4; 54, en-US
d2ureepe,
Version: 2.11.8.1 2009-05-11T16:21:02+02:00 - Seite 138
Page 154 of 308
Power tilt/sliding sunroof
Opening and closing
G
Observe Safety notes, see page 52. G
Warning!
When opening or closing the tilt/sliding
sunroof, make sure there is no danger of
anyone being harmed by the opening/closing
procedure.
The tilt/sliding sunroof is equipped with the
express operation and automatic reversal
function. If the movement of the tilt/sliding
sunroof is blocked during the closing
procedure, the tilt/sliding sunroof will stop
and open slightly.
The tilt/sliding sunroof operates differently
when the sunroof switch is pressed and held.
See the “Closing when the tilt/sliding sunroof
is blocked” section for details.
The opening/closing procedure of the tilt/
sliding sunroof can be immediately halted by
releasing the sunroof switch or, if the sunroof
switch was moved past the resistance point
and released, by moving the sunroof switch in
any direction. G
Warning!
The tilt/sliding sunroof is made out of glass.
In the event of an accident, the glass may
shatter. This may result in an opening in the
roof.
In a vehicle rollover, occupants not wearing
their seat belts or not wearing them properly
may be thrown out of the opening. Such an
opening also presents a potential for injury for
occupants wearing their seat belts properly as
entire body parts or portions of them may
protrude from the passenger compartment.
! To avoid damaging the seals, do not
transport any objects with sharp edges
which can stick out of the tilt/sliding
sunroof. Do not open the tilt/sliding sunroof if there
is snow or ice on the roof, as this could
result in malfunctions.
If you cannot open or close the tilt/sliding
sunroof due to a malfunction contact
Roadside Assistance or an authorized
Mercedes-Benz Center.
! Please keep in mind that weather
conditions can sometimes change rapidly.
Make sure to close the tilt/sliding sunroof
when leaving the vehicle. If water enters
the vehicle interior, vehicle electronics
could be damaged which is not covered by
the Mercedes-Benz Limited Warranty.
i You can also open or close the tilt/sliding
sunroof using the SmartKey or the
KEYLESS-GO function, see “Summer
opening feature” ( Y page 96) and
“Convenience closing feature”
(Y page 96).
i After switching off the ignition or
removing the SmartKey from the starter
switch, you can operate the tilt/sliding
sunroof until you open the driver’s or front
passenger door. If no door was opened you
can operate the tilt/sliding sunroof for up
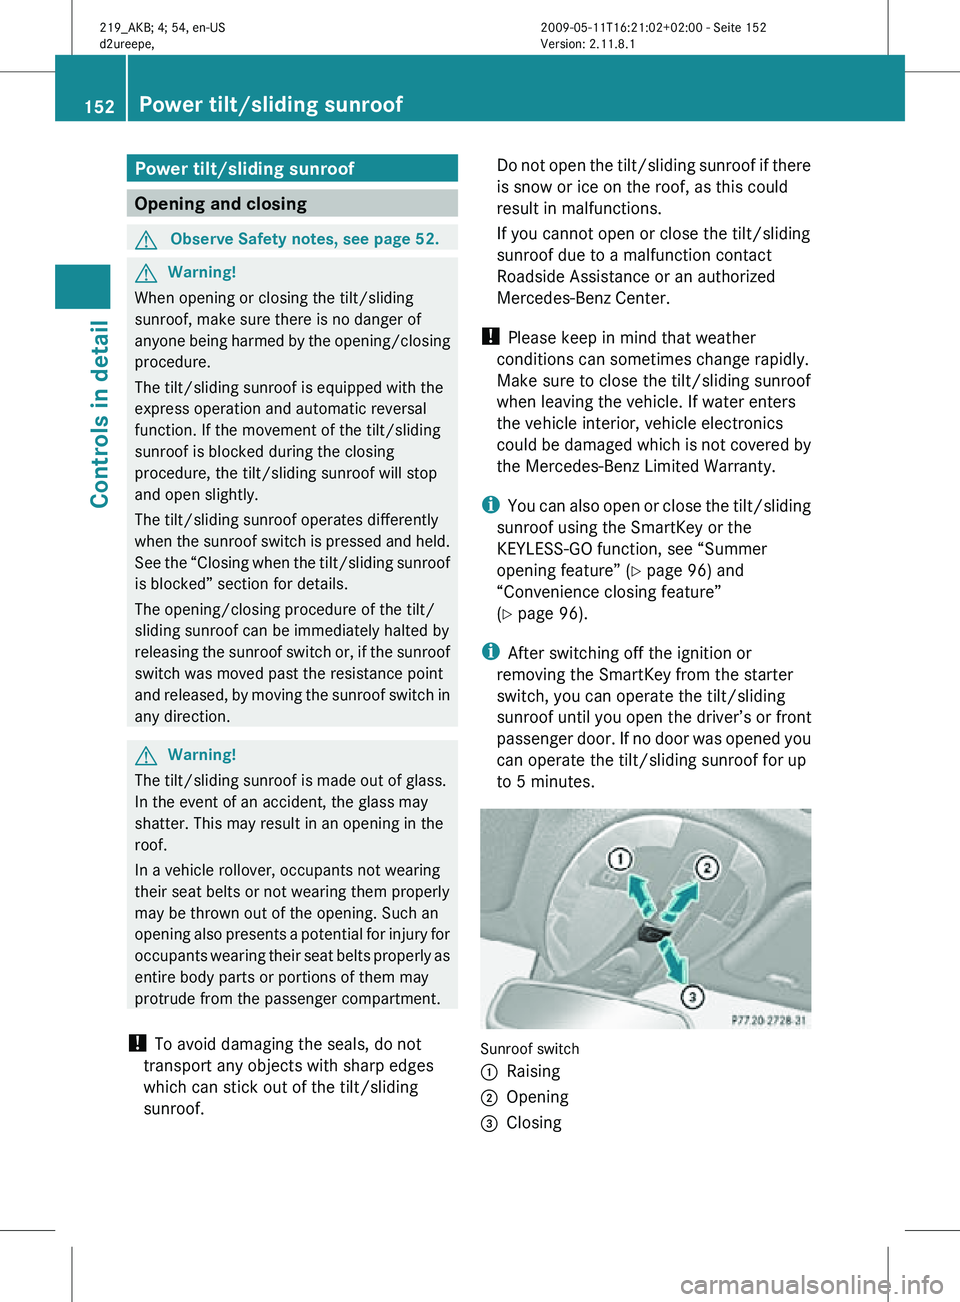
to 5 minutes. Sunroof switch
:
Raising
; Opening
= Closing 152
Power tilt/sliding sunroofControls in detail
219_AKB; 4; 54, en-US
d2ureepe,
Version: 2.11.8.1 2009-05-11T16:21:02+02:00 - Seite 152
Page 155 of 308
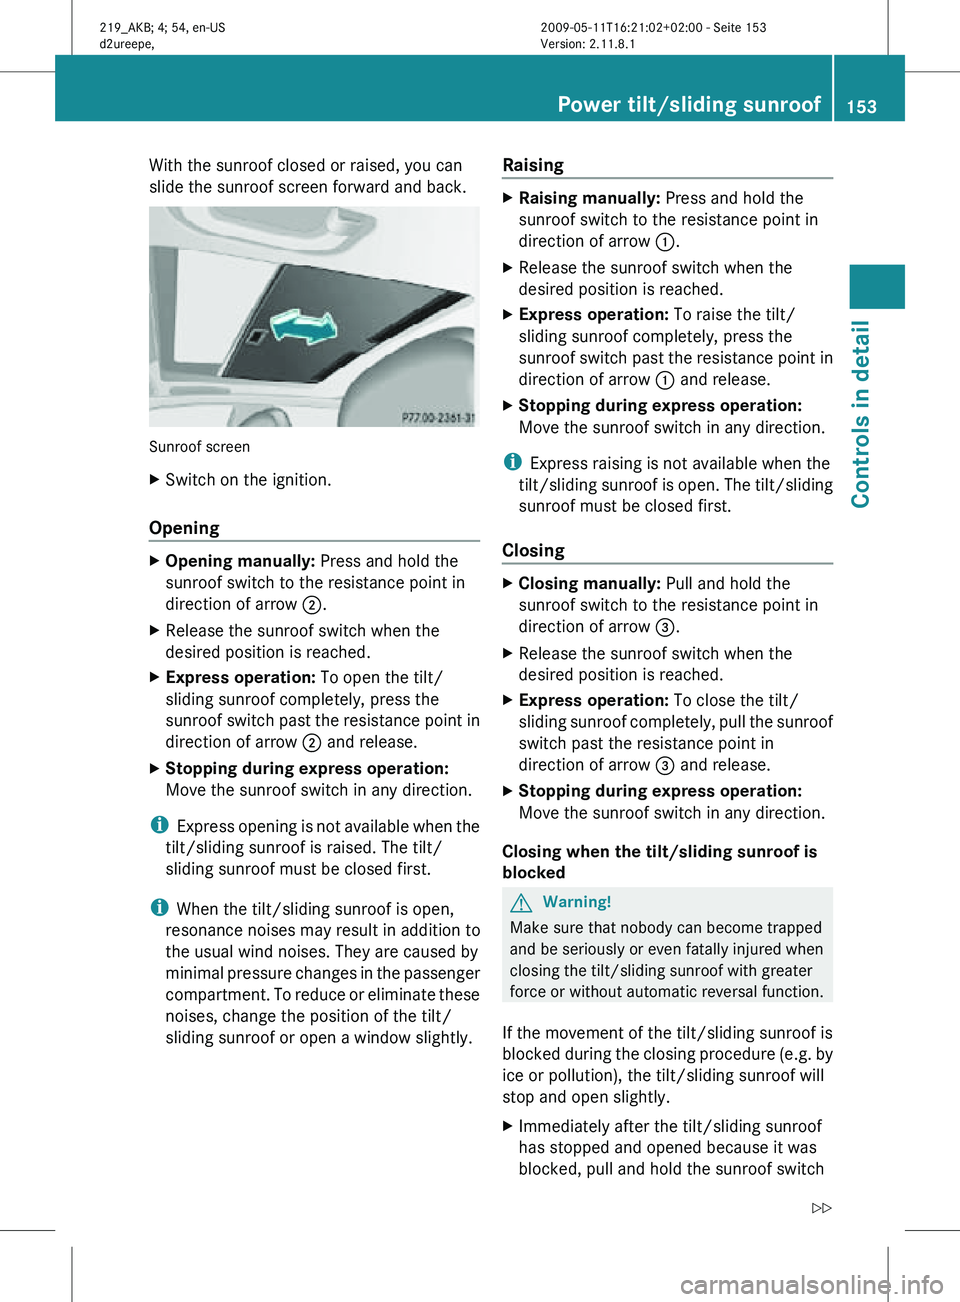
With the sunroof closed or raised, you can
slide the sunroof screen forward and back.
Sunroof screen
X
Switch on the ignition.
Opening X
Opening manually: Press and hold the
sunroof switch to the resistance point in
direction of arrow ;.
X Release the sunroof switch when the
desired position is reached.
X Express operation: To open the tilt/
sliding sunroof completely, press the
sunroof switch past the resistance point in
direction of arrow ; and release.
X Stopping during express operation:
Move the sunroof switch in any direction.
i Express opening is not available when the
tilt/sliding sunroof is raised. The tilt/
sliding sunroof must be closed first.
i When the tilt/sliding sunroof is open,
resonance noises may result in addition to
the usual wind noises. They are caused by
minimal pressure changes in the passenger
compartment. To reduce or eliminate these
noises, change the position of the tilt/
sliding sunroof or open a window slightly. Raising X
Raising manually: Press and hold the
sunroof switch to the resistance point in
direction of arrow :.
X Release the sunroof switch when the
desired position is reached.
X Express operation: To raise the tilt/
sliding sunroof completely, press the
sunroof switch past the resistance point in
direction of arrow : and release.
X Stopping during express operation:
Move the sunroof switch in any direction.
i Express raising is not available when the
tilt/sliding sunroof is open. The tilt/sliding
sunroof must be closed first.
Closing X
Closing manually: Pull and hold the
sunroof switch to the resistance point in
direction of arrow =.
X Release the sunroof switch when the
desired position is reached.
X Express operation: To close the tilt/
sliding sunroof completely, pull the sunroof
switch past the resistance point in
direction of arrow = and release.
X Stopping during express operation:
Move the sunroof switch in any direction.
Closing when the tilt/sliding sunroof is
blocked G
Warning!
Make sure that nobody can become trapped
and be seriously or even fatally injured when
closing the tilt/sliding sunroof with greater
force or without automatic reversal function.
If the movement of the tilt/sliding sunroof is
blocked during the closing procedure (e.g. by
ice or pollution), the tilt/sliding sunroof will
stop and open slightly.
X Immediately after the tilt/sliding sunroof
has stopped and opened because it was
blocked, pull and hold the sunroof switch Power tilt/sliding sunroof
153Controls in detail
219_AKB; 4; 54, en-US
d2ureepe, Version: 2.11.8.1 2009-05-11T16:21:02+02:00 - Seite 153 Z
Page 156 of 308
in direction of arrow
= until the tilt/sliding
sunroof is fully closed.
The tilt/sliding sunroof closes with greater
force.
If the tilt/sliding sunroof is blocked again and
opens slightly:
X Immediately after the tilt/sliding sunroof
was
blocked and has opened, pull and hold
the sunroof switch in direction of arrow
= until the tilt/sliding sunroof is fully
closed.
The tilt/sliding sunroof closes without
automatic reversal function. G
Warning!
Pulling and holding the sunroof switch to
close the tilt/sliding sunroof immediately
after
it had been blocked two times will cause
the tilt/sliding sunroof to close without any
reversal function for as long as you hold the
sunroof switch. Synchronizing
The
tilt/sliding sunroof must be synchronized
R after the battery has been disconnected or
discharged
R after a malfunction
R if the tilt/sliding sunroof does not open
smoothly
! If the tilt/sliding sunroof cannot be closed
or synchronized, contact an authorized
Mercedes-Benz Center or call Roadside
Assistance.
X Vehicles with SmartKey: Switch off the
ignition
and remove the SmartKey from the
starter switch.
X Vehicles with KEYLESS-GO: Switch off the
ignition and open the driver’s door. This
puts the starter switch in position 0, same
as with the SmartKey removed from the starter switch. The driver’s door then can
be closed again.
X Remove the fuse for the tilt/sliding sunroof
from the fuse box (Y page 284).
X Reinsert the fuse in the fuse box.
X Switch on the ignition.
X Press and hold the sunroof switch in
direction
of arrow : (Y page 152) until the
tilt/sliding sunroof is fully raised at the
rear.
X Keep holding the sunroof switch in
direction of arrow : for approximately
1 second.
X Check the express operation feature
(Y page 153).
If
the tilt/sliding sunroof opens and closes
completely, the roof is synchronized.
Otherwise repeat the above steps. Loading and storing
Loading instructions
G
Warning!
Always fasten items being carried as securely
as possible using cargo tie-down hooks and
fastening
materials appropriate for the weight
and size of the load.
In an accident, during hard braking or sudden
maneuvers, loose items will be thrown around
inside the vehicle. This can cause injury to
vehicle occupants unless the items are
securely fastened in the vehicle.
To help avoid personal injury during a collision
or sudden maneuver, exercise care when
transporting cargo. Do not pile luggage or
cargo higher than the seat backrests.
The trunk is the preferred place to carry
objects. Always use cargo tie-down hooks
when transporting cargo. Do not place
anything on the rear-window shelf.
Never drive a vehicle with the trunk open.
Deadly carbon monoxide (CO) gases may 154
Loading and storing
Controls in detail
219_AKB; 4; 54, en-US
d2ureepe,
Version: 2.11.8.1 2009-05-11T16:21:02+02:00 - Seite 154
Page 159 of 308
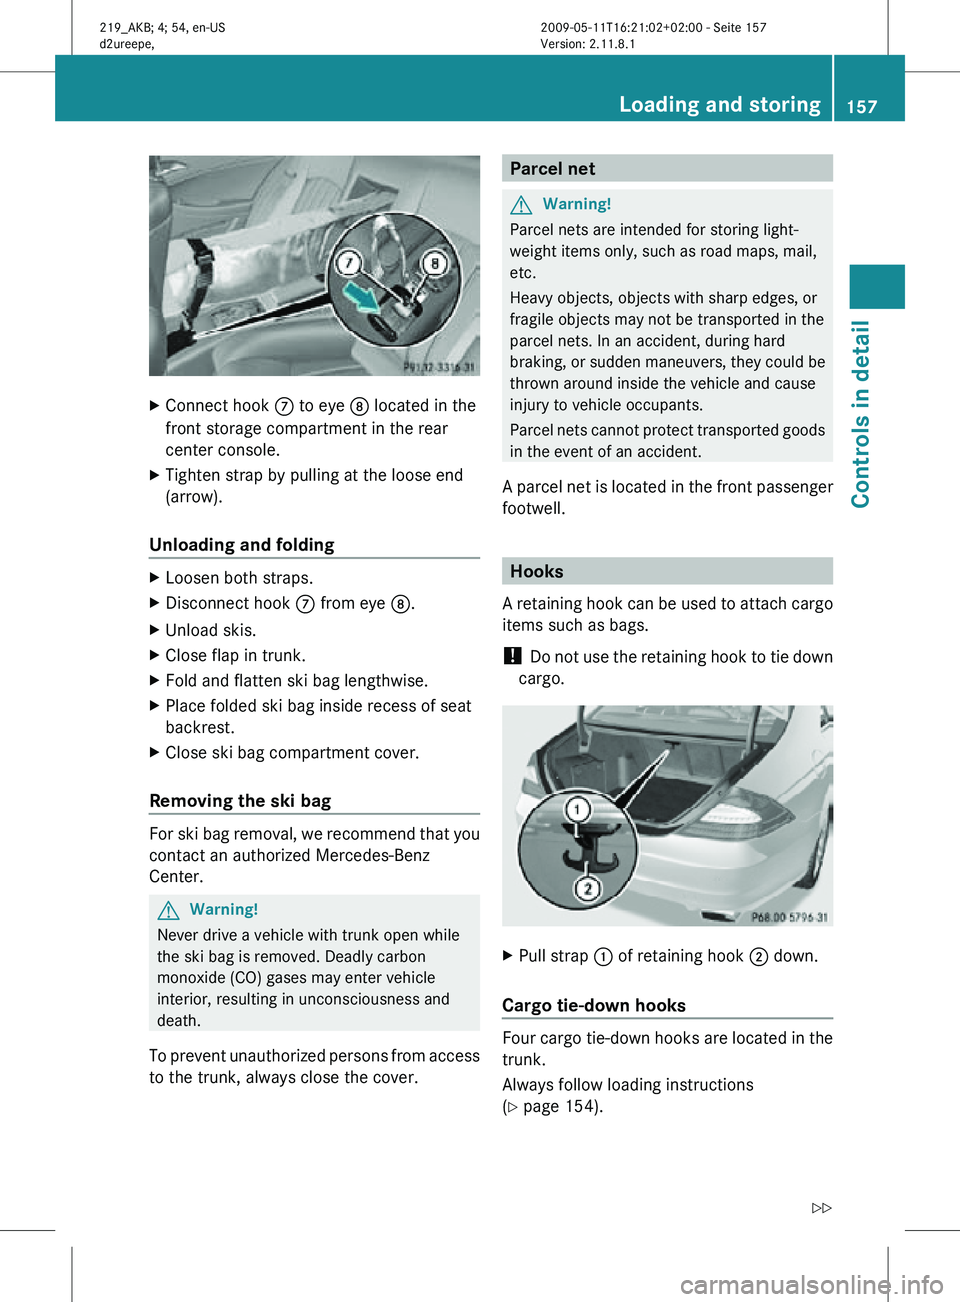
X
Connect hook C to eye D located in the
front storage compartment in the rear
center console.
X Tighten strap by pulling at the loose end
(arrow).
Unloading and folding X
Loosen both straps.
X Disconnect hook C from eye D.
X Unload skis.
X Close flap in trunk.
X Fold and flatten ski bag lengthwise.
X Place folded ski bag inside recess of seat
backrest.
X Close ski bag compartment cover.
Removing the ski bag For ski bag removal, we recommend that you
contact an authorized Mercedes-Benz
Center.
G
Warning!
Never drive a vehicle with trunk open while
the ski bag is removed. Deadly carbon
monoxide (CO) gases may enter vehicle
interior, resulting in unconsciousness and
death.
To prevent unauthorized persons from access
to the trunk, always close the cover. Parcel net
G
Warning!
Parcel nets are intended for storing light-
weight items only, such as road maps, mail,
etc.
Heavy objects, objects with sharp edges, or
fragile objects may not be transported in the
parcel nets. In an accident, during hard
braking, or sudden maneuvers, they could be
thrown around inside the vehicle and cause
injury to vehicle occupants.
Parcel nets cannot protect transported goods
in the event of an accident.
A parcel net is located in the front passenger
footwell. Hooks
A retaining hook can be used to attach cargo
items such as bags.
! Do not use the retaining hook to tie down
cargo. X
Pull strap : of retaining hook ; down.
Cargo tie-down hooks Four cargo tie-down hooks are located in the
trunk.
Always follow loading instructions
(Y page 154). Loading and storing
157Controls in detail
219_AKB; 4; 54, en-US
d2ureepe, Version: 2.11.8.1 2009-05-11T16:21:02+02:00 - Seite 157 Z
Page 162 of 308
X
Opening: Press the handle upwards and
fold the rear armrest lid up.
Storage bags G
Warning!
Do not place objects with a combined weight
of more than 4.4 lb (2 kg) into the storage bag.
Otherwise, the Occupant Classification
System (OCS) may not be able to properly
approximate the occupant weight category.
The storage bag is intended for storing light-
weight items only.
Heavy objects, objects with sharp edges or
fragile objects may not be transported in the
storage bag. In an accident, during hard
braking, or sudden maneuvers, they could be
thrown around inside the vehicle and cause
injury to vehicle occupants.
The storage bag cannot protect transported
goods in the event of an accident.
Storage bags are located on the back of the
front seats. Useful features
Cup holders
G
Warning!
In order to help prevent spilling liquids on
vehicle occupants and/or vehicle equipment,
only use containers that fit into the cup
holder. Use lids on open containers and do
not fill containers to a height where the
contents, especially hot liquids, could spill
during braking, vehicle maneuvers, or in an
accident. Liquids spilled on vehicle occupants
may cause serious personal injury. Liquids
spilled on vehicle equipment may cause
damage not covered by the Mercedes-Benz
Limited Warranty.
The cup holder must be extended when in use
with bottles. When not in use, keep the cup holder closed.
An open cup holder may cause injury to you
or others when contacted during braking,
vehicle maneuvers, or in an accident.
Keep in mind that objects placed in the cup
holder may come loose during braking,
vehicle maneuvers, or in an accident and be
thrown around in the vehicle interior. Objects
thrown around in the vehicle interior may
cause an accident and/or serious personal
injury.
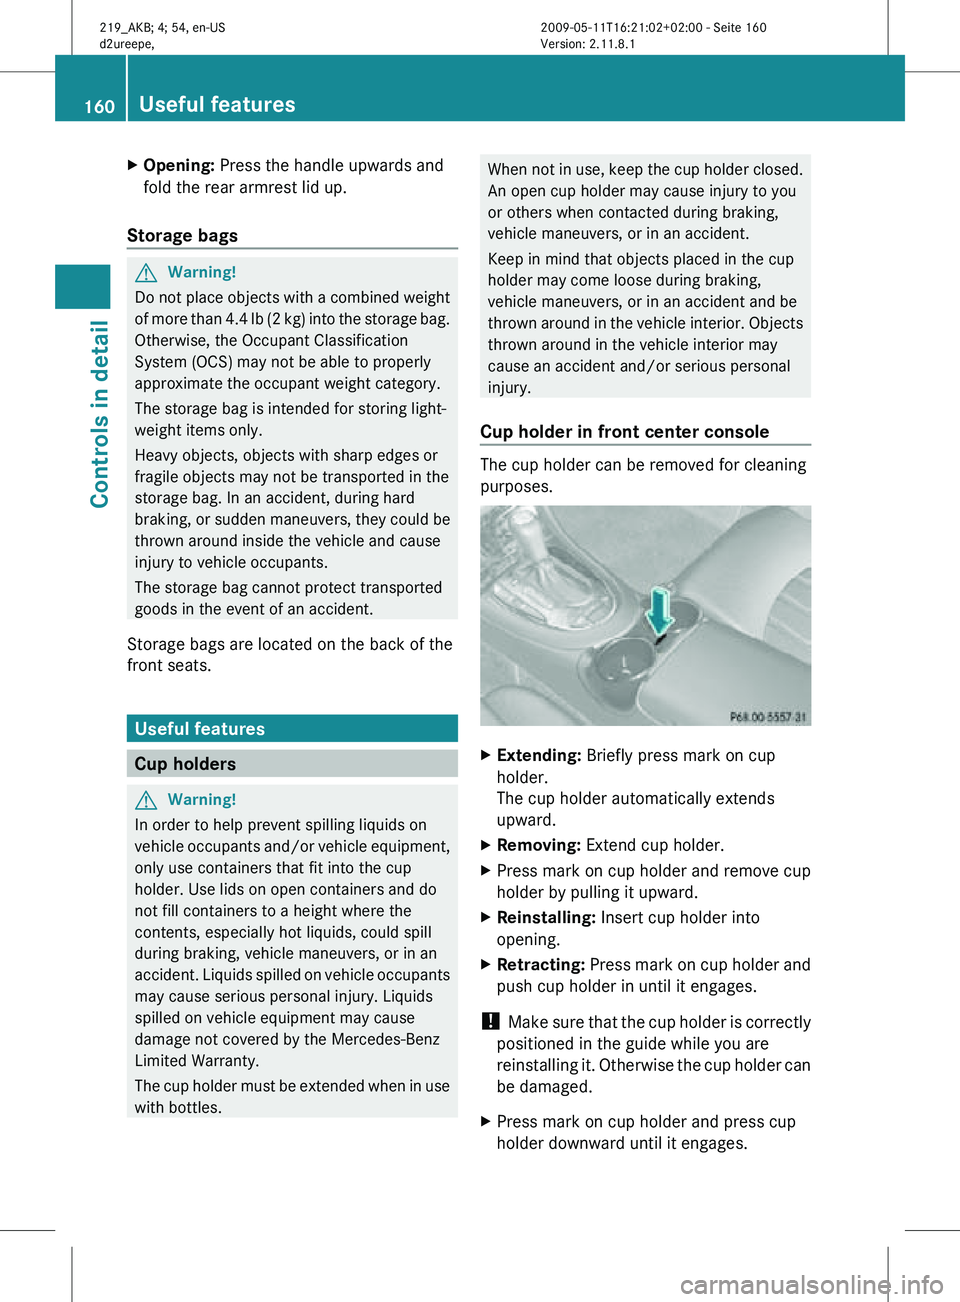
Cup holder in front center console The cup holder can be removed for cleaning
purposes.
X
Extending: Briefly press mark on cup
holder.
The cup holder automatically extends
upward.
X Removing: Extend cup holder.
X Press mark on cup holder and remove cup
holder by pulling it upward.
X Reinstalling: Insert cup holder into
opening.
X Retracting: Press mark on cup holder and
push cup holder in until it engages.
! Make sure that the cup holder is correctly
positioned in the guide while you are
reinstalling it. Otherwise the cup holder can
be damaged.
X Press mark on cup holder and press cup
holder downward until it engages. 160
Useful featuresControls in detail
219_AKB; 4; 54, en-US
d2ureepe,
Version: 2.11.8.1 2009-05-11T16:21:02+02:00 - Seite 160
Page 165 of 308
X
Grab and remove ashtray insert from
ashtray frame.
X Reinstalling ashtray insert: Push the
ashtray insert back into the frame until it
engages.
X Closing: Push down cover :.
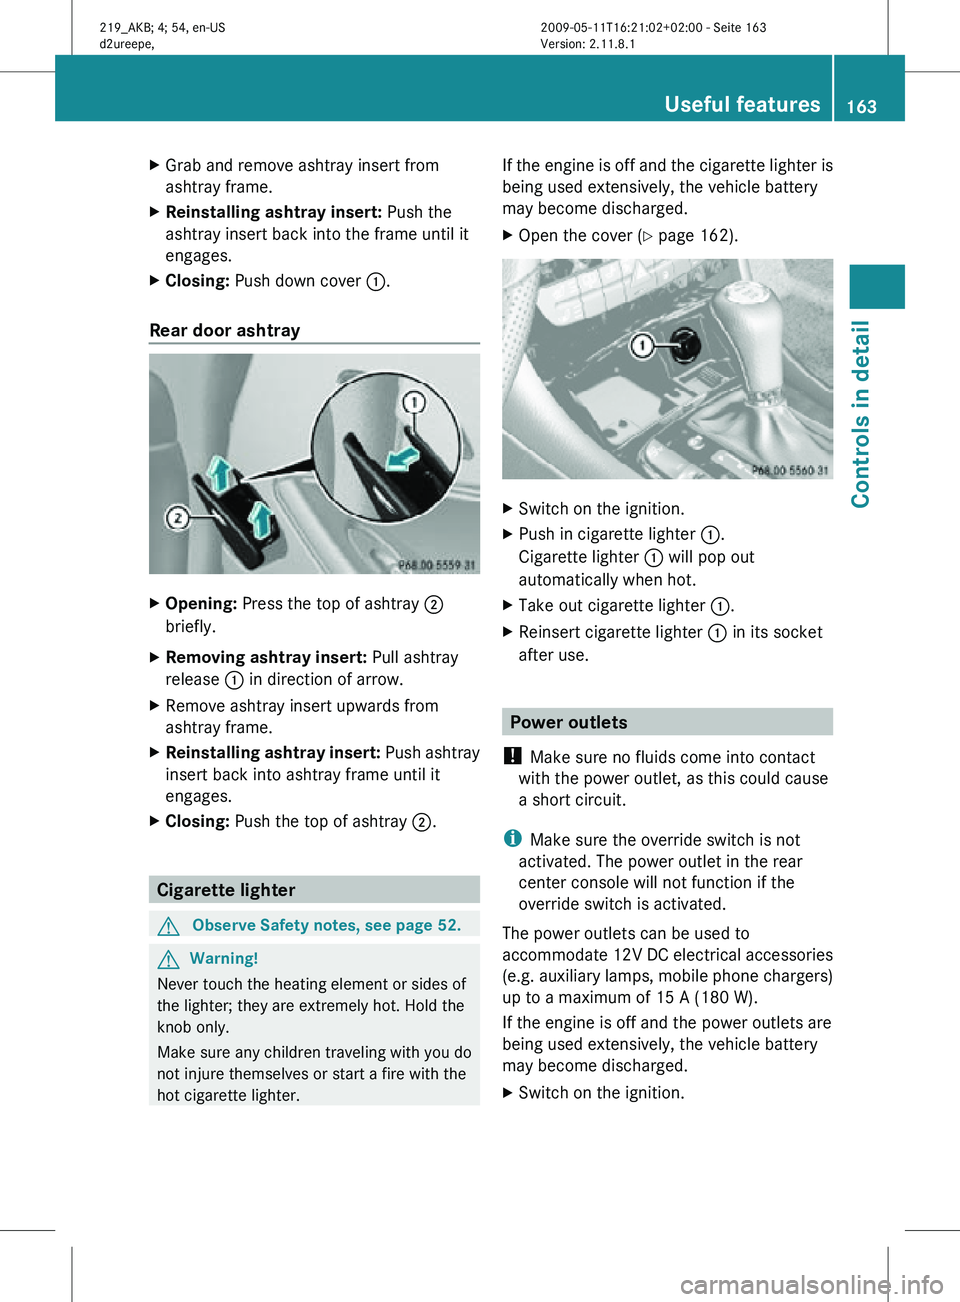
Rear door ashtray X
Opening: Press the top of ashtray ;
briefly.
X Removing ashtray insert: Pull ashtray
release : in direction of arrow.
X Remove ashtray insert upwards from
ashtray frame.
X Reinstalling ashtray insert: Push ashtray
insert back into ashtray frame until it
engages.
X Closing: Push the top of ashtray ;.Cigarette lighter
G
Observe Safety notes, see page 52. G
Warning!
Never touch the heating element or sides of
the lighter; they are extremely hot. Hold the
knob only.
Make sure any children traveling with you do
not injure themselves or start a fire with the
hot cigarette lighter. If the engine is off and the cigarette lighter is
being used extensively, the vehicle battery
may become discharged.
X
Open the cover ( Y page 162). X
Switch on the ignition.
X Push in cigarette lighter :.
Cigarette lighter : will pop out
automatically when hot.
X Take out cigarette lighter :.
X Reinsert cigarette lighter : in its socket
after use. Power outlets
! Make sure no fluids come into contact
with the power outlet, as this could cause
a short circuit.
i Make sure the override switch is not
activated. The power outlet in the rear
center console will not function if the
override switch is activated.
The power outlets can be used to
accommodate 12V DC electrical accessories
(e.g. auxiliary lamps, mobile phone chargers)
up to a maximum of 15 A (180 W).
If the engine is off and the power outlets are
being used extensively, the vehicle battery
may become discharged.
X Switch on the ignition. Useful features
163Controls in detail
219_AKB; 4; 54, en-US
d2ureepe, Version: 2.11.8.1 2009-05-11T16:21:02+02:00 - Seite 163 Z
Page 179 of 308
Mercedes-Benz Center to have the fuel
system drained completely.
! To prevent damage to the catalytic
converters, only use premium unleaded
gasoline in this vehicle.
Any noticeable irregularities in engine
operation should be repaired promptly.
Otherwise, excessive unburned fuel may
reach the catalytic converter, causing it to
overheat and potentially start a fire.
i Only use premium unleaded gasoline with
a minimum Posted Octane Rating of 91
(average of 96 RON/86 MON).
Information on gasoline quality can
normally be found on the fuel pump. Please
contact gas station personnel in case
labels on the pump cannot be found.
For more information on gasoline, see
“Premium unleaded gasoline”
(Y page 299), see “Fuel requirements”
(Y page 299), or contact an authorized
Mercedes-Benz Center, or visit
www.mbusa.com (USA only).
Locking/unlocking the vehicle with the
SmartKey or KEYLESS-GO automatically
locks/unlocks the fuel filler flap.
i In case the central locking system does
not release the fuel filler flap, see “Fuel filler
flap” (Y page 263).
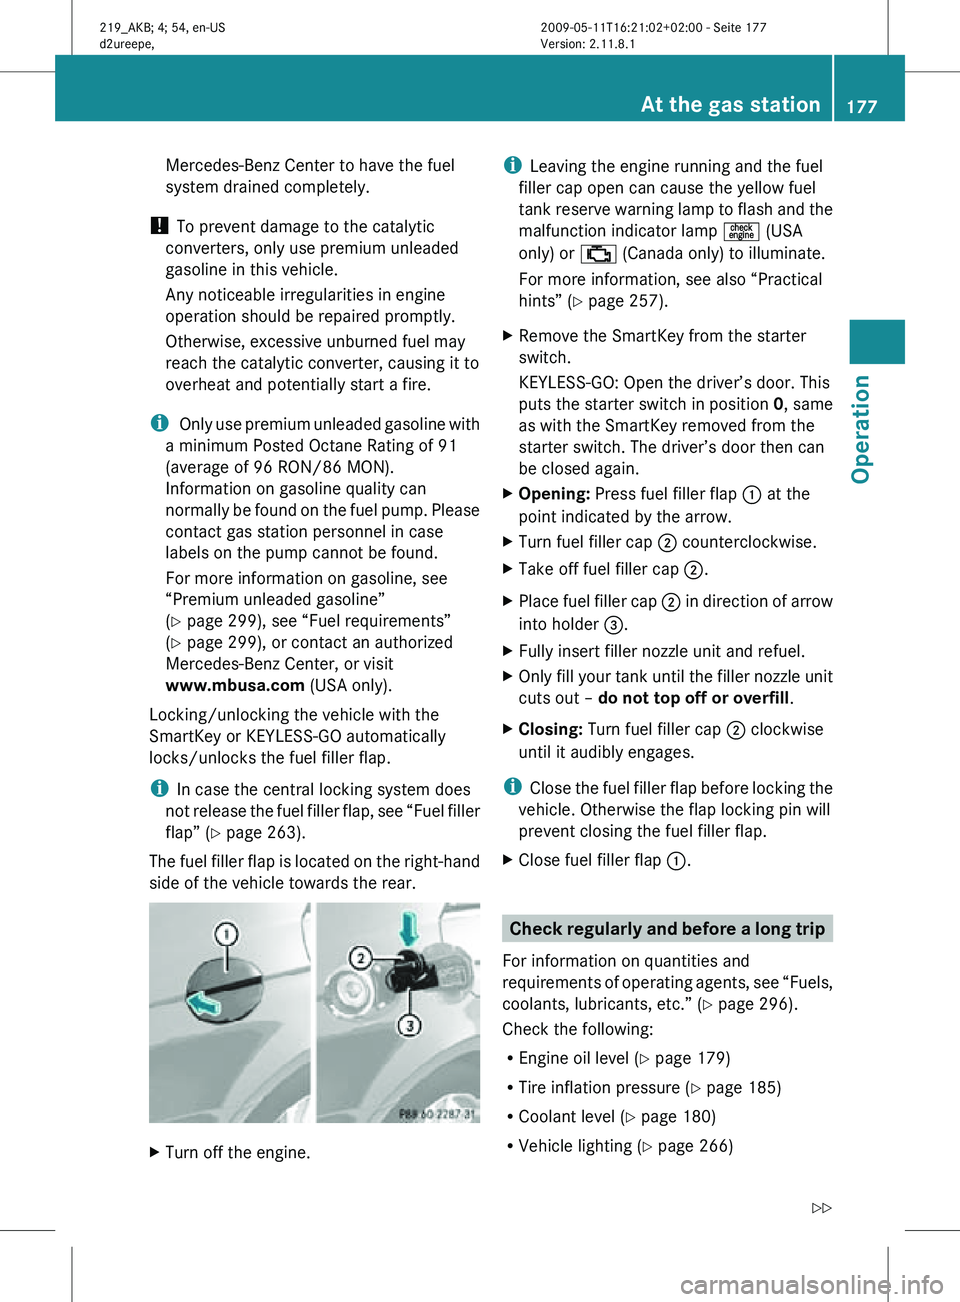
The fuel filler flap is located on the right-hand
side of the vehicle towards the rear. X
Turn off the engine. i
Leaving the engine running and the fuel
filler cap open can cause the yellow fuel
tank reserve warning lamp to flash and the
malfunction indicator lamp = (USA
only) or ; (Canada only) to illuminate.
For more information, see also “Practical
hints” (Y page 257).
X Remove the SmartKey from the starter
switch.
KEYLESS-GO: Open the driver’s door. This
puts the starter switch in position 0, same
as with the SmartKey removed from the
starter switch. The driver’s door then can
be closed again.
X Opening: Press fuel filler flap : at the
point indicated by the arrow.
X Turn fuel filler cap ; counterclockwise.
X Take off fuel filler cap ;.
X Place fuel filler cap ; in direction of arrow
into holder =.
X Fully insert filler nozzle unit and refuel.
X Only fill your tank until the filler nozzle unit
cuts out – do not top off or overfill .
X Closing: Turn fuel filler cap ; clockwise
until it audibly engages.
i Close the fuel filler flap before locking the
vehicle. Otherwise the flap locking pin will
prevent closing the fuel filler flap.
X Close fuel filler flap :. Check regularly and before a long trip
For information on quantities and
requirements of operating agents, see “Fuels,
coolants, lubricants, etc.” (Y page 296).
Check the following:
R Engine oil level ( Y page 179)
R Tire inflation pressure ( Y page 185)
R Coolant level ( Y page 180)
R Vehicle lighting ( Y page 266) At the gas station
177Operation
219_AKB; 4; 54, en-US
d2ureepe, Version: 2.11.8.1 2009-05-11T16:21:02+02:00 - Seite 177 Z