2010 MERCEDES-BENZ CLS COUPE length
[x] Cancel search: lengthPage 91 of 337
:
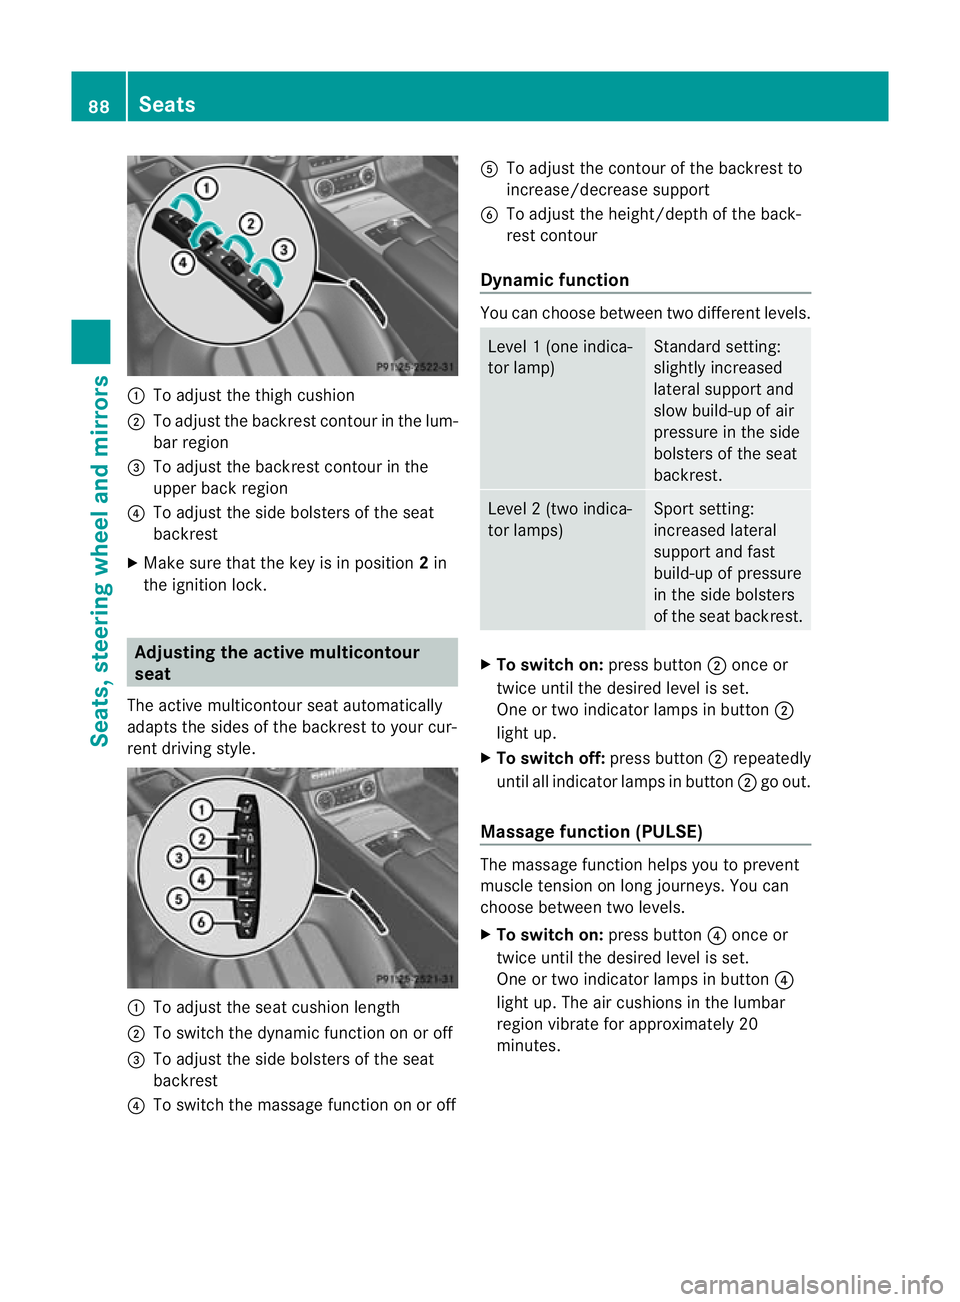
To adjust the thigh cushion
; To adjust the backrest contour in the lum-
bar region
= To adjust the backrest contour in the
upper back region
? To adjust the side bolsters of the seat
backrest
X Make sure that the key is in position 2in
the ignition lock. Adjusting the active multicontour
seat
The active multicontour seat automatically
adapts the sides of the backrest to your cur-
rent driving style. :
To adjust the seat cushion length
; To switch the dynamic function on or off
= To adjust the side bolsters of the seat
backrest
? To switch the massage function on or off A
To adjust the contour of the backrest to
increase/decrease support
B To adjust the height/depth of the back-
rest contour
Dynamic function You can choose between two different levels.
Level
1(one indica-
tor lamp) Standard setting:
slightly increased
lateral support and
slow build-up of air
pressure in the side
bolsters of the seat
backrest. Level
2(two indica-
tor lamps) Sport setting:
increased lateral
support and fast
build-up of pressure
in the side bolsters
of the seat backrest.
X
To switc hon:press button ;once or
twice until the desired level is set.
One or two indicator lamps in button ;
light up.
X To switch off: press button;repeatedly
until all indicator lamps in button ;go out.
Massage function (PULSE) The massage function helps you to prevent
muscle tension on long journeys. You can
choose between two levels.
X To switch on: press button?once or
twice until the desired level is set.
One or two indicator lamps in button ?
light up. The air cushions in the lumbar
region vibrate for approximately 20
minutes. 88
SeatsSeats, steering wheel and mirrors
Page 98 of 337
exterior mirror such that the rear
wheel and kerb are visible.
X Press memory button M? and one of
the arrows on adjustment button =
within three seconds.
The parking position is stored if the
exterior mirror does not move.
If the mirror moves out of position, repeat
the steps.
Calling up astore dparking position set-
ting X
With the key in position 2in the ignition
lock and the exterior mirror on the front-
passenge rside activated, engage reverse
gear.
The exterior mirror on the front-passenger
side moves to the stored parking position.
The exterior mirror on the front-passenger
side moves back to its original position:
R as soon as you exceed a speed of
10 km/h
R about ten seconds after you have disen-
gaged reverse gear
R if you press button :for the exterior mir-
ror on the driver's side Memory functions
Storing settings
With the memory function, you can store up
to three different settings, e.g. for three dif-
ferent people.
The following settings are stored as a single
memory preset:
R position of the seat, backrest and head
restraint
R active multicontour seat :seat cushion
length, seat backrest side bolsters, contour
of the backrest, dynamic function level set-
ting R
driver's side: steering wheel position
R driver's side: position of the exterior mir-
rors on the driver's and front-passenger
sides G
Risk of injury
The memory function can still be used when
the key has been removed. For this reason,
children should never be left unsupervised in
the vehicle. They could otherwise become
trapped when adjusting the seat or the steer-
ing wheel. G
Risk of accident
Only use the memory function on the driver's
side when the vehicle is stationary. Other-
wise, you could be distracted from the traffic
conditions by the steering wheel and seat
moving of their own accord, and as a result
cause an accident. X
Adjust the seat (Y page 86).
X On the driver's side, adjust the steering
wheel (Y page 91) and the exterior mirrors
(Y page 93).
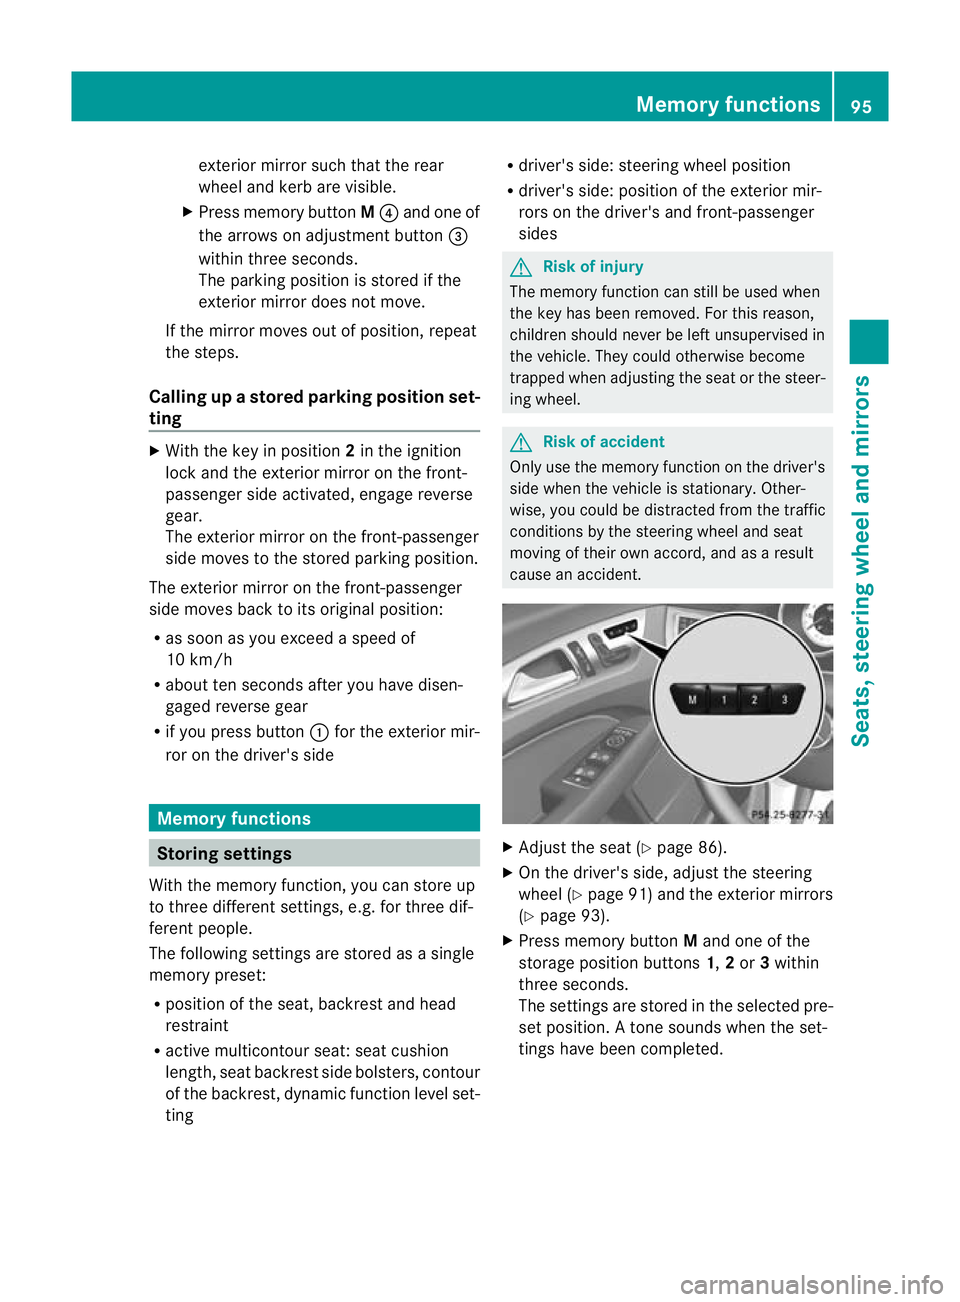
X Press memory button Mand one of the
storage position buttons 1,2or 3within
three seconds.
The settings are stored in the selected pre-
set position .Atone sounds when the set-
tings have been completed. Memory functions
95Seats, steering wheel and mirrors Z
Page 206 of 337
X
If only one telephone number is stored
for a name: press the6ora button
to start dialling.
or
X If there is more than one number for a
particular name: press the6ora
butto nto display the numbers.
X Press the 9or: button to select the
number you want to dial.
X Press the 6ora button to start dial-
ling.
or
X If you do not want to make a call: press
the ~ button.
Redialling The on-board computer saves the last names
or numbers dialled in the redial memory.
X Press the =or; button on the steer-
ing wheel to select the Tel menu.
X Press the 6button to switch to the
redial memory.
X Press the 9or: button to select the
desired name or number.
X Press the 6ora button to start dial-
ling. Assistance menu
Speed Limit Assist Displaying Speed Limit Assist
In the
Speed Lim. Asst. function, a detec-
ted speed limit is displayed under certain
conditions.
X Press =or; on the steering wheel
to select the Assist. menu.
X Press 9or: to select Speed Lim.
Asst .
X Press a.
The multifunction display shows Speed
Limit Assist. When a limit speed is detected, this is
shown in the multifunction display until:
R the speed limit ceases to apply.
R you pass city limits.
R the type of road changes, e.g. motorway
or country road.
R the speed limit is no longer detected
after a certain distance.
Activating/deactivating the Speed Limit
Assist message function
You can set Speed Limit Assist (Y page 178)
to display a detected speed limit automati-
cally for five seconds. Other messages in the
multifunction display will be faded out for this
length of time.
X Press =or; on the steering wheel
to select the Assist. menu.
X Press 9or: to select Speed Lim.
Asst .
X Press a.
The multifunction display shows Speed
Limit Assist.
X Press :.
The current selection is displayed.
X To activate or deactivate: pressa.
When Speed Limit Assist is operational and
the message function is activated, the multi-
function display shows the Äsymbol
when the ignition is switched on.
Showing the distance display This function is only available with DIS-
TRONIC PLUS.
X
Press =or; on the steering wheel
to select the Assist. menu.
X Press the 9or: button to select
Distance display .
X Press a.
The DISTRONIC PLUS distance display
(Y page 160) appears in the multifunction
display. Menus and submenus
203On-board computer and displays Z
Page 217 of 337
Lap evaluation
This function is only available if you have
stored at least two laps and have stopped the
RACETIMER.
X
Press =or; on the steering wheel
to selec tthe AMG menu.
X Press the 9button repeatedly until the
lap evaluation is shown.
Each lap is shown in a separate submenu.
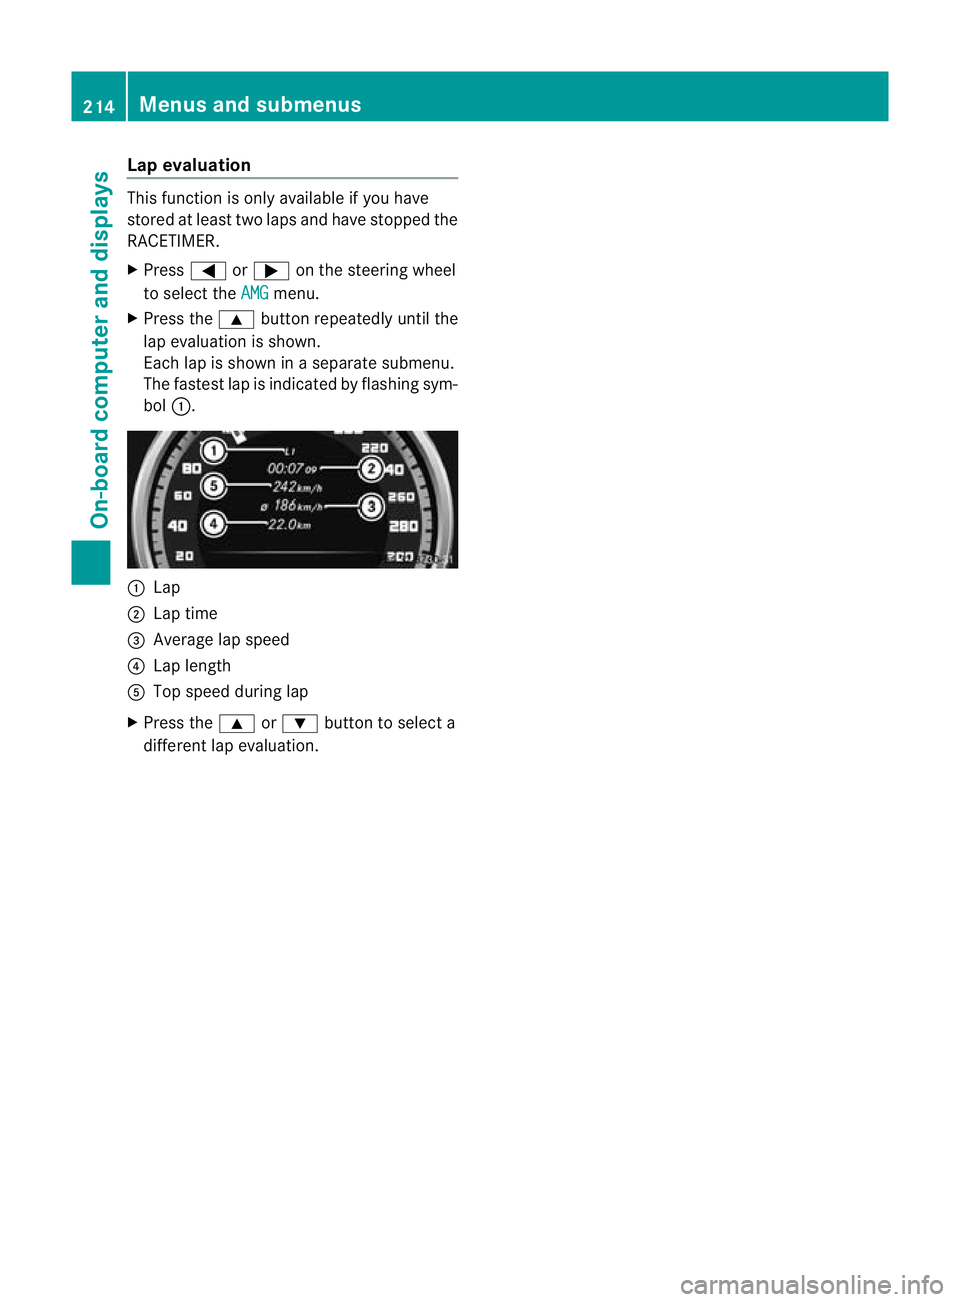
The fastest lap is indicated by flashing sym-
bol :. :
Lap
; Lap time
= Average lap speed
? Lap length
A Top speed during lap
X Press the 9or: button to select a
different lap evaluation. 214
Menus and submenusOn-board computer and displays
Page 293 of 337
R
you see smoke and smell rubber.
R ESP ®
is intervening constantly.
R there are tears in the sidewalls of the tyre.
After driving in run-flat mode, you must have
the wheel(s) checked for damage at a quali-
fied specialist workshop which has the nec-
essary specialist knowledge and tools to carry
out the wor krequired. The faulty tyre must be
replaced in every case.
Mercedes-Benz recommends that you use a
Mercedes-Benz Service Centre for this pur-
pose. In particular, work relevant to safety or
on safety-related systems must be carried out
at a qualified specialist workshop.
i When replacing one or all tyres, make
sure that you only use tyres marked
MOExtended and of the specified size for
the vehicle.
i Vehicles with MOExtended tyres are not
equipped with a TIREFIT kit at the factory.
It is therefore recommended that you addi-
tionally equip your vehicle with a TIREFIT kit
if you fit tyres that do not feature run-flat
properties, e.g. winter tyres. A TIREFIT kit
can be obtained from a Mercedes-Benz
Service Centre. Battery
Important safety notes
In order for the battery to achieve the maxi-
mum possible service life, it must always be
sufficiently charged.
Have the battery charge checked more fre-
quently if you use the vehicle mainly for short
trips or if you leave it standing idle for a
lengthy period.
To preven tdamage from corrosion, only
replace the battery with one that has a central
ventilation cover.
Only replace a battery with a battery that has
been recommended by Mercedes-Benz. Consult a Mercedes-Ben
zService Centre if
you wish to leave your vehicle parked up for
a long period of time. G
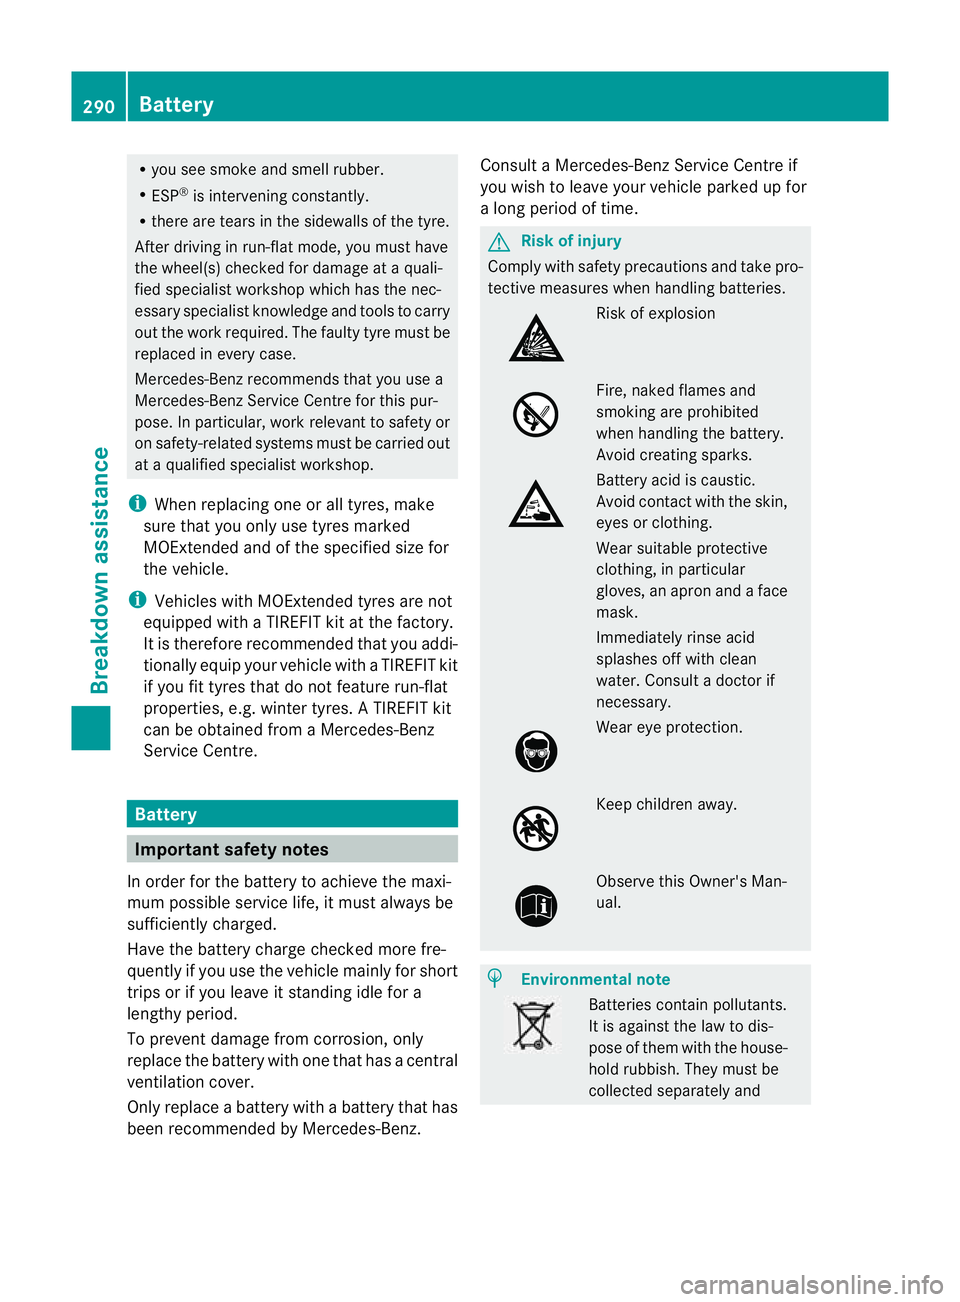
Risk of injury
Comply with safety precautions and take pro-
tective measures when handling batteries. Risk of explosion
Fire, naked flames and
smoking are prohibited
when handling the battery.
Avoid creating sparks.
Battery acid is caustic.
Avoid contact with the skin,
eyes or clothing.
Wear suitable protective
clothing, in particular
gloves, an apron and a face
mask.
Immediately rinse acid
splashes off with clean
water. Consult a doctor if
necessary.
Wear eye protection.
Keep children away.
Observe this Owner's Man-
ual.
H
Environmental note Batteries contain pollutants.
It is against the law to dis-
pose of them with the house-
hold rubbish. They must be
collected separately and290
BatteryBreakdown assistance
Page 297 of 337
Jump-starting
G
Risk of injury
There is a risk of acid burns when jump-starting a vehicle due to the gases which escape from
the battery. Do not lean over the battery while the engine is being jump-started. G
Risk of explosion
Gases escaping from the battery during jump-starting may cause minor explosions. Avoid cre-
ating sparks. Keep naked flames away from the battery, and do not smoke.
Comply with safety precautions when handling batteries. You will find these under "Battery" in
the index.
! Avoid repeated and lengthy starting attempts. Otherwise, non-combusted fuel may dam-
age the catalytic converter 39
and create a risk of fire.
Do not use a rapid-charging device to start the engine.
Make sure the jump leads are not damaged.
Make sure the jump leads are not touching any other metal objects when they are connected
to the battery.
If your vehicle's battery is discharged, the engine can be jump-started from another vehicle
or from a second battery using jump leads.
Observe the following points:
X The battery is not accessible in all vehicles. If the other vehicle's battery is not accessible,
jump-start the vehicle using a second battery or ajump-starting device.
X Only jump-start the vehicle when the engine is cold and the catalyti cconverter system has
cooled down 40
.
X Do not start the engine if the battery is frozen. Let the battery thaw first.
X Jump-starting may only be performed from batteries with a nominal voltage of 12 V.
X Only use jump leads that have a sufficient cross-section and insulated terminal clamps.
X Make sure that the jump leads cannot come into contact with parts, such as the pulley or
the fan. These parts move when the engine is started and while it is running.
X If the battery is fully discharged, leave the battery that is being used to jump-start connected
for a few minutes before attempting to start.T his charges the empty battery a little.
i Jump leads and further information about jump-starting can be obtained from any
Mercedes-Benz Service Centre.
X Make sure that the two vehicles do not touch.
X Apply the parking brake firmly.
X Shift the transmission to position P.
X Switch off all electrical consumers (e.g. radio, blower, etc.).
X Open the bonnet (Y page 266).
39 Only vehicles with a petrol engine.
40 Only vehicles with a petrol engine. 294
Jump-startingBreakdown assistance
Page 326 of 337
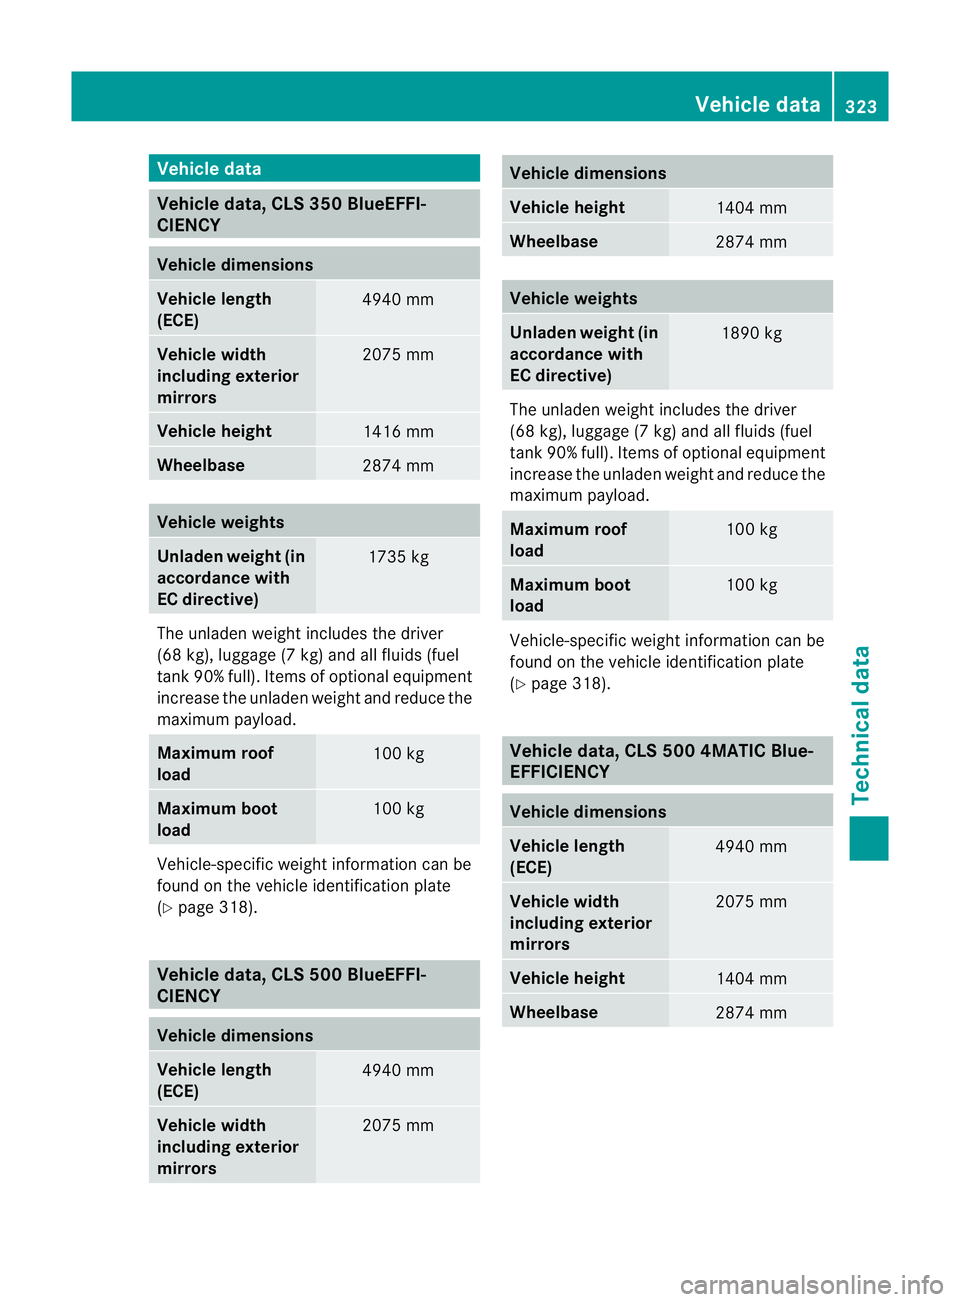
Vehicle data
Vehicle data, CLS 35
0BlueEFFI-
CIENCY Vehicle dimensions
Vehicle length
(ECE)
4940 mm
Vehicle width
including exterior
mirrors
2075 mm
Vehicle height
1416 mm
Wheelbase
2874 mm
Vehicle weights
Unladen weight (in
accordance with
EC directive)
1735 kg
The unladen weight includes the driver
(68 kg), luggage (7 kg) and all fluids (fuel
tan k90% full). Items of optional equipment
increase the unladen weight and reduce the
maximu mpayload. Maximum roof
load
100 kg
Maximum boot
load
100 kg
Vehicle-specific weigh
tinformation can be
found on the vehicle identificatio nplate
(Y page 318). Vehicle data
,CLS 500 BlueEFFI-
CIENCY Vehicle dimensions
Vehicle length
(ECE)
4940 mm
Vehicle width
including exterior
mirrors
2075 mm Vehicle dimensions
Vehicle height
1404 mm
Wheelbase
2874 mm
Vehicle weights
Unladen weight (in
accordance with
EC directive)
1890 kg
The unlade
nweight includes the driver
(68 kg), luggage (7 kg) and all fluids (fuel
tank 90% full). Items of optional equipment
increase the unladen weight and reduce the
maximum payload. Maximum roof
load
100 kg
Maximum boot
load
100 kg
Vehicle-specific weight information can be
found on the vehicle identification plate
(Y
page 318). Vehicle data, CLS 500 4MATIC Blue-
EFFICIENCY
Vehicle dimensions
Vehicle length
(ECE)
4940 mm
Vehicle width
including exterior
mirrors
2075 mm
Vehicle height
1404 mm
Wheelbase
2874 mmVehicle data
323Technical data Z
Page 327 of 337
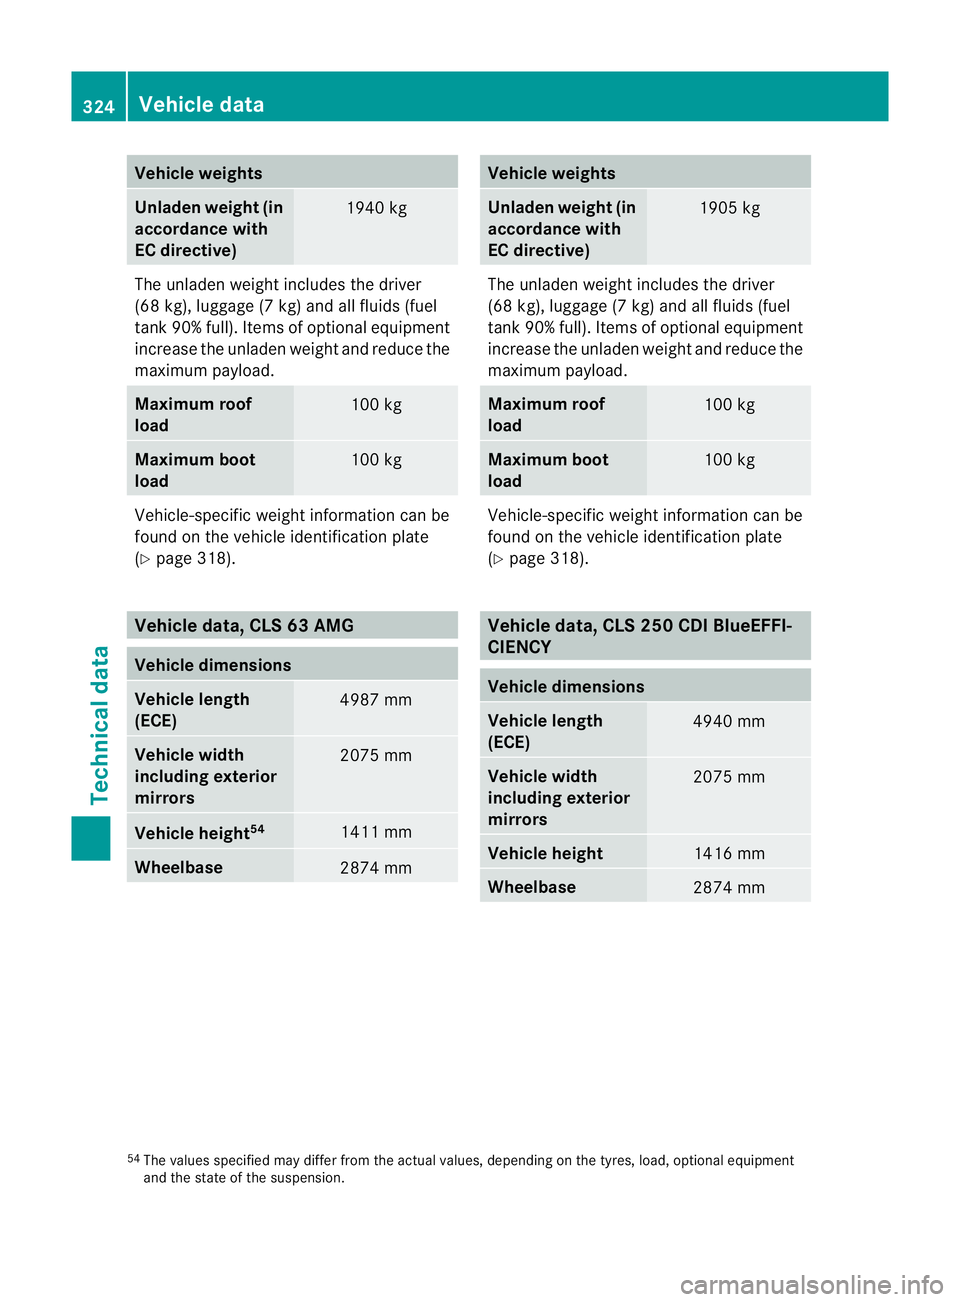
Vehicle weights
Unladen weight (in
accordance with
EC directive)
1940 kg
The unladen weight includes the driver
(68 kg), luggage (7 kg) and all fluids (fuel
tank 90% full) .Items of optional equipment
increase the unladen weight and reduce the
maximum payload. Maximum roof
load
100 kg
Maximum boot
load
100 kg
Vehicle-specifi
cweight information can be
found on the vehicle identification plate
(Y page 318). Vehicle data, CLS 63 AMG
Vehicle dimensions
Vehicle length
(ECE)
4987 mm
Vehicle width
including exterior
mirrors
2075 mm
Vehicle height
54 1411 mm
Wheelbase
2874 mm Vehicle weights
Unladen weight (in
accordance with
EC directive)
1905 kg
The unladen weight includes the driver
(68 kg), luggage (7 kg) and all fluids (fuel
tank 90% full). Items of optional equipment
increase the unladen weight and reduce the
maximum payload. Maximum roof
load
100 kg
Maximum boot
load
100 kg
Vehicle-specific weight information can be
found on the vehicle identification plate
(Y
page 318). Vehicle data, CLS 250 CDI BlueEFFI-
CIENCY
Vehicle dimensions
Vehicle length
(ECE)
4940 mm
Vehicle width
including exterior
mirrors
2075 mm
Vehicle height
1416 mm
Wheelbase
2874 mm
54
The values specified may differ from the actual values, depending on the tyres, load, optional equipment
and the state of the suspension. 324
Vehicle dataTechnical data