2010 MERCEDES-BENZ CLS COUPE stop start
[x] Cancel search: stop startPage 236 of 337
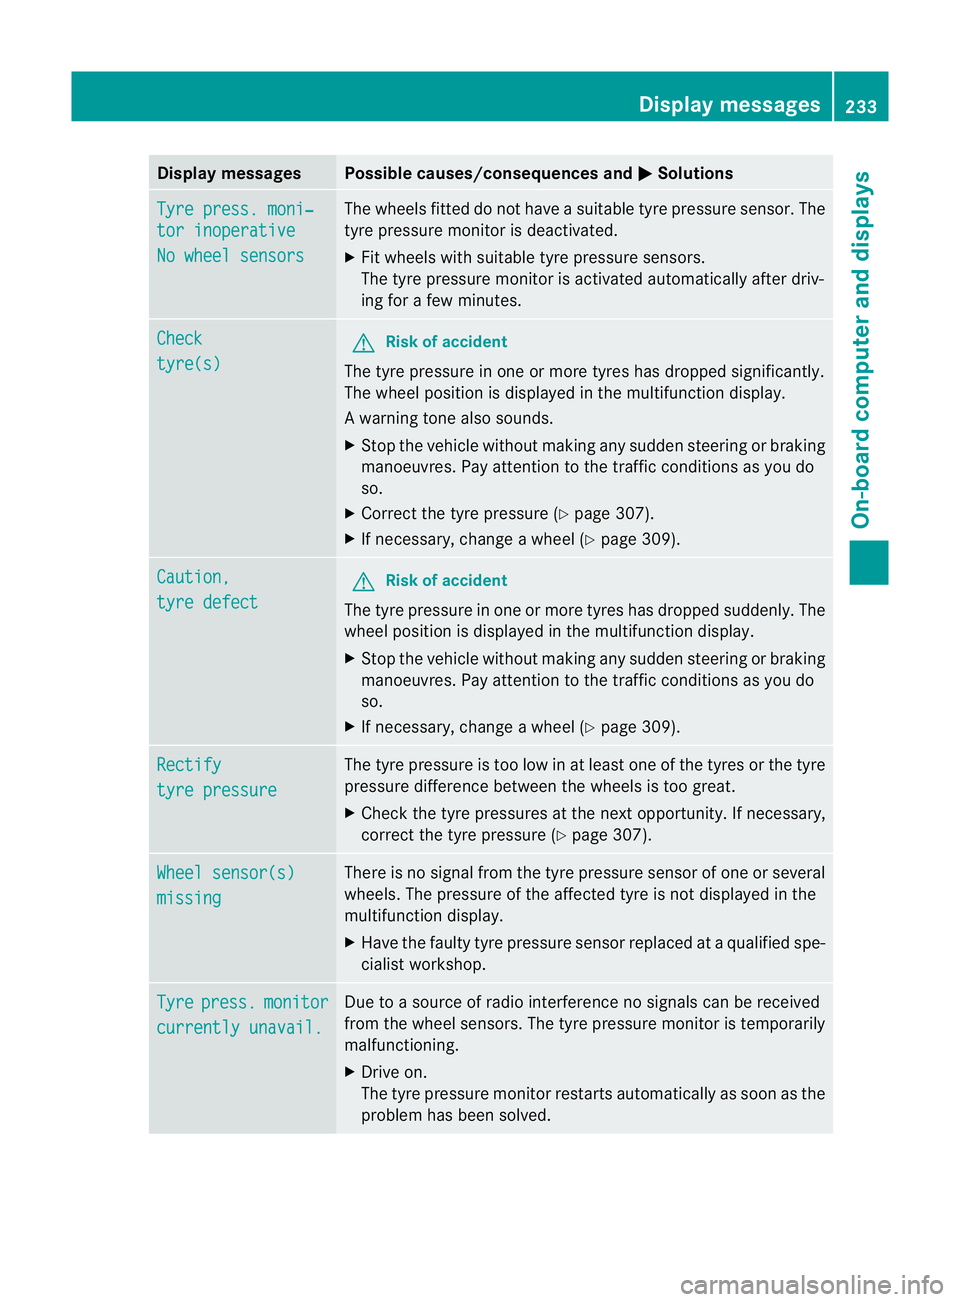
Display messages Possible causes/consequences and
M Solutions
Tyre press. moni‐
tor inoperative
No wheel sensors The wheels fitted do no
thave a suitable tyre pressure sensor .The
tyre pressure monitor is deactivated.
X Fit wheels with suitable tyre pressure sensors.
The tyre pressure monitor is activated automatically after driv-
ing for a few minutes. Check
tyre(s) G
Risk of accident
The tyre pressure in one or more tyres has dropped significantly.
The wheel position is displayed in the multifunction display.
Aw arning tone also sounds.
X Stop the vehicle without making any sudde nsteering or braking
manoeuvres .Pay attentio nto the traffic conditions as you do
so.
X Correct the tyre pressure (Y page 307).
X If necessary, change a wheel (Y page 309).Caution,
tyre defect G
Risk of accident
The tyre pressure in one or more tyres has dropped suddenly. The
wheel position is displayed in the multifunction display.
X Stop the vehicle without making any sudden steering or braking
manoeuvres. Pay attention to the traffic conditions as you do
so.
X If necessary, change a wheel (Y page 309).Rectify
tyre pressure The tyre pressure is too low in at least one of the tyres or the tyre
pressure difference between the wheels is too great.
X
Check the tyre pressures at the next opportunity. If necessary,
correct the tyre pressure (Y page 307).Wheel sensor(s)
missing There is no signal from the tyre pressure sensor of one or several
wheels. The pressure of the affected tyre is not displayed in the
multifunction display.
X
Have the faulty tyre pressure sensor replaced at a qualified spe-
cialist workshop. Tyre press. monitor
currently unavail. Due to a source of radio interference no signals can be received
from the wheel sensors. The tyre pressure monitor is temporarily
malfunctioning.
X Drive on.
The tyre pressure monitor restarts automatically as soon as the
problem has been solved. Display messages
233On-board computer and displays Z
Page 237 of 337
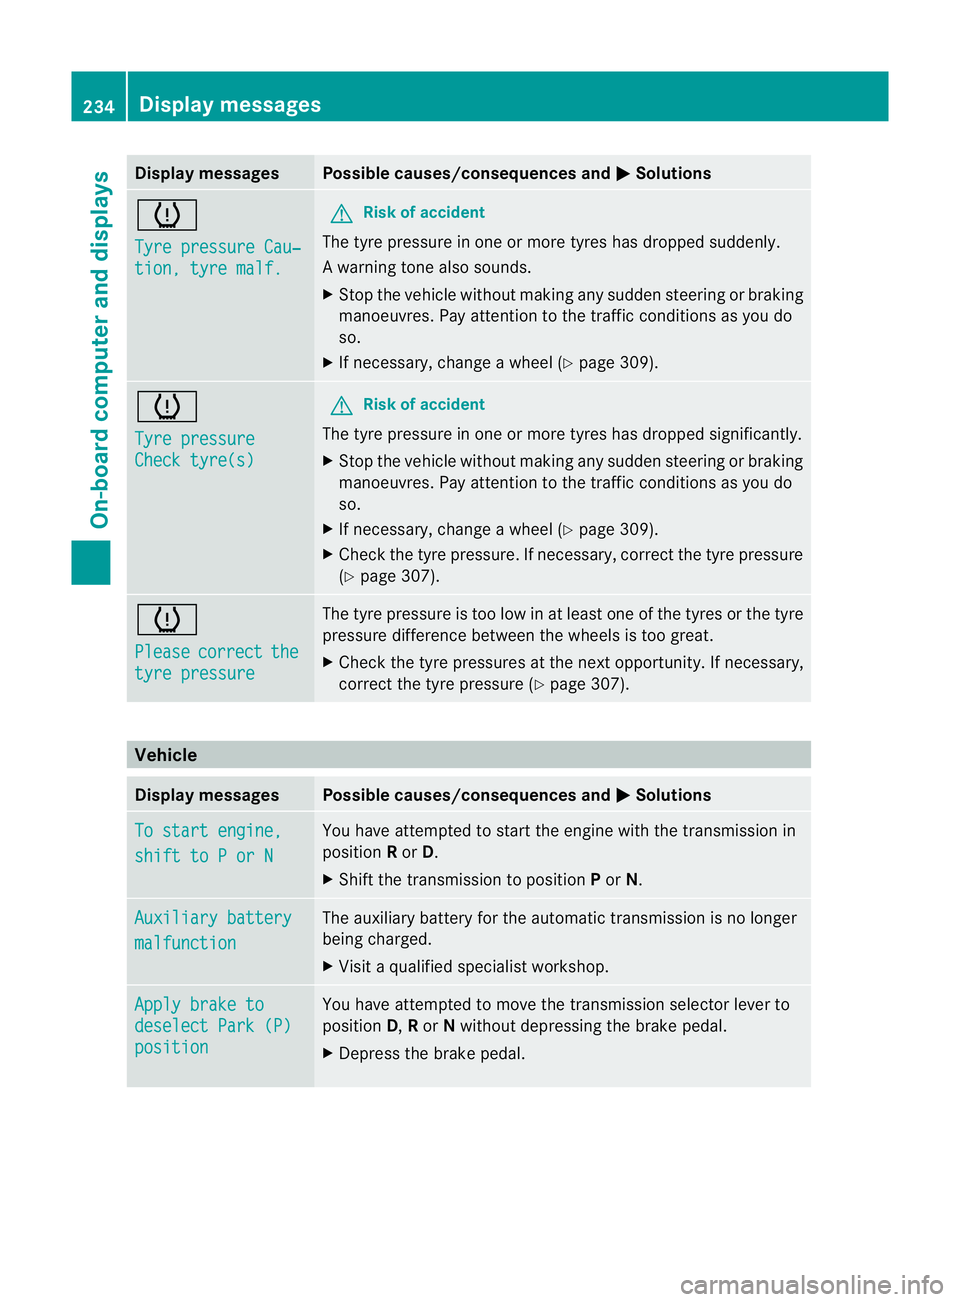
Display messages Possible causes/consequences and
M Solutions
h
Tyre pressure Cau‐
tion, tyre malf. G
Risk of accident
The tyre pressure in one or more tyres has dropped suddenly.
Aw arning tone also sounds.
X Stop the vehicle without making any sudde nsteering or braking
manoeuvres .Pay attentio nto the traffic conditions as you do
so.
X If necessary, change a wheel (Y page 309).h
Tyre pressure
Check tyre(s) G
Risk of accident
The tyre pressure in one or more tyres has dropped significantly.
X Stop the vehicle without making any sudden steering or braking
manoeuvres. Pay attention to the traffic conditions as you do
so.
X If necessary, change a wheel (Y page 309).
X Check the tyre pressure. If necessary, correc tthe tyre pressure
(Y page 307). h
Please
correct the
tyre pressure The tyre pressure is too low in at least one of the tyres or the tyre
pressure difference between the wheels is too great.
X
Check the tyre pressures at the next opportunity. If necessary,
correct the tyre pressure (Y page 307).Vehicle
Display messages Possible causes/consequences and
M Solutions
To start engine,
shift to P or N You have attempted to start the engine with the transmission in
position
Ror D.
X Shift the transmission to position Por N. Auxiliary battery
malfunction The auxiliary battery for the automatic transmission is no longer
being charged.
X
Visit a qualified specialist workshop. Apply brake to
deselect Park (P)
position You have attempted to move the transmission selector lever to
position
D,Ror Nwithout depressing the brake pedal.
X Depress the brake pedal. 234
Display messagesOn-board computer and displays
Page 240 of 337
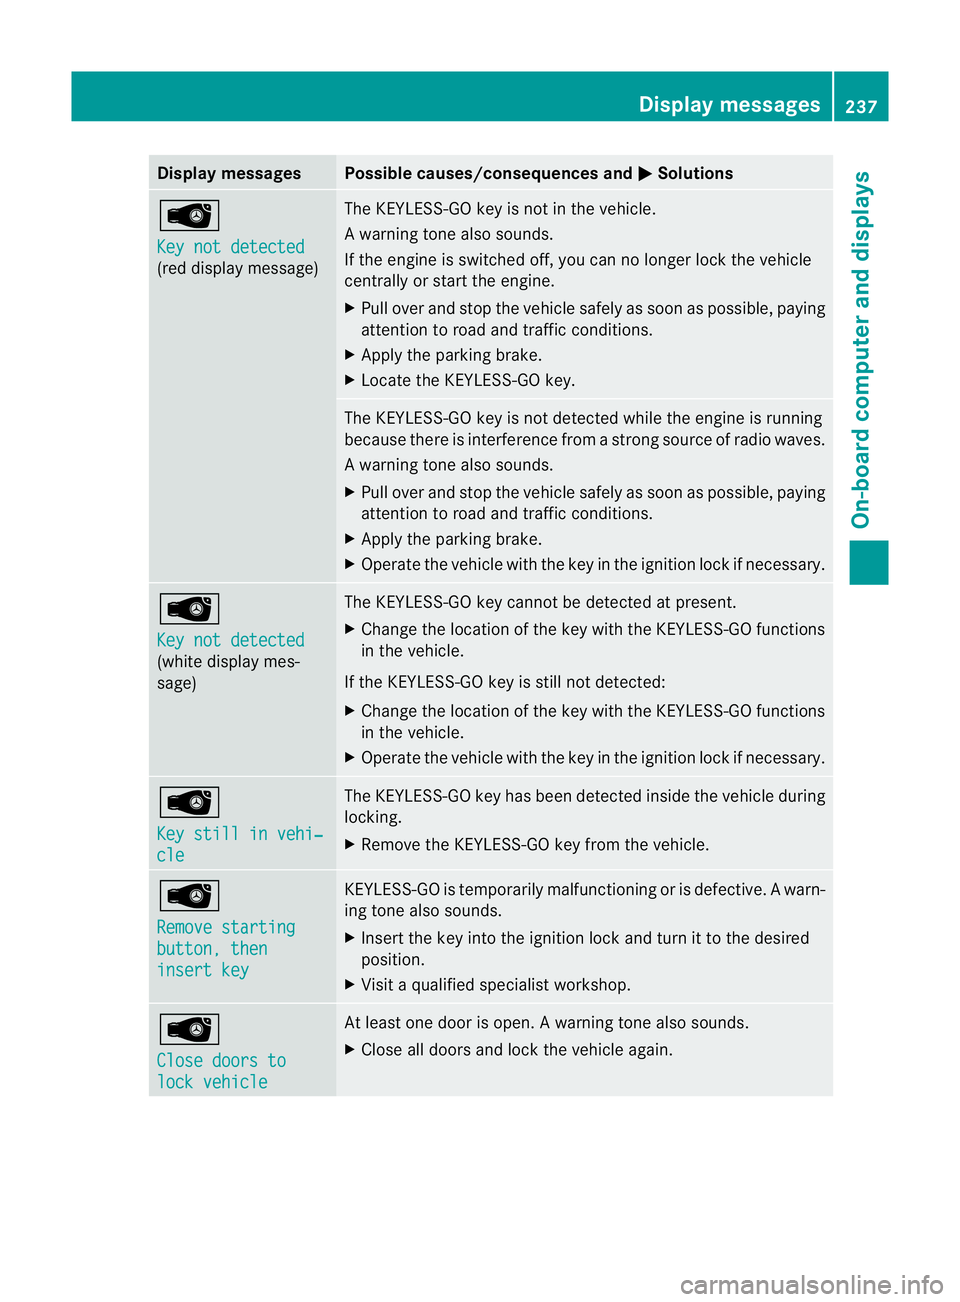
Display messages Possible causes/consequences and
M Solutions
Â
Key not detected
(red display message) The KEYLESS-GO key is not in the vehicle.
Aw
arning tone also sounds.
If the engine is switched off, you can no longer loc kthe vehicle
centrally or start the engine.
X Pull over and stop the vehicle safely as soon as possible, paying
attention to road and traffic conditions.
X Apply the parking brake.
X Locate the KEYLESS-GO key. The KEYLESS-GO key is not detected while the engine is running
because there is interference from a strong source of radio waves.
Aw
arning tone also sounds.
X Pull ove rand stop the vehicle safely as soo nas possible, paying
attention to road and traffic conditions.
X Apply the parking brake.
X Operate the vehicle with the key in the ignition lock if necessary. Â
Key not detected
(white display mes-
sage) The KEYLESS-GO key cannot be detected at present.
X
Change the location of the key with the KEYLESS-GO functions
in the vehicle.
If the KEYLESS-GO key is still not detected:
X Change the location of the key with the KEYLESS-GO functions
in the vehicle.
X Operate the vehicle with the key in the ignition lock if necessary. Â
Key still in vehi‐
cle The KEYLESS-GO key has been detected inside the vehicle during
locking.
X
Remove the KEYLESS-GO key from the vehicle. Â
Remove starting
button, then
insert key KEYLESS-GO is temporarily malfunctioning or is defective.
Awarn-
ing tone also sounds.
X Insert the key into the ignition lock and turn it to the desired
position.
X Visi taqualified specialist workshop. Â
Close doors to
lock vehicle At least one door is open.
Awarning tone also sounds.
X Close all doors and loc kthe vehicle again. Display messages
237On-board computer and displays Z
Page 247 of 337
Engine
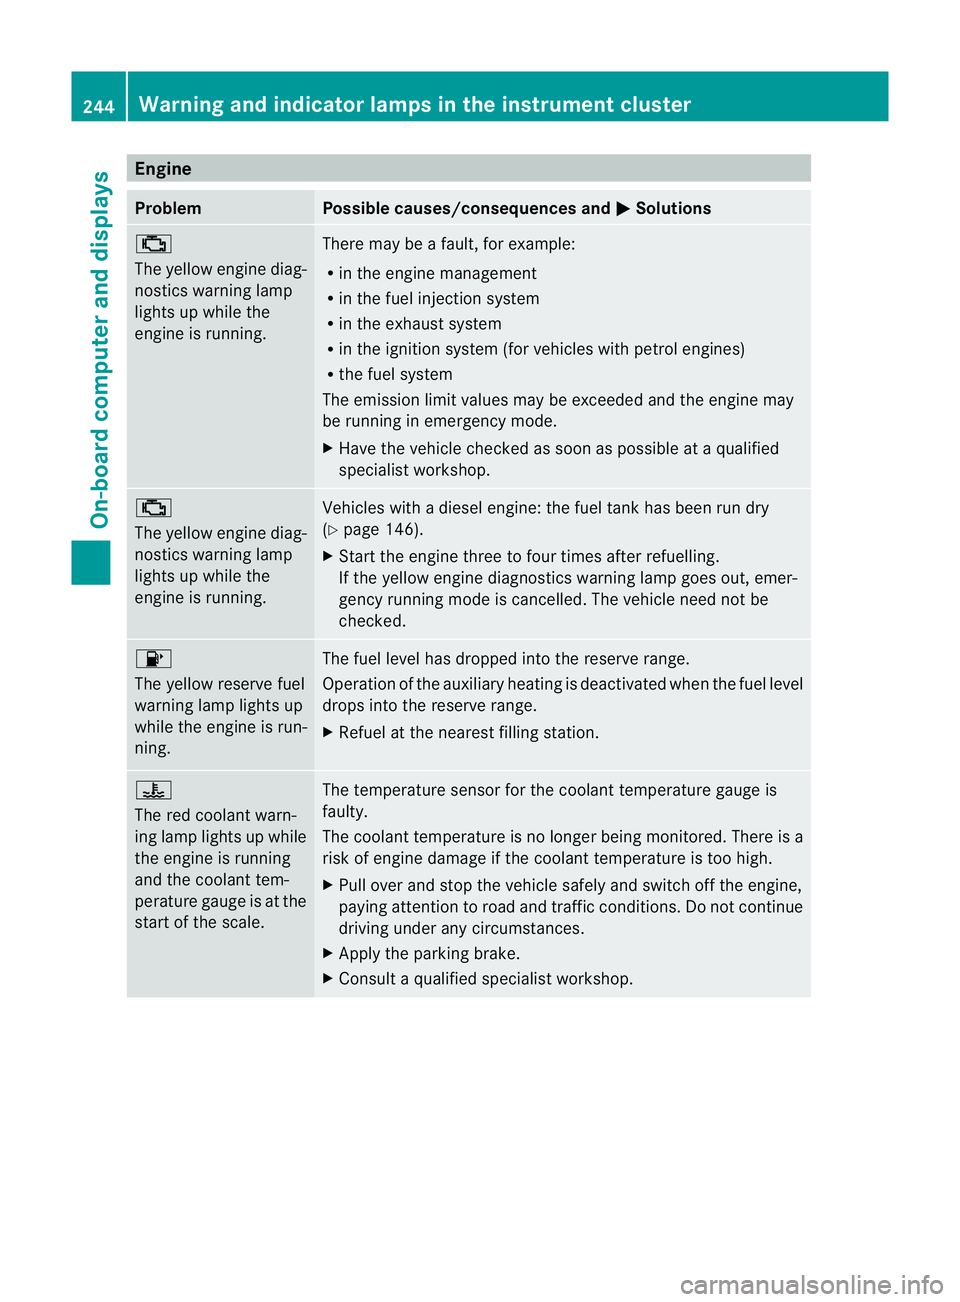
Problem Possible causes/consequences and
M Solutions
;
The yellow engine diag-
nostics warning lamp
lights up while the
engine is running.
There may be a fault, for example:
R
in the engine management
R in the fuel injection system
R in the exhaust system
R in the ignition system (for vehicles with petrol engines)
R the fuel system
The emission limit values may be exceeded and the engin emay
be running in emergency mode.
X Have the vehicle checked as soon as possible at a qualified
specialist workshop. ;
The yellow engine diag-
nostics warning lamp
lights up while the
engine is running.
Vehicles with a diesel engine: the fuel tan
khas been run dry
(Y page 146).
X Start the engine three to four times after refuelling.
If the yellow engine diagnostics warning lamp goes out, emer-
gency running mode is cancelled. The vehicle need no tbe
checked. 8
The yellow reserve fuel
warning lamp lights up
while the engine is run-
ning.
The fuel level has dropped into the reserve range.
Operation of the auxiliary heating is deactivated when the fuel level
drops into the reserve range.
X
Refuel at the nearest filling station. ?
The red coolant warn-
ing lamp lights up while
the engine is running
and the coolant tem-
perature gauge is at the
star
toft he scale. The temperature sensor for the coolant temperature gauge is
faulty.
The coolant temperature is no longer being monitored. There is a
risk of engine damage if the coolant temperature is too high.
X
Pull over and stop the vehicle safely and switch off the engine,
paying attention to road and traffic conditions. Do not continue
driving under any circumstances.
X Apply the parking brake.
X Consult a qualified specialist workshop. 244
Warning and indicator lamps in the instrument clusterOn-board computer and displays
Page 248 of 337
Problem Possible causes/consequences and
M Solutions
?
The red coolant warn-
ing lamp comes on
while the engine is run-
ning.
If the coolant level is correct, the airflow to the engine radiator
may be blocked or the electric engine radiator fan may be mal-
functioning.
The coolant is too hot and the engine is no longer being cooled
sufficiently.
X
Observe the additional display messages in the multifunction
display.
X Pull over and stop the vehicle safely and switch off the engine,
paying attention to road and traffic conditions.
X Allow the engine and coolant to cool.
X Check the coolant level and top up the coolant (Y page 268).
Observe the warning notes.
X If the coolant needs topping up more often than usual, have the
engine coolant system checked.
X Make sure that the air supply to the engine radiator is not
blocked, e.g. by snow, slush or ice.
X If the coolant temperature is less than 120 †, you can continue
driving to the nearest qualified specialist workshop.
X Avoid subjecting the engine to heavy loads, e.g. driving in moun-
tainous terrain, and stop-start driving. ?
The red coolant warn-
ing lamp comes on
while the engine is run-
ning. A warning tone
also sounds.
The coolant temperature has exceeded 120 †. The airflow to the
engine radiator may be blocked or the coolant level may be too
low.
The engine is not being cooled sufficiently and may be damaged.
X
Observe the additional display messages in the multifunction
display.
X Pull over and stop the vehicle safely and switch off the engine,
paying attention to road and traffic conditions.
X Allow the engine and coolant to cool.
X Check the coolant level and top up the coolant (Y page 268).
Observe the warning notes.
X If the coolant needs topping up more often than usual, have the
engine coolant system checked.
X Make sure that the air supply to the engine radiator is not
blocked, e.g. by snow, slush or ice.
X If the coolant temperature is less than 120 †, you can continue
driving to the nearest qualified specialist workshop.
X Avoid subjecting the engine to heavy loads, e.g. driving in moun-
tainous terrain, and stop-start driving. Warning and indicator lamps in the instrument cluster
245On-board computer and displays Z
Page 271 of 337
X
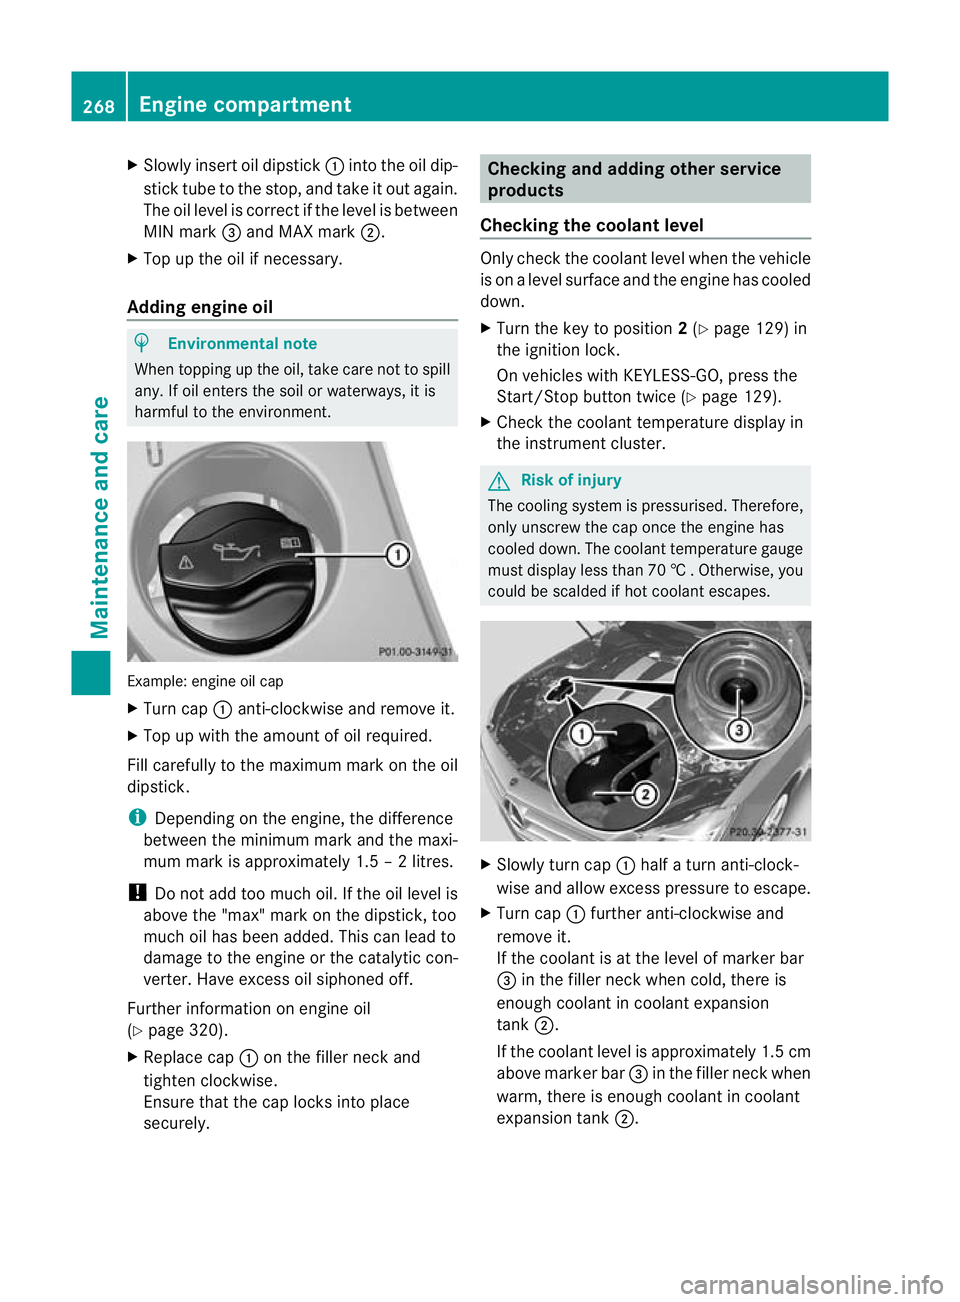
Slowly insert oil dipstick :into the oil dip-
stick tube to the stop ,and take it ou tagain.
The oil level is correc tifthe level is between
MIN mark =and MAX mark ;.
X Top up the oil if necessary.
Adding engine oil H
Environmental note
When topping up the oil, take care not to spill
any. If oil enters the soil or waterways, it is
harmful to the environment. Example: engine oil cap
X
Turn cap :anti-clockwise and remove it.
X Top up with the amount of oil required.
Fill carefully to the maximum mark on the oil
dipstick.
i Depending on the engine, the difference
between the minimum mark and the maxi-
mum mark is approximately 1.5 – 2 litres.
! Do not add too much oil. If the oil level is
above the "max" mark on the dipstick, too
much oil has been added. This can lead to
damage to the engine or the catalytic con-
verter. Have excess oil siphoned off.
Further information on engine oil
(Y page 320).
X Replace cap :on the filler neck and
tighten clockwise.
Ensure that the cap locks into place
securely. Checking and adding other service
products
Checking the coolant level Only check the coolant level when the vehicle
is on a level surface and the engine has cooled
down.
X
Turn the key to position 2(Y page 129) in
the ignition lock.
On vehicles with KEYLESS-GO, press the
Start/Stop button twice (Y page 129).
X Check the coolant temperature display in
the instrument cluster. G
Risk of injury
The cooling system is pressurised. Therefore,
only unscrew the cap once the engine has
cooled down. The coolant temperature gauge
must display less than 70 †.Otherwise, you
could be scalded if hot coolant escapes. X
Slowly tur ncap : half a turn anti-clock-
wise and allow excess pressure to escape.
X Turn cap :further anti-clockwise and
remove it.
If the coolant is at the level of marker bar
= in the fille rneck when cold, there is
enough coolant in coolant expansion
tank ;.
If the coolant level is approximately 1.5 cm
above marker bar =in the filler neckw hen
warm, there is enough coolant in coolant
expansion tank ;.268
Engine compartmentMaintenance and care
Page 274 of 337
scraper. You could otherwise scratch or
damage the surfaces and protective film. H
Environmental note
Dispose of empty packaging and cleaning
cloths in an environmentally responsible man-
ner.
! Do not park up the vehicle for an extended
period straight after cleaning it, particularly
after having cleaned the wheels with wheel
cleaner. Wheel cleaners could cause
increased corrosion of the brake discs and
brake pads/linings. For this reason, you
should drive for a few minutes after clean-
ing. Braking heats the brake discs and
brake pads, thus drying them. The vehicle
can then be parked up. Care of the exterior
Automatic car wash G
Risk of accident
Braking efficiency is reduced after washing
the vehicle. This could cause an accident. For
this reason, following a car wash, drive with
particular care until the brakes are dry. G
Risk of accident
The vehicle is braked when the HOLD function
or DISTRONIC PLUS is activated. Therefore,
deactivate the HOLD function and DISTRONIC
PLUS before the vehicle is washed in an auto-
matic car wash.
You can wash the vehicle in an automatic car
wash from the very start.
If the vehicle is very dirty, pre-wash it before
cleaning it in an automatic car wash.
! In car washes with a towing mechanism,
make sure that the automatic transmission
is in transmission position N, otherwise the
vehicle could be damaged.
R Vehicles with a key:
do not remove the key from the ignition
lock. Do not open the driver's door or front-passenger door when the engine is
switched off. Otherwise, the automatic
transmission selects park position
P
automatically and locks the wheels. You
can prevent this by shifting the auto-
matic transmission to Nbeforehand.
R Vehicles with KEYLESS-GO:
do not open the driver's door or front-
passenger door when the engine is
switched off. Otherwise, the automatic
transmission selects park position P
automatically and locks the wheels.
Observe the following to make sure that the
automatic transmission stays in position N:
X Make sure the vehicle is stationary and the
ignition is switched off.
X Turn the key to position 2(Y page 129) in
the ignition lock.
Use the key instead of the Start/Stop but-
ton on vehicles with KEYLESS-GO.
X Depress and hold the brake pedal.
X Shift the automatic transmission to posi-
tion N.
X Release the brake pedal.
X Release the parking brake.
X Switch off the ignition and leave the key in
the ignition lock.
! Make sure that:
R the side windows and sliding sunroof are
closed completely.
R the blower for the ventilation/heating is
switched off (OFF button is depressed).
R the windscreen wiper switch is at posi-
tion 0.
The vehicle could otherwise be damaged.
After using an automatic car wash, wipe off
wax from the windscreen and the wiper
blades. This will prevent smears and reduce
wiping noises caused by residue on the wind-
screen. Care
271Maintenance and care Z
Page 276 of 337
Always have paintwork repairs performed
at a qualified specialis tworkshop, e.g. a
Mercedes-Benz Service Centre.
! Do not use wash programs with a hot wax
treatment under any circumstances.
i Use only insect remover and car shampoo
from the range of recommended and
approved Mercedes-Benz care products.
Cleaning the windows G
Risk of injury
Switch off the windscreen wipers and remove
the key from the ignition lock before cleaning
the windscreen or the wiper blades. On vehi-
cles with KEYLESS-GO, press the Start/Stop
button repeatedly until all indicator lamps in
the instrument cluster have gone off. The
windscreen wipers could otherwise move and
injure you.
X Clean the inside and outside of the win-
dows with a damp cloth and a cleaning
agent that is recommended and approved
by Mercedes-Benz.
! Do not use dry cloths, abrasive products,
solvents or cleaning agents containing sol-
vents to clean the inside of the windows.
Do not use hard object sto clean the insides
of the windows, e.g. an ice scraper or ring.
There is otherwise a risk of damaging the
windows.
! Clean the water drainage channels of the
windscreen and the rear window at regular
intervals. Deposits such as leaves, petals
and pollen may under certain circumstan-
ces prevent water from draining away.T his
can lead to corrosion damage and damage
to electronic components.
Cleaning the wiper blades G
Risk of injury
Switch off the windscreen wipers and remove
the key from the ignition lock before cleaning
the windscreen or the wiper blades. On vehi- cles with KEYLESS-GO, press the Start/Stop
button repeatedly until all indicator lamps in
the instrument cluster have gone off. The
windscreen wipers could otherwise move and
injure you.
! Do not pull on the wiper blade. Otherwise,
the wiper blade could be damaged.
! Do not clean wiper blades too often and
do not rub them too hard. Otherwise, the
graphite coating could be damaged. This
could cause wiper noise.
X Fold the wiper arms away from the wind-
screen.
X Cleant he wiper blades carefully using a
damp cloth.
X Fold the windscreen wipers back again
before switching on the ignition.
! Hold the wiper arm securely when folding
back. The windscreen could be damaged if
the wiper arm hits against it suddenly.
Cleaning the exterior lighting X
Cleant he plastic lenses of the exterior
lighting using a wet sponge and a mild
cleaning agent, e.g. Mercedes-Ben zcar
shampoo or cleaning cloths.
! Only use cleaning agents or cleaning
cloths that are suitable for plastic lenses.
Unsuitable cleaning agents or cleaning
cloths could scratch or damage the plastic
lenses of the exterior lighting. Care
273Maintenance and care Z