2010 MERCEDES-BENZ CLS COUPE air condition
[x] Cancel search: air conditionPage 117 of 337
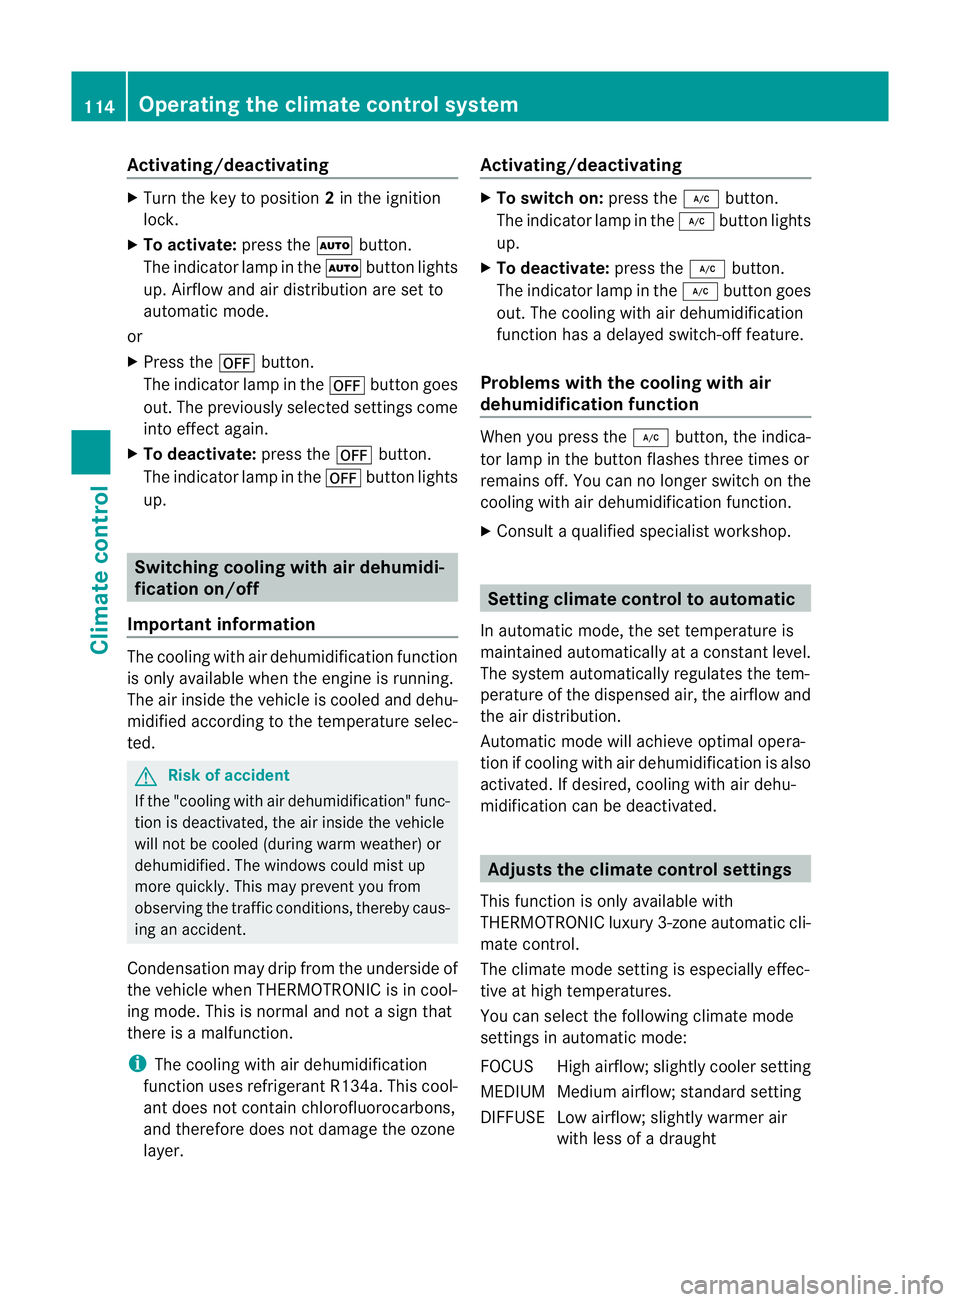
Activating/deactivating
X
Turn the key to position 2in the ignition
lock.
X To activate: press theÃbutton.
The indicator lamp in the Ãbuttonlights
up. Airflow and air distribution are set to
automatic mode.
or
X Press the ^button.
The indicator lamp in the ^button goes
out. The previously selected settings come
into effect again.
X To deactivate: press the^button.
The indicator lamp in the ^button lights
up. Switching cooling with air dehumidi-
fication on/off
Important information The cooling with air dehumidification function
is only available when the engine is running.
The air inside the vehicle is cooled and dehu-
midified according to the temperature selec-
ted.
G
Risk of accident
If the "cooling with air dehumidification" func-
tion is deactivated, the air inside the vehicle
will not be cooled (during warm weather) or
dehumidified. The windows could mist up
more quickly. This may prevent you from
observing the traffic conditions, thereby caus-
ing an accident.
Condensatio nmay drip from the underside of
the vehicle when THERMOTRONIC is in cool-
ing mode. This is normal and no tasign that
there is a malfunction.
i The cooling with air dehumidification
function uses refrigerant R134a. This cool-
ant does not contain chlorofluorocarbons,
and therefore does not damage the ozone
layer. Activating/deactivating X
To switch on: press the¿button.
The indicator lamp in the ¿button lights
up.
X To deactivate: press the¿button.
The indicator lamp in the ¿button goes
out. The cooling with air dehumidification
function has a delayed switch-off feature.
Problems with the cooling with air
dehumidification function When you press the
¿button, the indica-
tor lamp in the button flashes three times or
remains off. You can no longer switch on the
cooling with air dehumidification function.
X Consult a qualified specialist workshop. Setting climate control to automatic
In automatic mode, the set temperature is
maintained automatically at a constant level.
The system automatically regulates the tem-
perature of the dispensed air, the airflow and
the air distribution.
Automatic mode will achieve optimal opera-
tion if cooling with air dehumidification is also
activated. If desired, cooling with air dehu-
midification can be deactivated. Adjusts the climate control settings
This function is only available with
THERMOTRONIC luxury 3-zone automatic cli-
mate control.
The climate mode setting is especially effec-
tive at high temperatures.
You can select the following climate mode
settings in automatic mode:
FOCUS High airflow; slightly cooler setting
MEDIUM Mediuma irflow; standard setting
DIFFUSE Low airflow; slightly warmer air with less of a draught 114
Operating the climate control systemClimate control
Page 120 of 337

X
Press the Ãbutton.
The indicator lamp in the ¬button goes
out. Airflow and air distribution are set to
automatic mode.
or
X Turn controls :orB clockwise or anti-
clockwise (Y page 111), (Y page 112).
or
X Press the KorI button. Demisting the windows
Windows misted up on the inside X
Activate the ¿cooling with air dehu-
midification function.
X Activate automatic mode Ã.
X If the windows continue to mist up, activate
the demisting function (Y page 116).
i You should only select this setting until
the windscreen is clear again.
Windows misted up on the outside X
Activate the windscreen wipers.
X Press the _button repeatedly until the
P orO symbol appears in the dis-
play.
i You should only select this setting until
the windscreen is clear again. Rear window heating
Activating/deactivating G
Risk of accident
Clear all windows of ice or snow before setting
off. Otherwise, impaired visibility could
endanger you and others.
The rear window heating has ahigh current
draw. You should therefore switch it off as
soon as the window is clear, as it only
switches off automatically after several
minutes. If the battery voltage is too low, the rear win-
dow heating may switch off.
X Turn the key to position 2in the ignition
lock.
X Press the ¤button.
The indicator lamp in the ¤button lights
up or goes out.
Problems with the rea rwindow heating The rear window heating has switched off
prematurely or cannot be activated.
X
Switch off any consumers that are not
required, e.g. reading lamps or interior
lighting.
When the battery is sufficiently charged,
the rear window heating is activated again
automatically. Activating/deactivating air-recircula-
tion mode
You can deactivate the flow of fresh air if
unpleasan todours are entering the vehicle
from outside. The air already inside the vehi-
cle will then be recirculated.
The operation of the air-recirculation mode is
the same for all contro lpanels. G
Ris
kofa ccident
Only switch ove rto air-recirculation mode
briefly at low outside temperatures. Other-
wise, the windows could mist up, thus impair-
ing visibility and endangering yourself and
others. This may prevent you from observing
the traffic conditions, thereby causing an
accident.
X Turn the key to position 2in the ignition
lock.
X To switch on: press thegbutton.
The indicator lamp in the gbutton lights
up. Operating the climate control system
117Climate control Z
Page 122 of 337

X
Turn the key to position 0in the ignition
lock or remove it.
X To switch on: press theÌbutton.
The indicator lamp in the Ìbutton lights
up.
X To deactivate: press theÌbutton.
The indicator lamp in the Ìbutton goes
out.
i Residual heat is deactivated automati-
cally:
R after about 30 minutes
R when the ignition is switched on
R if the battery voltage drops
R if the coolant temperature is too low Auxiliary heating
Important safety notes G
Risk of poisoning
Exhaust fumes are produced when the auxili-
ary heating is in operation. Inhaling these
exhaust fumes can be poisonous. You should
therefore switch off the auxiliary heating in
confined spaces without an extraction sys-
tem, e.g. a garage. G
Risk of fire
When operating the auxiliary heating, parts of
the vehicle may become very hot, and highly
inflammable material such as fuels could be
ignited. Operating the auxiliary heating is thus
prohibited at filling station sorwhen your vehi-
cle is being refuelled. You must therefore
switch off the auxiliary heating at filling sta-
tions.
! Operating the auxiliary heating/ventila-
tion draws on the vehicle battery. After you
have heated or ventilated the vehicle a
maximum of two times, drive for a longer
distance.
i Switch on the auxiliary heating regularly,
e.g. for about ten minutes every month. The auxiliary heating heats the air in the vehi-
cle interior to the set temperature without
using the heat of the running engine. The aux-
iliary heating is operated directly using the
vehicle's fuel. For this reason, the tank con-
tent must be at least at reserve fuel level to
ensure that the auxiliary heating functions.
The auxiliary heating/ventilation automati-
cally adjusts to changes in temperature and
weather conditions. For this reason, the aux-
iliary heating could switch from ventilation
mode to heating mode or from heating mode
to ventilation mode.
The auxiliary heating switches off automati-
cally after 50 minutes. This time limit can be
altered. To do this, visit a qualified specialist
workshop, e.g. a Mercedes-Ben
zService
Centre.
You cannot use the auxiliary ventilation to
cool the vehicle interior to a temperature
lower than the outside temperature.
Before switching on X
Turn the key to position 2in the ignition
lock.
X Set the temperature.
The auxiliary heating/ventilation can be acti-
vated even when the climate control is being
controlled manually. Optimum comfort can
be attained when the system is set to auto-
matic mode. Set the temperature to 22 †.
The auxiliary heating/ventilation can be acti-
vated or deactivated using the remote control
or the button on the centre console.
The on-board computer can be used to spec-
ify up to three departure times, one of which
may be preselected (Y page 210). Operating the climate control system
119Climate control Z
Page 135 of 337
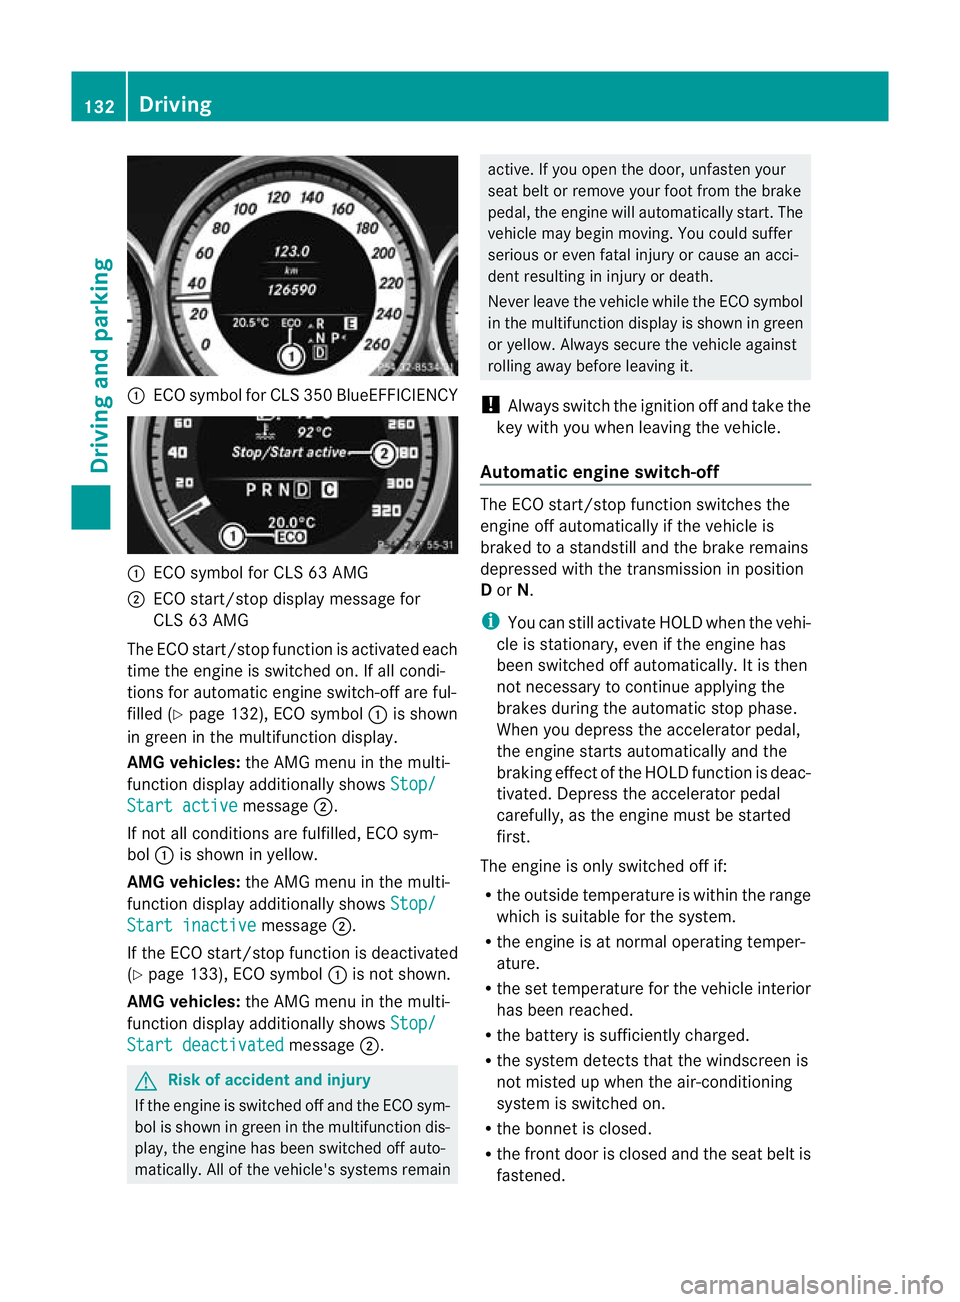
:
ECO symbo lfor CLS 350 BlueEFFICIENCY :
ECO symbol for CLS 63 AMG
; ECO start/stop display message for
CLS 63 AMG
The ECO start/stop function is activated each
time the engine is switched on. If all condi-
tions for automatic engine switch-off are ful-
filled (Y page 132), ECO symbol :is shown
in green in the multifunction display.
AMG vehicles: the AMG menu in the multi-
function display additionally shows Stop/Start active message
;.
If not all conditions are fulfilled, ECO sym-
bol :is shown in yellow.
AMG vehicles: the AMG menu in the multi-
function display additionally shows Stop/Start inactive message
;.
If the ECO start/stop function is deactivated
(Y page 133), ECO symbol :is not shown.
AMG vehicles: the AMG menu in the multi-
function display additionally shows Stop/Start deactivated message
;. G
Risk of accident and injury
If the engine is switched off and the ECO sym-
bol is shown in green in the multifunction dis-
play, the engine has been switched off auto-
matically. All of the vehicle's systems remain active. If you open the door, unfasten your
seat belt or remove your foot from the brake
pedal, the engine will automatically start.T
he
vehicle may begin moving. You could suffer
serious or even fatal injury or cause an acci-
dent resulting in injury or death.
Never leave the vehicle while the ECO symbol
in the multifunction display is shown in green
or yellow. Always secure the vehicle against
rolling away before leaving it.
! Always switch the ignition off and take the
key with you when leaving the vehicle.
Automatic engine switch-off The ECO start/stop function switches the
engine off automatically if the vehicle is
braked to a standstill and the brake remains
depressed with the transmission in position
D or N.
i You can still activate HOLD when the vehi-
cle is stationary, even if the engine has
been switched off automatically .Itis then
not necessary to continue applying the
brakes during the automatic stop phase.
When you depress the accelerator pedal,
the engine starts automatically and the
braking effect of the HOLD function is deac-
tivated. Depress the accelerator pedal
carefully, as the engine must be started
first.
The engine is only switched off if:
R the outside temperature is within the range
which is suitable for the system.
R the engine is at normal operating temper-
ature.
R the set temperature for the vehicle interior
has been reached.
R the battery is sufficiently charged.
R the system detects that the windscreen is
not misted up when the air-conditioning
system is switched on.
R the bonnet is closed.
R the front door is closed and the seat belt is
fastened. 132
DrivingDriving and parking
Page 136 of 337
Automatic engine start
The engine is started automatically if you:
R release the brake pedal when HOLD is not
activated and the transmission is in posi-
tion Dor N
R shif tthe transmission to position R
R depress the accelerator pedal
R switch off the ECO start/stop function by
pressing the ECO button (except for AMG
vehicles)
R change to drive program S,S+ orM(AMG
vehicles)
R unfasten your seat belt or open the driver's
door
The engine is also started automatically if:
R the vehicle starts to roll.
R the brake system requires this.
R the system detects moisture on the wind-
screen when the air-conditioning system is
switched on.
R the temperature in the vehicle interior devi-
ates from the set range.
R the battery's charge status is too low.
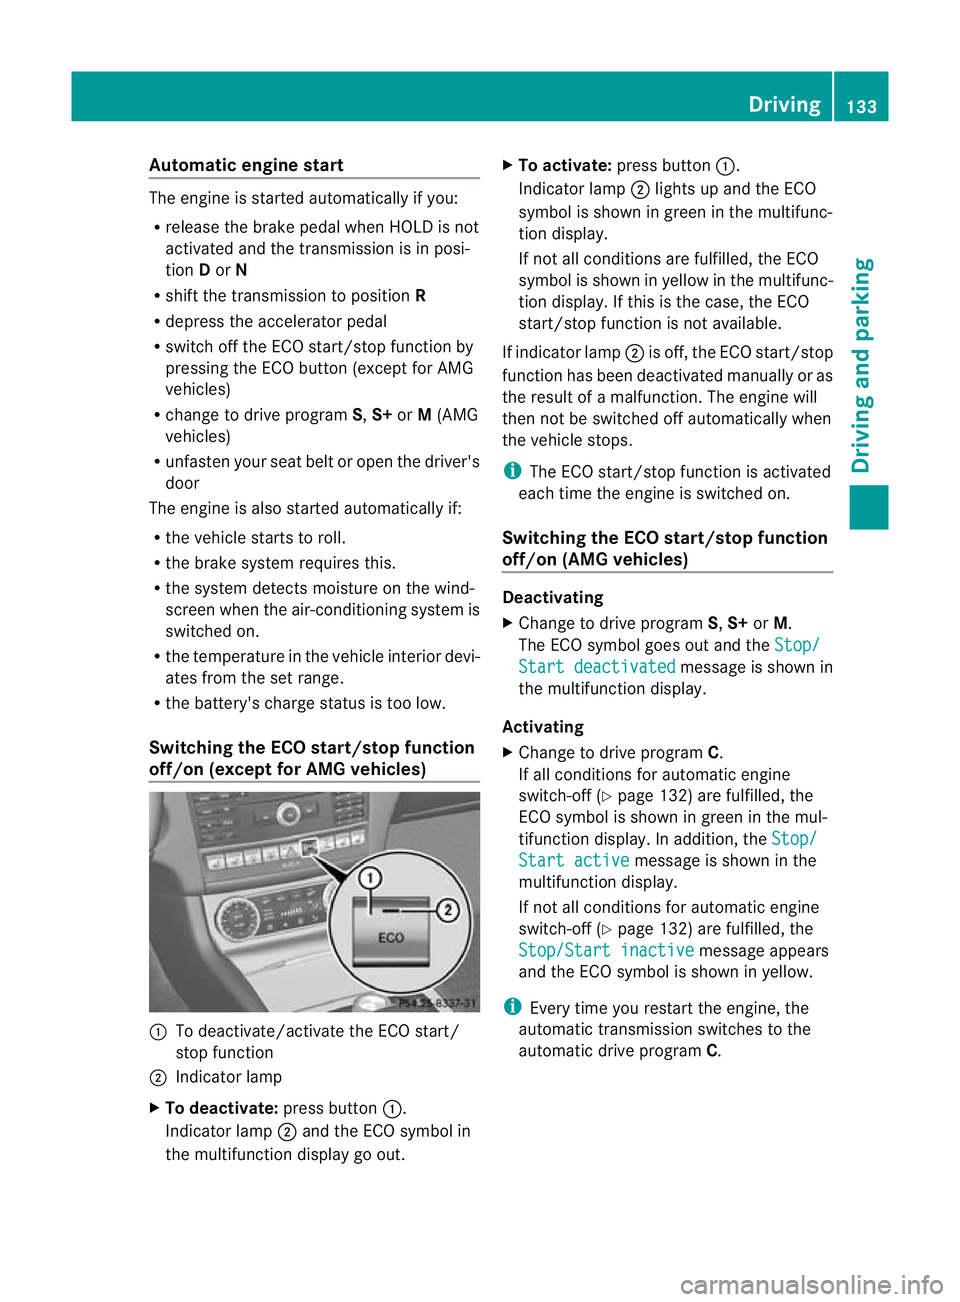
Switching the ECO start/stop function
off/on (except for AMG vehicles) :
To deactivate/activate the ECO start/
stop function
; Indicator lamp
X To deactivate: press button:.
Indicator lamp ;and the ECO symbol in
the multifunction display go out. X
To activate: press button :.
Indicator lamp ;lights up and the ECO
symbol is shown in green in the multifunc-
tion display.
If not all conditions are fulfilled, the ECO
symbol is shown in yellow in the multifunc-
tion display. If this is the case, the ECO
start/stop function is not available.
If indicator lamp ;is off, the ECO start/stop
function has been deactivated manually or as
the result of a malfunction. The engine will
then not be switched off automatically when
the vehicle stops.
i The ECO start/stop function is activated
each time the engine is switched on.
Switching the ECO start/stop function
off/on (AMG vehicles) Deactivating
X
Change to drive program S,S+ orM.
The ECO symbol goes out and the Stop/ Start deactivated message is shown in
the multifunction display.
Activating
X Change to drive program C.
If all conditions for automatic engine
switch-off (Y page 132) are fulfilled, the
ECO symbol is shown in green in the mul-
tifunction display. In addition, the Stop/ Start active message is shown in the
multifunction display.
If not all conditions for automatic engine
switch-off (Y page 132) are fulfilled, the
Stop/Start inactive message appears
and the ECO symbol is shown in yellow.
i Every time you restart the engine, the
automatic transmission switches to the
automatic drive program C. Driving
133Driving and parking Z
Page 153 of 337
Heavy and light loads
G
Risk of accident
Never depress the brake peda lcontinuously
while the vehicle is in motion, e.g. never cause
the brakes to rub by applying constant slight
pedal pressure. This causes the brake system
to overheat, increases the braking distance
and can lead to the brakes failing completely.
If the brakes have been subjected to a heavy
load, do not stop the vehicle immediately, but
drive on for a short while. This allows the air-
flow to cool the brakes more quickly.
If the brakes have been used only moderately,
you should occasionally test their effective-
ness. To do this, brake more firmly from a
higher speed. This improves the grip of the
brakes.
Wet road surface If driving in heavy rain for a prolonged period
of time without braking, there may be a
delayed reaction from the brakes when brak-
ing for the first time. This may also occur after
the vehicle has been washed.
You have to depress the brake pedal more
firmly. Maintain a greater distance from the
vehicle in front.
After driving on a wet road or having the vehi-
cle washed, brake firmly while paying atten-
tion to the traffic conditions. This will warm
up the brake discs, thereby drying them more
quickly and protecting them against corro-
sion.
Limited braking performance on salt
treated roads G
Risk of accident
The layer of salt on the brake discs and the
brake pads/linings may cause a delay in the
braking effect, resulting in a significantly lon-
ger braking distance, which could lead to an
accident.
To avoid this danger, you should: R
occasionally brake carefully, without put-
ting other road users at risk, when you are
driving on salted roads. This helps to
remove any salt that may have started to
build up on the brake discs and the brake
pads/linings.
R maintain a greater distance to the vehicle
ahead and drive with particular care.
R carefully apply the brakes at the end of a
trip and immediately after commencing a
new trip, so that salt residues are removed
from the brake discs.
New brake pads/linings G
Risk of accident
New brake pads/linings only reach their opti-
mum braking effect after several hundred kil-
ometres of driving. Before this optimum brak-
ing effect is reached, you should compensate
for the reduced braking effect by applying
greater pressure when braking. This also
applies after the brake discs or the brake
pads/linings have been replaced.
For safety reasons, Mercedes-Benz recom-
mends that you only have brake pads/linings
fitted to your vehicle which have been
approved for Mercedes-Benz vehicles or
which correspond to an equivalent quality
standard. Brake pads/linings which have not
been approved for Mercedes-Benz vehicles or
which are not of an equivalent quality could
affect your vehicle's operating safety.
High-performance brake system for
AMG vehicles The AMG brake systems are designed for
heavy loads. This may lead to noise when
braking. This will depend on:
R speed
R braking force
R environmental conditions, such as temper-
ature and humidity
The wear of individual components of the
brake system, such as the brake pads/linings 150
Driving tipsDriving and parking
Page 154 of 337
or brake discs, depends on the individual driv-
ing style and operating conditions.
For this reason, it is impossible to state a
mileage that will be valid under all circum-
stances. An aggressive driving style will lead
to high wear. You can obtain further informa-
tion about this from your Mercedes-Benz
Service Centre. Tyre traction
G
Risk of accident
Whereas the vehicle can be fully controlled at
a certain speed on dry roads, you must reduce
your speed on wet or icy roads to achieve the
same road safety. You could otherwise cause
an accident.
Pay particular attention to the road conditions
at temperatures around freezing point.
If ice has formed on the road surface (e.g.
from fog), a thin film of water rapidly forms on
the ice when you brake, considerably reduc-
ing tyre traction. Drive with particular care in
such weather conditions. Driving on wet roads
Aquaplaning If water has accumulated to a certain depth
on the road surface, there is a danger of aqua-
planing occurring, even if:
R you drive at low speeds
R the tyres have adequate tread depth
For this reason, do not drive in tyre ruts, and
brake carefully. Driving on flooded roads If you have to drive on stretches of road on
which water has collected, please bear in
mind that:
R
the maximum permitted still water depth is
25 cm.
R you should drive no faster than at walking
pace.
! Bear in mind that vehicles travelling in
front or in the opposite direction create
waves. This may cause the maximum per-
missible water depth to be exceeded.
These notes must be observed under all
circumstances. You could otherwise dam-
age the engine, the electronics or the trans-
mission. Winter driving
General notes G
Risk of poisoning
If the vehicle becomes trapped in snow,
ensure that snow is kept away from the
exhaust pipe and from around the vehicle as
long as the engine is running. Otherwise, poi-
sonous carbon monoxide (CO) may enter the
vehicle, resulting in loss of consciousness and
even death.
To assure sufficient fresh air ventilation, open
a window slightly on the side of the vehicle
not facing the wind.
At the onset of winter, have your vehicle win-
terproofed at a qualified specialist workshop,
e.g. at a Mercedes-Benz Service Centre.
Observe the notes in the "Winter operation"
section .
Slippery road surfaces G
Risk of accident
Do not shift down for additional engine brak-
ing on a slippery road surface. This could Driving tips
151Driving and parking
Z
Page 158 of 337
R
when changing to a lane with faster moving
traffic
R in complex driving situations or where lanes
are diverted, e.g .atroadworks on a motor-
way
DISTRONIC PLUS otherwise maintains the
current speed set by you or accelerates up to
the set speed.
DISTRONIC PLUS cannot take account of
weather conditions. Deactivate, or do not
activate, DISTRONIC PLUS:
R if the roads are slippery, snow-covered or
icy. The wheels could lose their grip when
braking or accelerating. The vehicle could
start to skid.
R if the sensors are dirty or there is poor vis-
ibility, e.g. due to snow, rain or fog. Dis-
tance control may be impaired.
Always pay attention to traffic conditions
even when DISTRONIC PLUS is activated.
Otherwise, you may fail to recognise dangers
in time, cause an accident and injure yourself
and others.
! You must deactivate the radar sensor sys-
tem in certain countries and near radio
telescope facilities. You will find further
information under "Radar sensor system"
in the index.
The radar sensor system is automatically
deactivated near radio telescope facilities
(Y page 327).
If you want DISTRONIC PLUS to assist you,
the radar sensor system must be activated
(Y page 210) and operational.
If there is no vehicle in front, DISTRONIC
PLUS operates in the same way as cruise
control in the speed range between
30 km/ha nd 200 km/h. If avehicle is driving
in front of you, DISTRONIC operates in the
speed range between 0km/h and
200 km/h.
Do not use DISTRONIC PLUS while driving on
roads with steep gradients. G
Risk of accident
DISTRONIC PLUS brakes yourv ehicle up to a
maximum of 4 m/s 2
depending on its speed.
This corresponds to approximately 40% of
your vehicle's maximum braking power. You
must also apply the brakes yourself if this
braking power is not sufficient.
If DISTRONIC PLUS detects a risk of collision
with avehicle in front, an intermittent warning
tone sounds. In addition, the ·distance
warning lamp in the instrument cluster lights
up. Brake to avoid a collision.
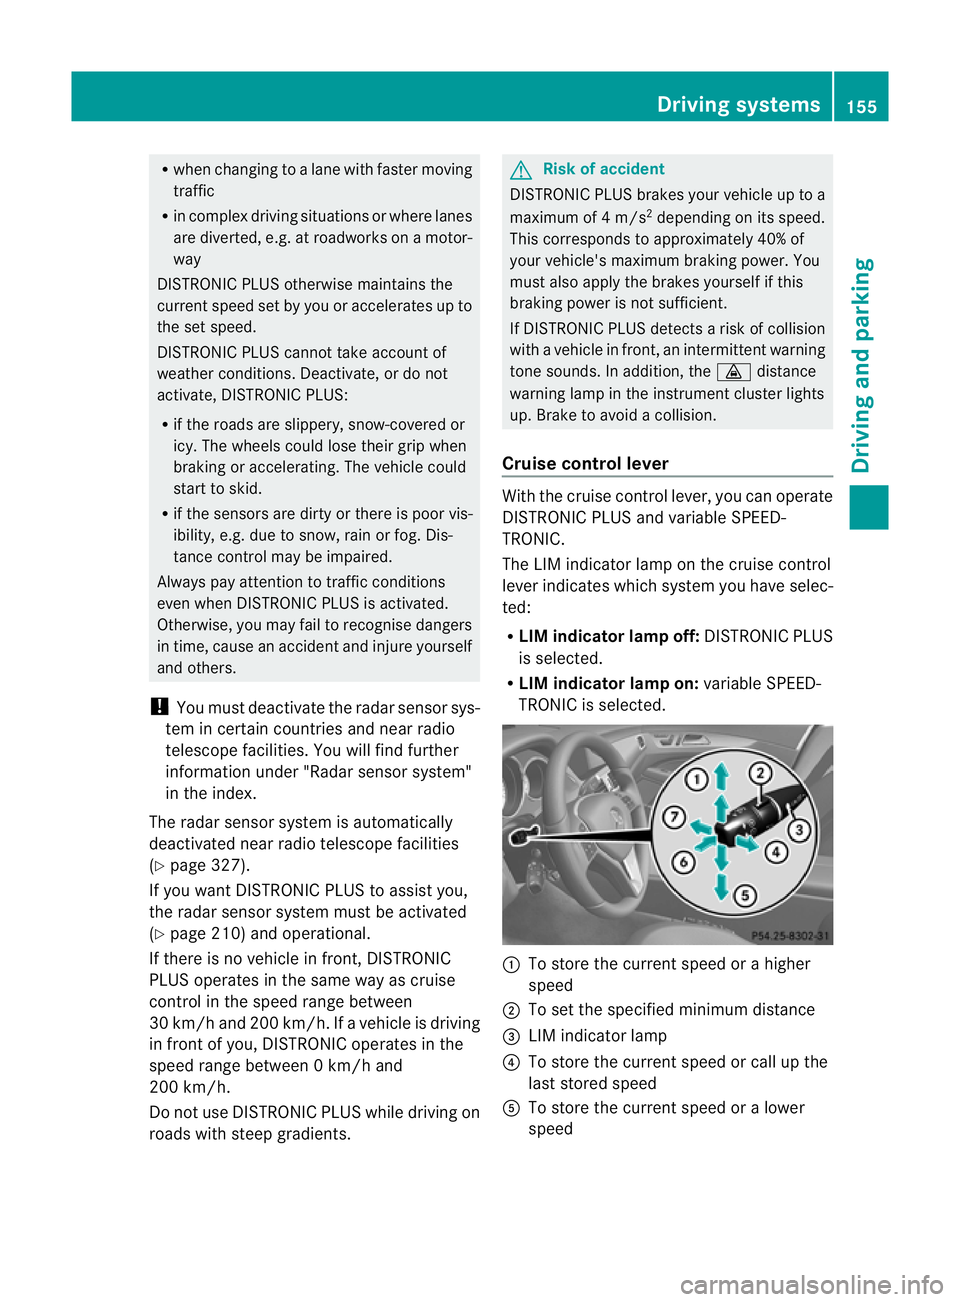
Cruise control lever With the cruise control lever, you can operate
DISTRONIC PLUS and variable SPEED-
TRONIC.
The LIM indicator lamp on the cruise control
lever indicates which system you have selec-
ted:
R
LIM indicator lamp off: DISTRONIC PLUS
is selected.
R LIM indicator lamp on: variable SPEED-
TRONIC is selected. :
To store the curren tspeed or a higher
speed
; To set the specified minimum distance
= LIM indicator lamp
? To store the curren tspeed or call up the
last stored speed
A To store the curren tspeed or a lower
speed Driving systems
155Driving and parking Z