2010 MERCEDES-BENZ CLS COUPE wheel
[x] Cancel search: wheelPage 287 of 337
X
Correct the tyre pressure if it is still at least
130 kPa (1.3 bar/20 psi) (for the values,
see the fuel fille rflap).
X To increase the tyre pressure: switch on
the tyre inflation compressor. X
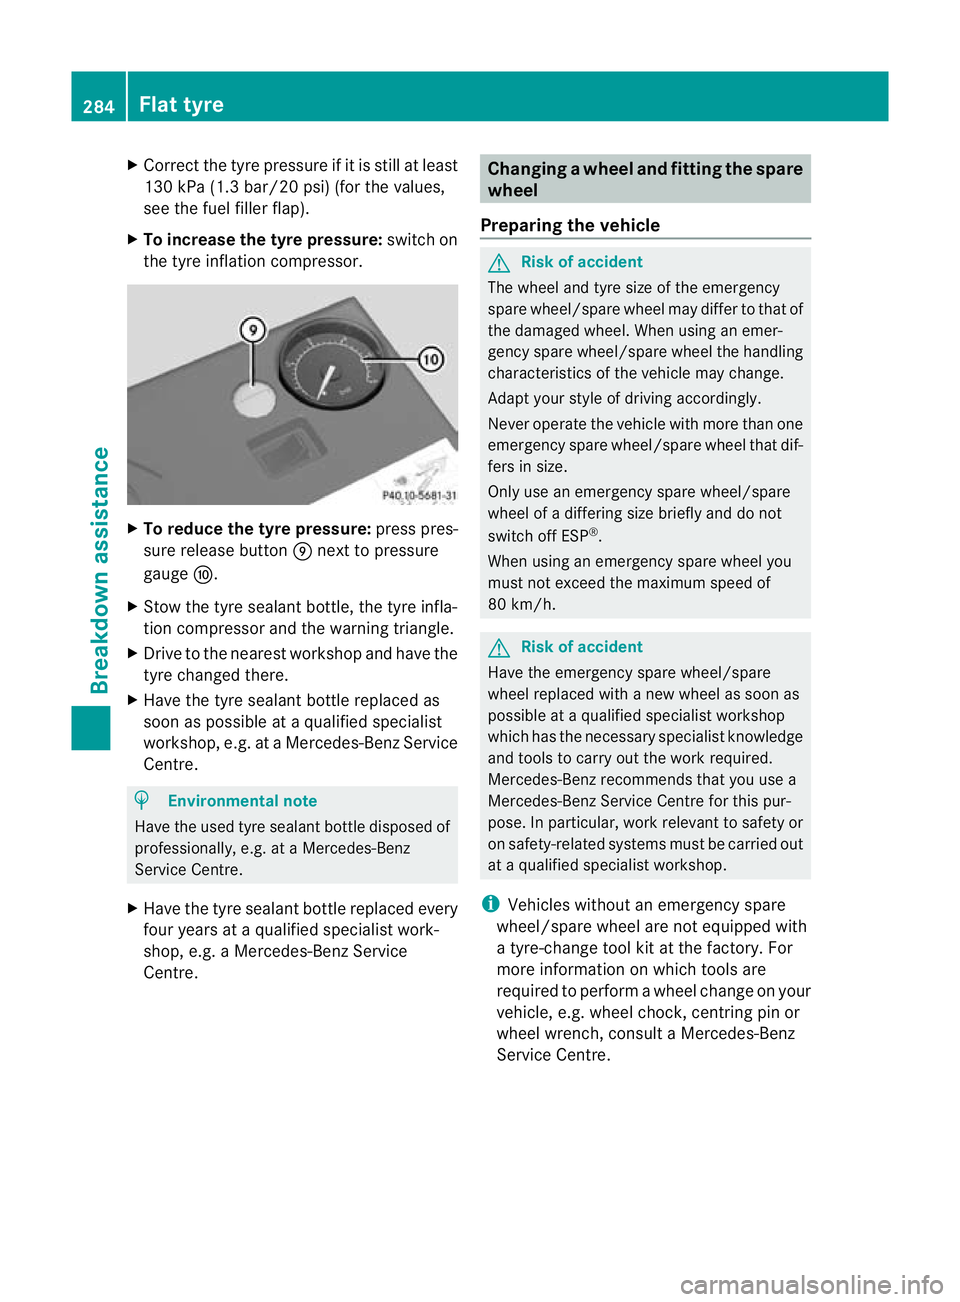
To reduce the tyre pressure: press pres-
sure release button Enext to pressure
gauge F.
X Stow the tyre sealant bottle, the tyre infla-
tion compressor and the warning triangle.
X Drive to the nearest workshop and have the
tyre changed there.
X Have the tyre sealant bottle replaced as
soon as possible at a qualified specialist
workshop, e.g. at a Mercedes-Ben zService
Centre. H
Environmental note
Have the used tyre sealant bottle disposed of
professionally, e.g. at aMercedes-Benz
Service Centre.
X Have the tyre sealant bottle replaced every
four years at a qualified specialist work-
shop, e.g. a Mercedes-Benz Service
Centre. Changing
awheel and fitting the spare
wheel
Preparing the vehicle G
Risk of accident
The wheel and tyre size of the emergency
spare wheel/spare wheel may diffe rto that of
the damaged wheel. When using an emer-
gency spare wheel/spare wheel the handling
characteristics of the vehicle may change.
Adapt your style of driving accordingly.
Never operate the vehicle with more than one
emergency spare wheel/spare wheel that dif-
fers in size.
Only use an emergency spare wheel/spare
wheel of a differing size briefly and do not
switch off ESP ®
.
When using an emergency spare wheel you
must not exceed the maximum speed of
80 km/h. G
Risk of accident
Have the emergency spare wheel/spare
wheel replaced with a new wheel as soon as
possible at a qualified specialist workshop
which has the necessary specialist knowledge
and tools to carry out the work required.
Mercedes-Benz recommends that you use a
Mercedes-Benz Service Centre for this pur-
pose. In particular, work relevant to safety or
on safety-related systems must be carried out
at a qualified specialist workshop.
i Vehicles without an emergency spare
wheel/spare wheel are not equipped with
a tyre-change tool kit at the factory. For
more information on which tools are
required to perform a wheel change on your
vehicle, e.g. wheel chock, centring pin or
wheel wrench, consult a Mercedes-Benz
Service Centre. 284
Flat tyreBreakdown assistance
Page 288 of 337
X
Prepare the vehicle as described
(Y page 281).
X Remove the following items from the stow-
age well under the boot floor:
R the emergency spare wheel
R the tyre inflation compressor 38
R the vehicle tool kit
R the folding wheel chock
R the jack
X Secure the vehicle to prevent it from rolling
away.
Securing the vehicle to prevent it from
rolling away If your vehicle is equipped with a wheel chock,
it can be found in the vehicle tool kit
(Y page 279).
The folding wheel chock is an additional
securing measure to prevent the vehicle from
rolling away, for example when changing a
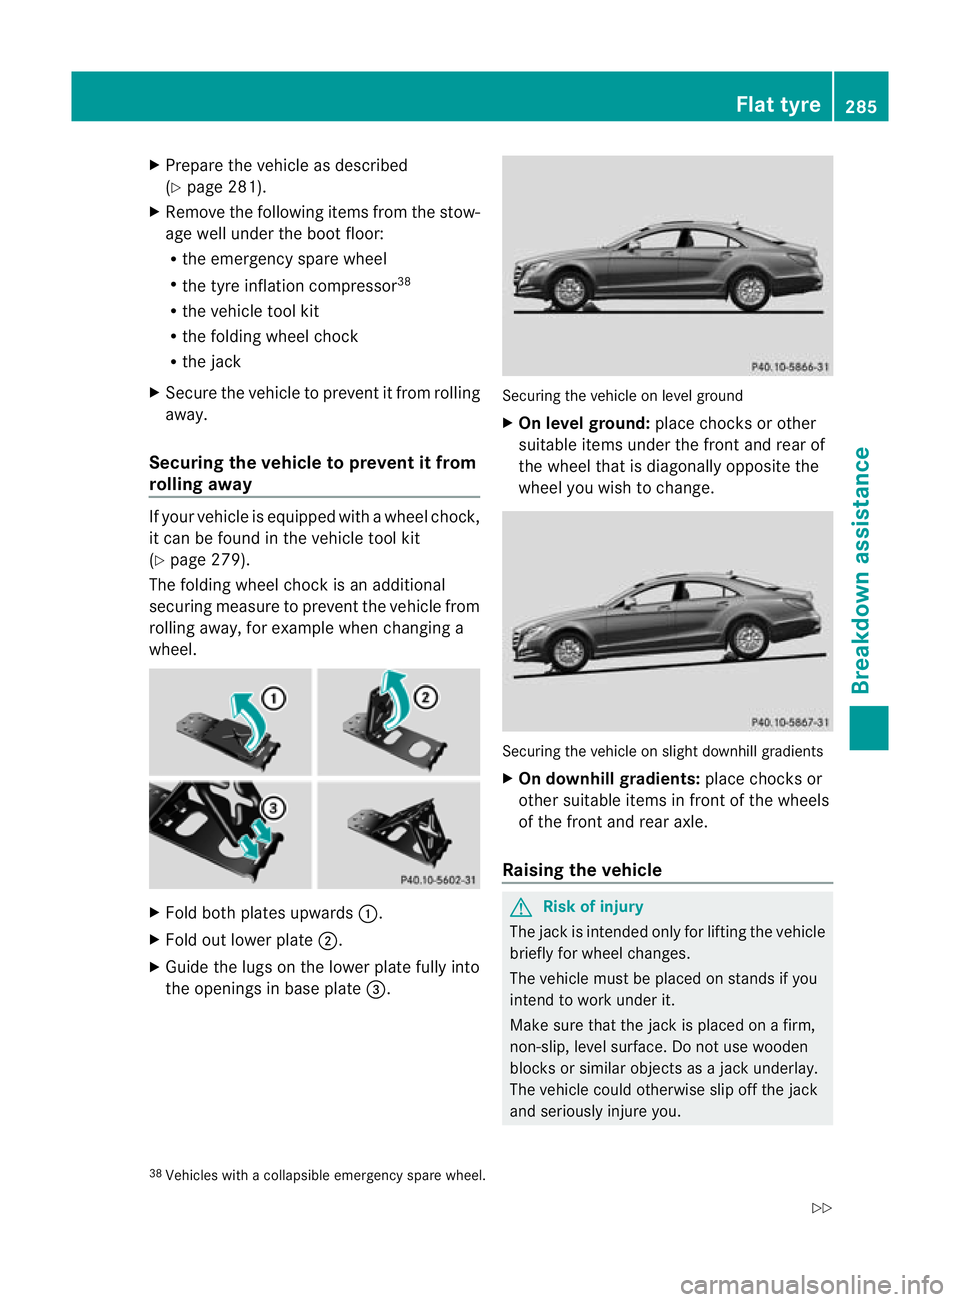
wheel. X
Fold both plates upwards :.
X Fold out lower plate ;.
X Guide the lugs on the lower plate fully into
the openings in base plate =. Securing the vehicle on level ground
X
On level ground: place chocks or other
suitable items under the fronta nd rearof
the wheel tha tis diagonally opposite the
wheel you wish to change. Securing the vehicle on slight downhill gradients
X
On downhill gradients: place chocks or
other suitable items in front of the wheels
of the front and rear axle.
Raising the vehicle G
Risk of injury
The jack is intended only for lifting the vehicle
briefly for wheel changes.
The vehicle must be placed on stands if you
intend to work under it.
Make sure that the jack is placed on a firm,
non-slip, level surface. Do not use wooden
blocks or similar objects as a jack underlay.
The vehicle could otherwise slip off the jack
and seriously injure you.
38 Vehicles with a collapsible emergency spare wheel. Flat tyre
285Breakdown assistance
Z
Page 289 of 337
Do not start the engine at any time while the
wheel is being changed.
Do not lie under the vehicle when it is being
supported by the jack. If you do not raise the
vehicle as described, it could slip off the jack
(e.g. if the engine is started or a door or the
boot lid is opened or closed
)and seriously
injure you. G
Ris
kofa ccident
If you fail to position the jack correctly, the
vehicle may:
R slip off the jack
R injure you or others
R be damaged.
Therefore, make sure that the jac kis posi-
tioned correctly in the respective jacking
points. Before positioning the jack, remove
any dirt that may have collected in the jacking
points. Please note that you must position the
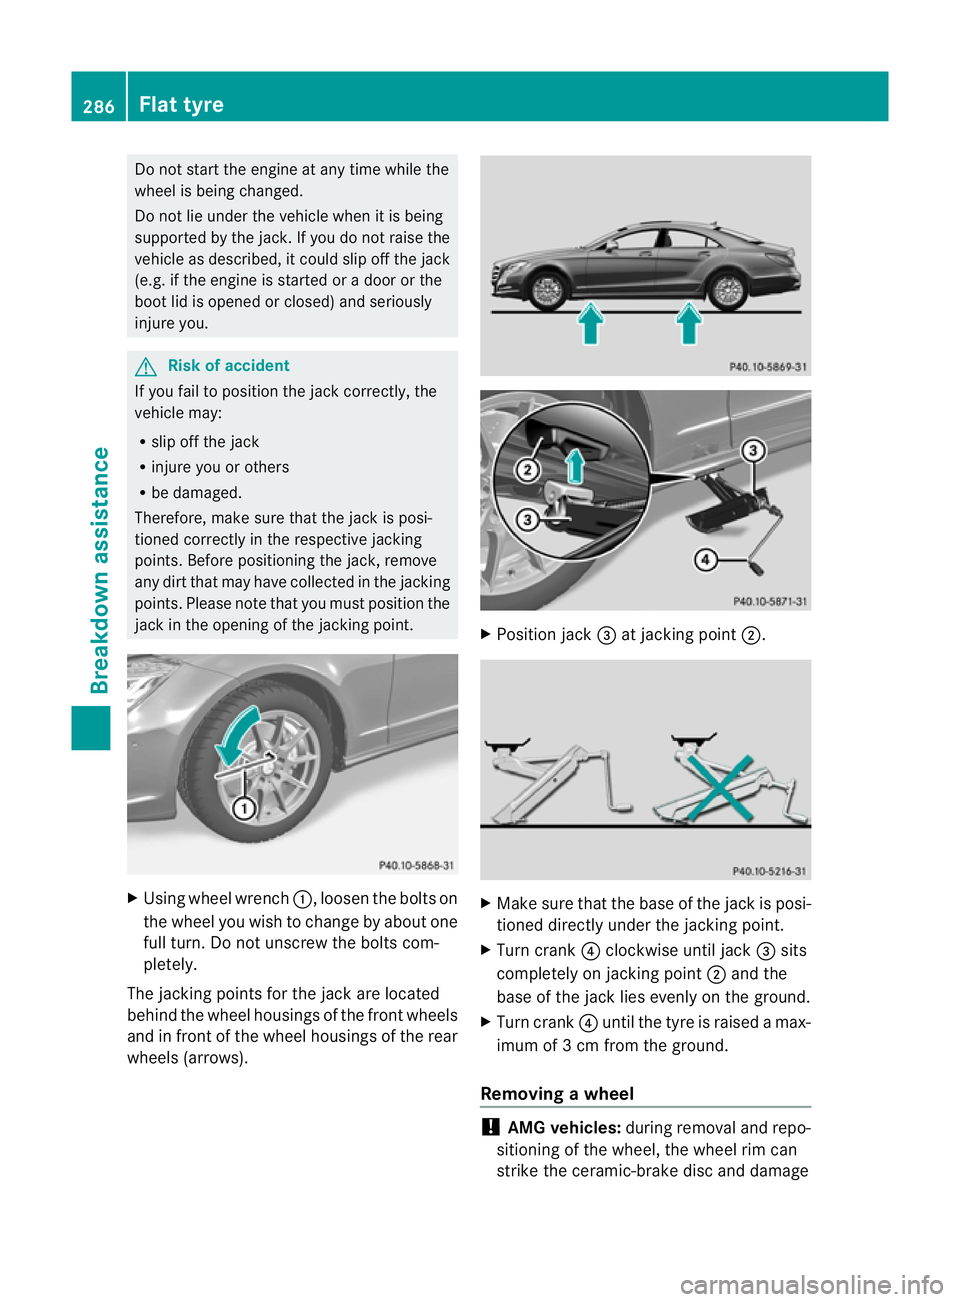
jack in the opening of the jacking point. X
Using wheel wrench :, loosen the bolts on
the wheel you wish to change by abouto ne
full turn. Do not unscrew the bolts com-
pletely.
The jacking points for the jack are located
behind the wheel housings of the front wheels
and in front of the wheel housings of the rear
wheels (arrows). X
Positio njack =at jacking point ;. X
Make sure that the base of the jac kis posi-
tioned directly under the jacking point.
X Turn crank ?clockwise until jack =sits
completely on jacking point ;and the
base of the jack lies evenly on the ground.
X Turn crank ?until the tyre is raised a max-
imum of 3 cm from the ground.
Removing awheel !
AMG vehicles: during removal and repo-
sitioning of the wheel, the wheel rim can
strike the ceramic-brake disc and damage 286
Flat tyreBreakdown assistance
Page 290 of 337
it. Therefore, take precautions and get a
second perso nto assist you. Alternatively,
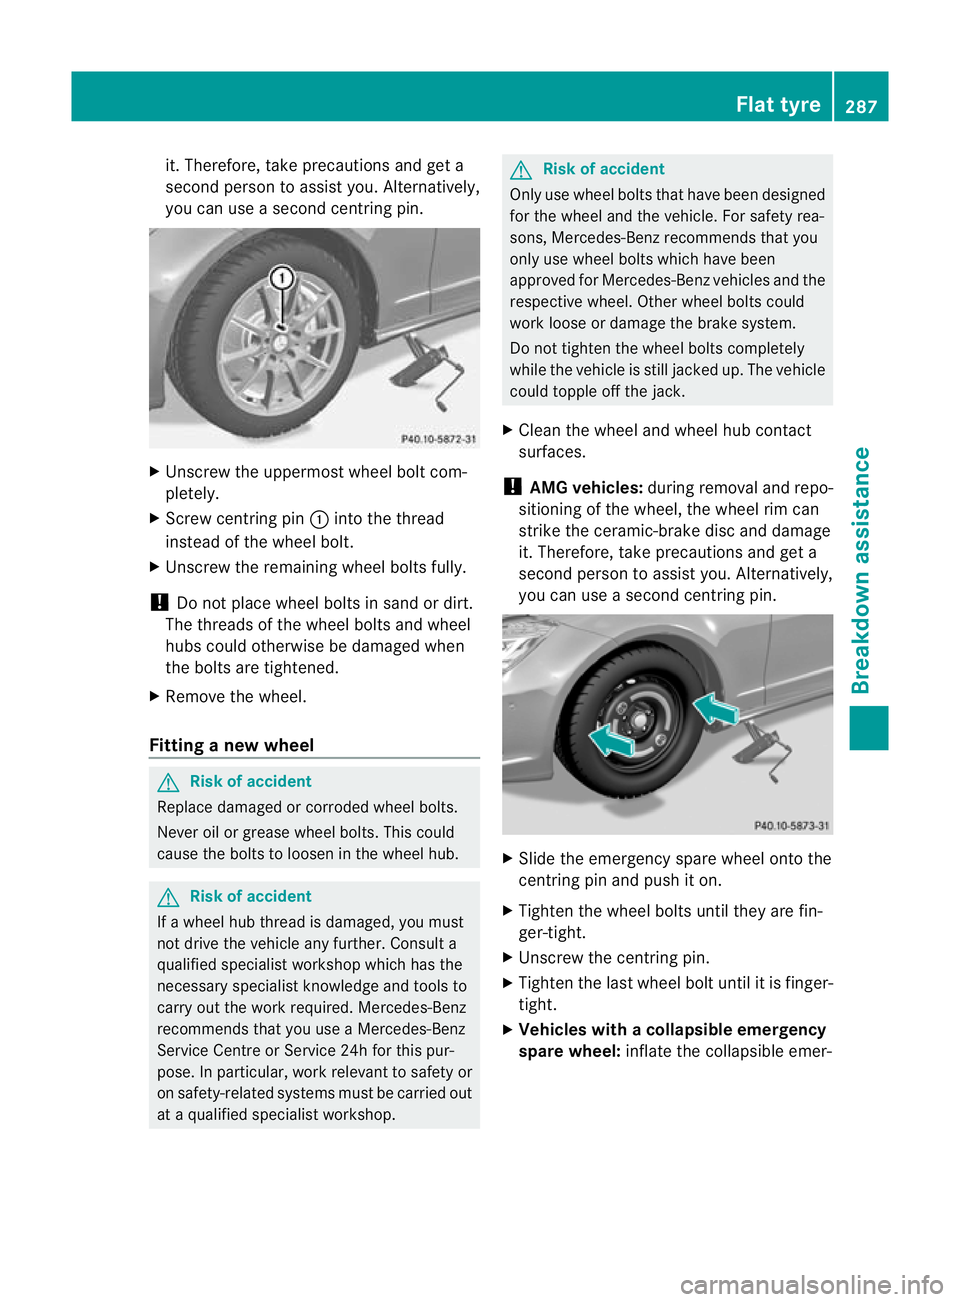
you can use a second centring pin. X
Unscrew the uppermost wheel bolt com-
pletely.
X Screw centring pin :into the thread
instead of the wheel bolt.
X Unscrew the remaining wheel bolts fully.
! Do not place wheel bolts in sand or dirt.
The threads of the wheel bolts and wheel
hubs could otherwise be damaged when
the bolts are tightened.
X Remove the wheel.
Fitting anew wheel G
Ris
kofa ccident
Replace damaged or corroded wheel bolts.
Never oil or grease wheel bolts. This could
cause the bolts to loosen in the wheel hub. G
Ris
kofa ccident
If a wheel hub thread is damaged, you must
not drive the vehicle any further. Consult a
qualified specialist workshop which has the
necessary specialist knowledge and tools to
carry out the work required. Mercedes-Benz
recommends that you use aMercedes-Benz
Service Centre or Service 24h for this pur-
pose. In particular, work relevant to safety or
on safety-related systems must be carried out
at a qualified specialist workshop. G
Risk of accident
Only use wheel bolts that have been designed
for the wheel and the vehicle. For safety rea-
sons, Mercedes-Benz recommends that you
only use wheel bolts which have been
approved for Mercedes-Benz vehicles and the
respective wheel. Other wheel bolts could
work loose or damage the brake system.
Do not tighten the wheel bolts completely
while the vehicle is still jacked up. The vehicle
could topple off the jack.
X Clean the wheel and wheel hub contact
surfaces.
! AMG vehicles: during removal and repo-
sitioning of the wheel, the wheel rim can
strike the ceramic-brak edisc and damage
it. Therefore, take precautions and get a
second perso nto assist you. Alternatively,
you can use a second centring pin. X
Slide the emergency spare wheel onto the
centring pin and push it on.
X Tighten the wheel bolts until they are fin-
ger-tight.
X Unscrew the centring pin.
X Tighten the last wheel bolt until it is finger-
tight.
X Vehicles with acollapsible emergency
spare wheel: inflate the collapsible emer- Flat tyre
287Breakdown assistance Z
Page 291 of 337

gency spare wheel (Y
page 288) and then
lower the vehicle ( Ypage 288).
or
X Vehicles with a "Minispare" emer-
gency spare wheel: lower the vehicle
(Y page 288)
Inflating the collapsible emergency
spare wheel G
Risk of accident
Inflate the collapsible emergency spare wheel
before lowering the vehicle. You could other-
wise damage the wheel rim. X
Pull plug ?and the air hose out of the
housing.
X Remove the cap from the valve on the col-
lapsible emergency spare wheel.
X Screw union nut :on the air hose onto the
valve.
X Make sure on/offs witchAof the tyre
inflatio ncompressor is set to 0.
X Insert plug ?into the socket of the ciga-
rette lighter (Y page 258) or into a 12 V
power socket (Y page 258) in your vehicle.
X Make sure that the key is in position
1(Y page 129) in the ignition lock.
X Press on/offs witchAon the tyre inflation
compressor to I.
The tyre inflatio ncompressor is switched
on. The tyre is inflated. The tyre pressure is
read at pressure gauge =.!
Do not operate the tyre inflation com-
pressor for longer than eight minutes at a
time without a break. It may otherwise
overheat.
The tyre inflation compressor can be oper-
ated again once it has cooled down.
X Pump the tyre to the specified tyre pres-
sure.
The specified tyre pressure is printed on
the yellow label of the emergency spare
wheel.
X When the specified tyre pressure has been
reached, press on/offs witchAon the
electric air pump to 0.
The tyre inflatio ncompressor is switched
off.
X Turn the key to position 0in the ignition
lock.
X If the tyre pressure is higher than the speci-
fied pressure, press pressure release but-
ton ;until the correct tyre pressure has
been reached.
X Unscrew union nut :on the air hose from
the valve.
X Screw the valve cap ontot he collapsible
emergency spare wheel valve again.
X Stow plug ?and the air hose in the lower
section of the pump housing.
X Stow the tyre inflation compressor in the
designated place in the vehicle.
Lowering the vehicle G
Risk of accident
Inflate the collapsible emergency spare wheel
before lowering the vehicle. You could other-
wise damage the wheel rim.
X Turn the crank of the jack anti-clockwise
until the vehicle is once again standing
firmly on the ground.
X Place the jack to one side. 288
Flat tyreBreakdown assistance
Page 292 of 337
X
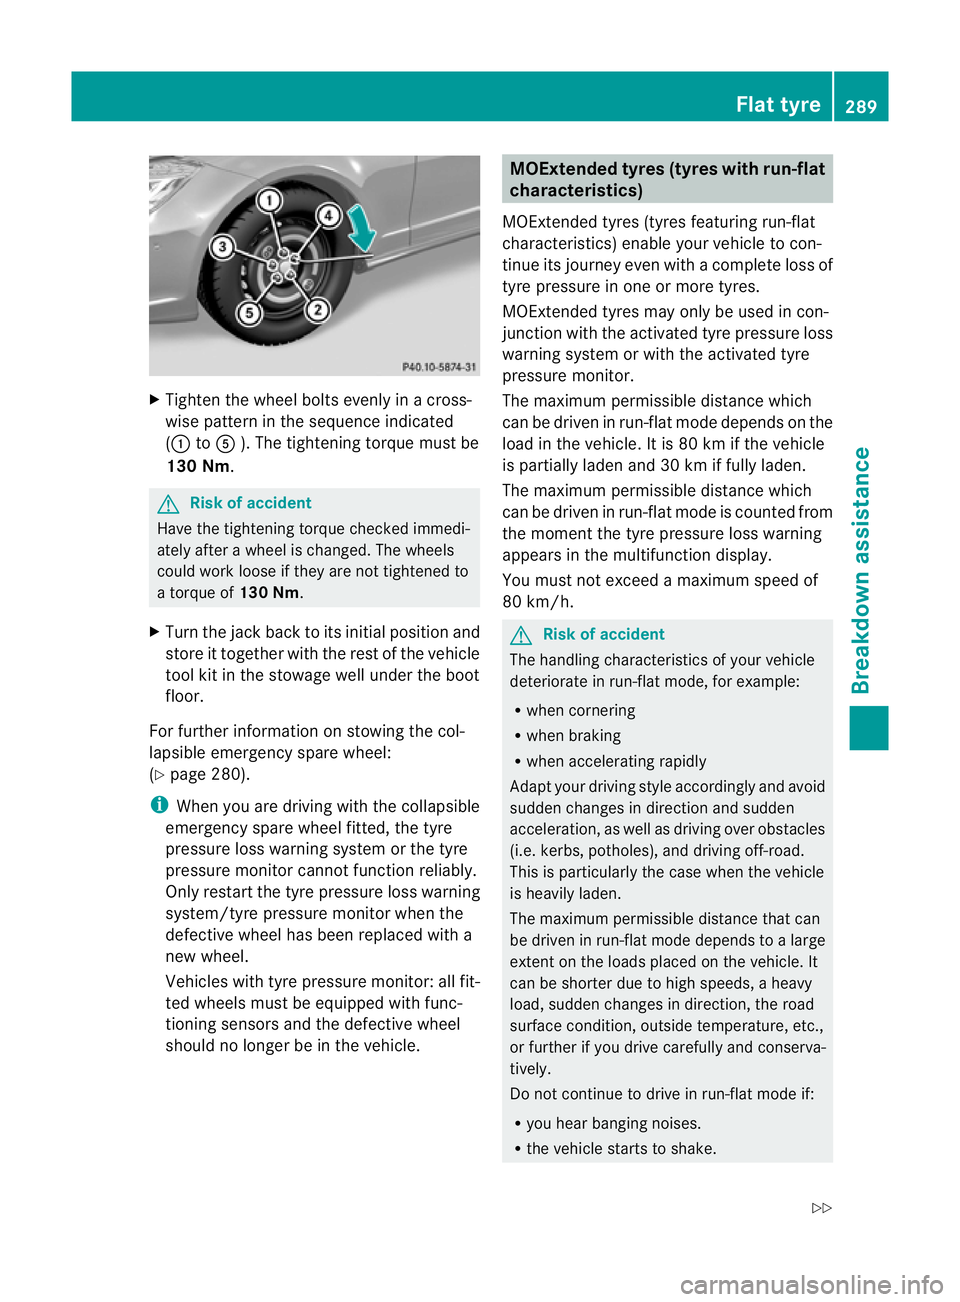
Tighten the wheel bolts evenly in a cross-
wise pattern in the sequence indicated
(: toA ). The tightening torque must be
130 Nm. G
Risk of accident
Have the tightening torque checked immedi-
ately after a wheel is changed. The wheels
could work loose if they are not tightened to
a torque of 130 Nm.
X Turn the jack back to its initial position and
store it together with the rest of the vehicle
tool kit in the stowage well under the boot
floor.
For further information on stowing the col-
lapsible emergency spare wheel:
(Y page 280).
i When you are driving with the collapsible
emergency spare wheel fitted, the tyre
pressure loss warning system or the tyre
pressure monitor cannot function reliably.
Only restart the tyre pressure loss warning
system/tyre pressure monitor when the
defective wheel has been replaced with a
new wheel.
Vehicles with tyre pressure monitor: all fit-
ted wheels must be equipped with func-
tioning sensors and the defective wheel
should no longer be in the vehicle. MOExtended tyres (tyres with run-flat
characteristics)
MOExtended tyres (tyres featuring run-flat
characteristics) enable your vehicle to con-
tinue its journey even with a complete loss of
tyre pressure in one or more tyres.
MOExtended tyres may only be used in con-
junction with the activated tyre pressure loss
warning system or with the activated tyre
pressure monitor.
The maximum permissible distance which
can be driven in run-flat mode depends on the
load in the vehicle. It is 80 km if the vehicle
is partially laden and 30 km if fully laden.
The maximum permissible distance which
can be driven in run-flat mode is counted from
the moment the tyre pressure loss warning
appears in the multifunction display.
You must not exceed a maximum speed of
80 km/h. G
Risk of accident
The handling characteristics of your vehicle
deteriorate in run-flat mode, for example:
R when cornering
R when braking
R when accelerating rapidly
Adapt your driving style accordingly and avoid
sudden changes in direction and sudden
acceleration, as well as driving over obstacles
(i.e. kerbs, potholes), and driving off-road.
This is particularly the case when the vehicle
is heavily laden.
The maximum permissible distance that can
be driven in run-flat mode depends to a large
exten tonthe loads placed on the vehicle. It
can be shorter due to high speeds, a heavy
load, sudden changes in direction, the road
surface condition, outside temperature, etc.,
or further if you drive carefully and conserva-
tively.
Do not continue to drive in run-flat mode if:
R you hear banging noises.
R the vehicle starts to shake. Flat tyre
289Breakdown assistance
Z
Page 293 of 337
R
you see smoke and smell rubber.
R ESP ®
is intervening constantly.
R there are tears in the sidewalls of the tyre.
After driving in run-flat mode, you must have
the wheel(s) checked for damage at a quali-
fied specialist workshop which has the nec-
essary specialist knowledge and tools to carry
out the wor krequired. The faulty tyre must be
replaced in every case.
Mercedes-Benz recommends that you use a
Mercedes-Benz Service Centre for this pur-
pose. In particular, work relevant to safety or
on safety-related systems must be carried out
at a qualified specialist workshop.
i When replacing one or all tyres, make
sure that you only use tyres marked
MOExtended and of the specified size for
the vehicle.
i Vehicles with MOExtended tyres are not
equipped with a TIREFIT kit at the factory.
It is therefore recommended that you addi-
tionally equip your vehicle with a TIREFIT kit
if you fit tyres that do not feature run-flat
properties, e.g. winter tyres. A TIREFIT kit
can be obtained from a Mercedes-Benz
Service Centre. Battery
Important safety notes
In order for the battery to achieve the maxi-
mum possible service life, it must always be
sufficiently charged.
Have the battery charge checked more fre-
quently if you use the vehicle mainly for short
trips or if you leave it standing idle for a
lengthy period.
To preven tdamage from corrosion, only
replace the battery with one that has a central
ventilation cover.
Only replace a battery with a battery that has
been recommended by Mercedes-Benz. Consult a Mercedes-Ben
zService Centre if
you wish to leave your vehicle parked up for
a long period of time. G
Risk of injury
Comply with safety precautions and take pro-
tective measures when handling batteries. Risk of explosion
Fire, naked flames and
smoking are prohibited
when handling the battery.
Avoid creating sparks.
Battery acid is caustic.
Avoid contact with the skin,
eyes or clothing.
Wear suitable protective
clothing, in particular
gloves, an apron and a face
mask.
Immediately rinse acid
splashes off with clean
water. Consult a doctor if
necessary.
Wear eye protection.
Keep children away.
Observe this Owner's Man-
ual.
H
Environmental note Batteries contain pollutants.
It is against the law to dis-
pose of them with the house-
hold rubbish. They must be
collected separately and290
BatteryBreakdown assistance
Page 301 of 337
X
Switch on the hazard warning lamps
(Y page 101).
X Leave the key in position 2in the ignition
lock.
i Whe ntowing with the hazard warning
lamps switched on, use the combination
switch as usual to signal achange of direc-
tion. In this case, only the turn signals for
the desired direction flash. When the com-
bination switch is reset, the hazard warning
lamps start flashing again. Transporting the vehicle
The towing eye can be used to pull the vehicle
onto a trailer or transporter for transporting
purposes.
X Vehicles with automatic transmission:
turn the key to position 2in the ignition
lock.
X Shift the automatic transmission to posi-
tion N.
As soon as the vehicle is loaded:
X Prevent the vehicle from rolling away by
applying the parking brake.
X Turn the key in the ignition lock to position
0and remove the key from the ignition
lock.
X Secure the vehicle.
! Only lash the vehicle down by the wheels
or wheel rims, not by parts of the vehicle
such as axle or steering components. Oth-
erwise, the vehicle could be damaged. Electrical fuses
Important safety notes
The fuses in your vehicle serve to close down
faulty circuits. If afuse blows, all the compo-
nents on the circuit and their functions will
fail. G
Risk of fire
Only use fuses that have been approved for
Mercedes-Ben zvehicles and which have the
correct fuse rating for the systems con-
cerned. Do not attempt to repair or bridge
faulty fuses. Otherwise, a circuit overload
could cause a fire. Have the cause traced and
rectified at a qualified specialist workshop,
e.g. a Mercedes-Benz Service Centre.
Blown fuses must be replaced with fuses of
the same rating, which you can recognise by
the colour and value. The fuse ratings are lis-
ted in the fuse allocation chart .AMercedes-
BenzS ervice Centre will be happy to advise
you.
If the newly inserted fuse also blows, have the
cause traced and rectified at a qualified spe-
cialist workshop, e.g. a Mercedes-Benz
Service Centre.
! Only use fuses that have been approved
for Mercedes-Benzv ehicles and which
have the correct fuse rating for the system
concerned. Otherwise, components or sys-
tems could be damaged. Before changing a fuse
X Park the vehicle and apply the parking
brake.
X Switch off all electrical consumers.
X Remove the key from the ignition lock.
The fuses are located in various fuse boxes:
R fuse box in the engine compartment on the
left-hand side of the vehicle, when viewed
in the direction of travel
R fuse box in the boot on the right when
viewed in the direction of travel
The fuse allocation chart is located in the
vehicle tool kit (Y page 279) in the stowage
compartment under the boot floor. 298
Electrical fusesBreakdown assistance