2010 MERCEDES-BENZ C350S heating
[x] Cancel search: heatingPage 17 of 364

Satellite radio .................................... 152
Seat belt force limiter ......................... 52
Seat belts ............................................. 48
Children in the vehicle .....................54
Cleaning ......................................... 265
Fastening ......................................... 50
Height adjustment ...........................51
Proper use of ................................... 49
Safety guidelines ............................. 39
Safety notes ..................................... 48
Telltale ........................................... 301
Seat heating ......................................... 84
Seating capacity ................................ 239
Seats ..................................................... 79
Adjustment ...................................... 79
Easy-entry/exit feature ....................85
Heating ............................................ 84
Memory function .............................. 89
Messages in the multifunction
display ........................................... 286
Split rear seat bench .....................204
Securing cargo
Cargo tie-down rings ...................... 203
Selective setting
see Key, SmartKey
Selector lever
see Gear selector lever
Self-test
BabySmart™ .................................... 47
OCS (Occupant Classification
System) ........................................... 46
Tele Aid .......................................... 212
Service
see Maintenance
Service, parts .................................... 332
Service and warranty information ..... 20
Service intervals see Maintenance System, Service
indicator message
Service life (tires) .............................. 243
Service menu ..................................... 129
Settings
Factory setting (KEYLESS-GO) .........73
Factory setting (SmartKey) ..............71
Memory function .............................. 89
Menu ............................................. 130Selective setting (KEYLESS-GO) .......73
Selective setting (SmartKey) ............71
Shelf below rear window, cleaning .. 265
Side impact air bags ........................... 41
Side marker lamps
Cleaning lenses ............................. 263
Messages in the multifunction
display ........................................... 293
Replacing bulbs ............................. 314
Sidewall (tires) .................................. 252
SmartKey see Key, SmartKey
SmartKey with KEYLESS-GO
see Key, SmartKey
Snow chains ...................................... 253
Snow tires see Winter tires
Spare wheel ....................................... 344
Mounting ....................................... 318
Storage location ............................ 270
Speedometer ....................................... 28
Speed settings
Cruise control ................................ 181
Resume function ............................ 183
SRS (Supplemental Restraint System)
Indicator lamp ......................... 36, 302
Messages in the multifunction
display ........................................... 284
Standing water, driving through ...... 257
Starter switch positions
KEYLESS-GO .................................... 78
SmartKey ......................................... 77
Starting difficulties (engine) ............ 102
Starting the engine ........................... 101
Steering column see Multifunction steering wheel,
Adjustment
Steering wheel
see Multifunction steering wheel
Steering wheel gearshift control ..... 112
Stolen Vehicle Recovery Services ... 216
Storage compartments ..................... 205
Storing tires ....................................... 244
Sunroof see Power tilt/sliding sunroof
Sunshade
Rear window .................................. 208Index15204_AKB; 5; 23, en-USd2ureepe,Version: 2.11.8.12009-07-16T17:54:06+02:00 - Seite 15
Page 33 of 364

Center console
Upper part
FunctionPage:Audio display cover139;Hazard warning flasher
switch93
=Alarm system indicator
lamp67
?Front passenger front air
bag off indicator lamp, USA
only
42,
308
Front passenger front air
bag off indicator lamp,
Canada only
46,
307
AElectronic Stability
Program (ESP®) switch63
BAudio system136orCOMAND system, see
separate operating
instructions
CSeat heating, front
passenger side84
FunctionPageDParktronic system
deactivation switch,
Canada only187
ERear window sunshade
switch208
FSport driving mode on/off
button184
GDual-zone automatic
climate control189
Rear window defroster196HSeat heating, driver’s side84Center console31At a glance204_AKB; 5; 23, en-USd2ureepe,Version: 2.11.8.12009-07-16T17:54:06+02:00 - Seite 31Z
Page 86 of 364
Rear seat head restraints, removing
and installing (vehicles with split
foldable rear seat backrest)
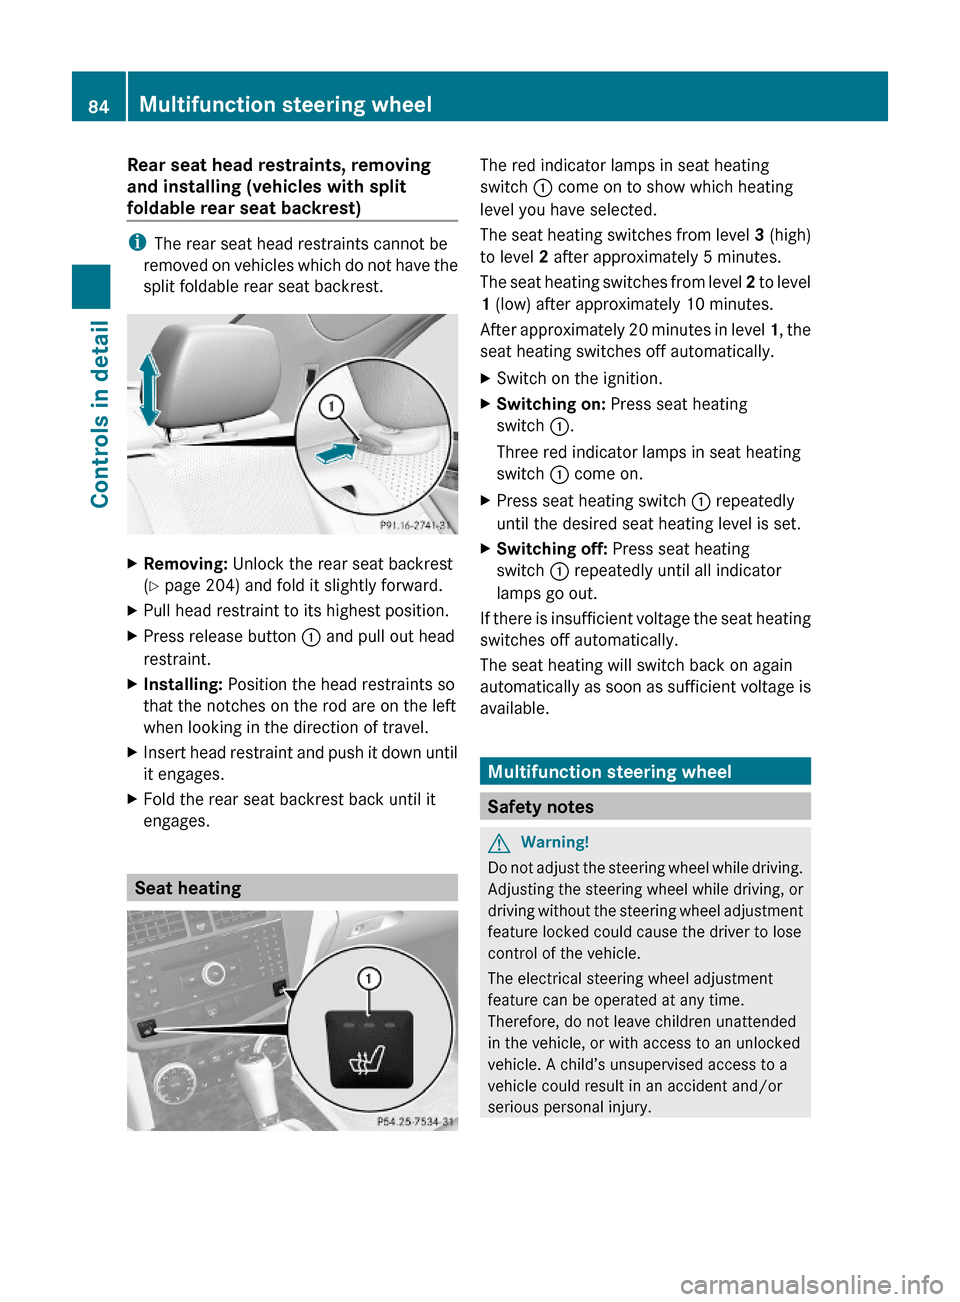
iThe rear seat head restraints cannot be
removed on vehicles which do not have the
split foldable rear seat backrest.
XRemoving: Unlock the rear seat backrest
(Y page 204) and fold it slightly forward.
XPull head restraint to its highest position.XPress release button : and pull out head
restraint.
XInstalling: Position the head restraints so
that the notches on the rod are on the left
when looking in the direction of travel.
XInsert head restraint and push it down until
it engages.
XFold the rear seat backrest back until it
engages.
Seat heating
The red indicator lamps in seat heating
switch : come on to show which heating
level you have selected.
The seat heating switches from level 3 (high)
to level 2 after approximately 5 minutes.
The seat heating switches from level 2 to level
1 (low) after approximately 10 minutes.
After approximately 20 minutes in level 1, the
seat heating switches off automatically.
XSwitch on the ignition.XSwitching on: Press seat heating
switch :.
Three red indicator lamps in seat heating
switch : come on.
XPress seat heating switch : repeatedly
until the desired seat heating level is set.
XSwitching off: Press seat heating
switch : repeatedly until all indicator
lamps go out.
If there is insufficient voltage the seat heating
switches off automatically.
The seat heating will switch back on again
automatically as soon as sufficient voltage is
available.
Multifunction steering wheel
Safety notes
GWarning!
Do not adjust the steering wheel while driving.
Adjusting the steering wheel while driving, or
driving without the steering wheel adjustment
feature locked could cause the driver to lose
control of the vehicle.
The electrical steering wheel adjustment
feature can be operated at any time.
Therefore, do not leave children unattended
in the vehicle, or with access to an unlocked
vehicle. A child’s unsupervised access to a
vehicle could result in an accident and/or
serious personal injury.
84Multifunction steering wheelControls in detail
204_AKB; 5; 23, en-USd2ureepe,Version: 2.11.8.12009-07-16T17:54:06+02:00 - Seite 84
Page 193 of 364
GWarning!
Severe conditions (e.g. strong air pollution)
may require replacement of the filter before
its scheduled replacement interval. A clogged
filter will reduce the air volume to the interior
and the windows could fog up, impairing
visibility and endangering you and others.
Have a clogged filter replaced as soon as
possible at an authorized Mercedes-Benz
Center.
The air conditioning will not engage (no
cooling) if the A/C mode ( Y page 191) is
deactivated.
GWarning!
Follow the recommended settings for heating
and cooling given on the following pages.
Otherwise the windows could fog up,
impairing visibility and endangering you and
others.
XKeep the air intake grille in front of the
windshield free of snow and debris.
Do not obstruct air flow by placing objects on
the air flow-through exhaust slots below the
rear window.
i If the vehicle interior is hot, ventilate the
interior before driving off, see “Summer
opening feature” ( Y page 99). The climate
control will then adjust the interior
temperature to the set value much faster.
Deactivating the climate control
system
GWarning!
When the climate control system is
deactivated, the outside air supply and
circulation are also deactivated. Only choose
this setting for a short time. Otherwise the
windows could fog up, impairing visibility and
endangering you and others.
XDeactivating: Press button ^.
The indicator lamp in the button comes on.XReactivating: Press button ^.
The indicator lamp in the button goes out.
The previous settings are once again in
effect.
or
XPress button Ã.
The indicator lamp in the button comes on.
Air volume and air distribution are adjusted
automatically.
Air conditioning
The air conditioning is operational while the
engine is running and cools the interior air to
the temperature set by the operator. In
addition, the air conditioning dehumidifies
the interior air and helps prevent window
fogging.
GWarning!
If you deactivate the air conditioning, the
vehicle will not be cooled when weather
conditions are warm. The windows can fog up
more quickly. Window fogging may impair
visibility and endanger you and others.
i Condensated water may drip out from
underneath the vehicle. This is normal and
not an indication of a malfunction.
The air conditioning uses the refrigerant
R134a. This refrigerant is free of CFCs which
are harmful to the ozone layer.
Deactivating
It is possible to deactivate the air
conditioning. The interior air will then no
longer be cooled or dehumidified.
XPress button ¿.
The indicator lamp in the button goes out.
The cooling function switches off after a
short delay.Climate control system191Controls in detail204_AKB; 5; 23, en-USd2ureepe,Version: 2.11.8.12009-07-16T17:54:06+02:00 - Seite 191Z
Page 195 of 364
For best possible performance of the climate
control:
XKeep the air intake grille in front of the
windshield free of snow, leaves, sticks, and
any other debris.
XAlways keep all air vents and grilles in the
passenger compartment free from
obstruction.
iFor draft-free ventilation, move the
adjustable center and side air vents to the
middle position.
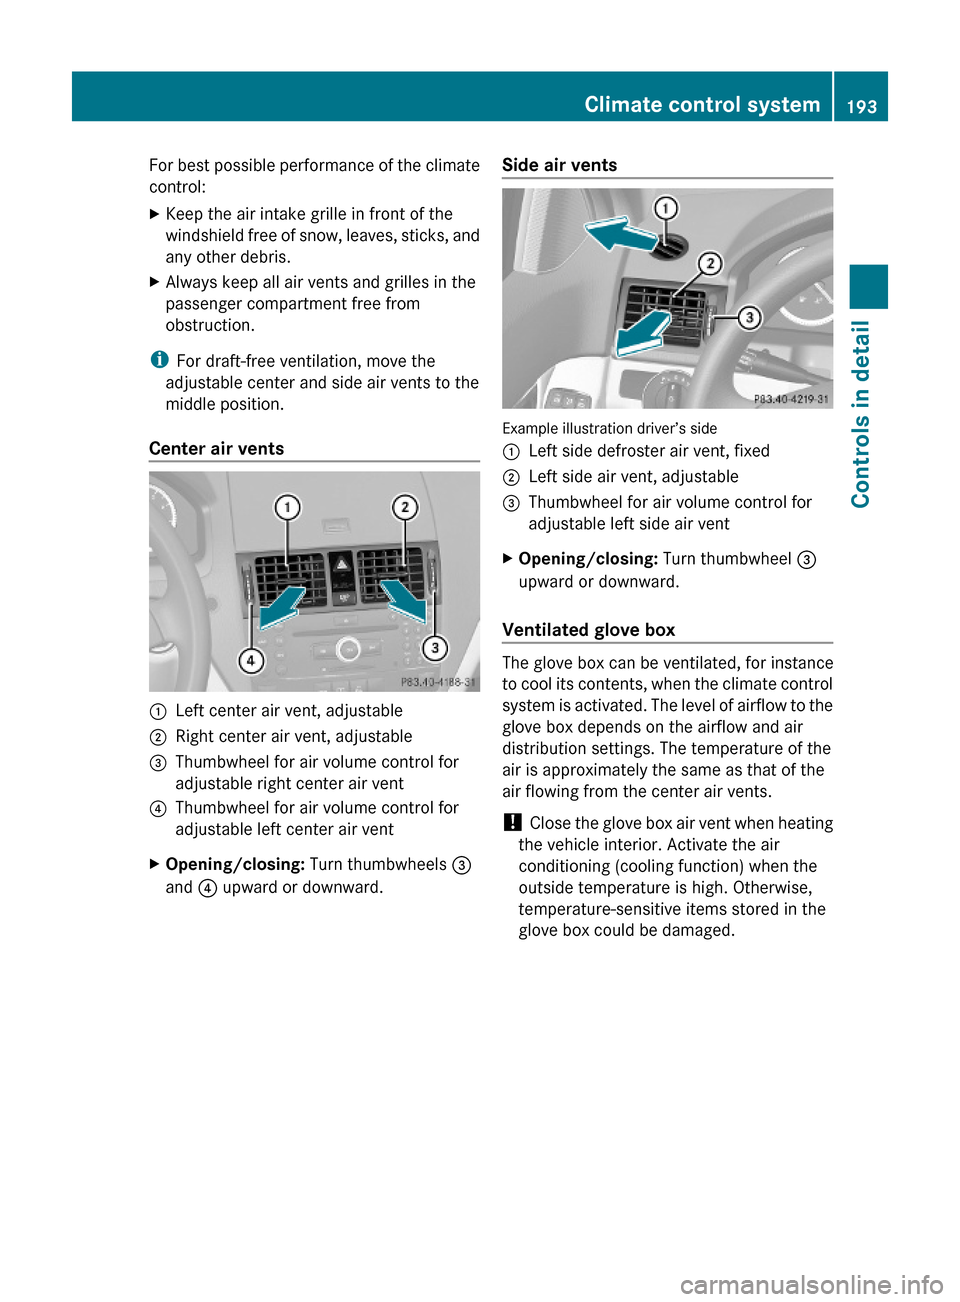
Center air vents
:Left center air vent, adjustable;Right center air vent, adjustable=Thumbwheel for air volume control for
adjustable right center air vent
?Thumbwheel for air volume control for
adjustable left center air vent
XOpening/closing: Turn thumbwheels =
and ? upward or downward.
Side air vents
Example illustration driver’s side
:Left side defroster air vent, fixed;Left side air vent, adjustable=Thumbwheel for air volume control for
adjustable left side air vent
XOpening/closing: Turn thumbwheel =
upward or downward.
Ventilated glove box
The glove box can be ventilated, for instance
to cool its contents, when the climate control
system is activated. The level of airflow to the
glove box depends on the airflow and air
distribution settings. The temperature of the
air is approximately the same as that of the
air flowing from the center air vents.
! Close the glove box air vent when heating
the vehicle interior. Activate the air
conditioning (cooling function) when the
outside temperature is high. Otherwise,
temperature-sensitive items stored in the
glove box could be damaged.
Climate control system193Controls in detail204_AKB; 5; 23, en-USd2ureepe,Version: 2.11.8.12009-07-16T17:54:06+02:00 - Seite 193Z
Page 197 of 364
iKeep this setting selected only until the
windshield or the front door windows are
clear again.XActivating: Press button ¬.
The indicator lamp in the button comes on.
The climate control switches to the following
functions automatically:
R cooling on to dehumidify
R most efficient blower speed and heating
power, depending on outside temperature
R air flows onto the windshield and the front
door windows
R the air recirculation mode is switched off
i You can adjust the air volume when the
front defroster is switched on.
XDeactivating: Press button ¬ again.
The indicator lamp in the button goes out.
The previous settings are once again in
effect. The cooling remains switched on.
The air recirculation remains switched off.
or
XPress button Ã.
The indicator lamp in button ¬ goes out.
Air volume and air distribution are adjusted
automatically.
i To deactivate defrosting, you can also
press button ^ or turn temperature
controls.
Windshield fogged on the outside
XSwitch the windshield wipers on
( Y page 96).
If the automatic mode of the climate control
is switched off:
XPress button _ repeatedly until one of
the following symbols appears in display
G (Y page 189) P or O .
Maximum cooling MAX COOL
MAX COOL is only available in U.S. vehicles.
MAX COOL is only operational when the
engine is running.
You can use this setting to provide the fastest
possible cooling of the vehicle interior (when
windows and tilt/sliding sunroof or tilt/
sliding panel are closed).XActivating: Press button Ù.
The indicator lamp in the button comes on.
The climate control switches automatically to
the following functions:
R maximum cooling
R maximum blowing power
R the air recirculation mode is switched on
XDeactivating: Press button Ù again.
The indicator lamp in the button goes out.
The previous settings are once again in
effect.
i To switch the maximum cooling function
off, you can also press button ^, Ã
or ¬ .
Air recirculation mode
Switch to air recirculation mode to prevent
unpleasant odors from entering the vehicle
from the outside (e. g. before driving through
a tunnel). This setting cuts off the intake of
outside air and recirculates the air in the
passenger compartment.
GWarning!
Fogged windows impair visibility,
endangering you and others. If the windows
begin to fog on the inside, switching off the
air recirculation mode immediately should
clear interior window fogging. If interior
window fogging persists, make sure the air
conditioning is activated, or press button
¬ .
XActivating: Press button g.
The indicator lamp in the button comes on.Climate control system195Controls in detail204_AKB; 5; 23, en-USd2ureepe,Version: 2.11.8.12009-07-16T17:54:06+02:00 - Seite 195Z
Page 211 of 364
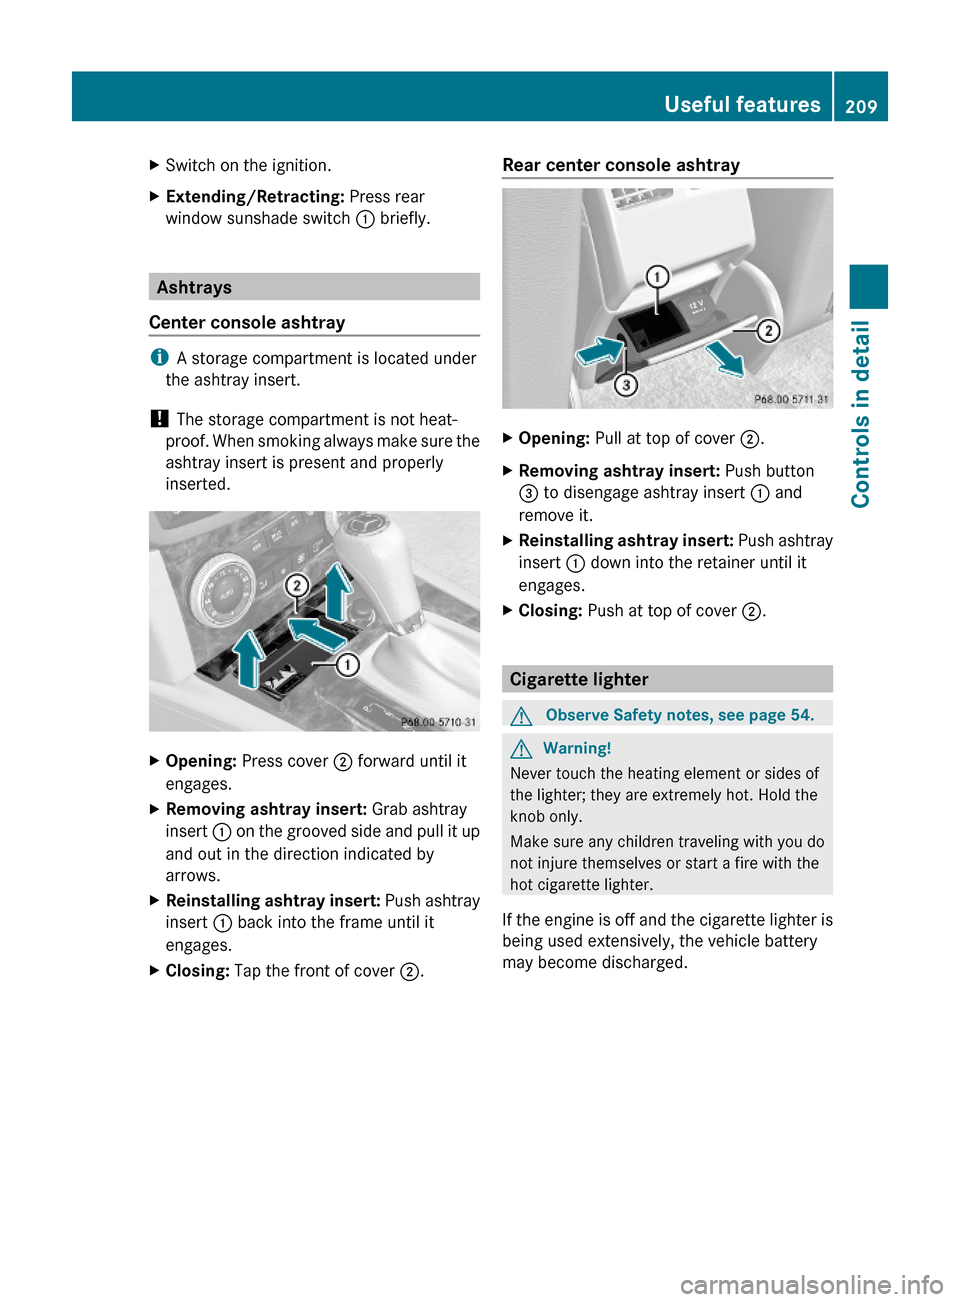
XSwitch on the ignition.XExtending/Retracting: Press rear
window sunshade switch : briefly.
Ashtrays
Center console ashtray
iA storage compartment is located under
the ashtray insert.
! The storage compartment is not heat-
proof. When smoking always make sure the
ashtray insert is present and properly
inserted.
XOpening: Press cover ; forward until it
engages.
XRemoving ashtray insert: Grab ashtray
insert : on the grooved side and pull it up
and out in the direction indicated by
arrows.
XReinstalling ashtray insert: Push ashtray
insert : back into the frame until it
engages.
XClosing: Tap the front of cover ;.Rear center console ashtray XOpening: Pull at top of cover ;.XRemoving ashtray insert: Push button
= to disengage ashtray insert : and
remove it.
XReinstalling ashtray insert: Push ashtray
insert : down into the retainer until it
engages.
XClosing: Push at top of cover ;.
Cigarette lighter
GObserve Safety notes, see page 54.GWarning!
Never touch the heating element or sides of
the lighter; they are extremely hot. Hold the
knob only.
Make sure any children traveling with you do
not injure themselves or start a fire with the
hot cigarette lighter.
If the engine is off and the cigarette lighter is
being used extensively, the vehicle battery
may become discharged.
Useful features209Controls in detail204_AKB; 5; 23, en-USd2ureepe,Version: 2.11.8.12009-07-16T17:54:06+02:00 - Seite 209Z
Page 257 of 364
obstacles. If there are any floormats or
carpets in the footwell, make sure that the
pedals still have sufficient clearance.
During sudden driving or braking maneuvers,
the objects could get caught between the
pedals. You could then no longer brake or
accelerate. This could lead to accidents and
injury.
Power assistance
GWarning!
There is no power assistance for the steering
and the brake when the engine is not running.
Steering and braking requires significantly
more effort and you could lose control of the
vehicle and cause an accident as a result.
Do not turn off the engine while the vehicle is
in motion.
Brakes
Downhill grades
! When driving down long and steep
grades, relieve the load on the brakes by
shifting into a lower gear to use the
engine’s braking power. This helps prevent
overheating of the brakes and reduces
wear.
When using the engine’s braking power, a
drive wheel may not spin for an extended
period of time, e.g. on slippery road
surfaces. This may cause serious damage
to the drivetrain which is not covered by the
Mercedes-Benz Limited Warranty.
Continuous or hard braking
GWarning!
Resting your foot on the brake pedal will
cause excessive and premature wear of the
brake pads.
It can also result in the brakes overheating,
thereby significantly reducing their
effectiveness. It may not be possible to stop
the vehicle in sufficient time to avoid an
accident.
After hard braking, it is advisable to drive on
for some time, rather than immediately park,
so that the air stream will cool down the
brakes faster.
Wet roadsGWarning!
After driving in heavy rain for some time
without applying the brakes or through water
deep enough to wet brake components, the
first braking action may be somewhat
reduced and increased pedal pressure may be
necessary to obtain expected brake effect.
Maintain a safe distance from vehicles in
front.
To help prevent brake disk corrosion after
driving on wet or salt-covered roads, it is
advisable to brake the vehicle with
considerable force prior to parking. The heat
generated serves to dry the brakes.
Salt-covered roads
GWarning!
A layer of salt on the brake discs and the brake
linings may cause a delay in the braking
effect, resulting in a significantly increased
braking distance, which could lead to an
accident.
To avoid this danger, you should:
R occasionally brake carefully when you are
driving on salt-covered roads, so that any
layer of salt that may have built up on the
brake discs and the brake linings is
Driving instructions255Operation204_AKB; 5; 23, en-USd2ureepe,Version: 2.11.8.12009-07-16T17:54:06+02:00 - Seite 255Z